8. Drupal Menus Explained
Menus are a way to create navigation on your Drupal site. They are kind of a big deal. Without any menus, your visitors will be stuck on your site’s homepage.
Because we are just covering the basics of how Drupal menus work, this is going to be a short chapter.
The reason we cover more advanced menu options in later chapters is because those options rely heavily on things you haven’t covered yet. In Chapters 9 through 12, you discover new features that enable you to get more out of your navigation.
At the end of this chapter, you should be able to
![]() Understand the purpose of the four default Drupal menus.
Understand the purpose of the four default Drupal menus.
![]() Add new menu links.
Add new menu links.
![]() Reorganize menu links.
Reorganize menu links.
The Four Default Drupal Menus
Start your exploration of Drupal’s menu by exploring the four available menus:
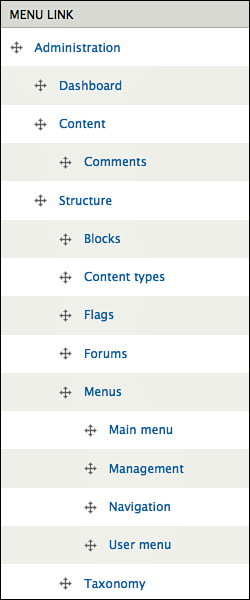
1. Click Structure and then Menus. You now see the four default menus: Main menu, Management, Navigation, and User menu (see Figure 8.1).

Now see what each menu does on your site.
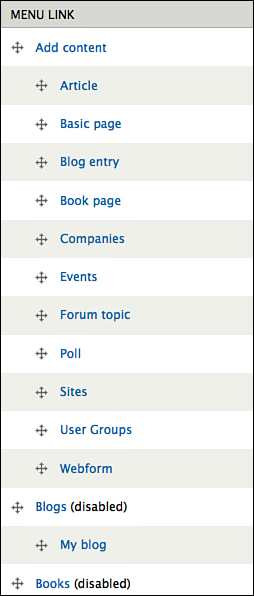
2. Click list links in the Main menu row (see Figure 8.2).

You now see four menu links, as shown in Figure 8.3.

These links correspond to the tabs across the top of your site as in Figure 8.4. That’s your Main menu.

3. Return to Structure, Menus, and click List Links on the Management row. You now see four menu links, as shown in Figure 8.5.
These links correspond to the administration menus that you see after logging in, as shown in Figure 8.6. Do not modify this menu until you have more experience. Otherwise, you might find yourself without some key menu link and thus, feeling lost!

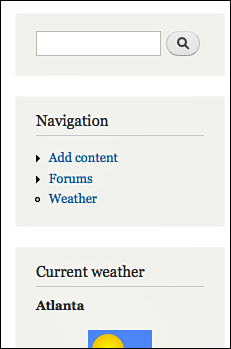
4. Return to Structure, Menus, and click List Links on the Navigation row. You now see a list of links, as shown in Figure 8.7.
These links correspond to the menu in the sidebar of your site, as shown in Figure 8.8. These links are designed to help visitors navigate around your site. These links might not be important enough to place in the Main menu, but they are still useful to visitors.
5. Return to Structure, Menus, and click List Links on the User menu row. You now see links, as shown in Figure 8.9.

These links correspond to the menu in the top-right of your site, as shown Figure 8.10. These links are designed to help visitors manage their account.

Adding a New Menu Link: Site Map
In previous chapters, you added menu links from content on your site. You did that by checking the Provide a Menu Link box while you edited the content.
You now see a second way to make menu links. This method is a little more cumbersome because you need to know the URL (the path, as Drupal calls it), but you sometimes need to use it.
Chapter 7, “Drupal Modules Explained,” showed you how to add modules. You combine that knowledge with what you’re learning in this chapter. You install a Site Map module that automatically generates a list of all the content on your site. You then link to that site map from your Main menu. Now, we go through that process.
Step 1: Find the Module
1. Go to http://drupal.org/project/imce and copy the link.
Step 3: Turn on the Module
1. Enable the Site map module.
Step 4: Set Up the Module
1. Click Configuration and then Site map in the Search and Metadata block.
2. Check these boxes to include them in the site map:
![]() Books to include in the site map: Drupal User Manual.
Books to include in the site map: Drupal User Manual.
![]() Menus to include in the site map: Main menu.
Menus to include in the site map: Main menu.
![]() Categories to include in the site map: Check all the boxes.
Categories to include in the site map: Check all the boxes.
3. Click Save configuration.
Step 5: Add the Menu Link
1. Click Structure and then Menus.
2. Click Add link on the Main menu row.
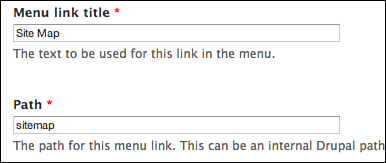
3. Complete the form as shown in Figure 8.11:
![]() Menu link title: Site Map
Menu link title: Site Map
![]() Path: sitemap
Path: sitemap
5. Return to the homepage. You see that the new menu link has become active (see Figure 8.12).

Adding a New Menu Link: Blogs
Now repeat that process and add the Blogs module to your Main menu:
1. Click Structure and then Menus.
2. Click Add Link on the Main menu row.
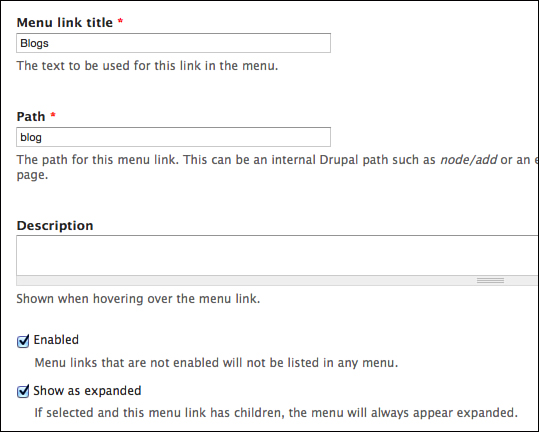
3. Complete the form as shown in Figure 8.13:
![]() Menu link title: Blogs
Menu link title: Blogs
![]() Path: blog
Path: blog
![]() Check Show as Expanded.
Check Show as Expanded.
Note that you need this in Chapter 9, “Drupal Themes Explained,” when you enable a drop-down Main menu.
4. Click Save.
5. Return to the homepage, and you see that the new menu link has become active (see Figure 8.14).

Adding a New Menu Link: Forums
Repeat this process one more time, and add Forums to your Main menu:
1. Click Structure, Menus, and then click Add Link on the Main menu row.
2. Complete the form as shown in Figure 8.15:
![]() Menu Link Title: Forums
Menu Link Title: Forums
![]() Path: forum
Path: forum

3. Check Show as Expanded.
4. Save.
5. Return to the homepage. You can see that the new menu link has become active.
Finding the URL for a New Menu Link
By now you’ve seen that the method in this chapter is more difficult to use than the method used earlier in this book. In the earlier method, you only needed to check the Provide a Menu Link box while you edited the content. With this new method, you need to know the URL. Finding the URL can be difficult.
However, some pages on your site don’t offer a Provide a Menu Link box, and you need to use this new method.
How can you find the URL of a page? There are three ways: Use the module name, the Pathauto module, or the Search module.
Using the Module Name
In the previous examples, the URL exactly matched the name of the module. The Site Map module’s URL is /sitemap/, the Blog module’s URL is /blog/, and the Forum module’s URL is /forum/.
Using the Pathauto Module
One way to find the URL is with the Pathauto module:
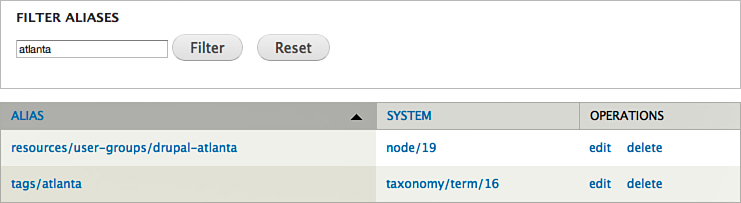
1. Go to Configuration and then URL Aliases. You are now inside the Pathauto module. You can enter part of the URL that you’re looking for into the Filter Aliases box.
2. Click Filter, and you see information about the URLs on your site, as shown in Figure 8.16. On the left side, you can see the new URLs created by Pathauto. On the right side, you see the old URLs created by the Drupal core.
Using the Search Module
On your site’s homepage, you have a search block on the left sidebar. Do the following:
1. Type information on the content you’re looking for into that search box, as shown in Figure 8.17.

2. Click the magnifying glass icon in the search block.
You can now see search results presented on your site, as shown in Figure 8.18. You can click the title for each search result and look up in the browser bar to find the URL.

![]() Check the Provide a Menu Link box while creating or editing content.
Check the Provide a Menu Link box while creating or editing content.
![]() Go to Structure, Menus, and click Add Link.
Go to Structure, Menus, and click Add Link.
However, you still have a problem with your menu links. As you can see in Figure 8.19, they’re not ordered as you would expect on a website. For example, the Home menu link should be the first tab on the left, but instead, it has wandered off to the right side. This is because the menus are organized alphabetically.

Now see how to reorganize your menu links:
1. Go to Structure, Menus, and click List Links on the Main menu row.
2. Select the cross next to the Home menu links, as shown in Figure 8.20.

3. Use the cross to drag-and-drop the link into a different order, as shown in Figure 8.21.

4. Repeat the previous process by making Contact Us into the second-to-last menu link.
5. Repeat the previous process by making About Us into the third-to-last menu link.
When you finish, your menu links will look like Figure 8.22.

6. Click Save Configuration.
Visit the homepage of your site. You see that your Main menu links have been reorganized, as shown in Figure 8.23.

Reorganizing Menu Links Using Weight
If the previous drag-and-drop solution doesn’t work for you, for any reason, there is an alternative called Weight.
The concept behind Weight is
![]() Menu links are assigned a number between –50 and 50.
Menu links are assigned a number between –50 and 50.
![]() Negative numbers from –50 to –1 are “light.”
Negative numbers from –50 to –1 are “light.”
![]() Positive numbers from 1 to 50 are “heavy.”
Positive numbers from 1 to 50 are “heavy.”
![]() Menu links start with a weight of 0, by default.
Menu links start with a weight of 0, by default.
![]() If a menu link has a light number, such as –50, it rises to the top of the menu.
If a menu link has a light number, such as –50, it rises to the top of the menu.
![]() If a menu link has a heavy number, such as 50, it sinks to the bottom of the menu.
If a menu link has a heavy number, such as 50, it sinks to the bottom of the menu.
Weight is a fairly cumbersome system that has been largely replaced by drag-and-drop. However, you see Weight in several difference places inside Drupal, so it’s useful to know how it works.
Here is an alternative approach to reorganizing menus:
1. Go to Structure, Menus, and click List Links on the Main menu row.
2. Click Edit on the Home row. You can now see a screen like the one shown in Figure 8.24.
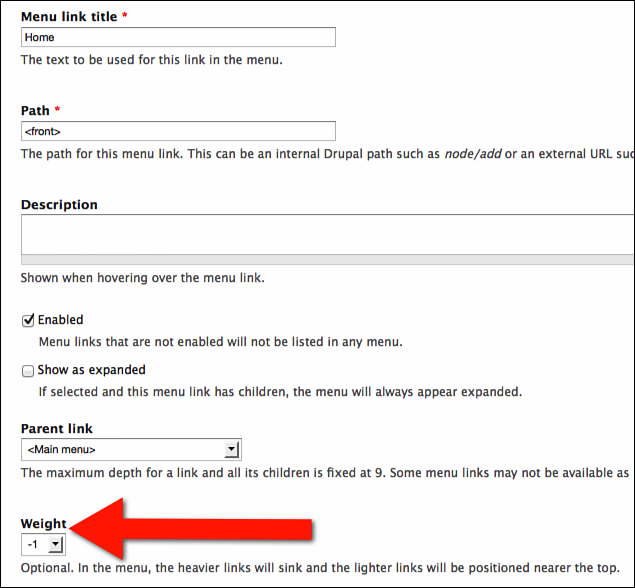
3. Change the Weight option from –1 to –10.
4. Click Save.
That guarantees that the Home link will be the first link that visitors see. You can repeat that process for other links, too:
1. Click Edit on the Site Map row.
2. Change the Weight option to 10.
3. Click Save.
4. Click edit in the Contact Us row.
5. Change the Weight option to 9.
6. Click Save.
7. Click Edit in the About Us row.
8. Change the Weight option to 8.
9. Click Save.
When you finish, your menu links will be ordered exactly as they were in Figures 8.22 and 8.23.
This was an example of how Weight works in Drupal. You can also see Weight in other Drupal screens, but drag-and-drop will almost always be a better and easier option. Actually, you can now see one thing that drag-and-drop can do but Weight cannot: Create parent and child links.
Creating Parent and Child Menu Links
A parent and child link is a common combination that you see on most websites.
What is a parent link and what is a child link? The parent link is a menu link that you will always see on a screen. A child link is a menu link that appears only when you click or hover over a parent link.
Probably the most common type of parent and child link is the drop-down menu. If you hover over a menu link, other links appear underneath. You can see an example from http://www.acquia.com in Figure 8.25. Solutions is the parent link. If you hover over the Solutions link, four child links appear: Solutions for Marketers, Government Solutions, Education Solutions, and Publishing Solutions.

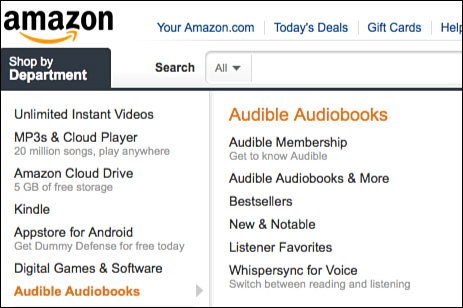
However, you can have parent and child links appear in different ways. For example, on http://www.amazon.com, the menus slide out horizontally instead of vertically, as shown in Figure 8.26. If you hover over the Audible Audiobooks link, six child links appear: Audible Membership, Audible Audiobooks & More, Bestsellers, New & Notable, Listener Favorites, and Whispersync for Voice.
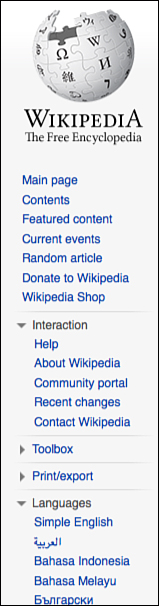
It’s also common to see parent and child links that don’t fly out. Many parent and child links simply expand to reveal more links underneath. For example, if you go to http://www.wikipedia.org and visit the main Wikipedia homepage for your language, you can see parent and child menus on the left side of the page, as shown in Figure 8.27. You can see the small arrows next to each parent link, which indicate that child links are underneath.
Now that you are clear on what parent and child menu links are, you can see how to create them. A reminder: You’re going to organize the links into a parent and child relationship. How they actually appear to your visitors will be controlled by the theme.
Until you change your theme, the only menu that shows parent and child links is on the Navigation menu. So, you use the Navigation menu for all these examples:
1. Go to Structure, Menus, and click List Links on the Navigation row.
2. Check the boxes next to Blogs and My Blog.
3. Click Save Configuration.
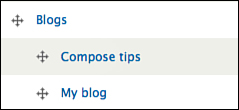
4. Visit your homepage and click the Blogs parent link on the Navigation menu.
You’ll be taken to a new page, and the My Blog child link now appears underneath, as shown in Figure 8.28.

That parent and child setup was already done for you. Now do a parent and child setup of your own:
1. Go to Structure, Menus, and click List Links on the Navigation row.
2. Check the boxes next to Compose Tips.
3. Select the cross next to Compose Tips and drag-and-drop that menu link so that it appears next to the My Blog menu link, as shown in Figure 8.29. You need to drag the link to the right to make it into a child link.
If you cannot manage to use the drag-and-drop, you can create the same parent and child setup by doing this:
1. Click Edit on the Compose Tips row.
2. Scroll down to the Parent link area.
3. Choose Blogs from the list.
4. Click Save.
This Parent link area is why you choose to describe these links as parent and child links. You want to use the same terminology as Drupal.
Now practice what you’ve learned before and earlier in this chapter. Create a list of subforums under your Forums Menu link.
First, you need to the find the URLs of your subforums. If you get stuck at this point, return to earlier in the chapter for a reminder:
1. Go to the homepage of your site, and click Forums on the Navigation menu.
2. Click the Drupal link in the Forum area.
3. Look for the URL / path of the page. Don’t forget to remove the URL of the site. With your example site the URL was forums/drupal.
4. Repeat that process for the other four forums and containers. Here are the URLs you collected:
![]() Drupal: forums/drupal
Drupal: forums/drupal
![]() Drupal Design: forums/drupal-design
Drupal Design: forums/drupal-design
![]() Drupal Installation: forums/drupal-installation
Drupal Installation: forums/drupal-installation
![]() Drupal Support: forums/drupal-support
Drupal Support: forums/drupal-support
![]() General Discussion: forums/general-discussion
General Discussion: forums/general-discussion
5. Go to Structure, Menus, and click Add Link on the Navigation row.
6. Enter the following information, but modify if your site is different:
![]() Menu link title: Drupal
Menu link title: Drupal
![]() Path: forums/drupal
Path: forums/drupal
![]() Show as Expanded: Check this box. This means that people don’t have to click to see all the child links.
Show as Expanded: Check this box. This means that people don’t have to click to see all the child links.
7. Click Save.
8. Click Add Link in the top-left corner.
9. Repeat the previous process and add the other four forums.
Now you could have selected the Parent Link option as you were creating these links, but drag-and-drop is more fun. Besides, with drag-and-drop you can visually confirm that everything is in the right place:
1. Use drag-and-drop to reorganize the Child Menu links so that they appear, as shown in Figure 8.30.
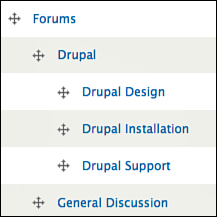
2. Click Save Configuration.
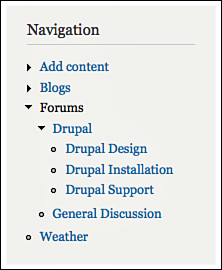
3. Go to your homepage and click the Forums Parent link.
4. Your child menus expand, as shown in Figure 8.31.
What’s Next?
As mentioned in the introduction to this chapter, this chapter focused on teaching you the essential basics of how to use menus in Drupal.
Your Drupalville site should look like Figure 8.32. Don’t worry if it’s not exact. The important thing is that you understand the concepts behind this chapter. If you feel that you know how to manage menus and menu links, evaluate, install, and use modules, you’re ready to move on to Chapter 9.

This chapter is a useful foundation for much that follows. Here’s an overview of how you’ll see menus again in future chapters:
![]() Chapter 9: Drop-down menus. You see drop-downs in Chapter 9 when you cover themes. That’s because themes control whether you can have drop-down menus.
Chapter 9: Drop-down menus. You see drop-downs in Chapter 9 when you cover themes. That’s because themes control whether you can have drop-down menus.
![]() Chapter 10: Placing menus around your site. In Chapter 10, “Drupal Blocks Explained,” you cover blocks. You’ve seen blocks already, but in Chapter 10 you’ll see how to use blocks to place menus in more positions on your site.
Chapter 10: Placing menus around your site. In Chapter 10, “Drupal Blocks Explained,” you cover blocks. You’ve seen blocks already, but in Chapter 10 you’ll see how to use blocks to place menus in more positions on your site.
![]() Chapter 11: Lists, tables, and grids of content. In Chapter 11, “Drupal Views Explained,” you cover the Views module. That enables you to link to lists, tables, or grids to specific content. For example, you could create a page that lists only your Events.
Chapter 11: Lists, tables, and grids of content. In Chapter 11, “Drupal Views Explained,” you cover the Views module. That enables you to link to lists, tables, or grids to specific content. For example, you could create a page that lists only your Events.
![]() Chapter 12: Landing pages. In Chapter 12, “Drupal Layout Modules Explained,” you cover the Panels module. That enables you to link to custom landing pages that bring together all different parts of your Drupal site.
Chapter 12: Landing pages. In Chapter 12, “Drupal Layout Modules Explained,” you cover the Panels module. That enables you to link to custom landing pages that bring together all different parts of your Drupal site.
If you’re ready, turn to Chapter 9 and explore themes. For many people, themes are the fun and exciting part of building your Drupal site.