9. Drupal Themes Explained
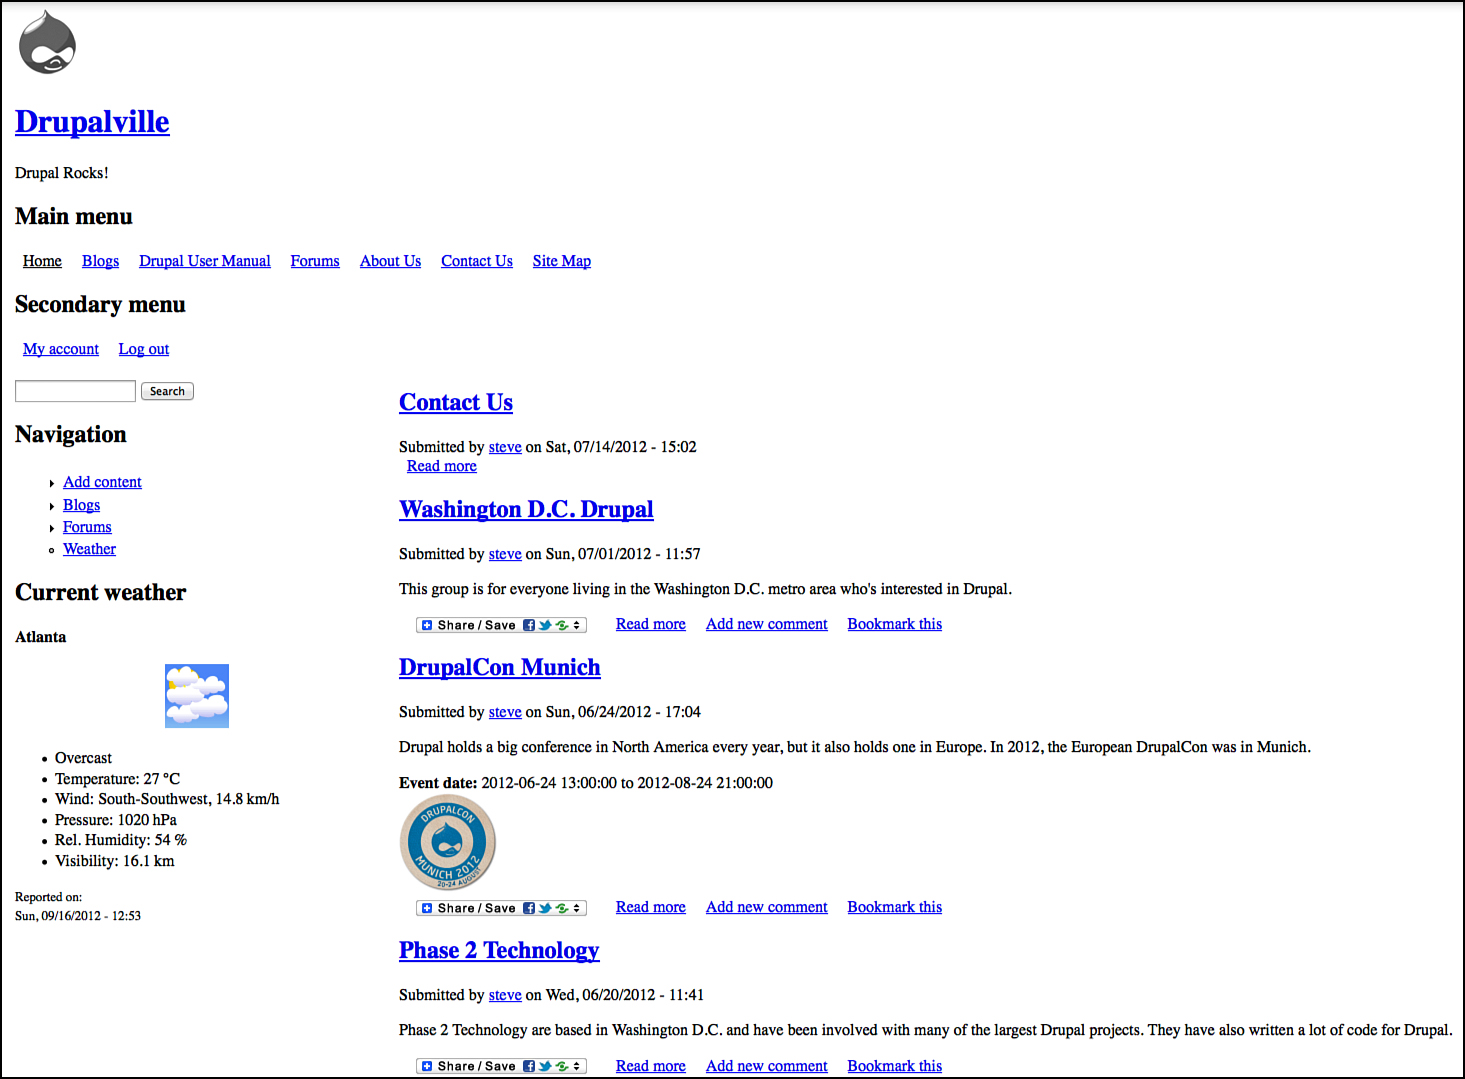
Up until now, your Drupal site has had a blue-and-white design. This is because you’ve been using a theme called Bartik whose default settings are blue and white.
Themes are responsible for controlling both your site’s design and layout.
This chapter shows you how to change your theme and thus, change your site’s design and layout.
At the end of this chapter, you should be able to
![]() Distinguish between the administrative theme and the site theme.
Distinguish between the administrative theme and the site theme.
![]() Install a theme from Drupal.org.
Install a theme from Drupal.org.
![]() Turn on and set up a theme.
Turn on and set up a theme.
![]() Configure a theme that utilizes modules to provide features.
Configure a theme that utilizes modules to provide features.
Bartik Explained
Start your exploration of themes by looking at the themes that come with Drupal by default. Click the Appearance link on the black admin bar, and you see a screen that looks like Figure 9.1.

Drupal comes with two themes enabled:
![]() Bartik is the default theme that your visitors see when they visit your site.
Bartik is the default theme that your visitors see when they visit your site.
![]() Seven is the administration theme that you see when you use any of the administration screens.
Seven is the administration theme that you see when you use any of the administration screens.
Below Bartik and Seven are the currently disabled themes: Garland and Stark, which are shown in Figure 9.2. You use these two themes for demonstration purposes in this chapter, but it’s highly unlikely that you’ll ever use either in real life. Garland is a legacy theme from Drupal 6 and has been replaced with Bartik. Stark is an example theme that is mainly useful to experts who are comfortable with HTML and CSS.

At the bottom of the Appearance screen is the drop-down option shown in Figure 9.3. Don’t touch this option. We’ve often talked to people who thought that this option was the way to change their site’s theme. It’s not. This is the option to change your administration theme, and we don’t recommend you do that until you are more experienced.

Theme Settings
You don’t have to replace Bartik to change the look and feel of your site. Bartik has settings that enable you to customize your site’s look and feel without changing any code. Now let’s see how that’s done. Click Settings in the Bartik theme area, as shown in Figure 9.4.

You now see the settings available for Bartik (see Figure 9.5).
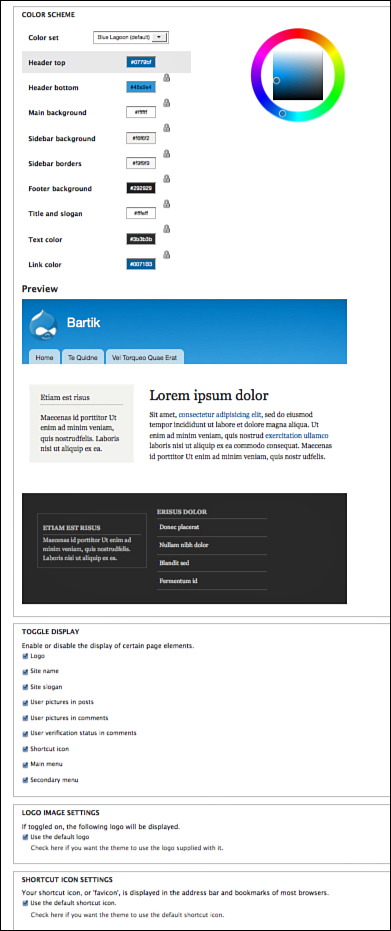
Color Scheme
The first setting you see in Figure 9.5 is the color scheme setting. So, if you prefer red, green, yellow, or some other color scheme, you can use this option to change from Drupal blue to a color of your choosing.
Now, let’s see how to change the color of the Bartik theme:
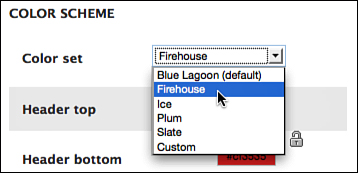
1. Select a color scheme from the color set drop-down, as shown in Figure 9.6.
2. Scroll down and you can see a preview of the color scheme you selected, as shown in Figure 9.7.

3. If you like the new color scheme, scroll to the bottom of the screen and click Save Configuration.
4. Go to your homepage and see the change.
5. Click on Appearance and then Settings for Bartik to return to the color scheme feature.
6. Experiment by manually changing one of the color codes by clicking in the color field of your choice and moving the color selector wheel, as shown in Figure 9.8.

7. If you like the new color scheme, scroll to the bottom of the screen and click Save Configuration.
8. Go to your homepage and see the change.
Repeat this as many times as you like. Remember that you can always return to the Drupal blue by selecting Blue Lagoon (Default) from the Color set drop-down.
Toggle Display
Below the Color Scheme settings is another area called Toggle Display, as shown in Figure 9.9.

The Toggle Display options show the features that the theme supports. Some themes support hundreds of features and some themes support none. A theme’s features rely entirely on the designer of the theme.
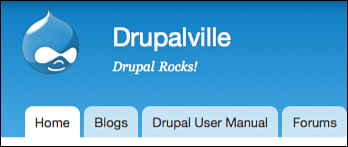
Now experiment with one of the features, as follows:
1. Make sure the Site Slogan check box is checked.
2. Scroll to the bottom and click Save Configuration.
3. Click Configuration on the black menu bar.
4. Click Site Information.
5. Type this short slogan in the Slogan field: Drupal Rocks!
6. Click Save Configuration.
7. Return to the homepage and see the slogan appear under the name of your site, as shown in Figure 9.10.
Logo Image Settings
Now, let’s see how to replace the logo for the Bartik theme:
1. Click Appearance and then Settings for Bartik.
2. Uncheck the Use the Default Logo Box.
You now have the option to upload your own logo, as shown in Figure 9.11. You’re welcome to use your own image, but we also have one that you can use at http://drupal7explained.com/chapter9.

3. Click Save Configuration.
Visit the front of your homepage, and it should look like Figure 9.12.

Enabling Themes Explained
In this activity, you switch from the Bartik theme to each of the other default themes that come with Drupal.
The process of switching between themes is simple at this stage of your site building. However, after your site is built, switching between themes might take a lot more effort.
For now, practice switching between themes.
Set Garland to Default
Use Garland instead of Bartik for your site’s theme:
1. Go to Appearance.
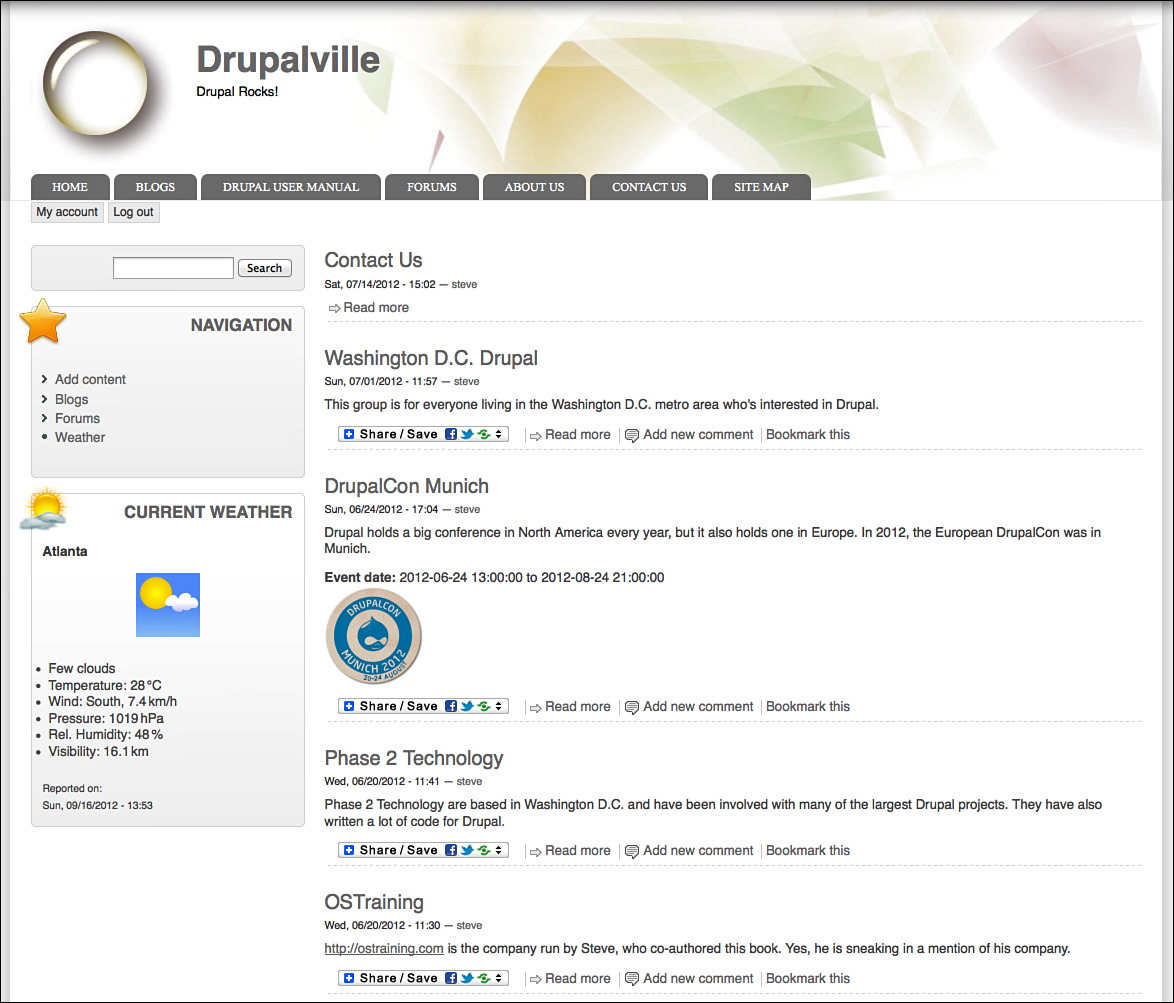
2. Click Enable, and set default next to Garland, as shown in Figure 9.13. If you click only the Enable button, you can use the Garland theme in certain situations, but it won’t be the default theme for the site.
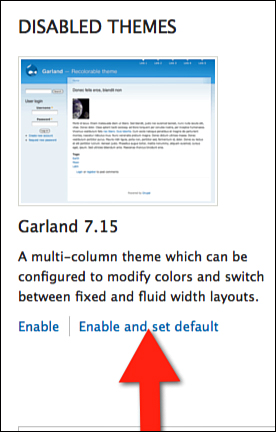
You see a message across the top of the screen saying Garland is now the default theme.
Go to your homepage and see the new theme, as shown in Figure 9.14. You can notice several changes, including that the Main menu is located in the top-right corner of the header. You also see that the logo you uploaded for Bartik has not been automatically applied to Garland.

Set Stark to Default
Repeat that process for Stark. The Stark theme lives up to its name by providing the minimum amount of code required to display a Drupal webpage:
1. Go to Appearance.
2. Click Enable and set the default next to Stark.
3. Go to your homepage and see the new theme, as shown in Figure 9.15.
Installing Themes Explained
Now that you’ve seen the default Drupal themes, install some new themes.
Start by looking at a theme called Danland, which provides an image slideshow unlike any of the default themes.
The process to install a theme is similar to the process you used when installing a module. You use the FITS workflow. Here’s how the FITS workflow operates for themes:
1. Find the theme.
2. Install the theme.
3. Turn on the theme.
4. Set up the theme.
Installing the Danland Theme
Try this workflow with the Danland theme.
Find the Theme
1. Go to http://drupal.org/project/danland.
2. Copy the tar.gz link for the Drupal 7 version of this theme.
Install the Theme
1. Go to your site.
2. Click Appearance on the black menu bar.
3. Click Install New Theme.
4. Paste the link into the Install from URL field.
5. Click Install.
6. Click Enable Newly Added Themes.
Turn On the Theme
1. Scroll down and locate the Danland theme.
2. Click Enable and Set Default.
Set Up the Theme
1. Click Settings for the Danland theme.
2. Observe that Danland comes with many of the same basic settings that you saw in Bartik, Garland, and Stark.
Now visit your homepage and you see Danland live on your site, as shown in Figure 9.16.

You’ll notice that there is a large slideshow across the homepage of your site. This slideshow appears only on the homepage, but the designers of Danland realized that not every user of the theme might want such a large slideshow. If you click Appearance, you see that there is also a version of this theme called Danblog. If you enable Danblog instead of Danland, the only difference you see is that the slideshow has disappeared.
Installing the Zero Point Theme
Now install another theme. Zero Point is just one theme, but it comes with several options providing flexibility. These options include color schemes, sidebar layouts, block styling, and more. Our apologies in advance: The designer of this theme sometimes refers to it as Zero Point and sometimes as 0 Point.
Install Zero Point and see what it has to offer.
Find the Theme
1. Go to http://drupal.org/project/zeropoint.
2. Copy the tar.gz link for the Drupal 7 version of this theme.
Install the Theme
1. Go to your site.
2. Click Appearance on the black menu bar.
3. Click Install new theme.
4. Paste the link into the Install from URL field.
5. Click Install.
6. Click Enable Newly Added Themes.
Turn On the Theme
1. Scroll down and locate the 0 Point theme.
2. Click Enable and Set Default.
Set Up the Theme
1. Click Settings for the 0 Point theme. (Notice the name change from Zero to 0.)
2. Observe that Zero Point comes with many of the same basic settings that you saw in Bartik, Garland, Stark, and Danland.
3. Observe that Zero Point also has Layout Settings, Breadcrumb, Search Results, and Theme Development areas.
4. Go to your homepage, and you can see that your site looks like Figure 9.17.
Installing the Company Theme
The Danland and Zero Point themes you have explored so far enable a drop-down menu, but both require some configuration. Now look at a theme called Company, which enables you to start using a drop-down menu almost immediately after installation. In the Company theme, you need to configure only your menu.
Find the Theme
1. Go to http://drupal.org/project/company.
2. Copy the tar.gz link for the Drupal 7 version of this theme.
Install the Theme
1. Go to your site and click Appearance.
2. Click Install New Theme.
3. Paste the link into the Install from URL field and then click Install.
4. Click Enable Newly Added Themes.
2. Click Enable and Set Default.
Set Up the Theme
1. Click Settings for the Company theme
2. Scroll down to find the Company Theme Settings and observe this theme has a slideshow.
3. Uncheck the Show Slideshow box.
4. Click Save Configuration.
Go to the homepage, and you can see the new theme live on your site. The Company theme has not only changed the design of the site, but also the layout. The left column has now moved to the right side of the screen (see Figure 9.18.)

Setting Up the Drop-Down Menu
Now set up the drop-down menu for your site. As you do this, we’ll remind you of what you did in Chapter 8, “Drupal Menus Explained,” and introduce you to a new feature of menus: moving links from one menu to another:
1. Go to Structure and then Menus.
2. Click list links on the Navigation row.
3. Look for the parent and child links that you created in Chapter 8. You’re going to move the child links to the Main menu.
4. Click Edit next to the Drupal child link.
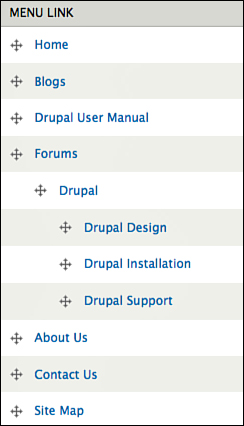
5. Scroll down to the Parent link option. Choose Forums, which is at the top of the option area, just under <Main Menu>, as shown in Figure 9.19.
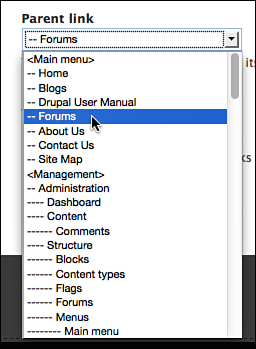
6. Click Save.
You can now see the Main menu, as shown in Figure 9.20. Your Drupal child link and the three links underneath now have moved from the Navigation menu to this Main menu.
Repeat that process and move the General Discussion link to the Main menu:
1. Go to Structure and then Menus.
2. Click List Links on the Navigation row.
3. Click Edit next to the General Discussion child link.
4. Scroll down to the Parent link option. Choose Forums, which is at the top of the option area just under <Main Menu>.
5. Click Save.
You are now at the part of drop-down menus that is often confusing to Drupal beginners: whether menus expand automatically or not. Go to your homepage and see your drop-down menus in action. On the homepage, you can see the drop-down menus don’t work, as shown in Figure 9.21.

However, if you click the Forums tab, the child menu links become visible, as shown in Figure 9.22.

Even now, your child links under Drupal aren’t visible. It won’t be until you click the Drupal link that all three child links will become visible, as shown in Figure 9.23.

Why is this happening? By default, Drupal’s menus are set up to match the needs of text menus. To use an example you’ve already seen, this behavior made perfect sense when you were using it with the Navigation menu. However, the same behavior seems abnormal with drop-down menus where you expect all the links to be visible on all pages.
How do you change this behavior? You need to check one box in the settings for each menu:
1. Go to Structure and then Menus.
2. Click List Links on the Main menu row.
3. Click Edit next to the Forums link.
4. Check the Show as Expanded box.
5. Click Save.
6. Check the Show as Expanded box for the Drupal and General Discussion links.
7. Click Save and go to see your menu in action.
Subthemes Explained
The themes you have installed and tested so far have been fairly straightforward, each one offering a different design, a different layout, and some different features.
You now look at the Sky theme, which is an example of a more complicated theme. The Sky theme is a subtheme, which means that it relies on another theme to work. The Sky theme requires a base theme called Adaptive Theme to work correctly.
Find a Theme
1. Go to the Drupal.org page for the Sky theme: http://drupal.org/project/sky. Copy the tar.gz link for the Drupal 7 version of this theme.
2. Repeat the process for Adaptive Theme: http://drupal.org/project/adaptivetheme.
Install the Theme
1. Go to your site and then click Appearance.
2. Click Install New Theme.
3. Paste the link into the Install from URL field and then click Install.
4. Click Enable Newly Added Themes.
5. Repeat Steps 1 and 2 for Adaptive Theme.
Turn On the Theme
1. Click Enable and set the default next to the Sky theme.
2. You do not have to enable AdaptiveTheme. It simply needs to be installed.
Set Up the Theme
1. Click Settings for the Sky theme.
2. As you can see, you now have many, many more options than you did for any previous theme. Many of these options will be useful for more experienced users but confusing for beginners. Change one of the simpler settings. Click the middle box for the Choose Sidebar Positions setting, as shown in Figure 9.24.

Go to your homepage and see how the Sky theme appears on your site, as shown in Figure 9.25.

You can notice that your Main menu is missing and that the third column, which you just chose in the settings, is not being used. Now go and fix those issues:
1. Go to Structure and then Blocks.
2. Scroll down to the Disabled area and find the Main menu block.
3. Choose Menu bar from the drop-down next to the Main menu block.
4. In the Disabled area find the Most Recent Poll Block.
5. Choose Sidebar second from the drop-down next to the Most Recent Poll Block.
6. Click Save Blocks.
Visit your homepage, and you’ll now see that it looks like Figure 9.26. Notice that the drop-down menu doesn’t work yet. The Sky theme, as with many things, is more complicated than most of the themes you’ve looked at in this chapter. You’d need to go to http://drupal.org/project/sky and view the documentation for the Sky theme to see how to set up the drop-down menu correctly.

Finding Themes Explained
Early in this chapter, you looked at the default Drupal themes: Bartik, Garland, and Stark.
Then you looked at some themes from Drupal.org: Danland, Zero Point, Company, and Sky.
All those themes that you’ve seen so far were chosen for you. In this part of the chapter, we’ll give you some advice on how to successfully find other themes that you could use to build a site.
As we did with modules in Chapter 7, here are some important points to know about themes before you start searching:
![]() Most themes are hosted on Drupal.org, but not all.
Most themes are hosted on Drupal.org, but not all.
![]() Most themes are free, but some companies sell commercial themes.
Most themes are free, but some companies sell commercial themes.
![]() There are no ratings or reviews of themes. The Drupal community is thinking about adding them to Drupal.org, but for now, there is no single place to find ratings or reviews.
There are no ratings or reviews of themes. The Drupal community is thinking about adding them to Drupal.org, but for now, there is no single place to find ratings or reviews.
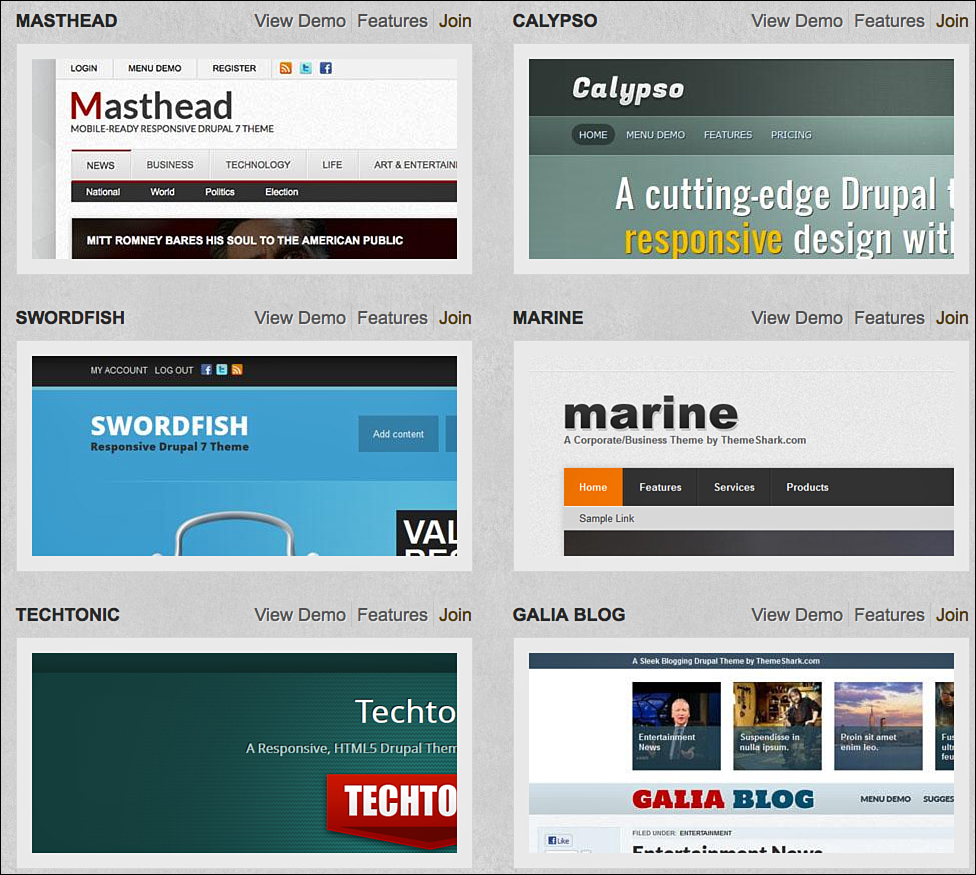
Start searching by going to the biggest and best resource for themes, which is http://drupal.org/project/themes. Visit this page, and you see a screen like the one in Figure 9.27. Notice that there are more than 1,000 themes hosted on Drupal.org.
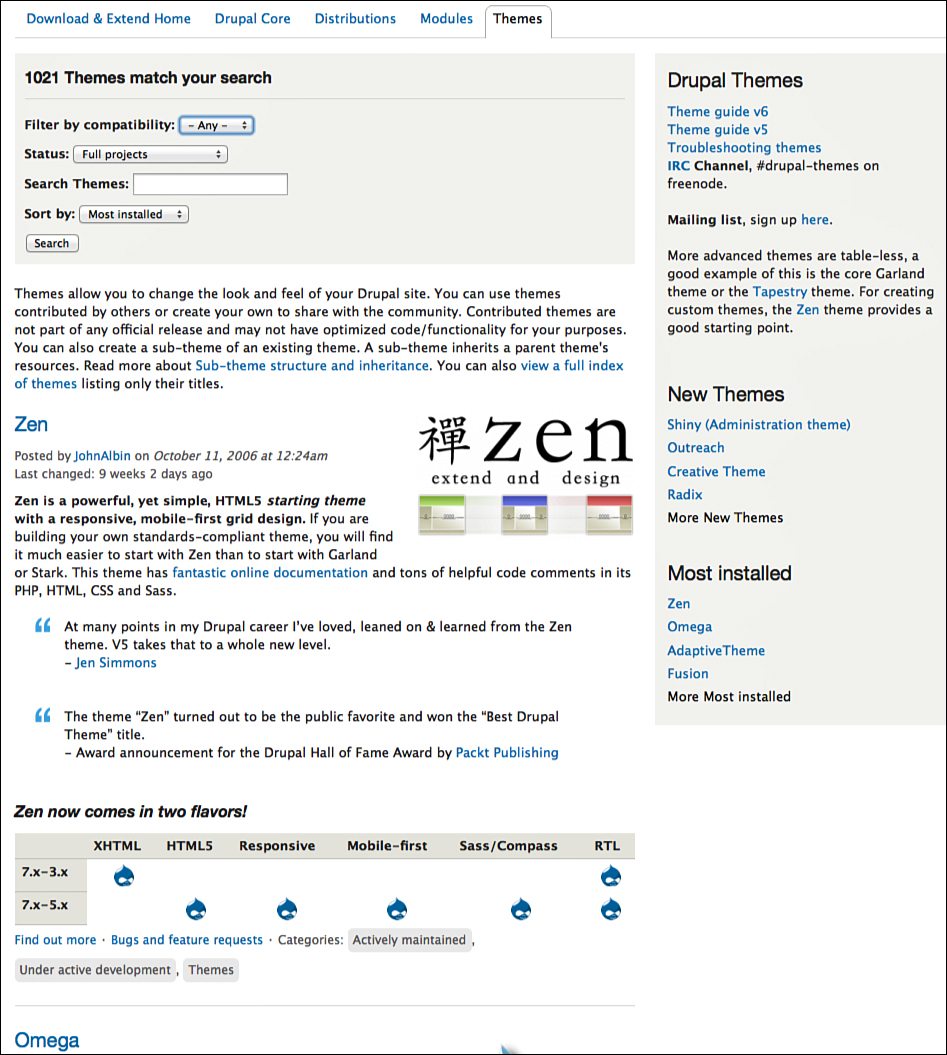
There is a search box on the top of the themes page, as shown in Figure 9.28. By default the themes are sorted from the Most Installed to the Least Installed.

Avoiding Starter Themes, Theme Frameworks, Base Themes
On the Themes page, you can see that Zen is the most commonly installed Drupal theme. This is a good time to introduce a note of caution: Unlike with modules, not all of the most popular themes are suitable for beginners.
For example, Zen is a wonderful theme with many advanced features, but it is not easy for beginners to use. The same is true of any theme whose description includes phrases like this: starting theme, starter theme, theme framework or base theme. A phrase like “starting theme” sounds as if its indicating that a theme is easy to use. In fact, the opposite is true.
Some of these themes can be used by beginners together with a subtheme. You saw a good example of that earlier in this chapter with Adaptive Theme, which is labeled as theme framework, and Sky, which is labeled as a subtheme.
Generally, it will be obvious if you’ve installed one of these more complicated themes by mistake. For example, Figure 9.29 shows what happens if you make Adaptive Theme into your site’s default theme.

As you become more experienced with Drupal, you should consider exploring starter themes, theme frameworks, and base themes. However, you should walk before you run and avoid using those themes as you start learning Drupal.
Evaluating Themes
At the time of writing, Marinelli is the most installed theme that is not labeled as a starter theme, theme framework, and base theme. So, Marinelli is used as an example for evaluating themes. Visit http://drupal.org/project/marinelli, and you can see a screen as shown in Figure 9.30.

We encourage you to evaluate each theme based on four different criteria, as shown in Figure 9.31. As with modules, we call this the IRIS evaluation and it involves the four areas of the page introduced in Chapter 7, “Drupal Modules Explained:”
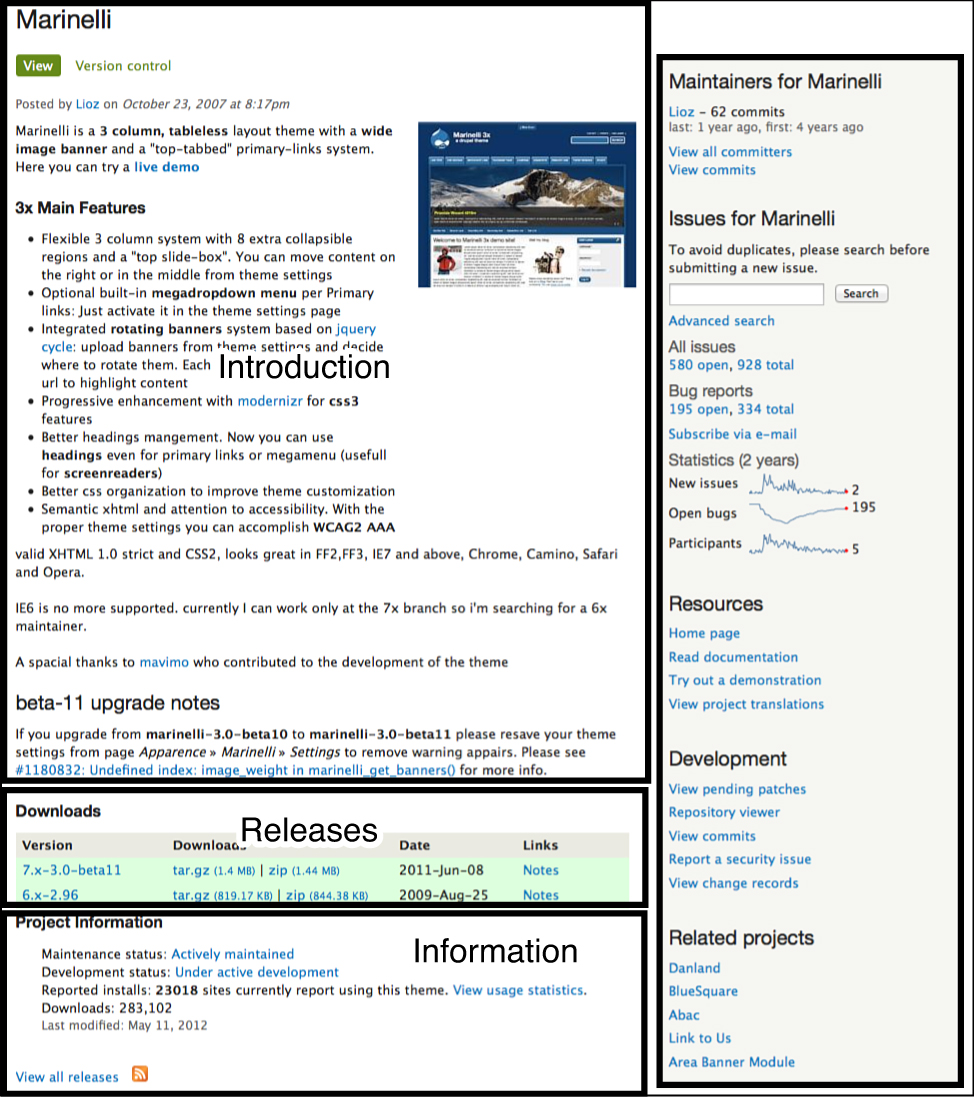
![]() Introduction: This area gives you an overview of all the theme’s key features and requirements.
Introduction: This area gives you an overview of all the theme’s key features and requirements.
![]() Releases: This area tells you if there is a release of a theme available for your Drupal version and if it is stable or perhaps only released in an alpha or beta version.
Releases: This area tells you if there is a release of a theme available for your Drupal version and if it is stable or perhaps only released in an alpha or beta version.
![]() Information: This area tells you if this module is actively updated and maintained, plus how many sites have installed it.
Information: This area tells you if this module is actively updated and maintained, plus how many sites have installed it.
![]() Sidebar: This area shows you the people who coded the module and when they were last active. It also provides important links, such as those to issues users have found and to documentation for the module.
Sidebar: This area shows you the people who coded the module and when they were last active. It also provides important links, such as those to issues users have found and to documentation for the module.
Area 1: Introduction
This area requires the least explanation. It provides a clear explanation of what this theme does. Figure 9.32 shows the example from Marinelli, which also has a screenshot of the theme.
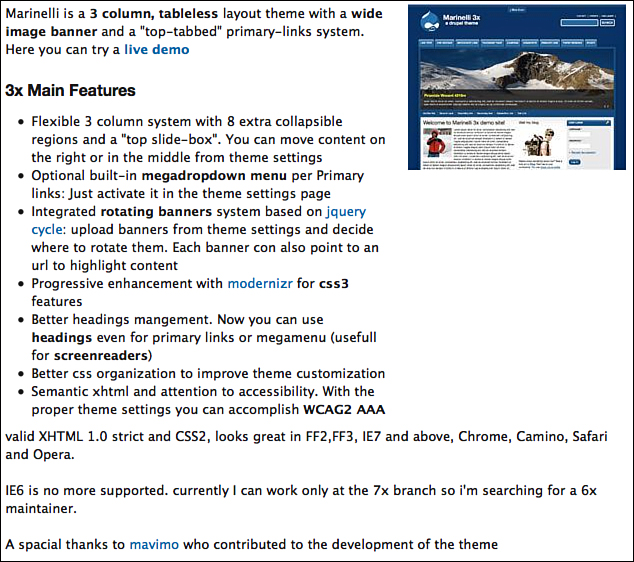
For Marinelli, the first paragraph is clear and useful: “Marinelli is a 3-column, tableless layout theme with a wide image banner and a top-tabbed primary-links system.” There is also a useful link to see a live demo.
The remainder of Marinelli’s introduction is also fairly clear, but does contain some Drupal and design jargon that beginners won’t understand.
Area 2: Releases
This area is the most important of all. If there isn’t a version of the theme available for your version of Drupal, stop your evaluation right here and start looking elsewhere:
![]() Themes in the green area are recommended for use on live sites.
Themes in the green area are recommended for use on live sites.
![]() Themes in the yellow area need to be carefully evaluated before use.
Themes in the yellow area need to be carefully evaluated before use.
![]() Themes in the red area are generally only for developers to test.
Themes in the red area are generally only for developers to test.
Not all themes will have a green, yellow, and red area. You can see Marinelli’s downloads in Figure 9.33.

Area 3: Information
This area at the bottom of the page, contains some useful information. First, it tells you if the theme is being actively maintained and updated. Second, it tells you if the theme is frequently download or installed.
Finally, it tells you when the theme was last updated. If a theme hasn’t been updated recently, be cautious. It might mean that the theme works perfectly and doesn’t need updating, but it might also mean the theme’s coders are not providing necessary updates and fixes.
Figure 9.34 shows you the Information area for Marinelli. This proves that Marinelli is a theme that is fairly regularly updated and is trusted by a lot of users.
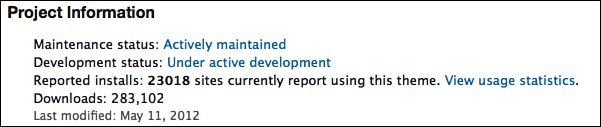
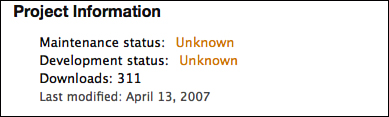
Figure 9.35 shows the Information area for another theme. Be more cautious about installing this one.
Area 4: Sidebar
It was straightforward to explain the information contained in the first three areas on a module page. The fourth area, the sidebar, contains more information and is more diverse. Figure 9.36 shows the sidebar on the Marinelli page. Here’s what in each of the four areas:
![]() Maintainers: This is some of the most important information of all about a theme. Marinelli has only one maintainer, who was active one year ago. This is not necessarily a negative sign, but it is worth noting.
Maintainers: This is some of the most important information of all about a theme. Marinelli has only one maintainer, who was active one year ago. This is not necessarily a negative sign, but it is worth noting.
![]() Issues: This area provides links to all potential bugs that people have found with the theme. A high number is not necessarily a bad thing, because the more popular it is, the more bugs people are likely to find. At first, it won’t be easy for you to get useful information from this area, but as you get more experience, you can read the list of issues and look for potential problems.
Issues: This area provides links to all potential bugs that people have found with the theme. A high number is not necessarily a bad thing, because the more popular it is, the more bugs people are likely to find. At first, it won’t be easy for you to get useful information from this area, but as you get more experience, you can read the list of issues and look for potential problems.
![]() Resources: This area contains key links. Perhaps the most important of all is the documentation link. Not all themes have documentation, but you should probably avoid those that don’t.
Resources: This area contains key links. Perhaps the most important of all is the documentation link. Not all themes have documentation, but you should probably avoid those that don’t.
![]() Development: If you’re researching themes, this area might give you ideas for similar themes to evaluate.
Development: If you’re researching themes, this area might give you ideas for similar themes to evaluate.

Commercial Themes
Unlike modules, not all themes are available on Drupal.org and not all themes are free. There are some companies that sell themes commercially.
For a commercial theme, you can expect to pay between $15 and $300. For that price, you might also expect a more polished, professional design and support from the theme’s developers.
However, if you’re coming from another content management system or blogging platform, you might be surprised at how few companies sell themes. In total, there are probably not more than a dozen commercial Drupal theme companies.
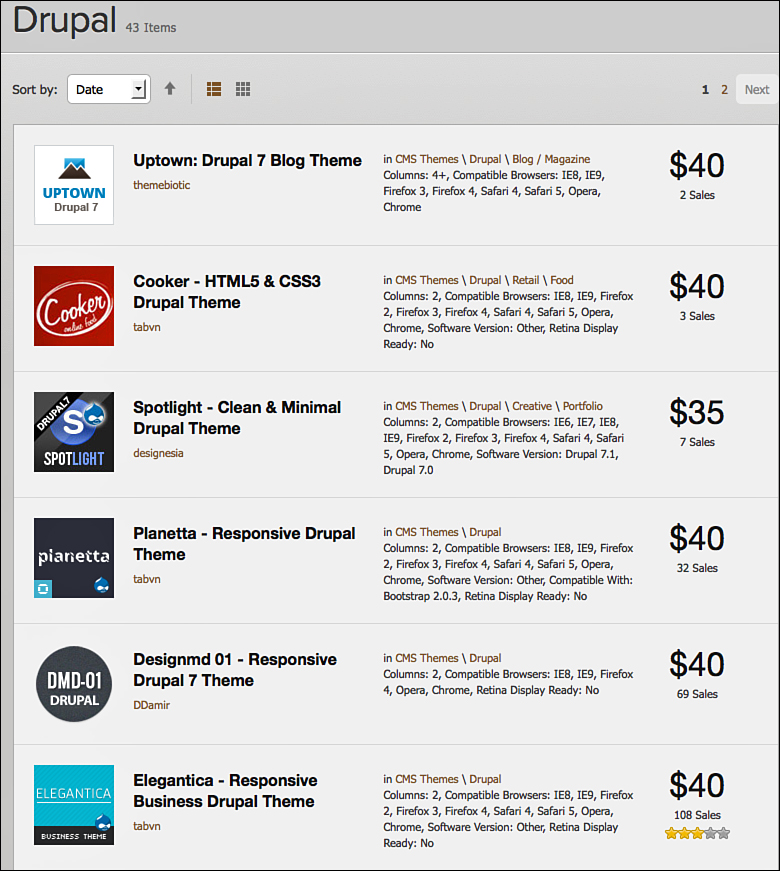
There are some large theme companies that sell designs for Drupal and for many platforms. These sites are typically marketplaces that attract thousands of different designers. One example of these marketplace sites is Theme Forest. You can find its Drupal themes at http://www.themeforest.net/category/cms-themes/drupal. Its list of Drupal themes is shown in Figure 9.37. It has more than 40 themes and most are priced between $15 and $50.
Another popular marketplace site is Template Monster. You can find its Drupal themes at http://www.templatemonster.com/drupal-themes.php. Its list of Drupal themes is shown in Figure 9.38. It has just hundreds of themes, and most are priced between $50 and $70.

There are also companies that specialize in creating only Drupal themes. After looking at Drupal.org, you may recognize the names of some of these companies. Many of these companies place free themes on Drupal.org as a way to give back to the Drupal community and as a form of advertising.
Sooper Themes sells only Drupal themes. You can find its designs at http://www.sooperthemes.com. Its list of Drupal themes is shown in Figure 9.39. They have more than a dozen themes, and you can buy access to all of them for prices ranging from $64 to $450.

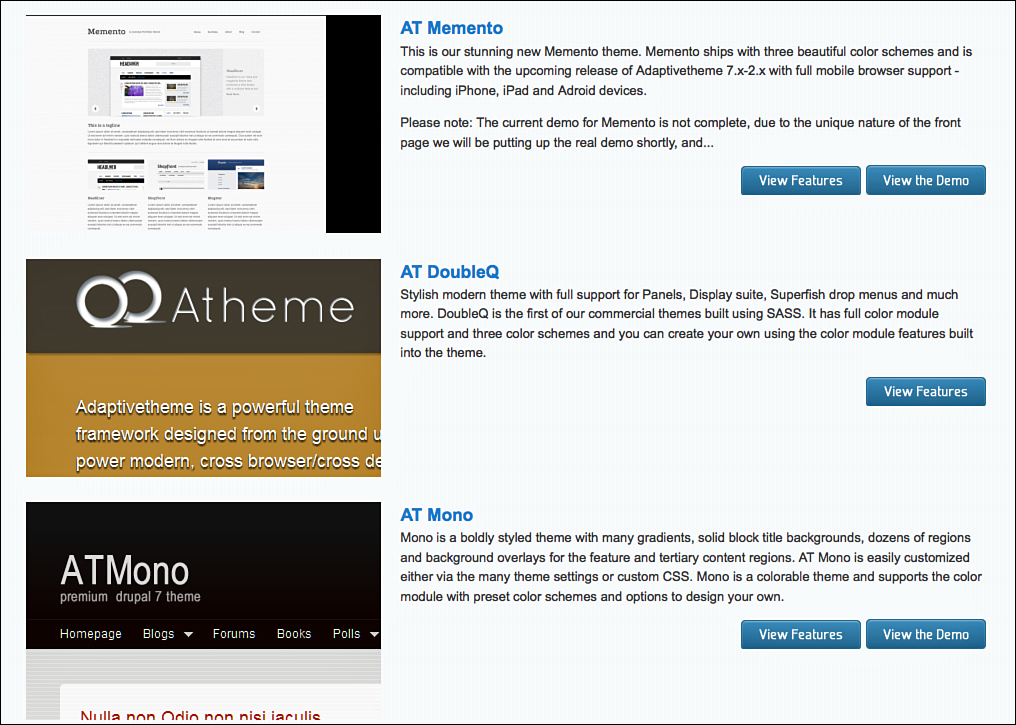
Adaptive Themes are Drupal specialists, and we used their work earlier with the Sky theme. You can find its designs at http://www.adaptivethemes.com. Its list of Drupal themes is shown in Figure 9.40. It has approximately ten themes, and you can buy access to all of them for $65.
Theme Shark has one of the larger selections of Drupal themes. You can find its designs at http://www.themeshark.com. Its list of Drupal themes is shown in Figure 9.41. It has more than 30 themes, and you can buy access to all of them for between $59 and $299.
Artisteer
So far, you have looked at two ways to get Drupal themes: free themes from Drupal.org and commercial themes.
There is a third option available for people who want to design their own themes. Artisteer is desktop software that can create themes without requiring any coding. After installing Artisteer on your desktop, you can click buttons to change layouts, colors, menus, fonts and more. You can import images to use as headers and backgrounds. An example of the theme creation process is shown in Figure 9.42.
When your design is complete, you can export your design as a complete Drupal theme. The theme can then be imported by going to Appearance; then Install new theme and by choosing the option to upload directly from your local computer.
Artisteer won’t produce the most beautiful underlying code, but it will produce workable, customized themes for people without a great deal of time or money.
Artisteer costs $130 and is available from http://www.artisteer.com. There is a free trial version that enables you to try all the features.
A Final Note on How Themes Get Built
In this chapter, you’ve seen three ways to find a Drupal theme for your site:
![]() Free themes from Drupal.org
Free themes from Drupal.org
![]() Commercial themes
Commercial themes
![]() Artisteer
Artisteer
In the Drupal community, using free themes is by far the most popular option.
It is rare to see a theme built from scratch. Nearly every Drupal project starts with an existing theme and brings in a designer to make modifications. Even the most prestigious Drupal projects tend to start with a theme from Drupal.org. Using an existing theme has many benefits:
![]() The code behind popular existing themes has been heavily road-tested.
The code behind popular existing themes has been heavily road-tested.
![]() Many themes already come with features such as mobile-compatibility.
Many themes already come with features such as mobile-compatibility.
![]() Drupal themes can be complicated to build from scratch.
Drupal themes can be complicated to build from scratch.
![]() Reusing existing code saves time and money.
Reusing existing code saves time and money.
It is beyond the scope of this book to teach you how to recode existing Drupal themes. However, for your first Drupal sites, you can find a suitable design from Drupal.org, a commercial theme site, or Artisteer.
Installing the Final Theme for Your Site
To end this chapter, install a theme to use to actually build your Drupaville site. Install a new theme, modify the settings, and enable a drop-down menu.
First, install the Marinelli theme that you evaluated earlier. Use the FITS workflow:
1. Go to http://drupal.org/project/marinelli and copy the tar.gz link for the Drupal 7 version of this theme.
2. To install, go to your site, click Appearance, and then Install New Theme. Paste the link into the Install from URL field, and then click Install.
3. To turn it on, locate the Marinelli theme. Click Enable and Set Default. Click Settings for Marinelli. Here’s what you will to modify:
![]() Logo Image Settings: Uncheck Use the Default Logo. Upload the drupalville-logo-small.png image from http://drupal7explained.com/chapter7.
Logo Image Settings: Uncheck Use the Default Logo. Upload the drupalville-logo-small.png image from http://drupal7explained.com/chapter7.
![]() Layout Settings: Choose Content in the middle for Layout Type. This returns your site to a traditional three-column design with the content in the middle of the screen.
Layout Settings: Choose Content in the middle for Layout Type. This returns your site to a traditional three-column design with the content in the middle of the screen.
![]() Primary Menu Settings: Choose Mega Drop-Down as the option for Which Kind of Primary Links Do You Want to Use? This enables the drop-drown menu.
Primary Menu Settings: Choose Mega Drop-Down as the option for Which Kind of Primary Links Do You Want to Use? This enables the drop-drown menu.
![]() Banner Management. Open Banner Configuration and choose Drupal region (advertise) for Do You Want to Use Marinelli Banners or a Classic Drupal Region? This removes the large slideshow from the homepage.
Banner Management. Open Banner Configuration and choose Drupal region (advertise) for Do You Want to Use Marinelli Banners or a Classic Drupal Region? This removes the large slideshow from the homepage.
4. Click Save Configuration.
By following the FITS workflow, you now have a site that looks like Figure 9.43.

As with any new theme, there will always be adjustments to make. For example, your parent and child links don’t fit perfectly into the new menu. As shown in Figure 9.44, the phrase General Discussion is too long for the menu.

You can make this adjustment by thinking back to Chapter 8:
1. Go to Structure and then Menus.
2. Click List Links on the Main Menu row.
3. Click Edit on the General Discussion row.
4. Change General Discussion to General.
5. Click Save.
The adjustments you make for a new theme may involve menus, but they may involve other things, too.
You may need to tweak the logo size as we did here. The drupalville-logo.png we used earlier was too large for this theme.
You may also need to move blocks around because the new theme has a different layout. How to do that will be the topic of the next chapter.
What’s Next?
In this chapter, you saw how to accomplish these tasks:
![]() Configure Bartik, the default Drupal theme.
Configure Bartik, the default Drupal theme.
![]() Change the default theme on your site.
Change the default theme on your site.
![]() Add new themes.
Add new themes.
![]() Search for and evaluate new themes.
Search for and evaluate new themes.
Now you know the key details about Drupal themes. At this point, your Drupalville site will look like Figure 9.45. For the first time in this book, your site now looks substantially different. Don’t worry if it’s not exact. The important thing is that you understand the concepts behind this chapter. If you feel that you know how to search for, evaluate, install, and use themes, then you’re ready to move on to Chapter 10, “Drupal Blocks Explained.”

In Chapter 10, you dig deeper into themes and how they impact your site. You focus on how themes work to control the layout of your site and how you can use blocks within that layout. By the end of the next chapter, you’ll have built on the knowledge from this chapter and have a good understanding of how to manage both design and layout.