13. Drupal Users Explained
The first 12 chapters of this book focused on the content and features of your Drupal site. Now you look at the people who will read that content and use those features.
This chapter shows you how to control who can do what on your site. Who can create, delete, and edit content? Who can upload modules and themes? Who can modify menus and blocks?
You also see how to make user accounts more interesting. You do this by allowing users to add more information about them. Here are the things you’ll be able to do after completing this chapter:
![]() Create roles.
Create roles.
![]() Assign permissions to roles.
Assign permissions to roles.
![]() Create new users.
Create new users.
![]() Test users’ accounts.
Test users’ accounts.
![]() Expand user profiles.
Expand user profiles.
![]() Modify the registration form.
Modify the registration form.
Drupal Permissions Explained
Throughout this book, you have been logged in as a site administrator. This is the most powerful user account on the site. As a site administrator you can go anywhere, do anything, and change anything. You can’t remove the permissions associated with this, and this account is also difficult to delete.
However, you can probably imagine that few of your site’s users can be trusted to be administrators. You will now see how to control what your users can and cannot do.
First Example
Start with the example of a Blogger. A Blogger will be a role that you can assign users to. If users are in this role, all they can do is write blog posts. There are four steps to make sure a user account is set up correctly: Roles, Permissions, Users, and Testing. Following are those four steps.
Step 1: Add a Role
1. Click People on the black menu bar and then the Permissions tab (see Figure 13.1).

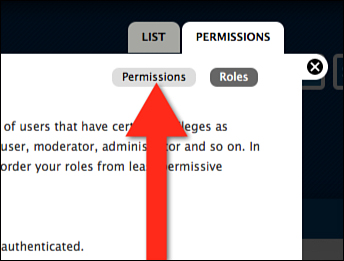
2. Click Roles, as shown in Figure 13.2.

You’re now going to see three roles set up by default: Anonymous user, Authenticated user, and Administrator. Now take a brief look at each default role, as shown in Figure 13.3:
![]() Anonymous: Visitors to your site who are not logged into your site are considered anonymous.
Anonymous: Visitors to your site who are not logged into your site are considered anonymous.
![]() Authenticated: Anyone who has an account on your site and logs in is authenticated. The Authenticated role also serves as the minimum set of permissions that is given to all logged in users.
Authenticated: Anyone who has an account on your site and logs in is authenticated. The Authenticated role also serves as the minimum set of permissions that is given to all logged in users.
![]() Administrator: Users assigned the administrator role can do everything on the site. This is similar to the main account that you have been using throughout this book.
Administrator: Users assigned the administrator role can do everything on the site. This is similar to the main account that you have been using throughout this book.

Now create a fourth Role: Blogger.
3. Type Blogger into field under the three default roles, as shown in Figure 13.4.

4. Click Add Role.
Step 2: Set Permissions
Now that the Blogger role has been created, you need to decide what users in the Blogger role can and can’t do.
Click the smaller Permissions tab, as shown in Figure 13.5.
You can now see a long list of check boxes with permissions for all the modules on your site, as shown in Figure 13.6.
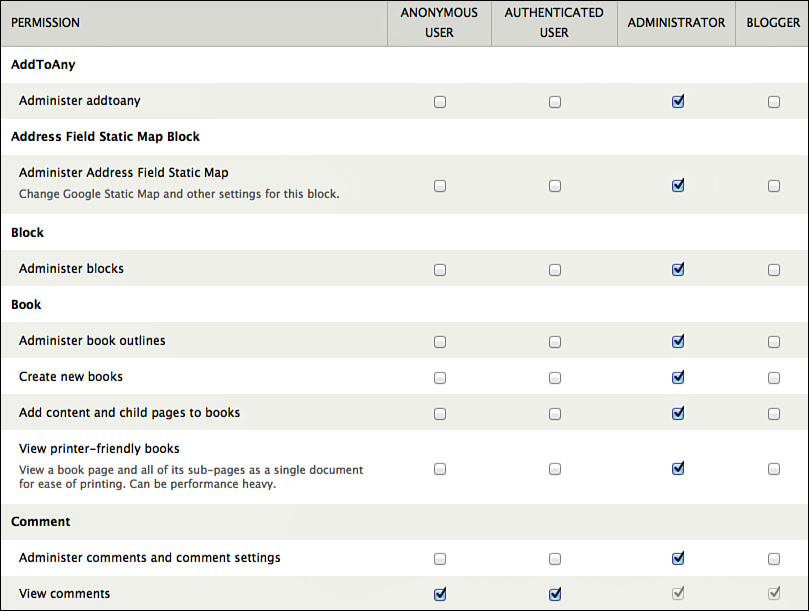
On the left side of the list, you can see all the modules and the permissions they contain. The modules are all ordered alphabetically. Across the top of the list, you see the four roles that you have set up.
The permissions for the three default roles are already set. You can also see that some permissions for the Blogger role, such as those shown in Figure 13.7, are already set. This is because the Authenticated user account serves as a minimum set of permissions. This makes it easier to ensure that all user accounts have access to at least some functionality.
You need to allow users in the Blogger role to create Blog posts. So, scroll down until you find the Node module. Remember that Node is Drupal’s geeky word for content.
At the top of the Node module area, you see some general permissions, as shown in Figure 13.8.
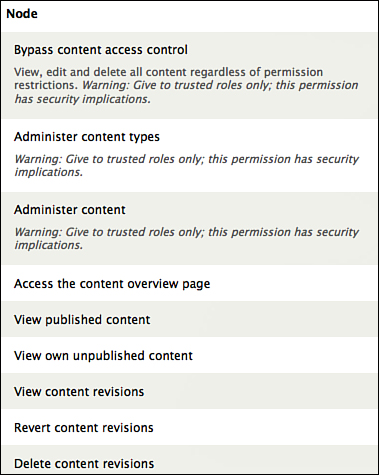
You should be interested in the permissions specific to content types. Scroll a little further to find the Blog entry permissions, as shown in Figure 13.9. You can see that each content type has five permissions:
![]() Create New Content
Create New Content
![]() Edit Own Content
Edit Own Content
![]() Edit Any Content
Edit Any Content
![]() Delete Own Content
Delete Own Content
![]() Delete Any Content
Delete Any Content

For your Bloggers, you want them to manage their own content, but not other people’s content. So you allow them to create, edit, and delete their own content only as follows (shown in Figure 13.10):
![]() Check the Blog Entry: Create New Content Box in the Blogger Column
Check the Blog Entry: Create New Content Box in the Blogger Column
![]() Check the Blog Entry: Edit Own Content Box in the Blogger Column
Check the Blog Entry: Edit Own Content Box in the Blogger Column
![]() Check the Blog Entry: Delete Own Content Box in the Blogger Column
Check the Blog Entry: Delete Own Content Box in the Blogger Column
![]() Click Save Permissions at the Bottom of the Screen
Click Save Permissions at the Bottom of the Screen

1. Click the List tab at the top of the screen.
2. Click Add user in the top-left corner.
![]() Username: blogger
Username: blogger
![]() E-mail address: [email protected]
E-mail address: [email protected]
![]() Password: blogger. You can set this to something more difficult if you want. Drupal warns you that this is a weak password.
Password: blogger. You can set this to something more difficult if you want. Drupal warns you that this is a weak password.
![]() Roles: Check the Blogger box.
Roles: Check the Blogger box.
3. Make sure your settings look like Figure 13.11.

4. Click Create New Account.
Step 4: Test the User Account
The fourth and final step is crucial. Permissions are a vital part of your site’s security, and if you don’t test your permissions, you could easily allow some users to do things that can compromise your site.
Following is a basic method for testing. You can use this method if you know the user’s password:
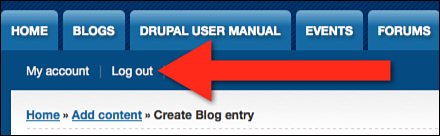
1. Click logout on the black admin bar.
2. Log in via the User Login block. You can use the blogger account created in the previous Step 3.
3. Look in the Navigation block, as shown in Figure 13.12.

4. Click Add Content, and then Blog entry to go to the Create Blog entry screen, as shown in Figure 13.13.

As you can see, the Blog entry is the only option for this user to create content. You can confirm this by looking at the expanded Navigation block, as shown in Figure 13.14.

Notice that the black admin bar has disappeared, but logged-in users do have some simple account links under the Main menu, as shown in Figure 13.15. This is the User menu that you saw in Chapter 8, “Drupal Menus Explained.”
However, there are limitations to this testing. It’s neither feasible nor safe to know what your users’ passwords are. Instead, you can use a module called Masquerade to easily test any user account. Here’s how it works:
1. Install the Masquerade module from http://drupal.org/project/masquerade.
2. Enable the module.
3. Go to Structure and then Block.
4. Publish the Masquerade block into a region on your site. In this example, choose the Second Sidebar region.
5. Visit the front of your site, and you see the block published and showing a search box.
6. Type in the name of the user you want to test. In this example, type blogger, as shown in Figure 13.16.
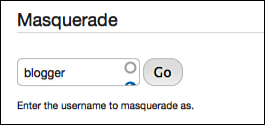
7. Click Go.
The Masquerade block now changes and shows the message that you see in Figure 13.17. Don’t worry: By default, this block appears only for administrators.
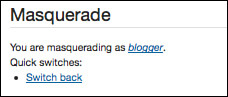
You can now browse the site and see exactly what the blogger user would see. Simply click the switch back link in the Masquerade block, and you’ll be back at the administrator account.
Second Example
Now that you finished creating the Blogger account, go through that process once more. In this second example, create a slightly more powerful role. This role is the Company Editor. He can manage all the submissions to the Companies content type.
Step 1: Add a Role
1. Click People on the black menu bar and then on the Permissions tab.
2. Type Company Editor into the field under the four existing roles.
3. Click Add role.
Step 2: Set Permissions
1. Click the smaller Permissions tab.
2. Scroll down until you find the Node module.
3. Find the Companies content type permissions area.
4. Check the Companies entry: Create a new content box in the Company Editor column.
5. Check the Companies entry: Edit your own content box in the Company Editor column.
6. Check the Companies entry: Edit any content box in the Company Editor column.
7. Check the Companies entry: Delete your own content box in the Company Editor column.
8. Check the Companies entry: Delete any content box in the Company Editor column.
9. Click Save Permissions at the bottom of the screen.
2. Click Add user in the top-left corner.
![]() Username: companyeditor.
Username: companyeditor.
![]() E-mail address: [email protected].
E-mail address: [email protected].
![]() Password: companyeditor. Again, you can set this to something more difficult if you want. Drupal warns you that this is a weak password.
Password: companyeditor. Again, you can set this to something more difficult if you want. Drupal warns you that this is a weak password.
![]() Roles: Check the Company Editor box.
Roles: Check the Company Editor box.
3. Click Create new account.
Step 4: Test the User Account
1. Visit the front page of your site.
2. Use the Masquerade module to see the site as the companyeditor user.
3. Go to Resources and then Companies on the Main menu.
4. Access any company listing, and you can edit or delete the listing.
5. Look in the Navigation block, and the only content you can create is in the Companies content type.
Note that Drupal takes a specific stance on security: Permissions are usually denied by default. Drupal does this to make sure that your site is as safe as possible. However, it does lead to extra clicking every time you set up a new feature. Every time you add a new content type or a new module, you need to check the permissions. Remember in early chapters when discussing the FITS workflow for adding new modules: Part of the final step in that workflow (Set Up) is to go to the People tab and set up the permissions for the module.
One common source of confusion in this regard is the Search module. You need to go to the People menu link and expressly give different roles permission to use search on your site.
Third Example
Now see one final example of user permissions, this time using more modules, instead of just the Node module.
You set up a role called Moderator. People in this role can moderate comments and forum posts. These people help to make sure that your site is a pleasant and spam-free destination.
2. Type Moderator into the field under the five existing roles.
3. Click Add role.
Step 2: Set Permissions
1. Click the smaller Permissions tab.
2. Scroll down until you find the Comment module.
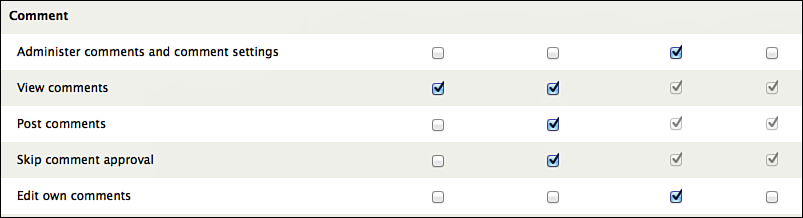
3. Check the Administer Comments and Comment Settings box in the Moderator column.
4. Scroll down until you find the Forum module.
5. Check the Administer Forums box in the Moderator column. This allows the Moderator to rearrange the forum boards if needed.
6. Scroll down until you find the Node module.
7. Check all five boxes for the Forum Topic Content Type in the Moderator column.
8. Scroll down until you find the User module.
9. Check the Administer Users box in the Moderator column. This allows the Moderator to ban users who spam or post inappropriate content.
10. Check the View User Profiles box in the Moderator column.
11. Click Save Permissions at the bottom of the screen.
Step 3: Add a User
1. Click the List tab at the top of the screen.
2. Click Add User in the top-left corner.
![]() Username: moderator
Username: moderator
![]() E-mail address: [email protected]
E-mail address: [email protected]
![]() Password: moderator (As before, you can set this to something more difficult if you want.)
Password: moderator (As before, you can set this to something more difficult if you want.)
![]() Roles: Check the Moderator box.
Roles: Check the Moderator box.
3. Click Create new account.
2. Use the Masquerade module to see the site as the moderator user.
3. Go to Forums on the Main menu.
4. Access any forum topic, and you can edit or delete the topic.
If there is a comment on a topic, you can moderate it using the delete and edit links, as shown in Figure 13.18.
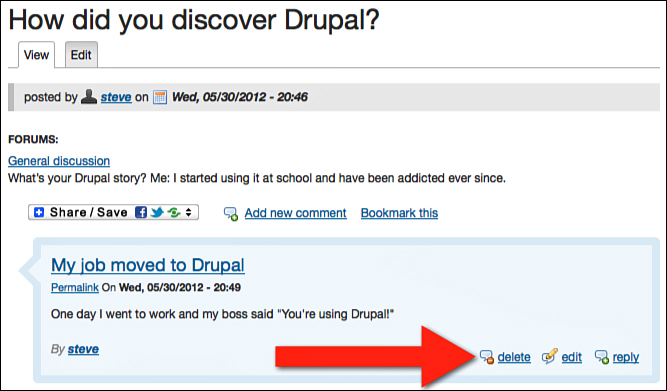
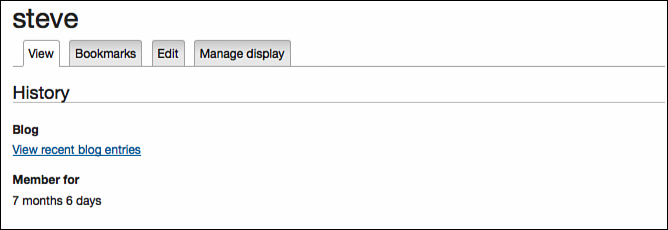
5. Click any user’s account name, which will be linked as shown in Figure 13.19.

You can see the user’s profile, as shown in Figure 13.20.
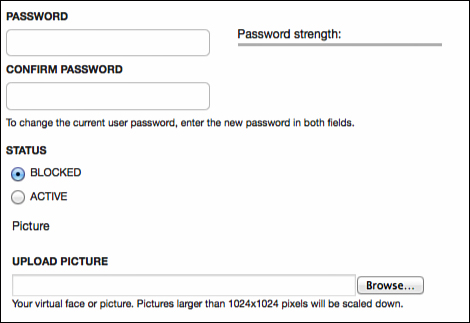
If you think the user needs moderating, you can now set the user’s status to blocked, as shown in Figure 13.21. Note: Do not try this with your own administrator account!
Drupal User Profiles Explained
At the end of the last section, you saw a user profile on your site.
By default, a user account collects basic information about the user. Most of that information is not visible to visitors or other users on the site.
Drupal makes it easy to modify and expand this profile so that people can add useful information about themselves such as their name, address, employer, URLs, biography, and more.
Now see how to create expanded user profiles. The process is similar to adding fields to a content type.
Before you start, make sure you have used the Masquerade module to switch back to the administrator account.
Create the Profile Fields
Go ahead and add some fields to your user profiles. This allows users to provide more information about themselves:
1. Click Configuration on the black menu bar and then on Account Settings.
2. Click the Manage fields tab in the top-right corner.
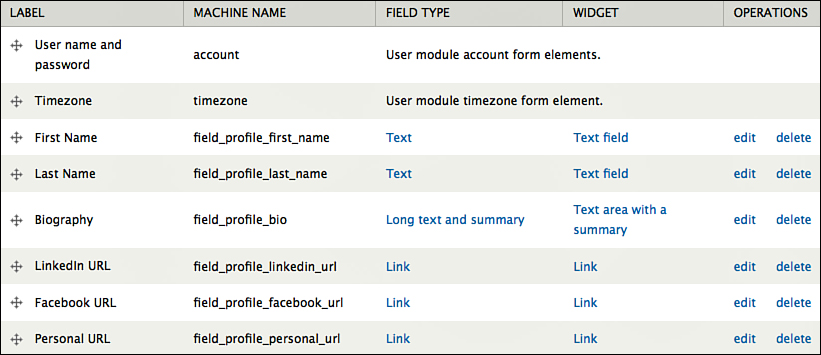
You can now see a screen, such as the one in Figure 13.22, which looks similar to the content type pages you saw earlier.

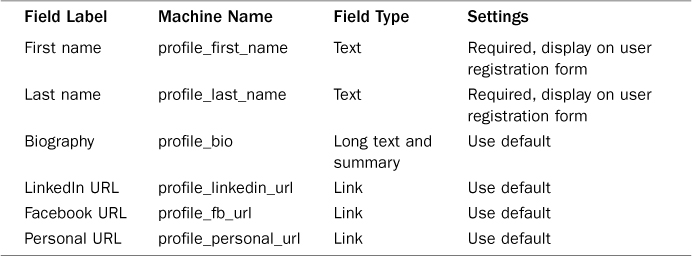
3. Add the fields shown in Table 13.1. Use exactly the same process that you did in Chapter 6, “Drupal Fields Explained,” when adding fields to content.
When you finish adding those six fields, your screen should look like Figure 13.23.
Go and see those user profile fields that you just created:
1. Visit the front page of your site.
2. Click My account on the Main menu.
3. Click the Edit tab.
4. Scroll down and you can use all the fields that you just created.
Also see how these fields appear to your site’s users. For many users, this user profile editing area should look similar, but slightly different:
1. Use the Masquerade module to browse the site as the blogger user.
2. Click My account on the Main menu.
3. Click the Edit tab.
Did you notice that the fields don’t show in a pop-up as they did when you were browsing the site as an administrator? This is because you haven’t given the Blogger role permission to use the Overlay module. The Overlay module puts Drupal’s administration area into a pop-up. This is just one of many examples of different permissions between a user in an administrator role and a lower-level role, such as a Blogger.
However, even viewing the site as a Blogger, all the user profile fields that you created are available to you, as shown in Figure 13.24. Users can also upload a profile picture of themselves—thanks to a default setting in Drupal.

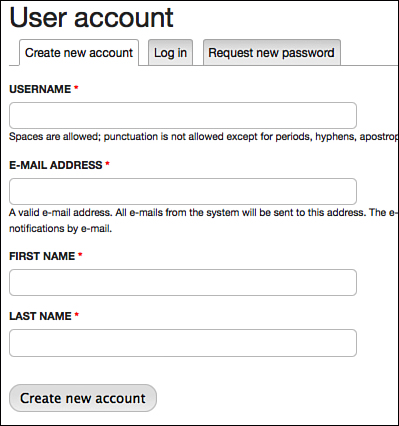
Finally, see how this appears to a new user:
1. Click Log Out on the Main menu.
2. Click Create New Account in the User Login block.
The registration screen should look like Figure 13.25. The First Name and Last Name fields show because, when creating these fields, you checked the boxes marked Display on User Registration Form. If you want to customize the emails that users receive when they register, log in as an administrator, and go to Configuration and then Account settings.
What’s Next?
At the end of this chapter, you completed your site building.
We mentioned that at the end of Chapter 12, “Drupal Layout Modules Explained,” you had completed all the visible changes you were going to make to your site. However, the previous chapter was not the end of our Drupal workflow, which is shown in Figure 13.26.

User permissions are the last step in our Drupal workflow for a logical reason: it’s not until every part of the site has been created that we can accurately browse the site and test the user permissions.
Now that our Drupal workflow is complete, we’re going to discuss how you maintain a completed Drupal site. In the final chapter of this book, “Drupal Site Management Explained,” we’ll show you how to maintain and secure a Drupal site.