
12. Drupal Layout Modules Explained
This chapter is the end result of nearly everything covered in the book so far. This chapter covers almost everything you’ve seen so far, from content, fields, and modules to themes, blocks, and views. You see how to take all those elements and lay them out on the page in the way that you want.
You focus on two modules—Display Suite and Panels—which enable you to control the layout of your Drupal content. You need these modules because there is a limit to the layout options provided by themes. Display Suite enables you to accurately control the layout of individual content items. Panels enables you to combine different elements from across your site.
This chapter is the last one in which you focus on building and designing your site. After this, you focus on how to manage and maintain your site.
After reading this chapter, you should be able to
![]() Use Display Suite to control the layout of existing content.
Use Display Suite to control the layout of existing content.
![]() Use Panels to create new pages.
Use Panels to create new pages.
![]() Understand how the Drupal Workflow takes you logically, step-by-step from Chapter 5, “Drupal Content Explained,” to the end of this chapter.
Understand how the Drupal Workflow takes you logically, step-by-step from Chapter 5, “Drupal Content Explained,” to the end of this chapter.
Display Suite Explained
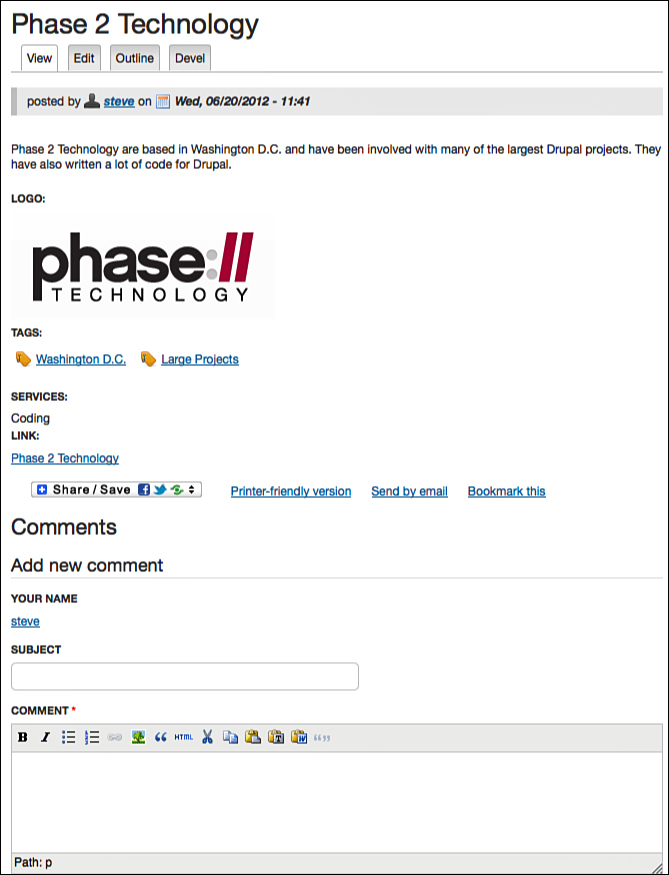
The first module that you tackle in this chapter is Display Suite. What is the purpose of Display Suite? Well, look at your current content. Figure 12.1 shows a site listing. All the details on the page from the title to the comments display vertically.

The same is true of your other content types: They all have the same top-to-bottom layout. Figure 12.2 shows an example from your Companies content type.
In the first part of the chapter, you install Display Suite and redesign the layout of this content.
Installing Display Suite
Use the FITS workflow to get Display Suite running on your site:
1. Go to http://drupal.org/project/ds and copy the link for the Drupal 7 version of Display Suite.
2. To install, go back to your site and install Display Suite.
3. To turn on Display Suite, you need to check only the Display Suite and Display Suite UI boxes.
4. To set up, read on because that’s our next step.
Using Display Suite
Display Suite greatly enhances the Manage Display screen that you have seen in earlier chapters:
1. Go to Structure, Content types, and then click Manage Display next to Sites.
This screen should look exactly the same as it did in earlier chapters, except for two extra tabs at the bottom of the screen.
2. Click the Select a Layout drop-down, as shown in Figure 12.3.

In this drop-down you can see a variety of layout options, as shown in Figure 12.4. You can choose from a variety of one to four column layouts.

3. Choose the Two Column option and you see a preview, as shown in Figure 12.5. Choose the other options one-by-one to get a preview of all the layout options.
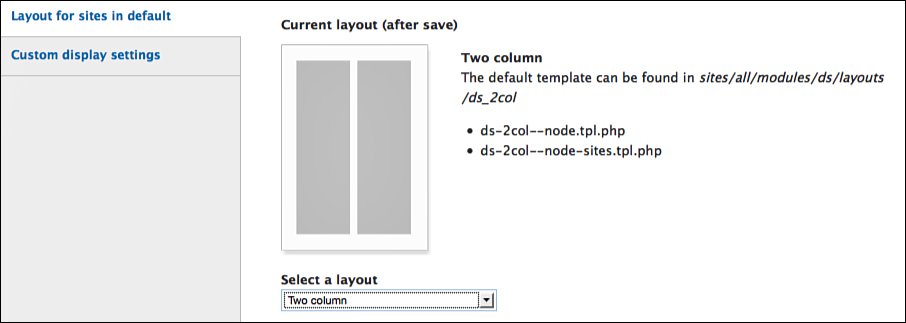
4. Choose the Two Column option again.
You now see that the page changes substantially. One of the most important changes is that different areas have now appeared in the list of field. You can see Left, Right, and Disabled areas, as shown in Figure 12.6.

6. Select the Screenshot field, and using the drag-and-drop feature that you’ve seen before, move it into the Right area.
7. Click the cog on the right side of the Screenshot row.
8. Change Image style to Medium.
9. Click Update.
10. Click Save at the bottom of your screen.
11. Visit the homepage of your site and search for DrupalModules.com. It should now look like Figure 12.7.

You can do several additional things to tidy up this page. For example, the labels take up too much space, and you’re missing your comments area.
Fortunately, it’s now easy to access your Display Suite options because there’s a Manage Display tab over the content, as shown in Figure 12.7:
1. Click the Manage Display tab.
2. At the bottom of the screen, in the Layout for Sites in Default Area, change Two Column to Two Column Stacked.
3. Click Save.
4. Click Save again, without changing the default settings for moving fields.
5. In the Tags row, set the Label option to Inline.
6. In the Official Sites row, set the Label option to Inline.
7. In the Topics row, set the Label option to Inline.
8. In the Vote row, set the Label option to Inline.
9. In the Screenshot set the Label option to Hidden.
10. Move the Comments field out of the Disabled area and into the Footer area.
11. Check that your fields now look like Figure 12.8.
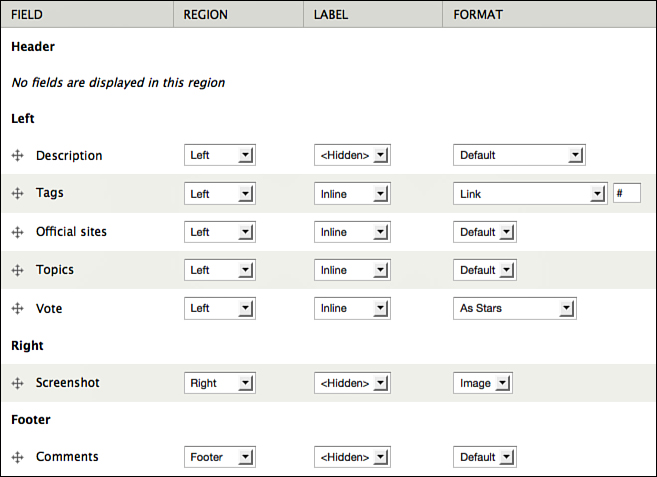
12. Click Save.
13. View your DrupalModules.com content again, which should look like Figure 12.9.

Now repeat that process with another content type:
1. Go to Structure, Content types, and then click manage display next to Companies.
2. Under Layout for companies in default, choose the Three Column Stacked - Equal Width option.
3. Click Save.
4. Move the Logo field to the Right column and hide the label.
5. Change the Image style for the Logo field to scale_90w. Don’t forget to click Update.
6. Move the Tags field to the Middle column and place the label inline.
7. Move the Services field to the Middle column and place the label inline.
8. Move the Link field to the Middle column and place the label inline.
9. Move the Languages Spoken field to the Middle column and place the label inline.
10. Move the Comments field into the Footer area.
11. Check that your fields now look like Figure 12.10.

13. View a company listing on your site, and it will look like Figure 12.11.

Using Display Suite for Other Layouts
Display Suite can modify your normal content pages, but it can also be used elsewhere on your site. For example, you may decide that your Articles page needs improvement:
1. Go to your site’s homepage, Resources in the Main menu, and then Articles, and you see a screen, as shown in Figure 12.12. The layout of the articles on this page could definitely be improved.

2. Go to Structure, Content types, and click Manage Display next to Article.
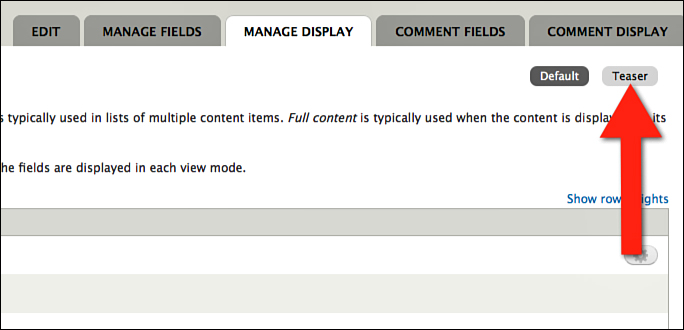
3. Click the Teaser button in the top-right corner of the screen, as shown in Figure 12.13.
4. Under Layout for article in teaser, choose the Fluid two-column stacked option.
6. Change the Image style for the Logo field to scale_90w. Don’t forget to click Update.
7. Move the Body field to the Right column.
8. Move the Tags field to the Disabled area.
9. Move the Title field to the Header area.
10. Move the Post Date field to the Header area.
11. Move the Read More field to the Footer area.
12. Check that your fields now look like Figure 12.14.

13. Click Save.
14. View the Articles page on your site. It should look like Figure 12.15.

You can also modify other displays beyond the Teaser. If you’re in the manage display screen, click Custom Display Settings, and you’ll see that you can alter the layout of other displays, as shown in Figure 12.16.

Advanced Display Suite
If Display Suite did only what we’ve seen so far, it would be a useful module. However, it goes much further and has many more features than are covered in this book. In this section, you get a glimpse into what else is possible with Display Suite.
Search for and find the Washington D.C. Drupal content item on your site. It currently looks like Figure 12.17.

You can move the map inside the main area so that it’s part of the content, rather than isolated in the right column:
1. Click the Manage display tab at the top of the content.
2. Under Layout for user group name in default, choose the two-column stacked option.
3. Click Save.
4. Move the Description field to the Left column.
5. Move the Organizers field to the Left column.
6. Move the User Group Website field to the Left column.
7. Move the User Group Location field to the Right column.
8. Move the Tags field to the Disabled area.
9. Move the Comments field to the Footer area.
10. Scroll down to the Custom Fields area, as shown in Figure 12.18.
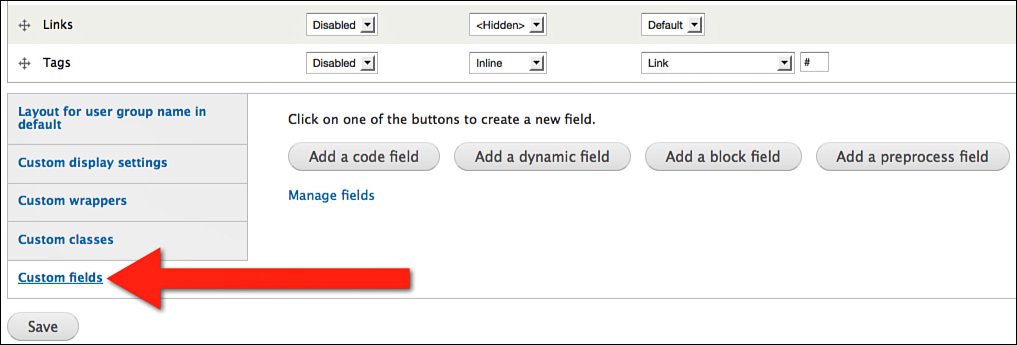
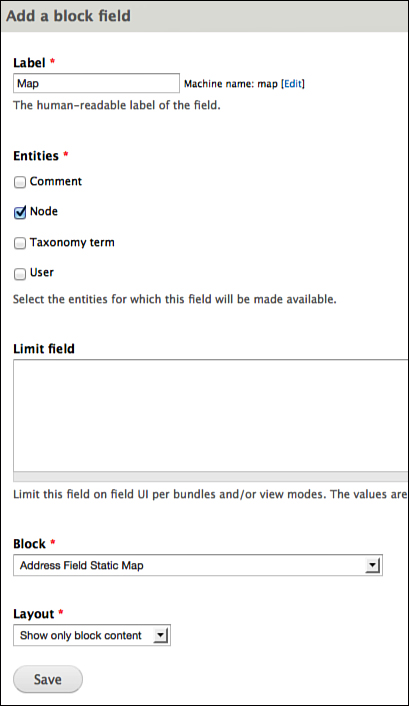
11. Click Add a Block field and you see a pop-up screen.
12. Enter Map into the Label field.
13. Under Entities, choose Node.
14. Under Block, choose Address Field Static Map.
15. Under Layout, choose Show Only Block Content.
16. Check that your fields now look like Figure 12.19.
17. Click Save.
18. Move the new Maps field into the Right column.
19. Make sure the Maps field is ordered underneath the User Group Location field.
20. Click Save.
21. View your Washington D.C. Drupal content again and it should look like Figure 12.20.

To finish setting up your user group content type, you can now unpublish the Address Field Static Map block:
1. Go to Structure and then Blocks.
2. Move the block to the Disabled area by selecting None.
3. Click Save blocks.
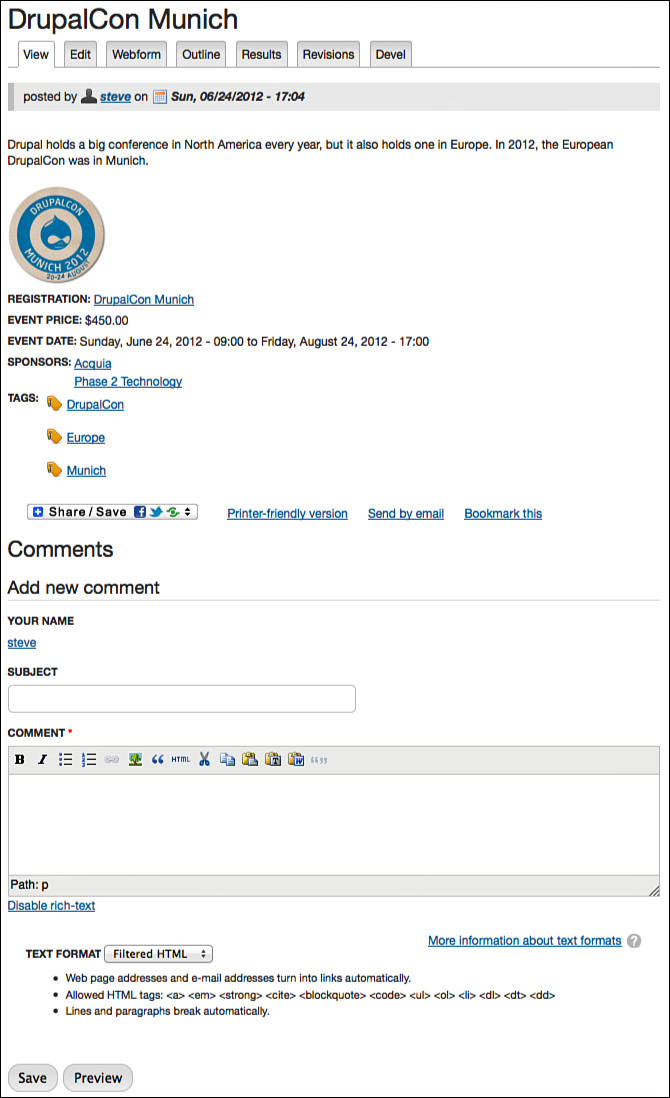
Now, see one more example from Display Suite. The beginning of this chapter mentioned that you were going to cover almost everything you’ve seen so for, from content, fields, and modules to themes, blocks, and views. As you go through this final Display Suite example, see if you can pinpoint all those elements from earlier in this book. Go and find the DrupalCon Munich content item. It should look like Figure 12.21.
1. Click the Manage display tab at the top of the content.
2. Under Layout for Events in default, choose the Three-Column Stacked - Equal Width option.
3. Click Save.
4. Move the Description field to the Left column.
5. Move the Event Logo field to the Left column and hide the label.
6. Change the Image style for the Event Logo field to thumbnail. Don’t forget to click Update.
7. Move the Event Price field to the Middle column.
8. Move the Event Date field to the Middle column.
9. Move the Registration field to the Middle column.
10. Move the Sponsors field to the Middle column.
11. Click the cog in the Sponsors row, and check the box Link label to the referenced entity. Don’t forget to click Update.
12. Move the Tags field to the Middle column.
13. Move the Comments field to the Footer column.
14. Move all remaining fields to the Disabled area.
Now add some more Advanced Display Suite features:
1. Go to Custom fields and click Add a block field.
2. Set the Label to Other Upcoming Events.
3. Check Node in the Entities box.
4. Choose View: Events: Upcoming in the Block option.
5. Click Save.
6. Move the Other Upcoming Events field to the Right column. Make sure that the label is set to Above.
Now repeat that process you just did to add social bookmarks to this page:
1. Go to Custom fields and click the Add a Block field.
2. Set the Label to Social Bookmarks.
3. Check Node in the Entities box.
4. Choose AddtoAny buttons in the Block option.
5. Set the Layout to Show only block content.
6. Move the Social bookmarks field to the Right column. Make sure that the label is set to Above.
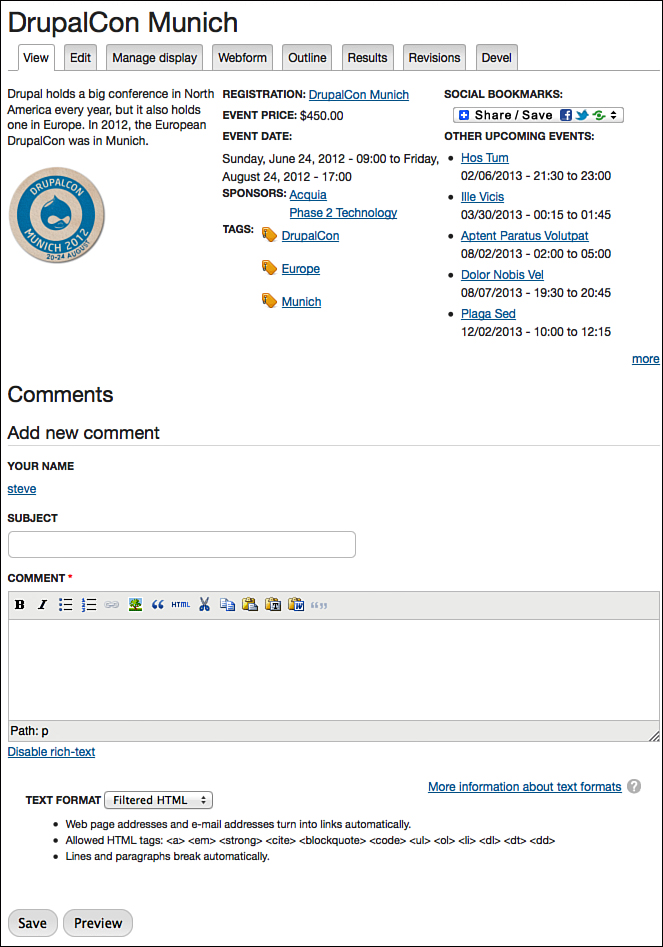
7. Click Save and visit your DrupalCon Munich content item. It should look like Figure 12.22.
Now see what else is available to use when you create pages with Display Suite:
1. Click Manage Display to go back to the Display Suite screen.
2. Go to Custom fields and click Add a Dynamic field.
3. Set the Label to Extras.
4. Check Node in the Entities box.
5. Click Save.
6. Move the Extras field to the Footer column.
7. Click the cog in the Extras row, and you can see an area open up, as shown in Figure 12.23.
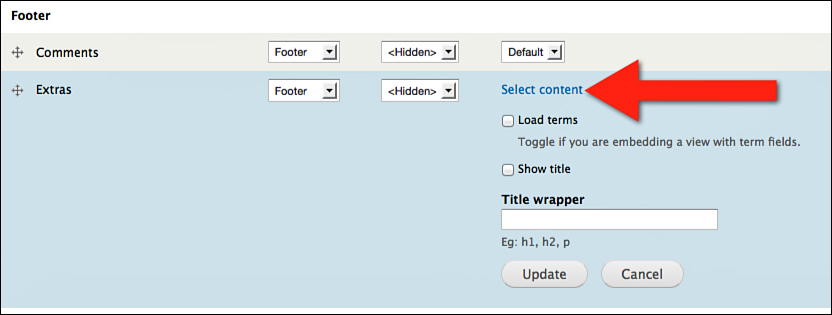
8. Click the Select content link, as shown in Figure 12.23.
9. You now see a pop-up box like the one shown in Figure 12.24.

The options on the left side in Figure 12.23 contain almost everything you created in the book so far, plus much more. All these items are available to be placed into your Events pages:
1. Click through all the items in the left column, from Activity down to Widgets, to see what’s available to you.
2. Experiment by adding some of these items to your content.
3. If you make a mistake with any item, you can always modify the field by clicking the cog in the Extras row and clicking Edit Content.
4. You can also manage these custom fields by going to Structure, Display Suite, and then clicking Fields in the top-right corner.
Panels Explained
The first part of this chapter showed you how you can control the layout of individual content items with Display Suite. However, Display Suite has its limits. It is not well suited for creating new pages. For example, if you want to create a new homepage for your site, Display Suite would be of limited use. If you want to create new pages, rather than redesign existing pages, you should use the Panels module. In this section, we see how Panels works.
Install Panels
To install panels, follow these steps:
1. Find the link for Panels from http://drupal.org/project/panels.
2. To install use the link to install Panels into your site.
3. To turn on, in the Panels area, check the boxes for Panel nodes, Panels, and Panels In-Place Editor. Also, in the Chaos Tools suite area, check the boxes for Page Manager and Views content panes.
4. To set up go to Structure and then Panels.
Panels User Interface
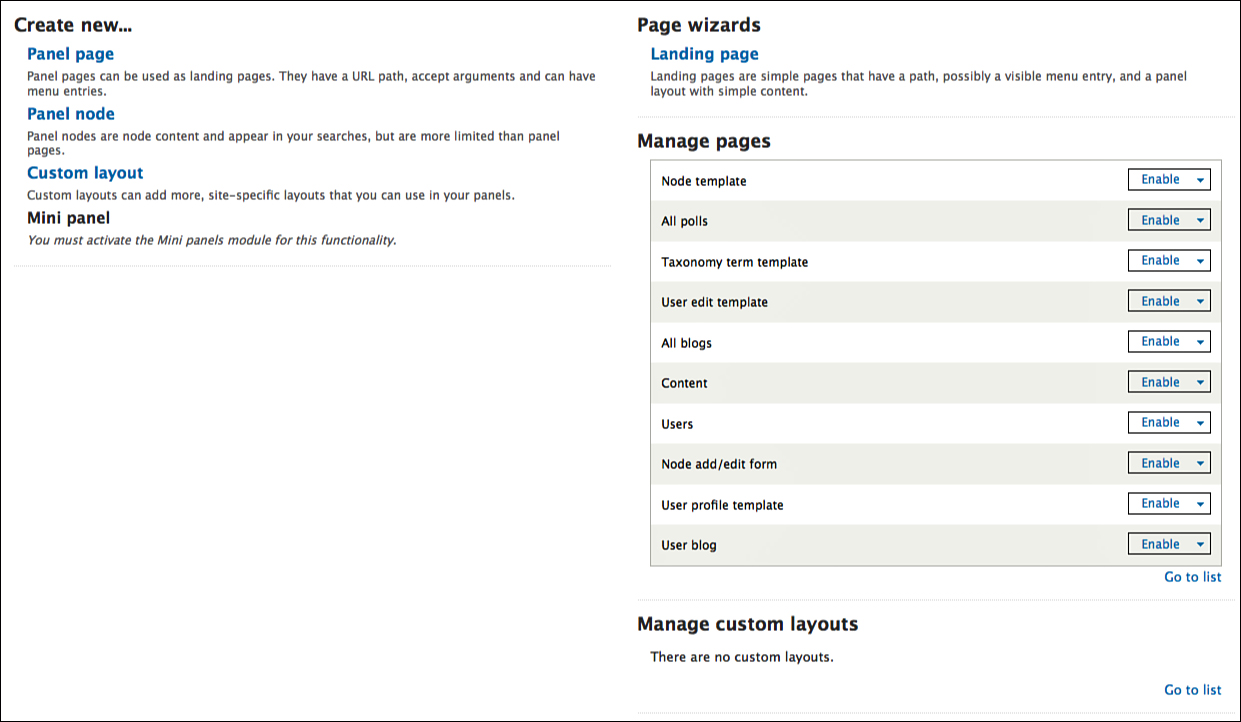
Now that you’re in the main Panels screen, what you see should look like Figure 12.25.
Do the following:
1. Click Panel page on the top of the left side.
2. Enter homepage for the Administrative title.
3. Enter homepage for the path.
4. Check the box that says Make This Your Site Home Page. You screen should look like Figure 12.26.

5. Click Continue.
6. Choose Columns: 2 and Two column stacked, as shown in Figure 12.27.

7. Click Continue.
8. Click Continue again.
9. You see a screen like the one shown in Figure 12.28. Earlier, you chose a two-column stacked layout, and that’s what you see now.

Our next task with Panels is similar to one we completed earlier in this book with Display Suite. You’re going to use Panels in a way that allows you select from all the content that you previously created in this book:
1. Click the cog in the top-left corner of the Top area, as shown in Figure 12.29.

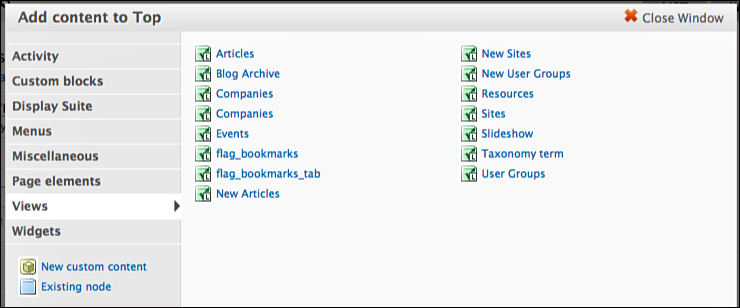
2. Click Add content.
3. You can now see a pop-up, as shown in Figure 12.30. This pop-up contains a list of options similar to Display Suite.

4. Click Views, and you see a screen like Figure 12.31.
5. Click Slideshow.
6. Click Continue.
7. Check the Override title box.
8. Click Finish. You’ll now see that the slideshow is in the Top region, as shown in Figure 12.32.

9. Click the cog in the top-left corner of the Left area.
10. Click Views.
11. Click New User Groups.
12. Click Continue.
13. Click Finish.
14. Click the cog in the top-left corner of the Right area.
15. Click Views.
16. Click New Sites.
17. Click Continue.
18. Click Finish.
19. Click the cog in the top-left corner of the Bottom area.
20. Click Existing node.
21. Type About Us into the area named Enter the Title or NID of a Node.
22. Click Finish. Your screen will now look like Figure 12.33.
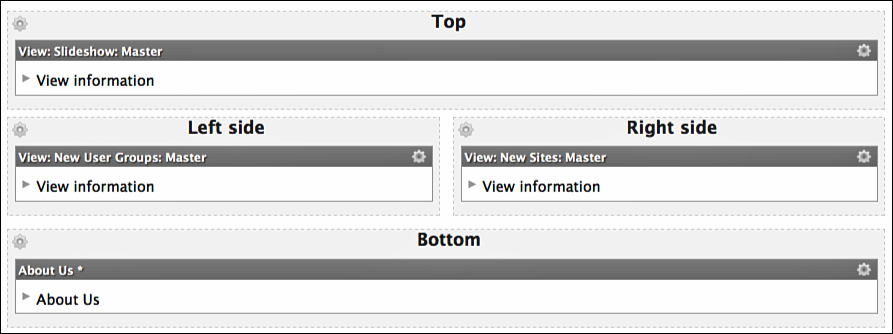
23. Click Finish.
24. Set the Title type drop-down to No Title, as shown in Figure 12.34.
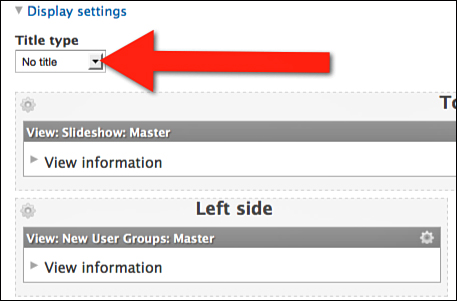
25. Click Update and save.
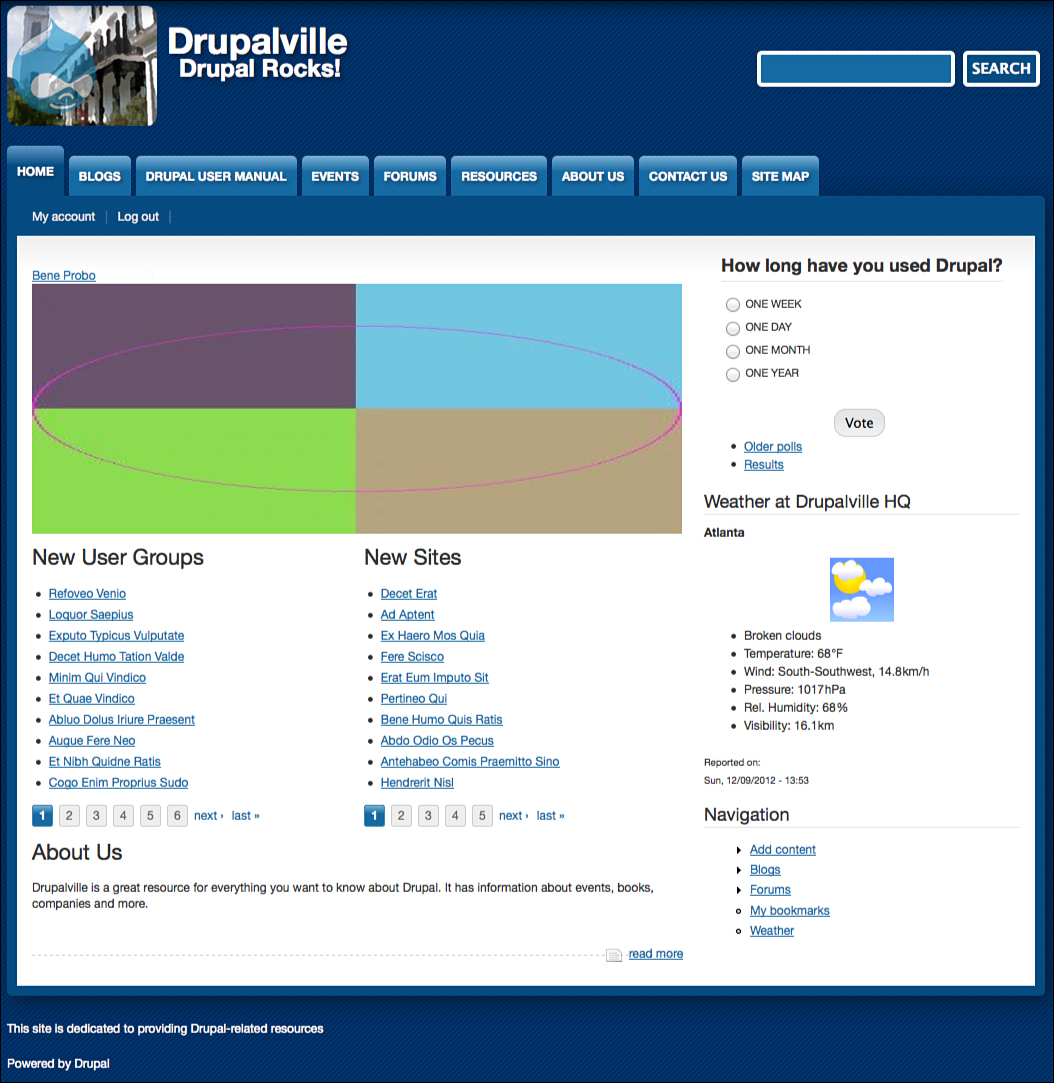
Visit your site’s homepage. It should now look like Figure 12.35.

If you want to make any modifications to this Panel, do what you did with Views: Hover over the homepage and click the Edit Panel in the top-right corner, as shown in Figure 12.36.

As with Fields, Modules, Themes, Views, and Display Suite, there is much more to Panels than covered in this book.
Panels can do everything that Display Suite did in the first part of this chapter. The main reason Display Suite is recommended for those tasks is that it’s a little easier to use.
The recommendation is to use Display Suite to modify existing pages and to use Panels for creating new pages.
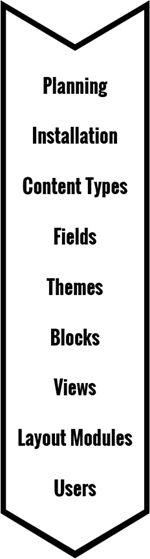
The Drupal Workflow Explained
What you’ve seen in this chapter is that layout modules, such as Display Suite, are the culmination of everything you’ve done so far. It’s also a prefect example of the Drupal workflow that you can see in Figure 12.37.
Now think back to your DrupalCon Munich page as an example.
What did you do so that the DrupalCon Munich content item can appear as it does now?
1. Create a content type: Events.
2. Add fields: Event Logo, Event Price, Sponsors, and so on.
3. Add a theme: Marinelli
4. Create views: Upcoming Events.
5. Use layout modules: Display Suite.
You took all those five steps, in that particular order, to create this content item. If you tried to skip any steps or do them in a different order, it wouldn’t have worked:
![]() You can’t add fields before you’ve created a content type.
You can’t add fields before you’ve created a content type.
![]() You can’t add content until you have the correct content types and field.
You can’t add content until you have the correct content types and field.
![]() Your views won’t display unless you have content.
Your views won’t display unless you have content.
![]() You can’t use layout modules if you haven’t any fields, content, or views available.
You can’t use layout modules if you haven’t any fields, content, or views available.
To take another example: What did you do to create your homepage?
1. Create content types: Articles, User Groups, and Sites.
2. Add fields: Articles, User Groups, and Sites all needed fields.
3. Add a theme: Marinelli
4. Create views: The slideshow, plus New User Groups, and New Sites.
5. Use layout modules: Panels.
This is a workflow that is tailored specifically for Drupal. This workflow wouldn’t apply if you built websites with other software, for example, if you build websites with Dreamweaver, WordPress, Joomla, or other software.
This does not mean that Drupal is better than these other softwares. However, this does mean that Drupal is different. Hopefully, this workflow, shown in Figure 12.37, helps you realize how Drupal is different and how you should approach using it.
If you create your Drupal sites using this workflow, you can build better sites, quicker and with fewer mistakes and less frustration.
At the end of this chapter, your site now looks like Figure 12.38. As always, it’s not important if your site doesn’t match this exactly. What’s important is that you understand the concepts covered.
What’s Next?
You completed all the visible changes to your site. However, there is one more important step in the Drupal Workflow that you haven’t addressed yet: users. You have been viewing the site as administrators. What about the visitors? What about the people who view, create, and edit the content on your site?
Click Log Out in the top-right corner of your screen on the black bar. You see that your site now looks like Figure 12.39. You also see several differences between this view and the one in Figure 12.38.

In Chapter 13, “Drupal Users Explained,” you see why those differences exist and how you can manage them successfully.