11. Drupal Views Explained
Views is the most popular module in Drupal. It’s estimated that more than 75 percent of Drupal sites use Views. In fact, Views is so close to being an indispensable module that it will become part of Drupal 8.
So, why is Views so popular?
Because Views enables you to do many things that you can’t do with default Drupal. Here are some examples:
![]() Display: Views enables you to create your own pages, blocks, RSS feeds, and more.
Display: Views enables you to create your own pages, blocks, RSS feeds, and more.
![]() Format: With default Drupal, you can display content only in a blog format, as with your current homepage. Views enables you to format information in tables, grids, lists, slideshows, calendars, and much more.
Format: With default Drupal, you can display content only in a blog format, as with your current homepage. Views enables you to format information in tables, grids, lists, slideshows, calendars, and much more.
![]() Fields: With Views, you can display only the fields that you want. You can show, hide, reorder, and change the display of fields as you choose.
Fields: With Views, you can display only the fields that you want. You can show, hide, reorder, and change the display of fields as you choose.
![]() Filter: With default Drupal, it’s hard to select only certain content to show. For example, you can’t choose to show only content from a single content type. Views enables you to filter based on content type, taxonomy terms, publication date, or many other criteria.
Filter: With default Drupal, it’s hard to select only certain content to show. For example, you can’t choose to show only content from a single content type. Views enables you to filter based on content type, taxonomy terms, publication date, or many other criteria.
![]() Sort: With default Drupal, you can sort content only by showing the most recently published content first. Views enables you to sort alphabetically, by popularity, by author name, or by any criteria you choose.
Sort: With default Drupal, you can sort content only by showing the most recently published content first. Views enables you to sort alphabetically, by popularity, by author name, or by any criteria you choose.
So far in this book, you’ve added a lot of information to your site. In Chapters 5, “Drupal Content Explained,” and Chapter 6, “Drupal Fields Explained,” you spent time creating content types and fields. In Chapter 7, “Drupal Modules Explained,” you added modules such as Bookmarks and Fivestar ratings.
Now that you have all that content, you can use Views to present it to your site’s visitors in ways that are interesting and useful for them.
At the end of this chapter, you should be able to
![]() Create blocks and pages using Views.
Create blocks and pages using Views.
![]() Create calendars and slideshows with Views.
Create calendars and slideshows with Views.
![]() Learn to create views by thinking of the Display, Format, Fields, Filter, and Sort features that were just mentioned.
Learn to create views by thinking of the Display, Format, Fields, Filter, and Sort features that were just mentioned.
![]() Use modules to help you expand the features of Views.
Use modules to help you expand the features of Views.
Plan
You can use Views to create much of your site’s structure. Here’s an overview of all the blocks and pages that you can use Views to create.
You can use Views to create the following blocks:
![]() New Articles
New Articles
![]() New Sites
New Sites
![]() New Companies
New Companies
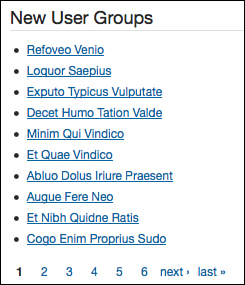
![]() New User Groups
New User Groups
![]() Archived Blogs
Archived Blogs
![]() Upcoming Events
Upcoming Events
![]() Slideshow
Slideshow
You can also use Views to create the following pages:
![]() Resources landing page
Resources landing page
![]() Articles sublanding page
Articles sublanding page
![]() User Groups sublanding page
User Groups sublanding page
![]() Sites sublanding page
Sites sublanding page
![]() Companies sublanding page
Companies sublanding page
![]() Events landing page
Events landing page
Views is a popular module, but it can also be a lot to learn. You start slowly by creating some blocks, creating some pages, and then moving on and creating some more exciting displays using slideshows and calendars.
Installing the Views Modules
In Chapter 7, you installed Drupal modules using the FITS workflow: Find, Install, Turn On, and Set Up. It’s time to put those skills to use again:
1. Find the following modules:
![]() Views: http://drupal.org/project/views
Views: http://drupal.org/project/views
![]() Devel: http://drupal.org/project/devel
Devel: http://drupal.org/project/devel
2. Install those two modules.
3. Turn on the following modules:
![]() Devel
Devel
![]() Devel generate
Devel generate
![]() Views
Views
![]() Views UI
Views UI
4. Now you set up the modules. In the following section, you set up the Devel module and then Views.
Generating Sample Content Explained
The Devel module provides a quick way to generate sample content that you can use to test your Views blocks and pages. Now create some content quickly and easily so you can see your Views come to life:
1. Click Configure on the black menu bar.
2. Locate the Development links on the right side of the screen, as shown in Figure 11.1.

3. Click Generate content. You see a new screen and at the top are the options shown in Figure 11.2. Make sure that all the boxes are checked.

4. Increase the number of nodes to generate from 50 to 1000.
5. Check the box labeled Add a URL Alias for Each Node.
6. Click Generate.
7. You’ll see a progress bar across the screen. When the progress bar is finished, you’ll see a message across the top of the screen saying that the content was generated successfully. Visit the front of your site, and you’ll see lots of dummy content, as shown in Figure 11.3. The content is all in Latin.

Creating Blocks with Views Explained
In the following activities, you create five blocks. Each time you create a block, you introduce new options available to you in Views and Drupal. You create the following blocks:
![]() New User Groups: Basic listing of content titles
New User Groups: Basic listing of content titles
![]() New Sites: Basic listing of content titles
New Sites: Basic listing of content titles
![]() New Articles: Basic listing of content titles plus post date
New Articles: Basic listing of content titles plus post date
![]() New Companies: Basic listing of content titles plus an image with a custom style
New Companies: Basic listing of content titles plus an image with a custom style
New User Groups Block
When creating a view, there are five things to plan, which were mentioned in the introduction to this chapter: Display, Format, Fields, Filter, and Sort. Here are our choices for the User Groups Block:
![]() Display: Block
Display: Block
![]() Format: HTML list
Format: HTML list
![]() Fields: Title
Fields: Title
![]() Filter: User Groups content type
Filter: User Groups content type
![]() Sort: Newest first
Sort: Newest first
Note: We like to use memorable acronyms, such as FITS, to help people remember easily. Unfortunately, DFFFS is hard to pronounce, but we’ll use it again to remind you of these five options.
Step 1: Create a New User Groups Block
1. Click Structures and then Views.
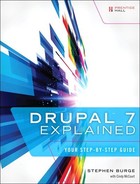
2. Click Add New View. You see a screen that looks like Figure 11.4. This is the first of the two main Views screens. This screen is for creating views. There’s also another screen for editing views that you see later.
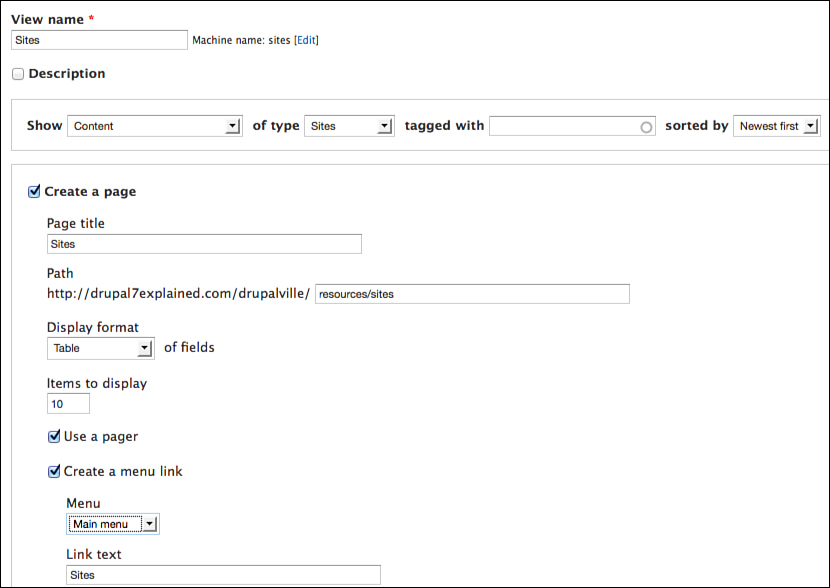
First, tackle the general settings at the top of the page, as shown in Figure 11.5:
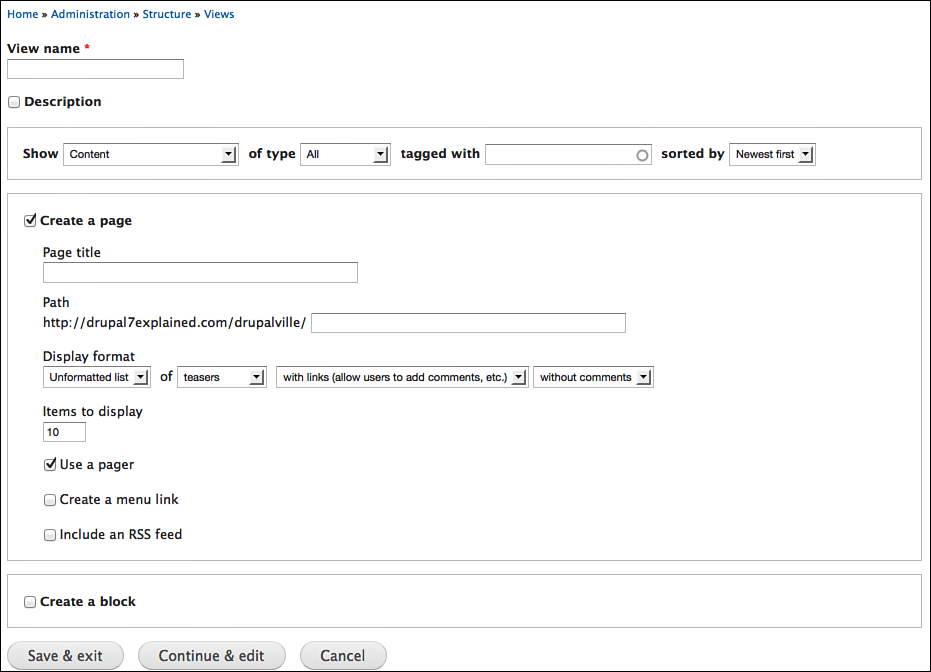
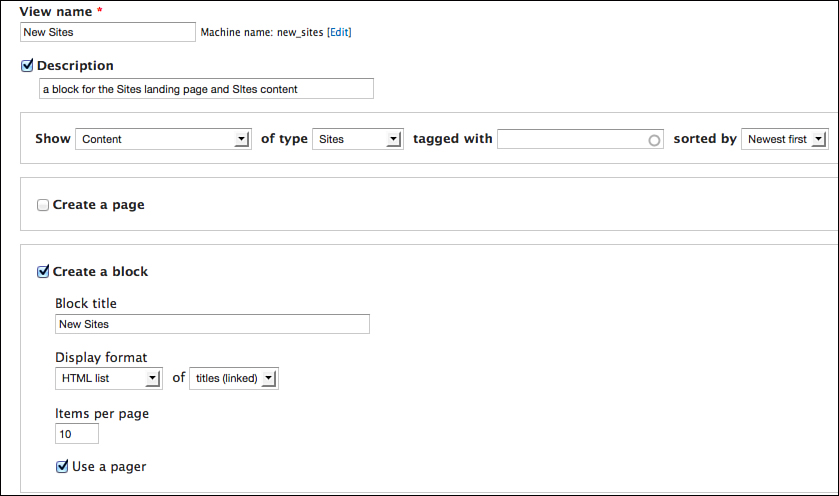
1. View name: New User Groups.
2. Check the box for Description and type: A block for the User groups landing page and user groups content.
3. Select User Groups for the Type.
4. Select Sorted By Newest first.

Now, be specific about the type of view that you want to create. Fill in the settings:
1. Uncheck the Create a Page box, as shown in Figure 11.6.
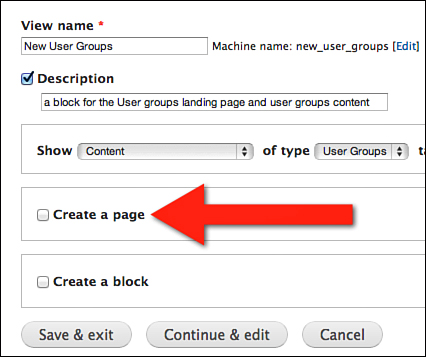
2. Check Create a Block. More settings appear, as shown in Figure 11.7.
![]() Select HTML list from Display format.
Select HTML list from Display format.
![]() Change the items per page from 5 to 10.
Change the items per page from 5 to 10.
![]() Check Use a Pager.
Check Use a Pager.
3. Click Save & Exit.
Step 2: Enable New User Groups Block
1. Click Structures and then Blocks.
2. Locate the block you just created. Look under the Disabled list for View: New User Groups.
3. Click Configure for This Block.
4. Place the block into the second sidebar region.
5. Set the block to show on resources/user-groups*. This will show the block on the user groups landing page and all the user groups nodes.
6. Click Save Block.
Step 3: Observe the Results
1. Return to the homepage.
2. Use the search box to search for Washington D.C.
3. Click the listing for the Washington D.C Drupal group. You see a screen that looks like Figure 11.8 and has your new block in the right sidebar.
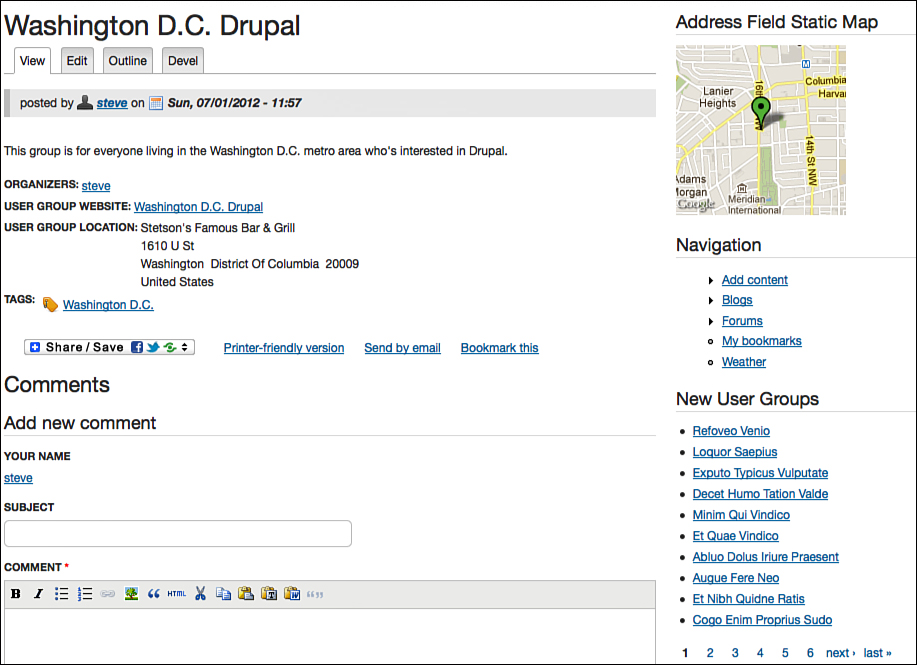
4. Check your block, shown in close up in Figure 11.9, and you can see that your view matches the settings you had planned:
![]() Display: Block
Display: Block
![]() Format: HTML list
Format: HTML list
![]() Fields: Title
Fields: Title
![]() Filter: User Groups content type
Filter: User Groups content type
![]() Sort: Newest first
Sort: Newest first
New Sites Block
Now repeat that process. This time you create a block showing the most recent items added to the Site content type. Here’s the DFFFS plan for this view:
![]() Display: Block
Display: Block
![]() Format: HTML list showing five titles and a pager
Format: HTML list showing five titles and a pager
![]() Filter: Sites content type
Filter: Sites content type
![]() Sort: Newest first
Sort: Newest first
2. Click Add new View.
3. View name: New Sites.
4. Check the box for Description and type: a block for the Sites landing page and Sites content.
5. Select Sites from the type.
6. Uncheck Create a Page.
7. Check Create a Block.
8. Select HTML list from Display format.
9. Change the items per page from 5 to 10.
10. Check Use a Pager.
11. Make sure your settings match, as shown in Figure 11.10.
12. Click Save & Exit.
Step 2: Enable New Sites Block
1. Click Structures and then Blocks.
2. Locate the block you just created. Look under the Disabled list for View: New Sites.
3. Click Configure for This Block.
4. Place it in the second sidebar.
5. Set the block to Show on Resources/Sites* to show the block on Sites Content Only.
6. Click Save Block.
Step 3: Observe the Results
1. Return to the homepage.
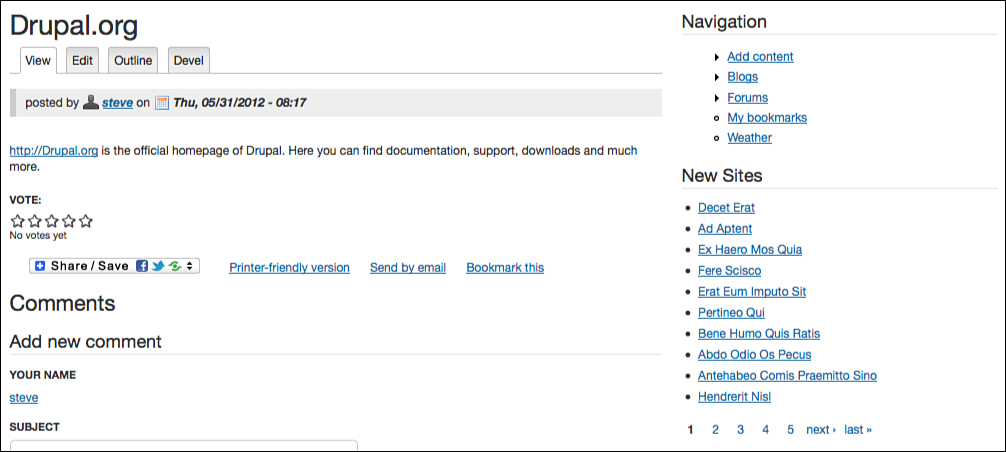
2. Use the search box to search for Drupal.org.
3. Click the listing for Drupal.org. You’ll see a screen that looks like Figure 11.11 and has your new block in the right sidebar. This block will match the Display, Format, Fields, Filter, and Sort options that you had planned.
New Articles Block
Now that you created two blocks using Views, you’re ready to use more of the power that Views gives you. For the first time, you won’t see only the Views creation screen but also the Views editing screen.
In this task, you’re going to show more than just the title of the content. Here’s the DFFFS plan:
![]() Display: Block
Display: Block
![]() Format: HTML list
Format: HTML list
![]() Filter: Article content type
Filter: Article content type
![]() Sort: Newest first
Sort: Newest first
Step 1: Create New Articles Block
1. Click Structures and then Views.
2. Click Add New View.
3. View name: New Articles.
4. Check the box for Description and type: a block for the article content type.
5. Select Article from the type.
6. Uncheck Create a Page.
7. Check Create a Block.
8. Select HTML list from Display format.
9. Change the items per page from 5 to 10.
10. Check Use a Pager.
11. Make sure your settings match, as shown in Figure 11.12.

12. This time, don’t click Save & Edit. Instead, click Continue & Edit. This takes you to the Views editing screen, which should look like Figure 11.13.

On this screen, there are four main areas that you need to be aware of:
![]() Main settings: This area contains all your DFFFS settings.
Main settings: This area contains all your DFFFS settings.
![]() Extra settings: This area contains settings that provide minor, extra tweaks to your view.
Extra settings: This area contains settings that provide minor, extra tweaks to your view.
![]() Advanced: This area contains complex settings and most are well beyond the scope of this book. These settings are hidden for a reason!
Advanced: This area contains complex settings and most are well beyond the scope of this book. These settings are hidden for a reason!
![]() Preview: This area shows a preview of what your view will look like.
Preview: This area shows a preview of what your view will look like.
These four areas are marked on the screen in Figure 11.14.

As you can see, Views is an enormously powerful module with many, many settings.
This chapter focuses on areas 1, 2, and 4 (see Figure 11.14).
Start simply by adding another field to display. Currently, the title of the article is the only field being displayed. Also add the date the article was posted:
1. Click Add next to Fields, as shown in Figure 11.15.

2. You’ll now see a pop-up screen. Type post date in the Search box.
3. Check the box for the Content: Post Date field, as shown in Figure 11.16.
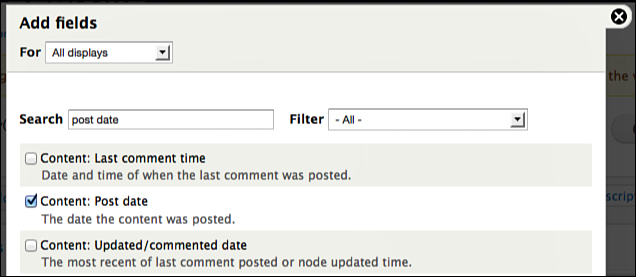
4. Click Apply (all displays) at the bottom of the pop-up.
5. Uncheck the Create a Label option.
6. Under Date Format, choose the Short Format option, as shown in Figure 11.17.

7. Click Apply (all displays) at the bottom of the pop-up.
8. Scroll down and you can see a preview of your block at the bottom of the screen.
9. Click Save in the top-right corner, as shown in Figure 11.18.

2. Locate the block you just created. Look under the Disabled list for View: New Articles.
3. Click Configure for this block.
4. Place in the second sidebar.
5. Set the block to show on resources/articles* so that the block appears on article nodes only.
6. Click Save Block.
2. Use the Search box to search for your Welcome to Drupalville article.
3. Click the listing for Welcome to Drupalville. You’ll see a screen like Figure 11.19 that has your new block in the right sidebar. This block matches the Display, Format, Fields, Filter, and Sort options that you had planned.

New Companies View Block
For this next block, you display an image in your block. The image needs to be smaller than the default thumbnail style that comes with Drupal, so you are introduced to a new feature in Drupal: custom image styles.
Here’s your DFFFS plan for this view:
![]() Display: Block
Display: Block
![]() Format: Unformatted list
Format: Unformatted list
![]() Fields: Title and Image
Fields: Title and Image
![]() Filter: Companies content type
Filter: Companies content type
![]() Sort: Random
Sort: Random
Step 1: Create an Image Style
1. Click Configuration on the black menu bar.
2. Click Image Styles in the Media block on the left side of the page, as shown in Figure 11.20.

3. Click Add Style.
4. Style name: scale_crop_35x35 (Note: This type of style name reminds you the type of style and the size, making it easier to know if this style will meet your needs somewhere else on the site.)
5. Click Create New Style.
6. Select Scale and Crop from the Select a New Effect drop-down, as shown in Figure 11.21.

7. Click Add.
8. Enter 35 for both Width and Height, as shown in Figure 11.22.
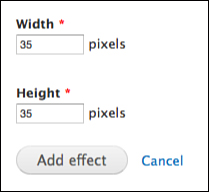
9. Click Add Effect.
2. Click Add New View.
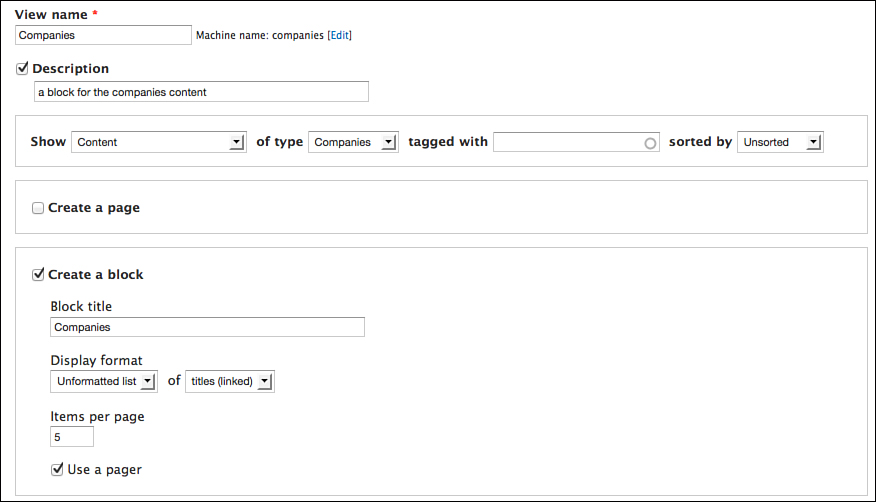
![]() View name: Companies.
View name: Companies.
![]() Check the box for Description and type: a block for the companies content.
Check the box for Description and type: a block for the companies content.
![]() Select Companies from the Type.
Select Companies from the Type.
![]() Select Unsorted from the Sort Filter.
Select Unsorted from the Sort Filter.
![]() Uncheck Create a Page.
Uncheck Create a Page.
![]() Select Unformatted List from Display Format.
Select Unformatted List from Display Format.
![]() Check Use a Pager.
Check Use a Pager.
Make sure your settings match Figure 11.23.
3. Click Continue & Edit.
You can now add an image field to your display using the same steps you used when adding the Post date to your New Articles block:
1. Click Add next to Fields.
2. Search for the Image field, and check the box for the Image field as shown in Figure 11.24.

3. Click Apply (all displays).
4. Uncheck the Create a Label option.
5. In the Image Style drop-down, select scale_crop_35x35, as shown in Figure 11.25.

6. Click Apply (all displays).
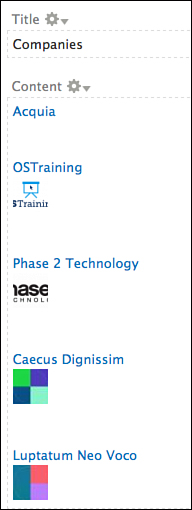
7. Scroll down and see a preview of your content, as shown in Figure 11.26. There isn’t a logo attached to Acquia because you created that content before adding the Image field to Companies.
Now that you have added the image field, let’s tweak a few things starting with the field order:
1. Return to the Add button next to Fields, and click the arrow next to Add. You’ll see the Rearrange option, as shown in Figure 11.27.
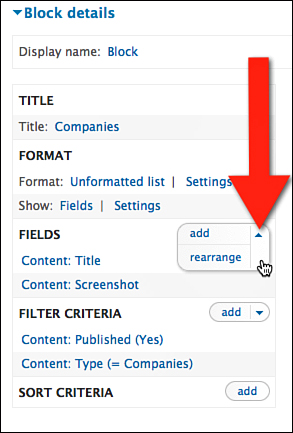
2. Click Rearrange.
3. You can rearrange the fields using the same Click+Hold+Drag technique used to rearrange the order of your fields and blocks in earlier chapters (see Figure 11.28).

4. Click Apply (All Displays).
The last change to make is to add sort criteria. You don’t want to show favoritism to the companies on your site, so in this block your list order will be random:
1. Click Add next to Sort Criteria, as shown in Figure 11.29.

2. Type random in the Search box.
3. Check the box next to Global: Random.
4. Click Apply (All Displays).
5. Click Apply (All Displays).
6. Click Save in the top-right corner.
Step 3: Enable Companies Block
1. Click Structures and then Blocks.
2. Locate the block you just created. Look under the Disabled list for View: Companies.
3. Click Configure for This Block.
4. Place the block into the second sidebar region.
5. Set the block to show on resources/companies* to show the block the article nodes only.
6. Save Block.
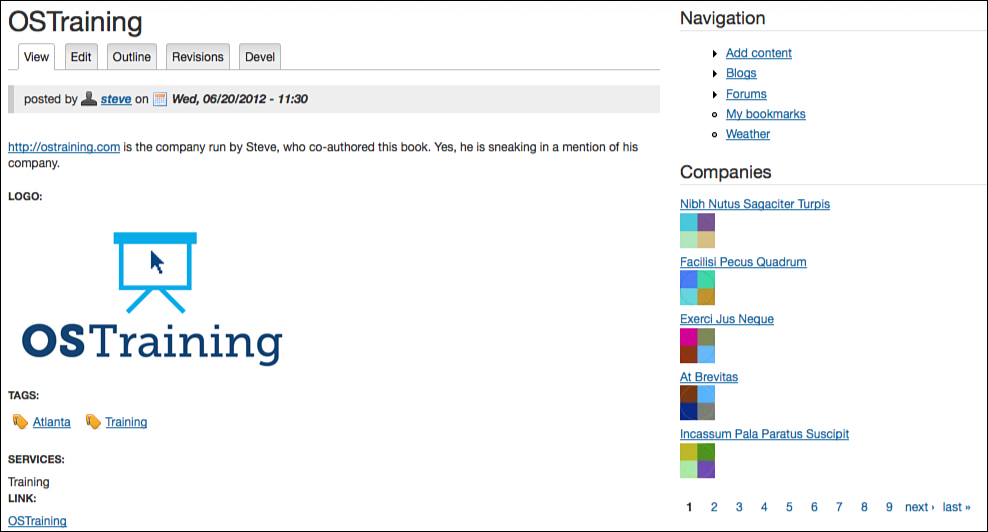
2. Use the Search box to search for OSTraining.
3. Click the listing for OSTraining. You’ll see a screen that looks like Figure 11.30 and has your new block in the right sidebar. This block will match the Display, Format, Fields, Filter, and Sort options that you had planned.
Creating Pages with Views Explained
In the first part of this chapter, you created blocks. You created four blocks, one each for pages created with the Article, User Groups, Sites, and Companies content types.
In the next part of this chapter, you create landing pages for Articles, User Groups Sites, and Companies.
The process you use is similar to the process you used to create the view blocks.
On a normal site, you would probably make all these landing pages look the same. However, you’re building a site for no other reason than to help you learn. You use different strategies for each page, offering you an insight into some of the options available to you in Views.
In this part of the chapter, you build four landing pages for your content types:
![]() Articles landing page: Basic page with teaser display
Articles landing page: Basic page with teaser display
![]() User Groups landing page: Basic page with a table display and added fields
User Groups landing page: Basic page with a table display and added fields
![]() Sites landing page: Basic page with a table display and added fields
Sites landing page: Basic page with a table display and added fields
![]() Companies landing page: Basic page with a grid display, added fields, and a new image style
Companies landing page: Basic page with a grid display, added fields, and a new image style
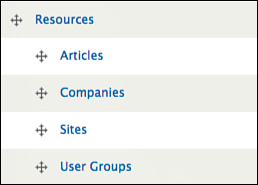
You also build a page that shows all the resources you have available:
![]() Resources landing page: Basic page with a table display, added fields, and an exposed filter
Resources landing page: Basic page with a table display, added fields, and an exposed filter
Articles Landing Page
To create the Articles landing page, use the Quick Page Create feature you used to create the New Sites view block.
This is your DFFFS plan for this view:
![]() Display: Page.
Display: Page.
![]() Format: Unformatted list of teasers showing 10 titles, a pager, and a link on a menu.
Format: Unformatted list of teasers showing 10 titles, a pager, and a link on a menu.
![]() Fields: None. Fields are not an option on a teaser format.
Fields: None. Fields are not an option on a teaser format.
![]() Filter: Articles content type.
Filter: Articles content type.
![]() Sort: Latest first.
Sort: Latest first.
Now create the view:
1. Click Structures and then Views.
2. Click Add New View.
![]() View name: Articles.
View name: Articles.
![]() Check the box for Description and type: the articles landing page
Check the box for Description and type: the articles landing page
![]() Select Article from the type.
Select Article from the type.
![]() Observe the default settings that you will be using.
Observe the default settings that you will be using.
![]() Change the Path from articles to resources/articles to match the path patterns.
Change the Path from articles to resources/articles to match the path patterns.
![]() Check the box to Create a Menu Link.
Check the box to Create a Menu Link.
![]() Select Main menu from the Menu drop-down.
Select Main menu from the Menu drop-down.
Check that your settings match Figure 11.31.

3. Click Save & Exit.
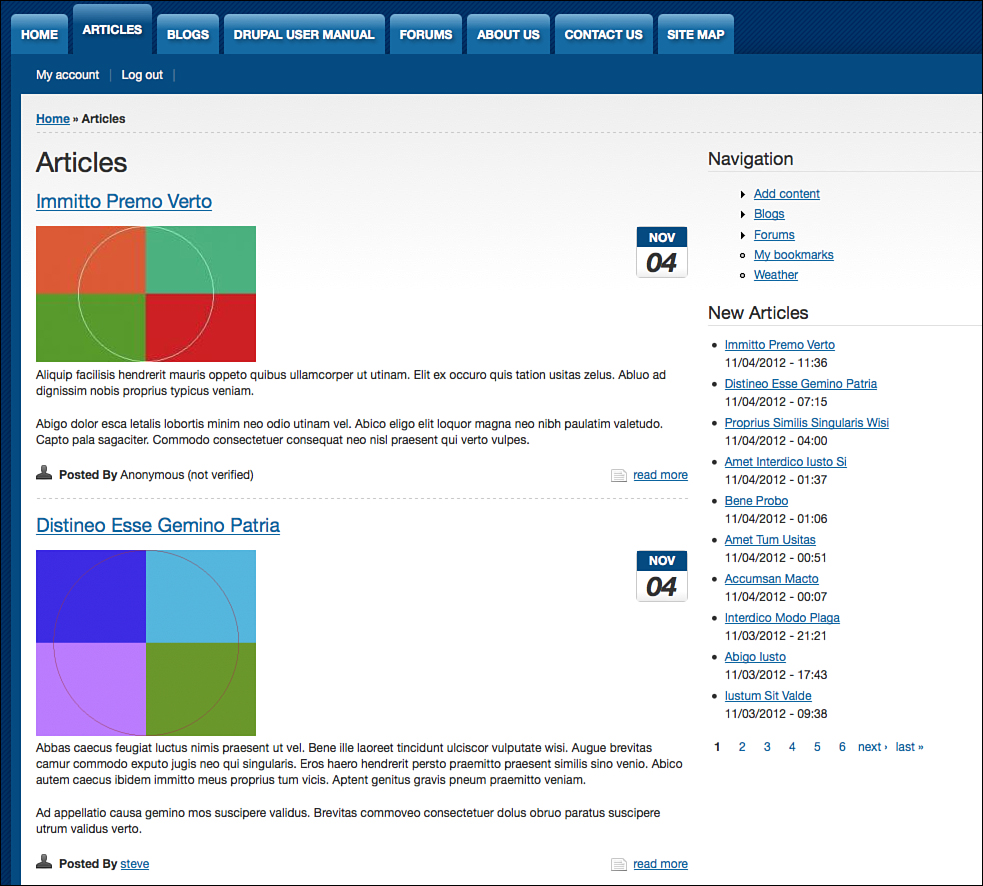
You’ll be taken to the new Articles page, and it will look like Figure 11.32. Notice that there’s now a menu link to this page on the Main menu.
User Groups Landing Page
For your next page, create a table display. Start as you did when creating the Articles page, but then choose a different display and add a couple fields.
This is the DFFFS plan for this view:
![]() Display: Page
Display: Page
![]() Format: Table, a pager, and a link on a menu
Format: Table, a pager, and a link on a menu
![]() Fields: Title, Post Date
Fields: Title, Post Date
![]() Filter: User Groups content type
Filter: User Groups content type
![]() Sort: Latest first
Sort: Latest first
1. Click Structure and then Views.
2. Click Add New View.
![]() View name: User Groups.
View name: User Groups.
![]() Check the box for Description and type: the user groups landing page
Check the box for Description and type: the user groups landing page
![]() Select User Groups from the Type.
Select User Groups from the Type.
![]() Change the Path from user-groups to resources/user-groups to match the path patterns.
Change the Path from user-groups to resources/user-groups to match the path patterns.
![]() Select Table from the Display Format drop-down.
Select Table from the Display Format drop-down.
![]() Check the box to Create a Menu Link.
Check the box to Create a Menu Link.
![]() Select Main menu from the Menu drop-down.
Select Main menu from the Menu drop-down.
Make sure that your settings match Figure 11.33.

3. Click Continue & Edit.
You need to add a field to your display: Post Date (which you added in the Articles view block):
1. Click Add next to Fields.
2. Search for the post date, and check the box for the Post Date field.
3. Click Apply (All Displays).
4. Choose Short Format under the Date Format drop-down.
5. Click Apply (All Displays).
Check your preview. It will look like Figure 11.34.
There are several improvements you could make to this table. First, make the column titles more meaningful:
1. Click Content: Title (Title) under the Fields list.
2. Type User Group Name in the label field.
3. Click Apply (All Displays).
4. Click Content: Post Date (Post Date) under the Fields list.
5. Type User Group Listing Date in the Label field.
6. Click Apply (All Displays).
You also edit the Format settings so the table columns can be sorted by users:
1. Click Settings for the Table Format, as shown in Figure 11.35.

2. Check the boxes under the Sortable column, as shown in Figure 11.36.

3. Click Apply (All Displays).
4. Click Save in the top-right corner.
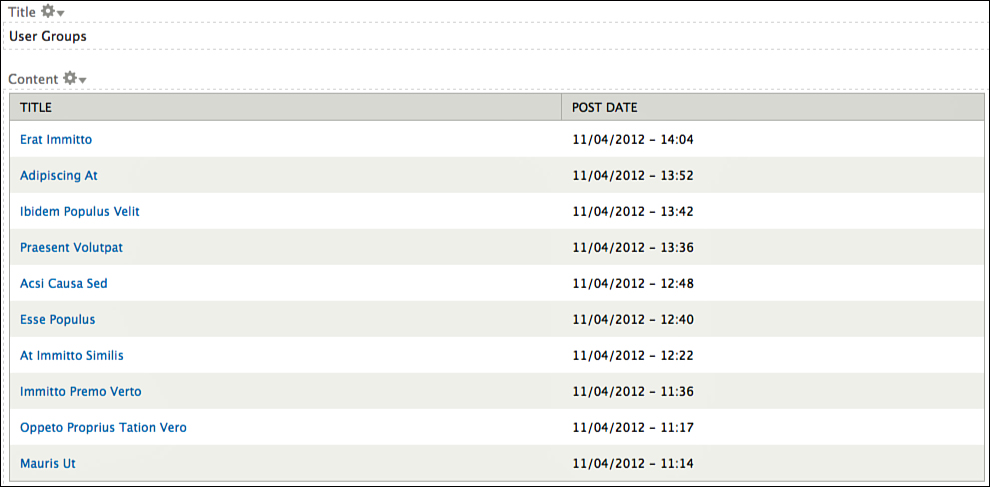
5. Click the View Page link in the top-right corner under the Save button.
You’ll now see your new page, as shown in Figure 11.37. You can click the User Group Name and User Group Listing Date to reorganize the table.
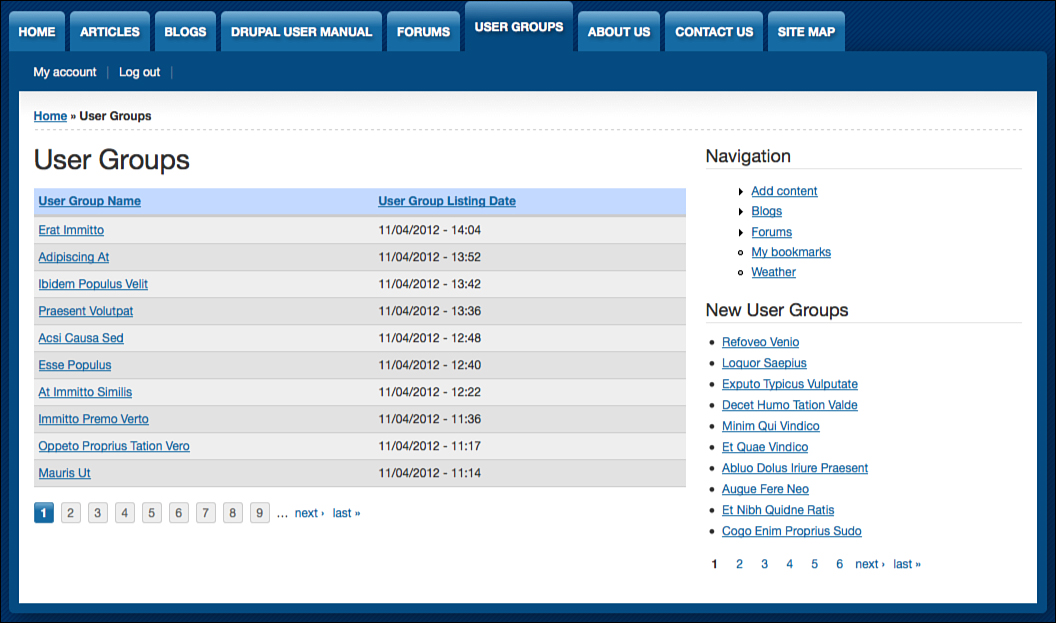
Sites Landing Page
The Sites landing page will also have a table display. This time you add two fields to the table.
Here is your DFFFS plan for this view:
![]() Display: Page
Display: Page
![]() Format: Table
Format: Table
![]() Fields: Title, Post Date, Topics
Fields: Title, Post Date, Topics
![]() Filter: User Groups content type
Filter: User Groups content type
![]() Sort: Latest first
Sort: Latest first
Now create this view:
1. Click Structures and then Views.
2. Click Add New View.
![]() View name: Sites.
View name: Sites.
![]() Check the box for Description and type: the sites landing page.
Check the box for Description and type: the sites landing page.
![]() Select Sites from the type.
Select Sites from the type.
![]() Change the Path from sites to resources/sites to match the path patterns.
Change the Path from sites to resources/sites to match the path patterns.
![]() Select Table from the Display format drop-down.
Select Table from the Display format drop-down.
![]() Check the box to create a Menu link.
Check the box to create a Menu link.
![]() Select Main menu from the Menu drop-down.
Select Main menu from the Menu drop-down.
Check that your settings look like Figure 11.38.
3. Click Continue & Edit.
You need to add two fields to your display: Post Date (which you added in the Articles view block) and Content:Topics (the username of the person who added the site page):
1. Click Add next to Fields.
2. Search for the Post Date and check the box for the Post Date field.
3. Click Apply (All Displays).
4. Choose Short Format under the Date Format drop-down.
5. Click Apply (All Displays).
6. Click Add next to Fields.
7. Search for topics and check the box for the Content: Topics field.
8. Click Apply (All Displays) twice.
9. Scroll down and see a preview of your content, as shown in Figure 11.39.
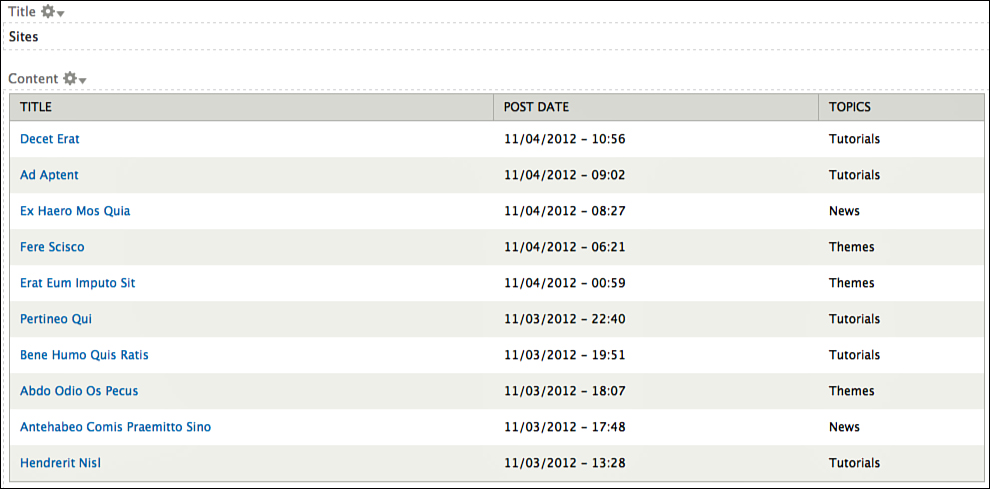
Now make improvements to the table. We’re going to add labels and a new way of sorting the results.
First, add the labels:
1. Click Content: Post Date under the Field list.
2. Type Site Name in the Label field.
3. Click Apply (All Displays).
4. Click Content: Title under the Field list.
5. Type Site Listing Date in the Label field.
6. Click Apply (All Displays).
Now add sorting. You also split the table into several sections based on what topic the sites deal with:
1. Click Settings for the Table Format.
2. Check the Site Name and Site Listing Date boxes under the Sortable column.
3. Select Topics under Group field Nr.1, as shown in Figure 11.40.
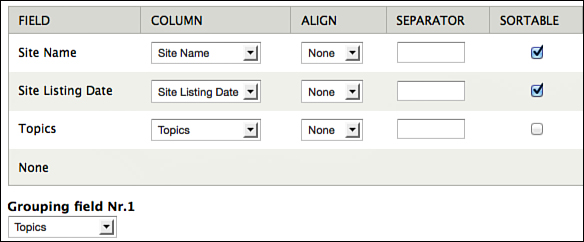
4. Click Apply (All Displays).
5. Click Save and then click View Page.
You’ll see your new Sites page, as shown in Figure 11.41.

Companies Landing Page
For your fourth page, you use a grid display to show the logo and company name in a grid pattern. To make this page, you need to first configure a new image style so that you will have it ready when you create the Views page.
Here is your DFFFS plan for this view:
![]() Display: Page
Display: Page
![]() Format: Grid
Format: Grid
![]() Fields: Title and Logo
Fields: Title and Logo
![]() Filter: Companies content type
Filter: Companies content type
![]() Sort: Title
Sort: Title
Create an Image Style
1. Click Configuration on the black menu bar.
2. Click Image Styles in the Media block on the left side of the page.
4. Style name: scale_90w. (Note: This strategy will allow logos with different sizes to be the same width but be resized without becoming distorted.)
5. Select Scale from the Select a New Effect drop-down.
6. Type 90 for Width. You can leave the Height box empty.
7. Click Add Effect.
Create the View Page
1. Click Structure, Views, and then Add New View.
2. View name: Companies.
3. Machine-readable name: companies_page (Note: You already used companies here for the Companies block.)
4. Check the box for Description and type: the companies landing page
5. Select Companies from the Type.
6. Sort by Title.
7. Change the Path from companies to resources/companies to match the path patterns.
8. Select Grid of Fields from the Display Format drop-downs.
9. Check the box to Create a menu link.
10. Select Main menu from the Menu drop-down.
11. Click Continue & Edit.
For your grid, you need to add the image field, just like you did with the New Companies view block:
1. Click Add next to Fields.
2. Search for the image field and check the box for Field.
3. Click Apply (All Displays).
4. Uncheck the Create a Label option.
5. Scroll down to the Image style drop-down and select scale_90w.
6. Click Apply (All Displays).
Scroll down and see a preview of your content, as shown in Figure 11.42.

Now that you have added the image field, rearrange the field order:
1. Return to the Add button next to Fields, click the arrow next to Add, and see the Rearrange option.
2. Click Rearrange.
3. Drag the image field above the Title field using the same Click+Hold+Drag technique used to rearrange the order of your fields and blocks.
4. Click Apply (All Displays).
You have one final setting to change. You have a grid with 12 spaces, but only 10 items showing on the page:
1. In the middle of the Views editing screen, click Paged, 10 items. As shown in Figure 11.43.
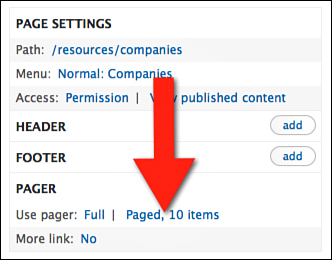
2. Under Items per Page, change 10 to 12.
3. Click Apply (All Displays).
4. Click Save and then click the View Page link.
You’ll see your Companies page live on your site, as shown in Figure 11.44.

Resources Landing Page
Each page you have created so far has introduced a different feature of Views. For the Resources page, you engage your site visitors by offering them the ability to filter the content.
Here’s your DFFFS plan for this view:
![]() Display: Page
Display: Page
![]() Format: Table, a pager, and a link on a menu
Format: Table, a pager, and a link on a menu
![]() Fields: Title, Post Date, and Logo.
Fields: Title, Post Date, and Logo.
![]() Filter: Companies, Sites, Articles, and User Groups content type
Filter: Companies, Sites, Articles, and User Groups content type
![]() Sort: Newest First
Sort: Newest First
Now start:
1. Click Structure, Views, and then Add New View.
2. View name: Resources.
3. Check the box for Description and type: the resources landing page.
4. Select All from the Type.
5. Select Table from the Display Format drop-down.
6. Check the box to Create a Menu link.
7. Select Main menu from the Menu drop-down.
8. Click Continue & Edit.
Next, using what you have already learned, modify your view in these ways:
1. Add the Image field set with the scale_crop_35x35 image style. Don’t create a label.
2. Add the Post Date field. Set the Label to Listing Date and the Date Format to Short Format.
3. Rearrange the fields in the following order: Image, Title, Post Date.
4. Change the Table settings to make the Title and Listing Date fields sortable.
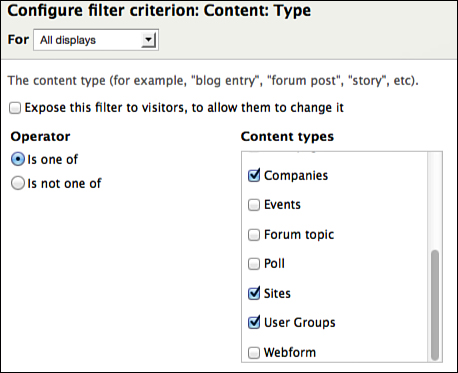
Now add one filter criteria twice. Confusing? Maybe. You want to limit the content that displays on the page to four content types. Then, you want the site visitors to limit the content on the page to one of the four content types. This means you need to add the content type filter twice:
1. Click Add next to Filter Criteria.
2. Search for Type and select Content: Type.
3. Click Apply (All Displays).
4. Check the boxes for Article, Companies, Sites, and User Groups, as shown in Figure 11.45.
5. Click Apply (All Display).
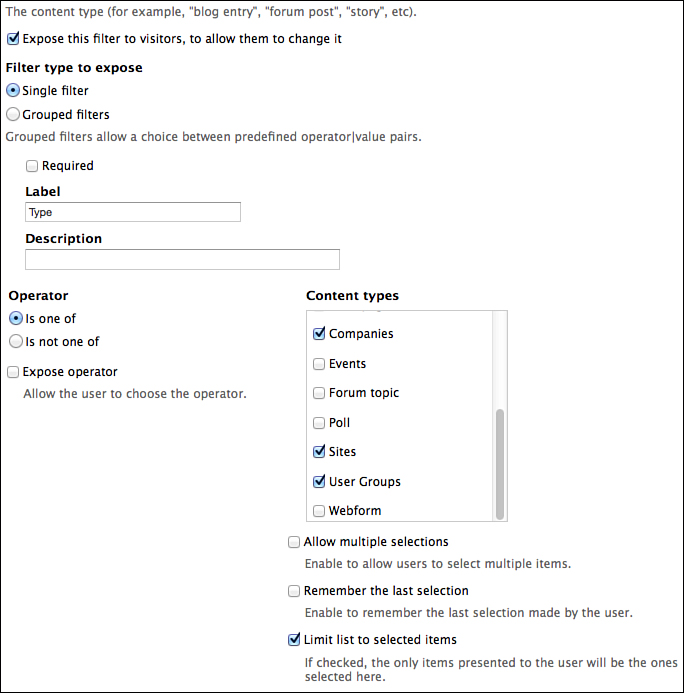
Repeat the previous steps exactly but with two differences, both shown in Figure 11.46:
1. Check the box to expose the filter.
2. Check the box to Limit List to Selected Items.
The exposed filter isn’t going to show up without a little help. You need to enable Ajax on your view:
1. Click Advanced on the right side of the page.
2. Locate the Use Ajax feature and set it to Yes, as shown in Figure 11.47.

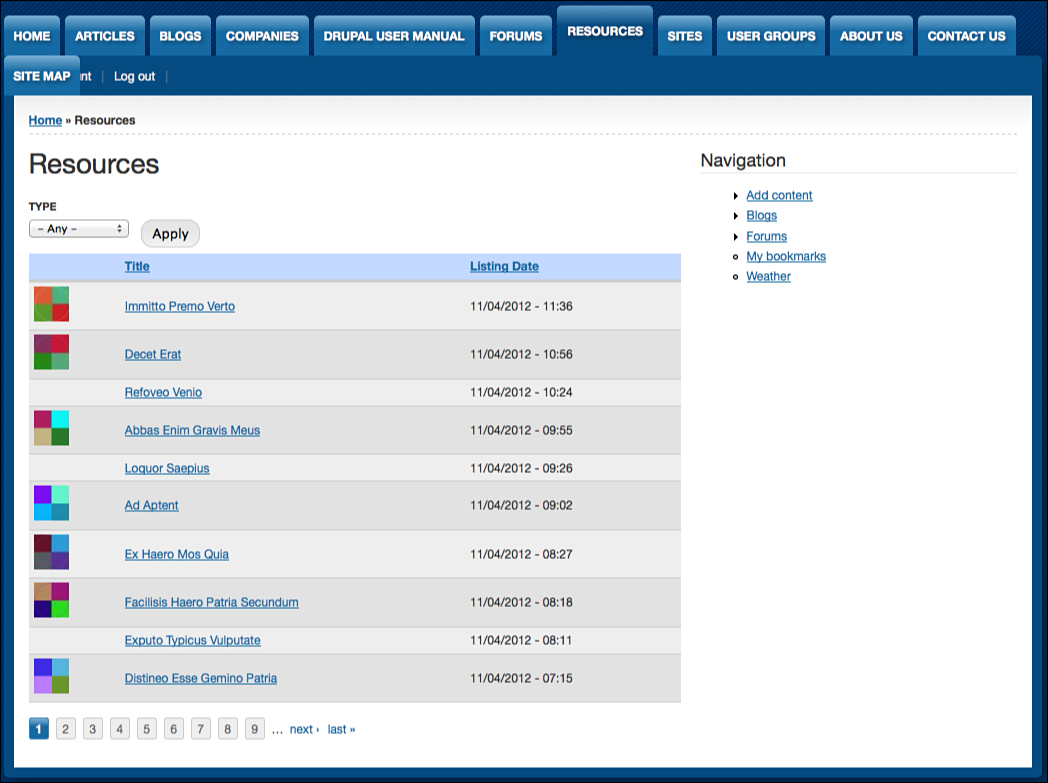
3. Save the view and click the View Page link.
Your Resources page will look like Figure 11.48.
Reorganizing the Main Menu
Now you have five new pages created by Views. However, there’s now too many menu links on the Main menu and you need to do some reorganizing. Keep Resources as the parent link and turn Articles, Companies, Sites, and User Groups into child links:
1. Click Structures and then Menus.
2. Click List Links next to Main menu.
3. Place Articles, Companies, Sites, and User Groups under the Resources link, as shown in Figure 11.49.
4. Click Save Configuration.
Creating a Calendar of Events Explained
In this chapter, you’ve created Views pages from scratch by setting the Display, Format, Fields, Filters, Sort, and other features in Views. You’ve also seen a variety of formats, including HTML list, Unformatted list, Table, and Grid.
In this next activity, we’re going to go further with Views. Using the Calendar module, add a Calendar format.
Install Calendar
1. Install and enable the Calendar module: http://drupal.org/project/calendar.
2. When you enable Calendar, Drupal also prompts you to enable Date Views. Click Continue to accept.
Configure the Calendar of Events Views
1. Click Structures and then Views.
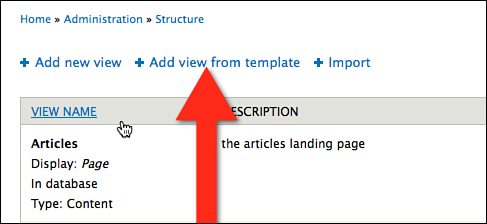
2. This time, click a different link. Click Add View from Template, as shown in Figure 11.50.
3. Click Add next to “A calendar view of the ‘field_events_date’ field in the ‘node’ base table,” as shown in Figure 11.51.

5. Click Continue.
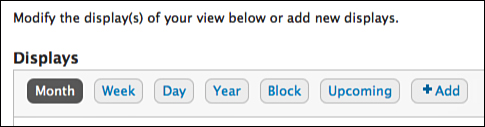
We’ve talked about the DFFFS settings in this chapter. You’ve seen that a view can have multiple fields, filter criteria, and sort criteria. This view shows that it’s possible to have multiple displays. Each display is similar but has slight variations. You can see the displays along the top of the screen, as shown in Figure 11.52.
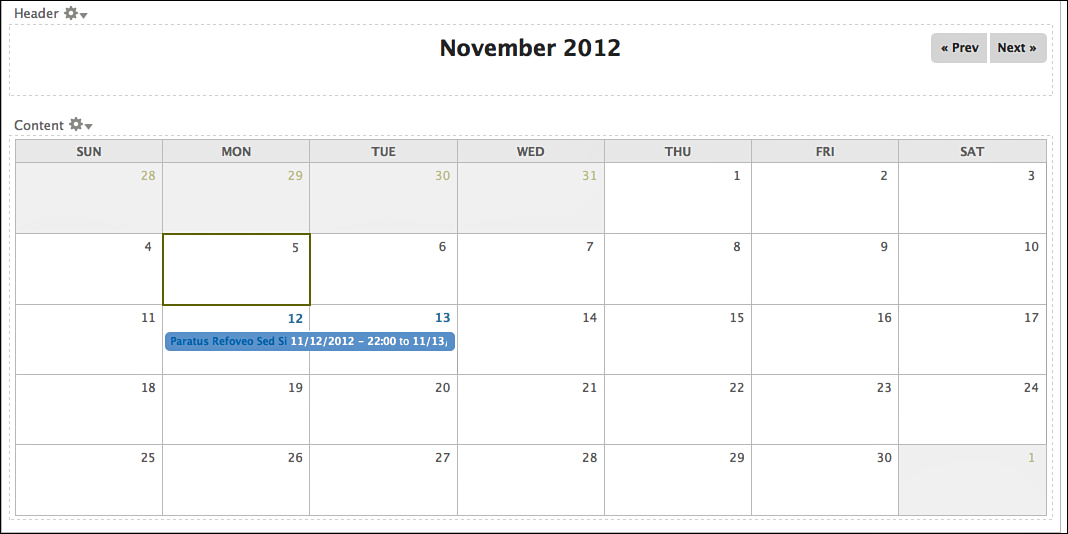
6. Scroll down and you see the preview for the main Month display, as shown in Figure 11.53.
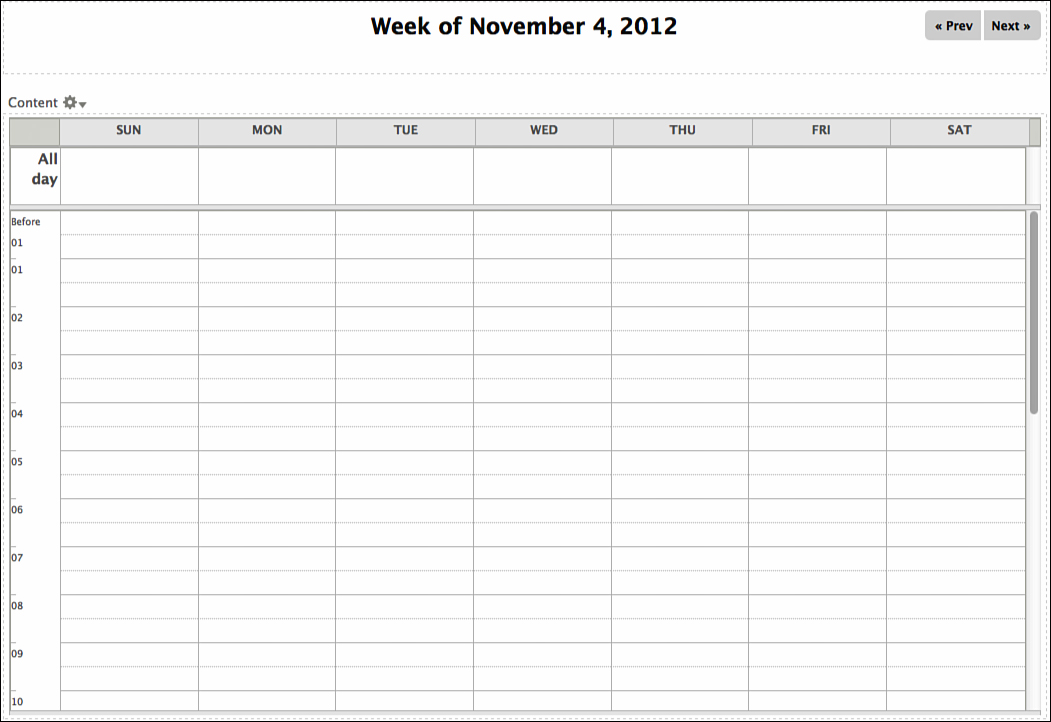
7. Click the Week tab at the top of the page. Figure 11.54 shows a preview of this display.
Browse through the Day, Year, and Block previews. You’ll start to get an idea of how powerful and flexible Views is:
1. Return to the Month display and click the Path link in the Page settings area.
2. Change calendar-node-field-events-date/month to events/month to match the path pattern you set for Events.
3. Click Parent menu item next to Menu in the Page settings area.
4. Change Calendar to Events and Select Main Menu from the Menu drop-down.
5. Click Apply.
6. Click the tab for Week, click the Path settings, and change calendar-node-field-events-date to events/week.
7. Repeat the path change for Day and Year.
8. Click Save.
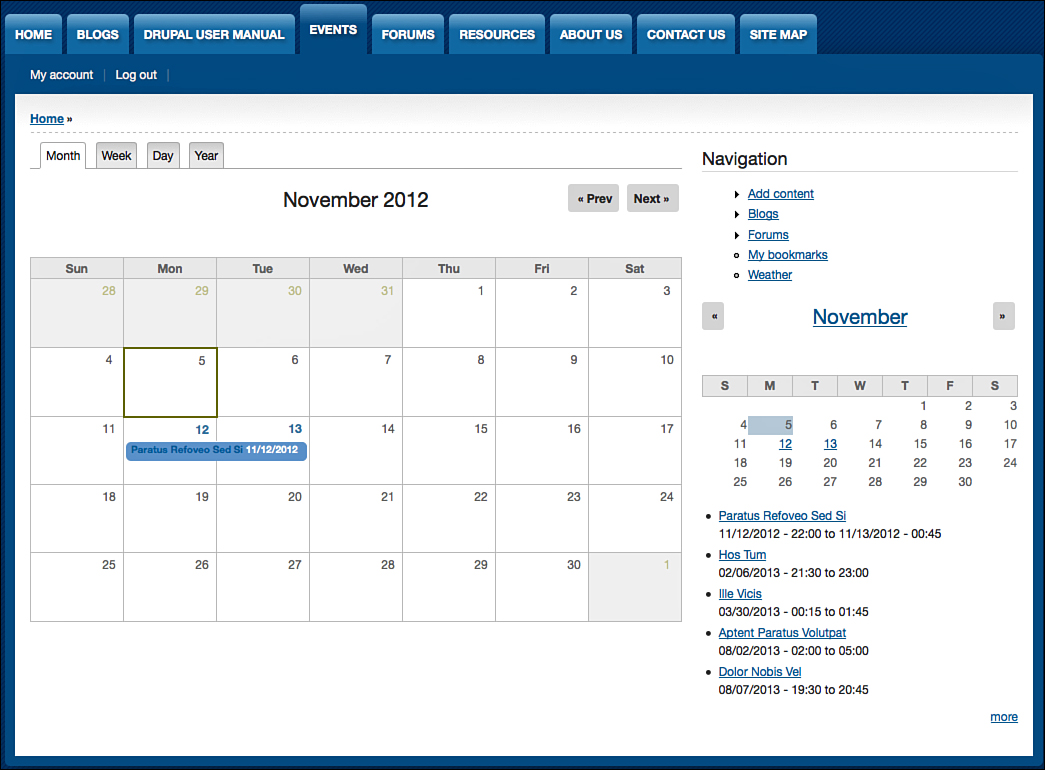
Return to the homepage and click the Events menu item available on the Main menu. You’ll see the Month tab first. All the other displays are available as tabs, as shown in Figure 11.55.

Add Event Blocks to Events Page
Inside the Views editing page, there were two block displays. One was literally called Block. The other was called Upcoming. Now see what they look like by configuring them:
1. Click Structure and then Blocks.
2. Locate View: Events and click Configure for that block.
3. Select the second sidebar for Marinelli (default theme).
4. Set the block to show on events* so that the block appears on event pages only.
5. Save Block.
6. Repeat this configuration for the View: Events: Upcoming block.
7. Return to the homepage.
8. Click your Events link in the Main menu, and you see the blocks you just enabled, as show in Figure 11.56.
Cloning Views Explained
You’ve clicked Structure and then Views many times in this chapter. On that page, before you clicked Add New View, you might have noticed there were some views already created but not yet enabled.
These views are useful when learning different ways to configure Views. In this activity, you use an existing view to create an archive block for your Blog page, a common block on blogs.
Enable and Clone the View
1. Click Structure and then Views.
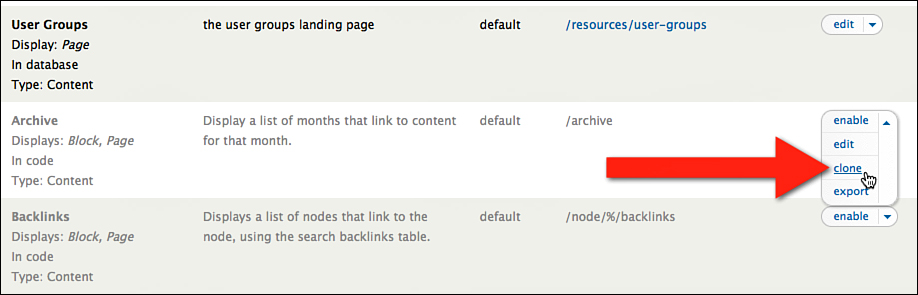
2. Click the Arrow next to Enable for the Archive View and click Clone. This is shown in Figure 11.57.
3. Name it Blog Archive and click Continue.
4. Click Add next to the Filter Criteria.
5. Search for type and select Content: Type.
6. Add and configure filters criteria.
7. Check the box for Blog Entry.
8. Click Apply.
9. Click the Block display and observe the filter was added to both the Page and Block display.
10. Return to the Page display.
11. Edit the Path under Page settings from archive to blogs/archive to keep you paths consistent.
12. Click No Menu under Page settings.
13. Choose Normal Menu Entry.
14. Enter Blog Archive as the Title.
15. Select Main menu as the Menu.
16. Click Apply and then Save in the top-right corner.
17. Go to Structure, Menus, and then List Links next to Main menu.
18. Place the Blog Archive link as a child menu link under Blogs.
Configure the Blog Archive Block
1. Go to Structure, Blocks, and click Configure next to View: Blog Archive.
2. Select the second sidebar for Marinelli (default theme).
3. On the Path tab, set the block to show only on blog*.
4. Save the block and return to the homepage.
5. Click Blogs in the Main menu and you’ll see your block on the right side, as shown in Figure 11.58.

6. Click the Blog Archive child link under Blogs, and you can see this same output in Page form.
Creating a Slideshow Explained
So far, you have displayed content in lists, tables, and even a grid. As your last task in this chapter, you create a slideshow using Views. You use a module called Views Slideshow, logically enough. You install that module but also need to upload some files via FTP.
Create an Image Style
1. Install Views Slideshow: http://drupal.org/project/views_slideshow.
2. Install Libraries: http://drupal.org/project/libraries.
3. Access your site’s files as you did back in earlier chapters.
4. Browse to the /sites/all/ folder.
You see a folder that you created earlier in the book called /libraries/.
5. Open the /libraries/ folder and create a folder called /jquery.cycle/.
6. Go to https://github.com/malsup/cycle/downloads.
Download the jquery.cycle.all.latest.min.js file, as shown in Figure 11.59. You can spot this because it has many more downloads than any other file.

7. Rename this file to jquery.cycle.all.min.js.
8. Upload the file your /jquery.cycle/ directory.
Check that the full path to this file is /sites/all/libraries/jquery.cycle/jquery.cycle.all.min.js, as shown in Figure 11.60.

9. Go the admin area of your Drupal site, and enable the Views Slideshow, Views Slideshow: Cycle and Libraries modules.
Create an Image Style
1. Click Configuration and then Image styles.
2. Click Add Style.
3. Style name: resize_650w_250h. (Note: This strategy will allow logos with different sizes to be the same width but be resized without becoming distorted.)
4. Select Scale from the Select a New Effect drop-down.
5. Type 650 for Width and 250 for Height.
6. Click Add Effect.
Create Views Slideshow Block
1. Click Structure, Views, and then Add New View.
2. View name: Slideshow.
3. Select Article Content Type from the Type drop-down.
4. Uncheck the Create a Page.
5. Check Create a Block.
6. Select the Slideshow from the Display format.
7. Click Continue & Edit.
8. Add the Image field to the display.
9. Uncheck the Create a Label box.
10. Set Image style to resize_650w_250h.
11. Set Link Image to Content.
12. Click Save.
Configure the Slideshow Block
1. Click Structures and then Blocks.
2. Locate View: Slideshow block and click Configure for that block.
3. Enter Drupal Articles Slideshow for the Block title.
4. Select the Over Node content region.
5. On the Path tab, set to show only on <front>.
6. Click Save Block.
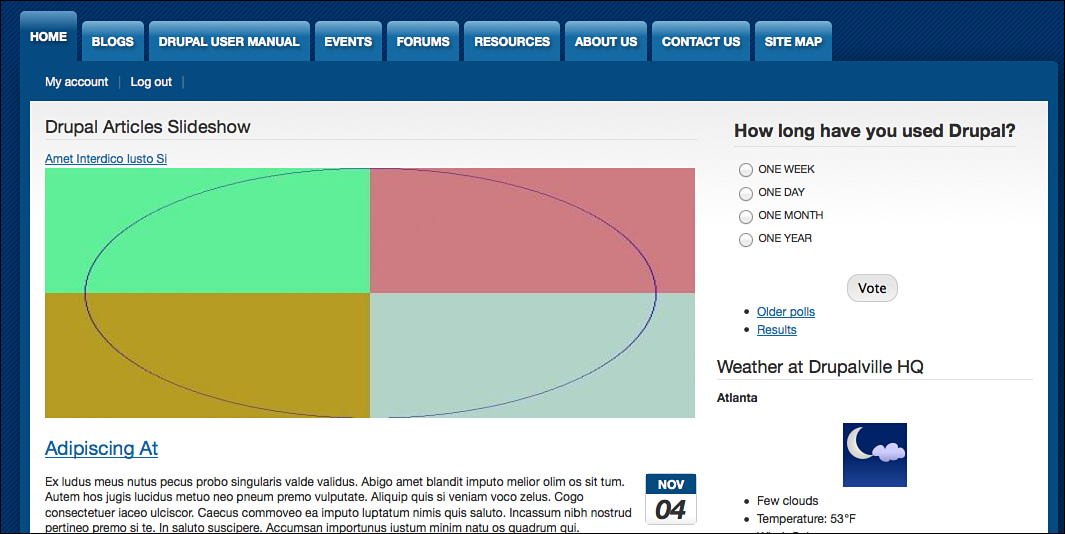
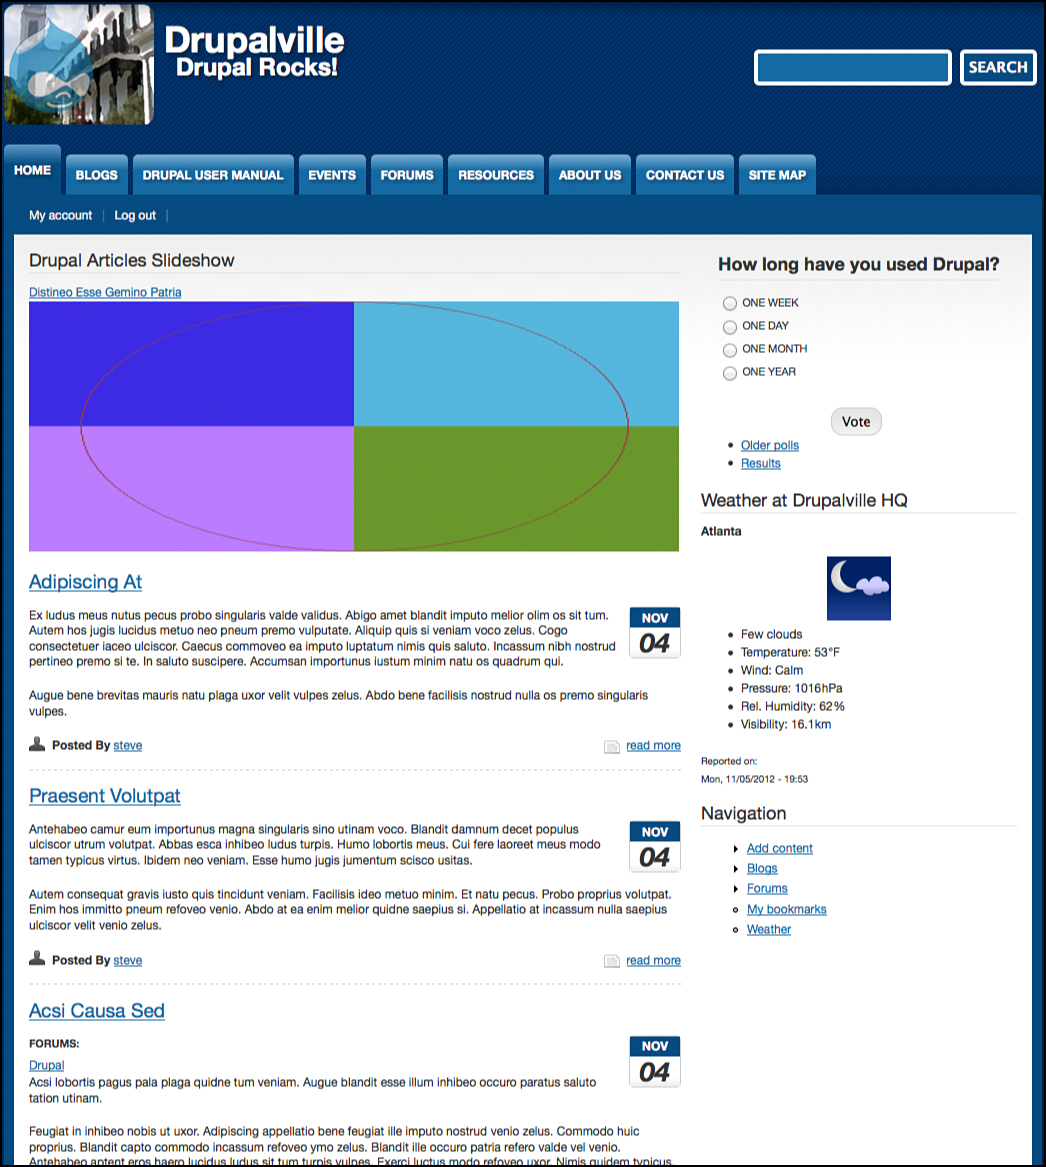
Return to the homepage and your slideshow will be on your homepage, as shown in Figure 11.61. The titles and images should be rotating automatically.
It is possible to think of several ways to improve this slideshow. The most obvious is that images could be designed specifically to fit in here. Neither scaling nor resizing offers a perfect solution. Scaling can lead to problems with fitting the image into the predefined height and width for the slideshow. Resizing can cause problems by squashing the image into the predefined height and width. Automatically manipulating your images can be useful, but there would be no substitute for creating images that were designed to be 650 pixels wide and 250 pixels high.
Here’s what you can do if you want to go back and edit the slideshow settings:
1. Hover your mouse over the view so that the dotted line appears.
2. Click the cog in the top-right corner of the view.
3. Click Edit, as shown in Figure 11.62.
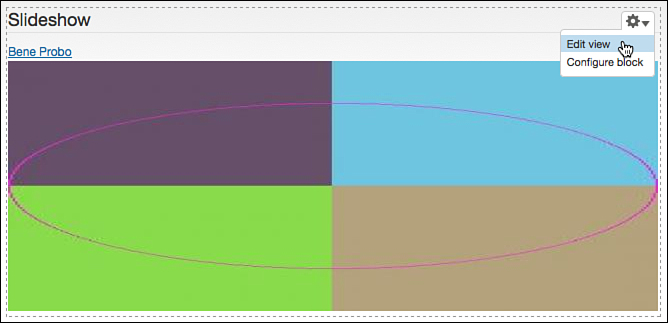
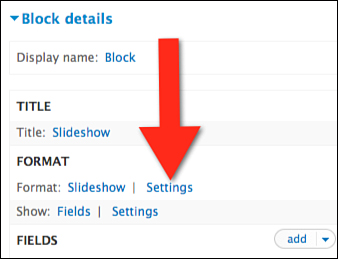
4. Click the Settings link next to Slideshow, as shown in Figure 11.63.
What’s Next?
The beginning of the chapter mentioned that Views was the most popular and important module in Drupal. In this chapter, you’ve seen some of what Views can do. Views is so powerful and flexible that we could write an entire book on it.
However, when you start with Views, focus on the five DFFFS settings. Focus on these five decisions, and you can create many of the views that you want.
![]() Display: Do you want a page, a block, or an RSS feed?
Display: Do you want a page, a block, or an RSS feed?
![]() Format: Do you want a list, a grid, a table, a slideshow, or something else?
Format: Do you want a list, a grid, a table, a slideshow, or something else?
![]() Fields: Which fields do you want shown?
Fields: Which fields do you want shown?
![]() Filter: Do you want to drill down and select only some content?
Filter: Do you want to drill down and select only some content?
![]() Sort: How do you want to organize all the content shown?
Sort: How do you want to organize all the content shown?
At the end of this chapter, your site should look like Figure 11.64. As always, it’s more important that you understand the lessons covered in this chapter than that your site exactly matches the image.
You now have only one main chapter left that will change the look of your site. In the previous chapter, you saw how to display and organize many content items.
Chapter 12, “Drupal Layout Modules Explained,” talks about the layout of those individual content items. You see how to combine multiple elements such as content, blocks, and views to create a single page, such as a homepage. You can achieve both tasks by using design modules.
Before starting the next chapter, let’s see how Views fits into our Drupal workflow shown in Figure 11.65:
![]() You had to create content types before you could use fields.
You had to create content types before you could use fields.
![]() You needed content on your site before we could successfully set up our themes and blocks.
You needed content on your site before we could successfully set up our themes and blocks.
![]() You had to install a theme before you could place blocks.
You had to install a theme before you could place blocks.
![]() You needed content before you could use Views. You also needed to have your theme before you could place the Views that we created.
You needed content before you could use Views. You also needed to have your theme before you could place the Views that we created.
