
Chapter 3. Editing Techniques
You have the courage of your convictions. When you’re editing you have to make thousands of decisions every day and if you dither over them all the time, you’ll never get anything done.
—Anne V. Coates
Crafting a compelling story from images is a process that demands more than just perseverance. Deft hand-and-eye coordination helps, but making art from a folder full of camera files requires learning and continually practicing essential editing skills.
Studio professionals need to perform editing functions in the Timeline as fast as they can think about the changes they want to make. In this chapter you’ll learn some tricks-of-the-trade that can help you achieve professional-level speed. Adobe Premiere Pro is designed for the quick and easy joining of visual and audio elements, and it allows you to reorder and refine story ideas—in real time—if you know how to use important editing features and understand when and how to apply specific tools.
Maybe you’re already familiar with drag-and-drop editing, and can perform insert and overwrite edits. If so, great! It never hurts to review the basics, so I’ll start by covering common methods for assembling a cut. Arranging windows, customizing the Timeline, and incorporating keyboard shortcuts makes working in a sequence easier and more enjoyable, but it’s trimming that makes a story flow. Choosing the trimming technique that best fits your needs in the moment is the most important step toward increasing speed and precision.
This chapter focuses on practical steps to improve your overall performance while editing in Adobe Premiere Pro, and it shines light on some familiar tools that often don’t get nearly enough use. I’ll share a few tips that make editing any sequence more fun. Sometimes the most advanced editing tools seem simple to use once practiced in context, so I’ll guide you through some steps to enhance your overall skill set. Finally, you’ll move into more refined methods of finessing a cut, using Trim tool shortcuts, and using real-time playback.
![]() Notes
Notes
This chapter’s project files are available for download. Please see “A note about downloadable content” in the Introduction of this book.
An experienced artist is always learning and layering new ideas on top of standard practices. To turn creative insights into tangible forms of expression, editors must keep their primary skills sharp while making adjustments to their editing style when new tools arrive to improve workflow. Dede Allen once said, “Intellect and taste count, but I cut with my feelings.” The goal of this chapter is to get you to a skill level that allows you to cut from your feelings without having to think too much about which tool to use or how to use it. Let’s get started by implementing basic editing protocol, and then ramp up to professional practices. Patience will turn the use of a few new techniques into habits, and the result will be fast cutting with minimal hassle.
Editing Essentials
You’re reading a Studio Techniques book, so you probably know how to edit clips into a Timeline. Even if you understand the basics, there are practical methods you can incorporate into your everyday work to improve efficiency and speed while editing. I meet quite a few people who work in professional studios, and many are not making the most of their editing tools. It’s easy to get stuck in old patterns, so shake things up and make some new habits!
Workspace Setup
Before you begin editing, familiarize yourself with some of the Workspace presets located on the Window menu. Start with an Adobe Premiere Pro Workspace preset, customize panel groupings, and then save these window arrangements to suit your changing needs throughout the editing process.
Workspace layout presets
For general creative editing, I start by choosing the Editing (CS5.5) Workspace from the Window menu, and then further customize it to fit my own style. The reason I begin with this layout is that it fits my preference regarding the arrangement of the Project and Media Browser panels when I begin a project. When I open this workspace, these two important panels are instantly separated into different tab pane groupings, one on top of the other. I like the Project panel to stay in the upper left, and I want the Media Browser to remain beneath the Project panel.
I dock open bin tabs next to the Project tab, directly above the Media Browser, so I can view and hoverscrub through footage in the Media Browser, and then quickly drag folders and clips directly into my project bins. Once I begin editing in a sequence, I drag the panel boundaries to make the Project and Media Browser panels narrow and maximize the Timeline, Source, and Program panels.
I further customize my workspace by placing the Audio Meter directly underneath my Timeline, so it occupies only a thin horizontal space but is easily visible while I’m playing a sequence. I drag my toolbar to the upper-left corner or delete it altogether in favor of using keyboard shortcuts (Figure 3.1).
Figure 3.1 Example of a single-monitor workspace layout modified from the standard Editing (CS5.5) Workspace. The transport controls and Info panel are closed, the preview area is visible, and tools and meters are relocated to maximize Timeline width.
I recommend trying some of the Adobe Premiere Pro preset workspace arrangements, just to discover panels, features, and layouts that you might not otherwise stumble upon. Choose Window > Workspace, and quickly try these useful layouts:
![]() Add Metadata and Sync Scripts. Open the Metalogging Workspace. Whether you’re editing a scripted feature, a TV show, or a documentary with transcribed interviews, the Metadata panel is great for syncing scripts to clips. I use this workspace to quickly add descriptions, notes, and scene information to large batches of clips. It’s invaluable for documentary work. When combined with script syncing, the Metadata panel helps me locate the exact lines of dialogue I need while editing.
Add Metadata and Sync Scripts. Open the Metalogging Workspace. Whether you’re editing a scripted feature, a TV show, or a documentary with transcribed interviews, the Metadata panel is great for syncing scripts to clips. I use this workspace to quickly add descriptions, notes, and scene information to large batches of clips. It’s invaluable for documentary work. When combined with script syncing, the Metadata panel helps me locate the exact lines of dialogue I need while editing.
![]() Apply Effects. Choosing the Effects Workspace instantly places the Effects panel just to the left of the Effects Control panel, making it easier to add and tweak effects.
Apply Effects. Choosing the Effects Workspace instantly places the Effects panel just to the left of the Effects Control panel, making it easier to add and tweak effects.
![]() Mix Audio. Open the Audio Workspace, and both the Clip and Track Mixers are ready to use, allowing you to quickly adjust the mix for individual clips or for an entire audio track.
Mix Audio. Open the Audio Workspace, and both the Clip and Track Mixers are ready to use, allowing you to quickly adjust the mix for individual clips or for an entire audio track.
![]() Color for Broadcast. The Color Correction Workspace will open a Reference Monitor loaded with video scopes.
Color for Broadcast. The Color Correction Workspace will open a Reference Monitor loaded with video scopes.
Once you’re familiar with workspace panel options and layouts, you can access the Window menu, open individual panels that meet your needs, and drag to dock them into appropriate panel groupings.
Customizing and docking panel tabs
Use panel fly-out menus to customize additional, panel-specific features. For example, you can turn on the Preview Area and Thumbnails from the fly-out menu located in the upper-right corner of the Project panel (Figure 3.2). The preview area now appears at the top of the Project panel, so you can view clip icons and properties at a glance. Thumbnails appear next to the clip names when the Project panel is set to List view. Use the Source and Program fly-out menus to hide or reveal transport control buttons, markers, and safe margin overlays.

Figure 3.2 Use the fly-out/panel menus located at the top right of each panel to activate additional context-specific features.
Making decisions about which panels to close or dock with other panels means experimenting to find out what works best for you. I Option-double-click (Alt-double-click) on bins of video footage to dock them right next to the Project panel, and then set the bins to display in Icon view. I prefer the Project panel to display in List view. This setup allows me to quickly switch between the Project tab and the Bin tabs, so I can browse the same group of clips in List view with metadata in the Project tab, and then quickly switch views by clicking the bin tab, where I can visually scrub shots and mark the clips. This is especially useful when working with bins filled with lots of visual imagery, like B-roll footage.
I don’t need redundant information provided by both the Info panel and the preview area, so I close the Info panel. You might prefer to close the preview area to save space, in which case the Info panel is useful.
I dock the Marker and History panels in the lower-right pane group next to the Media Browser, because I often use these panels to view marker information and to undo edit steps while I’m working in the Timeline.
From the Source and Program panel fly-out menus, I often choose to close the transport controls, because I rely heavily on keyboard shortcuts.
These choices are mainly a matter of personal editing style, but you might find that your preferences change as a project progresses and new, job-specific panel groupings become helpful.
Saving Workspace presets
The Workspace menu allows you to save and retrieve New Workspace Presets, which are automatically assigned unique keyboard shortcuts.
I often work with two monitors, so I dock most of my bins in Icon view on the left monitor, and then set up my Source, Program, and Timeline panels on the right monitor. Take the time to customize your editing interface the way you like it, and then name and save a preset for your workspace.
I save different Workspace presets for both my laptop and desktop edit sessions, and for single and dual monitor setups. I also save presets for creative story editing, audio, and finishing work. I’ll occasionally bounce over to the standard Adobe Premiere Pro Workspace presets to quickly access a needed panel, and then press a keyboard shortcut to return to my favorite arrangement. The workspace you choose is all about personal style and project-specific editing needs (Figure 3.3).
Figure 3.3 Choose Workspace from the Window menu to reset, delete, or create a new workspace. Note that keyboard shortcuts are assigned to your saved, custom workspaces.
Focus on the Timeline
There are specific Timeline options that every editor should know how to customize. Take the time to familiarize yourself with often needed display settings, and master the features that will allow you to easily navigate the Timeline. When you’re down to the wire and need to deliver a cut, you won’t be hunting around for track displays and cursing the mouse.
The following sections describe a few helpful options that I can’t work without.
Scrolling and zooming in the Timeline
No editor or assistant can work efficiently in the Timeline without these shortcuts:
![]() Zoom in and out at the Timeline playhead location. Select the Timeline and press the keyboard shortcuts for zoom in (+) and zoom out (-).
Zoom in and out at the Timeline playhead location. Select the Timeline and press the keyboard shortcuts for zoom in (+) and zoom out (-).
![]() Scale the sequence to fit all clips within the Timeline length. Press the backslash () key.
Scale the sequence to fit all clips within the Timeline length. Press the backslash () key.
![]() Scroll tracks. If you use a scroll wheel, placing the mouse pointer over the center of the Timeline video or audio tracks allows you to vertically or horizontally scroll tracks. Set this option in the General category of the Preferences panel. When editing with many layers of video or audio tracks, vertical scrolling is necessary.
Scroll tracks. If you use a scroll wheel, placing the mouse pointer over the center of the Timeline video or audio tracks allows you to vertically or horizontally scroll tracks. Set this option in the General category of the Preferences panel. When editing with many layers of video or audio tracks, vertical scrolling is necessary.
![]() Snap to playhead. While you have the General tab open in the Preferences panel, select the check box next to Snap Playhead in Timeline when Snap is Enabled. This allows clip edges to snap to the playhead when you’re dragging to move shots around in the Timeline, or snap the playhead to a cut point while viewing visual guides that indicate the playhead and cut point are lined up.
Snap to playhead. While you have the General tab open in the Preferences panel, select the check box next to Snap Playhead in Timeline when Snap is Enabled. This allows clip edges to snap to the playhead when you’re dragging to move shots around in the Timeline, or snap the playhead to a cut point while viewing visual guides that indicate the playhead and cut point are lined up.
![]() Scroll to expand or minimize Timeline track height. Place the mouse pointer over the empty gray area just to the right of the track targets, and then use the scroll wheel to increase or decrease the size of individual tracks. Hold down the Shift key to increase or decrease all track heights while scrolling.
Scroll to expand or minimize Timeline track height. Place the mouse pointer over the empty gray area just to the right of the track targets, and then use the scroll wheel to increase or decrease the size of individual tracks. Hold down the Shift key to increase or decrease all track heights while scrolling.
![]() Expand or minimize all Timeline tracks. Press Shift++ and Shift+- to expand or minimize all audio and video tracks at once.
Expand or minimize all Timeline tracks. Press Shift++ and Shift+- to expand or minimize all audio and video tracks at once.
![]() Tip
Tip
When performing insert and overwrite edits, you’ll often need to toggle the focus between the Source and Timeline panels. Press Shift+2 and Shift+3 to quickly toggle between the selection of those two panels.
Timeline display settings
While editing, there will be times when you want to quickly expand specific Timeline tracks, view audio waveforms, and access video and audio keyframes too. I find that setting up display preferences is especially important before refining the cut or adjusting audio levels. Timeline preferences can be set and saved for different tasks, so you can quickly switch to a new Timeline display when your edit needs change.
Consider customizing your Timeline display settings as soon as you begin a project. While training a new assistant editor, I noticed he was struggling while editing in the Timeline. He was thrilled when I showed him the Timeline Display Settings button, which I call “the little wrench” (Figure 3.4), because he was able to customize his displays to make his work a lot easier. Little things can make a big difference when you’re performing repetitive tasks. Here are few settings you can configure to make working with the Timeline more enjoyable:
![]() Name and save a couple of your preferred track height displays—the ones you use most often.
Name and save a couple of your preferred track height displays—the ones you use most often.
![]() Configure video and audio track headers to serve your project needs.
Configure video and audio track headers to serve your project needs.
![]() Activate visual aids, such as through-edit marks. Through-edit marks are new to the Adobe Premiere Pro CC release. Now when you razor blade a clip, a through-edit mark shows you that those two sections were once one clip.
Activate visual aids, such as through-edit marks. Through-edit marks are new to the Adobe Premiere Pro CC release. Now when you razor blade a clip, a through-edit mark shows you that those two sections were once one clip.
![]() Toggle audio waveform and keyframe displays on and off.
Toggle audio waveform and keyframe displays on and off.

Figure 3.4 Turn on visual aids, such as audio waveforms, video thumbnails, and markers using the Timeline Display Settings button.
One of the most helpful Timeline Display Settings button options is the ability to create and save custom presets for my track heights. When editing a dialogue scene, for example, I rely heavily on expanding the video thumbnails in V1 and the audio waveforms in tracks A1 and A2, so I can zoom in and fine-tune the audio that is typically linked to the primary video clips. This track viewing preference allows me to recognize which actor is speaking at a glance and visually identify exactly where the dialogue is located in the Timeline.
To set this up, I use the scroll wheel to expand the height of Tracks V1, A1, and A2 so they’re large enough for me to see thumbnail images and waveforms; then I use the Timeline Display Settings menu to save a display preset (Figure 3.5).

Figure 3.5 Save presets with preferred track heights for common editing tasks, and they’ll appear in the Timeline Display Settings menu.
To save your own track height preferences, follow these steps.
1. Make sure Show Audio Waveform and Show Video Thumbnails are selected in the Timeline Display Settings menu.
2. Use the mouse scroll wheel or drag the dividing line between tracks to open the audio tracks so they are tall enough in height to reveal waveforms.
3. Scroll or drag to set the height of individual video tracks to your liking.
4. From the Timeline Display Settings (the wrench icon), name and save your own custom preset for track heights.
5. When you return to the Timeline Display Settings, your new preset will appear in the list.
It’s also useful to configure your track headers to accommodate specific editing tasks at the touch of a button. These features are “at a glance” items. By that I mean that I can see whether they are active or off. For example, I add Mute and Solo buttons to my audio track headers because I constantly solo lines of dialogue or mute music tracks while I’m working. I like this feature because I can glance to the left and see which audio tracks are active or silenced. I keep Toggle Track Output (the little eyeball) in all video track headers for the same reason.
You can customize individual tracks by right-clicking in the empty gray area next to track targets and choosing Customize or Rename. For example, when I want to keep certain types of clips on specific tracks, I name individual tracks VFX for visual effects, GRFX for titles, DX for dialogue, SFX for sound effects, MX for music, VO for voice-over narration, and so on. Typically, only my VO narration track header will contain the R button that enables recording.
From the Timeline Display Settings, you can quickly customize all video and audio track headers at once by following these steps.
1. Click the little wrench and choose Customize Audio Header.
2. Drag and drop to place icons for Mute, Solo, and Record into an audio track header.
3. Drag and drop to place Add-Remove Keyframe or drag the mini Audio Track Meters into the track header area to find out if it’s helpful for you to have these visual references in this area of the Timeline.
4. To remove an item from the track header, click and drag it out of the header area.
I always recommend activating the display indicators for Duplicate Frames, Clip Markers, and Through-Edit Marks. Just click the Timeline Display Settings button and make sure these items are selected. You can turn any of these visual indicators on and off as needed, but I typically leave Markers and Through-Edits visible at all times. I like visual indicators to appear when I’ve added a cut, even if I haven’t removed any frames. If I’ve added a marker, I want to see it!
From the Timeline Display Settings menu you can also activate keyframe displays. This allows you to adjust volume keyframes for individual clips in the track (great for dialogue) or for the entire track (great for adjusting music and voice-over narration). Adjusting track keyframes allows you to replace audio while maintaining previously set volume adjustments. I keep the Show Keyframes button in all audio track headers. I use Clip and Track Keyframes when adjusting audio levels, which allows me to swiftly switch between the two types of keyframes (Figure 3.6).
Figure 3.6 When Show Audio Keyframes is selected on the Timeline Display Settings menu, the Show Keyframes button next to audio track headers can display either Track or Clip Keyframes level lines.
Timeline fly-out (panel) menu
The Timeline fly-out (panel) menu offers even more options for Timeline management. Some of these features are covered in other chapters, but here are a few essentials items that I use when I begin an edit session:
![]() Change the start time of your sequence. I set this option at the start of every edit. Professional editors need access to this feature to ensure that time is allowed for slate information, black, and bars and tone at the head of programs. The program typically starts at hour one, whereas the sequence may begin at 00:58:30:00 or 00:59:45:00, for example.
Change the start time of your sequence. I set this option at the start of every edit. Professional editors need access to this feature to ensure that time is allowed for slate information, black, and bars and tone at the head of programs. The program typically starts at hour one, whereas the sequence may begin at 00:58:30:00 or 00:59:45:00, for example.
![]() Alter the look of Timeline waveform displays. Rectified audio waveforms are easier to work with when audio volume is low and waveforms are consequently small. This view is also helpful when working with Timeline tracks set to smaller heights when there are many tracks that you need to view simultaneously.
Alter the look of Timeline waveform displays. Rectified audio waveforms are easier to work with when audio volume is low and waveforms are consequently small. This view is also helpful when working with Timeline tracks set to smaller heights when there are many tracks that you need to view simultaneously.
![]() Set up Multi-Camera Audio. In some multi-cam workflows, audio needs to be independent; in others, it needs to follow the video. This toggle switches between the two capabilities.
Set up Multi-Camera Audio. In some multi-cam workflows, audio needs to be independent; in others, it needs to follow the video. This toggle switches between the two capabilities.
![]() Turn on Show Audio Time Units. When you want to edit at the subframe levels, select Show Audio Time Units. When you need to zoom in all the way down to the audio sample size, this feature enables you to make a cut at a subframe location, allowing you to add keyframes and remove those annoying clicks and pesky coughs that always seem to occur between frames.
Turn on Show Audio Time Units. When you want to edit at the subframe levels, select Show Audio Time Units. When you need to zoom in all the way down to the audio sample size, this feature enables you to make a cut at a subframe location, allowing you to add keyframes and remove those annoying clicks and pesky coughs that always seem to occur between frames.
![]() Use keyboard shortcuts
Use keyboard shortcuts
![]() Master three-point editing
Master three-point editing
![]() Mind the tracks
Mind the tracks
Rock the cut with keyboard shortcuts
A colleague recently said to me, “When you asked if I was using the keyboard, I said yes, but I didn’t know you meant using the keyboard like this!”
You should rarely look down at the keyboard while performing basic editing operations, like playing footage, marking In and Out points, or putting clips into the Timeline with insert or overwrite. It takes time to perfect, but if you map your keyboard correctly, you’ll rarely look down at the keys while assembling the cut. Keep your eyes on the prize—the footage!
You may already be using the JKL keys to play through footage, but perfect this trick and layer on additional keyboard moves to increase your speed while performing the most common editing tasks. The following simple practices will train your muscle memory in preparation for dynamic trimming:
![]() Use key commands, not buttons. Always use the JKL keys to play, rewind, and pause rather than clicking buttons with the mouse or pressing the spacebar. Using keyboard shortcuts is the fastest way to navigate through hours of footage and helps prevent carpel tunnel syndrome.
Use key commands, not buttons. Always use the JKL keys to play, rewind, and pause rather than clicking buttons with the mouse or pressing the spacebar. Using keyboard shortcuts is the fastest way to navigate through hours of footage and helps prevent carpel tunnel syndrome.
Place three fingers on the “home keys” (JKL) and you’ll be able to keep your eyes on the content at all times while playing through clips and sequences. This method is similar to touch-typing (without looking down at the keyboard) and is far faster than hunt-and-peck typing.
![]() Use the keyboard as a work surface, not as a typing tool. Consciously place the keyboard so it’s easy to reach and comfortable for you. To encourage key command use and reduce hand and arm fatigue, the keyboard should be positioned so your fingers land on the JKL keys when in a neutral position, so the wrist is in alignment with the elbow.
Use the keyboard as a work surface, not as a typing tool. Consciously place the keyboard so it’s easy to reach and comfortable for you. To encourage key command use and reduce hand and arm fatigue, the keyboard should be positioned so your fingers land on the JKL keys when in a neutral position, so the wrist is in alignment with the elbow.
I slide my keyboard to the left so the arrow keys point to the center of my body. You may need to push the keyboard even farther to the left so the number pad is centered in front of your torso. I also angle the keyboard slightly, so the number pad is a little farther from my body than the Esc key. I park my ring finger at the bump on the J key to find “home” position on the keyboard. The keyboard should not be centered in front of your torso like a typewriter! If the JKL keys are in front of your torso, your wrist will be forced to work at an angle. Move the keyboard into a comfortable position and learn to use it “by feel,” without looking at it.
![]() Drive the keyboard with one hand. Keeping one hand on the keyboard and the other hand on the mouse allows you to work more efficiently with both tools.
Drive the keyboard with one hand. Keeping one hand on the keyboard and the other hand on the mouse allows you to work more efficiently with both tools.
![]() Speed through footage by pressing J and L multiple times. The fastest way to preview footage is to use the keyboard shortcuts for fast forward and rewind. Press J repeatedly to rewind and press L repeatedly to fast-forward through clips. Press JJ or LL to achieve double speed, or press these keys multiple times to play even faster. You’ll eventually be able to hear exactly what is playing at double speed. It’s actually a bit freaky.
Speed through footage by pressing J and L multiple times. The fastest way to preview footage is to use the keyboard shortcuts for fast forward and rewind. Press J repeatedly to rewind and press L repeatedly to fast-forward through clips. Press JJ or LL to achieve double speed, or press these keys multiple times to play even faster. You’ll eventually be able to hear exactly what is playing at double speed. It’s actually a bit freaky.
![]() Scrub clips. Hold down both K and L or K and J to scrub footage in the Source and Timeline panels. Turn the option Play Audio While Scrubbing on and off in the Audio category of the Preferences pane (Figure 3.7 on the next page).
Scrub clips. Hold down both K and L or K and J to scrub footage in the Source and Timeline panels. Turn the option Play Audio While Scrubbing on and off in the Audio category of the Preferences pane (Figure 3.7 on the next page).

![]() Move one frame at a time. Practice moving the playhead back and forth across a cut point in the Timeline in single-frame increments by holding K down while tapping J and L. I call this rocking the cut.
Move one frame at a time. Practice moving the playhead back and forth across a cut point in the Timeline in single-frame increments by holding K down while tapping J and L. I call this rocking the cut.
![]() Mark clips on the fly. While playing footage, always press I and O to mark In and Out points rather than mouse click on the buttons.
Mark clips on the fly. While playing footage, always press I and O to mark In and Out points rather than mouse click on the buttons.
![]() Quickly add shots to a sequence. Use the comma and period keys to insert and overwrite shots into the Timeline. Insert and overwrite edits are covered in more detail later in this chapter.
Quickly add shots to a sequence. Use the comma and period keys to insert and overwrite shots into the Timeline. Insert and overwrite edits are covered in more detail later in this chapter.
Learn Adobe Premiere Pro default keyboard shortcuts
Many shortcuts are ready to use, so try them out! Don’t miss out on some of the great shortcuts that have been pre-mapped by Adobe.
Here are a few of the default keyboard shortcuts I use constantly while editing:
![]() Zoom to sequence. A helpful default keyboard shortcut I use all day long is the backslash () key. It zooms the display of clips in the sequence to fit the Timeline panel.
Zoom to sequence. A helpful default keyboard shortcut I use all day long is the backslash () key. It zooms the display of clips in the sequence to fit the Timeline panel.
![]() Zoom in sequence. To zoom in and out on the clips inside a sequence, press the + and – keys (without modifiers). I use these keys constantly while working in the Timeline. Try remapping these keys to the G and H keys if you find you’re looking down at the keyboard to locate + and - too often.
Zoom in sequence. To zoom in and out on the clips inside a sequence, press the + and – keys (without modifiers). I use these keys constantly while working in the Timeline. Try remapping these keys to the G and H keys if you find you’re looking down at the keyboard to locate + and - too often.
![]() Maximize frame under cursor. Pressing the accent (`) key enlarges any panel the mouse is hovering over so it fills the screen. I use this most often to enlarge a bin of clips that are in Icon view or to get a quick view of all Timeline tracks.
Maximize frame under cursor. Pressing the accent (`) key enlarges any panel the mouse is hovering over so it fills the screen. I use this most often to enlarge a bin of clips that are in Icon view or to get a quick view of all Timeline tracks.
![]() Toggle full screen. Press Command+` (Ctrl+`) to view the Program panel at the full screen size.
Toggle full screen. Press Command+` (Ctrl+`) to view the Program panel at the full screen size.
![]() Restore frame size. The accent (`) key commands are like light switches. Press them again to return the panel to normal size.
Restore frame size. The accent (`) key commands are like light switches. Press them again to return the panel to normal size.
Modify existing keyboard shortcuts
If a pre-mapped keyboard command isn’t working for you, change it. I remap keyboard shortcuts mainly so I don’t have to look down at the keyboard while I’m working. Place the shortcuts for features you use every few seconds within easy reach of the JKL keys.
Recently, while I was working with the San Francisco 49ers media team, I noticed that some of the guys couldn’t use my favorite personalized keyboard shortcuts because their hands were twice the size of mine! A few of them could reach the arrow keys with the thumb of their left hand while ring, middle, and index fingers were parked in the “home position” (JKL). That’s not an option for me. My thumb rests naturally near the Command and Option (Alt) keys, but the thumb of someone with larger hands can rest on the Ctrl key and might easily stretch to reach the arrows. To move the playhead between cut points in a sequence, which I do all day, I map keyboard shortcuts to the semicolon and apostrophe keys. I move the default lift and extract keyboard shortcuts up a level to the bracket keys, which are located just to the right of the P key.
Mapping the keyboard is very personal, and your choices should accommodate your editing style and physical comfort. The physical size and position of your hand will dictate some mapping options. It makes a huge difference in speed when you get it right.
Saving and using keyboard shortcuts helps me stay in the flow of the creative process. When I’m deeply engaged in editing, I don’t want to lose my hold on a fleeting idea because I have to go hunting through a list in a fly-out menu. A simple solution for increasing speed while editing is to set up your keyboard so everything you need is within easy reach. Then practice pressing those keys without looking at the keyboard.
Here are some guidelines when you choose keys to remap:
![]() Increase speed. Any shortcut you use all day should be in reach of your “home” hand position on the keyboard. I use the G and H keys to hold some of my favorite editing options (such as sequence zoom in and zoom out) because those keys are right under my pinky finger. Take time to modify the keyboard to suit your needs. It’s the simplest thing you can do to fly through the more tedious tasks of the trade.
Increase speed. Any shortcut you use all day should be in reach of your “home” hand position on the keyboard. I use the G and H keys to hold some of my favorite editing options (such as sequence zoom in and zoom out) because those keys are right under my pinky finger. Take time to modify the keyboard to suit your needs. It’s the simplest thing you can do to fly through the more tedious tasks of the trade.
![]() Modify pre-mapped shortcuts. Shift+2 and Shift+3, which toggle focus between the Timeline and Source panels, can be remapped to the 2 and 3 keys (without the modifier) if you’re not currently using those commands for multi-cam editing.
Modify pre-mapped shortcuts. Shift+2 and Shift+3, which toggle focus between the Timeline and Source panels, can be remapped to the 2 and 3 keys (without the modifier) if you’re not currently using those commands for multi-cam editing.
![]() Reclaim unused keys. Consider remapping infrequently used keyboard shortcuts, like the capture keys (F5 and F6). It’s rare to capture from tape-based sources these days, so set these keys to more commonly used commands.
Reclaim unused keys. Consider remapping infrequently used keyboard shortcuts, like the capture keys (F5 and F6). It’s rare to capture from tape-based sources these days, so set these keys to more commonly used commands.
Create custom shortcuts
Add familiar shortcuts from other editing applications, and enhance your own personal editing style by creating custom shortcuts for often-used buttons and items in menus you frequently visit.
If you use a feature more than five times during an edit session, consider creating a shortcut, and then test it while you’re editing to see if it speeds up your workflow. Here are the specific steps if you’ve never done this before.
1. Open the Keyboard Shortcuts panel. Choose Premiere Pro > Keyboard Shortcuts (Mac) or Edit > Keyboard Shortcuts (Windows).
2. Select the Adobe Premiere Pro default keyboard layout. From the pop-up menu, begin with the Default Layout or choose [Custom].
3. Twirl the disclosure triangles. Click the disclosure triangles to view available menu options and panel features.
4. Map a keyboard shortcut. Click the Edit button, and then press the desired shortcut keys on your keyboard.
5. Do not press Return (Enter). Continue to customize your keyboard layout before you press Return (Enter) or click the OK button.
6. Click OK. When you’ve added all the custom keyboard shortcuts you want, close the Keyboard Shortcuts panel by clicking OK.
![]() Tip
Tip
If you want to add familiar Final Cut Pro or Avid keys, start with the Adobe Premiere Pro default settings, and then add your favorite commands from the other applications on top of the default set. If you simply start with your familiar keyboard preset, you’ll miss out on learning some great features in Adobe Premiere Pro—many of which are available for mapping in the Keyboard Shortcuts panel.
Here are a few tips for mapping keys:
![]() Map features you use repeatedly. Because I often use markers, I was constantly right-clicking on the markers to add comments, so I created a keyboard shortcut for the Edit Marker panel. Now I can press M to add a marker, and then immediately press Ctrl+M to add information and designate a duration for the marker. The added text appears right on the marker “tail” after the duration has been set (Figure 3.8).
Map features you use repeatedly. Because I often use markers, I was constantly right-clicking on the markers to add comments, so I created a keyboard shortcut for the Edit Marker panel. Now I can press M to add a marker, and then immediately press Ctrl+M to add information and designate a duration for the marker. The added text appears right on the marker “tail” after the duration has been set (Figure 3.8).
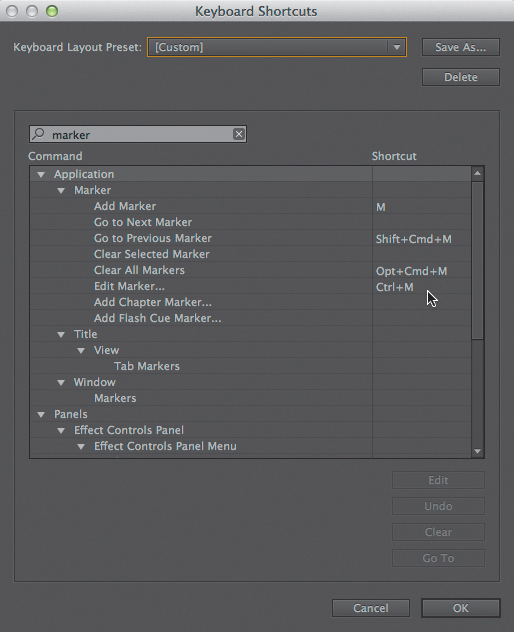
Figure 3.8 Create a keyboard shortcut for features you use repeatedly during an edit session, such as Edit Marker.
![]() Map features that save time. While you’re currently adding and testing new keyboard shortcuts, make a shortcut that opens the Keyboard Shortcuts panel! Type the word keyboard into the search field and add your own command for quick access to this panel so you don’t have to repeatedly mouse up to the main menu. I use Ctrl+K.
Map features that save time. While you’re currently adding and testing new keyboard shortcuts, make a shortcut that opens the Keyboard Shortcuts panel! Type the word keyboard into the search field and add your own command for quick access to this panel so you don’t have to repeatedly mouse up to the main menu. I use Ctrl+K.
![]() Learn the default keyboard shortcuts. Learn the built-in features that Adobe Premiere Pro offers by opening the Keyboard Shortcuts panel, twirling the disclosure triangles, and simply looking at the list of available items.
Learn the default keyboard shortcuts. Learn the built-in features that Adobe Premiere Pro offers by opening the Keyboard Shortcuts panel, twirling the disclosure triangles, and simply looking at the list of available items.
Save keyboard layout presets
If you engage in different roles, such as creative editing and finishing work, you may need to save a few different keyboard presets. Consider saving a keyboard layout for creative editing, another for audio work, a third for finishing and effects work, and one for multi-cam editing (Figure 3.9):

![]() Save your custom keyboard layout. Open the Keyboard Shortcuts panel. If you’ve customized keys without saving them, the pop-up menu will be set to [Custom]. Further customize as needed, click Save As, name the set, and then click OK.
Save your custom keyboard layout. Open the Keyboard Shortcuts panel. If you’ve customized keys without saving them, the pop-up menu will be set to [Custom]. Further customize as needed, click Save As, name the set, and then click OK.
![]() Create additional sets. Select Custom from the Keyboard Layout Presets pop-up menu, edit or add commands as needed, and then name and save the new set.
Create additional sets. Select Custom from the Keyboard Layout Presets pop-up menu, edit or add commands as needed, and then name and save the new set.
![]() Add to an existing set. Rather than creating a new set, select an existing preset from the pop-up menu, add or edit some keyboard commands, and then rename the updated set using the same name so it replaces the previously saved layout.
Add to an existing set. Rather than creating a new set, select an existing preset from the pop-up menu, add or edit some keyboard commands, and then rename the updated set using the same name so it replaces the previously saved layout.
Saving a keyboard preset allows you to quickly adjust your work surface to meet your needs for speed in any given situation. I regularly update my customized keyboard shortcuts, and alter them for specific projects as needed, so I can fly through an edit with ease.
Keyboard presets (along with other saved presets) are saved inside your Adobe Profile folder. You can move the presets to other systems manually, but don’t forget that syncing your settings is a fantastic advantage of the Creative Cloud (see Chapter 1).
Three-point Editing
You may love drag-and-drop editing, but the most precise way to add footage to a sequence is to use a standard three-point edit. It’s fast and accurate. If you’re already seasoned at three-point editing, you may want to move on to the next section.
If you regularly drag and drop footage into the Timeline, cut with the Razor tool, and constantly move groups of clips around inside the Timeline to make room for more shots, I guarantee your workflow will speed up if you master three-point editing using the overwrite and insert keyboard shortcuts to add clips to an existing sequence:
![]() Overwrite. An overwrite edit replaces frames in the sequence with new frames from the source clip.
Overwrite. An overwrite edit replaces frames in the sequence with new frames from the source clip.
![]() Insert. An insert edit adds a clip to your sequence and shifts the existing material to the right (later in the sequence) to make room for the inserted media.
Insert. An insert edit adds a clip to your sequence and shifts the existing material to the right (later in the sequence) to make room for the inserted media.
Three-point editing allows you to define the segment of a clip you want to put at a specific place in the sequence or to define a specific range in the sequence that you want to fill with a clip.
![]() Notes
Notes
This chapter’s project files are available for download. Please see “A note about downloadable content” in the Introduction of this book.
Inserts
When you set two of the three points—an In and an Out—in the source clip, and then set either an In or an Out point in the sequence to define the third point, most likely you’ll perform an insert edit. The playhead location is assumed to be an In point if you don’t set an In or an Out mark in the sequence.
Typically, when adding media of a set duration into a sequence at a specific point in time, I use a three-point insert edit. For example, in the sequence named Skiing Everest_Time Alone_Insert, I’ve placed the playhead at 28:10 to define the point where I want to add a sound bite. In the Source panel I’ve set an In and Out point for the clip called SE_03 to bracket the segment where the narrator says, “When you’re climbing, you’re not talking to your buddies.” I press Option+K (Alt+K) to play from In to Out in the Source panel to check my selection, and then press the comma key to insert the footage into the sequence at the Timeline playhead (Figure 3.10, facing page).

Figure 3.10 When In and Out points define a duration for a clip in the Source panel, you’re set up to perform a three-point edit into the sequence. This is the common setup for performing an insert edit.
Overwrites
There may be times when you’ll want to define a duration in the sequence and fill it with footage. In this case, two points are set in the Timeline, and one point is marked in the source clip—either an In or an Out point. This is a common technique used for placing B-roll visuals on top of audio bites that are already in the sequence. When this type of three-point selection is set up, you’ll typically perform overwrite edits.
In the Skiing Everest_Time Alone_Overwrite sequence, I’ve defined a range in the Timeline for a clip I want to write over with another shot of B-roll. The narrator is talking about time spent alone, so I’ve selected a shot of him climbing alone from clip SE_04 and marked an In point in the Source panel. To mark and accurately fill a desired duration in the sequence, I set an In and Out point in the Timeline by clicking to select the clip at 31:07 in the sequence and then pressing the forward slash (/) key to mark the clip I want to write over. Having defined all three edit points, I then press the period (.) key to perform an overwrite edit. Note that I chose a B-roll clip that did not contain audio. The new video clip now perfectly fills the space where the previous clip had been (Figure 3.11).
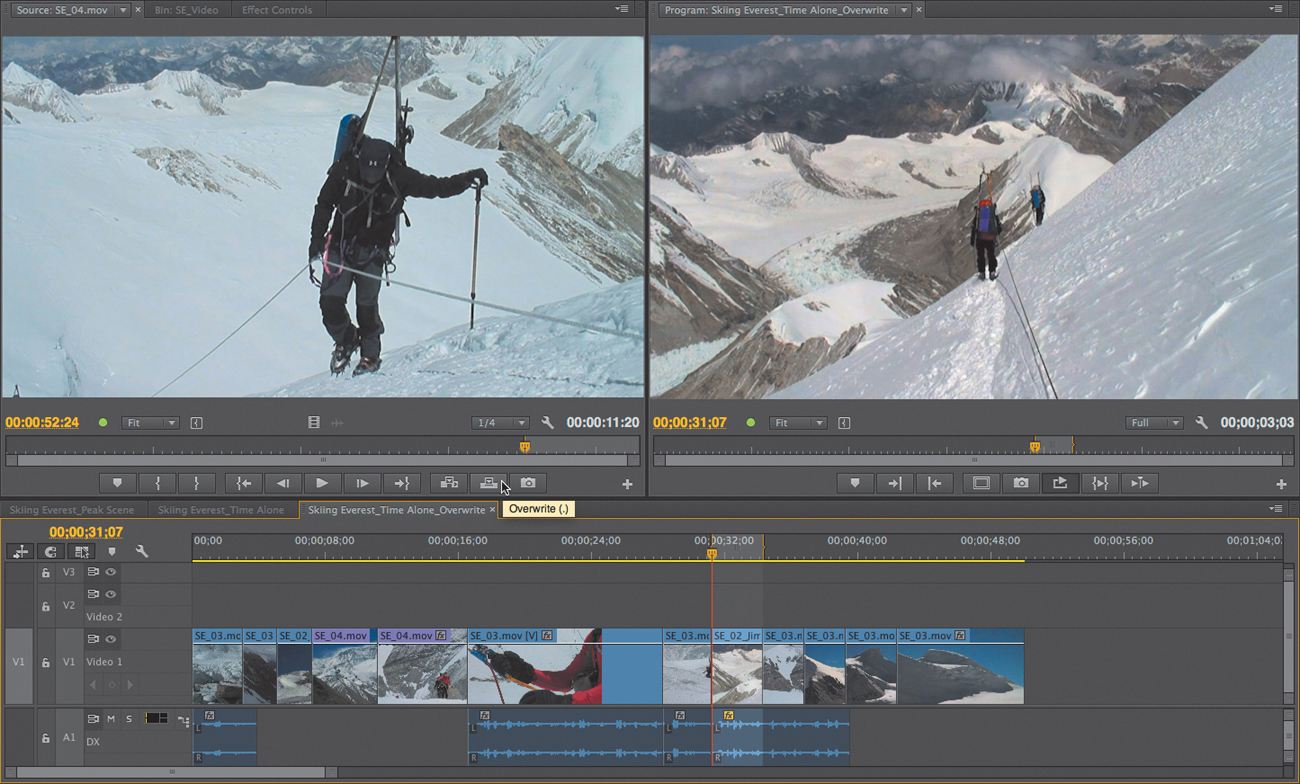
Figure 3.11 Set In and Out points to define a duration in the sequence, and then place an In or Out point in the source clip and press the period (.) key to perform an overwrite edit. This type of edit is often used to place visuals at very specific points in time to complement sequence audio.
Mind the Tracks
Source patching lets you designate which sequence tracks will be affected by insert and overwrite edits. Track targeting also effects many Timeline operations. You may already be familiar with these functions, but if not they are covered later in this chapter and in others. Here are the primary features that depend on track awareness:
![]() Insert and Overwrite
Insert and Overwrite
![]() Add Edit
Add Edit
![]() Extract and Lift
Extract and Lift
![]() Copy, Paste, and Paste Insert
Copy, Paste, and Paste Insert
![]() Move Playhead to Next and Previous Edit
Move Playhead to Next and Previous Edit
Source patching for insert and overwrite edits
A big advantage of three-point editing is the ability to be precise. You can specify whether to use only the video or audio from a source clip, or both video and audio, and to control exactly which channels of an audio or video source will be edited into specific tracks in the Timeline. Clicking and dragging the Source Patching buttons so they line up with specific video and audio track targets in the Timeline—and making sure they are highlighted in light gray—ensures that source tracks end up right where you want them.
Some of the techniques that require patching include:
![]() Edit source video and audio into Timeline tracks V1 and A1. This is the most common Timeline configuration for inserting and overwriting clips that contain picture with synced sound, such as dialogue scenes and interviews.
Edit source video and audio into Timeline tracks V1 and A1. This is the most common Timeline configuration for inserting and overwriting clips that contain picture with synced sound, such as dialogue scenes and interviews.
Click to highlight the V1 and A1 Source buttons. “Patch,” or align, the Source buttons with the corresponding V1 and A1 Timeline track targets (these do not need to be highlighted). Mark an In point in the sequence, or use the playhead location as the In point, and then press insert (,) or overwrite (.) (Figure 3.12).
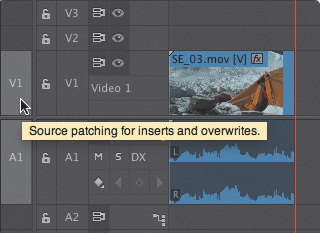
Figure 3.12 Toggle Source buttons for video and audio and place them in line with specific Timeline track targets before performing an insert or an overwrite edit.
![]() Edit a sound bite from the source video onto the A2 track in the Timeline. Sometimes I want to use a sound bite from a clip but don’t need the picture. This is especially common while editing promos, trailers, and commercials where fast-paced cutting makes synced dialogue less important than placing the most exciting visuals above sparse but powerful sound bites.
Edit a sound bite from the source video onto the A2 track in the Timeline. Sometimes I want to use a sound bite from a clip but don’t need the picture. This is especially common while editing promos, trailers, and commercials where fast-paced cutting makes synced dialogue less important than placing the most exciting visuals above sparse but powerful sound bites.
To edit the audio track only from a source clip into the sequence, first select an In to Out range in the Source panel. For the Skiing Everest scene called Time Alone, I marked In and Out points around a sound bite from clip SE_03 that says, “We had great weather...we were psyched.” Click in the Timeline source patching area next to the A2 track to highlight and place the A1 Source button next the A2 Timeline track target. Make sure the Video Source buttons are dark (not highlighted), and then press overwrite (.) (Figure 3.13).

Figure 3.13 To insert or overwrite only the audio from a source clip into the sequence, toggle Audio Source buttons on and line them up next to specific Timeline audio track targets. Make sure Video Source buttons are dark (not selected).
In this documentary about skiing Mount Everest, I want to build a “radio cut”(sketch out the story in sound bites) and later choose B-roll imagery. I typically “checkerboard” the tracks when working with audio that isn’t in sync with the picture. In other words, I place sound that isn’t dependent on sync onto a lower audio track, such as A2, so it stands out from the audio that is in sync with the picture on V1. After a few more edits, the audio on A1 and A2 will take on a checkerboard pattern in the Timeline. To see exactly what I mean, investigate the Skiing Everest_Time Alone sequence in the included project where audio on track A1 is linked and in sync with the picture on V1, and audio on track A2 is not synced or linked to the picture tracks and can be easily slid around (Figure 3.14).
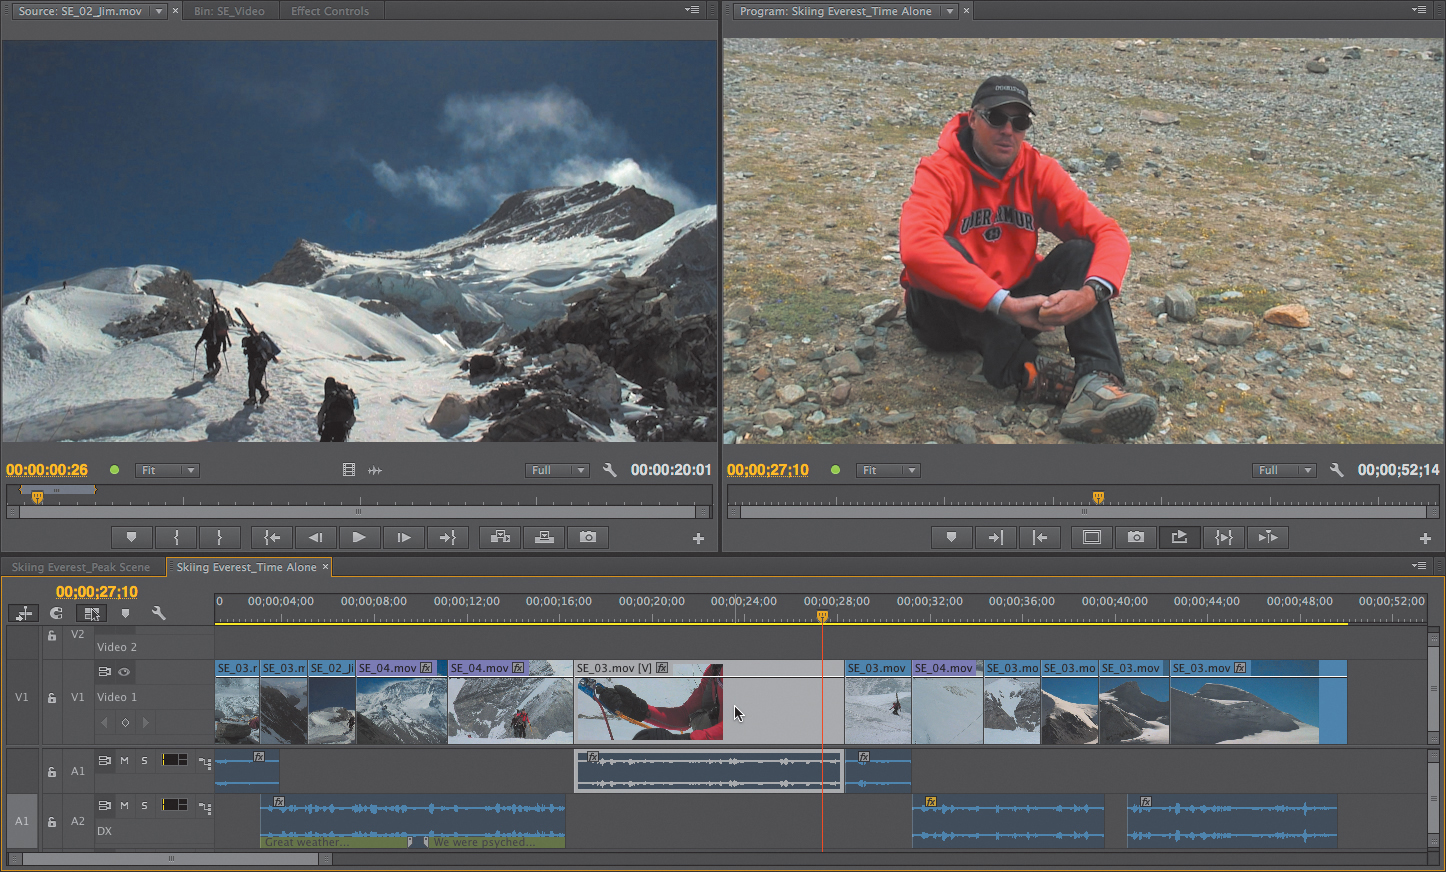
Figure 3.14 Place audio that is not synced to the picture on a separate audio track, so it can be easily moved around. This helps preserve sync on other tracks and makes it visually clear which sound bites are in sync and linked to the picture.
![]() Edit video without audio into the Timeline. To place the video portion of a clip into the Timeline without its synced audio, patch the V1 Source button to a specific Timeline track target by clicking in the empty Source button area where you want the source video to end up. Make sure the Audio Source buttons are dark (not highlighted), and then press overwrite (.)
Edit video without audio into the Timeline. To place the video portion of a clip into the Timeline without its synced audio, patch the V1 Source button to a specific Timeline track target by clicking in the empty Source button area where you want the source video to end up. Make sure the Audio Source buttons are dark (not highlighted), and then press overwrite (.)
In the Skiing Everest_Time Alone sequence, I edited a video-only portion of clip SE_02 onto V2, so I could slide it around and check placement over different sound bites. Later, I changed my mind and performed an overwrite edit to try out another image from the clip called SE_03 above the sound bite I’d chosen to use in this scene. Feel free to try this out using the provided project and sequences (Figure 3.15).

Figure 3.15 To insert or overwrite the source video without sound onto specific sequence tracks, click to toggle on the V1 Source button and line it up next to a specific Timeline video track target. Make sure the Audio Source buttons are dark (not selected).
![]() Tip
Tip
The Add Edit feature (Command+K [Ctrl+K]) is the fastest way to splice footage in the Timeline. If you want all tracks to be spliced regardless of track targeting, press Command+Shift+K (Ctrl+Shift+K).
Track targeting
In addition to source patching, mind the track targets to make the best use of Adobe Premiere Pro’s editing tools and keyboard commands. These essential features depend on track targeting:
![]() Add Edit. Using the Add Edit command to make cuts across multiple tracks is faster and more precise than using the Razor tool. Clips under the playhead will be spliced only for targeted tracks when you press the keyboard shortcut for Add Edit (Command+K [Ctrl+K]).
Add Edit. Using the Add Edit command to make cuts across multiple tracks is faster and more precise than using the Razor tool. Clips under the playhead will be spliced only for targeted tracks when you press the keyboard shortcut for Add Edit (Command+K [Ctrl+K]).
In the Skiing Everest_Time Alone sequence, toggle (highlight) the Track Targeting button for V2, but leave other audio and video tracks dark (not highlighted) (Figure 3.16).
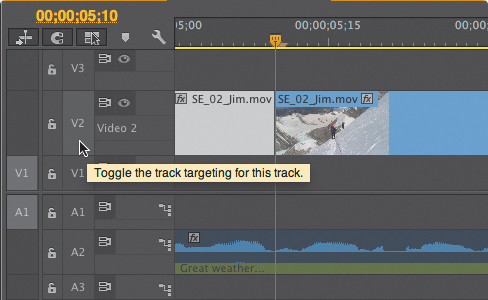
Figure 3.16 Click to highlight the Timeline track where you want to add a splice. Leave other track targets dark.
Now place the Timeline playhead at 25:21 in the sequence and press Command+K (Ctrl+K) to place a cut on the video track and isolate the onscreen lip-synced interview. The video portion of the clip will be spliced, but the audio portion of the clip will remain whole, making it easy to replace the B-roll portion above the sound bite while preserving the on-camera interview segment.
![]() Cut, Copy, and Paste. Pasting clips is a quick way to rearrange clips in the Timeline or to move segments from one sequence to another. Toggling the Timeline track targets allows you to paste audio or video into specific Timeline tracks with intent when using Cut, Copy, and Paste commands.
Cut, Copy, and Paste. Pasting clips is a quick way to rearrange clips in the Timeline or to move segments from one sequence to another. Toggling the Timeline track targets allows you to paste audio or video into specific Timeline tracks with intent when using Cut, Copy, and Paste commands.
Select and cut (Command+X [Ctrl+X]) or copy (Command+C [Ctrl+C]) a clip or group of clips in the Timeline. Toggle (highlight) the track targets for specific video and/or audio tracks and then paste (Command+V [Ctrl+V]) to overwrite clips at the playhead location.
![]() Go To commands. Track targets affect the Go to Next Edit and Go to Previous Edit buttons and keyboard shortcuts (Up and Down arrow keys). Targeting all tracks results in the playhead stopping at cut points on every track.
Go To commands. Track targets affect the Go to Next Edit and Go to Previous Edit buttons and keyboard shortcuts (Up and Down arrow keys). Targeting all tracks results in the playhead stopping at cut points on every track.
![]() Tip
Tip
Cut or copy a clip or group of clips, and then target the tracks where you want to insert the clips into the Timeline. Press Command+Shift+V (Ctrl+Shift+V) to Paste Insert the clips onto the targeted Timeline video and audio tracks at the playhead location. Clips beyond the playhead location will ripple farther down the Timeline.
Back-timing
Sometimes the completion of an action is more important when building a scene than seeing where the action begins. For example, you might want the viewer to see an actor exit the frame or watch a ball connect with a bat in close-up just before cutting to the wide shot.
![]() Tip
Tip
Press the Shift key while targeting Timeline Track buttons or Source Patch buttons to quickly select and deselect all video or audio sources or tracks. Keyboard shortcuts for Toggling All Source and Video Tracks can be found by typing Toggle All in the search field in the Keyboard Shortcuts panel.
It’s not uncommon to set an Out point for the source clip to specify where a clip should end, and then allow Adobe Premiere Pro to “back-time” the clip to fill a duration in the sequence. When you perform this type of three-point edit, the frame under the Out point in the source clip will be placed exactly where the Out point is set inside the sequence. The clip is edited into the Timeline for the duration defined by the third point—most often, the In point in the sequence.
![]() Tip
Tip
Put the playhead over a clip inside the Timeline and press the X key to quickly mark an In to Out range around that specific clip. The In/Out Duration field in the Program panel will update with the selected clip’s duration. This is another feature that follows track targets! Deselect the V1 track target to perform Mark Clip on Targeted V2 Track.
Check out the example sequence I’ve set up for you called Skiing Everest_Peak Scene_Backtiming. I’ve marked In and Out points in the sequence around a clip I’d like to write over to set a duration that I’ll fill using another shot. I want to use clip SE_01 where there is a close-up of the skier in red. After loading SE_01 into the Source panel, I mark an Out point where the skier is closest to the viewer and largest in the frame. I want the Out point I’ve selected in this source clip to replace the frame under the Out point in my sequence. After I press overwrite (.) the viewer will see a wide shot of a skier in red completing a left turn that began in the close-up. The Out point of the action is more important to me than where the shot begins, because I want it to match-cut with the next shot in the sequence. Allowing the Out point to be dominant in this case helps me create the feeling of continuous action across the cut, which was my intent. I’ll play around this area in the sequence after completing the edit to make sure the close-up shot of the skier in red contained enough footage to fill the Timeline duration I selected (Figure 3.17 on the next page).
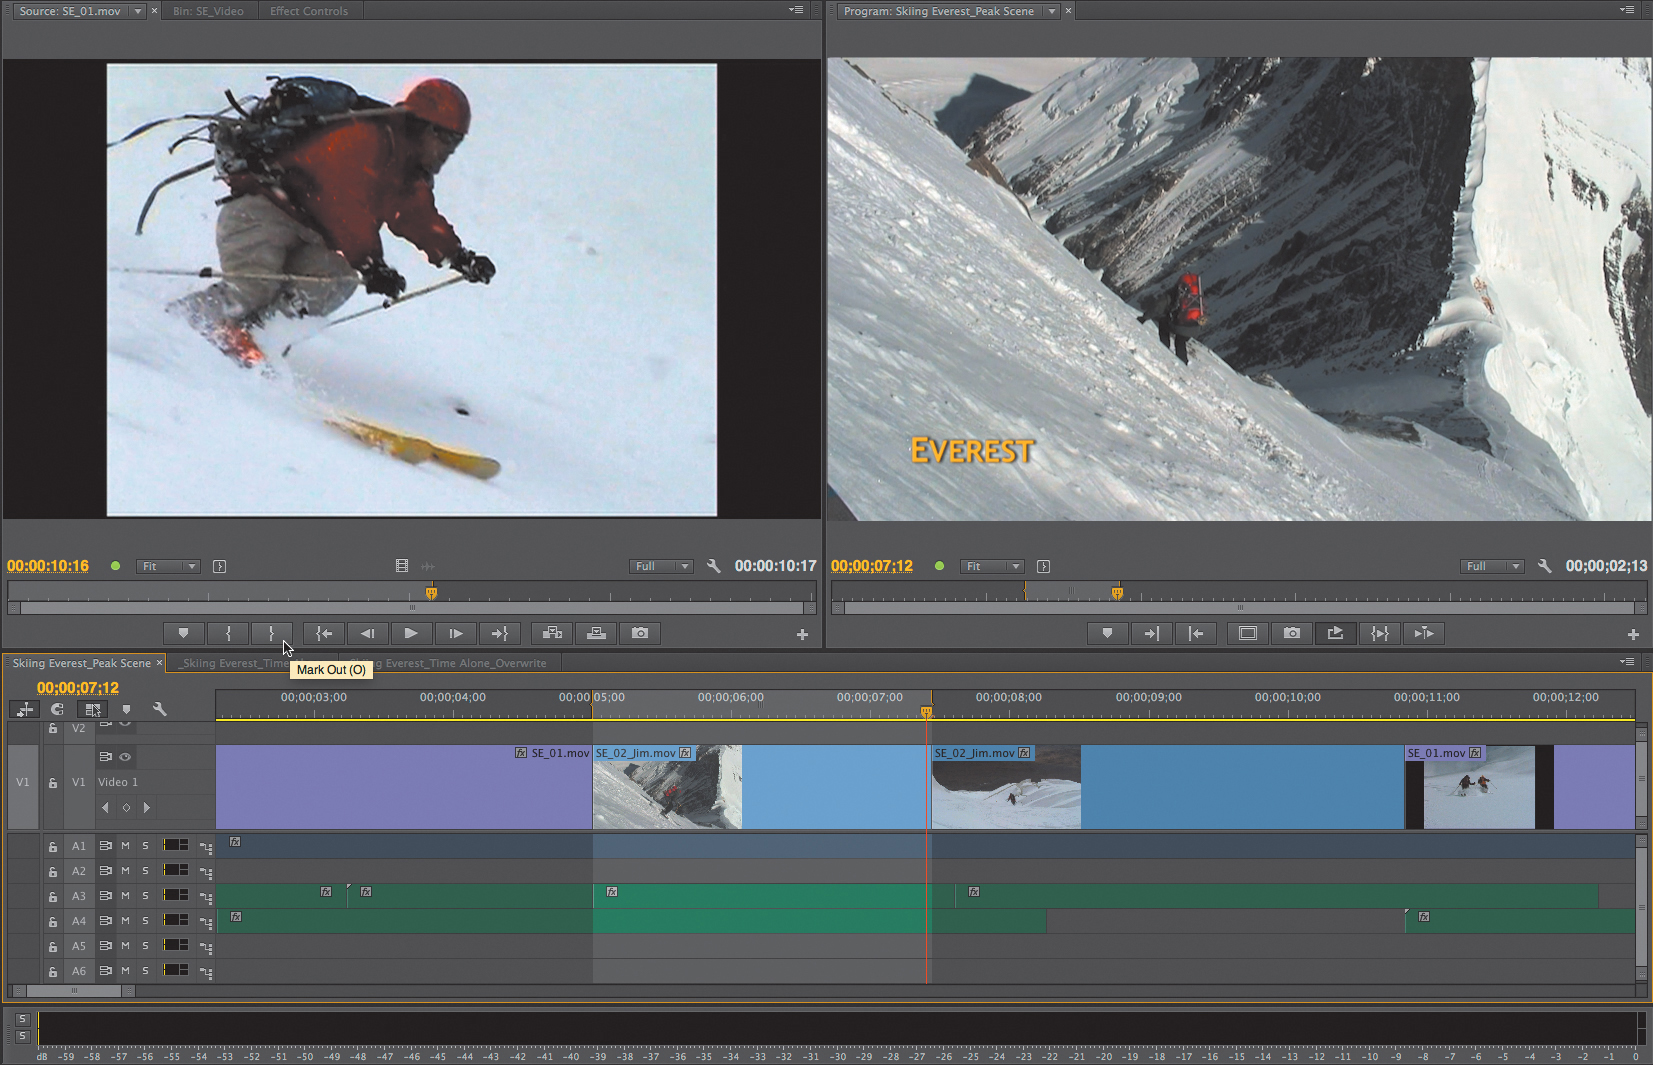
Figure 3.17 When backtiming a three-point edit, the frame under the Out point in the source clip will be added to the Timeline at the location of the sequence Out point, and footage from the source clip will be “back-timed” to fill the sequence In-to-Out duration.
Generally, when an Out point is set in the source clip and two points are set in the Timeline, you’ll want to perform this special type of overwrite edit, where the source clip’s Out point is timed to the Out Point in the Timeline.
Four-point editing
When four points are defined by marking In and Out points in both the Source panel and in the Timeline sequence, you’ll need to make a decision about how Adobe Premiere Pro should resolve the four-point edit. After setting four points and pressing insert or overwrite, the Fit Clip panel opens and offers you the option to ignore one of the points or change the speed of the clip when performing the edit (Figure 3.18).
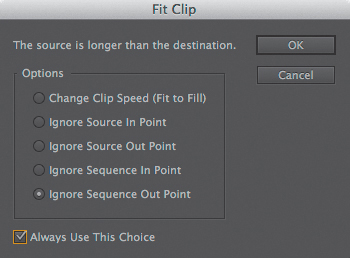
Figure 3.18 The Fit Clip panel offers five options for resolving an edit range mismatch. Fit Clip panel options can be customized to “stick” to your preference.
Here are the variations of the Fit Clip panel:
![]() Change Clip Speed. In and Out points for the source clip are preserved, and the clip’s speed is adjusted to fill the duration set by the sequence In and Out points.
Change Clip Speed. In and Out points for the source clip are preserved, and the clip’s speed is adjusted to fill the duration set by the sequence In and Out points.
![]() Ignore Source In Point. The frame marked with an Out point in the source clip is placed at the Out point mark in the Timeline. The duration is determined by the sequence In and Out points. This only works when the source clip is longer than the range set in the sequence.
Ignore Source In Point. The frame marked with an Out point in the source clip is placed at the Out point mark in the Timeline. The duration is determined by the sequence In and Out points. This only works when the source clip is longer than the range set in the sequence.
![]() Ignore Source Out Point. The Out point in the source clip is ignored. Duration is determined by the sequence’s In and Out points, and the frame marked by the In point in the source clip is placed at the In point mark in the Timeline. The source clip must be longer than the range set in the sequence.
Ignore Source Out Point. The Out point in the source clip is ignored. Duration is determined by the sequence’s In and Out points, and the frame marked by the In point in the source clip is placed at the In point mark in the Timeline. The source clip must be longer than the range set in the sequence.
![]() Ignore Sequence In Point. This choice will ignore the sequence In point and perform a standard three-point edit. Duration is defined by the source clip points. If the clip is shorter than the duration defined, you might need to clean up unwanted video in the sequence.
Ignore Sequence In Point. This choice will ignore the sequence In point and perform a standard three-point edit. Duration is defined by the source clip points. If the clip is shorter than the duration defined, you might need to clean up unwanted video in the sequence.
![]() Ignore Sequence Out Point. The sequence Out point is ignored, and a standard three-point edit is placed in the sequence with duration defined by the source clip In and Out points.
Ignore Sequence Out Point. The sequence Out point is ignored, and a standard three-point edit is placed in the sequence with duration defined by the source clip In and Out points.
When I accidentally make a fourth point and simply intended to add a clip to the Timeline using a standard three-point edit, I typically choose to ignore the Out point in the sequence and perform an insert edit. When my intention is to fill a set duration in the Timeline with a specific piece of footage, such as B-roll that illustrates a great sound bite, I commonly choose to ignore the Out point in the source clip. However, when the Out frame in the source clip defines action for a match-cut—pertinent action is happening at the end of the shot and I want it to continue in the incoming shot—I’ll choose to ignore the source In point and press overwrite to back-time the shot.
Fit to Fill
Performing a Fit to Fill is the main reason I set four points! I don’t mind the Fit Clip dialog opening when I set four edit points, because I typically only set four edit points when I intend to change a clip’s speed. Often, I need all of the action that takes place in a shot, and I need to fit that action into a very specific duration in the sequence. In this case, I usually set In and Out points in the Timeline that define a section of dialogue, bracket a music cue, or support an audio sound bite.
Test this feature in your own work. Set In and Out marks in both a sequence and a source clip, and then press insert or overwrite with the very clear idea that you’re going to force the source clip to speed up or slow down to fill an intentionally defined range in the sequence.
Here are some nuances of the Fit to Fill choice:
![]() Be deliberate in your actions. Learn how the different Fit Clip options work so you can choose what best suits your needs. Use four-point editing to place a speed-varied clip into a specific duration in the Timeline.
Be deliberate in your actions. Learn how the different Fit Clip options work so you can choose what best suits your needs. Use four-point editing to place a speed-varied clip into a specific duration in the Timeline.
![]() Set Preferences. It’s great that Adobe Premiere Pro offers so many four-point editing options, but because every second counts when a deadline is looming, you might want to deactivate this pop-up dialog. Set Fit Clip to perform one specific task every time you insert or overwrite with four points chosen by clicking the radio button next to the option you prefer in the Fit Clip panel. Then select Always Use This Choice. The Fit Clip panel will no longer open when you perform four-point edits.
Set Preferences. It’s great that Adobe Premiere Pro offers so many four-point editing options, but because every second counts when a deadline is looming, you might want to deactivate this pop-up dialog. Set Fit Clip to perform one specific task every time you insert or overwrite with four points chosen by clicking the radio button next to the option you prefer in the Fit Clip panel. Then select Always Use This Choice. The Fit Clip panel will no longer open when you perform four-point edits.
![]() Or Reset Preferences. If you’ve adjusted the Fit Clip dialog to perform one specific function—for example, you’ve selected Change Clip Speed and then selected Always Use This Choice—you might later find you want to choose another option and the Fit Clip panel no longer opens. Go to the Adobe Premiere Pro Preferences panel and in the General category select “Fit clip dialogue opens for edit range mismatches.” The Fit Clip dialog will become active again (Figure 3.19).
Or Reset Preferences. If you’ve adjusted the Fit Clip dialog to perform one specific function—for example, you’ve selected Change Clip Speed and then selected Always Use This Choice—you might later find you want to choose another option and the Fit Clip panel no longer opens. Go to the Adobe Premiere Pro Preferences panel and in the General category select “Fit clip dialogue opens for edit range mismatches.” The Fit Clip dialog will become active again (Figure 3.19).
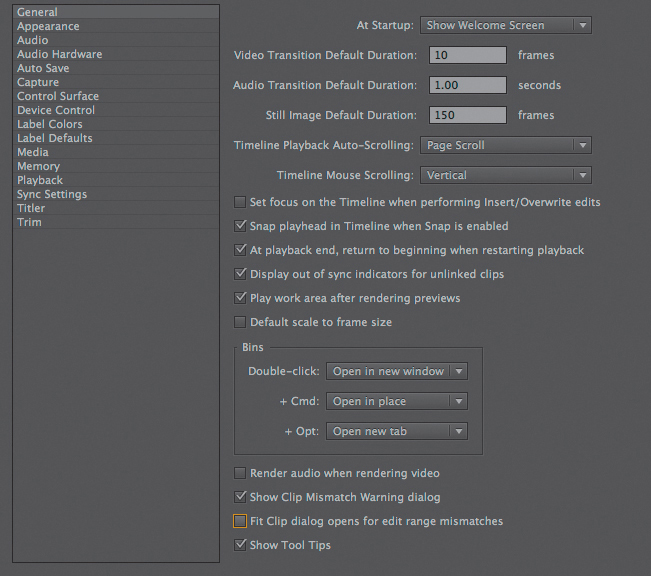
Figure 3.19 The Fit Clip dialog can be deactivated and reactivated in the Adobe Premiere Pro Preferences panel.
Automate to Sequence
Automate to Sequence is a great feature you can use in Adobe Premiere Pro to quickly rough out an idea. It allows you to edit multiple shots into a sequence simultaneously. You could just drag and drop multiple clips to a sequence, but you won’t have quite as much control over specific source audio and video tracks if you’re using the drag-and-drop method. Automate to Sequence performs an insert or overwrite using multiple clips, so you can place selected video and audio into the Timeline deliberately and with precise results.
I use this feature while storyboard editing to rough out a quick assembly. It’s great when you want to grab interview sound bites and assemble them in order or insert several B-roll clips at once into the Timeline. It’s the fastest way to edit a montage with dissolves, and you can use it to place clips precisely at numbered markers in the Timeline.
Using a bin as a Source Monitor
The fastest way I’ve found to rough out an assembly is to treat a bin of clips like it’s a multiple-Source Monitor. Set In to Out marks for clips in the bin, and then use Automate to Sequence to edit several shots into the Timeline all at once. This is the main reason I use Automate to Sequence!
You usually have an idea about the order you’d like to see certain clips play in a sequence. It’s time-consuming to load a single clip into the Source Monitor, mark In and Out points, edit the clip into the sequence, and then double-click another clip from the project to load it into the Source Monitor, mark In and Out points, edit that clip next to the first, and so on. Instead, open a bin of clips and use it as a multiple-Source Monitor.
![]() Tip
Tip
When clips are set to Icon view in a bin, drag the small playhead or simply hoverscrub over each clip and stop at specific frame. Press Command+P (Ctrl+P) to set a poster frame for each shot. Setting a poster frame will “park” each clip on a frame that represents clip content at a glance.
Although you could drag and drop several clips into the Timeline all at once, using the Automate to Sequence feature gives you finer control over how clips are edited into the Timeline. Preparing the interface for this process will make rough cutting and B-roll editing fast, easy, and fun. Here’s how to set up your workspace:
1. Option-double click (Alt-double-click) on a bin of video clips to open it into a tab (or set Preferences so bins open into a tab when double-clicked to avoid holding down the Option [Alt] key).
2. Drag the bin by its tab and drop it in the center of the Source panel. You don’t really need to relocate a bin to the same panel as the Source Monitor, because the bin can be docked anywhere, but try this for now so you’ll grow accustomed to a bin behaving like a Source Monitor.
3. Set the bin to display the clips in Icon view by selecting the bin and pressing Command+Page Down (Ctrl+Page Down). Drag the size slider so the images are larger and, if needed, drag the edge of the Source panel so it’s large enough to see multiple clips. You’ll now have multiple source clips available while editing, and you won’t need to double-click to open each clip into the source window for marking—the clips are already open!
4. Play through each of the clips using JKL. Set an In-to-Out range for each clip you want to add to the Timeline (Figure 3.20).
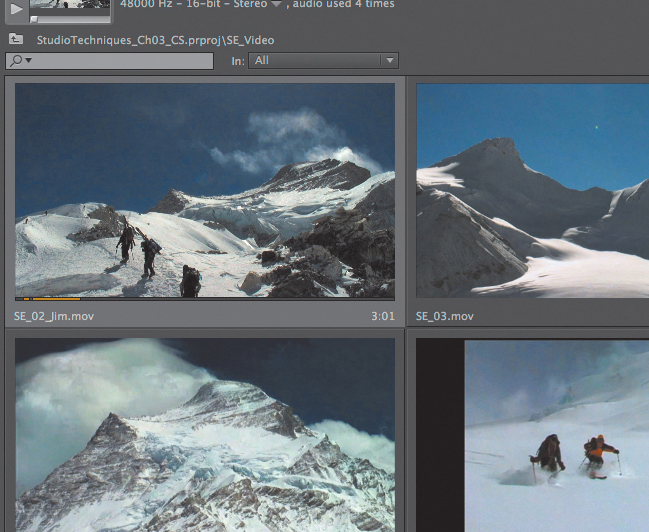
Figure 3.20 Dock a bin of clips next to the Source Monitor and set view to Icon mode. When In and Out points are set, a small orange line indicates the marked area of the clip, and the In-to-Out duration is displayed at the lower-right corner of each clip.
Now that you’ve set up a bin as a multiple-Source Monitor, let’s use the Automate to Sequence feature to edit several clips into a sequence. You can use these steps in your own project, or open the project I’ve included for this chapter and double-click on the Skiing Everest_Automate sequence. If you’re using the sequence I’ve prepared, you’ll also want to open the bin named SE_Video. I suggest dragging the tab and docking that video bin inside the Source Monitor.
1. Play through the sequence to get familiar with the sound bites.
2. If any clips are selected in the sequence, deselect all by pressing Command+Shift+A (Ctrl+Shift+A).
3. Turn on Snapping (S) and move the playhead to the end of the last video clip in the sequence.
4. Press M to set a marker.
5. While playing through the sequence again, press M to set another marker after the narrator says, “We had great weather...,” but just before he says “The North ridge...”. Adjust your Timeline tracks so you can see the audio waveforms in the dialogue track while playing the sequence to help you locate each sound bite when adding markers.
6. Place a third marker where the narrator says, “The way that it is...”.
I’ve already set In and Out points for clips SE_02, SE_03, and SE_04 inside the SE_Video bin.
7. Select the clips in the order you want them to appear in the sequence by pressing Command-click (Ctrl-click) to select multiple, noncontiguous clips.
8. Click the Lock icon next to the Timeline tracks you don’t want affected by the edit.
9. Click the Automate to Sequence button (Figure 3.21).

Figure 3.21 Carefully position the playhead and markers in the Timeline to indicate where you’d like to add clips. With a bin of video clips now functioning as a multi-clip Source Monitor, set In and Out points in multiple clips. Command-click (Ctrl-click) to select clips in the order you want them to appear in the sequence. Click Automate to Sequence.
10. The Automate to Sequence dialog appears, giving you options to insert or overwrite clips in sort or selection order. Explore the options that allow you to ignore audio or video and add transitions and still images (Figure 3.22).

Figure 3.22 Clips will overwrite onto the targeted Timeline track at marker locations in selection order, ignoring audio when that option is selected in the Automate to Sequence dialog.
11. From the Ordering pop-up menu, choose Selection Order.
12. If you’ve added markers to your sequence, select At Unnumbered Markers for Placement. If you haven’t added markers, choose Sequentially.
13. For Method, select Overwrite Edit.
14. Select Use In/Out Range for stills.
15. Deselect Default Video and Audio Transitions.
16. Select Ignore Audio.
17. Click OK.
For extra credit, try dragging a few more clips to the top your the bin in the order you’d like to add them to the sequence. Place the playhead at a cut point in between two shots in your sequence and Shift-click to lock all audio tracks. Click the Automate to Sequence button and choose Sort Order from the pop-up menu. Choose Insert Edit from the Method pop-up menu and select Ignore Audio. Click OK. Clips will insert onto the targeted tracks, and audio tracks will not be affected.
![]() Notes
Notes
Be aware that inserting clips, like ripple trimming, always has the potential to throw clips out of sync. Mind the tracks.
Using Automate to Sequence is a great way to quickly get a sequence started. It’s also useful for inserting several shots simultaneously into an existing sequence. Automating clips to numbered markers is helpful when you want to overwrite B-roll or graphics onto a higher level Timeline video track in time to music or audio narration, especially when you know exactly where each shot should be placed in the sequence. If you use this feature regularly, make a keyboard shortcut to open the Automate to Sequence dialog. I use Shift+A (Figure 3.23).
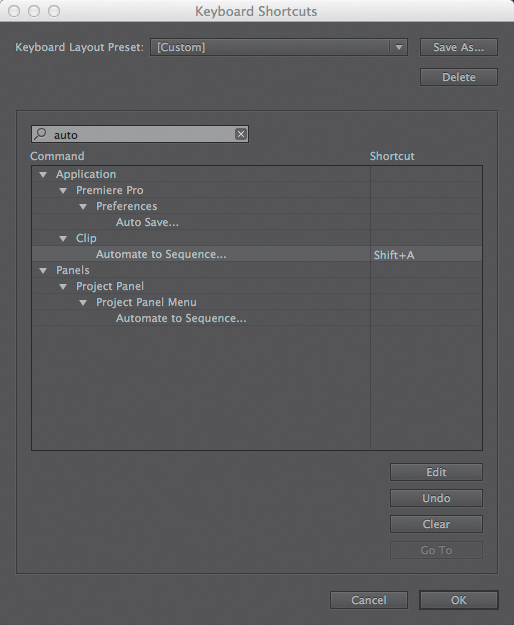
Figure 3.23 Create a keyboard shortcut, such as Shift+A, for favorite features like Automate to Sequence.
Timeline Finesse
There are several well-known editing functions that are essential to all editors, no matter the story genre. When you choose the right tool for the job, quickly rearranging the order of shots in a sequence becomes easy. Let’s look at the best methods for artfully adding, removing, replacing, and rearranging shots in the Timeline.
Match Frame
I use Match Frame dozens of times each day while editing in the Timeline. If you’re not already familiar with the feature, place your playhead over a clip in the Timeline and press the F key for Match Frame. The master clip is loaded into the Source Monitor and parked at the same frame as the playhead in the sequence.
Using Match Frame to replace or sync audio
One common reason to use Match Frame is to replace audio channels you didn’t originally edit into the sequence along with the picture or to restore audio channels that you deleted and now want.
1. Place the Timeline playhead at the In point of a shot in the sequence (Figure 3.24), and then press F to load the master shot into the Source Monitor.

Figure 3.24 Mind the tracks! Put the Timeline playhead on the In point of a sequence clip and press F to perform a Match Frame. To replace Audio only, deselect Video Source Patch buttons and set the Audio Source button to the desired Timeline track target before performing the edit.
2. Toggle Source Track patching on for audio and off for video.
3. Press period (.) to overwrite the audio track back into the sequence in sync.
![]() Tip
Tip
To ignore track targeting when you’re working with multiple layered tracks, simply click on the clip you want to Match Frame in the Timeline (it can be either audio or video) before pressing F.
Mind the tracks! Track targeting affects Match Frame functionality. When all tracks are targeted, video tracks are dominant over audio tracks and higher-numbered tracks are dominant over lower-numbered tracks. For example, if you Shift-click to highlight all video track targets, and there is layered video on V1 and V2, the V2 master clip will load into the Source panel. Deselect the V2 track target and press F again, and the V1 master clip will load into the Source panel.
Clicking to select a clip under the playhead in the Timeline will give it priority for Match Frame regardless of track target settings. For example, when there is audio under the Timeline playhead that is not linked to video above it and you want to Match Frame on that audio track, click on that specific audio clip to select it before pressing F so the master audio clip will load into the Source Monitor. Clicking the clip is the quickest way to indicate my preference for Match Frame when I want to match anything other than the topmost video track.
Using Match Frame to cut a dialogue scene
My favorite reason for using Match Frame is that it’s great for rapidly cutting a dialogue scene between two characters. When a dialogue scene is filmed from two cameras angles (one angle on each character) but is not a multi-camera shoot—in other words, the timing isn’t continuous—try this technique.
1. Edit the first line of dialogue from character number one into the sequence. Very likely, this is an over the shoulder (OTS) shot.
2. Edit the first response, either the first line of dialogue or a reaction, from the second character into the sequence as you normally would by performing an overwrite or an insert edit to put the two lines of dialogue together in sequence.
3. Place the Timeline playhead on the last frame of character number one’s clip, and press F (Match Frame) to quickly reload the clip for the first character back into the Source Monitor.
The source clip is now ready for you to play forward and quickly mark an In-to-Out range in real time for character number one’s next line.
4. Press Shift+3 to toggle focus on the Timeline, press the down arrow key to move the playhead into position for the edit, and then press insert (,).
5. Press the up arrow key and then the left arrow key once to put the Timeline playhead on the last frame of character number two’s clip.
6. Press F. Character number two’s master clip is now loaded into the Source panel and ready for you to play forward and mark the next line of dialogue.
7. Continue using Match Frame to quickly build a rough cut of the entire dialogue, alternating between the two actors.
Reveal Master Clip
Another feature I use often is Reveal Clip. Instead of having a selected clip open into the Source Monitor, as it does with the Match Frame command, you can select a clip in the Timeline or Source panel and reveal the master clip for that shot inside the project bin. Simply select a clip in either the Timeline or the Source panel, right-click and choose Reveal in Project. What’s really handy is that if your footage is well organized, this command will open the bin full of similar shots, making it quick and easy to replace shots and try out different takes or camera angles in the Timeline (Figure 3.25).

Figure 3.25 Right-click on a clip in the Timeline or Source Monitor and choose Reveal in Project to highlight the master clip inside bins in the Project panel.
For extra credit, remember to map keyboard shortcuts for frequently used features! Right-clicking on a clip and hunting through the pop-up menu for Reveal in Project annoyed me because I was looking for this feature several times in an hour. I recommend setting the same keyboard shortcut to access Reveal in Project for both the Source and Timeline panels. Then, one keyboard shortcut will open the bin that contains the highlighted clip whether you select the clip inside the Timeline or in the Source panel. Don’t forget to save, and type the same name to replace your current keyboard preferences with the newly added shortcuts (Figure 3.26).
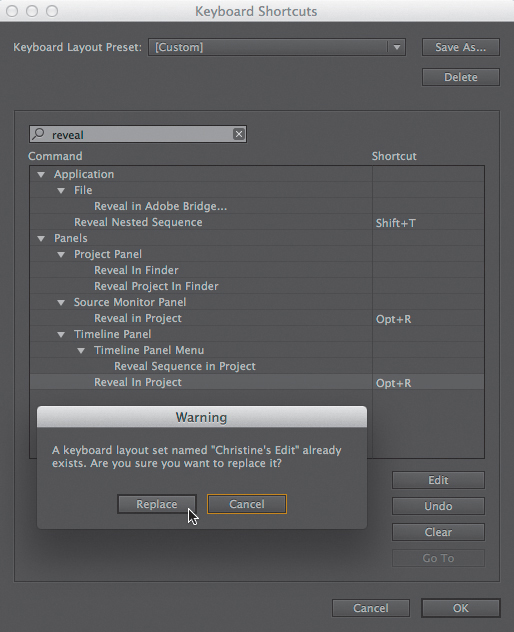
Figure 3.26 In the Keyboard Shortcuts panel, set the same shortcut for Reveal in Project in both the Timeline and Source panel lists. Click Save, and name and replace the existing keyboard layout with the newly created commands.
Replace Footage
There will come a time when you’ll need to replace a clip, either for the whole project or just for one scene. Whether you’ve been given updated motion graphics or revised animation, or you simply want to try another take of an actor’s performance for a scene inside the sequence, replacing shots is a mainstay of editing. There are several methods for replacing footage inside projects and individual sequences, but I’ll focus on the most useful techniques and explain when or why you’d use one instead of another.
Replacing footage in the project
Imagine you have a clip called Logo_001 in the Timeline, which is a temporary graphic that was created for the episode you’re working on. You’re now on the third version of your cut sequence, and the motion graphics editor sends you the final version of this graphic. The easiest way to replace the temporary version with the new one, throughout multiple sequences (all three versions of your cut), is to use the Replace Footage command in the Project panel.
1. Right-click the footage you want to update inside the Project panel and choose Replace Footage.
2. Navigate to the new file, and select Rename Clip to File Name.
The new file is now updated “live” inside all sequences too!
Choosing Replace Footage at the project level is my go-to choice for updating in-sequence motion graphics, because the new graphics are immediately ready to be screened inside all sequences. I also use this method to replace older temporary audio files with final narration and music tracks. The Replace Footage command automatically updates the audio files, so I’m confident that the final recordings have been replaced in every sequence.
This feature saves so much time, especially when the placement of clips inside a sequence won’t change at all, and the updated versions of the files make the older versions obsolete. In other words, when you don’t need to keep the temporary clips inside the project and you want all sequences updated at once, use this method to replace clips. It’s fast and easy.
Replacing Shots in the Timeline
When you want to replace a clip inside a specific sequence rather than updating a shot throughout the entire project, there are several great techniques you can use. In the following sections I’ll share my favorite and most commonly used methods for replacing individual shots.
Drag-and-drop replace
The quickest way to replace a single clip inside a sequence is by using the Option-drag (Alt-drag) technique.
To play along, open the example sequence called Skiing Everest_Time Alone_Replace. From the SE_Video bin, double-click to open clip SE_04 into the Source panel.
Let’s replace the second shot in this Sequence with a wide shot of the tents at Camp 1 to give the viewer a sense of place at the beginning of the climbing day. Set an In Point at about 30:20 in the source clip where the text is fully visible.
The trick is to hold down the Option (Alt) key as you drag the replacement clip from the Source panel into the Timeline. Drop the replacement clip right on top of the existing clip in the sequence by releasing the mouse when you see the green plus symbol over the clip you want to replace. Using this method, the In point of the source clip will be used to define the starting point for the edit (Figure 3.27).
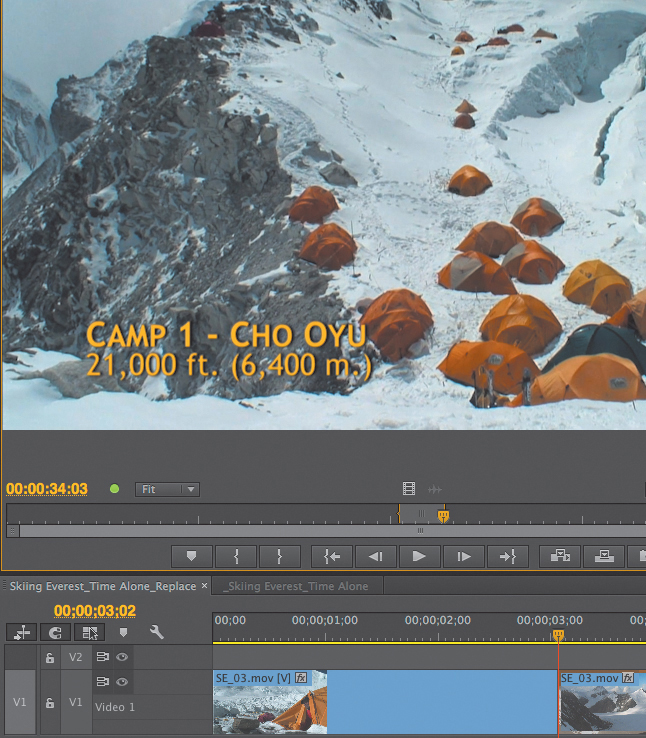
Figure 3.27 Hold down the Option (Alt) key while dragging a replacement clip from the Project or Source panel. Release the mouse when you see the green plus symbol on top of the Timeline clip you intend to replace.
If you want to use the In point of the original clip (not the In-point from the replacement clip), hold down Shift+Option (Shift+Alt) when you drag. The only time I use this method is when I’m editing with multi-cam footage that was shot with matching timecode.
If you want to use the Out point from the source clip and back-time, you can select the clip you want to replace inside the Timeline and press the forward slash (/) key to mark that clip. Then perform a standard four-point overwrite edit and select Ignore Source In Point from the Fit Clip panel.
Sync Replace with Match Frame
Dragging while holding down the Option (Alt) key is fast and very cool, but performing a Sync Replace is even better than a simple drag-and-drop replace.
A Sync Replace is the most accurate method for performing a replace edit, because it allows you to precisely sync the exact frame you want to replace in the original clip with a specific frame from the replacement clip. This method uses the playhead in both the Source and Timeline panels to achieve frame-accurate results.
Let’s sample this feature in action.
1. Open the example sequence called Skiing Everest_Peak Scene_Sync Replace.
2. If needed, clear any In and Out marks from both the Timeline and Source panels by pressing Option+X (Ctrl+Shift+X).
3. Put the Timeline playhead at 05;17 where the skier is turning to his right and has just pulled his poles away from the snow—about six to eight frames past where his poles have touched the ice.
4. Load SE_01 into the Source panel. Put the Source panel playhead at 08;23 where the skier in red is also turning to his right—about six to eight frames past where his poles have touched the ice.
5. Now that you’ve selected matching action frames using the Source and Timeline playheads, right-click on the clip in the sequence and choose Replace With Clip > From Source Monitor, Match Frame to replace the shot in the sequence with the shot in the Source panel (Figure 3.28).

Figure 3.28 Match action and replace shots from different cameras using frame-specific sync by choosing Replace With Clip > From Source Monitor, Match Frame.
Once you master this technique, you’ll use it constantly in your own work. Simply put the playhead over a clip you want to replace inside a sequence at a specific frame of action or even at the start of a specific word or phrase. Open the replacement clip into the Source Monitor and park the playhead over the precise frame of action (or sound bite) that will replace the original frame under the sequence playhead. Right-click on the original clip in the sequence and choose Replace With Clip > From Source Monitor, Match Frame.
![]() Tip
Tip
This is so slick: A big advantage of using Replace Edit is that whichever Timeline Replace method you choose, the replaced clip will retain any effects that were applied to the original clip in the sequence. This saves tons of time. Don’t overwrite a clip that contains effects—replace it! You can try out several different shot options and effects stay put.
This precision style of replacing a clip is super useful when you’re trying out multiple takes of action shots, especially while cutting sports sequences, because it allows you to audition different camera angles at critical points in the sequence. I often use this technique for trying out repeated takes of dialogue, and find it most useful when an actor delivers multiple reads at roughly the same speed but with varying emotion and I want to see how each take plays with the surrounding shots.
I highly recommend creating a keyboard shortcut for Replace Clip with Match Frame. The keyboard shortcut will allow you to quickly test different deliveries of a performance with the touch of key while maintaining visual sync on the action inside the cut. Place Timeline and Source playheads over desired frames, click to select the sequence clip you want to replace, and press the keyboard shortcut. It’s that easy!
Removing Footage from the Timeline
You may be familiar with some of the standard editing features for quickly removing footage from the Timeline, and if so great! I’m including fundamental techniques because I’ve trained many people at different companies—editors who’ve been using editing software for years—and found that they weren’t making full use of these simple yet powerful tools. If you already use the Lift and Extract commands, skip those sections. If you need a bit of review, read on, because these techniques are essential for grasping the more advanced methods of removing footage from the Timeline using keyboard shortcuts.
Lift
A Lift edit removes selected frames from your sequence and leaves a gap in the Timeline to preserve audio sync. The frames removed are determined by setting an In-to-Out range in the Timeline and targeting tracks from which media will be lifted. Remember: Mind the Tracks!
Typically, the Lift command is used when a gap in the sequence is desired, because you want to fill that gap with B-roll imagery or sound. I often clean up unnecessary audio from sound bites using Lift to leave gaps that will later be filled with room tone or “background air.” A big advantage of using Lift is that you can select just a portion of a clip, or portions of multiple clips, by selecting an In-to-Out range in the sequence. You aren’t limited to simply deleting or lifting out whole clips. Let’s see how it works.
1. In the Timeline, mark In and Out points to set a range for the media to be lifted.
2. Toggle track targets to specify which tracks should be affected by the Lift command.
3. Click the Lift button in the Program Monitor or use the default keyboard shortcut (press ;).
The media is lifted from selected tracks, leaving a gap in the Timeline.
Removed frames are copied to the clipboard and can be pasted back into the sequence elsewhere using the Paste (Command+V [Ctrl+V]) or Paste Insert (Command+Shift+V [Ctrl+Shift+V]) commands to overwrite or insert the media to a new location.
Extract
The Extract command is similar to the Lift command except it doesn’t leave a gap in the Timeline where media is removed. When you extract footage, clips farther down the Timeline will be shifted to the left (rippled) to fill the gap. The media is removed and the gap is closed in one step. Set In and Out points in the Timeline to specify a range where you want footage removed. The range selected for extraction can include portions of a clip. When you’re using Extract:
1. Check track targets to select the tracks from which media should be removed.
2. Click the Sync Lock boxes next to all Timeline tracks that you want to be shifted when the Extract button is clicked. Gaps will be closed for all sync locked tracks.
3. Lock tracks that you don’t want rippled (like music tracks).
Sequence runtime is reduced when using Extract. This command is perfect for quickly tightening the cut, whittling down sequences full of interview selects, or trimming out the end of one shot and the beginning of the next shot at the same time.
To quickly see the difference between Lift and Extract, open the example sequence called Skiing Everest_Lift & Extract. I’ve already placed a few interview clips on the A1 track and set markers to indicate portions of clips for lifting an extracting (Figure 3.29).
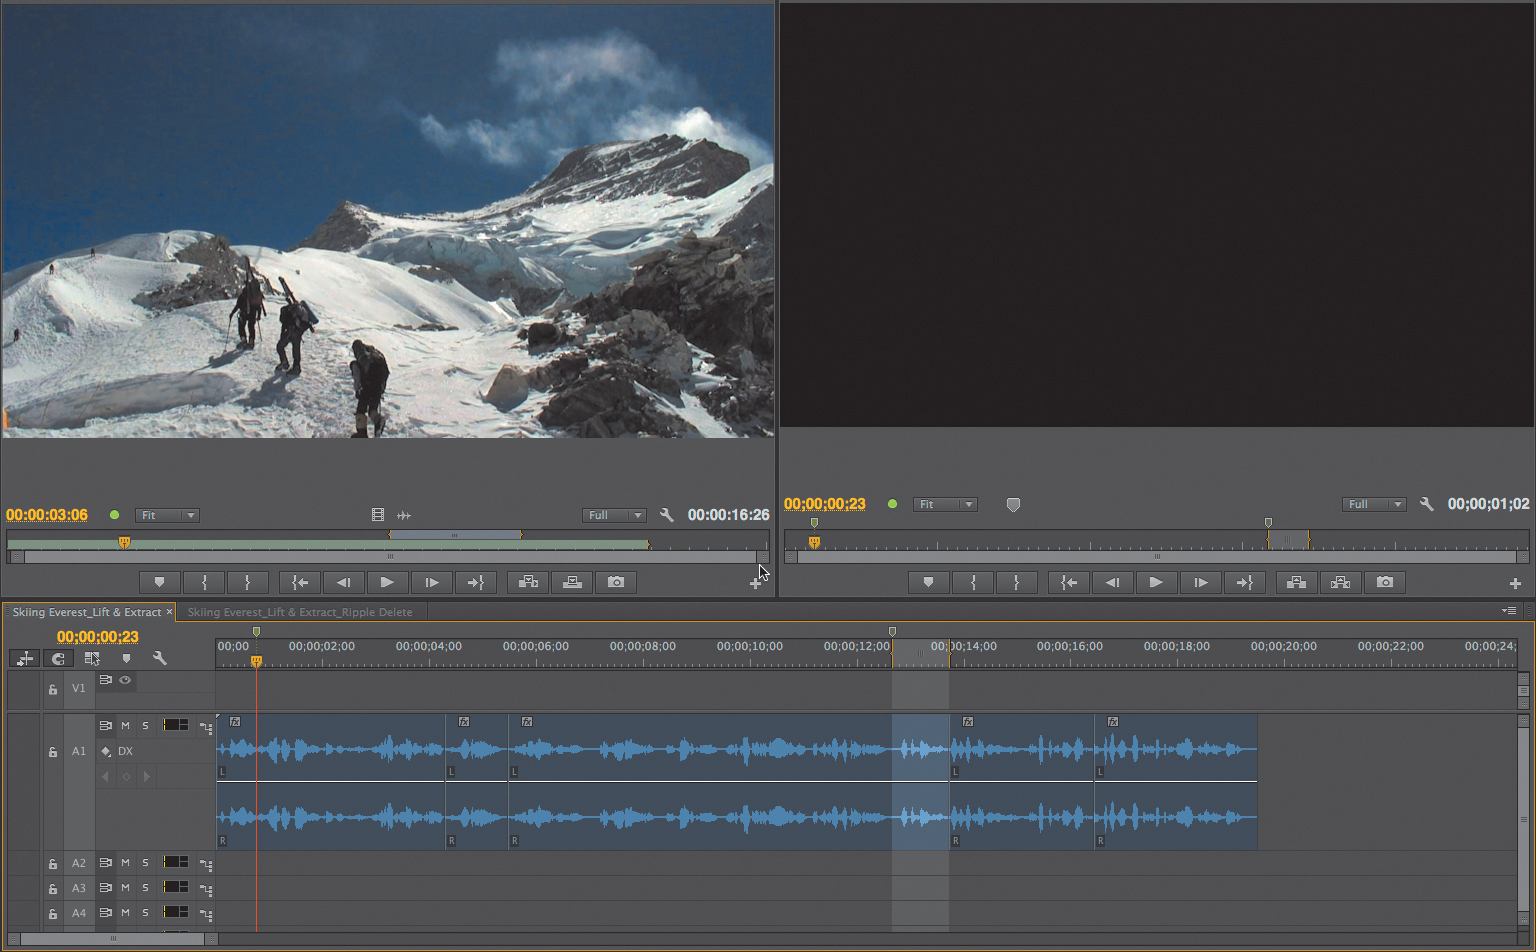
Figure 3.29 Set In-to-Out ranges in the Timeline and use Lift or Extract to remove unwanted portions of clips from the sequence.
1. Mark an In point (I) at the begging of the sequence.
2. Press Shift+M to jump to the first marker.
3. Set an Out point (O).
4. Click the Extract button in the Program Monitor or use the keyboard shortcut for Extract (’) to remove the portion of the first clip where the narrator says “The thing is, is...”.
The sound is removed from the first portion of that clip and the gap is closed, so the narrator now begins his line cleaning by saying, “When you’re out there on those peaks...” Farther down the Timeline, let’s use a Lift edit to remove a portion of a sound bite and leave a gap in the dialogue.
5. Press Shift+M to jump to the second marker in the Timeline.
6. Press I to set an In point.
7. Press the down arrow key to jump the end of that sound bite, and then press O to set an Out point.
8. Click the Lift button in the Program Monitor or use the default keyboard shortcut (;) to remove the sound where the narrator says “Like they say, as you know...”
The unnecessary dialogue is removed, and a gap remains in the sequence.
Delete
Unlike Lift and Extract, which use In and Out points to select a range in the sequence for deletion, the Delete and Ripple Delete commands use the Selection tool to remove whole clips. Both Delete and Ripple Delete are used to quickly remove a selected clip or a group of clips from the Timeline. To delete footage, simply select a clip in the Timeline and press Delete. The selected media is removed, leaving a gap in the sequence. Sync is preserved. If you want to delete just a portion of a clip, use the Lift command.
Ripple Delete
Ripple Delete removes footage and closes the gap in one step. Media on all unlocked tracks beyond your selection will be shifted to the left (rippled) to close the gap when you choose Ripple Delete. If you want to prevent an item from moving, lock the track (or turn off Sync Locks).
This method of removing footage is super fast, especially when you want to clean up many pieces of footage at once. I use this feature when editing documentaries, because it’s faster to put an entire interview into a sequence and then splice and quickly remove the sections I don’t intend to use rather than setting In and Out marks in source clips and overwriting individual sound bites into the Timeline.
Try this: Open the example sequence called Skiing Everest_Ripple Delete. I’ve spliced the track using Command+K (Ctrl+K) to perform an Add Edit and isolated portions of the clips I want to ripple out of the sequence. Alternately, you can use the Razor tool (C) to add edits. I’ve placed markers that indicate multiple sections of sound bites that can quickly be cleaned up all at once using Ripple Delete. Markers aren’t necessary; I simply placed them to make this example clear.
Press Shift and click to select every portion you want to delete from the sequence (Figure 3.30). To perform a Ripple Delete, press Shift+Forward Delete (Shift+Delete). All selected portions of clips are removed from the sequence and remaining clips are rippled to close the gaps.
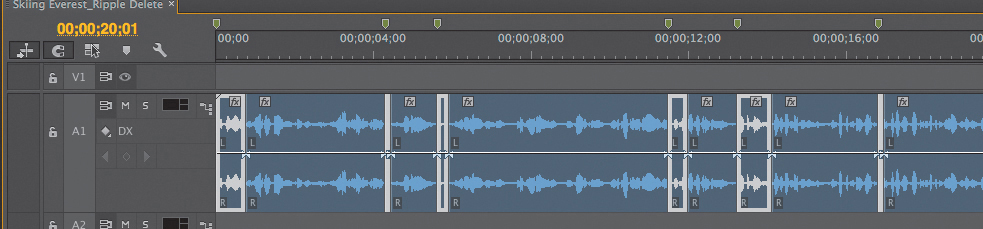
Figure 3.30 Using Ripple Delete to cut up a long interview clip lets you visually delete unwanted portions.
Removing tops and tails
The most advanced method of quickly removing footage from the Timeline involves using keyboard shortcuts to lop off the beginning (top) or ending (tail) portion of a shot. This is one of my favorite Timeline editing tricks. When I want to quickly tighten shots and remove time from the sequence, this technique requires the least amount of clicking with the mouse, and it feels highly intuitive. This is actually a Ripple Trimming technique. Trimming is covered in detail later in this chapter, but because these keyboard shortcuts are used simply to remove unwanted footage from the beginning and end of clips in the Timeline, it makes sense to learn this type of trim now.
Rippling out the top of a clip is similar to marking an In-to-Out range around the beginning portion of a clip and then pressing Extract (’) except that it happens in one keystroke! It’s often called a “top” trim because you’re removing the portion from the top of a clip to the playhead. You don’t need to select any cut points. When you press Q, which is the shortcut for Ripple Trim Previous Edit to Playhead, the beginning portion of the clip is removed from the previous cut point to the playhead location.
In the example sequence called Skiing Everest_Tops & Tails, let’s remove the extra shot at the beginning of the final clip along with the sound bite where the narrator says, “So your mind just wanders wherever it’s going to wander to.” Performing a Top Trim is the slickest way to remove these frames. This is so slick, you’ve got to try it.
1. Play the Skiing Everest_Tops & Tails sequence in real time.
2. While playing the sequence, press Q after the narrator says, “...it’s going to wander to,” right after the picture cuts to the image where the clouds are moving through the peak (there is a marker at this location) (Figure 3.31).

Figure 3.31 In points of Timeline clips are rippled to the playhead location when you press Q. There is no need to select the edit point or set In and Out points when using the keyboard shortcut for Ripple Trim Previous Edit to Playhead.
The top portion of both picture and sound clips are removed, and footage farther down the Timeline ripples to the playhead location to fill the gap.
Notice in this example sequence that the music track (A7) has been locked. Mind the tracks! When clips are rippled in this way, a splice will be created through all tracks to extract frames. When clips farther down the Timeline are rippled, the entire sequence gets shorter. That fact should alert you to look for potential audio sync issues before performing the edit.
Rippling away the tail is similar to marking an In-to-Out range around the end portion of a clip in the Timeline and then pressing Extract (’) except that all steps happen in one keystroke. When you press W, which is the keyboard shortcut for Ripple Trim Next Edit to Playhead, the end or “tail” portion of the clip is removed from the playhead location all the way to the next cut point in the Timeline.
Tail Trimming can feel trickier to master than Top Trimming, especially during real-time playback. It essentially works the same way as Top Trimming but in reverse. To ease the learning curve, begin practicing this technique by parking the playhead in the middle of a clip in the Timeline and then pressing W to get the feel of removing the tail portion of a clip, as described in the following steps.
1. In the Skiing Everest_Tops & Tails sequence, park the Timeline playhead at 25;11, just before the narrator says, “We get a lot of time just sitting in the tent reading and relaxing” (Figure 3.32 on the next page).
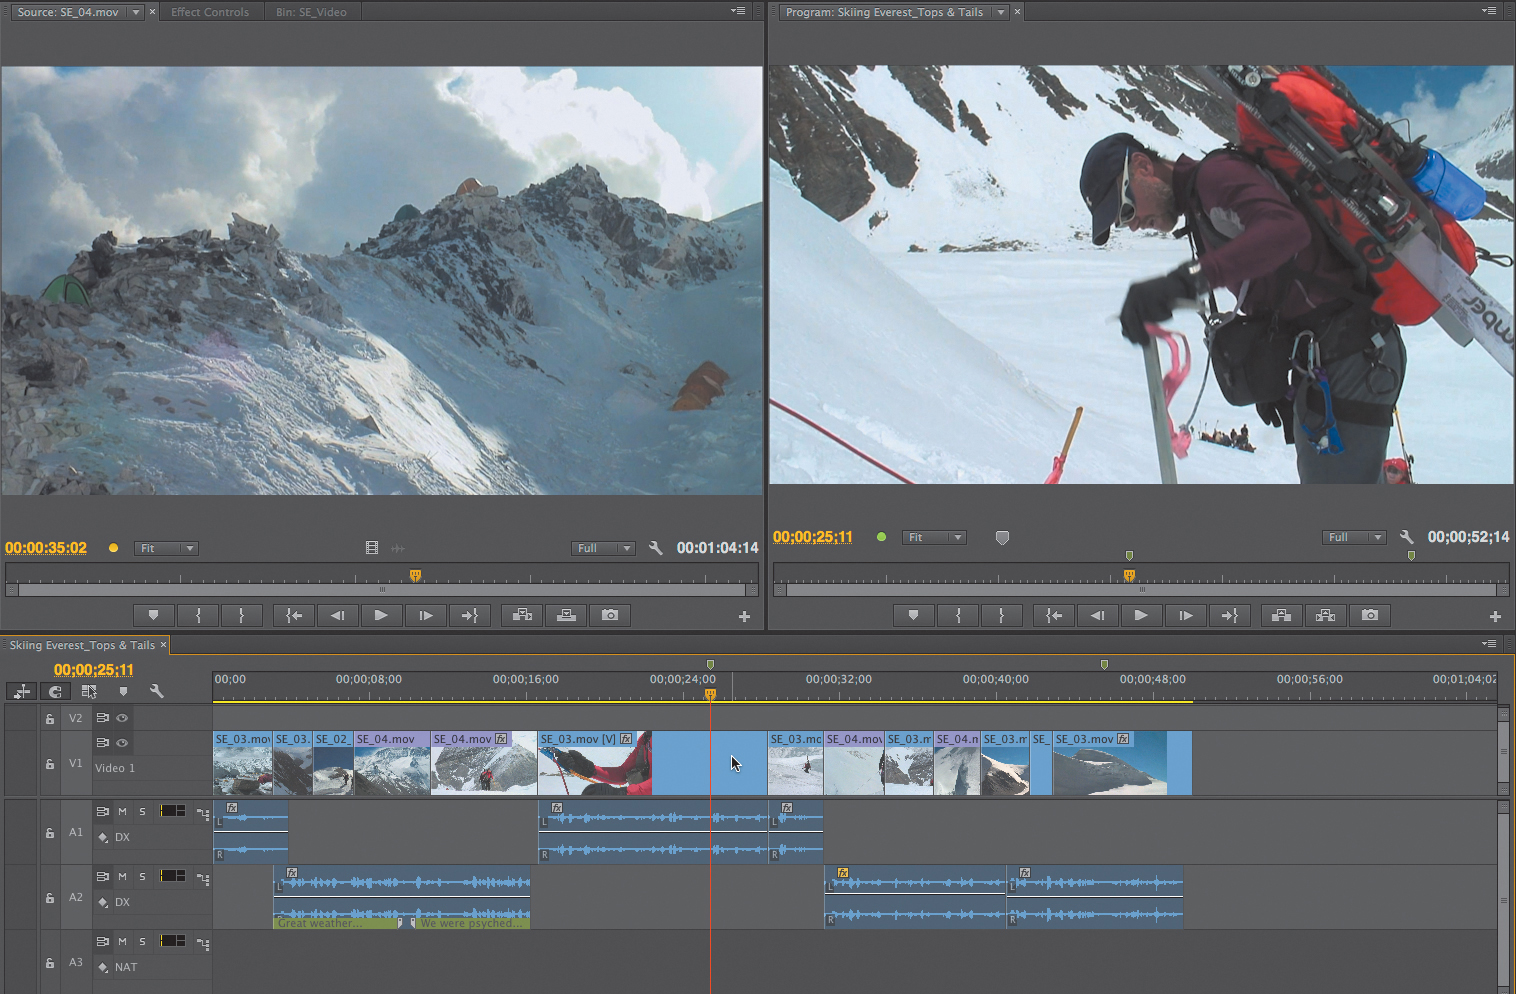
Figure 3.32 The tail, or end portion, of clips in the Timeline can be quickly removed by pressing the keyboard shortcut W. It’s an amazingly fast way to edit.
2. Press W.
The tail portion of the clip called SE_03 is extracted, and clips farther down the Timeline are rippled to the playhead to fill the gap where frames were removed.
For extra credit, practice removing footage from the tail portion of clips using the keyboard shortcut (W) while playing the sequence live (in real time).
Adding modifier keys to Q and W will activate different trimming features, which I’ll cover in more detail later in this chapter.
Repositioning Timeline Clips
While editing, I often need to move sections of clips around on my Timeline—more than just one or two clips. Frequently, I see editors drag clips into higher tracks to make room on the Timeline. Instead, you can use two great techniques to move clips on the Timeline—Swap Edit and Paste Insert.
Swap Edit
I use the Swap Edit command repeatedly throughout the day when I’m working in the Timeline. By holding a simple modifier key while you drag and drop, you can swap the position of a clip, or several clips, in the sequence with other clips. The repositioned clip will be inserted into a new location. Surrounding clips are rearranged, and gaps are closed or created as needed to preserve sync. Sounds like magic? It seems that way!
This command is similar to both an extract and insert edit in that clips are rippled while being repositioned, or “swapped,” in the Timeline. This technique is easier to perform on clips that have not been L or J cut, so if this is new to you, it’s best to practice on clips in the Timeline that have straight cuts. In other words, if clips have linked audio and video, practice on shots where the audio portion of the clip cuts at the same time as the video. Try this exercise.
1. Open the provided sequence called Skiing Everest_Peak Scene_Swap Edit.
2. Make sure Snapping (S) is on.
3. Click to select the second video shot.
4. Press and hold Command+Option (Ctrl+Alt) while dragging the second clip to the left, and snap it the very beginning of the sequence.
5. Look for the Swap icon (this is sometimes referred to as the Rearrange icon) (Figure 3.33).

Figure 3.33 Performing a Swap Edit rearranges the order of clips in the Timeline. Turn Snapping on, press and hold Command+Option (Ctrl+Alt), and then drag and drop the clip at the new location. Surrounding clips are rippled to accommodate the repositioned shot.
6. Watch for Snapping symbols and insert arrows as you drag, indicating you have reached the cut point where the first shot is currently located.
7. Release the mouse.
The two shots have swapped position! This worked quite easily in the example because these two video clips are not linked to audio. Don’t forget: When linked audio is longer or shorter than the corresponding picture, swapping clips may result in gaps in the Timeline, which preserves audio sync. It’s cleaner to swap clips before creating split edits (L and J cuts). I also find it easier to swap clips by dragging to the left, so I’m moving them earlier in the Timeline. Practice this technique on all types of clips so you’ll know what to expect when you perform a Swap Edit in different situations.
For extra credit, try swapping the clip that is now at the beginning of the sequence with the second clip in the Timeline. While holding down Command+Option (Ctrl+Alt) you’ll need to drag the first clip far to the right to the end of the second clip, and then snap it to the Out point of the second shot in the sequence before releasing the mouse. Next, try selecting several sequential clips and swap them as a unit.
Paste Insert
I briefly mentioned the Paste Insert technique earlier in the chapter, but it’s such an efficient method for repositioning groups of clips in the Timeline that I want to reinforce the concept. I’m certain you’ll incorporate this into your editing workflow. I use this trick so often that a director I work with called me the other day to ask if I could explain it to his new editor. It you’re constantly opening up space in the Timeline by dragging clips farther down the sequence and then repositioning Timeline clips and then closing the gaps, practice this skill.
Master the Paste Insert and you’ll rarely need to move clips just to reposition shots. In cases where a Swap Edit just won’t work correctly, usually because of audio sync concerns or split edits, try a Paste Insert.
1. Open the sequence called Skiing Everest_Paste Insert.
2. Click and drag to select the last two clips of video at the end of the sequence and the corresponding audio (the last sound bite that begins, “You really don’t have a lot to think about”).
3. Press Command+X (Ctrl+X) to cut those three clips from the sequence.
4. Snap the playhead to the beginning of the clip called SE_04 at the cut point just before the narrator says, “It’s hours out there by yourself,” at 31;07 in the Timeline.
5. Lock the A7 music track (Figure 3.34).

Figure 3.34 Be mindful of audio sync. Before performing a Paste Insert, lock tracks that should not be spliced or moved.
7. Press Command+Shift+V (Ctrl+Shift+V) to perform a Paste Insert (Figure 3.35).

Figure 3.35 After pressing Command+Shift+V, the copied clips will be inserted at the playhead location on dominant targeted tracks. Clips to the right of the playhead will move farther down the Timeline.
If you listen to this scene in the sequence after performing the Paste Insert and then press Command+Z (Ctrl+Z) to undo and listen again, you’ll hear the difference in shot sequencing and understand how great this technique is for rearranging story ideas in the Timeline. This is my go-to method for repositioning groups of clips when I’m moving toward the fine-cut stage, especially when there are complicated split edits or layered picture and dialogue tracks.
![]() Tip
Tip
Track locks hammer down a track and prevent it from being shifted when inserting or rippling footage. This is useful when I want to keep a music track entirely untouched by Add Edit splices, Extract, Lift or insert edits, and Ripple Deletes.
When performing a Paste Insert, it’s important to remember the following:
![]() Target Timeline tracks where you want Audio and video tracks to be pasted as an insert edit.
Target Timeline tracks where you want Audio and video tracks to be pasted as an insert edit.
![]() Lock Tracks to prevent accidental adjustments. A splice will be made through all tracks when the playhead is not positioned on a cut point, so lock any music or narration tracks that shouldn’t be altered by the insert.
Lock Tracks to prevent accidental adjustments. A splice will be made through all tracks when the playhead is not positioned on a cut point, so lock any music or narration tracks that shouldn’t be altered by the insert.
![]() Clips are rippled down the Timeline to make room for the insert edit, so keep an eye on audio sync.
Clips are rippled down the Timeline to make room for the insert edit, so keep an eye on audio sync.
![]() Tip
Tip
When I spend time layering and syncing sound effects to a video clip, I like to group the clips so I can move them around or Paste Insert the entire group of clips and maintain sync. To do this, Shift-click to select clips that you want to group together. Choose Clip > Group or press Command+G (Ctrl+G), or right-click on one of the clips and choose Group. Now the group will move, cut, and paste as a single clip.
For extra credit, open the Skiing Everest_Peak Scene sequence. Press Shift while selecting several skiing sound effects and then group them with a matching video clip by pressing Command+G (Ctrl+G). Cut and Paste Insert the group to a new location in the Timeline (Figure 3.36).
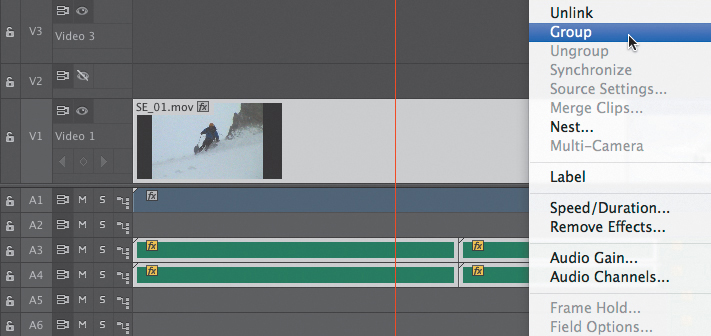
Figure 3.36 Group unlinked audio and video clips and they will always move, cut, and paste as a single unit.
Basic Trimming
Trimming is most useful when it’s time to take an assembly edit to a rough cut. Often, this phase of the edit is about trimming to make the story sound right. This process is sometimes called the radio edit. Once the sound bites and fundamental shots are timed to roughly tell the story, more advanced trimming techniques help pace the visual cuts and add tension to the scene.
You may have heard the phrase, “There are three ways to do everything.” When it comes to editing, that’s true. It’s possible to achieve identical results from three different methods of trimming, but one technique may be faster and easier to use in a given situation.
The trimming tools you’ll use most often are partly a matter of preference and partly chosen to fit specific needs. You might choose to use the Trim Monitor, while syncing action for a wide shot that cuts to a close-up. The Trim Monitor allows you to view and choose the exact frames on both sides of the cut. A similar trim might be made more rapidly on the Timeline when syncing the visual action isn’t a big concern. For example, while working on the radio edit it’s often preferable to expand the sequence audio tracks and trim directly in the Timeline while viewing large waveforms to see the space between lines of dialogue.
Learning how all trimming techniques work, and how each trimming tool differs, will help you understand when to choose one method over another when refining a cut sequence. More important, mastering the basic use of these tools will allow you to advance to performing these types of edits using keyboard shortcuts that really speed up the trimming process. The primary trimming tools include:
![]() Ripple Edit tool
Ripple Edit tool
![]() Rolling Edit tool
Rolling Edit tool
![]() Slip tool
Slip tool
![]() Slide tool
Slide tool
If you’ve been using Premiere Pro or another editing application for a while, you might skim this section as a quick review, then move on to the more advanced trimming techniques. If you’re yet not making full use of the basic trimming tools, heed the detailed instructions below.
The Selection Tool
I’m sure you’re familiar with using the selection tool to click-drag on a cut in the Sequence to adjust the length of clips in the Timeline. This is the trimming at its most basic. Using the Selection tool is safe, because it will never throw clips out-of-sync. It isn’t the most elegant method of trimming but, when it’s the right tool for the job, it’s easy and it works.
Press the Selection Tool keyboard shortcut (V) and place the arrow over a cut point of a clip in a Sequence. When you do, you’ll notice that the pointer changes to the Trim Tool. Move the mouse back and forth across the cut, and the Trim Tool arrow will change from left to right, so you can click to create an Incoming or an Outgoing trim.
If you’ve been performing a trim on both sides of a cut by first trimming to make one clip shorter and then dragging the edge of the next clip to fill the gap, read on!
The Rolling Edit Tool
The problem with using the Selection tool is that when you want to make a clip longer, other clips don’t move out of the way. In other words, you can only drag to trim a clip so far with the Selection tool before it bumps up against another shot. You can use the Rolling Edit tool to trim both sides of the cut at the same time (Figure 3.37).

A Roll is a called a two-sided edit because both points (the In and the Out) on either side of the cut are adjusted simultaneously. The length of one clip adjusts to accommodate the changing length of the other. As one clip gets shorter the other gets longer, provided that there is enough “handle” content available to allow the trim. Handles refer to unused footage surrounding the selected portion of a shot inside the sequence.
![]() Tip
Tip
View how much handle is available for a trim by placing the playhead over a selected shot you’d like to trim in the Timeline and then pressing F to perform a Match Frame. Look at the bracketed area in the Source Monitor, which represents the portion of the shot used inside the sequence. The footage available on either side of the In to Out brackets are the “handles,” and contain footage available for trimming.
When using the Rolling Edit tool in the Timeline, you don’t have to worry about throwing tracks out of sync (unless you’ve locked dialogue tracks that are synced to an unlocked picture).
Rolling an edit point changes the location of the cut inside the sequence. The Rolling Edit tool is often used to create split edits, so that a clip’s audio plays for a longer or shorter time than the matching video.
The Ripple Edit Tool
The Ripple Edit tool adds or removes frames while closing gaps (Figure 3.38). It’s a single-sided trim, which means only one edit point, either the selected In point or the selected Out point, will be changed during the operation.

Figure 3.38 From the Tools panel select the Ripple Edit tool, or press B before selecting a cut point in the Timeline.
When you ripple a clip, footage beyond that selected cut point in the sequence will “ripple” (move to the right or left) depending on whether the selected clip is getting longer or shorter. As you trim a clip with the Ripple Edit tool, the entire sequence gets longer or shorter to accommodate the trim.
The point is this: When you use the Ripple Edit tool, mind the tracks!
Methodology: Using Ripple and Roll in Tandem
The Ripple tool is used to remove unwanted frames from clips in the Timeline, and much like using Extract, it’s a quick way to shorten the overall duration of a sequence. It is also used to add and remove frames between two shots to achieve visual sync. For example, when syncing action between two different camera angles of a baseball player swinging a bat, you might use the Ripple tool to add or remove frames and make the action match exactly at the cut point between the medium shot and a close-up.
Holding down the Option (Alt) key while selecting a clip or a cut point temporarily unlinks audio from video, allowing you to quickly create a split edit. The resulting edit is often called an L cut or a J cut because, as a result of splitting the edit, the clips in the Timeline now mimic the letter L (when audio continues after picture cuts) or the letter J (when the audio cuts before the picture changes).
After using the Ripple tool to add and remove frames, editors frequently use the Roll tool to create split edits, which are known as L or J cuts. Here’s an example of how to use both tools to smooth action across a cut:
![]() Ripple to place the cut anywhere the action is easiest to sync. Begin by using the Ripple Edit tool (B) to trim the shots on each side of the cut, so you end up putting the cut exactly where the ball hits the bat in both shots or where someone’s footstep hits the ground from both camera angles.
Ripple to place the cut anywhere the action is easiest to sync. Begin by using the Ripple Edit tool (B) to trim the shots on each side of the cut, so you end up putting the cut exactly where the ball hits the bat in both shots or where someone’s footstep hits the ground from both camera angles.
![]() Roll to create a split edit. Once the visual action is in sync at the cut point, the Roll tool comes into play. Hold down the Option (Alt) key and click to select only the video portion of the clip with the Rolling Edit tool (N). Offset the video cut point so that action begins in the first shot and completes in the second shot.
Roll to create a split edit. Once the visual action is in sync at the cut point, the Roll tool comes into play. Hold down the Option (Alt) key and click to select only the video portion of the clip with the Rolling Edit tool (N). Offset the video cut point so that action begins in the first shot and completes in the second shot.
In summary, sync the shots on action using the Ripple Edit tool, and then switch to the Rolling Edit tool to move the video cut point earlier, so the bat begins to swing in the first shot and then connects with the ball and completes the swing in the second shot.
The technique of beginning action in the first clip and continuing or completing the action in the next clip makes the cuts between shots go unnoticed by viewers, because their eyes are literally “on the ball,” not on the cut between shots. By rolling only the video portion of the clip, you also offset the picture cut from the sound cut. This helps smooth the change from one shot to the next, making a more elegant transition between shots that will likely go unnoticed by the audience. Quickly achieving frame accurate, invisible cuts is the point of mastering the Ripple and Roll Edit tools.
Let’s practice performing Ripple and Roll Edits in tandem. I’ll throw in a few bonus techniques and some review in the process.
1. Open the example sequence called Skiing Everest_Trimming.
2. Look at the track configuration. Synced dialogue has been placed on the A1 track, and narration that is not linked to video clips has been placed on A2. Notice that all audio tracks except A1 are locked. This configuration allows an editor to easily perform ripple trims while keeping linked audio in sync with the picture.
3. While holding down the Shift key, click on the track target for A1. This will turn off all audio track targets, so you can use keyboard shortcuts to jump to cut points only on the video tracks and ignore the audio cuts.
4. Use the up and down arrow keys to place the playhead at the cut point between the first two video clips in the sequence.
5. Zoom into the Timeline using the plus (+) key.
6. Press B to activate the Ripple Edit tool.
7. Click and drag on the left side of the playhead, and drag to ripple the outgoing shot so that it’s shorter.
8. Look at the Program Monitor while dragging the Ripple tool. Release the mouse when you visually see the skier in blue dig his skis and poles into the snow, so he is facing perpendicular to the camera with his skis pointing to the left side of the screen. The timecode overlay on the outgoing shot in the Program Monitor should read 04:20. The overlay in the Timeline should indicate that you’ve shortened the shot (Figure 3.39).

Figure 3.39 It’s always helpful to use the visual two-up display in the Program Monitor, as well as timecode overlays, to help position the edit point while making the trim.
9. Click with the Ripple Edit tool on the incoming shot, just to the right of the same cut point, and drag to the left again, lengthening the second shot.
10. Release the mouse when the timecode overlay on the incoming shot in the Program Monitor reads about 06:20. The skier in red should be in roughly the same position as the skier in blue from the previous shot. Snow should be flying off the skis toward the right of the frame in both shots (Figure 3.40).
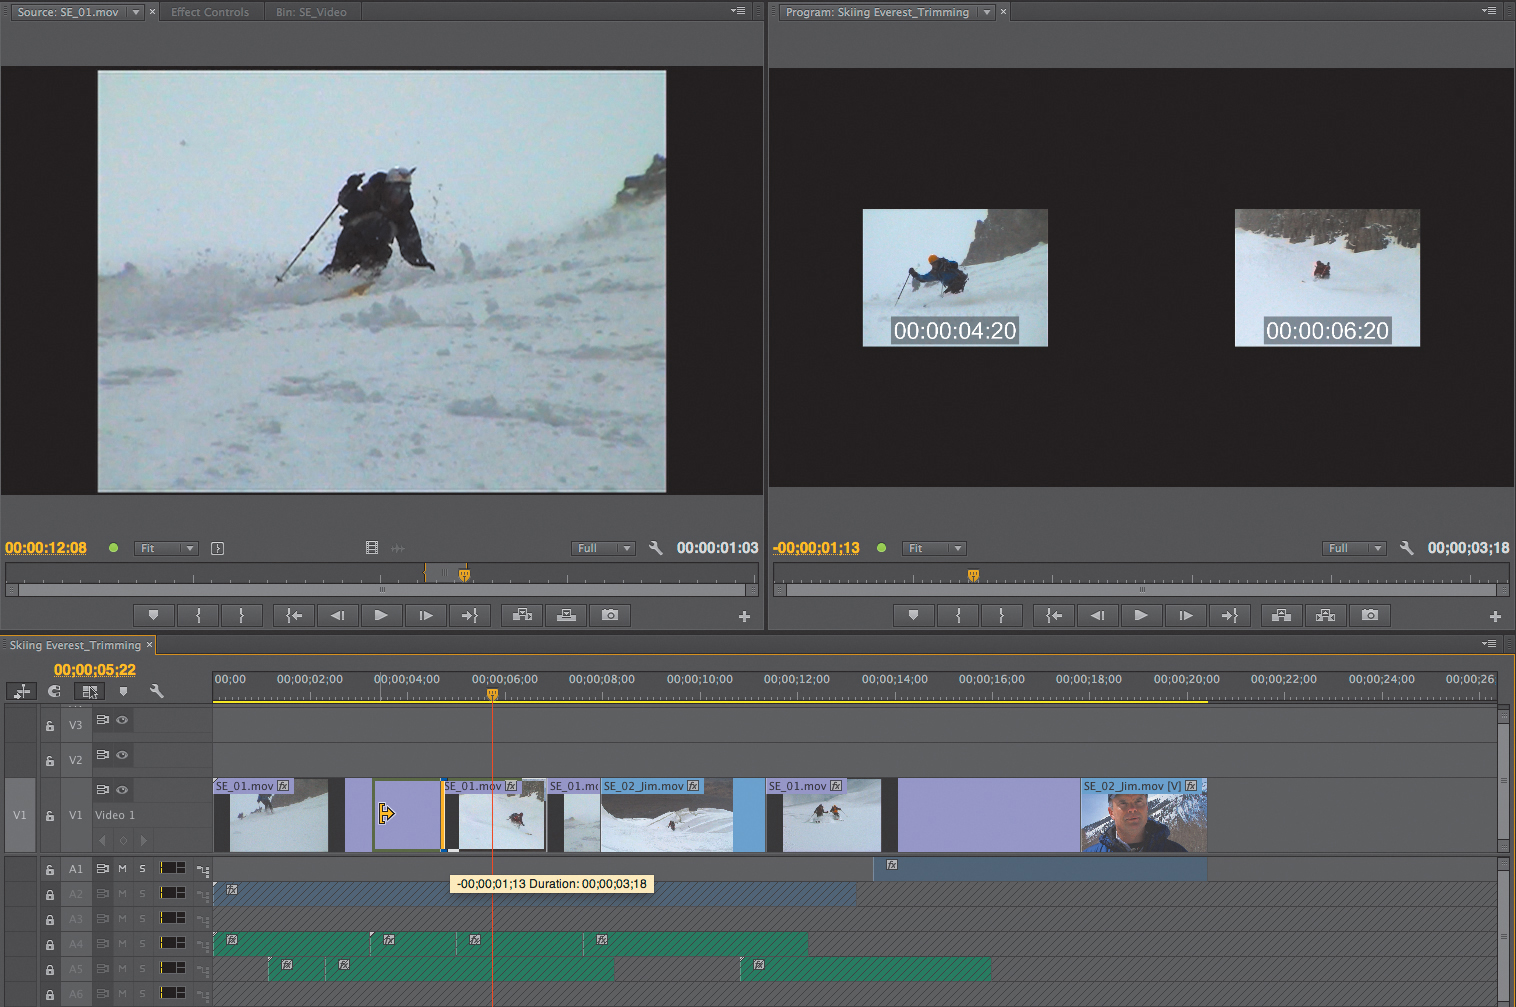
11. The cut point is now positioned on matching action in both clips. Play through the edit.
12. Press N to activate the Rolling Edit tool, and select the same cut point as a Roll (red I-bar).
13. Drag to roll the cut point to the right, later in time. Release the mouse when both athletes are in mid turn, with poles and skis released from the snow as though they’re floating above the earth (Figure 3.41).
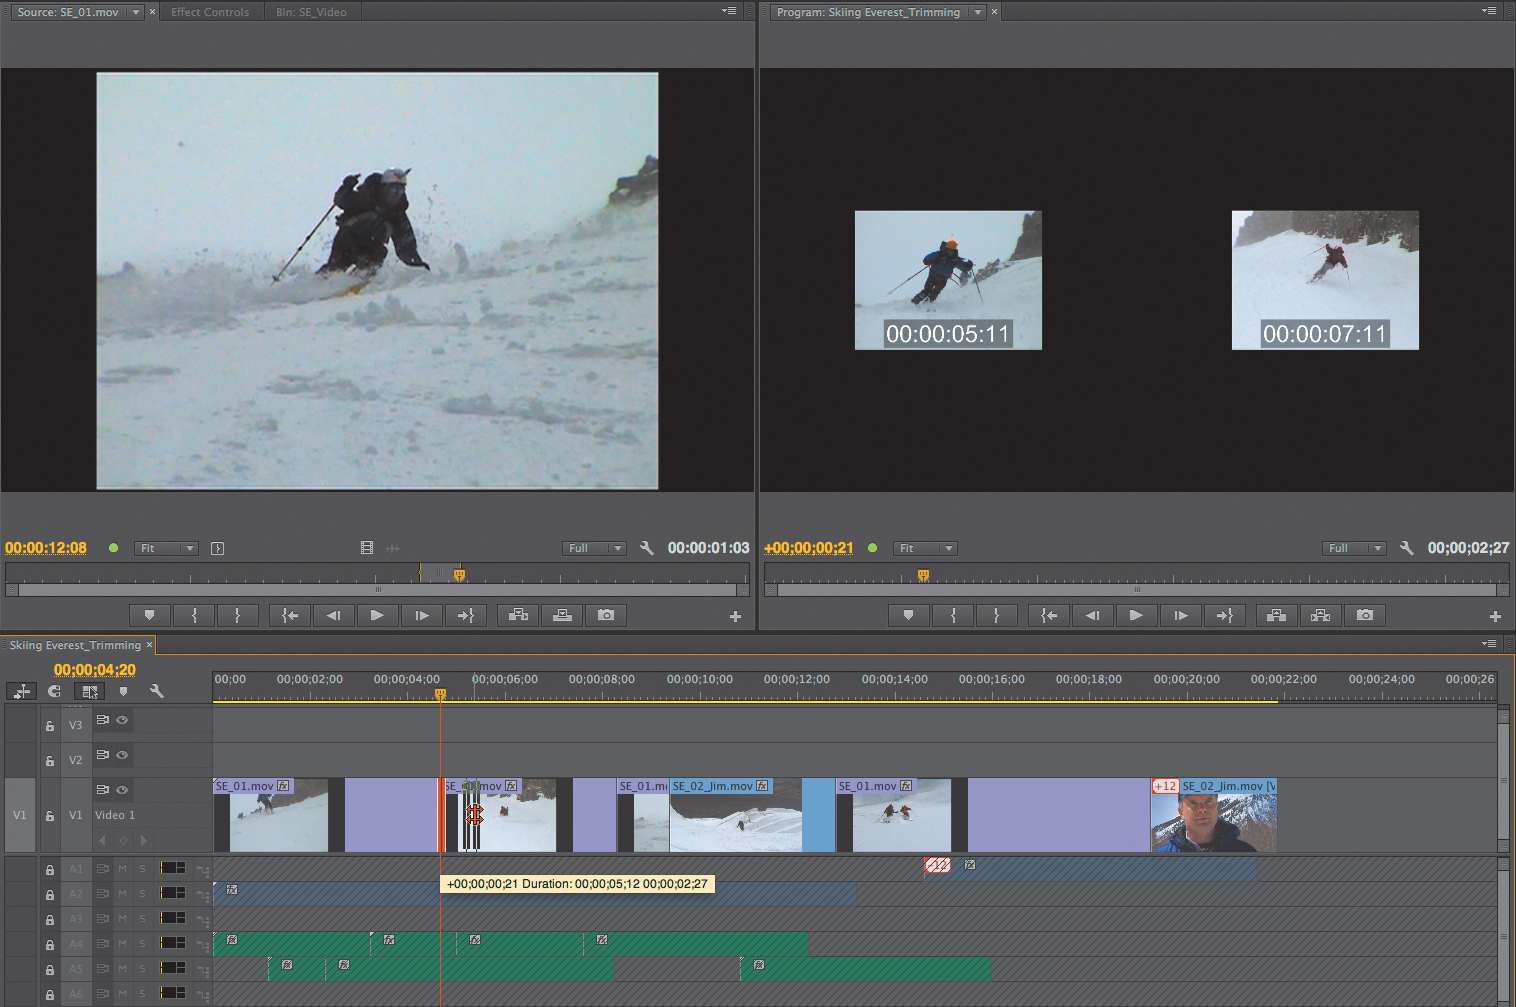
14. Play through the edit. The action of the turn is initiated by the first skier and completed by the second. The cut across matching action should feel smooth, not jarring. This works even better using two camera angles of the same skier.
![]() Tip
Tip
If you have difficulty trimming a cut to a specific frame because the selected trim keeps snapping to the playhead, you can press S to turn Snapping off, even mid trim while dragging.
Trimming in the Program Panel
Trimming in the Program panel provides you with a two-up display (Figure 3.42). This is the best way to view images on either side of the cut while trimming. When I want to cut away from a shot on a very specific frame—and I want to make that decision visually—I use the Program panel to perform the trim rather than adjusting the edit by dragging in the Timeline.
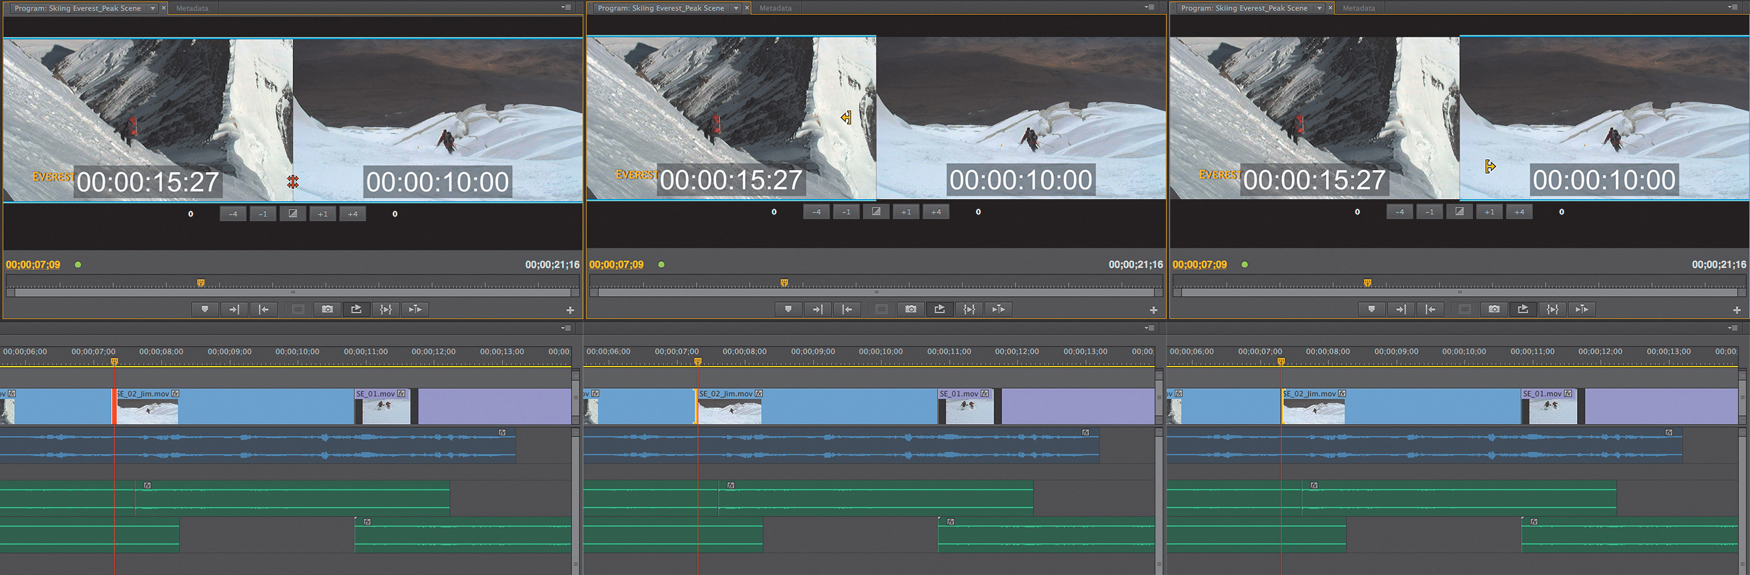
Figure 3.42 By clicking directly on either side of the image, you can choose a ripple trim, or by clicking in the middle, you can choose a roll trim.
To trim in the Program panel, start by activating the two-up display (Trim mode). Using the Selection tool, double-click on a cut in the Timeline (or select the edit and press T) to load the edit into the Program Monitor.
![]() Close-Up: Timeline Trimming Tips
Close-Up: Timeline Trimming Tips
![]() Press Option+left arrow (Alt+left arrow) and Option+right arrow (Alt+right arrow) to trim in single frame increments.
Press Option+left arrow (Alt+left arrow) and Option+right arrow (Alt+right arrow) to trim in single frame increments.
![]() Press Option+Shift+left arrow (Alt+Shift+left arrow) and Option+Shift+right arrow (Alt+Shift+right arrow) for multi-frame trims.
Press Option+Shift+left arrow (Alt+Shift+left arrow) and Option+Shift+right arrow (Alt+Shift+right arrow) for multi-frame trims.
![]() Holding down the Option (Alt) key while clicking with the Selection, Ripple, or Roll tools allows you to select just the video or audio cut point (temporary unlink).
Holding down the Option (Alt) key while clicking with the Selection, Ripple, or Roll tools allows you to select just the video or audio cut point (temporary unlink).
![]() Right-click on a cut point with the edit tools to see Trim In and Trim Out options.
Right-click on a cut point with the edit tools to see Trim In and Trim Out options.
![]() Press the keyboard shortcut to toggle Snapping (S) while trimming so cuts snap to the playhead or move freely as needed.
Press the keyboard shortcut to toggle Snapping (S) while trimming so cuts snap to the playhead or move freely as needed.
![]() When trimming, mind the Timeline tracks targets, because targeting affects cut point selection while navigating with the up and down arrow keys (Go to Next Edit and Go to Previous Edit shortcuts).
When trimming, mind the Timeline tracks targets, because targeting affects cut point selection while navigating with the up and down arrow keys (Go to Next Edit and Go to Previous Edit shortcuts).
Here are some guidelines about using the Trim mode:
![]() Roll the edit. If you want to trim visually while dragging, you can click in between the two images in the Program panel to select the edit point as a roll, and then drag the Rolling Edit tool left or right to move the cut point earlier or later in the Timeline.
Roll the edit. If you want to trim visually while dragging, you can click in between the two images in the Program panel to select the edit point as a roll, and then drag the Rolling Edit tool left or right to move the cut point earlier or later in the Timeline.
![]() Ripple the edit. Move the mouse across the cut in the Program Monitor and look for the yellow ripple indicators. Click to select either the incoming or outgoing shot. Drag with the Ripple tool, or use the trim buttons to add or remove frames.
Ripple the edit. Move the mouse across the cut in the Program Monitor and look for the yellow ripple indicators. Click to select either the incoming or outgoing shot. Drag with the Ripple tool, or use the trim buttons to add or remove frames.
![]() Perform a single or multi-frame trim. Use the Trim Forward and Trim Backward buttons to add and remove frames.
Perform a single or multi-frame trim. Use the Trim Forward and Trim Backward buttons to add and remove frames.
![]() Loop playback. Pressing the spacebar will loop playback in the Program panel and keep Trim Mode active.
Loop playback. Pressing the spacebar will loop playback in the Program panel and keep Trim Mode active.
![]() Improve functionality. Use the JKL keys while trimming in the Program Monitor.
Improve functionality. Use the JKL keys while trimming in the Program Monitor.
![]() Use keyboard shortcuts. Press Option+left arrow (Alt+left arrow) and Option+right arrow (Alt+right arrow) to perform “live” trimming during looped playback. Keep an eye on the Timeline as it dynamically updates.
Use keyboard shortcuts. Press Option+left arrow (Alt+left arrow) and Option+right arrow (Alt+right arrow) to perform “live” trimming during looped playback. Keep an eye on the Timeline as it dynamically updates.
We’ll look at more advanced keyboard shortcuts that you can use in conjunction with Program Monitor trimming in the “Advanced Trimming” section later in this chapter.
![]() Close-Up: Trim Tool Guide
Close-Up: Trim Tool Guide
![]() A Red Bracket is a basic trim, which behaves like a Lift edit (leaves a gap).
A Red Bracket is a basic trim, which behaves like a Lift edit (leaves a gap).
![]() A Yellow Bracket performs a Ripple Edit, which adds or removes frames and makes the sequence longer or shorter.
A Yellow Bracket performs a Ripple Edit, which adds or removes frames and makes the sequence longer or shorter.
![]() When a trim bracket is open to the left, the Out point of the outgoing clip is trimmed. If the bracket is open to the right, the In point of the incoming clip is trimmed.
When a trim bracket is open to the left, the Out point of the outgoing clip is trimmed. If the bracket is open to the right, the In point of the incoming clip is trimmed.
![]() The Red I-bar is a Rolling edit, which adjusts only the two clips on either side of the selected cut. Trimming with the Roll tool moves the cut point a bit earlier or later but does not change the length of the sequence.
The Red I-bar is a Rolling edit, which adjusts only the two clips on either side of the selected cut. Trimming with the Roll tool moves the cut point a bit earlier or later but does not change the length of the sequence.
![]() As you drag a cut point with any of the Trim tools, you’ll see a yellow timecode indicator showing how many frames have been trimmed (forward or backward).
As you drag a cut point with any of the Trim tools, you’ll see a yellow timecode indicator showing how many frames have been trimmed (forward or backward).
![]() Shots trimmed in the Timeline update dynamically in the Program Monitor.
Shots trimmed in the Timeline update dynamically in the Program Monitor.
Extend Edit
Extend Edit is one of the easiest and most useful features to use while trimming. I couldn’t work without it! Select a cut in the Timeline with the Rolling Edit tool, and then simply press E to “extend” that cut to the playhead location. Of course, this feature requires you to have enough handle frames available to allow the trim to function.
1. Open the example sequence you previously used called Skiing Everest_Tops & Tails.
2. Press N to select the second video cut point as a rolling edit.
3. Zoom into the Timeline (+) if needed.
4. Play backward (J) and then forward (L), and press pause (K) to stop the playhead after the narrator says “The North Ridge.”
5. Press E to move the cut to the playhead location.
6. Move the next edit point by pressing the down arrow key; then Extend the third shot in the sequence so it covers the line, “The way that it is more often than not....”
This is so easy and effective that I thought about sharing this information earlier. But here is the coolest part: This trick also works when the cut is selected as a Ripple Edit! It works with the basic Trim tool (selection arrow) too. If the cut point is selected as a ripple incoming or a ripple outgoing (yellow brackets), mind your tracks for sync.
For extra credit, the Extend Edit can be employed to quickly create L and J cuts (split edits). Option-click (Alt-click) on a video cut point when selecting with a Trim tool, which will temporarily unlink the audio, to trim only the video edit point.
The Slip Tool
When you like the duration and location of a clip in the Timeline sequence but want to use a different portion of the shot’s content, use the Slip tool to simultaneously change both the In and Out points for the shot. You won’t be repositioning the clip in time; rather, you’ll be slipping the clip’s content by selecting a new In and Out frame for the shot that’s being slipped. Performing a Slip edit in the Timeline is so much easier than reloading the master clip into the Source Monitor to choose a new segment of the shot.
To fully grasp how fast and easy it is to slip a shot, try this exercise.
1. Open the example sequence called Skiing Everest_Trimming.
2. In the Tools panel select the Slip tool (Y).
3. With the Slip tool active, place it over the clip called SE_02 (about 12 seconds into the sequence). This clip contains two shots with lower-third text that reads Mustagh Ata and Everest.
4. Click and drag to the right with the Slip tool. In the Program Monitor you’ll see the new In and Out frames for the clip displayed and updating as you perform the slip (Figure 3.43 on the next page).

Figure 3.43 Activate the Slip tool (Y) to readjust the In and Out points of a clip in the Timeline. Use the two-up display in the Program Monitor to help you perform the trim.
5. When you see the Mustagh Ata shot displaying frames without text for both the In point (left image in a two-up display) and Out point (right image in a two-up display), release the mouse.
6. Play through the edit to ensure that the Mustagh Ata text fades up and out on the shot. Adjust the trim as needed.
The Slide Tool
Let’s say you have a great shot in your sequence but you’d like to cut to it just a bit earlier so that it times up better with the music cue. This is a perfect moment to use the Slide tool.
When you like the content and duration of a clip in the Timeline but want to reposition that clip to a new location that’s just a bit earlier or bit later in the sequence, use the Slide tool. When you click and drag on a clip in the Timeline with the Slide tool, the Out frame of the clip to the left and the In frame of the clip to the right update.
Using the Slide tool does not result in a change to the duration of your sequence, because the clips on either side of the shot you’re sliding are adjusted to accommodate the clip you’re moving.
![]() Close-Up: Viewing Audio Waveforms While Trimming
Close-Up: Viewing Audio Waveforms While Trimming
1. Put the mouse over the audio track header to scroll open the dialogue or narration track.
2. Press Option++ (Ctrl++) so the tracks are wide enough that you can visually identify a character’s individual lines while you trim.
3. Look for places where the audio waveform flattens out, which visually indicates the space between lines of dialogue.
Let’s slide a clip to fit with a line of narration.
1. Open the example sequence called Skiing Everest_Trimming.
2. In the Tools panel select the Slide tool (U).
3. Play the clip called SE_01 (about 11 seconds into the sequence), and stop the playhead just after the narrator says, “...accomplishing a goal” and before he says, “It’s like nothing else.”
4. Make sure Snapping is on (S).
5. With the Slide tool active, click and drag the clip so the Out point snaps to the playhead and release the mouse.
6. In the Program Monitor you’ll see new In and Out frames updating for the clips on either side of the shot you’re sliding. The mini-frames above the two-up display show you the In and Out points of the clip you’re sliding (Figure 3.44).

Figure 3.44 Activate the Slide tool (Y) to reposition a clip in the Timeline. Use the two-up display in the Program Monitor to help you make the trim.
7. Play through the edit to ensure that the shot ends after the narrator says, “...goal” and that both the outgoing and incoming shots on either side had enough handle to accommodate the trim.
![]() Notes
Notes
Be aware that deactivating Linked Selection for the entire Timeline is risky and may result in sync issues. In general, it’s best to keep Linked Selection active for the Timeline and unlink individual clips as needed.
Maintaining Sync
While editing, it’s extremely important to manage Linked Selection in the Timeline, maintain sync while trimming, and fix clips that have lost sync in a sequence. There are several features in Adobe Premiere Pro that help preserve audio and picture sync. Let’s review a few of them next.
Linked Selection
When the Linked Selection button is active (dark), all clips in the Timeline with linked video and audio can be selected, moved, and trimmed as a unit. Turn off Linked Selection and all clips in the Timeline will behave as though they are unlinked.
I typically work with Linked Selection active, but when editing movie trailers or promos it’s helpful to deactivate this feature. During this style of editing, I’m more interested in using compelling imagery over narration like, “In a world...full of renegade cops who don’t play by the rules...one man will be tested.” Because I’m not working with a lot of synced dialogue while making a promo, I prefer to turn off Linked Selection so I can quickly place short, dramatic sound bites under the most intriguing action shots (Figure 3.45).

Temporarily unlink audio and video
Because I use temporary unlink feature more often than any other method of unlinking, I’ll walk you through using this feature.
Open the example sequence called Skiing Everest_Trimming. The last clip in the Timeline is Jim speaking about climbers. Let’s clean up his audio by trimming off the beginning portion where he says, “Like they say, as you know....”
With the audio waveform visible on the A1 track, it’s easy to see exactly where Jim begins his next line, “Climbers have short memories.” Place the playhead just before Jim says the word “Climbers.” Press V for the Selection tool and drag to trim the audio portion of the clip. Because Linked Selection is active, the linked picture is trimmed too, leaving a gap on the video track. Whoops. Undo. I want to see Jim onscreen at the end of the scene. I don’t want to permanently unlink Jim’s audio from his picture because I intend to Ripple Trim other clips in this sequence, and I want Jim’s onscreen clip to maintain sync!
Do the following to trim Jim’s linked audio clip: Press the Option (Alt) key while dragging the edge of the sound clip to trim out the unwanted audio. The picture track will be ignored. After you release the mouse to complete the trim, the clip will behave as a typical linked clip, so it will maintain the split edit (L or J cut) and stay in sync when other clips are trimmed (Figure 3.46).
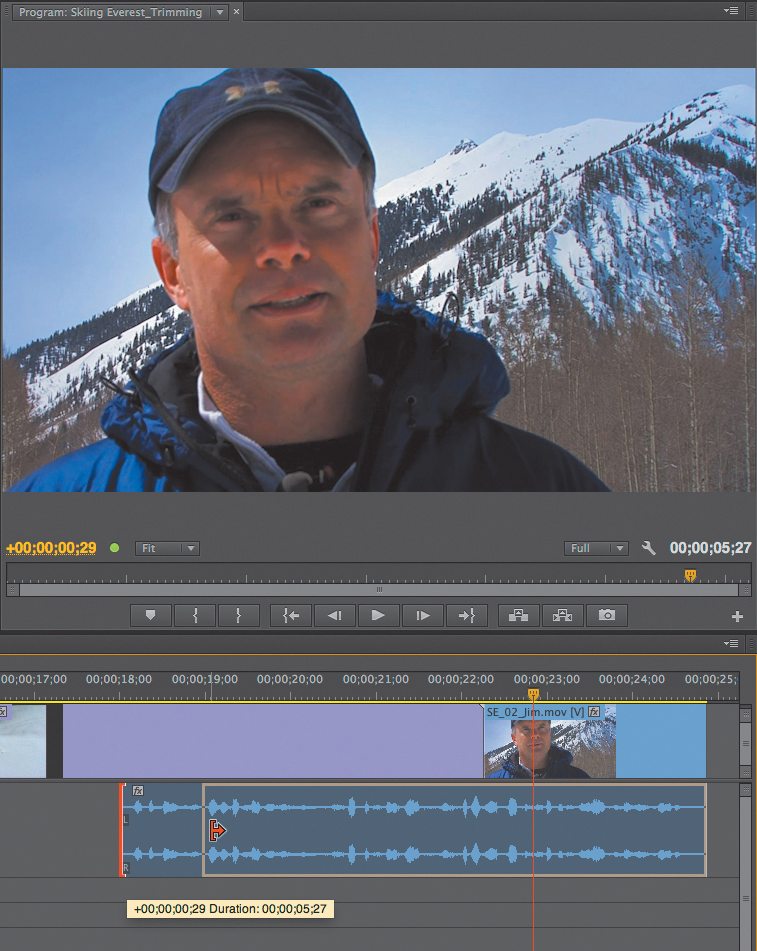
Figure 3.46 Press Option (Alt) to temporarily unlink when trimming the edge of the audio clip to avoid trimming the linked picture and creating a gap on the video track.
This temporary unlink feature is also handy to delete unwanted tracks from linked clips. Use this technique to clean up the Timeline when you’ve unintentionally brought in audio tracks that you don’t need. If you wanted only A1 and A2, but A3 and A4 are still linked to the picture because you didn’t modify the clip before editing it into the Timeline, hold down Option (Alt) when you select the unneeded audio and press Delete.
Unlink and relink individual clips
In some cases, you’ll want to unlink video from audio for an individual clip in the sequence and leave it permanently unlinked. When I use audio from a clip—let’s say it’s sound from an on-camera interview—and I’ve spliced it to remove a long “um..uh,” and I intend to cover the pause and the cut with B-roll footage, I’ll use this method to permanently unlink that sound bite from the picture of the speaker who will appear in sync later in the program.
You can select the clip and either choose Clip > Unlink or right-click on the clip and choose Unlink. To relink clips that are unlinked, Shift-click to select both audio and video portions, and then choose Clip > Link or right-click on the clip and choose Link.
The best way to quickly Link and Unlink individual clips is to use keyboard shortcuts. Try this exercise.
1. Open the Skiing Everest_Trimming sequence.
2. Put the playhead at the beginning of Jim’s on camera video clip.
3. Press Command+K (Ctrl+K) to add an edit through the linked audio track.
4. Click to select the video portion of Jim’s clip.
Darn it! The portion of the clip that should stay linked to Jim—where he is on-camera speaking—was unlinked as a result of adding a splice, but the earlier portion of the clip that is hidden by B-roll is still linked to the picture. This situation will happen often, I promise (Figure 3.47).
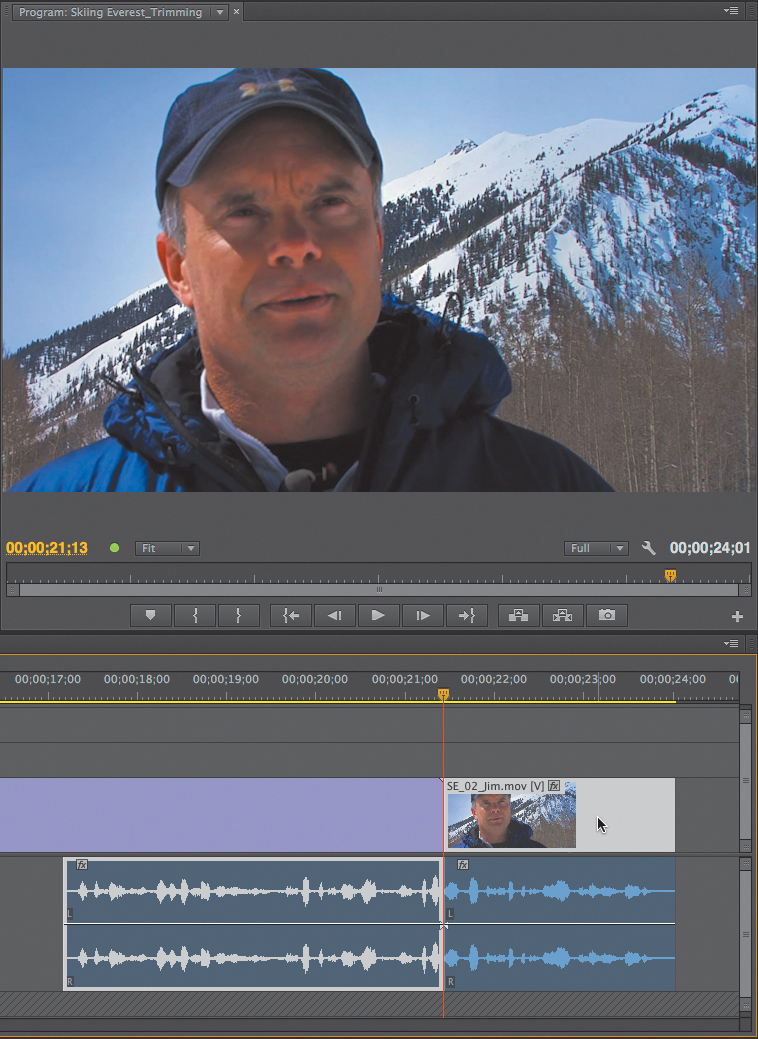
5. Select Jim’s video clip and press Command+L (Ctrl+L) to unlink it from the audio that’s under B-roll.
6. To preserve lip-sync, hold down Shift to select both the picture and audio clips at the end, where Jim is on-camera, and press Command+L (Ctrl+L) to relink that portion.
Group clips
As I mentioned earlier in this chapter, clips that were never linked can be selected and grouped together. Let’s dive in and get familiar with how this works.
1. Return to the Skiing Everest_Trimming sequence in Adobe Premiere Pro.
2. Unlock the A4 track that contains natural skiing sound effects, which were recorded on location.
3. Select the third video clip in the sequence, the shot with the skier in black wearing a white helmet. Beneath this shot is a sound effect that is in sync with the action.
4. Press Shift to select the sound effect on V4 below the video clip.
5. Press Command+G (Ctrl+G), or right-click on either the selected video or audio clip and choose Group (Figure 3.48).

Figure 3.48 Grouped clips behave as a single items for operations such as Move, Copy, Paste, Paste Insert, or Swap Edit.
6. Lock track A4 and notice that the video portion of this grouped clip will behave as an independent clip again if you try to Slip, Slide, move, or perform any other edit function when you select it, because the audio is locked down.
![]() Notes
Notes
Grouped clips will behave as if they are ungrouped if the Linked Selection button is not active for the Timeline.
Once grouped, these clips will move, copy, and trim as though linked, even though they originated from separate source footage. The real advantage of grouping is that you can link not only several synced sound effect clips to a single video clip, but you can group multiple video and audio clips together, and then Cut and Paste Insert, reposition, and quickly Swap Edit the grouped clips using keyboard commands. It allows you to keep an entire scene, or a portion of a scene, together and behaving as a single, grouped clip. It’s an invaluable technique for taking a portion of a scene that is working well, including video, several layers of dialogue, background sound, and graphics, and moving the entire scene to a new location in the film.
For extra credit, return to the Skiing Everest_Trimming sequence. Zoom (+) into the first three video clips at the beginning of the sequence. Reposition, Slip, or, Slide the matching sound effects on A4, so they sync with picture. View audio waveforms if needed. Group the first three video clips with the four sound clips beneath them. Click to select the group, and move, or Cut and Paste Insert the group of clips to a new location, or into a new sequence.
Grouping isn’t necessary simply to keep separate sound effects in sync while trimming other clips in the sequence. There is no need to group clips if you don’t plan to move them as a single unit. Sync Lock will help you maintain sync while inserting shots and trimming without grouping clips.
Sync Lock
Sync Lock help keep all tracks in sync while trimming. This feature is helpful for maintaining audio sync when inserting footage or performing Ripple Trims and Ripple Deletes, whether or not you’re targeting to insert source media onto those tracks.
If a Timeline track does not have a Source Track Patch connected and activated but has Sync Lock enabled, an insert edit will affect that track. Media on tracks that have Sync Lock enabled will ripple when the insert is performed, and in some cases empty track background will be inserted on the track for the duration that matches the inserted source clip.
In other words, if you have Sync Lock on, gaps may appear to preserve sync.
To clarify this concept, let’s experiment with Sync Lock in the Skiing Everest_Trimming sequence.
1. Hold down the Shift key and click on an audio track lock icon to unlock all audio tracks.
2. Make sure Sync Lock is enabled for all audio tracks by Shift-clicking on the Sync Lock icon for one of the audio tracks until all are active (no slash mark through the sync icons).
3. Press B to activate the Ripple Edit tool.
4. Drag with the Ripple Edit tool on the incoming edge of the second video shot in the sequence to make it longer.
A gap appears in the sound effects tracks, A4 and A5, to preserve sync (Figure 3.49).
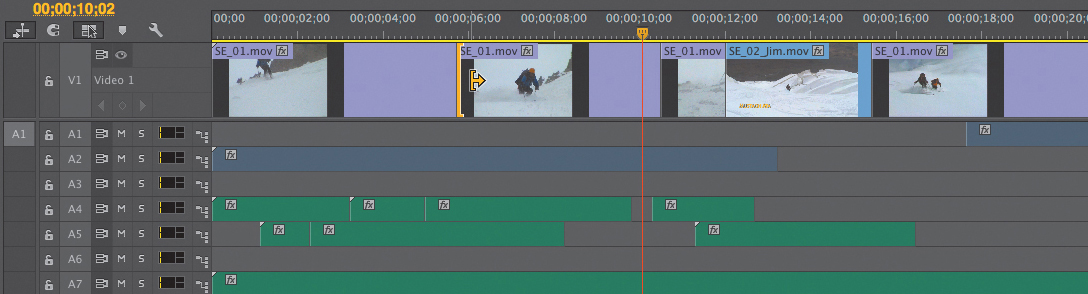
Figure 3.49 When Sync Lock is active for a track, clips will ripple or a gap may be inserted, to preserve sync while performing insert edits, Ripple Deletes, and Ripple Trims.
5. Press Command+Z (Ctrl+Z) to undo.
6. Drag with the Ripple Edit tool on the incoming edge of the second video shot in the sequence to make it shorter. You won’t able to trim the video shorter because with Sync Lock active the clip is blocked by the clip on A4. The Timeline overlay indicates that the natural sound effect track is blocking the trim.
7. Click to deactivate the Sync Lock icons next to tracks A4 and A5.
8. Drag with the Ripple Edit tool on the incoming edge of the second video shot in the sequence to make it shorter. With Sync Lock deactivated for the sound effects tracks, frames can be removed from the video clip to make it shorter (Figure 3.50).
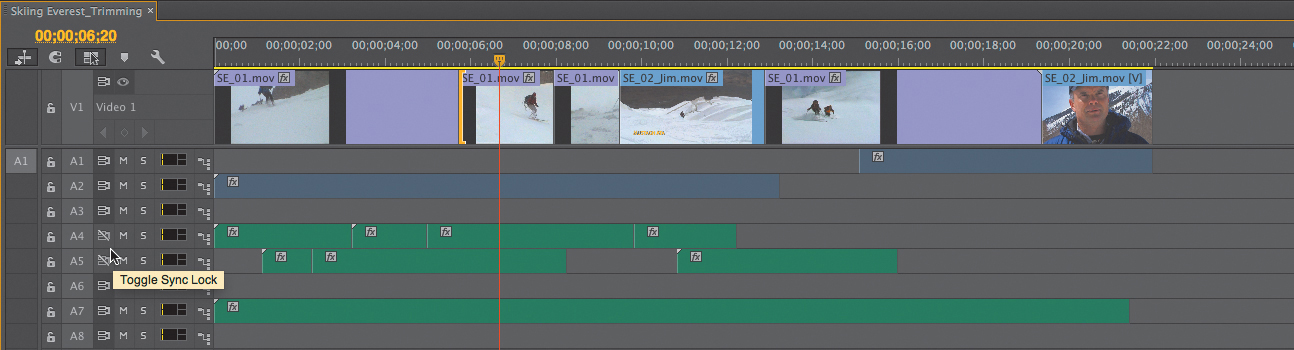
Figure 3.50 With Sync Lock off on A4 and A5, the video clip can be rippled and the trim is not limited by the preservation of sync. In most cases, Sync Lock should remain enabled for primary video and dialogue tracks.
Notice that the audio linked to Jim’s onscreen interview (the last shot in the sequence) has maintained sync during the trim.
9. Click to deactivate Sync Lock on A1.
10. Again, drag with the Ripple Edit tool on the incoming edge of the second video shot in the sequence, toward the left, to make the shot longer again.
Out of sync markers may appear for linked clips, like Jim’s onscreen interview, when Sync Lock is deactivated.
11. Press Command+Z (Ctrl+Z) to undo.
When Sync Lock is active for corresponding linked tracks, clips on those tracks will all shift when a Ripple Trim is performed and sync will be preserved. Turn off Sync Lock for linked audio tracks, and those tracks will stay put when you perform the Ripple Trim. I recommend leaving Sync Lock active for all linked dialogue tracks to preserve sync when insert and ripple edits are performed anywhere in the Timeline.
![]() Tip
Tip
It’s faster to lock all tracks and then selectively unlock an individual track you want to use, or vice versa, rather than clicking on each lock icon individually. To lock all video or audio tracks at once, Shift-click on a Sync or Track Lock icon in the Timeline panel, and then click once on the individual track you want to unlock.
Repairing Sync Issues
When a clip goes out of sync, a sync flag appears on the upper-left corner of the clip. Right-click on a clip’s audio or video sync flag, and you’ll be presented with two options—Move into Sync and Slip into Sync:
![]() Move clips into sync. If you choose Move into Sync, Adobe Premiere Pro just moves the out of sync portion back into sync with the other part of the clip. The video or audio (depending on which sync flag you right-clicked) is repositioned in the Timeline to achieve sync.
Move clips into sync. If you choose Move into Sync, Adobe Premiere Pro just moves the out of sync portion back into sync with the other part of the clip. The video or audio (depending on which sync flag you right-clicked) is repositioned in the Timeline to achieve sync.
![]() Slip clips into sync. If you choose Slip into Sync, Adobe Premiere Pro slips the out of sync audio or video back into sync. Slipping the clip won’t change the location of the out of sync clip in the Timeline. The clip will remain where it is in the sequence, and Adobe Premiere Pro will slip the part of the clip you selected back into sync. This is a great way to create a split edit! If you intentionally want the audio to lead the viewer into the upcoming picture shot, move the sound portion of the clip so it begins before the video, and then slip it back into sync with the picture (Figure 3.51).
Slip clips into sync. If you choose Slip into Sync, Adobe Premiere Pro slips the out of sync audio or video back into sync. Slipping the clip won’t change the location of the out of sync clip in the Timeline. The clip will remain where it is in the sequence, and Adobe Premiere Pro will slip the part of the clip you selected back into sync. This is a great way to create a split edit! If you intentionally want the audio to lead the viewer into the upcoming picture shot, move the sound portion of the clip so it begins before the video, and then slip it back into sync with the picture (Figure 3.51).

Figure 3.51 Right-click on the out of sync indicators to select an option for repairing sync. Selecting Slip into Sync in this situation will preserve the J cut configuration of the split edit while slipping the picture back into sync.
And when sync really goes wrong, use Match Frame and Replace. It’s possible to use a Match Frame and then perform a Replace edit to bring audio and picture back into sync in the Timeline.
Advanced Timeline Editing
Once you’ve mastered basic trimming techniques in the Timeline and regularly use keyboard shortcuts, accelerate your process by adding a few advanced trimming methods to your daily workflow.
Replacing and reordering shots in the Timeline is critical, but when it comes time to join ideas and match cuts so they work invisibly to tell a story, you’ll want to master the more advanced Timeline trimming features. Trimming really is the heart of editing, so let’s get you up to speed with the most elegant techniques for finessing the cut.
Extend Edit Live
Using Extend Edit (E) with Real-Time Playback is an amazing method of trimming a cut point directly in the Timeline when visual frame accuracy is less important than speed. I especially like trimming while watching the sequence in real time, because it allows me to “feel” where the cut should occur while the program is in play.
Let’s take your skills up a notch.
1. Instead of using the Trim tools to select the cut point, press T, the keyboard shortcut for trim. The edit point nearest to the playhead will be selected as a rolling edit (red I-bar). The clips on each side of the selected edit point will be loaded into the two-up display in the Program Monitor.
2. Toggle through Trim types by pressing Command+T (Ctrl+T). Incoming and Outgoing shots are selected and update in the Program monitor as you toggle.
3. Turn on Looping by pressing Command+L (Ctrl+L) (Figure 3.52).

Figure 3.52 Click the plus symbol at the bottom right in the Program panel to add the Loop button to your transport controls. Or press Command+L (Ctrl+L) to toggle Looping on.
4. Press Shift+K to Play Around the current edit (Figure 3.53).

5. With playback looping live, press E to make the trim.
6. Let looping continue to play and watch the cut.
7. Press E again as playback continues to refine the trim as needed.
Modified Tops and Tails
Using modifier keys to perform top and tail trims during real-time playback is a great way to rapidly cut the sequence down to the final running time while pacing the timing of cuts to match music and dialogue cues. If you need to review top and tail trims, jump back a bit earlier in this chapter. I’m revisiting the tops and tails technique in the advanced trimming section to encourage your practice of real-time trimming.
The most elegant way to perform a top or tail trim is to become so proficient at understanding it’s operation in the Timeline that you can perform the trim during real-time playback. You’ll be trimming clips faster than you can think I want to trim off this bit here.
There is no need to select the edit as a ripple or a roll! There is no need to mark an In or Out point and use Lift or Extract! There is no need to press a keyboard shortcut to toggle the trim type! The start or end (In or Out point) of a clip in the sequence works with the location of the playhead to designate the frames that will be trimmed from the sequence. The keyboard shortcut you press determines the trim type. It’s so easy!
Let’s practice this technique with real-time playback.
1. Open the example sequence called Skiing Everest_Advanced Trimming.
2. Select the clip called SE_02 Jim and press the forward slash (/) key to mark the clip. This is not necessary to perform the trim; I’m just lending you training wheels to help you develop real-time trimming chops.
3. Lock all audio tracks except A1 (the track linked to the onscreen interview).
4. With Looping active, press Option+K (Alt+K) to play the clip from In to Out points.
This clip contains two shots. The goal is to make the trim after the Mustagh Ata text fades but just before the Everest shot begins.
5. When the clip changes from the Mustagh Ata shot to the Everest shot, press W to ripple away the tail portion of the clip (Figure 3.54).

Figure 3.54 Press W when the playhead reaches the frame where the Mustagh Ata text has faded. Because playback is looping, watch the shot once or twice for accuracy before performing the trim.
6. Press Command+Z (Ctrl+Z) to Undo the previous trim.
7. While playback continues to loop, repeat the trim but add the Option (Alt) modifier key when you press W to perform a Lift edit.
8. With playback looping, press Command+Z (Ctrl+Z) to Undo.
9. Repeat this trim again, but add the Shift modifier key when you press W to perform a Rolling Edit. Allow playback to continue looping, so you can evaluate the result of the trim.
10. While playback continues to loop, press Command+Z (Ctrl+Z) to Undo.
![]() Tip
Tip
During playback, when the playhead reaches the middle of a clip in the Timeline, simply press Q and the first half of the clip will be extracted from the sequence. If you press W, the second half of the clip will be extracted from the sequence. Add the Shift key to perform a Rolling Extend Edit, or hold down Option (Alt) to perform a Lift edit (Figure 3.55).

Figure 3.55 Review the needed keys for real-time trimming by entering “playhead” into the Keyboard Shortcuts panel’s search field.
Performing edits while looping real-time playback could prove hazardous if easily annoyed humans are nearby. Use headphones if the situation requires consideration.
Let’s take this trick to 11! Now that you’ve got the hang of trimming tops and tails in real time, prepare to perform a one-two punch. In Skiing Everest_Advanced Trimming try the following exercise.
1. Press Option+K (Alt+K) to loop playback of the clip from In to Out points.
2. Place your fingers on the Q and W keys. Watch and listen to the clip once or twice.
3. With playback looping, press W to trim out the Everest shot and then quickly press Q to trim the top half of the next shot, after the Shisha Pangma text appears (Figure 3.56).
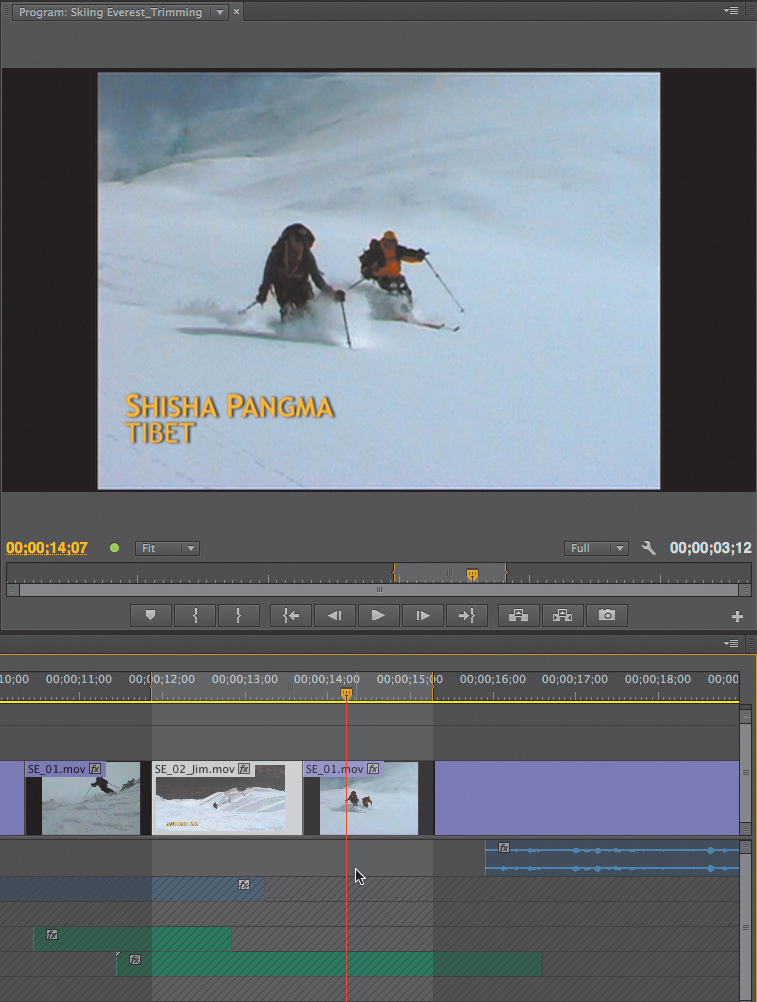
Figure 3.56 Press Q to perform a top trim when the playhead reaches the frame where the Shisha Pangma text is fully visible. Because playback is looping, watch the shot once or twice for accuracy before performing the trim.
Dynamic Trimming
If you want to be a superhero of the editing world, learn how to trim dynamically. After you get the hang of this trimming method, you’ll wonder why you haven’t always been trimming in real time while looping playback in the Timeline.
Dramatically increase your speed while trimming by following these simple rules:
![]() Always press T instead of clicking cut points with the Selection arrow or the Ripple or Roll tools to select the edit points as a trim.
Always press T instead of clicking cut points with the Selection arrow or the Ripple or Roll tools to select the edit points as a trim.
![]() Always press Command+T (Ctrl+T) to toggle the trim type.
Always press Command+T (Ctrl+T) to toggle the trim type.
![]() Always use the up and down arrow keys (or your preferred keyboard shortcuts for Go to Next and Go to Previous Edit Point) to move the trim selection to another cut point.
Always use the up and down arrow keys (or your preferred keyboard shortcuts for Go to Next and Go to Previous Edit Point) to move the trim selection to another cut point.
![]() Mind track targeting to control where the playhead stops when using Go to Next and Previous Edit shortcuts.
Mind track targeting to control where the playhead stops when using Go to Next and Previous Edit shortcuts.
Practice dynamic trimming in the sequence called Skiing Everest_Advanced Trimming. Some of the following steps should feel like review but will help you build on your existing skills while adding new techniques.
1. Put your Timeline playhead at the first video cut in the sequence.
2. Make sure nothing is selected in the Timeline by pressing Command+Shift+A (Ctrl+Shift+A).
3. Press T to select the first cut point and automatically open the shots on either side of the selected cut into the Program panel.
4. Press Command+T (Ctrl+T) to toggle the Trim mode to a Ripple Outgoing (yellow bracket facing left).
5. Before you trim, always glance over at your Timeline track targets. Linked and selected video and audio tracks will trim together. Selected audio tracks containing unlinked audio may prevent certain types of trims.
6. Put your fingers in the home position (three fingers on JKL keys).
7. Press J to play in reverse until the skier is up at the top of the hill, and then without stopping playback press L to play forward.
8. Watch the Program Monitor and press K to make the trim when the image of the skier in blue matches the action of the skier in red and the narrator begins to say, “...and moving around” (Figure 3.57).

Figure 3.57 While in Trim mode, press JKL to play and trim in real time. Watch the Program Monitor and press K to ripple the trim to the playhead location in real time when the action matches on both sides of the cut.
The cut should now be somewhere between 04:12 and 04:20 in the Timeline.
If you want to try again, there’s no need to undo. The cut should remain selected as a Ripple Trim. If you’ve lost the two-up display in the Program Monitor, press T again and press Command+T (Ctrl+T) to toggle the cut back to a Ripple Outgoing selection. Press J and K, and the trim updates. Press L and K, and the trim updates again, in real time. Watch the two-up display and practice this until you achieve the best cut between the shots.
Work those home keys! Now try this trick.
1. Press T to select the first video cut point.
2. Press Command+T (Ctrl+T) to toggle the trim type to Ripple Incoming.
3. Watch the two-up display in the Program Monitor.
4. Fine-tune this edit by holding down the K key while tapping J or L to move one frame at time. When you release K, the trim is complete.
5. Further refine the edit by pressing and holding the K and L keys together to scrub the footage in slow motion. When you release the keys, the trim is made.
6. Use the Go to Next Edit Point (down arrow) and Go to Previous Edit Point (up arrow) shortcuts to jump the playhead to the next edit point.
Cut points will stay selected in Trim mode, so you can continue to quickly adjust additional edit points.
Trimming dynamically (so the K key makes the trim instantly) is one of the best ways to make edit changes because it’s quick and allows you to watch the edit points update in the Program and Timeline panels as you trim. You can adjust the edits while playing based on where the cut change feels right visually.
Consider practicing this technique with the audio tracks deselected at first (Shift-click on one of the audio track targets to deselect all), and toggle the video track cut point so it’s selected as a roll (red I bar). Rolling only the video track cut points is a great way to get good at this technique without breaking sync in your audio tracks. As you get more comfortable with this method of trimming, select linked audio tracks to Ripple Trim dynamically with picture with sound.
If dynamic trimming is new to you, it may take time to get used to the feel of the K key enacting the trim. If you don’t like this method, choose another that suits you! Try all methods of trimming, and work to develop speed using the technique that best fits your style.
Live Trimming on the Timeline
What I call “trimming live” is similar to, but slightly different from, pressing the K key to enact a trim (dynamic trimming).
The Play Around keyboard shortcut, Shift+K, is imperative for reviewing all trims, but it’s especially helpful when using Extend Edit and Ripple Trimming during live trimming in the Timeline. To trim “live,” follow these steps.
1. Make Looping active. Press Command+L (Ctrl+L) to turn Looping on.
2. Activate Trim mode. Press T to select and open the cut point into the Program panel.
3. Select trim type. Toggle the trim type by pressing Command+T (Ctrl+T).
4. Play Around the edit. Press Shift+K to Play Around. The playhead will back up and play through the edit point.
5. Trim live in the Timeline while playback is looping. Press Option+right arrow (Alt+right arrow) and Option+left arrow (Alt+left arrow) to trim the selected cut point in single frame increments while playback is active and looping in the Program Monitor. The cut location will update in the Timeline. Add the Shift key to the preceding shortcuts to trim in multiframe increments.
6. Use the best trimming shortcuts ever invented. While looping playback around the edit (Shift+K) press the Q and W keys to ripple and the E key to roll the edit.
Dynamic and live trimming tips
Once you get a handle on the concept of how live trimming works, you can make a number of little adjustments to improve the “feel” of trimming dynamically:
![]() Make live trimming even better. Remap the keyboard shortcuts for Trim Backward and Trim Forward Many. Place them in easy reach of the home keys (JKL) (Figure 3.58).
Make live trimming even better. Remap the keyboard shortcuts for Trim Backward and Trim Forward Many. Place them in easy reach of the home keys (JKL) (Figure 3.58).

Figure 3.58 Consider remapping the Trim Backward keyboard shortcuts to make live trimming even faster.
![]() Customize Preroll and Postroll duration for the Play Around edit command. When you use the Play Around keyboard shortcut with the playhead positioned on or near an edit point, the playhead will back up a few seconds, play through the cut, and stop a few seconds after the original playhead position. You can customize how far back and how far forward the playhead moves by adjusting Preroll and Postroll settings in the General category of the Preferences panel.
Customize Preroll and Postroll duration for the Play Around edit command. When you use the Play Around keyboard shortcut with the playhead positioned on or near an edit point, the playhead will back up a few seconds, play through the cut, and stop a few seconds after the original playhead position. You can customize how far back and how far forward the playhead moves by adjusting Preroll and Postroll settings in the General category of the Preferences panel.
![]() Customize Large Trim Offset. Set Large Trim Offset as a multiple of the sequence timebase. For example, when you’re working in a sequence with a 24 fps timebase, you might choose a multi-trim frame size of 4 or 6. When you’re working at 25 or 30 fps, you might prefer a 5 frame offset (Figure 3.59).
Customize Large Trim Offset. Set Large Trim Offset as a multiple of the sequence timebase. For example, when you’re working in a sequence with a 24 fps timebase, you might choose a multi-trim frame size of 4 or 6. When you’re working at 25 or 30 fps, you might prefer a 5 frame offset (Figure 3.59).
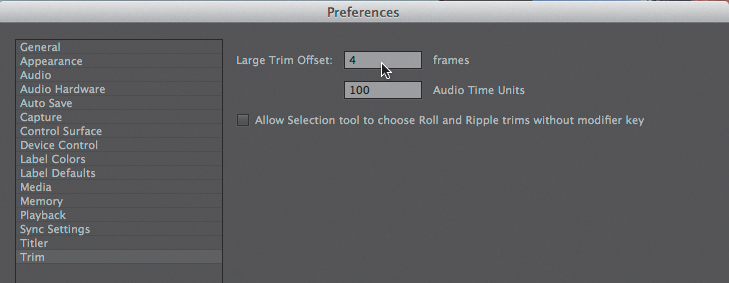
Figure 3.59 Set your preference for multiframe trims in the Large Trim Offset box located in the Trim category of the Preferences panel.
![]() Toggle Snapping while trimming live. Snapping (S) can be toggled on and off anytime, even when you’re dragging a clip or dynamically trimming a cut point.
Toggle Snapping while trimming live. Snapping (S) can be toggled on and off anytime, even when you’re dragging a clip or dynamically trimming a cut point.
Asymmetrical Trimming
When finessing a sequence, I always take time to smooth the cut points between shots by creating split edits, so the picture and sound cut at different times. By splitting the edit, audio can “lead the cut,” in which case the audience hears a sound and then sees the pictures that syncs with the sound a moment later. This feels very natural, because people tend to hear a sound and then quickly turn to look at what made the sound. In other cases, the picture will cut while the audience continues to hear the sound from a previous clip. For example, an actor is speaking and the picture cuts to a reaction shot of another actor while the first character is still speaking. Straight cuts tend to look and sound a bit harsh. In most cases, split edits feels much smoother. In a moment I’ll show you an advanced technique for creating split edits that I use at some point during every project.
Asymmetrical trimming is another way of creating split edits, which are also referred to as an L cuts or J cuts. A basic split edit doesn’t require any special, asymmetrical trimming techniques. Creating a simple L cut is easy when you’re trimming only the video or audio portion of one clip, but things can get a bit tricky when you want to select and edit multiple edit points simultaneously.
Selecting cut points across multiple edits, on different tracks, allows me to accomplish two things in one quick step. I can offset the timing for the change in picture and sound while extending or shortening a shot. It takes a bit of practice, but once you know what to expect when performing these types of trims, you’ll use them all over the place.
In the sequence called Skiing Everest_Time Alone, I want to add frames to the close-up shot of the climber to see and hear him breathing heavily as he hauls his ski gear up the mountain. I want the image and sound of the climber’s struggle to lead the viewer into the next line of dialogue where he says, “I think the hardest thing about climbing is....” At the same time I extend this shot, I also want to extend the audio from the preceding clip underneath this one to smooth the cut by overlapping the audio tracks. In other words, I want to add frames to two shots at the same time and soften the cut with a split edit. Here’s how to accomplish this type of trim.
![]() Tip
Tip
Use the Shift key with Trim tools to select edit points on multiple tracks, and then drag, or use keyboard shortcuts, to trim several edit points in unison. Adding the Shift key to select edit points across many tracks allows you to adjust a complex sequence while maintaining sync.
1. Play Around the cut point between the fifth and sixth shot in the Timeline, around 16 seconds into the sequence.
2. Select the cut with the Ripple tool (B) at the start of the close-up shot on the climbing gear when the climber says, “I think the hardest thing to explain....”
3. Be sure to select the cut as a Ripple In trim (yellow bracket facing right). Toggle the trim by pressing Command+T (Ctrl+T) if needed.
4. If the Linked Selection button is active for the Timeline, the linked audio track is also selected as an Incoming Ripple Trim. If audio and picture are not linked, or if Linked Selection is off, Shift-click the audio cut point to add it to the selection as an Incoming Ripple to preserve sync.
5. Press the Shift key, move the mouse to the left, and click to select the previous clip’s audio track as an Outgoing Ripple Trim (Figure 3.60).

Figure 3.60 Use the Shift key to select multiple cut points asymmetrically. While the edit point on V1 and A1 are selected as a Ripple Incoming trim, press Shift and click to add the audio on A2 as a Ripple Outgoing trim.
6. Drag the Ripple tool to the right to add about one second to the shot (Figure 3.61).
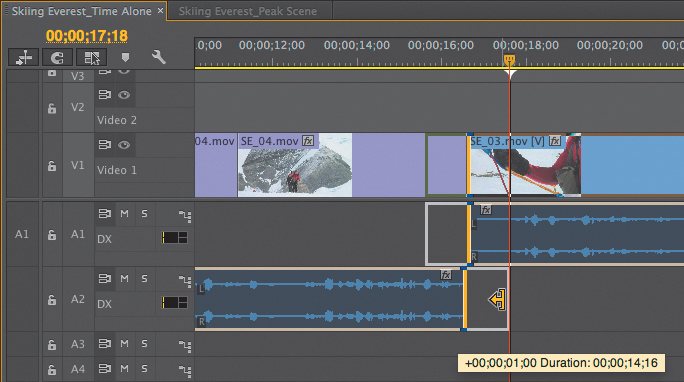
Figure 3.61 As you drag to the right, a yellow rectangular overlay will show a plus sign to indicate the number of frames or seconds you’re adding to the trim.
7. Release the mouse when you see that you’ve added a second to both the outgoing audio track and the incoming video and audio tracks.
The resulting asymmetrical trim creates an L cut while adding one second of content—in opposite directions—to multiple shots at the same time (Figure 3.62).
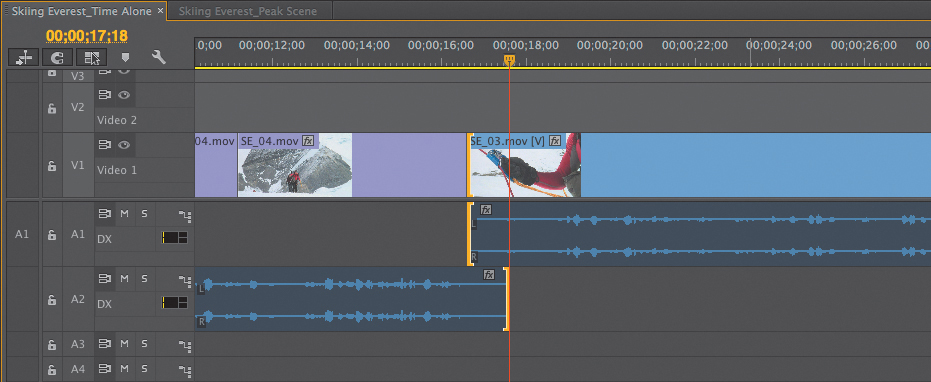
Figure 3.62 The asymmetrical trim adds frames to the close-up shot of the climber and creates an L cut to soften the edit.
Another great reason to select cut points across multiple cuts is to adjust edits in a way that keeps all tracks in sync without leaving gaps in the audio tracks by pulling sound from an audio clip on another track to fill the gap.
In the sequence called Skiing Everest_Peak Scene, I’ve taken the time to place and sync “nat sound” (natural sound effects of skiing that were recorded on location). I want to ripple the video, maintain sync with previously placed sound effects while I add frames to the Mustagh Ata shot, and extend those natural sound effects to fill in the gaps. If I ripple only the video clip, Adobe Premiere Pro will leave a gap in the sequence to preserve audio sync (Figure 3.63).
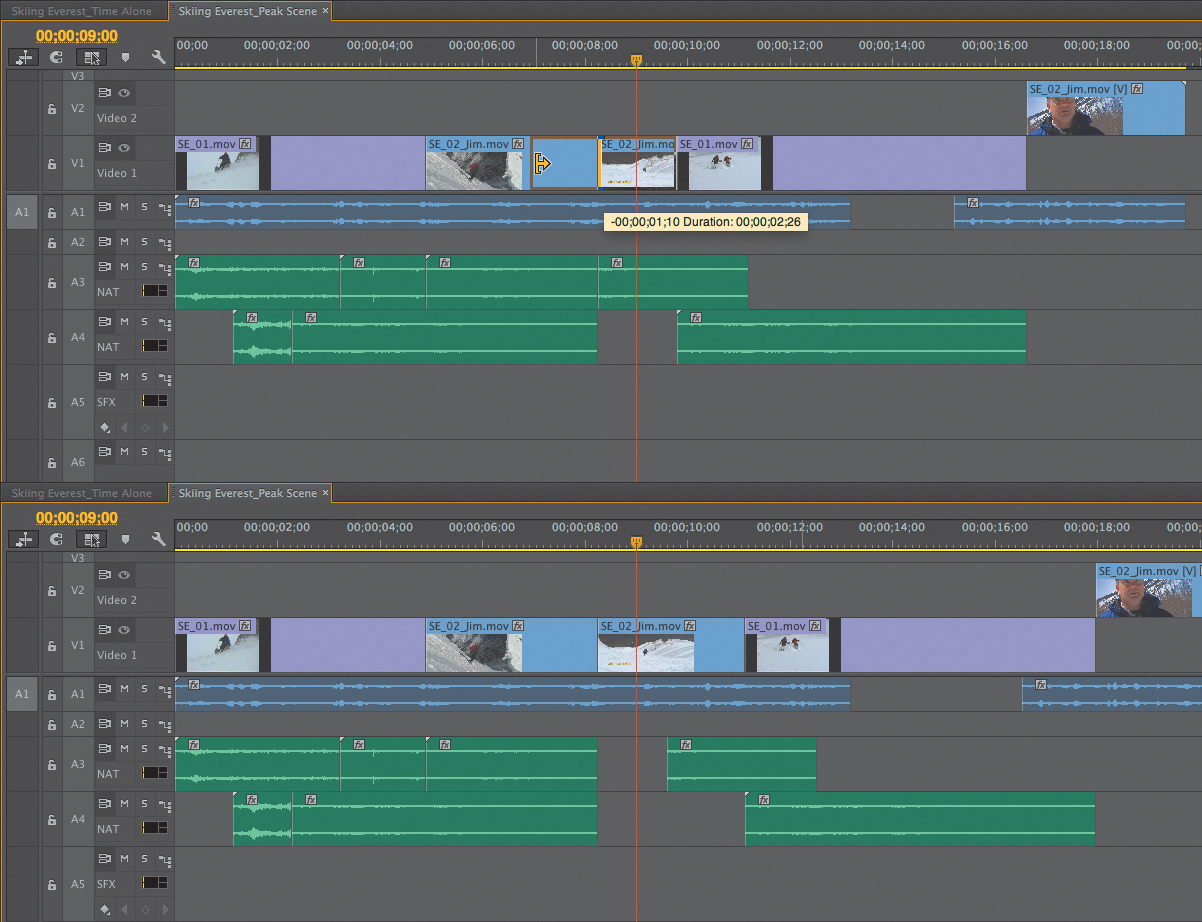
Figure 3.63 Rippling only the video results in a gap in the sequence on sound effects tracks. Where Sync Lock is active, inserting black video gaps keeps sound in sync with the trimmed picture.
Instead, I’ll asymmetrically select the video cut as a Ripple Incoming, and then Shift-click to select the synced natural sounds on Audio Track 3 as a Ripple Incoming too, which will pull out more of the matching natural sound effects to fill the gap. Because I’m selecting cut points, I’ll move the Ripple tool to the left and Shift-click to select the sound effects on Audio Track 4 as a Ripple Outgoing Trim (Figure 3.64).
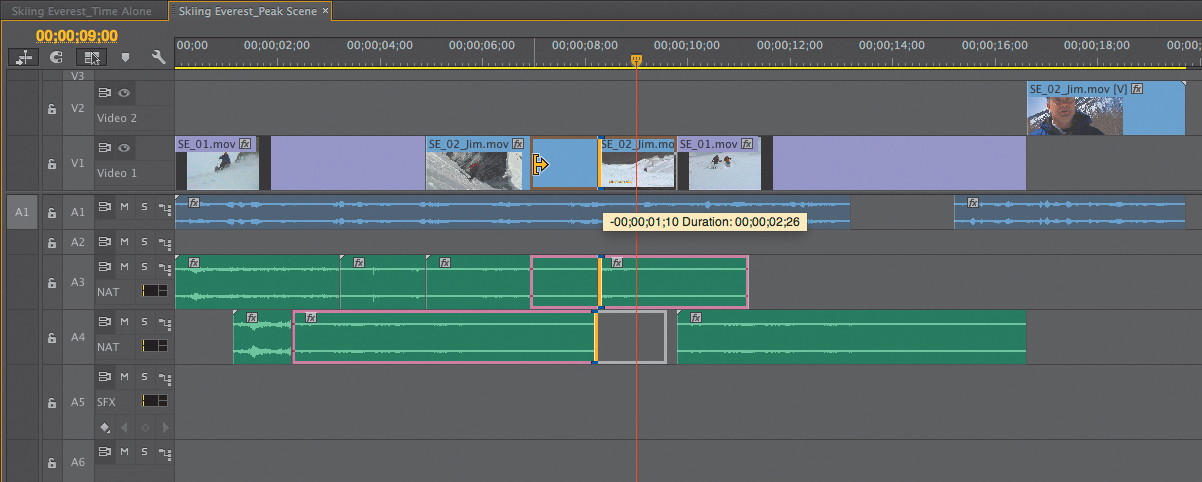
Figure 3.64 Selecting cut points asymmetrically preserves sync for previously placed sound effects while frames are added to the picture and fills the gaps with overlapping sound to smooth the edit.
Now, when I drag to the left with the Ripple tool over the video cut to lengthen the shot, the audio from A3 will fill the gap, and audio on Track 4 will overlap the above cut and smooth the edit.
If I had dragged to the left rather than to the right over the A4 track, which was selected as a Ripple Outgoing Trim, I would have ended up shortening the video clip (and the sequence) instead of adding frames to the shot. Try this on your own so you know what to expect.
Selecting multiple edit points across many tracks allows you to asymmetrically adjust the cuts in complex sequences while maintaining sync. Remember to use the Shift key with any Trim tool to select edit points across multiple tracks, and then drag or use keyboard trimming shortcuts to trim several shots in unison.
Marquee-drag to Group-Select cuts
Another quick way to maintain sync while trimming is to Group-Select the edit points across multiple tracks. Try this exercise.
1. Park the playhead at the cut point between the shots you want to adjust.
2. Hold down the Command (Ctrl) key while dragging a marquee around all cut points. The resulting asymmetrical selection will automatically favor sync.
The cuts open into the two-up display in the Program panel, ready for trimming.
3. Press Command+T (Ctrl+T) to toggle the trim type.
Next I’ll walk you through an example of how to use marquee-drag for asymmetrical selection. Open Skiing Everest_Peak Scene.
I want to remove frames from the final B-roll shot, just before Jim says, “the stuff you don’t like you forget real quick.” If I select the clip of the two skiers as a Ripple Outgoing to shorten that shot, it could throw Jim’s audio out of sync. Instead, I’ll hold down Command (Ctrl) and drag a marquee around all cut points (Figure 3.65).

Now I’ll press Command+T (Ctrl+T) to toggle to Ripple Outgoing (yellow brackets facing left) and drag to the left to remove frames. When I release the edit, the B-roll shot is shorter and lip sync is preserved in the interview.
If I’d also wanted to have the skiing sound effects under the cut as I trimmed, I could have dragged a marquee to select all cuts but then pressed Command+Shift (Ctrl+Shift) to reselect the empty track area to the right of the clip on A4 as an Incoming trim (yellow bracket facing right). As I click and drag with this asymmetrical arrangement, the audio clip on A4 will not be trimmed shorter as I remove frames from the clips above (Figure 3.66).

Figure 3.66 After dragging a marquee around multiple edits, press Command+Shift (Ctrl+Shift) to select the empty track area on A4 as an Outgoing Ripple to keep the audio clip on A4 from getting shorter.
Use asymmetrical trimming when you want to trim the picture but have several tracks of audio beneath and need to preserve the sync work you’ve already done. In the case of very complex edits, this is the best way to achieve the trim you want and maintain sync.
![]() Tip
Tip
If you have a full-size keyboard, you can use the numeric keypad for frame-specific moves and trims. Select a clip in the Timeline with the Selection tool, and then Slip, Slide, or select a cut point with a Trim tool like Ripple or Roll. Press the plus (+) or the minus (-) key and then enter a number, like 12, to indicate how many frames you want to trim or move or trim to the left or right. Press Return (Enter) to reposition or trim the clip. To move or trim in one-second increments, press plus or minus, and then type a number, followed by a period (for example -1 followed by a period). Then press Return (Enter) to trim or move a whole second to the left. This is the only time when 99 is greater than 100: When you select a clip and type +99, the clip will move 99 frames to the right, but if you type +100, periods are automatically entered and the clip is moved only one second to the right.
![]() Close-Up: Tail Trim Jim
Close-Up: Tail Trim Jim
1. Place the playhead before Jim’s audio begins. Press W, the keyboard shortcut for Ripple Trim Next Edit to Playhead.
The B-roll shot is now shorter, and Jim’s onscreen footage remains in sync.
2. Press Option (Alt) and use the Selection tool to trim the beginning of Jim’s line to the left.
Advanced Workflows
There are so many advanced workflow topics that I want to include in this section, but I’ll stick to two less intuitive workflow-oriented editing techniques that every studio editor should know.
Scale to Frame Size
Adobe Premiere Pro allows you to mix footage frame sizes and frame rates. There is no need to transcode, compress, or make proxy files for “offline” editing and then reconnect full-size footage for the “online” edit or finishing work. Editing can be completed at the native resolution of the footage and later be transcoded or compressed during output. In addition, Adobe Premiere Pro can take 4k footage, and when it’s dropped into a 1080p sequence, it downsamples the high-resolution media and effectively plays it back at the lower-resolution settings. This is an amazing feature and has revolutionized studio workflows.
When Default Scale to Frame Size is selected, imported elements are set to fit sequence dimensions, downsampling video and stills to the size of the sequence. You can edit using the downsampled footage, and when you want to create camera moves or recompose a shot, instantly scale the frame size back to the original dimensions. The image will appear “zoomed in,” and you can then scale and move the image around to create camera moves or recompose a shot using the full resolution of the original file.
It’s important to have a clear understanding of how this process works and what will happen when a clip of any size is downsampled to match the sequence settings:
![]() Default Scale to Frame Size affects images upon import into the project. If you have footage already saved in your project, changing this preference will only affect images you import after the setting has been altered. If you want all images scaled to match sequence settings, select Default Scale to Frame Size in the General category of the Preferences panel before importing, or you’ll need to reimport a folder of clips after changing the setting.
Default Scale to Frame Size affects images upon import into the project. If you have footage already saved in your project, changing this preference will only affect images you import after the setting has been altered. If you want all images scaled to match sequence settings, select Default Scale to Frame Size in the General category of the Preferences panel before importing, or you’ll need to reimport a folder of clips after changing the setting.
![]() When Default Scale to Frame Size is not selected, imported elements are left alone and not downsampled (Figure 3.67).
When Default Scale to Frame Size is not selected, imported elements are left alone and not downsampled (Figure 3.67).
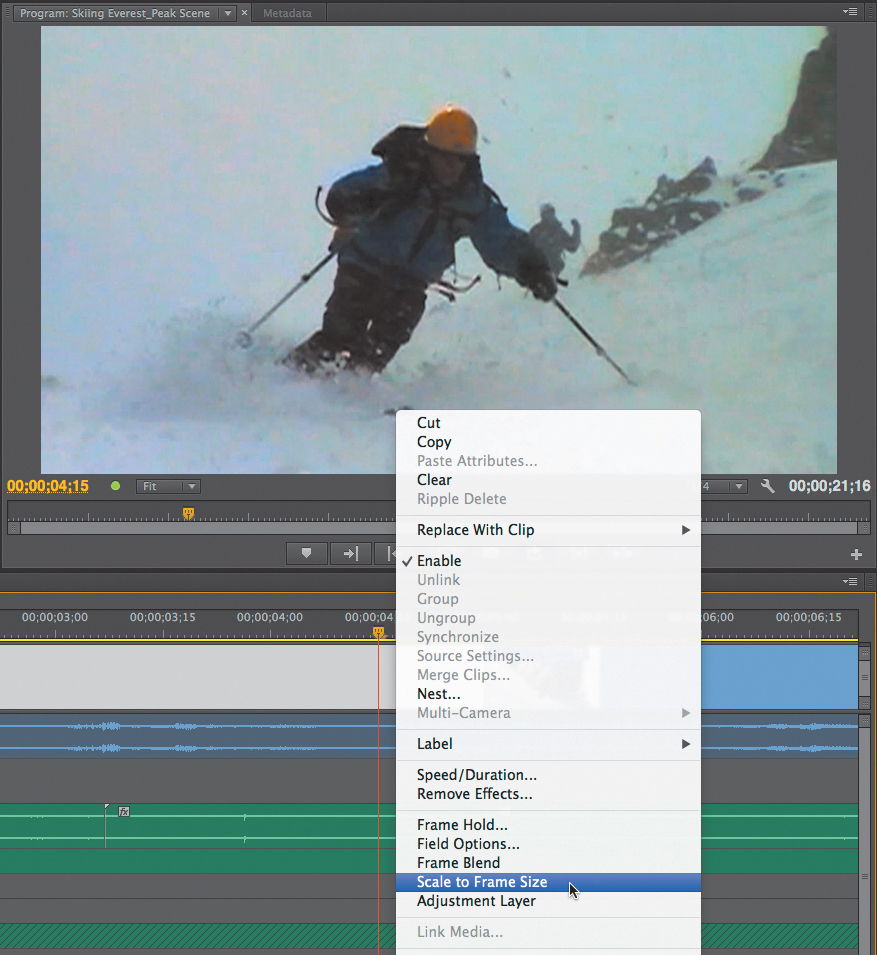
![]() When Default Scale to Frame Size is selected, pictures may appear with letterboxing or pillar-boxing (black areas around the image) when image and sequence dimensions don’t match (Figure 3.68).
When Default Scale to Frame Size is selected, pictures may appear with letterboxing or pillar-boxing (black areas around the image) when image and sequence dimensions don’t match (Figure 3.68).

![]() Default Scale to Frame Size options can be changed for clips already inside a Timeline. Right-click on a clip in the sequence (or on a group of selected clips) and choose Scale to Frame Size.
Default Scale to Frame Size options can be changed for clips already inside a Timeline. Right-click on a clip in the sequence (or on a group of selected clips) and choose Scale to Frame Size.
![]() When Scale to Frame Size is selected, images are downsampled. If you try to zoom into a downsampled image beyond 100%, the image quality will be degraded.
When Scale to Frame Size is selected, images are downsampled. If you try to zoom into a downsampled image beyond 100%, the image quality will be degraded.
![]() To zoom or recompose a shot, make sure Scale to Frame Size is not selected for the clip you’re altering, so you have access to the full resolution of the image.
To zoom or recompose a shot, make sure Scale to Frame Size is not selected for the clip you’re altering, so you have access to the full resolution of the image.
![]() Remember that using Scale to Frame size works best with video or stills that are larger than the sequence dimensions, because it results in better quality images. With Scale to Frame Size selected, images that are smaller than the sequence dimensions will be scaled up, and the resulting image could look soft. You can recompose the shot and animate keyframes to create camera moves without degrading image quality by keeping Scale settings below 100%.
Remember that using Scale to Frame size works best with video or stills that are larger than the sequence dimensions, because it results in better quality images. With Scale to Frame Size selected, images that are smaller than the sequence dimensions will be scaled up, and the resulting image could look soft. You can recompose the shot and animate keyframes to create camera moves without degrading image quality by keeping Scale settings below 100%.
Combining Scenes: Sequence into Sequence
Similar to nesting, but more well-organized and far less problematic, editing one sequence into another allows you to focus on scene building and then later combine those scenes with control over Source and Timeline track patching.
Often, I’ll create three separate sequences for Act One, Act Two, and Act Three of a narrative film. At any time I can quickly edit these three sequences together to get an overall feeling of assembly length for the entire program.
Here are some general suggestions for using techniques as sources:
![]() Separate sections, scenes, or acts. Simplify complex or long-form editing by editing in several sequences; then later combine those sequences into one final Timeline without the hassle of nested elements.
Separate sections, scenes, or acts. Simplify complex or long-form editing by editing in several sequences; then later combine those sequences into one final Timeline without the hassle of nested elements.
![]() Load a sequence into the Source panel and edit it like it’s a clip. Right-click the sequence icon in the Project panel and choose Open in the Source Monitor, or click and drag the sequence into the Source panel. Select segments of the source sequence for insert or overwrite into the Timeline by setting In and Out points in the Source panel for editing into the Timeline.
Load a sequence into the Source panel and edit it like it’s a clip. Right-click the sequence icon in the Project panel and choose Open in the Source Monitor, or click and drag the sequence into the Source panel. Select segments of the source sequence for insert or overwrite into the Timeline by setting In and Out points in the Source panel for editing into the Timeline.
![]() Target specific tracks. Patch Source buttons to Timeline targets for total control over where video and audio tracks from the source sequence end up in the Timeline sequence.
Target specific tracks. Patch Source buttons to Timeline targets for total control over where video and audio tracks from the source sequence end up in the Timeline sequence.
To activate the toggle to edit clips from a sequence (rather than treating a source sequence as a nest) in the Timeline, click the Nests or Individual Clips button to make source targets active for the source sequence (Figure 3.69).

Figure 3.69 Drag a sequence into the Source panel and click the Insert and Overwrite Sequences as Nests or Individual Clips button in the Timeline to make source targets active for patching into Timeline targets.
Multi-camera Editing
With the cost of high-quality camera equipment falling and considering the obvious creative benefits of shooting Multi-Camera, having access to effective tools to deal with multi-angle, multi-format media is perhaps more important than ever.
![]() Tip
Tip
Do your research! It’s well worth finding out the format and codec of each camera on the shoot ahead of production. The more information you have before you arrive on location, the better prepared you’ll be.
It’s common to work with owner-operators who bring “a camera” to the shoot. That is, for lower-budget productions you may not have much control over the camera equipment you’ll use. The good news is that I haven’t seen a bad picture from a professional camera for some years. But calibration and codecs can vary enormously depending on the hardware and the preferences of your operator.
![]() Close-Up: Fixing It in Post
Close-Up: Fixing It in Post
Fortunately, Adobe Premiere Pro has powerful multi-format editing features that remove many of the challenges you’ll face when working with multiple cameras. Briefly, you can leave aside worries about mixed format editing, because Adobe Premiere Pro will conform everything on the Timeline to your sequence settings automatically. Of course, this makes careful selection of sequence settings (Figure 3.70) particularly important when you’re working with mixed formats.

The Multi-Camera Workflow
You may have performed a multi-camera edit before. To summarize, here’s the workflow in Adobe Premiere Pro.
1. Acquire your media. Be sure to record sync marks. A clapper board is perfect. Get enough visual variation to avoid apparent jump-cuts when editing, and decide on timings to change storage cards to ensure that only one camera at a time stops recording.
2. Organize your media. Merge external audio with video clips if needed, add metadata if required, and rename clips to avoid confusion.
3. Prepare the multi-camera sequence. Automatically create a sequence with each camera angle synchronized and on separate tracks. Nest this sequence (edit it into another sequence as a clip). You’ll be performing your multi-camera edit on the nested version.
4. Perform the multi-camera edit. You can do this while playing your camera angles in the Multi-Camera Program Monitor view or cut by cut directly on the Timeline.
5. Adjust the multi-camera edit. Change the timing or contents of your cuts.
Let’s deal with each of these steps in turn to discover good habits for creative excellence.
Acquire Your Media
Some of the best postproduction results come from preparation during preproduction. Plan your shoot carefully to ensure that you arrive at the edit suite with all the information you need and rushes that are easy to sync and work with.
Tips for multi-camera shooting
With file-based cameras, the historical tape length limits are no longer a challenge. However, just about every other challenge remains. Here are a few:
![]() Avoid stops and starts. Avoid stopping and starting recordings, because every time a camera is paused it will have to be re-synced with the other camera angles in post. This is time-consuming and adds to the risk of making mistakes. Anything you can do to simplify the process in post is a good idea!
Avoid stops and starts. Avoid stopping and starting recordings, because every time a camera is paused it will have to be re-synced with the other camera angles in post. This is time-consuming and adds to the risk of making mistakes. Anything you can do to simplify the process in post is a good idea!
![]() Get sync marks. Even if you’re not forced to pause during the action, try to get a sync mark at the beginning and end of your recordings, just in case. It’s a small time cost on-set that will make you very happy if you need it.
Get sync marks. Even if you’re not forced to pause during the action, try to get a sync mark at the beginning and end of your recordings, just in case. It’s a small time cost on-set that will make you very happy if you need it.
![]() Use a clapper/slate. Clapper boards are great for recording sync marks. Information on the board is genuinely useful to the editor (don’t bother with shot logs; if you can read it on the board, you can be confident you have the right clip). The audio and visual clap of the clapper board presents an easy-to-find mark for all cameras.
Use a clapper/slate. Clapper boards are great for recording sync marks. Information on the board is genuinely useful to the editor (don’t bother with shot logs; if you can read it on the board, you can be confident you have the right clip). The audio and visual clap of the clapper board presents an easy-to-find mark for all cameras.
![]() Change Timeline views. Adobe Premiere Pro allows you to view Audio Time Units rather than frames, both in the monitors and on the Timeline. If you switch your Source Monitor to audio waveform display (Figure 3.71) and turn on audio time units (both in the Panel Settings menu), you’ll find it quick and easy to sync source audio and video clips without the playhead jumping between frames that are just slightly out from the clap.
Change Timeline views. Adobe Premiere Pro allows you to view Audio Time Units rather than frames, both in the monitors and on the Timeline. If you switch your Source Monitor to audio waveform display (Figure 3.71) and turn on audio time units (both in the Panel Settings menu), you’ll find it quick and easy to sync source audio and video clips without the playhead jumping between frames that are just slightly out from the clap.

Adobe Premiere Pro will place the mark on one frame or another, but it’s a little more precise to use audio time units (Figure 3.72). Try it and see.
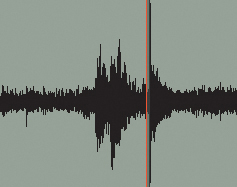
Use sync timecode
If you’re shooting in a studio or on a larger budget on location, you may have external sync timecode. This gives every camera the same timecode, so sync in post is extremely easy. In practice, it doesn’t save that many hours and the cost of cameras and equipment that support this feature can be relatively high, but if you have the opportunity to use this option, go for it. When you want to sync audio and video, or multiple camera angles, Adobe Premiere Pro can use the timecode (Figure 3.73).
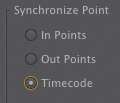
Without external sync timecode, be sure to get at least a clapper board clap or some other kind of sync mark at the beginning of your recording. It doesn’t matter all that much what you use as a sync mark as long as you have one. Many wedding videographers use a flash gun because it’s unnoticed at a wedding but provides a clear visual mark.
It also isn’t all that important where your sync mark is. I once edited the World Judo Championship using media from multiple TV stations. I often found there was just one moment every camera caught—when the losing competitor’s head hit the floor!
Record sync marks
Adobe Premiere Pro needs just one sync mark somewhere on the clip. For some events, it’s not possible to record that mark before or during the recording, so it has to come at the end. In this case, be clear with all camera operators that they must not stop recording until the sync mark has been recorded. This can be as simple as everyone coming together and pointing their cameras at an assistant who claps his hands a couple of times (twice in case an operator forgets to focus or turn his mic up).
Try to get a visual and auditory sync mark to give you more options in the edit. Also, be sure to record audio on every camera, not just the one getting a clean mix from a sound desk. However poor the on-camera audio is, the editor will thank you for it because it makes it so much easier to locate content.
If there’s simply no way to record a sync mark, don’t worry. I’ve synced using speech or even action where someone is reaching for a cup or opening a door. You can use just about any event that is on every camera, but note one important detail: Every camera must capture the same event, or you’ll have no visual references to set your sync mark.
When you get into post, sync marks for all camera angles have to be from the same moment. It’s a challenge to sync different parts of different clips (although it can be done—see the section “Manually creating a multi-camera sequence”).
Use camera logs
As much as possible, record useful information about each camera angle. Much of this information won’t be needed, but every now and then just one camera catches an important piece of action and in among the mix it might easily be missed. Make rough notes about these kinds of events—such as someone tripping or a particularly lucky composition when people happen to come together in the right way—and bring them to the edit.
Decide early on which camera is which number. You should be doing this anyway, but if all the names and notes match, it will make the edit easier.
Make a note of each camera model, format, and codec. Although it’s simpler if you have matching cameras and settings, it’s not as important as it once was thanks to the mixed format editing facilities in Adobe Premiere Pro. Still, the more information known about the production, the easier your job will be when you perform the editorial work, especially if you weren’t involved with the production. Unexpected issues with content from one camera or you need to choose a rendering codec for a mixed format Timeline can complicate the editorial process unnecessarily.
Record overlap
While shooting multi-camera, try to minimize any occasions where more than one camera is missing the action. It’s impossible to avoid ill-timed events like suddenly discovering the battery is about to run out or that someone forgot to change the storage card before recording, or to have to move the camera during recording because an obstacle appears.
Agree on a signal for camera operators to use if recording has to be paused. While one camera is changing cards or batteries, the other cameras can go easy on the movement, tend toward shooting wide, and generally aim for “safe” footage rather than exciting (but potentially unusable) footage. Once the camera in question is up and running again, everyone can resume looking for creative excellence.
It’s important to agree on a pause signal in advance. I’ve worked on shoots where an operator tries to signal something like he has to change a storage card and the other operators all nod in agreement, thinking they’re being told by the operator that he’s getting great shots or some other equally misunderstood communication that could have been avoided.
Shoot wide
A book on postproduction techniques is not the place to give advice on production aesthetics. But if you’re shooting a one-off event, consider shooting a little wider than you would usually.
Although closer angles are often more engaging, there’s nothing quite as disengaging as missing the action. If you shoot a little wider, it’s easier to catch unexpected movements or adjust to include action that enters the shot. You usually can scale up the shot a little if needed (about 20–30%), providing a tighter shot than the original wide shot.
If you can, have one camera on full wide catching the entire event. Your editor may never use this angle, but he’ll be extremely grateful if he needs it to cover a gap in the action the main cameras failed to capture. This camera doesn’t need an operator; it just needs to start and finish with the other cameras, and have a shared sync mark.
Of course, this is not always possible—I know of a production in the UK that sometimes shoots with 60 cameras spread over a large area. The important thing is finding a way to sync.
Organize Your Media
Consider creating a bin for each multi-camera shoot to make it easier to identify the media you intend to include. It’s all too easy to miss a camera angle among the other shots in a production, and grouping media in a bin (Figure 3.74) helps you stay in control.
If you’re working with raw media, such as RED R3D files, consider making source setting adjustments before you do anything else. The results will show in the Source Monitor, on the Timeline, and in the Multi-Camera display. Leveling out strong color differences will help you focus on the action when performing your multi-camera edit.
It can’t hurt to rename your source clips Cam 1, Cam 2 (or C1, C2), and so on (Figure 3.75). It will make it easier to locate the content later and you can view the clip names overlaid on the angles as you perform your edit. You’ll also find it easier to stay organized in the Project panel.
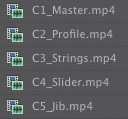
Prepare for the Multi-Camera Edit
Before you perform your multi-camera edit, consider adjusting your workspace. You may want to shrink your Source Monitor and expand your Program Monitor, and save this as a workspace for multi-camera that suits your display setup.
You’ll need to provide Adobe Premiere Pro with one of the following sync point marks on every clip. All clips must have the same kind of mark, and of course, every mark must be in sync with every other mark:
![]() In point or Out point marks
In point or Out point marks
![]() Synchronized timecode
Synchronized timecode
![]() A clip marker
A clip marker
![]() Sync audio recorded on all clips
Sync audio recorded on all clips
Once you’ve set the sync points, you’re ready to create a multi-camera sequence.
Automatically creating a multi-camera sequence
Creating a multi-camera sequence is super easy. If you want to try this, use the Multi-Camera.prproj sequence and associated clips in the Multi-Camera_Media folder.
In the Project panel, select the clips you want to combine into a multi-camera sequence, right-click on any one, and choose Create Multi-Camera Source Sequence (Figure 3.76).

The dialog that appears includes important options that tell Adobe Premiere Pro how to synchronize your source clips and which audio you want to use. When you click OK, Adobe Premiere Pro will create a sequence that is synchronized and ready to nest, with the Multi-Camera mode already enabled. Let’s look at a few of the options:
![]() Name. The box at the top of the dialog simply names the newly created sequence.
Name. The box at the top of the dialog simply names the newly created sequence.
![]() Synchronize Point. The Synchronize Point options are used to tell Adobe Premiere Pro what is in sync. If you can, you’ll use the Timecode option. I wouldn’t particularly recommend using In Points or Out Points because these will trim the clips. Instead, add a marker (M) at the sync point on each clip.
Synchronize Point. The Synchronize Point options are used to tell Adobe Premiere Pro what is in sync. If you can, you’ll use the Timecode option. I wouldn’t particularly recommend using In Points or Out Points because these will trim the clips. Instead, add a marker (M) at the sync point on each clip.
![]() Synchronize Point Audio option. If you have source audio on all of the clips, the Audio option will automatically sync your clips (this makes it well worth shooting sync audio on every camera). Depending on your original audio, this option might not work. If this is the case, just revert to adding a marker manually to each clip.
Synchronize Point Audio option. If you have source audio on all of the clips, the Audio option will automatically sync your clips (this makes it well worth shooting sync audio on every camera). Depending on your original audio, this option might not work. If this is the case, just revert to adding a marker manually to each clip.
![]() Create single multi-cam source sequence. If you have a group of clips from one time period and another group from another, Adobe Premiere Pro will normally put them in separate multi-camera sequences. If you select this option, they’ll all be included in one long sequence instead. This is perfect if you have camera operators stopping and starting at different times. Be warned: You are likely to have gaps in that sequence (which is fine as long as you know to expect it).
Create single multi-cam source sequence. If you have a group of clips from one time period and another group from another, Adobe Premiere Pro will normally put them in separate multi-camera sequences. If you select this option, they’ll all be included in one long sequence instead. This is perfect if you have camera operators stopping and starting at different times. Be warned: You are likely to have gaps in that sequence (which is fine as long as you know to expect it).
![]() Audio. The Audio options relate to the sequence you are about to create. Remember that this will be a sequence just like any other, with conforming settings. The visual settings (image size, frame rate, and so on) will come from the clips, but you must tell Adobe Premiere Pro which audio mastering option you want to use.
Audio. The Audio options relate to the sequence you are about to create. Remember that this will be a sequence just like any other, with conforming settings. The visual settings (image size, frame rate, and so on) will come from the clips, but you must tell Adobe Premiere Pro which audio mastering option you want to use.
![]() Camera Names. The Camera Names options set the onscreen overlay information you’ll see during the multi-camera edit and the angles you’ll see in the right-click menu when choosing a multi-camera angle. Making the names visible makes it worth prenaming your clips in the bin.
Camera Names. The Camera Names options set the onscreen overlay information you’ll see during the multi-camera edit and the angles you’ll see in the right-click menu when choosing a multi-camera angle. Making the names visible makes it worth prenaming your clips in the bin.
Things you need to know about creating multi-camera sequences
Here are a few things to keep in mind:
![]() The Adobe Premiere Pro multi-camera workflow is made possible by combining a number of standard features, including nesting a sequence, a particular Program Monitor view, and even regular trimming. If you’ve been using Adobe Premiere Pro for a while, none of these will be new to you.
The Adobe Premiere Pro multi-camera workflow is made possible by combining a number of standard features, including nesting a sequence, a particular Program Monitor view, and even regular trimming. If you’ve been using Adobe Premiere Pro for a while, none of these will be new to you.
![]() Tip
Tip
Stay in control: Remember that when you’re manually building a multi-cam sequence, each track should have clips from just one camera each. Don’t mix and match angles on the same track or you risk getting lost during the edit.
![]() When you select multiple clips in the Project panel, right-click, and choose Create Multi-Camera Source Sequence (Figure 3.77), Adobe Premiere Pro gives you options to combine them in a new sequence (ready to be placed in a different sequence for editing) specially configured for multi-camera editing:
When you select multiple clips in the Project panel, right-click, and choose Create Multi-Camera Source Sequence (Figure 3.77), Adobe Premiere Pro gives you options to combine them in a new sequence (ready to be placed in a different sequence for editing) specially configured for multi-camera editing:
![]() Each clip will be placed on its own track, and the sequence will have a unique icon to indicate that the Multi-Camera option is already enabled.
Each clip will be placed on its own track, and the sequence will have a unique icon to indicate that the Multi-Camera option is already enabled.
![]() If you have a single long clip from each camera, building the multi-camera sequence in the Project panel saves a few clicks and offers automatic syncing.
If you have a single long clip from each camera, building the multi-camera sequence in the Project panel saves a few clicks and offers automatic syncing.
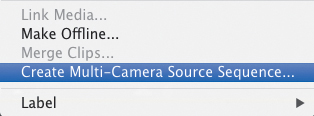
Adobe Premiere Pro displays the results of special effects while performing a multi-camera cut during playback. This might have an impact on playback performance, so consider working with effects after you have applied the cut if you can. You can always open the nested multi-camera sequence later and apply effects to a camera angle (clip) as a whole. You’ll see the result update in each instance of the nest automatically, as you would expect with any nested sequence. If you work with nested effects this way, it’s quick and easy to temporarily disable effects on clips (by using the Effect Controls panel), improving performance while performing your multi-camera cut.
Manually creating a multi-camera sequence
If you have multiple clips from each camera and each one needs to be placed in sync at different times, it’s best to build the nested sequence the manual way, clip by clip.
![]() Tip
Tip
Map shortcut keys when you need them: Unless you’re using Adobe Premiere Pro’s automatic audio sync or external sync timecode, consider mapping the Source Monitor audio waveform display to a keyboard shortcut. This is quicker to switch the view than using the Settings menu.
Place each camera angle clip on a separate track, stacked one above the other and synchronized. You can sync manually: Just display the waveforms and move each clip until the clapper board clap is lined up, or use the same automatic syncing options that you find in the Project panel. Select each stack of clips that should be in sync, right-click, and choose Synchronize (Figure 3.78).

If you want to add sync markers, it’s usually easier to do so in the Source Monitor before adding them to the Timeline. Once clips are on the Timeline, you can add markers by double-clicking on each clip to open it in the Source Monitor and adding it there. You’ll be opening the instance of the clip that appears on the Timeline, and the marker will appear on the segment you selected.
If you have lots of media to sync, consider using PluralEyes by Red Giant. The workflow is simple and fast, and automatically syncs all the clips on your Timeline based on in-camera audio.
Then all you need to do is nest that sequence in another, right-click on it in the Timeline, and choose Multi-Camera > Enable (Figure 3.79).

Creating sync in a sequence you have created manually requires exactly the same marks, timecode, or audio as you’d need if you were syncing in the Project panel. The marker can be anywhere in the clips, as long as it is on a frame that truly is meant to be in sync (Figure 3.80, next page). This will be the reference for Adobe Premiere Pro.

Perform the Multi-camera Edit
Once you’ve nested your multi-camera sequence you are ready to perform a cut during playback. If you’ve used the option to create a multi-camera sequence in the Project panel automatically, the Multi-Camera > Enable option will already be on. If you haven’t, right-click on the nested sequence now and you’re ready to go.
Once a sequence is marked as a multi-camera source, double-clicking on it no longer opens the nested sequence in the Timeline. Instead, it’ll open in the Source Monitor (Figure 3.81).

Selecting one or other angle in the Source Monitor will update the selected angle in the current Timeline. Be warned! This is easy to do by accident, and you’ll be changing your sequence.
If you ever want to change the current angle without right-clicking, you can do so by opening the clip in the Source Monitor. Keyboard shortcuts are available for this as well, provided you’ve enabled the correct Timeline track (to tell Adobe Premiere Pro which content you’re working on): Pressing Command+1 (Ctrl+1) adds a cut at the playhead and switches to Camera 1, pressing Command+2 (Ctrl+2) adds a cut at the playhead and switches to Camera 2, and so on.
You can override opening multi-camera sequences in the Source Monitor by holding down Command (Ctrl) when you double-click on the nested sequence. Doing so will open the sequence in a separate Timeline panel, as normal.
Set the Program Monitor to the Multi-Camera display mode (Figure 3.82) and turn on Overlays if you want to see your camera angles displayed on the images. You can configure this in the Overlay settings (both options are on the Program Monitor Settings menu).

Figure 3.82 Be sure you have the correct track enabled (turn on the track header), or you won’t see the contents of your nested sequence.
Now all you need to do is start playing the video and click on the angle you want. But you won’t be clicking, will you? The number keys along the top of your keyboard can be used to select camera angles, and you should definitely use them. It’s faster than clicking and allows you to focus your attention on your content.
Adjust the Multi-Camera Edit
When your multi-camera cut is complete, you’re free to change the timing of your cuts as you would with any other clip on the Timeline. You can trim, extract, copy, and paste—whatever you like. There is nothing strange about a multi-camera enabled nested sequence in terms of editing. It’s just a nested sequence.
You can also select all of the multi-camera sequence segments, right-click on them, and choose Multi-Camera > Flatten to replace the nested sequence with its selected clips. Use this option with care: There’s little benefit in terms of playback performance, and you will lose the option to open the nested sequence and apply effects to whole camera angles. This may be exactly what you want to do, but think it through before you take this one-way step.
Switching Video with Matching Audio
You’ll notice there are options for audio handling when setting up your multi-camera sequence. Adobe Premiere Pro needs to know if you want to take the audio that comes with each camera angle as you cut or stick with one particular source audio. There is, of course, no right or wrong here. You’ll need to make a choice based on your media. If you are working with cameras that are very far apart, where it would be natural to cut to the different audio, go for it. If, instead, you have a clean feed on just one camera, you’ll want to stick with that.
It’s not unheard of to have a completely separate audio recording that you add to the master sequence, ignoring the original in-camera audio completely.
![]() Close-Up: Choosing Cameras
Close-Up: Choosing Cameras