
Chapter 1. Editing in Adobe Premiere Pro
If you haven’t already downloaded the Project and Lesson files, click here for instructions.

Film editing is now something almost everyone can do at a simple level and enjoy it, but to take it to a higher level requires the same dedication and persistence that any art form does.
—Walter Murch
At one point this chapter was called the “New Method of Editing,” except it’s not new. It’s about three or four years old and was introduced in CS5. What is the “new” way of editing? It’s a pair of ideas that basically mean the tools should get out of your way:
![]() Just drop your footage in a project and edit.
Just drop your footage in a project and edit.
![]() Use whatever tools you feel are best for the job.
Use whatever tools you feel are best for the job.
Once upon a time you were limited by the video formats you could use. If your tool didn’t support it, you had to jump through hoops to get the footage to work (see “Transcode Is a Dirty Word” later in this chapter.)
You shouldn’t be forced to work in a specific frame rate or frame size, or be limited to just broadcast frame sizes. You should be able to output for broadcast as well as for digital signage (where the video is vertical), museum installations (nearly every one is custom), and mobile devices.
And the workflow you choose or build should wrap around tools you’re familiar with. In fact, you should use whatever tools from Adobe you prefer and use other companies’ tools where you feel appropriate. Adobe Premiere Pro has fantastic interoperability with other third-party tools, whether it’s a Digital Audio Workstation (DAW), a compositor, or a color correction suite, even though Adobe provides all of these.
The beautiful thing? As content creators, we shouldn’t care. Use what you need. Pick a format. Pick an output. Don’t neglect planning and testing, and make sure your pipeline works; your tools shouldn’t stand in your way.
Best of all, Adobe Premiere Pro packaged in an interface that’s recognizable to editors. It’s the common 2-up editing interface, with a Timeline that feels familiar.
The biggest hurdle for you the editor, is picking up the depth and the techniques that are available in Adobe Premiere Pro, beneath the immediate surface—that’s what this book is about.
This chapter explores some of the areas that are more abstract, like the overview of the general workflow in Adobe Creative Cloud, and progresses to concrete subjects, like choosing appropriate hardware.
Format Agnostic
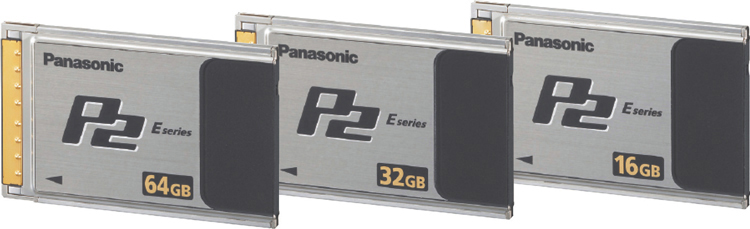
In a given year I see at least ten formats that come from hundreds of cameras: XDCam, P2 cards (Figure 1.1), Red R3d files, and even footage from iPhones and other smartphones.
Traditionally, trying to make all these pieces fit have caused editors major headaches. In fact, I believe there’s someone sitting in a room right now making up a new format just to give editors more headaches.
The message I’m trying to relay is to stop sweating. When I encounter a new format, I just throw it at Adobe Premiere Pro. So far, it’s almost always worked. And if it doesn’t work now, I know the next Adobe Premiere Pro update will make it work.
This flexibility doesn’t stop at cameras. It extends to other nonlinear editors (NLEs) through XML and AAF. For this reason, Adobe Premiere Pro is the hub that intersects with my camera and all my software.
Any Camera Format
There are three generalized camera types: prosumer, professional, and cinema. I use the term generalized because the distinction between these formats used to be very black and white. Now, it’s a gray haze because some of these cameras can cross boundaries.
Therefore, it’s crucial to know which formats you have to work with. Each type has different advantages and limitations.
![]() Tip
Tip
It’s all too common for productions to want to use prosumer cameras. Although they’re not optimum for professional work, Adobe Premiere Pro handles their files beautifully. Just be sure to hold the cameras sideways!
Prosumer cameras
No longer are there consumer cameras. Everything can be used on professional productions. Therefore, everything is prosumer.
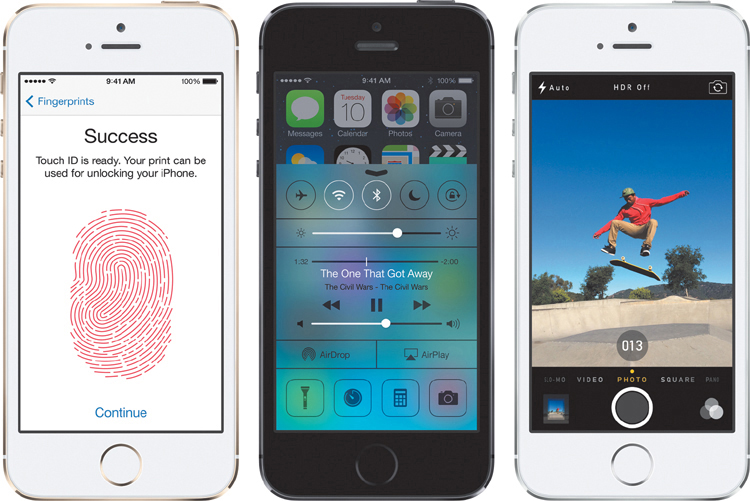
The idea that I can use my iPhone (Figure 1.2) or iPad to shoot glorious 1080 video is both wonderful and maddening at the same time. It’s become almost a bad joke that on set a client can use his cell phone and shoot video just to give you an alternate shot (or give an opinion of what he envisions the shot should be).
What makes a prosumer camera prosumer is mostly the small sensor size and high compression of the video. Uncompressed video eats about 6 GB per minute. But that same 6 GB can capture about an hour of video on my iPhone. The best camera can be the camera in your pocket because it goes with you anywhere and everywhere. That’s the beauty of these prosumer cameras.
The other limitation of prosumer cameras, aside from compression, is that they have a very small chip, which affects how they capture light and focus. The chip creates all sorts of struggles in low-light situations to capture a decent image. More often than not, these cameras end up producing lots of noise.
Professional cameras
As with prosumer cameras, professional cameras typically shoot HD, but they have a couple of different features that make them attractive to the pro market.
The footage they capture is less compressed. In many ways, the less compressed the footage is, the easier it will be to edit, color correct, and output. Sometimes you have the ability to change lenses on these cameras, and the lenses are engineered with a higher grade of glass, meaning that you can shoot cleaner, sharper images with the added benefit of adjustable apertures and f-stops (Figure 1.3).

Figure 1.3 Professional cameras have critical features that place them in a class above consumer/prosumer cameras.
They may also have features like jam sync of timecode (making two cameras’ clocks exactly match, which is fantastic for multicam shoots), zebra striping (in-camera exposure awareness), and possibly some input adjustment of metadata like essence marks (essentially clip markers made by some cameras while shooting). Such features make these cameras “run and gun” devices—perfect for everyday use and ENG.
Cinema cameras
The hallmarks of a cinema camera are that these cameras can produce formats idealized for postproduction with less compression, such as Avid’s DNxHD and Apple’s ProRes, and some can deliver raw sensor data.
Cameras in this category often shoot greater than HD (2k, 4k, and beyond), which provides the flexibility of being able to deliver footage at these higher resolutions or just in HD and reframe the content as needed (Figure 1.4).
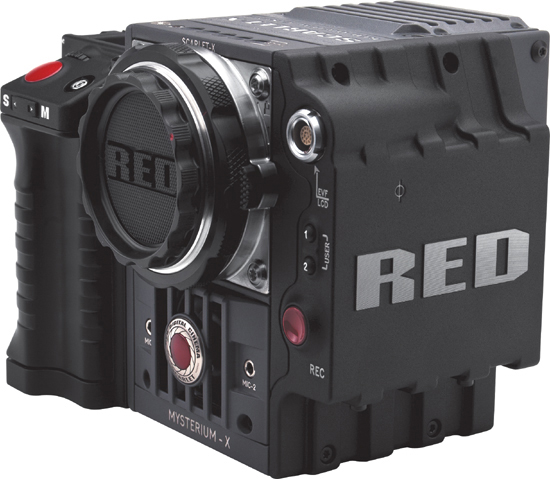
Figure 1.4 The RED Scarlet-X shoots 5k on a sensor that’s greater in size than a frame of 35mm film.
Cinema cameras may not be as flexible or optimized for “run and gun” shooting. For example, it may be necessary to capture dual sound—sound on the camera and on an outboard device—and then sync both in post. These cameras require much more customization; not just to the camera body. Lenses, battery packs, SSD (solid state drive) storage systems, camera mounts, and device acquisition systems (such as the AJA Ki Quad Pro) are all items that will increase your costs in addition to the camera body.
Often, when a cinema camera is used on a shoot, there’s additional on set support, such as a DIT (Digital Imaging Technician) and possibly an on set editor and/or colorist to assist with the image.
Tape-based cameras
Because of the debate about the inclusion of tape-based cameras in this book, sadly, little will be mentioned about them.
Each author loved the permanence of tape (or film!). But realistically, in the past five years the amount of tape we’ve worked with has been nearly nil. So, this book won’t cover much tape-based information because the industry has moved away from it.
File-based camera flexibility
Every camera type mentioned previously is now primarily file based, storing data on a card or a chip, not on a video tape. Video tape has this nasty limitation of forcing you to work in real time.
A unique ability in Adobe Premiere Pro is that you can check the cards from these cameras while on set. It’s not a file listing, but it gives you a chance to view the actual footage.
Handling cards (such as P2, CF cards, or SD cards) on set is commonly done by a DIT who does this sort of work and more (including backing up and checking the files for consistency). However, all too frequently this job gets lumped with the tasks of a DP or assistant editor.
The ability to quickly check a card and hoverscrub (where you hover over a clip and scrub to preview the clip) for content allows for the quick analysis and checking of the card content, ensuring that the footage looks good before the media is copied and the card is reformatted for reuse.
Using the Media Browser to preview media
Because it’s all too common to encounter editors who aren’t aware of the Media Browser, it’s worth mentioning and describing here. You can find the Media Browser in the default workspace in the lower-left panel (Figure 1.5).
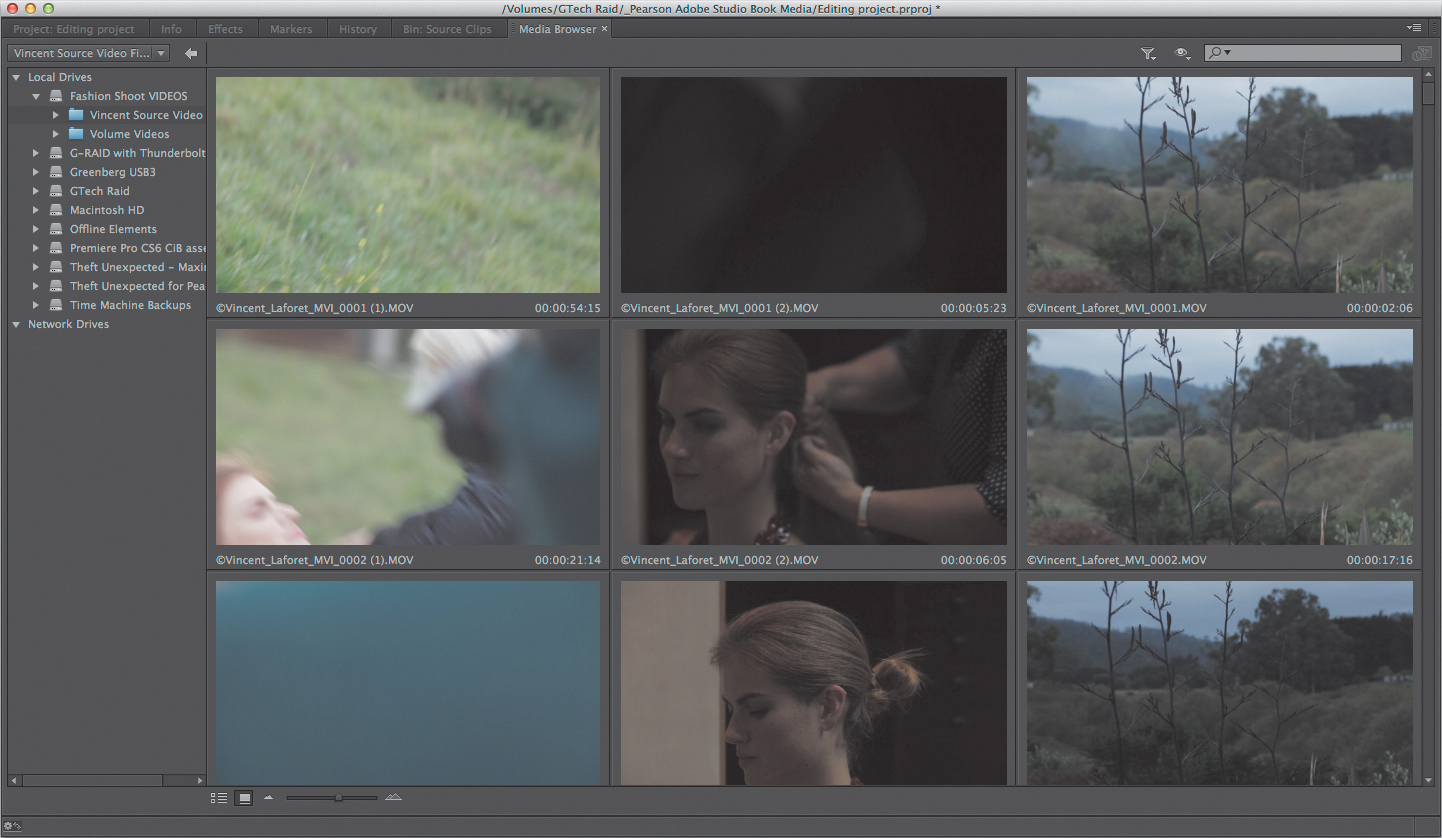
Figure 1.5 The Media Browser (maximized here due to the accent (`) key), is the fastest way to look at a card.
If you’re not familiar with the Media Browser, this is an epiphany because you can browse a card visually.
In Adobe Premiere Pro’s Media Browser (which is essentially the same as Adobe Prelude’s Ingest panel) is a view of the media. Merely navigate to the card (on the left side of the Media Browser are the Volumes on your system), and the card contents become available to you visually as thumbnails.
You can hoverscrub these clips (pass your mouse over the clip), and the thumbnail changes to show different sections of the clip. Double-clicking the thumbnail will place the clip in the Source Monitor but not add it to your project! This is a great way to view the clip using the JKL keys and other playback tools.
Unless you drag it into the Project panel or Timeline, this clip, which is living out on a card, isn’t part of your project and yet can be played back full screen.
And you can edit directly from the card. The obvious danger is if you eject the card, the media is gone. But this concept of being able to view media on a live card is fantastic!
Adobe Prelude, a dedicated tool in Adobe Creative Cloud, is discussed in Chapter 2, “Setup and Organizing” and Chapter 8, “Workflow Management.” Prelude can view clips as well as do a more important step: It can handle your file-based media correctly by ensuring that a copy is made.
Now that you’ve seen how flexible Adobe Premiere Pro is with media (more about this in Chapter 2), it’s worth looking at other NLE interoperability.
![]() Tip
Tip
In the Program or Record Monitor, pressing Ctrl+` (accent key) will fill the screen with the video. Over and over again you’ll see the accent key (`) mentioned in this book. It’s probably the most useful feature because it enables you to maximize a panel when you mouse over it.
Final Cut Pro
It’s likely that Adobe Premiere Pro isn’t your primary editorial tool. Even if it is, clients may come to you with projects from Apple’s Final Cut Pro (Figure 1.6) that they would like continued or revised.
Because of XML (eXtensible Markup Language), it’s possible to import a project from Final Cut Pro into Adobe Premiere Pro and relink it to the QuickTime files (if you have them).
This ability to export XML exists for Apple’s Final Cut Pro version 7 and earlier. If you’re utilizing Final Cut Pro X, you’ll need a tool from Intelligent Assistance to convert the XML from Final Cut Pro X to the XML of Final Cut Pro 7 so it’s compatible with Adobe Premiere Pro.
Export XML
When you export an XML file from Final Cut Pro, it’s important to be aware of a couple of possible speed bumps:
![]() Make sure that all your media is connected prior to your XML export.
Make sure that all your media is connected prior to your XML export.
![]() Be aware of any camera codecs that need rewrapping into QuickTime, such as XDCam and clips from P2 cards.
Be aware of any camera codecs that need rewrapping into QuickTime, such as XDCam and clips from P2 cards.
![]() If you’re working with Final Cut Pro X, you’ll need translation software to make the XML file more compatible.
If you’re working with Final Cut Pro X, you’ll need translation software to make the XML file more compatible.
What translates?
The elements that translate to Adobe Premiere Pro include clips (including multiclips), dissolves, most transfer modes, scale, crop, rotation, opacity, audio keyframes, several audio filters, and several video filters (including the Three-Way Color Correctors).
The elements that don’t translate are mostly “generated,” such as titles, generators, and motion elements.
After importing an XML file, a report is generated if errors occurred. This Final Cut Pro Translation report is a text file. Double-click it to open it and show the names of the clips and timecodes of where errors occurred.
Media considerations
QuickTime media is the architecture of all the video media that comes from Final Cut Pro. QuickTime is installed on all Macs and merely needs to be installed on a Windows computer. Apple’s own professional codec, ProRes, is readable on both platforms but only writable on the Macintosh.
To relink clips and sequences, simply select everything in a project and choose File > Relink Media.
One issue you need to be aware of is rewrapped media. File-based media from XDCam and P2 cards are normally natively stored in the MXF (Materials eXchange Format) architecture, which is a rich media architecture and is similar to QuickTime in that there are different codecs available within the MXF container. Final Cut Pro ingests these files by taking them out of MXF and rewrapping them as QuickTime files. This is an issue because these codecs have to be licensed to use. If you do not have Final Cut Pro installed on your system, you’re not licensed to use these codecs in QuickTime.
On a Mac, owning any of the Apple ProApps (Compressor, Motion, Final Cut Pro X, or Logic) grant the system a license to use these codecs.
On Windows, it’s necessary to purchase a license from Calibrated Software. It has several packages that will add the appropriate licensed codecs to QuickTime, making the rewrapped media available to QuickTime.
![]() Tip
Tip
Do you need to bring bins across from an Avid sequence? Build sequences of all the clips in a bin on a single sequence, and then export the AAF for the sequence that represents the bin.
Avid
Importing from Avid Media Composer (Figure 1.7) is limited to a single sequence (not a project like Final Cut Pro). What’s exciting about the Adobe Premiere Pro CC release is the licensing of Avid’s DNxHD codec. All Avid media is now available to Adobe Premiere Pro.

Figure 1.7 AAF exports from Avid Media Composer. Symphony, and Newscutter can translate to Adobe Premiere Pro but only on a sequence-by-sequence basis.
![]() Make sure you select the Edit Protocol in the Export dialog.
Make sure you select the Edit Protocol in the Export dialog.
![]() Set Media to Link if you want to link to the existing media.
Set Media to Link if you want to link to the existing media.
![]() Set Media to Consolidate to copy existing media. The best place for media to be copied is in a folder in the same location as the AAF file.
Set Media to Consolidate to copy existing media. The best place for media to be copied is in a folder in the same location as the AAF file.
![]() Convert Audio Sample Rate to Project so all of your audio is a single sample rate.
Convert Audio Sample Rate to Project so all of your audio is a single sample rate.
The following should be tested prior to exporting to avoid problems:
![]() Mixed frame rates
Mixed frame rates
![]() Clips linked via Avid Media Access (AMA)
Clips linked via Avid Media Access (AMA)
What translates?
The clips and tracks import without a problem. Key items like cross dissolves and audio clip gains also come across cleanly.
Media considerations
Media support from Avid Media Composer is very robust: It’s possible for Adobe Premiere Pro to reconnect to AMA media, file-based MXF (such as XDCam and P2), and DNxHD; the latter is new in Adobe Premiere Pro.
Less certain for successful sequence/media transfers are situations with mixed media sizing (SD in HD projects) and mixed frame rates.
Transcode Is a Dirty Word
Transcoding video refers to the process of re-encoding video files to an architecture + codec that your NLE can handle or can handle with less stress on your system.
For example, many NLEs have struggled with h.264 files (regardless of containers such as QuickTime, MTS, or MXF) because of the very lossy nature of this distribution codec (Figure 1.8). Some editorial systems can’t handle them. Some formats suffer and drop frames so heavily that editing is difficult or unrealistic.

Figure 1.8 This is a directory of MTS – MPEG Transport Stream files. Here they’re h.264 wrapped in the MPEG architecture. Many NLEs struggle or require multiple steps to use this type of media, often forcing editors to transcode.
![]() Tip
Tip
Place your media caches on your fastest storage, preferably on a USB 3 or a Thunderbolt connected SSD drive. More about this in detail in Chapter 2.
Some formats, such as R3D files that contain RAW information from the camera sensor, ask your system to push large amounts of data, making it difficult for playback. Transcoding used to be common in these situations. But Adobe Premiere Pro handles these formats without transcoding due to the Mercury Playback Engine (see the section “Mercury Engine” later in this chapter).
So, why transcode? One of Adobe Premiere Pro’s strengths is that you should just be able to import and edit!
Every Format Should Import
Adobe Premiere Pro can import any and every video format. Part of the advantage of Adobe Creative Cloud is the ability for Adobe to rapidly implement new formats as they become available. While writing this book, Adobe in fact improved these capabilities. For example, Adobe added the ability to import the format from RED Dragon sensor footage.
![]() Close-Up: To Transcode or Not to Transcode
Close-Up: To Transcode or Not to Transcode
![]() Performance. Some formats, even on the best hardware, stress out a system, particularly heavily compressed h.264 video and larger formats with high data rates (2k and above media, such as RED R3d or ArriRaw). On older hardware transcoding may be a necessity to get any decent playback at all. Multicam editing, especially beyond four streams, may also stress a system enough that transcoding may help.
Performance. Some formats, even on the best hardware, stress out a system, particularly heavily compressed h.264 video and larger formats with high data rates (2k and above media, such as RED R3d or ArriRaw). On older hardware transcoding may be a necessity to get any decent playback at all. Multicam editing, especially beyond four streams, may also stress a system enough that transcoding may help.
The best transcoding choice for performance is to use a postproduction codec (as long as you have the bandwidth), such as Avid’s DNxHD (DNxHD 145 or 220) or Apple’s ProRes (ProRes 422 or HQ).
![]() Portability. Whether it’s to share the project with another editor or have the flexibility of working on a laptop on an airplane, the idea of making a “smaller” version of the video is generically called proxy or offline editing. The easiest way to make smaller media files is by choosing a codec/data rate combination that is low (such as DNxHD 36 or ProRes Proxy) and that is optimized for postproduction and provides an adequate enough picture.
Portability. Whether it’s to share the project with another editor or have the flexibility of working on a laptop on an airplane, the idea of making a “smaller” version of the video is generically called proxy or offline editing. The easiest way to make smaller media files is by choosing a codec/data rate combination that is low (such as DNxHD 36 or ProRes Proxy) and that is optimized for postproduction and provides an adequate enough picture.
At the very end of the edit, you’ll need to relink the sequence to the full quality footage.
![]() Tip
Tip
If you’re working in a news/fast turnaround environment, it’s ideal to select Use Previews in the Export Media dialog. This option forces Adobe Premiere Pro to use previews (lower-quality processing) for faster output.
Proper Media Handling
The golden rule when you’re working with various file-based media is to organize it outside of Adobe Premiere Pro. It’s crucial to have copies of your media. Linking to clips that are on media cards is dangerous, because it’s likely the cards will be ejected and reformatted.
See the section “Start Organized and Sleep at Night” in Chapter 2.
Mercury Engine
The Mercury Playback Engine (MPE) is the technology that permits the real-time acceleration of formats and effects in Adobe Premiere Pro. The key elements that power this technology include:
![]() 64-bit architecture. This moves more data through the computer’s CPU and can address more RAM compared to 32-bit architectures.
64-bit architecture. This moves more data through the computer’s CPU and can address more RAM compared to 32-bit architectures.
![]() Multithreading. Tasks can be broken down into smaller jobs and doled out to multiple cores on each CPU.
Multithreading. Tasks can be broken down into smaller jobs and doled out to multiple cores on each CPU.
![]() RAM. Utilize as much RAM as the system has, shared between multiple applications. Be sure to have 2 to 3 GB of RAM per core (see the section “System Design” later in this chapter.)
RAM. Utilize as much RAM as the system has, shared between multiple applications. Be sure to have 2 to 3 GB of RAM per core (see the section “System Design” later in this chapter.)
![]() Video card. Some effects and processing are accelerated and offloaded from the CPU (a general processor) to the GPU (Graphical Processing Unit), which is optimized to process video (some cards have over 100 cores and some over 1000!). The right types of video card (CUDA and Open CL) with at least 1 GB of RAM are vital to obtain this acceleration.
Video card. Some effects and processing are accelerated and offloaded from the CPU (a general processor) to the GPU (Graphical Processing Unit), which is optimized to process video (some cards have over 100 cores and some over 1000!). The right types of video card (CUDA and Open CL) with at least 1 GB of RAM are vital to obtain this acceleration.
Leveraging the MPE
The key to maximizing the capabilities of the MPE is twofold: one part is in your system design (mentioned later in this chapter); the other part is how you choose to do your workflow.
Most of the MPE benefits are invisible. You can’t see how the Mercury Playback Engine permits areas that just “work” like processing footage that might have needed transcoding.
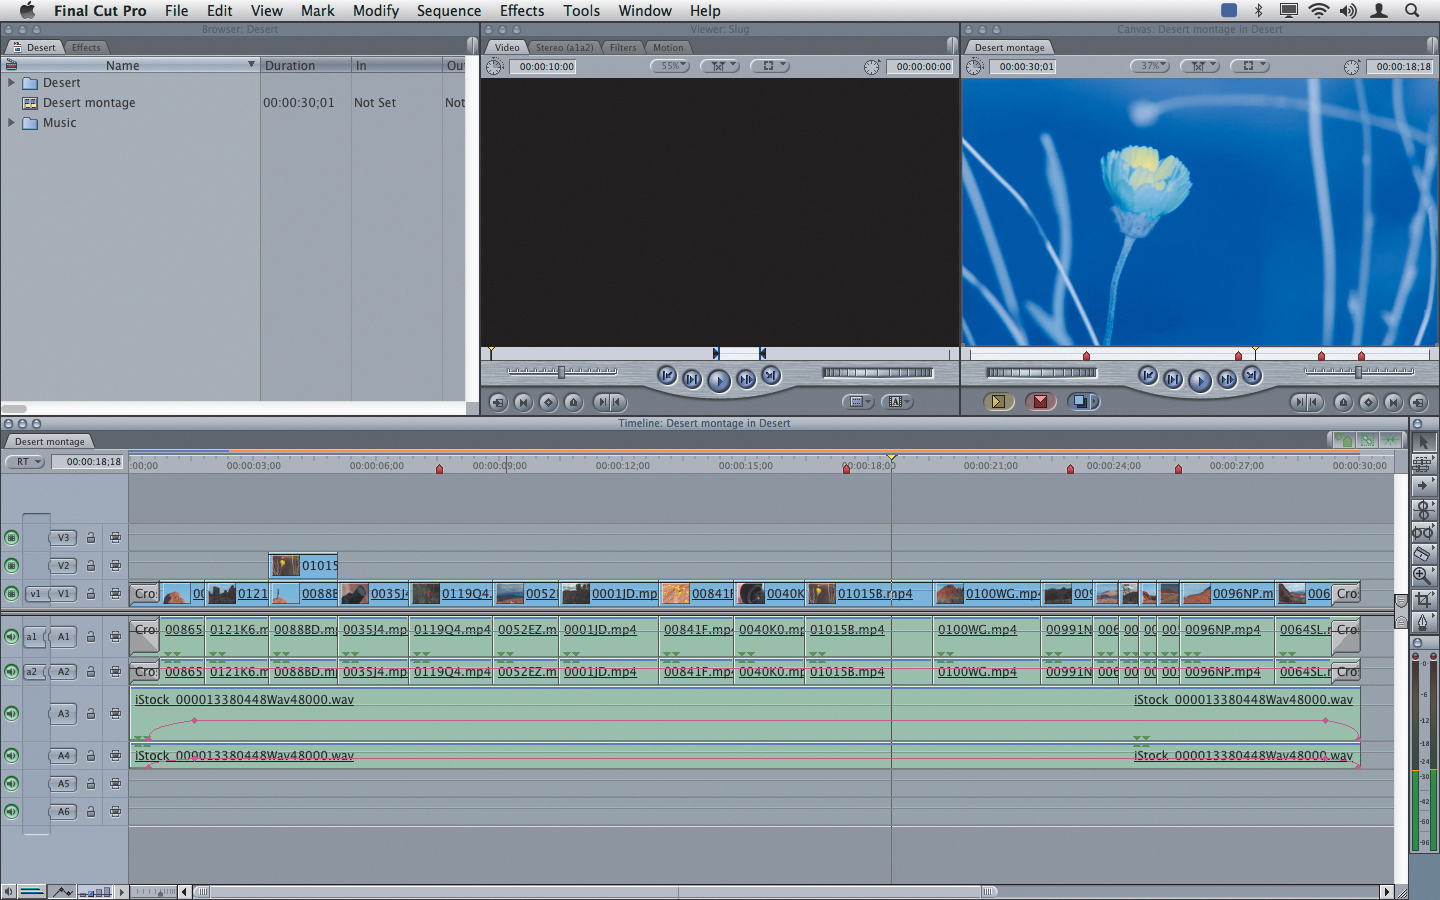
The ideal strategy is to select only accelerated effects (marked in Figure 1.9) in the Effects panel. Certain items, such as scaling, deinterlacing, blending modes, and color space conversions, also benefit from using the right video card.
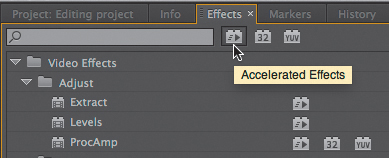
Figure 1.9 Using accelerated effects maximizes the playback of effects by offloading complex calculations to the GPU—a dedicated processor for graphics.
Don’t render (Adobe calls the render files Previews) unless you absolutely need to. Often, footage and effects will play back without needing any rendering at all—even if the Timeline has a red line! An exception to this would be workflows that have crucial time-based deliverables—usually same day productions, such as news. It’s devastating to discover that output will take longer than you expected because of extra rendering that was left for processing until the output stage.
![]() Tip
Tip
Consider rendering Adobe After Effects compositions in Adobe Premiere Pro’s Timeline. Although the Dynamic Link feature is fantastic for making changes, the playback depends on Adobe After Effects having cache files for the composition. By rendering in Adobe Premiere Pro, you reduce the strain on your system.
Turn on the dropped frame indicator (Figure 1.10) in the Settings menu on the Program Monitor. You’ll see a green light to the right of the timecode as long as playback is working. If you encounter a problem, the light will turn yellow. Mousing over the dropped frame indicator shows you how many frames were dropped.

When playback is sluggish, that’s a sign to take one of three actions:
![]() Drop the video resolution. Adobe Premiere Pro’s default is to play back at half (1⁄2) resolution. For HD and SD sizes, the only option is to drop the Playback Resolution to 1⁄4 (Figure 1.11). When you pause the video, Adobe Premiere Pro will still show the full resolution of the image. Even at 1⁄4 resolution, the image was still decent. It’s not like you’re doing a one-to-one pixel mapping on your screen. The video has been reduced to “fit,” so why would you calculate those pixels for playback? If you work on a sequence that’s greater than HD, such as 2k from an Arri Alexa, you’ll unlock more resolution choices, such as 1⁄8 and 1⁄16.
Drop the video resolution. Adobe Premiere Pro’s default is to play back at half (1⁄2) resolution. For HD and SD sizes, the only option is to drop the Playback Resolution to 1⁄4 (Figure 1.11). When you pause the video, Adobe Premiere Pro will still show the full resolution of the image. Even at 1⁄4 resolution, the image was still decent. It’s not like you’re doing a one-to-one pixel mapping on your screen. The video has been reduced to “fit,” so why would you calculate those pixels for playback? If you work on a sequence that’s greater than HD, such as 2k from an Arri Alexa, you’ll unlock more resolution choices, such as 1⁄8 and 1⁄16.

![]() Build renders (previews). Consider building renders. Just press the Return (Enter) key on your keyboard. Once the preview is created, it’ll be played instead of the individual original media. Any change will require new previews to be created.
Build renders (previews). Consider building renders. Just press the Return (Enter) key on your keyboard. Once the preview is created, it’ll be played instead of the individual original media. Any change will require new previews to be created.
![]() Consider transcoding. See the earlier sidebar “To Transcode or Not to Transcode.”
Consider transcoding. See the earlier sidebar “To Transcode or Not to Transcode.”
Mercury Transmit I/O
The Mercury Transit architecture allows Adobe Premiere Pro to “transmit” the Mercury Engine processing to output cards (used for monitoring or tape output).
Do you have an output card? If so, you’ll get all the great acceleration on output (a feature that earlier versions of Adobe Premiere Pro did not have). This technology is applicable only if you have an output card or breakout box (Figure 1.12), such as the those from AJA, Black Magic Designs, BlueFish, or Matrox. Given that some of these devices are less than $300 (like the AJA T-Tap), professional editors consider this sort of outboard monitoring (especially for color correction) a mandatory addition.

Figure 1.12 Breakout cards and boxes permit the professional evaluation of video on studio monitors (not to be confused with a regular LCD or LED flat panel). The AJA IO 4k will handle 4k and Ultra HD over Thunderbolt 2.
![]() Close-Up: CUDA or Open CL Architecture
Close-Up: CUDA or Open CL Architecture
It’s crucial that you make sure your GPU and the specific type of I/O you’re using are supported by the Mercury Engine.
Greater than HD
At one point HD was a dream to most editors, and SD was the standard. Today, everyone shoots in HD (they might look at SD in their archives). If larger formats, such as 2k, 3k, 4k, and above, aren’t on your radar, they will be on your competitors’ radar. And the MPE is what will power this greater than HD future. See the section “System Design” to get insights on how and what to buy to utilize these technologies.
Adobe Creative Cloud
In May of 2013, Adobe switched from a perpetual licensing model (physical boxes) to a Software as a Service (SAS) model.
The major benefit of Adobe Creative Cloud is obvious: Get every major Adobe tool, and download what you need from a selection of nearly 20 different tools spanning video photography, print, and web (Figure 1.13).

Figure 1.13 The Creative Cloud application runs in either the menu bar of OS X or the system tray in Windows. It’s the heart of installing applications, managing fonts, and identifying what was installed or modified in Adobe Creative Cloud.
Although some people just buy Adobe Premiere Pro, nearly everyone we’ve met has chosen the Creative Cloud package, giving them more tools than they know what to do with.
The access to so many tools is amazing (and a little overwhelming); it’s worth noting that there are some practical benefits beyond just the software.
Sync Settings
Adobe has added the capability to synchronize settings, such as your preferences and keyboard shortcuts. This capability is tied to your Adobe ID and is probably the most valuable professional benefit for editors. Your customizations are saved, and they can be transferred from system to system.
When you sit down on your system, you want it to be exactly adjusted the way you want. But what if you need to work on someone else’s system? Or what if you want to use Adobe Premiere Pro on a second system (see the section “Two Licenses”)? What if you need to reset your settings? Sync Settings enables you to do all of these tasks easily.
When you launch Adobe Premiere Pro, you’ll see that Sync Settings to Adobe Creative Cloud is part of the Welcome dialog, as shown in Figure 1.14 on the next page.

Figure 1.14 Signing into the Adobe Creative Cloud account permits you to sync key settings. The account sign in can be the owner’s Adobe ID, a different user, or even a “free” Adobe ID. When signed in, the user’s email will appear here.
On a Mac, the Sync Settings is located in the Premiere Pro menu; on Windows it’s in the Edit menu. Initially, it’s the login for the Adobe ID that was used to install the software.
From the Creative Cloud, Sync Settings uploads and downloads your personalized adjustments on a per application setting. These settings include:
![]() Preferences. Almost all the preferences, ranging from the General category through the Trim settings.
Preferences. Almost all the preferences, ranging from the General category through the Trim settings.
![]() Workspace Layouts. The unique way you customize the arrangement of the different windows and panels.
Workspace Layouts. The unique way you customize the arrangement of the different windows and panels.
![]() Keyboard Shortcuts. Any keyboard adjustments are also capable of being synced.
Keyboard Shortcuts. Any keyboard adjustments are also capable of being synced.
Not everything is synced. The most important items that are ignored are cache files (which speed up some media handling), because they’re always going to be unique to your local system.
Multi-user systems are still commonly found in many facilities, where two editors share the same machine and often the same logon. The Adobe Creative Cloud settings are initially tied to the license, but don’t have to be.
Sync doesn’t rely on ownership of Adobe Creative Cloud
It’s possible to create an Adobe ID without buying or downloading anything. You do get some storage space (2 GB) and a couple of other features as a “free user” of the Creative Cloud.
So starting a free membership grants you an Adobe ID. With that ID you can sync your preferences. To sign up, go to http://creative.adobe.com and choose Get started (Figure 1.15).

Figure 1.15 This free method of acquiring an ID permits users to easily transfer their favorite settings without being tied to the purchase of Adobe Creative Cloud.
If you’re a working freelancer and you don’t own Creative Cloud (and even if you do), this ID allows you to transfer settings via the Internet from location to location. Just remember to sign out when you’re finished. You don’t want someone else updating or changing your keyboard!
Key preferences
Some users constantly tweak their settings. It’s important that if you fall into this category, you save your settings to the Cloud on a regular basis. When you choose to Sync Settings via the menu, a dialog asks which you want to do, upload or download. You can automate this option via the Preferences, as shown in Figure 1.16.
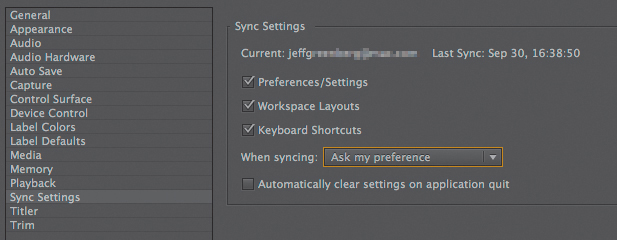
Figure 1.16 By using the drop-down When Syncing menu, Sync Settings allows you to choose what is synced and whether it should be uploaded or downloaded to the current system.
If your facility consists of freelancers or you’re working in other situations where users constantly come and go, it’s valuable to adjust the Sync Settings to “Automatically clear settings on application quit.” Then, when someone quits for the day, that person can reset Adobe Premiere Pro for the next user automatically.
Two Licenses
You can always have multiple installs of Adobe applications, but prior to this release you were limited to running the software on only one machine at a time per license.
Starting with Adobe Premiere Pro CC, you’re able to have two live licenses. This makes it easy and convenient to work any way you’d like, for example on a Mac and Windows machine, two different machines in an office, or on your work system and home system.
When you sign in to a third license instance, Adobe Creative Cloud logs out the other two users.
Frequent Updates
Although nobody (except Adobe) can exactly say when new feature rollouts will occur, they should occur more frequently than boxed software releases. No longer is Adobe tied to 18-month “major” releases.
Prior to the Adobe Creative Cloud release, Adobe (like most software companies) could legally only add major new features to software with major version changes (for the inquisitive, it’s the Sarbanes-Oxley Act that created this issue).
With the new subscription model, it’s possible for Adobe to quickly react to technological needs, such as new camera formats, bleeding-edge technology innovations, and rapid bug fixes.
Storage Space
Although not included with the initial release of Creative Cloud, Adobe is including 20 GB of desktop-based sync storage (Figure 1.17) with versioning and private folder sharing. This will make it easy for users to share and sync projects invisibly between machines or be accessible from a web browser. Additional storage space will be available for purchase.

Figure 1.17 The desktop-based sync mimics what’s in the Adobe Creative Cloud folder: On the left, the Macintosh folder contains photos, projects, and folders. On the right the same material is synced and available online.
In many ways, this type of storage is the ultimate live backup for projects. Having additional versions of a file will not count against the storage space (unlimited versions are stored for ten days). It’s unclear if this will work for Adobe Premiere Pro projects, but it’s certain to work for other tools, such as Adobe Photoshop.
Typekit Fonts
You’ll have the license to use some 175 plus Typekit fonts for your video, web, and print needs. Getting away from using the default fonts of Helvetica, Arial, Times, and Palatino can only be good for your productions.
To access these fonts, use the Adobe Creative Cloud application (Figure 1.18) to log into the Typekit website and see the fonts you have access to. The font must be labeled as “desktop” to be used on your system.
Behance /Behance ProSite
Behance is a service that permits the publishing of projects into online portfolios. There is also a professional social network (you can follow and be followed). Publishing your work and discovering others’ work can be done from the Adobe Creative Cloud application.
Currently (third quarter 2013), Behance is just available for Adobe Photoshop and Adobe Illustrator documents.
Behance ProSite (Figure 1.19) is a full web hosting service with drag-and-drop templates that will help you utilize your uploaded content and create a portfolio driven website in minutes. That content can include your work, additional pages, your resume, and much more.

Figure 1.19 Behance ProSite used to cost more than $100 a year, but it is now free for Adobe Creative Cloud members.
As with Typekit, currently Behance ProSite is geared more toward those who want to output to print and the web. But we hope to see some expansion into showcasing video directly from Adobe Premiere Pro soon.
System Design
The most difficult pill to swallow about hardware in the video production industry is how short-lived purchases can be.
To do word processing, I can use a computer from 2007 and it does the same thing as my current system. Technically speaking, I might even be able to use hardware nearly a decade old for word processing.
![]() Tip
Tip
Be sure to check Adobe’s specification page on Adobe Premiere Pro at www.adobe.com/products/premiere/tech-specs.html before you buy hardware.
This is not the case with postproduction. If hardware lasts 18 to 24 months, that’s ideal. Four years is the maximum. Outside of that window of time, the innovations speed the work so significantly that the purchase of new hardware just makes sense.
If performance gains yield a difference of 12 minutes a day, that’s an hour a week. That’s also 50 hours a year—a working week’s worth of time-savings. This efficiency isn’t just for rendering or outputting; it’s for everything.
![]() Notes
Notes
Never, ever, purchase a system designed at the “minimum” configuration. Although it will work, meeting just the minimum requirements guarantees the worst performance.
There won’t be any holy wars—Mac versus Windows or build it yourself versus a preconfigured box—in this section. The goal here is provide you with valuable information so you can make smart hardware decisions well beyond the publication date of this book.
If the following component sections (Figure 1.20) feel overwhelming because of the number of factors to balance, feel free to jump to the section “Too Many Hardware Choices?” later in this chapter.

The essential message I want to convey is balance. Buying the best CPU but ignoring the amount of RAM in the machine is equivalent to buying a Ferrari but only being allowed to use two cylinders. I cannot stress enough that each component should be balanced across your system. Just investing entirely in RAM or the fastest CPU will be less effective than balancing both.
One thing is certain; if your motherboard has only USB 2 or FireWire drive connections, it’s time to purchase new hardware.
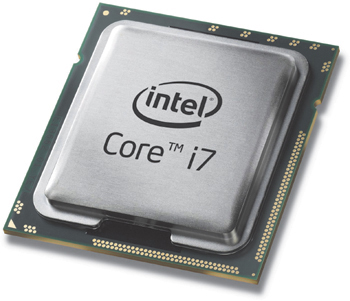
CPU
The CPU is the brain of your system (Figure 1.21). It is one of the cornerstones to maximizing the behavior of the MPE. For a balanced system, the critical ingredients are the number of cores (and hyperthreading), cache size, and clock speed.
Here are some general rules when choosing a CPU:
![]() Intel CPUs, particularly the i7 and Xeon CPUs, are the fastest choice for your money today. Pay attention to the latest chipsets. The Haswell architecture chip sets are beginning to become available in desktops and laptops. This architecture is newer than the third generation Ivy Bridge architecture. Those laptops that implement the newer generation will often contain a slower chip (clock speed) than the prior generation for lower power requirements and better battery life—meaning equal or better performance with longer battery life.
Intel CPUs, particularly the i7 and Xeon CPUs, are the fastest choice for your money today. Pay attention to the latest chipsets. The Haswell architecture chip sets are beginning to become available in desktops and laptops. This architecture is newer than the third generation Ivy Bridge architecture. Those laptops that implement the newer generation will often contain a slower chip (clock speed) than the prior generation for lower power requirements and better battery life—meaning equal or better performance with longer battery life.
![]() The number of cores is more important than clock speed. Hyperthreading is crucial and allows one core to act as two virtual processors.
The number of cores is more important than clock speed. Hyperthreading is crucial and allows one core to act as two virtual processors.
![]() AMD chips generally won’t match Intel performance due to the lack of support of SSE 4.1 (a specific set of instructions that permit the acceleration of data through the chip).
AMD chips generally won’t match Intel performance due to the lack of support of SSE 4.1 (a specific set of instructions that permit the acceleration of data through the chip).
RAM
Make sure your system isn’t starved for RAM (Figure 1.22). It should have approximately 2–3 GB per core. Purchasing a system with eight cores but only 8 GB of RAM will create a problem in which the cores will be starved for needed RAM.
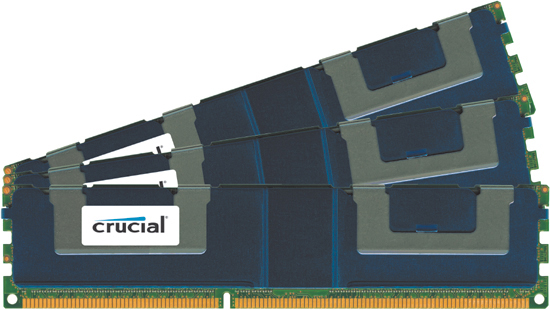
Figure 1.22 Make sure any RAM you purchase has sufficient speed for your system. Two to three gigabytes per core is the minimum. Keep in mind that other tools like Adobe After Effects can quickly use all the RAM in a system.
![]() Tip
Tip
If you’ll be running other software (such as a browser or email) while editing, it’s best to increase the memory allocation for other applications in the Adobe Premiere Pro Preferences.
With multiple CPUs, or cores, many processes occur in parallel. Some processes take longer to finish, and in lower memory situations, the RAM isn’t freed up, forcing an individual CPU to wait.
An easy test to determine if your system is starved for RAM is to process some stock effects (nonaccelerated) and check your CPU performance (see “Measuring System Performance” later in this chapter). If your machine is low on RAM, it may be worth trying to disable hyperthreading. Hyperthreading refers to the technology where one core can behave as if it was two (as mentioned in the “CPU” section). By turning off hyperthreading in low RAM situations, it may be possible to achieve better performance, although I’d recommend buying more RAM instead!
Video Card
The right video card (Figure 1.23) is crucial for accelerated effects via the MPE. I’d almost go as far as to say that buying a system that supports the MPE is an easy choice to make. This acceleration advantage is one of main reasons for buying Adobe Premiere Pro. So why wouldn’t you plan to get a video card that supports it?

![]() Notes
Notes
For you Apple users out there, the only time Apple updates the video driver is when it does an OS revision (e.g., 10.8.3 to 10.8.4). It’s smart to download your video driver directly to have the latest update.
![]() Tip
Tip
Getting the best performance from RED footage requires at least one RED Rocket board. For laptop users, several companies make a Thunderbolt chassis for a RED Rocket board.
![]() Tip
Tip
Multiple GPU cards will accelerate export but not playback. This is significant for systems that are intended for use with Adobe After Effects, which can also benefit from multiple video cards.
Make sure the card supports CUDA or OpenCL and that it has at least 1 GB of RAM. If you’re working in formats larger than HD, more RAM is a necessity. A 4k frame requires about 510 MB of video RAM.
![]() Notes
Notes
Laptop users should be aware that you might not be able to upgrade the video card on your laptop. Make sure you purchase the best video card within your budget.
Video cards have innovations every year. Top-of-the-line cards can be very expensive (over $2000) but can provide maximum acceleration—more than 15x that of a system without the card but only for certain key effects. It won’t necessarily provide acceleration for everything.
Storage
With file-based camera systems being the norm, storage becomes the consumable rather than the video tapes of the past.
Making the right storage choices is just as important as choosing the right processor or the amount of RAM. The biggest need is speed but in the right places.
Connections
The drive connection (cable) shouldn’t be the bottleneck in your system. Internally, try to connect via the fastest plug on your motherboard. Today, SATA (Serial Advanced Technology Attachment) is the most common internal connection.
Externally, I strongly encourage you to move to USB 3 or Thunderbolt (Figure 1.24). Both are faster than most internal connections. At this point (third quarter 2013), I recommend that you divest yourself of hardware that has USB 2 or FireWire because the newer connections are ten or more times faster.

Figure 1.24 Thunderbolt is a new connection from Intel. The protocol can handle 10 Gb/s in a single channel, twice as fast as USB 3 and more than ten times faster than FireWire.
Caches
Configuring caches on the fastest storage possible is vital for making Adobe Premiere Pro as snappy as possible. The connection point (if not internal) is crucial for accessing these cache files; it’s best to use USB 3 or Thunderbolt.
![]() Close-Up: Adobe After Effects and Adobe SpeedGrade
Close-Up: Adobe After Effects and Adobe SpeedGrade
![]() Adobe After Effects can utilize multiple video cards as long as they belong to the same CUDA generation (all cards are CUDA 2.0 compatible). This application will utilize as much RAM as it can, with a minimum of 2–3 GB per CPU. A separate cache SSD drive is suggested for its specialized disk cache.
Adobe After Effects can utilize multiple video cards as long as they belong to the same CUDA generation (all cards are CUDA 2.0 compatible). This application will utilize as much RAM as it can, with a minimum of 2–3 GB per CPU. A separate cache SSD drive is suggested for its specialized disk cache.
![]() Adobe SpeedGrade is very sensitive to the video card. The GPU delivers most of this application’s real-time capabilities and speeds output (beyond the base ability to play footage).
Adobe SpeedGrade is very sensitive to the video card. The GPU delivers most of this application’s real-time capabilities and speeds output (beyond the base ability to play footage).
The top choice for fast storage is SSD. An SSD is also ideal for Adobe After Effects. SSDs have no moving parts; their speed is merely just reading and writing to memory chips.
If the cost of an SSD is too high, consider creating a RAID-0 (two or more drives that act as a striped set). Each drive increases the overall speed as it lowers the waiting time for mechanical parts to move the read/write heads.
![]() Tip
Tip
If you want the media to be portable (from system to system), configure the Media Caches (found in the Preferences) with the actual media.
Media
Speed is a less important factor in the straight playback of media. Most drives (USB 2 or FireWire) can play back two streams of media of nearly every HD format short of uncompressed HD.
Redundancy is a more important issue. For the best combination of speed and storage, a RAID-5 (four drives with a section of each for redundancy) provides the best blend of abilities. If one drive dies, nothing is lost.
![]() Notes
Notes
RAID (Redundant Array of Information Disks) is a storage technology where multiple disks are grouped together. Different configurations provide different benefits. See the sidebar “Raid-5 Helps to Maintain Your Sanity.”
The alternative is to fully back up every piece of live media on a regular basis. Having a level of redundancy means sleeping well at night knowing your media is safe.
![]() Notes
Notes
Objects with moving parts (drives, cars, etc.) break. You can count on it. In fact, you can bet on it happening a day before delivery.
Projects
Projects should be on some cloud-based backup system, like the Creative Cloud’s desktop sync. Although this feature is just beginning to roll out while this book is being written, some frequently mentioned Cloud alternatives include Dropbox, and Google Drive, or cloud backups such as CrashPlan or Mozy.
By having your project in the cloud, it’s automatically backed up as you work. One caveat (mentioned in detail in Chapter 2) is that you probably don’t want your Preview files sitting in the cloud (where they would be by default). They can grow quite large and waste space because they’re considered temporary.
![]() Close-Up: Raid-5 Helps to Maintain Your Sanity
Close-Up: Raid-5 Helps to Maintain Your Sanity
![]() Raid-0 consists of two (or more) drives and stripes (alternates) the data between each drive. This means faster access (because there are two read/write heads rather than one) but at the cost of reliability. If either drive fails, all the data is lost. The advantage of a Raid-0 lies in its speed.
Raid-0 consists of two (or more) drives and stripes (alternates) the data between each drive. This means faster access (because there are two read/write heads rather than one) but at the cost of reliability. If either drive fails, all the data is lost. The advantage of a Raid-0 lies in its speed.
![]() Raid-1 consists of two drives and writes the data twice, once to each drive. The advantage is pure redundancy. If one drive dies, the other contains all the data. The disadvantage of a Raid-1 is that half of your storage is dedicated to a backup. This is great as a “bulletproof” live mirror but not great from a performance point of view.
Raid-1 consists of two drives and writes the data twice, once to each drive. The advantage is pure redundancy. If one drive dies, the other contains all the data. The disadvantage of a Raid-1 is that half of your storage is dedicated to a backup. This is great as a “bulletproof” live mirror but not great from a performance point of view.
![]() Raid-5 consists of four or more drives (Figure 1.25) and stripes them like a Raid-0 (favoring speed), but copies some redundancy information to the other drives. You get nearly the performance of a Raid-0, but if a drive dies, the remaining drives can permit recovery of the lost data. The only real negative is that 33 percent of each drive in a four drive array is lost to redundancy information. A Raid-5 is suggested as the minimum choice for media professionals because it provides nearly the performance of a Raid-0 with the reliability of a Raid-1, sacrificing only one quarter of the total media.
Raid-5 consists of four or more drives (Figure 1.25) and stripes them like a Raid-0 (favoring speed), but copies some redundancy information to the other drives. You get nearly the performance of a Raid-0, but if a drive dies, the remaining drives can permit recovery of the lost data. The only real negative is that 33 percent of each drive in a four drive array is lost to redundancy information. A Raid-5 is suggested as the minimum choice for media professionals because it provides nearly the performance of a Raid-0 with the reliability of a Raid-1, sacrificing only one quarter of the total media.

Figure 1.25 A Raid-5 requires at least four drives and a dedicated RAID controller, such as this model from G-Technology.
OS considerations
If you’re working on a Macintosh system, the optimal drive format is HFS+. Because most hard drives sold aren’t formatted this way, it’s a good practice to format a brand-new hard drive on purchase. If you plug an HFS+ drive into a Windows system, a utility called MacDrive allows Windows to read and write to the HFS+ format.
If you’re using a Windows system, the optimal drive format is NTFS. Many hard drives come formatted for FAT32, so it’s a good practice to reformat a brand-new hard drive on purchase. If you plug an NTFS drive into a Macintosh system, a utility called Paragon NTFS allows a Mac to read and write to the NTFS format.
If you’re working cross-platform, the simplest way to work is to format your drives as ExFAT, which will work on both platforms and no third-party software is needed. ExFAT isn’t as reliable as HFS+ or NTFS and has some slight overhead, slowing down the speed of a drive’s read and write access.
Computer Monitor
Strictly speaking, the computer monitor you use makes no difference whatsoever. Don’t confuse a cheap monitor with a broadcast monitor (see the sidebar “Real-world Setup” in Chapter 6).
Some editors prefer to use two screens; some prefer very large screens (greater than 1920x1080); and some prefer screens with matte coatings (to avoid distorting black points).
Hardware Monitoring Card
A hardware monitoring card acts as a “black box” connector to transmit the video from your computer to scopes and broadcast monitors (Figure 1.26). Although the sidebar “Real-world Setup” in Chapter 6 provides some detail, a hardware output is invaluable for truly being able to professionally monitor your playback and connect scopes.
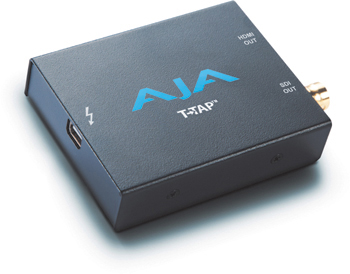
Figure 1.26 The AJA T-Tap is one of the most inexpensive ways to perform output monitoring. Plug Thunderbolt into your system and then plug in a broadcast monitor via HDMI or HD-SDI.
This piece of hardware can actually be a box or a card and is available from companies such as AJA, Black Magic Designs, Bluefish 4444, and Matrox.
Measuring System Performance
Measuring system performance goes beyond just using the Dropped Frame indicator (see the section “Leveraging the MPE” earlier in this chapter). Although it’s important to know that you’ve dropped frames, the more difficult question to answer is why isn’t my system performing well?
Unfortunately, there is no magic performance tool that will indicate exactly how well your specific machine will perform with your specific video formats in your specific workflow.
But there are tools on Macs and Windows machines that will monitor playback and rendering. By checking these tools while playing back footage (or rendering) you can observe where your bottlenecks may be.
Apple’s Activity Monitor
The Activity Monitor (located in your Utilities folder) permits the monitoring of the CPU, RAM, and Disk Activity via tabs at the bottom of the window. It’s assumed that you’ll look at these tabs (Figure 1.27) while you’re playing (or rendering) video. The following list describes these tabs in detail:

Figure 1.27 The Activity Monitor shown here is being taxed heavily by the simultaneous use of Adobe Premiere Pro and Adobe Media Encoder.
![]() CPU. With the CPU tab active, you can watch the percentage of CPU usage. It can go up to 100 percent per core, so, for example, it’s possible to see 600 percent on an eight core system. Adding the floating CPU window (Window> Floating CPU Window > Horizontal [or Vertical]) will display a live bar graph, showing how hard each core is working.
CPU. With the CPU tab active, you can watch the percentage of CPU usage. It can go up to 100 percent per core, so, for example, it’s possible to see 600 percent on an eight core system. Adding the floating CPU window (Window> Floating CPU Window > Horizontal [or Vertical]) will display a live bar graph, showing how hard each core is working.
![]() System Memory. The item to keep your eye on in this tab is Swap Used. All modern operating systems have relatively unlimited virtual memory. They page (write) RAM to the system hard drive when they run out of memory. This slows down your system because it takes time to perform this writing (and later reading) to (and from) your hard drive. Although this is one of the major speed advantages of having your OS run from an SSD, it’s optimum to use as little swap space as possible.
System Memory. The item to keep your eye on in this tab is Swap Used. All modern operating systems have relatively unlimited virtual memory. They page (write) RAM to the system hard drive when they run out of memory. This slows down your system because it takes time to perform this writing (and later reading) to (and from) your hard drive. Although this is one of the major speed advantages of having your OS run from an SSD, it’s optimum to use as little swap space as possible.
![]() Disk Activity. It’s necessary to use a utility, such as the AJA System Test (Figure 1.28) or the Black Magic Disk Speed Test, to max out the read and write speeds your drive can handle. Play back footage in Adobe Premiere Pro and observe the Disk Activity tab. If your drives are nearing their peak speed, they are likely the bottleneck issue.
Disk Activity. It’s necessary to use a utility, such as the AJA System Test (Figure 1.28) or the Black Magic Disk Speed Test, to max out the read and write speeds your drive can handle. Play back footage in Adobe Premiere Pro and observe the Disk Activity tab. If your drives are nearing their peak speed, they are likely the bottleneck issue.

Figure 1.28 A drive speed test, like the AJA System Test, should be used regularly to make sure your system’s performance doesn’t degrade over time.
Window’s Resource Monitor
Most users are familiar with the Task Manager (Ctrl+Alt+Del), which has some monitoring capabilities, but a more thorough set of monitoring capabilities is found in the Resource Monitor (Figure 1.29).

Figure 1.29 The Resource Monitor in Windows 7. The tabs along the top allow focusing on how well Windows in performing while under load.
To start the Resource Monitor in Windows 7, choose Start > All Programs > Accessories > System Tools > Resource Monitor. There’s also a button in the Task Manager that brings up the Resource Monitor. The following list explains each tab in more detail:
![]() Overview. On the Overview tab are four bar graphs on the right side; each shows system utilization. Watch the CPU, Memory, and Disk Active graphs and see if any graph has filled its display.
Overview. On the Overview tab are four bar graphs on the right side; each shows system utilization. Watch the CPU, Memory, and Disk Active graphs and see if any graph has filled its display.
![]() CPU. With the CPU tab active (not in the overview image), watch the percentage of CPU usage. CPU – Total shows the average usage across all processors. Each processor is individually labeled and measured.
CPU. With the CPU tab active (not in the overview image), watch the percentage of CPU usage. CPU – Total shows the average usage across all processors. Each processor is individually labeled and measured.
![]() Memory. Pay attention to the Physical Memory used at the top of the window. If it’s over 80%, it’s time to add more RAM.
Memory. Pay attention to the Physical Memory used at the top of the window. If it’s over 80%, it’s time to add more RAM.
![]() Disk Activity. It’s necessary to use a utility such as the AJA Disk System Test or the Black Magic Disk Speed Test (Figure 1.30) to max out the speed of read and write speeds your drive can handle while watching the Peak speed. Then play back footage in Adobe Premiere Pro. If your drives are nearing their peak speed, they are likely the bottleneck issue.
Disk Activity. It’s necessary to use a utility such as the AJA Disk System Test or the Black Magic Disk Speed Test (Figure 1.30) to max out the speed of read and write speeds your drive can handle while watching the Peak speed. Then play back footage in Adobe Premiere Pro. If your drives are nearing their peak speed, they are likely the bottleneck issue.

Figure 1.30 On Windows, the Black Magic Disk Speed Test requires you to download one of the drivers for its video software, such as for the line of Intensity output devices. On a Mac, this software can be found in the App store.
The Resource Monitor has changed a little in Windows 8, but generally the same concepts apply to evaluate machine performance along with the requirement of a speed test utility.
GPU card performance
Video card performance is harder to measure than disk speed if you have enough RAM. The best way to determine how much assistance your system is getting from the GPU is to turn off the GPU and then compare how your system runs when it is unaccelerated.
To turn off the acceleration (Figure 1.31), choose File > Project Settings, and then choose Software Only from the drop-down menu.
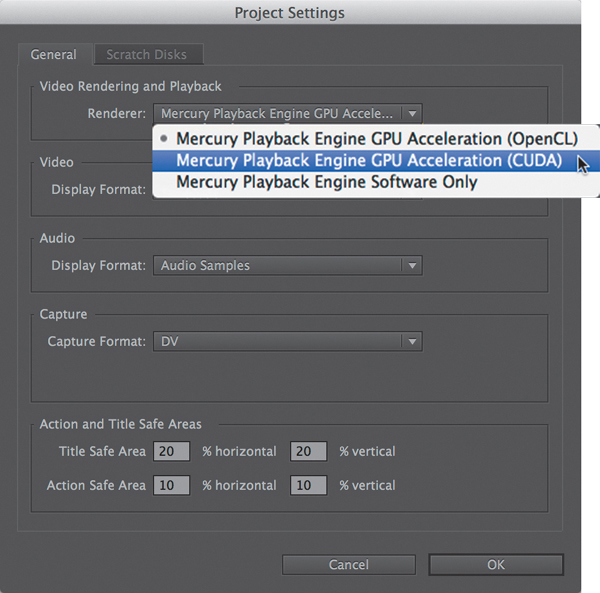
Figure 1.31 When you change the MPE to Software Only, there should be lots of red bars in your Timeline.
If you don’t also see a CUDA or OpenGL choice available, your video card either may not be capable of performing MPE acceleration (make sure you have at least 1 GB of GPU RAM) or your driver may be out of date.
Too Many Hardware Choices?
What if you’re not a “do it yourself” sort of user? Perhaps you don’t want to build or configure a system, or risk being unsure if you purchased an optimized system.
Consider using a VAR (Value Added Reseller) that specializes in video. There’s a certain advantage to being able to buy all of your hardware from a single vendor; the vendor will configure it, possibly set it up, and likely have the associated hardware (such as switchers and black burst generators) that a professional user may need.
![]() Notes
Notes
Some Apple machines have RAM and video cards permanently soldered to their motherboards, and there may be little or no upgrades possible. Consult http://everymac.com for details on your specific hardware.
On the Apple side, an Apple is an Apple. When you’re buying a Mac (Figure 1.32) you’ll generally buy the same box regardless of whether you purchase it direct or from a reseller. Just be aware that you cannot upgrade many of the Apple products with memory or video cards after the initial purchase.

Figure 1.32 Apple’s Retina MacBook Pro works well with Adobe Creative Cloud. Just make sure you max out the RAM because there’s no changing it after the fact.
On the Windows side, HP continues to produce top-of-the-line hardware (Figure 1.33) and aggressive systems with specific custom design for professional video users that are also optimized for the Adobe products.

Figure 1.33 HP offers optimized products, like the Z820 desktop model (shown here), and mobile workstations, like the 8770w, specifically for pro video needs.
Breathing Life into Old Hardware
The struggle is always to maximize the life of existing hardware equipment. There comes a point when it’s not worth upgrading. A system that can work more efficiently just one hour a week (at the very minimum) pays for itself within a year. If you cannot afford new equipment, breathe life into what you already have.
The availability of hardware improvements depend on the system you own. Some motherboards can handle only certain chips. Some video cards may not fit in specific systems. Here are some general tips on what to upgrade and in what order:
![]() SSD. Getting an SSD for a caching drive and a system drive will make your system seem fast and new.
SSD. Getting an SSD for a caching drive and a system drive will make your system seem fast and new.
![]() High-speed external port. Get a card for your older desktop that allows you to use USB 3 or Thunderbolt.
High-speed external port. Get a card for your older desktop that allows you to use USB 3 or Thunderbolt.
![]() RAID. A Raid-0 will provide the fastest performance (at the cost of higher vulnerability). Be sure to have a daily backup when you’re using a RAID-0 for media.
RAID. A Raid-0 will provide the fastest performance (at the cost of higher vulnerability). Be sure to have a daily backup when you’re using a RAID-0 for media.
![]() Video card. Get a new GPU. The faster it is and the more RAM it has, the better.
Video card. Get a new GPU. The faster it is and the more RAM it has, the better.
![]() Correct slot. When plugging in any GPU or storage card, make sure that it goes in a 16x slot to ensure the best performance. If you’re out of slots, consider upgrading your motherboard, if possible.
Correct slot. When plugging in any GPU or storage card, make sure that it goes in a 16x slot to ensure the best performance. If you’re out of slots, consider upgrading your motherboard, if possible.
![]() Add RAM. A minimum of 2 GB per core is best. It’s possible to experience degraded performance when RAM is less than 2 GB.
Add RAM. A minimum of 2 GB per core is best. It’s possible to experience degraded performance when RAM is less than 2 GB.
Overview of a Workflow
The postproduction process mirrors what you can do in Adobe Premiere Pro and the way all the video applications in Adobe Creative Cloud work. With so many tools at your disposal, your workflow can be overwhelming.
So, in parallel, let’s walk through the actual process that occurs in production and in postproduction, and explore the options you have while working solely in Adobe Premiere Pro and when working with the alternative tools in the suite.
The Big Picture
It’s important to mention that with so many tools at your fingertips, making the best choices as to which to use can be overwhelming to implement as well as to learn.
Table 1.1 outlines the comparison between what Adobe Premiere Pro does intrinsically (nearly everything!) and the general concept of how the other tools fit into a workflow.

The section “Order of Learning,” later in the chapter, should provide you with some further insight into the order in which you should learn the tools. Keep in mind that you don’t have to master each tool in its entirety to put some features of a tool into operation.
Generally speaking, working in Adobe Premiere Pro will be faster. It’s generally faster from creation to output. For example, as you become more skilled in performing audio finishing or color correction, you’ll realize that the dedicated tools will have major advantages rather than working entirely in Adobe Premiere Pro.
As you begin to utilize tools outside of Adobe Premiere Pro, the final quality of the work improves, but it generally takes longer to produce and may possibly increase render times.
A good rule of thumb for a quick turnaround is to use Adobe Premiere Pro. But when you need a specific feature or a higher level of dedicated functionality, that’s what the other tools in the suite bring to the table.
Stress-free Start into Other CC Apps
Often, it feels intimidating to consider the number of tools available to you. Although learning each tool provides additional capabilities to editors (you), each interface adds a layer of complexity to the learning curve.
However, some of the tools at your disposal have a near zero learning curve. You can just use them for a single function or capability without feeling like you have to learn the entire application.
Adobe Media Encoder for background encoding
Background encoding is probably the first “single use” excursion you should regularly make outside of Adobe Premiere Pro.
Mentioned in detail in Chapter 7, clicking the Queue button (Figure 1.34) in the Export Media dialog passes your sequence from Adobe Premiere Pro to Adobe Media Encoder for compression.
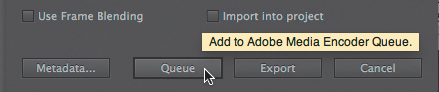
Figure 1.34 The Queue button routes the controls from within Adobe Premiere Pro to a dedicated compression tool, Adobe Media Encoder.
The single action you’ll need to learn in Adobe Media Encoder is to click the green start button (Figure 1.35), which is located at the top right of the Queue window.

Then you can go back to editing your work while Adobe Media Encoder compresses in the background.
Adobe After Effects for effects and presets
Adobe After Effects can seem fairly daunting. Whereas editing software is horizontal, compositing software is vertical, which changes the feel of the workflow.
![]() Tip
Tip
Exploring the prebuilt Animation Presets that consist of animated backgrounds, text, shapes, and more in the Effects panel in Adobe After Effects is a must. Some apply directly to a selection (the video you sent from Adobe Premiere Pro). Some require nothing to be selected because they create their own layers.
To encourage you to use After Effects, I’ll emphasize that you can apply an After Effects built-in single effect or preset animation to a single clip via Dynamic Link. The technique of Dynamic Linking allows you to “try” After Effects by turning it into an advanced effect engine for Adobe Premiere Pro. To use this technique:
1. Select a clip on a Timeline.
2. Choose File > Adobe Dynamic Link > Replace with After Effects Composition (Figure 1.36).

This option generates an After Effects project, which you’ll need to save somewhere better than the default location. Chapter 2 covers some best practices for project locations.
Instead of sequences, Adobe After Effects projects contain compositions. Your clip shows up automatically in a composition, with the Timeline visible, ready for you to drag an effect onto the clip.
3. Drag any item from the list in the Effects & Presets panel in Adobe After Effects (Figure 1.37) onto your image in the composition window (the main window) to apply the effect. Your Effects controls appear on the left side, which are identical to Adobe Premiere Pro Effects controls.

Figure 1.37 The Effects & Presets panel in Adobe After Effects looks quite like the equivalent in Adobe Premiere Pro.
4. Save your project. Switch back to Adobe Premiere Pro (quitting Adobe After Effects is optional but frees up system resources).
Adobe Audition for noise reduction
Audition has a fantastic sample-based noise reduction feature. Although it can’t repair audio recorded in a coffee house, it can repair repetitive noises, such as a rumble from a fan or an AC unit, if you provide the application with a sample of the noise.
See the example in the section “Removing Noise” in Chapter 4. The entire noise reduction process can be done in less than five minutes.
Order of Learning
As mentioned earlier, having access to several useful tools can be intimidating, especially because you have everything you could possibly use (and more!) in the Creative Cloud suite. So, in what order should you learn these tools? Maybe it’s obvious; maybe it’s not.
Here are the two general rules about the order in which you should tackle new software:
![]() Learn based on similarity/complexity. Choose an app that is similar to Adobe Premiere Pro to ease learning. Applications with severely different interfaces (such as Adobe SpeedGrade) require a “start from scratch” approach.
Learn based on similarity/complexity. Choose an app that is similar to Adobe Premiere Pro to ease learning. Applications with severely different interfaces (such as Adobe SpeedGrade) require a “start from scratch” approach.
![]() Learn based on need. Sometimes you’ll need a specific feature (like Foundry Keylight, the superior chroma keyer included with Adobe After Effects). The amount of time and difficulty it takes to learn the new tool will be mitigated by the addition of a capability that was weak or nonexistent in Adobe Premiere Pro.
Learn based on need. Sometimes you’ll need a specific feature (like Foundry Keylight, the superior chroma keyer included with Adobe After Effects). The amount of time and difficulty it takes to learn the new tool will be mitigated by the addition of a capability that was weak or nonexistent in Adobe Premiere Pro.
![]() Tip
Tip
It’s my belief that everyone should always be learning something new and that your brain starts dying when learning stops happening. Every day I try to spend at least 15 minutes trying to chip away at mountains of things I want to learn and need to know.
Which to Learn First?
Writing as an educator (rather than an editor), it’s easier to learn something that is similar to prior information, like a dialect of a language, rather than learning something completely from scratch, like having to learn a new alphabet.
It’s more likely that your needs will dictate which tools you learn and in which order. It’s worthwhile to compare your needs against Table 1.1 earlier in the chapter to decide how and where to budget your time.
The following sections provide some killer reasons and solutions that make learning specific uses of necessary tools part of your workflow.
Quick to learn
The tools described here share enough interface similarities that they will be the easiest to tackle:
Adobe Media Encoder. Adobe Media Encoder is primarily a utilitarian application and is almost part of Adobe Premiere Pro.
Yes, there’s some depth and nuance about how to adjust various codecs, but the preset list enables you create output easily.
You should use its useful background encoding, and given it’s utilitarian nature, it’s probably the easiest application to learn in the suite. See “Adobe Media Encoder” in Chapter 7 for some advanced techniques, including watch folders.
Adobe Photoshop. It’s likely that you already use this industry-standard image manipulation tool. It can perform the obvious of creating titles (with built-in presets for video) and adjusting images for pan/scan moves.
A lesser-known feature is the ability to work directly with video. Open a video clip directly in Adobe Photoshop and then change the Workspace (Window > Workspace) to Motion. You’ll have a full Timeline and access to all of Adobe Photoshop’s layers, adjustments, and filters.
When you’re finished, choose File > Export > Render Video.
Adobe Prelude. This tool permits the handling of media from file-based cameras and allows you to copy camera media files, back them up to multiple locations, mark and perform some simple editorial before transferring your video to Adobe Premiere Pro.
The struggle with card-based media is the need for projects to be organized from the start. The greatest danger is to improperly copy card contents or work directly from the card!
The Ingest window in Prelude (Figure 1.38) resembles the Media Browser in Adobe Premiere Pro. Its major difference is its ability to copy (with a check on data integrity, something that OS level file copies do not do!) your card media to one or more locations, helping you to stay organized from the beginning.
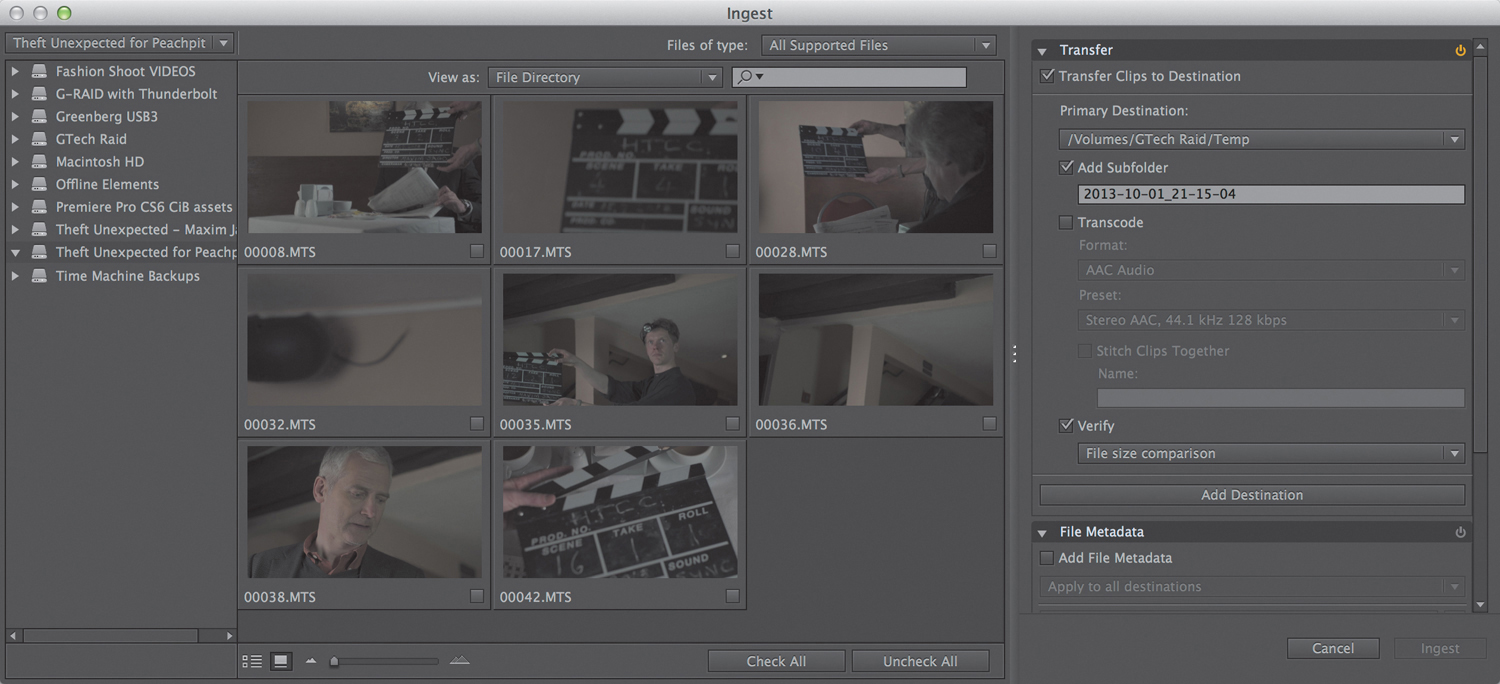
Figure 1.38 The Ingest window in Adobe Prelude. Quickly select one or more clips, and then click Ingest to transfer them from your media cards to your system.
Adobe Audition. Adobe Audition shares strong similarities to Adobe Premiere Pro in its track-based layout, mixers, and submixes. It has two interfaces, one for individual clips and a second for multiple tracks.
The first use of Adobe Audition is usually for noise reduction (see Chapter 4) as a clip-based repair. Along with a deeper set of audio effects available, the clip-based editor has analysis tools to analyze and repair at the sample level, and a spectral analysis view along with healing brushes to fix audio based on the audio frequency spectrum (from deep basses through high-pitched whistles).
A full multitrack DAW is used when you send an entire sequence to it by choosing Edit > Edit in Adobe Audition > Sequence in Adobe Premiere Pro. This sends every track and clip to Audition, permitting the use of nondestructive track-based effects and submix features that are very similar to those found in Adobe Premiere Pro (Figure 1.39).

Figure 1.39 Adobe Audition tracks are similar to those in Adobe Premiere Pro. But notice how much of the screen real estate is dedicated to tracks. It’s ideal for audio mixing.
Two stand-out features, only available in the Multitrack view are Match Clip Volume and Automatic Speech Alignment. Both are located in the Clip menu in Adobe Audition. Match Clip Volume permits you to quickly select multiple clips and have their volumes match. Automatic Speech Alignment permits you to re-record poor audio and have the waveform “retimed” and adjusted to match. This is the equivalent of Automatic Dialog Replacement (ADR).
![]() Notes
Notes
ADR is also known as looping. The process consists of an actor re-recording his lines in a clean studio. The retiming feature in Adobe Audition does this by retiming the read, not depending on the actor to re-read his lines and match the timing.
Require dedicated focus
Some tools aren’t as intuitive as others to learn. Usually, that means they have more value, not less. It also means that they probably have more flexibility.
I suggest you make a more dedicated effort to learn these tools because the return will be much higher than learning a tool that’s “easy” to jump into. The following two tools—Adobe After Effects and Adobe SpeedGrade—are both learnable but come at a greater cost of time commitment.
Adobe After Effects. This compositing and animation tool has become an important industry standard. Some television animation is built into this tool as well.
What makes Adobe After Effects more difficult to learn is the sheer level of its depth. The following list contains several notable features, but the number of tasks that can be done with Adobe After Effects is nearly endless:
![]() The built-in library of presets and effects are strong standouts. Foundry Keylight, which comes bundled, is an industry standard for performing professional-looking chroma keys.
The built-in library of presets and effects are strong standouts. Foundry Keylight, which comes bundled, is an industry standard for performing professional-looking chroma keys.
![]() Text animation is very powerful and has the ability to be quickly animated in or out and comes with over 150 presets, permitting the quick building of kinetic type.
Text animation is very powerful and has the ability to be quickly animated in or out and comes with over 150 presets, permitting the quick building of kinetic type.
![]() Camera tracking permits the quick interpretation of where the real-world camera was placed; after using this technique, you can create a virtual camera and move objects to match the way the original camera shook or panned.
Camera tracking permits the quick interpretation of where the real-world camera was placed; after using this technique, you can create a virtual camera and move objects to match the way the original camera shook or panned.
![]() The ability to draw masks with freehand Bezier tools allows for the cutting of layers in more complex ways than is possible in Adobe Premiere Pro and the idea that an effect can be limited to a portion of a clip based on the mask shape.
The ability to draw masks with freehand Bezier tools allows for the cutting of layers in more complex ways than is possible in Adobe Premiere Pro and the idea that an effect can be limited to a portion of a clip based on the mask shape.
![]() Rotoscoping, the manual drawing of shapes to cut out an object, is painful. After all, that’s why you use a chroma key. The RotoBrush tool permits the building of a mask with significantly less effort than drawing shapes by hand because it’s based on detecting edges (similar to the way the Magic Wand works in Adobe Photoshop).
Rotoscoping, the manual drawing of shapes to cut out an object, is painful. After all, that’s why you use a chroma key. The RotoBrush tool permits the building of a mask with significantly less effort than drawing shapes by hand because it’s based on detecting edges (similar to the way the Magic Wand works in Adobe Photoshop).
Adobe SpeedGrade. This is a full-featured color correction suite that is optimized for sophisticated color correction and stereoscopic (3D) finishing. Where you’ll struggle with SpeedGrade is with its interface (Figure 1.40).

Figure 1.40 Adobe SpeedGrade has powerful new interoperability in its 7.1 release, making it a strong color correction companion to Adobe Premiere Pro.
Whereas Adobe Premiere Pro is optimized for the adjustment of clip length and location, SpeedGrade is optimized for quickly adjusting a shot and moving on to the next.
Powerful secondary effects, such as shape-based vignettes and key-based adjustments, make it quick and easy to adjust flesh tones, skies, and grass without affecting the rest of the image.
A quick, single-click Shot Matching feature allows for the speeding up of getting different camera angles and different cameras to match.
In Chapter 6, “Color Correction,” you’ll learn how to move an Adobe Premiere Pro project to Adobe SpeedGrade, where to find the scopes and basic color correction tools, and how to work back in Adobe Premiere Pro.