
Chapter 4. Professional Audio
...the visuals and the audio have to be of a certain quality before I start to get excited about the thing.
—Hans Zimmer
In video and film, it’s been said that audio is the most important thing to get right, and I agree with that statement. In fact, in the old days of silent movies, the movie theater would hire a professional musician to improvise and live perform a score while the movie was playing. Even then, moviemakers and theater owners understood the power of audio when viewing a feature film. Audio has the power to change how you feel about a character, the power to affect your mood, and definitely the power to change a mere adventure into an epic story.
![]() Notes
Notes
This chapter’s project files are available for download. Please see “A note about downloadable content” in the Introduction of this book.
However, I find that most people in my classes lack basic audio knowledge and the know-how to create a good, solid audio mix of their work. In many cases, even good and experienced editors have never seen an audio engineer at work, and have no idea about how to start. So, they’ll experiment with different volume levels and effects, trying to get a good mix and balanced audio. But without basic knowledge of what to do, they usually fail.
Most people perceive video as being of lower quality if the audio is low quality, which means that you can improve your production quality by improving your audio quality.
Although this book is about postproduction, keep in mind that maintaining good quality audio in the production process will be invaluable in the postproduction stage. “Fixing audio in post” is unrealistic and will rarely yield good results.
This chapter will help you start to generate great audio in your program. Because you don’t always get to work with perfect audio, this chapter also features a section on how to fix common audio problems using Adobe Premiere Pro and Adobe Audition CC. From setting up your working environment to adjusting levels to adding effects, you’ll work with audio just like the pros do.
Listening Environment
The importance of your listening environment cannot be overstated. Two tools will determine how you treat your audio: your ears and the equipment that gets the sounds to them.
![]() Tip
Tip
During production you need to get the strongest audio signal possible without it being too loud. You also need the noise in the environment to be as negligible as possible. This ratio of desired audio versus noise is known as signal-to-noise ratio. The idea is to have a strong “good” signal and a weak noise level. One of the techniques that you should use is to decrease the distance between the source of audio (instrument, voice, etc.) and the microphone, thereby decreasing the levels of noise. (Microphone placement and recording techniques are beyond the scope of this book.)
Your Ears
Some people are born with natural abilities that make their perception of audio and therefore their processing tasks very easy for them; others are not. Just like any other skill, you can train your ears to detect the nuances of audio. You can also train your ears to know what to do to adjust your audio to get the desired results. Perceiving good audio does not happen overnight; sometimes it takes years of training. I recommend constantly comparing your work to the original recording (unprocessed) and to recordings that you know are good and that you like. Start training your ears to hear what you’ve been missing!
Equipment and Your Audio Setup
Having sounds get to your ears in the most accurate way possible is essential to the successful mixing and mastering of your program. Needless to say, you should work in a quiet room. But besides quiet, you can use certain equipment and do many things to improve the way you listen to your audio in your editing space. Some of them are costly (a pair of quality monitor speakers will set you back a few dollars), and some don’t cost a penny:
![]() Quality of speakers. Get the best speakers you can afford. A wide variety of models and sizes (and prices) are available. Educate yourself as to what the best models and sizes are for your room and your work (speaker manufacturer websites are an excellent source of information). Your speakers don’t have to necessarily be huge and or extremely expensive. They just need to have a decent response to the signal that is being fed to them. If possible, try to use speakers in two different sizes: larger ones (not necessarily big; mine are bookshelf size) and smaller ones so you can compare what your program will sound like on two different systems. Make sure that the same output from your system feeds both pairs.
Quality of speakers. Get the best speakers you can afford. A wide variety of models and sizes (and prices) are available. Educate yourself as to what the best models and sizes are for your room and your work (speaker manufacturer websites are an excellent source of information). Your speakers don’t have to necessarily be huge and or extremely expensive. They just need to have a decent response to the signal that is being fed to them. If possible, try to use speakers in two different sizes: larger ones (not necessarily big; mine are bookshelf size) and smaller ones so you can compare what your program will sound like on two different systems. Make sure that the same output from your system feeds both pairs.
![]() Wall material. Various materials will have distinct sound absorption properties. One side of the room may be brighter than the other, and your mix will suffer. If is not that difficult and not very costly, make sure all of your walls use the same type of absorption material (foam, curtains, Sheetrock, etc.).
Wall material. Various materials will have distinct sound absorption properties. One side of the room may be brighter than the other, and your mix will suffer. If is not that difficult and not very costly, make sure all of your walls use the same type of absorption material (foam, curtains, Sheetrock, etc.).
![]() Notes
Notes
When used in reference to sound, “brightness” indicates the amount of high frequency content. Bright sounds contain more high frequencies, and dark sounds more low frequencies. In music it also refers to the speed of the beat and the key signature used in composing.
On the other hand, “muddy” is a demeaning term for sounds that have a lot of low-to-mid frequency content in them. These sounds lack clarity, because it is hard to distinguish different instruments and voices.
![]() Position the speakers. Assuming you have decent speakers, follow these guidelines for the best positioning:
Position the speakers. Assuming you have decent speakers, follow these guidelines for the best positioning:
![]() Try to place yourself in the middle of the speakers. They should be at the same distance on the left and on the right (the “sweet spot”) (Figure 4.1). If they are small, bookshelf-type speakers, position them between three and four feet from your head. The size and position of the speaker is referred to as a near-field monitor, because they are near the listener and therefore are minimizing the room’s influence on the audio waveforms.
Try to place yourself in the middle of the speakers. They should be at the same distance on the left and on the right (the “sweet spot”) (Figure 4.1). If they are small, bookshelf-type speakers, position them between three and four feet from your head. The size and position of the speaker is referred to as a near-field monitor, because they are near the listener and therefore are minimizing the room’s influence on the audio waveforms.

Figure 4.1 Position your speakers so you’re in the “sweet spot,” preferably in the center of the room away from corners.
![]() Ensure that some space is between the speaker and the wall. This will prevent the wall reflection from distorting how the audio gets to you.
Ensure that some space is between the speaker and the wall. This will prevent the wall reflection from distorting how the audio gets to you.
![]() Avoid placing speakers in the corners of the room. All of your walls reflect sound waves, so your ears will receive audio that is not quite accurate if your speakers are in the corners of the room. Some extra reverb or distortion may be added, which will cause you to overcompensate and deliver a faulty mix or implementation of effects.
Avoid placing speakers in the corners of the room. All of your walls reflect sound waves, so your ears will receive audio that is not quite accurate if your speakers are in the corners of the room. Some extra reverb or distortion may be added, which will cause you to overcompensate and deliver a faulty mix or implementation of effects.
![]() Speaker height. Consult the manufacturer for the correct speaker height. But sometimes all you need to do is place the speakers at ear level. You may need to purchase a pair of short pedestals from a local pro-audio distributor to achieve optimal elevation.
Speaker height. Consult the manufacturer for the correct speaker height. But sometimes all you need to do is place the speakers at ear level. You may need to purchase a pair of short pedestals from a local pro-audio distributor to achieve optimal elevation.
![]() Listen to good recordings. After you’ve placed your speakers correctly, listen to tracks that you know well and know are mastered correctly. Try to match the genre of the tracks. For example, if you are mixing audio for a commercial, listen to a commercial that you like and compare your mix with the commercial. You can then judge how the speakers sound. Pay close attention to the evenness of the audio, and make sure that the audio is balanced in the left and right channels. Make adjustments to the speakers if needed.
Listen to good recordings. After you’ve placed your speakers correctly, listen to tracks that you know well and know are mastered correctly. Try to match the genre of the tracks. For example, if you are mixing audio for a commercial, listen to a commercial that you like and compare your mix with the commercial. You can then judge how the speakers sound. Pay close attention to the evenness of the audio, and make sure that the audio is balanced in the left and right channels. Make adjustments to the speakers if needed.
![]() Speaker volume. Play tone through the speakers and adjust the volume until the level is comfortable, as if someone is speaking normally to you in the room (do this for both sets of speakers, if it applies). You can find tone by choosing File > New > Bars and Tone or File > New > HD Bars and Tone. Thereafter, do not adjust the level of the speakers (or of your computer’s audio). If you alter the speakers’ volume, you’ll throw off your sense of level and never be sure about the levels of your program.
Speaker volume. Play tone through the speakers and adjust the volume until the level is comfortable, as if someone is speaking normally to you in the room (do this for both sets of speakers, if it applies). You can find tone by choosing File > New > Bars and Tone or File > New > HD Bars and Tone. Thereafter, do not adjust the level of the speakers (or of your computer’s audio). If you alter the speakers’ volume, you’ll throw off your sense of level and never be sure about the levels of your program.
![]() Headphones. Sometimes, you’ll need to keep your sound volume to a minimum, forcing you to wear headphones. Headphones have both good and bad qualities to them.
Headphones. Sometimes, you’ll need to keep your sound volume to a minimum, forcing you to wear headphones. Headphones have both good and bad qualities to them.
If you combine a set of high-quality, professional headphones with a clean amplification system, you can get the most accurate and uncolored sound content. You won’t need to consider room acoustics or other problems because when you rotate your head, the headphones will rotate with you, which means that no matter what you will always be in the “sweet spot.”
There are also negative aspects to wearing headphones:
![]() Your ears get tired more easily. Most earphones are uncomfortable, and you tend to raise the audio level.
Your ears get tired more easily. Most earphones are uncomfortable, and you tend to raise the audio level.
![]() Frequency response varies. The frequency response of the headphones can be quite different from that of loudspeakers, so you will get a false sense of what the mix sounds like. You might overcompensate with various forms of sound treatment like EQ, reverberation, and so on.
Frequency response varies. The frequency response of the headphones can be quite different from that of loudspeakers, so you will get a false sense of what the mix sounds like. You might overcompensate with various forms of sound treatment like EQ, reverberation, and so on.
![]() Waveform refers to waves. Sound moves in waves. Lower tones, particularly deeper/bass tones, have a wave that can be as long as six feet, making them difficult to truly represent in headphones.
Waveform refers to waves. Sound moves in waves. Lower tones, particularly deeper/bass tones, have a wave that can be as long as six feet, making them difficult to truly represent in headphones.
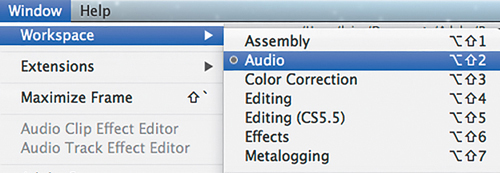
Adobe Premiere Pro’s Workspace
As you know, you can change Adobe Premiere Pro’s workspace to suit your needs. I usually change the workspace when working with audio because doing so places the panels that I use the most in a place that I can easily find. Changing workspaces is easy, and Adobe Premiere Pro ships with predesigned workspaces that are very convenient. The one I use for audio editing is the Audio workspace. To access this workspace, choose Window > Workspace > Audio (Figure 4.2).
Gain and Levels
Both gain and levels refer to the loudness of the audio. However, gain is the input level of the clips and volume is the output. In recording audio, gain is the first control that the microphone signal goes through in a mixer while levels are adjusted after that.
In Adobe Premiere Pro, we adjust the gain before doing anything else to the clip, and then individually adjust the different levels of the clips so they match throughout the program (Figure 4.3 and Figure 4.4).

Why should we worry about the loudness of the clips matching? Because it is important to establish audio continuity in your work. You should not have a portion of your program be disproportionally louder than the rest; it will cause confusion to the viewer and your message will not be as clear to them. Most viewers (listeners) will expect some kind of evenness of the audio levels in the program. Of course, there are exceptions. Sometimes audio levels are used to produce an emotional response.
Unless there is a really good reason for not doing so, our audio levels should be even throughout our program.
Adjusting Gain in the Project Panel
Before you add clips to the Timeline, you should start doing some pre-mixing. This is easy to do, and it will save you time. Most of the audio that you will get in your project will come in at a level that is not ideal. Music, for example, usually comes in too loud, so it will definitely save you time if these elements are already at a better level before you add the clip to the Timeline.
![]() Tip
Tip
Keep an eye on the Peak Amplitude measurement at the bottom of the Audio Gain window. It displays the peak amplitude in a clip before gain has been applied. If the Peak Amplitude value is -12dB, theoretically you can add 12dB of gain. However, this will give you a peak value that is way too loud. Use this value as a guide, not as a setting suggestion (a good reference level for broadcast is -12dB with a dynamic range [DR] of 6dB).
What I do is select all of my foreground audio (voice-over or dialogue) and adjust the gain of all of these clips at the same time, and then select the background audio (music and Foleys) and do the same. To adjust this gain, I select the clips first and then press G to open a dialog that I use to adjust my clips. I usually set background audio elements to an average of -22dB (or so) and foreground elements to an average of -12dB with nothing peaking above -6dB.
The process is as follows.
1. Select multiple clips from the Project panel.
2. Choose Clip > Audio Options > Audio Gain. In the Audio Gain panel that appears, adjust the gain of multiple clips using one of these four methods:
![]() Set Gain to
Set Gain to
![]() Adjust Gain by
Adjust Gain by
![]() Normalize Max Peak to
Normalize Max Peak to
![]() Normalize All Peaks to
Normalize All Peaks to
Set Gain to
The Set Gain to adjustment affects the net amount of gain by which you are adjusting the clip. You can increase or decrease gain by as much as 96dB.
Adjust Gain by
The Adjust Gain by option is similar to the Set Gain to option, but it allows you to add or decrease the net gain amount by incremental amounts. As you enter amounts, the Set Gain to amount automatically adjusts. Set Gain to is absolute, but Adjust Gain by is incremental, meaning that if you adjust it twice by 2dB, you will get an increment of 4dB.
Normalize Max Peak to
When you apply the Normalize Max Peak to a single clip, the highest peak in the clip is normalized to peak at the decibel level you enter, effectively increasing or decreasing the gain of the entire clip. When you apply this option to a group of selected clips, all clips are normalized by the same amount of gain so that the highest peak across all the selected clips peaks at the decibel level you enter. In essence, this option will treat all the clips as if they were just one clip, and the level of the loudest clip will be used to normalize all three of them. The level of all three will be adjusted by the same amount regardless of how soft one of the clips may be.
Normalize All Peaks to
When multiple clips are selected, the Normalize All Peaks to gain option normalizes the peak of each clip to the decibel value you enter. Each clip will receive its own setting (Figure 4.5 and Figure 4.6).

Figure 4.5 Normalize Max Peak to treats all of the clip’s volumes as if they were just one clip. Adobe Premiere Pro will not take into consideration that they are separate clips and will adjust all of them by the same value.

Figure 4.6 Using either Normalize Max Peak to or Normalize All Peaks to will yield different results.
Normalization in action
To see and hear the difference between different normalization methods, open Chapter04_Audio.prproj, and then open the sequence named Normalize. This sequence contains three groups of clips. The first group has no processing, the second group uses Normalize Max Peak to, and the third group uses Normalize All Peaks to. The voice-over (VO) track was normalized to -12dB, the music track to -18dB, and all other audio to -22dB. The difference is not huge, but you can definitely hear it.
Experiment with this sequence by following these steps.
1. Select one of the clips in the Timeline (sequence Normalize).
2. Press G or choose Clip > Audio Options > Audio Gain (Figure 4.7).

Figure 4.7 You also access the Audio Gain panel by choosing Clip > Audio Options > Audio Gain (or press G).
3. Choose any of the options in the dialog and listen to the clip.
4. Choose Edit > Undo or press Command+Z (Ctrl+Z).
5. Apply a different normalization choice and listen to the clip again.
6. Repeat steps 4 and 5 until it becomes apparent what the different options do.
![]() Close-Up: Useful Audio Terms
Close-Up: Useful Audio Terms
![]() Decibels (dBs). Units used to measure the intensity of sound: 0dB is near silence; 10dB is 10 times as loud; 20dB is 100 times as loud; 30dB is 1000 times as loud; and so on.
Decibels (dBs). Units used to measure the intensity of sound: 0dB is near silence; 10dB is 10 times as loud; 20dB is 100 times as loud; 30dB is 1000 times as loud; and so on.
![]() Audio normalizing. Is the process of changing the overall volume of an audio clip so that you reach (and don’t pass) a target level. I usually normalize spoken audio to -6dB and background music to -18dB.
Audio normalizing. Is the process of changing the overall volume of an audio clip so that you reach (and don’t pass) a target level. I usually normalize spoken audio to -6dB and background music to -18dB.
![]() Peak amplitude. Is the maximum absolute value of the signal. This is the loudest that it will be.
Peak amplitude. Is the maximum absolute value of the signal. This is the loudest that it will be.
![]() LUFS (Loudness Units relative to digital Full Scale). The European Broadcast Union (EBU) uses the term LUFS. These are absolute units used to measure audio levels. The loudness target level could be -23 LUFS. In conjunction with this they use Loudness Units (LU). LUs are used to show relative level changes (-23 LUFS is 2 LUs lower than -21 LUFS). One unit of LUFS equals one decibel.
LUFS (Loudness Units relative to digital Full Scale). The European Broadcast Union (EBU) uses the term LUFS. These are absolute units used to measure audio levels. The loudness target level could be -23 LUFS. In conjunction with this they use Loudness Units (LU). LUs are used to show relative level changes (-23 LUFS is 2 LUs lower than -21 LUFS). One unit of LUFS equals one decibel.
![]() Dynamic range (DR). Is the difference between the loudest and the quietest part of your audio, and is measured in decibels. Depending on which genre of audio you’re working with, you’ll need to have a wider or narrower DR, so keep this in mind. Classical music, for example, will have a much wider DR than Pop or Rock.
Dynamic range (DR). Is the difference between the loudest and the quietest part of your audio, and is measured in decibels. Depending on which genre of audio you’re working with, you’ll need to have a wider or narrower DR, so keep this in mind. Classical music, for example, will have a much wider DR than Pop or Rock.
Adjusting Gain on the Timeline
Adjusting gain on the Timeline is as simple as right-clicking on the audio clip and choosing Audio Gain to launch the Audio Gain panel (or press G). You’ll be presented with the same four choices described earlier. You can also choose Clip > Audio Options > Audio Gain as described earlier.
Timeline Interface
Making Timeline adjustments doesn’t add functionality that isn’t available elsewhere in Adobe Premiere Pro. But putting additional meters and buttons directly on the Timeline makes it easier to tweak and monitor audio settings at any stage in the editing and mixing process. In this section I’ll discuss expanding the tracks, adding buttons to the track header, and keyframing.
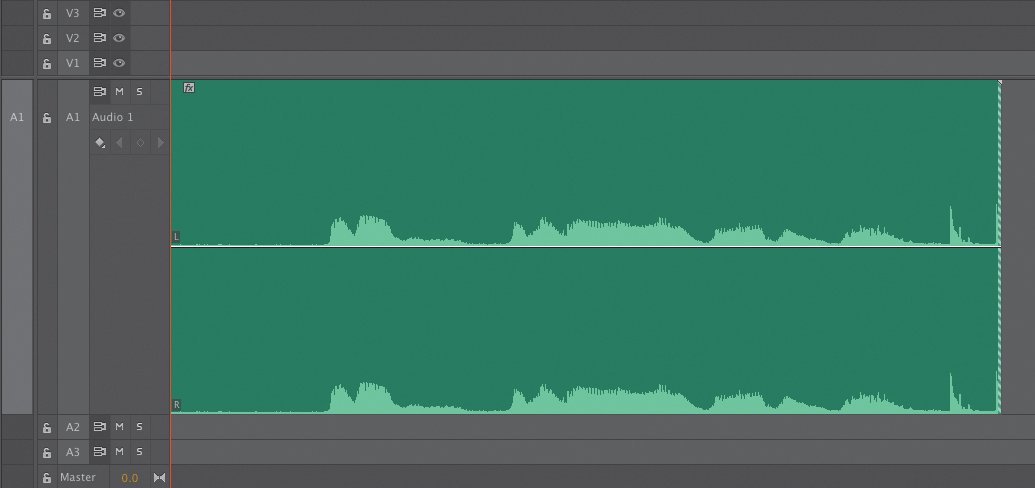
Expand Audio Track
The first helpful customization when you’re working with audio is the ability to expand the audio track to show the audio waveforms. You need a visual representation of the peaks and valleys of your audio clips, and displaying the waveforms is the easiest way to accomplish that.
![]() Close-Up: Why You May Not Want to Normalize
Close-Up: Why You May Not Want to Normalize
New in Adobe Premiere Pro CC is the ability to save this expanded view as a preset. This preset is especially useful when you’re adding keyframes, searching for the start or end of dialogue, or finding unwanted sounds that were recorded. To save the waveform view as a preset, simply click the wrench icon ![]() at the top of your Timeline and choose Save Preset (Figure 4.8).
at the top of your Timeline and choose Save Preset (Figure 4.8).

Give the preset a name you’ll remember, and you’re done! To recall your preset, choose it from the same menu.
You can adjust the height of a track by placing your mouse in the track header and in between the different tracks. When your mouse cursor changes shape to a double-headed arrow with two lines through it, click and drag to adjust the height of the track.
![]() Tip
Tip
You can also adjust the size of the audio track by hovering your mouse pointer over the track button area and using the scroll wheel on your mouse to increase or decrease the size of the track. Additionally, you can change the height of all tracks (video or audio) by adding the Shift key as a modifier.
Audio Track Buttons
Adobe Premiere Pro CC includes by default some common audio track buttons, such as Mute, Solo, Toggle Sync, Keyframe, and more (Figure 4.9). These buttons are used in the editing process to help you better perform your edit. If you need to keyframe the volume level of a particular clip, it might be better to listen to just that track; so soloing that clip makes sense. By the same token, if you need to see track keyframes instead of clip keyframes, you would select the appropriate setting using these buttons:
![]() The Mute button mutes the corresponding audio track and is useful when you want to isolate audio between tracks during playback. This button is used when you need to stop listening to a particular audio track momentarily so that it will not distract you.
The Mute button mutes the corresponding audio track and is useful when you want to isolate audio between tracks during playback. This button is used when you need to stop listening to a particular audio track momentarily so that it will not distract you.

![]() The Solo button mutes all other tracks during playback. You can solo multiple audio tracks, which effectively mutes all tracks with the exception of those soloed. This is particularly useful when you have many audio tracks but at the moment you only need to listen to a few.
The Solo button mutes all other tracks during playback. You can solo multiple audio tracks, which effectively mutes all tracks with the exception of those soloed. This is particularly useful when you have many audio tracks but at the moment you only need to listen to a few.
![]() The Show Keyframes button toggles the display of keyframes in the audio waveform on the track. If you have used track keyframes in your work, you will need to see them at some point. This button enables you to change the display of the Timeline to show you the track keyframes instead of the clip keyframes. To display the clip keyframes again, just select the option from the same button (Figure 4.10).
The Show Keyframes button toggles the display of keyframes in the audio waveform on the track. If you have used track keyframes in your work, you will need to see them at some point. This button enables you to change the display of the Timeline to show you the track keyframes instead of the clip keyframes. To display the clip keyframes again, just select the option from the same button (Figure 4.10).

![]() The Previous Keyframe and Next Keyframe buttons navigate between existing keyframes on the audio track. These buttons are particularly important when you need to navigate between keyframes to adjust their settings. It is easy to miss the time position of the keyframe if you drag the playhead, making any adjustments you make create a new keyframe. Therefore, it is better to use these buttons to navigate when you need to adjust an existing keyframe.
The Previous Keyframe and Next Keyframe buttons navigate between existing keyframes on the audio track. These buttons are particularly important when you need to navigate between keyframes to adjust their settings. It is easy to miss the time position of the keyframe if you drag the playhead, making any adjustments you make create a new keyframe. Therefore, it is better to use these buttons to navigate when you need to adjust an existing keyframe.
![]() The Add/Remove Keyframe button adds or removes keyframes (depending on the position of your playhead). If the playhead is on a keyframe, clicking here will delete it. If the playhead is not directly on a keyframe, clicking here will add a new keyframe at that point in the Timeline.
The Add/Remove Keyframe button adds or removes keyframes (depending on the position of your playhead). If the playhead is on a keyframe, clicking here will delete it. If the playhead is not directly on a keyframe, clicking here will add a new keyframe at that point in the Timeline.
![]() The audio Toggle Sync Lock determines which tracks will be affected when you perform an insert, ripple, or trim edit. Imagine you have several clips in several different tracks in your Timeline and you need to perform a ripple edit. Only the clips in the track that contain the edited clip will be affected. However, if the Sync Lock button is enabled in all of the tracks, any edit you perform in any of the tracks will make the clips in the other tracks adjust their time position to allow for the edit.
The audio Toggle Sync Lock determines which tracks will be affected when you perform an insert, ripple, or trim edit. Imagine you have several clips in several different tracks in your Timeline and you need to perform a ripple edit. Only the clips in the track that contain the edited clip will be affected. However, if the Sync Lock button is enabled in all of the tracks, any edit you perform in any of the tracks will make the clips in the other tracks adjust their time position to allow for the edit.
![]() The audio Track Lock button goes a step further and locks the audio track completely, which prevents any change, accidental or intended. In essence, the Track Lock button “saves you from you.” Using this button will prevent you from accidentally making changes to a track.
The audio Track Lock button goes a step further and locks the audio track completely, which prevents any change, accidental or intended. In essence, the Track Lock button “saves you from you.” Using this button will prevent you from accidentally making changes to a track.
![]() Tip
Tip
The disclosure triangle below the Show Keyframes button means that additional settings are available. Clicking the Show Keyframes button disclosure triangle allows you to select between track keyframes and clip keyframes. I discuss both in the next section.
Additional Audio Track Buttons
In addition to the default audio track controls mentioned in the previous section, Adobe Premiere Pro CC offers several additional buttons that you can add to the audio tracks. To add (or delete) any of these buttons, right-click on the track button area and choose Customize, or click the Timeline Display Settings button ![]() and choose Customize Audio Header. You can then drag and drop additional buttons to the track button area, or you can reset the layout by clicking the Reset Layout button in the Button Editor panel (Figure 4.11).
and choose Customize Audio Header. You can then drag and drop additional buttons to the track button area, or you can reset the layout by clicking the Reset Layout button in the Button Editor panel (Figure 4.11).

These buttons are the Track Meter, Left/Right Balance, Track Volume, and Enable Track for Recording. To me, the ability to control some settings directly in the Timeline is both exciting and time-saving.
The most important track buttons that you might want to add are
![]() The Track Meter button adds audio meters to the corresponding audio track. This is useful when you’re working with multiple audio tracks and you want to see the audio levels from individual audio tracks without switching to the Audio Clip Mixer panel.
The Track Meter button adds audio meters to the corresponding audio track. This is useful when you’re working with multiple audio tracks and you want to see the audio levels from individual audio tracks without switching to the Audio Clip Mixer panel.
![]() The Left/Right Balance button adds a left/right pan dial.
The Left/Right Balance button adds a left/right pan dial.
![]() The Track Volume control allows you to increase the track volume level by +6dB or decrease it to∞ (infinity). The reason this is referred to as infinity is because dB (decibels) are a ratio. As stated earlier in this chapter, 0dB is near silence; 10dB is 10 times as loud; 20dB is 100 times as loud; 30dB is 1000 times as loud; and so on. You can click and drag left to decrease or drag right to increase the volume level, or simply enter a numeric value.
The Track Volume control allows you to increase the track volume level by +6dB or decrease it to∞ (infinity). The reason this is referred to as infinity is because dB (decibels) are a ratio. As stated earlier in this chapter, 0dB is near silence; 10dB is 10 times as loud; 20dB is 100 times as loud; 30dB is 1000 times as loud; and so on. You can click and drag left to decrease or drag right to increase the volume level, or simply enter a numeric value.
![]() The Enable Track for Recording button lets you record audio directly to the corresponding audio track.
The Enable Track for Recording button lets you record audio directly to the corresponding audio track.
![]() Tip
Tip
Tip: The numeric value for ∞ is -100.
Keyframes
Clicking the Show Keyframes button will let you choose between showing Clip Keyframes and Track Keyframes. Showing Clip Keyframes displays keyframes that are clip based, so if you move the clip, the keyframes follow the clip because they belong with the clip. These keyframes are the same keyframes that you would add in the Effect Controls panel. I discuss clip keyframes later in the chapter.
Track Keyframes
Track keyframes are added to the track and not the clip. Imagine you are editing your program and you need to add background music. You are not sure which track of music you want to add to your program. You add one clip to the track, and you add clip keyframes to the volume of that clip so that the music becomes softer when the voice-over starts. After listening to the edit several times, you decide that you no longer want to use that music clip, but instead you want to use a different clip. You delete the clip in the Timeline and add the new clip. However, the keyframes that you added to the original clip have disappeared when you deleted the clip.
Now imagine that instead of clip keyframes you added track keyframes to the original edit. Instead of the keyframes disappearing when you delete the clip, they will stay with the track and apply to any clip you add to that track at that point in time. Now you can add as many different music clips to that track and the keyframes will apply.
![]() Close-Up: One Track per Person?
Close-Up: One Track per Person?
Keyframes in action
To get a better understanding of how keyframes work, follow these steps.
1. Open the project Chapter04_Audio.prproj, and then open the sequence named Keyframes.
You will see two different tracks, one showing clip keyframes and the other showing track keyframes.
2. Move the clip with the clip keyframes, and then do the same with the clip in the other track. The clip with the keyframes maintains them, but the other clip does not because the keyframes belong to the track. If you find that you cannot move the clip that is in the track with the keyframes, temporarily show clip keyframes, move the clip, and then switch back to the track keyframes view.
Working with Separate Audio Tracks
Imagine you recorded an interview with your video camera and have different microphones going to different audio sources. It would be difficult for you to edit these clips separately if they show up together in the Timeline as a stereo clip, so you may want to separate both of these channels. To separate these channels into distinct (but linked) clips, choose Preferences > Audio and change the Default Audio Tracks options to fit your needs (Figure 4.12). In the previous scenario, you need the clips to come in as mono clips when importing that footage so you can edit each of the channels separately from the other one. Each channel of recorded audio will appear in its own track. Although having each channel in its own track is not always necessary, it is very useful when needed.
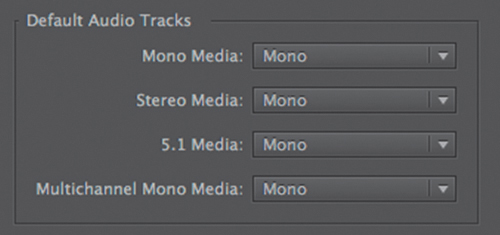
Figure 4.12 Check your Audio Preference settings to ensure that each audio channel appears in the Timeline as a separate track.
Track naming
It is always a best practice to name your tracks. As a result, it will be easier to distinguish your audio when you’re working in the Mixer or even in the Timeline. You can easily name your track by right-clicking in the track header and choosing Rename. You can also rename the track using the Audio Track Mixer.
![]() Notes
Notes
If the amplitude of a signal goes beyond a digital system’s limits, that part will be discarded or “clipped.” This is particularly detrimental in digital audio because a large amount of definition can be lost through audio clipping.
Mixing Sound
You have adjusted the gain of your clips and they are starting to sound OK. However, you’re not done; you need to do more to your clips. Maybe some parts of your clips are still a little too loud, or maybe some of the different sounds on the different tracks are competing with each other. You need to make sure that this is not an issue, so you need to start mixing sound. To help you with this task, use the Audio meters (VU Meters).
VU Meters
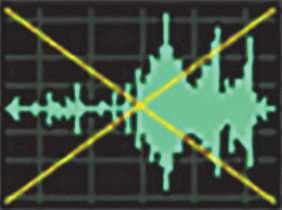
A VU meter lets you see how loud (and soft) your audio is. You need to constantly monitor how loud your audio is not only to maintain uniformity, but also to make sure that your audio does not clip: If the audio is so loud that the media cannot reproduce it, you’ll end up with a clip lacking in dynamics, or a “square” instead of a wavy waveform, and the result will be distorted audio, which of course is highly undesirable (Figure 4.13).

Figure 4.13 Waveforms with square or “flat” areas at the top usually mean clipping/distortion has occurred.
1. Open the project Chapter04_Audio.prproj, and then open the sequence named Clipping. The sequence contains two different clips.
2. Listen to the first clip; it hasn’t been processed.
3. Listen to the second clip; it’s been processed through gain.
In the second clip you’ll notice that there are less dynamics and that the audio goes into the red in the VU meter. The sound is also harsher and distorted in this second clip.
Dynamic range
All audio material has a DR. DR is the difference between the loudest and the softest part of your audio, and is measured in decibels. Depending on which genre of audio you’re working with, you’ll need to have a wider or narrower DR, so keep this is mind. As mentioned earlier, Classical music, for example, will have a much wider DR than Pop or Rock.
To see this DR, you need to use the VU Audio meters.
1. Open Chapter04_Audio.prproj, and then open the sequence named Dynamic Range. The sequence contains two different clips.
2. Listen to the first clip and then the second clip. As they play, look at the Audio meters. The first clip has a DR of -28dB to -6dB. The second clip (through compression, described later in this chapter) has a DR of -16dB to -12dB.
Adobe Premiere Pro’s VU meter (Figure 4.14 on the next page) defaults to a 60dB range, displaying dynamic peaks, and shows color gradients that correspond to the audio levels. A gradient that progresses from green to yellow to orange to red indicates low audio levels, normal audio levels, and peaking audio levels.

You can customize the audio track meter by right-clicking and choosing one of the available options. Some of the options will be grayed out, depending on the type of audio master that you are using. Some of them are available only to 5.1 surround masters, or adaptive tracks. I prefer showing static peaks and valleys, and not showing the color gradients. This lets me see with more detail what my levels are and what my DR is. I use this information to help me set my levels (Figure 4.15). These options are

![]() Show Valleys. Displays an indicator on the audio track meter that corresponds to the lowest audio amplitude in the portion of the clip that you play back. This is effectively the noise floor. You should know what the noise floor is because it will help you determine the DR.
Show Valleys. Displays an indicator on the audio track meter that corresponds to the lowest audio amplitude in the portion of the clip that you play back. This is effectively the noise floor. You should know what the noise floor is because it will help you determine the DR.
![]() Show Color Gradient. Indicates track meter levels in a gradual gradient rather than hard color changes, although in such a small meter the difference is very subtle. Showing the color gradient is a little softer on the eyes, and it is fine if you don’t need to be very precise with the levels. I usually leave these off. However, I’ve met several editors who prefer to see the color gradients here.
Show Color Gradient. Indicates track meter levels in a gradual gradient rather than hard color changes, although in such a small meter the difference is very subtle. Showing the color gradient is a little softer on the eyes, and it is fine if you don’t need to be very precise with the levels. I usually leave these off. However, I’ve met several editors who prefer to see the color gradients here.
![]() Solo in Place. Allows you to solo one or more channels without changing their speaker assignment (available for Source Monitor and Timeline panels). You may want to use this option if you need to temporarily listen to just one or some of the channels. When you select this option, you’ll see solo buttons at the bottom of the VU meters, one per channel (Figure 4.16).
Solo in Place. Allows you to solo one or more channels without changing their speaker assignment (available for Source Monitor and Timeline panels). You may want to use this option if you need to temporarily listen to just one or some of the channels. When you select this option, you’ll see solo buttons at the bottom of the VU meters, one per channel (Figure 4.16).

![]() Monitor Mono Channels. Allows you to listen to one specific channel out of both of your stereo monitoring speakers regardless of its assignment (available for adaptive clips and multichannel masters). You may want to use this option if you need to temporarily listen to just one of the channels. When you select this option, you will also see solo buttons at the bottom of the VU meters, one per channel. However, you will be able to solo only one of the channels at a time.
Monitor Mono Channels. Allows you to listen to one specific channel out of both of your stereo monitoring speakers regardless of its assignment (available for adaptive clips and multichannel masters). You may want to use this option if you need to temporarily listen to just one of the channels. When you select this option, you will also see solo buttons at the bottom of the VU meters, one per channel. However, you will be able to solo only one of the channels at a time.
![]() Monitor Stereo Pairs (default option). Allows you to monitor some of the channels from the left and right speakers (available for multichannel masters).
Monitor Stereo Pairs (default option). Allows you to monitor some of the channels from the left and right speakers (available for multichannel masters).
![]() 120–24 dB Ranges. Allows you to change the decibel range from six options that range from 24dB to 120dB. You may want to change this range depending on how precise you need to be with your audio levels. Obviously, if you select the 120dB range, you will be able to more accurately see your level values than if you selected the 20dB range.
120–24 dB Ranges. Allows you to change the decibel range from six options that range from 24dB to 120dB. You may want to change this range depending on how precise you need to be with your audio levels. Obviously, if you select the 120dB range, you will be able to more accurately see your level values than if you selected the 20dB range.
![]() Dynamic Peaks. Allows you to see the max peak of the audio change depending on the part of the clips you are listening to. Levels are constantly refreshed every three seconds.
Dynamic Peaks. Allows you to see the max peak of the audio change depending on the part of the clips you are listening to. Levels are constantly refreshed every three seconds.
![]() Static Peaks. Displays the loudest peak until the indicator is reset (by clicking on the meter) or playback is restarted.
Static Peaks. Displays the loudest peak until the indicator is reset (by clicking on the meter) or playback is restarted.
![]() Reset Indicators. Resets your indicators.
Reset Indicators. Resets your indicators.
![]() Close-Up: Audio VU Meter Target
Close-Up: Audio VU Meter Target
![]() Broadcast. Traditionally, many broadcasters have maintained strict audio level requirements of -10dBFS for peak audio with average audio levels at -20dBFS. But some broadcasters are allowing editors to “work hot” and submit video with audio that has non-broadcast peaks of -3 or -6dBFS. Always check with your broadcaster because its requirements will vary.
Broadcast. Traditionally, many broadcasters have maintained strict audio level requirements of -10dBFS for peak audio with average audio levels at -20dBFS. But some broadcasters are allowing editors to “work hot” and submit video with audio that has non-broadcast peaks of -3 or -6dBFS. Always check with your broadcaster because its requirements will vary.
![]() Non-broadcast. Similar to how online video delivery doesn’t have a hard 100 IRE limit, online audio delivery doesn’t have a set peak limit. Therefore, I recommend limiting audio peaks to somewhere around -6dBFS and have average audio levels around -12dBFS.
Non-broadcast. Similar to how online video delivery doesn’t have a hard 100 IRE limit, online audio delivery doesn’t have a set peak limit. Therefore, I recommend limiting audio peaks to somewhere around -6dBFS and have average audio levels around -12dBFS.
Level Adjustment in the Timeline
By default Adobe Premiere Pro is set up to show clip keyframes, which, as discussed earlier, also means that audio adjustments you make on the Timeline affect individual clips (not the entire track).
You can adjust the volume level of an individual clip by hovering your pointer over the volume band until it changes to a volume band pointer (Figure 4.17). Then drag the volume band up to increase the volume by up to 6dB or down to lower the volume to -∞. This adjustment affects the volume for the entire clip that is selected (if it doesn’t have any existing keyframes). But often you’ll want to make changes to the volume of a clip over time; you can do this by adding keyframes. This can be useful to fade in and out audio clips or to adjust for loud or soft sections in an individual clip.

You can add clip keyframes either in the Timeline or by using the Effect Controls panel. If you’re working in the Timeline, you can add, select, move, and remove keyframes using the Pen tool.
1. Select the Pen tool (press P) from the toolbar (Figure 4.18).
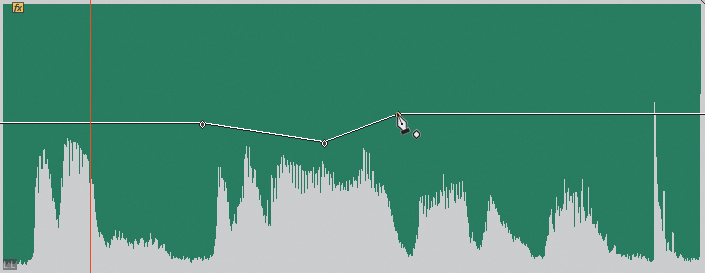
2. Play the Timeline and determine the points in time at which you need the audio to become softer or louder. Then click on the band to add the keyframe.
3. Using the Selection tool, drag individual keyframes or sections between keyframes up or down to increase the clip volume at that point in time.
4. Play back the audio clip, and look at the peaks and valleys of the audio in the VU meter.
5. In some cases you’ll need the same keyframes in more than one place or in more than one clip. You could have more than one track or music or dialogue that requires the same changes in volume. You could copy these keyframes and then paste them as needed, either to the same clip in a different point in time or to a different clip.
Other ways of adding keyframes
Here are a few other ways you can use to add keyframes to the Timeline:
![]() Use the Selection tool instead of the Pen tool by holding down the Command (Ctrl) key and clicking on the points at which you want to add a keyframe along the clip’s volume band (also known as the rubber band).
Use the Selection tool instead of the Pen tool by holding down the Command (Ctrl) key and clicking on the points at which you want to add a keyframe along the clip’s volume band (also known as the rubber band).
![]() Use the Add/Remove Keyframe button.
Use the Add/Remove Keyframe button.
![]() Adjust the audio volume of a nonselected clip by using the [ and ] keys . If the playhead is on a keyframe, you will adjust that keyframe only. If the playhead is not on a keyframe, you will adjust the span between keyframes
Adjust the audio volume of a nonselected clip by using the [ and ] keys . If the playhead is on a keyframe, you will adjust that keyframe only. If the playhead is not on a keyframe, you will adjust the span between keyframes
![]() Quickly reset keyframes by clicking on clip(s) and choosing Clip > Remove Effects.
Quickly reset keyframes by clicking on clip(s) and choosing Clip > Remove Effects.
Keyframes in action
To get a practical understanding of how to use keyframes, follow these steps.
1. Open the project Chapter04_Audio.prproj, and then open the sequence named Begin Keyframes.
2. Play the sequence. You will hear that the music fades as the voice starts.
3. If necessary, expand the track; then notice that some keyframes were added.
4. Play the sequence again and listen to the audio levels as the playhead goes through the sections with keyframes.
5. Add other keyframes to make the audio get louder and softer over time.
Track Keyframes
Track keyframes are identical to clip keyframes except they are applied to the track, not to the clip. So, if you were to move, remove, or change a clip in the Timeline, these keyframes would remain unaffected and would apply to any clip placed in the track where the keyframes are located. I’ll discuss track keyframes further in the “Track Mixer” section later in this chapter.
Crossfades
Crossfades are the gradual lessening of the audio volume in one clip at the same time as the gradual increase of the volume of a different audio clip. They are used in two different ways: to fade in between two clips and to fade up from silence. It is common to fade a clip up from silence at the beginning and fade down to silence at the end because not doing so may cause the sound of those clips to “pop” in and out (there might be loud ambient sound or a loud first sound in the clip). This means that you would need to fade in and out every audio clip in your entire program.
To avoid manually keyframing these clips, you usually use crossfades. An audio crossfade is a transition, a lot like a video crossfade, that is used instead of manually keyframing the clips to fade them up from or down to silence.
Open the project Chapter04_Audio.prproj, and then open the sequence named Crossfades. Play the sequence. You’ll notice that there are crossfades added to the first clip in the Timeline and that it fades in at the beginning and out at the end.
If both clips are adjacent in the same track, you can easily add a crossfade by adding a transition: Adobe Premiere Pro creates the overlap from handle media, and a single transition will suffice for the edit point. You can see an example of a crossfade on the next set of clips in the Crossfade sequence. Notice how the crossfades affect the audio. If the clips are in two different tracks, you can still use the audio transition, but you need to ensure that the clips overlap by the amount of time that you want the crossfade to last. Of course, you can also use keyframes to accomplish the crossfade. You can see an example of crossfades that exist between clips in different tracks in the next set of clips in the Crossfade sequence.
For multiple clips
To add crossfades to multiple clips at the same time, adjust the default transition duration for the audio crossfade first and then use the transition. You can change this value by choosing Preferences > General and changing the Audio Transition Default Duration (Figure 4.19). Because I prefer a fast crossfade, I usually set this value to between 0.10 and 0.17 seconds, which in NTSC will give me a duration of three to five frames.

Figure 4.19 You can adjust the default duration of the audio transition by accessing the General preferences and changing the time duration.
Then select the clips you want to affect and choose Sequence > Apply Audio Transition (Figure 4.20).

Figure 4.20 You can apply audio transitions to your selected clips by choosing Sequence > Apply Audio Transition.
When you’re doing crossfades, avoid these two mistakes:
![]() If you made your cuts a little too close, the audio might fade out too soon.
If you made your cuts a little too close, the audio might fade out too soon.
![]() If you do a crossfade in between two clips, you may be adding unwanted sounds, because Adobe Premiere Pro will add enough frames to the edit to create the crossfade.
If you do a crossfade in between two clips, you may be adding unwanted sounds, because Adobe Premiere Pro will add enough frames to the edit to create the crossfade.
Exponential Fade, Constant Power, Constant Gain
As you may already know, there is more than one type of crossfade. The difference is in the rate of change of the levels during the transition. You should use Exponential Fade when coming up from silence and Constant Power when using a crossfade in between two different clips. The different types of crossfades are
![]() Constant Gain. Changes the audio at a constant rate. This is not very natural, which is why it is not used much (Figure 4.21).
Constant Gain. Changes the audio at a constant rate. This is not very natural, which is why it is not used much (Figure 4.21).
![]() Constant Power. Creates a slow fade that gradually changes to a faster rate of change when fading out. When fading in, the opposite occurs: Constant Power increases the rate of the audio and then as the fade progresses the rate of change slows down. This causes the levels to not “lose power” during the transition, which is what would have happened if you had used Exponential Fade (Figure 4.22).
Constant Power. Creates a slow fade that gradually changes to a faster rate of change when fading out. When fading in, the opposite occurs: Constant Power increases the rate of the audio and then as the fade progresses the rate of change slows down. This causes the levels to not “lose power” during the transition, which is what would have happened if you had used Exponential Fade (Figure 4.22).

![]() Exponential Fade. Uses a logarithmic curve to fade up and down. It is very similar to the Constant Power fade but is more gradual. This is more natural to your ears because this is how you naturally perceive sound (Figure 4.23).
Exponential Fade. Uses a logarithmic curve to fade up and down. It is very similar to the Constant Power fade but is more gradual. This is more natural to your ears because this is how you naturally perceive sound (Figure 4.23).

Figure 4.23 Exponential Fade uses a logarithmic curve to fade up and down. The fade is slower at the beginning but gets faster in the middle of the duration of the transition.
Noise Floor/Room Tone
All rooms have a “sound,” or “room tone,” that is generated by lights, furniture, and even the people in it. No place is totally silent (unless you’re in a vacuum). You should record at least 20 seconds (at the very minimum) of this room tone (make sure you record it during production). Mixing it with your clips on a separate track will help you create the illusion of evenness.
![]() Tip
Tip
No room tone? Find the longest amount of silence in a spoken track for a minimum of one second. Place this little audio piece into its own sequence and then reverse it. You now have at least two seconds of room tone and don’t have to play games with crossfades to make it work. Build 30–40 seconds and you can add it to your clips as needed.
Panning
Panning places the signal anywhere between hard left and hard right in a stereo recording (or in any of the channels of a 5.1 surround panning). It is used to give the perception of depth and space (Figure 4.24). In other words, panning will give listeners a better illusion that they were present during the events presented in your program.

Figure 4.24 Adjusting the pan of a stereo clip adjusts both channels. However, adjusting a mono clip’s pan adjusts independently by clip or track.
For example, if you see a car moving from left to right, the sound should move from left to right following the car. Panning accomplishes that through animating (keyframing) the panning so that the sound goes from one channel to the other gradually, just like the sound of the car would travel from one side to the other in real life.
You can adjust panning on a global basis, or you can animate it (as just explained in the preceding moving car example). Most of the time I’ll set panning to about 30 percent into a channel (rarely any more than that). I won’t go all the way to 100 percent unless the sound is coming from offscreen.
In my experience, the following is usually true:
![]() True stereo recordings (most commercially available music) will not need any panning modification.
True stereo recordings (most commercially available music) will not need any panning modification.
![]() Voice-overs will almost always be right in the center.
Voice-overs will almost always be right in the center.
![]() Interviews can pan (a little) to the left and right to correspond with the speaker’s positioning on the screen.
Interviews can pan (a little) to the left and right to correspond with the speaker’s positioning on the screen.
![]() SFX will also correspond to whatever on the screen is producing the sound.
SFX will also correspond to whatever on the screen is producing the sound.
Mixers and Submixes
Mixing audio on the Timeline alone can be restrictive, especially when you’re trying to mix down several different clips and audio on multiple tracks. For more advanced audio mixing controls, Adobe Premiere Pro CC offers two different audio mixers that you can use to speed up and increase your control over the audio mixing levels.
These mixers are the Audio Clip Mixer and the Audio Track Mixer. You use the Audio Clip Mixer when you need to change the levels of individual clips on a clip-by-clip basis. You use the Audio Track Mixer when you need to change the levels of audio on a track basis, when you don’t need the changes to travel with the clips in case you need to replace the clips with different ones. Track and clip keyframes were discussed earlier in this chapter.
Clip Mixer
The Audio Clip Mixer is a new feature in Adobe Premiere Pro CC that allows you to view and adjust audio on a clip-by-clip basis. You can access this new window by choosing Window > Audio Clip Mixer or by pressing Shift+9.
Using the Audio Clip Mixer (Figure 4.25) lets you monitor and adjust individual clips on the go, even if they are in the Timeline. If you play your program in the Timeline and use the Audio Clip Mixer to adjust levels during the playback, the Clip Mixer will affect the clips as you hear the audio being played from the Timeline. You’ll be able to perform changes on the fly. Any changes you make to the volume of the clip using this tool will be reflected in the Timeline volume line (rubber band). When you’re using the Clip Mixer, note that only the clip is affected, not the track (the Track Mixer affects the track level).

Figure 4.25 Using the Audio Clip Mixer allows you to add clip keyframes in real time as you listen to the clip being played in the Timeline.
As you move the playhead along, tracks that contain audio clips will become available to control; the controls for those tracks that don’t contain audio clips will be grayed out.
![]() Tip
Tip
When you stop recording keyframes in the Audio Clip Mixer panel, Adobe Premiere Pro creates a final keyframe at the point in time where you stopped. This keyframe is often an abrupt change from the next-to-last keyframe, so I recommend deleting it. Simply select that keyframe and then press the Delete key.
To better understand how the Audio Clip Mixer works, follow these steps.
1. Move the playhead to the spot in the Timeline where you want to start your changes.
2. In the Audio Clip Mixer panel select the keyframe icon for the tracks that you want to affect. Remember that although this selection is on a track-by-track basis, the adjustments made are applied to clips, not tracks.
3. Mute any tracks you don’t want to hear or solo a single track if you need to.
4. Start playback, move the volume level up and down, and pan left and right as desired.
When you stop playback, keyframes will be added.
5. Adjust the keyframes if needed, or even record a second pass.
6. Play back and enjoy your work!
Audio Clip Mixer practice
To better understand how the Audio Clip Mixer works, follow these steps.
1. Open the project Chapter04_Audio.prproj, and then open the sequence named Clip Keyframes.
2. Open the Audio Clip Mixer panel and click the Write Keyframes icon.
3. Play the Timeline, and as it plays, adjust the Volume fader.
Notice that when you’re done, keyframes are on your clip (if you do not see them, make sure Clip Keyframes is selected in the audio track header).
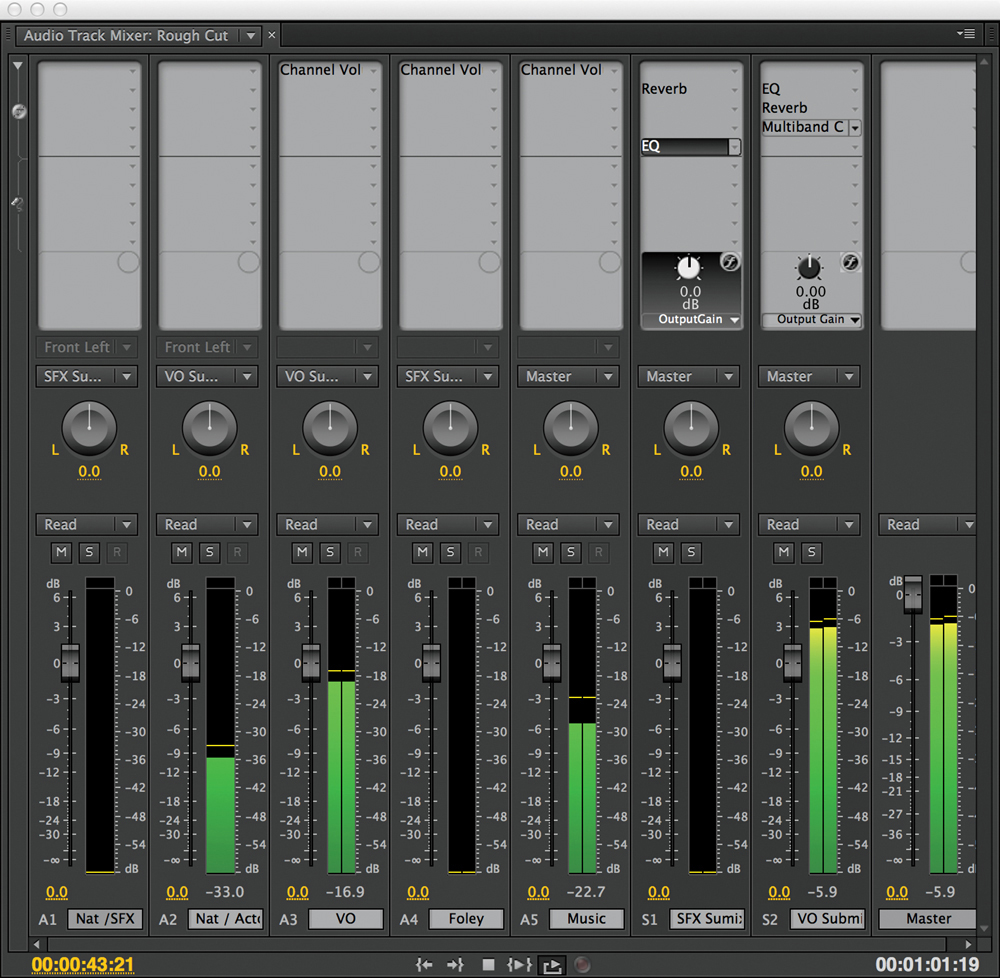
Track Mixer
The Audio Track Mixer has Volume and Pan controls, and it will add keyframes, but instead of making changes to a clip it makes changes to the audio tracks. I usually use these track keyframes in conjunction with clip keyframes. If I’m editing a segment with a voice-over preceded by music, I’ll add track keyframes to fade the music at the appropriate time, and if needed, add clip keyframes to further adjust the level of the music.
To open this tool, choose Window > Audio Track Mixer (Figure 4.26).

Figure 4.26 The Audio Track Mixer makes changes to the audio tracks through keyframes or through changes to the whole track’s level.
Several automation modes help you create the keyframes that will affect your track (Figure 4.27):
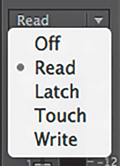
Figure 4.27 The automation modes in the Audio Track Mixer panel create keyframes on the go as you listen to the audio in the Timeline.
![]() Off. This setting, as you may have guessed, ignores existing keyframes. Even though you can still make changes to the track, these changes will not be recorded. Off is simply, off.
Off. This setting, as you may have guessed, ignores existing keyframes. Even though you can still make changes to the track, these changes will not be recorded. Off is simply, off.
![]() Read. After you’ve created some keyframes, change the automation mode to Read to hear how they sound. Read mode will read any changes that you’ve already performed on the clip. If a clip has no keyframes and you adjust a track, the changes will affect the entire track. Once you stop adjusting, the fader will return to its former value. The speed of the return is determined by the Automatch Time option (Preferences > Audio > Automatch Time).
Read. After you’ve created some keyframes, change the automation mode to Read to hear how they sound. Read mode will read any changes that you’ve already performed on the clip. If a clip has no keyframes and you adjust a track, the changes will affect the entire track. Once you stop adjusting, the fader will return to its former value. The speed of the return is determined by the Automatch Time option (Preferences > Audio > Automatch Time).
![]() Write. This automation mode lets you record any changes to volume or pan that you make to the track (as long as the Automation Mode is not set to Safe During Write). When you adjust the levels using this automation mode, new keyframes will be added, overwriting existing ones. You could also preserve a track property while recording the mix by right-clicking an effect or send and choosing Safe During Write from the menu.
Write. This automation mode lets you record any changes to volume or pan that you make to the track (as long as the Automation Mode is not set to Safe During Write). When you adjust the levels using this automation mode, new keyframes will be added, overwriting existing ones. You could also preserve a track property while recording the mix by right-clicking an effect or send and choosing Safe During Write from the menu.
![]() Latch. Similar to Write, but Latch changes don’t start recording until you begin adjusting the property. So, if you are set to Latch and you play the track, nothing will be altered until you actively start adjusting.
Latch. Similar to Write, but Latch changes don’t start recording until you begin adjusting the property. So, if you are set to Latch and you play the track, nothing will be altered until you actively start adjusting.
![]() Touch. Same as Write, but when you stop adjusting a property, the fader will continue following existing keyframes, or return to the original value of the clip if there are no keyframes present. The speed of the return is determined by the Automatch Time option (Preferences > Audio > Automatch Time).
Touch. Same as Write, but when you stop adjusting a property, the fader will continue following existing keyframes, or return to the original value of the clip if there are no keyframes present. The speed of the return is determined by the Automatch Time option (Preferences > Audio > Automatch Time).
To better understand how the Audio Track Mixer works, follow these steps.
1. Move the playhead to the spot in the Timeline where you want to start your changes.
2. In the Audio Track Mixer panel select the desired automation mode.
3. Mute any tracks you don’t want to hear or solo a single track if needed.
4. Start playback, move the volume level fader up and down, and pan left and right as desired.
5. When you stop playback, keyframes will be added. If you do not see these keyframes, click the Show Keyframes button in the track header and choose Track Keyframes.
6. Adjust the keyframes if needed, or even record a second pass.
7. Play back and enjoy your work!
If you feel you are adding too many keyframes, check and adjust the value in Preferences > Audio > Minimum Time Interval Thinning; larger values will reduce the number of keyframes. If you create keyframes that make changes that last one second, this option will create only the necessary keyframes at the beginning and at the end of the change. Otherwise, Adobe Premiere Pro may create other keyframes in the middle of these.
To make this process easier, rename your audio tracks from the default of Audio 1, Audio 2, and so on to reflect the type of clips you’ll be placing on the track, such as male voice, female voice, nat sound, music, effects, and the like. You can rename your audio tracks in the Audio Track Mixer or in the Timeline. To see an example of renaming tracks, open the project Chapter04_Audio.prproj, and then open the sequence named Mix. Notice the names of the tracks in the Audio Track Mixer.
Audio Track Mixer practice
To better understand how the Audio Track Mixer works, follow these steps.
1. Open the project Chapter04_Audio.prproj, and then open the sequence named Track Keyframes.
2. Open the Audio Track Mixer panel and select the Write automation mode.
3. Play the Timeline, and as it plays, adjust the Volume fader or the Pan control.
Notice that when you’re done, keyframes are added to your track (if you don’t see them, make sure you have Track Keyframes selected in the audio track header).
4. Test the different automation modes and experience their differences. Remember to adjust the Automatch Time value in the Audio Preferences if you need to do so.
Submixes
In audio a submix is a grouping of tracks that are processed together to add some common effects. In Adobe Premiere Pro you use a submix mainly to avoid having to add the same effects over and over to many clips, and to be able to adjust levels of several tracks at the same time.
A submix is akin to a nested sequence, where you can add effects to the nested sequence instead of adding many different effects to many different clips (Figure 4.28). Consider a submix an intermediary track between the original tracks and the master track. The source for this intermediary track is other audio tracks, so you cannot add clips directly to this submix track; however, you can add as many tracks to a submix as you need.

A send takes the audio signal from a track and “sends” it somewhere else before it goes to the master track. This is what you use to route audio tracks through submixes.
To create a submix, you can use the Send Assignment menu on the Track Mixer, or you can right-click on the audio track button area in the Timeline and choose Add a Submix Audio Track. Then, in the Audio Track Mixer panel, select the Sends drop-down from the track(s) you want to send to the Submix track and choose Submix.
![]() Close-Up: Pre-fader or Post-fader?
Close-Up: Pre-fader or Post-fader?

Figure 4.29 Pre-faders and post-faders will ignore or follow the fader in the Audio Track Mixer before going to the submix.
In the Audio Track Mixer panel you can adjust the fader and/or add any effects you desire to the submix.
Submixes practice
To better understand how submixes work, follow these steps.
1. Open the project Chapter04_Audio.prproj, and then open the sequence named Submix.
2. Open the Audio Track Mixer panel, which contains two submixes: one called SFX submix the other called VO Submix. The different tracks are being routed to different submixes except for the music track, which goes directly to the master. Some effects are already applied.
3. Test different settings and experiment with different effects to hear how they affect your sound.
Audio FX
Even after you’ve mixed your audio, it still might not sound right. Some clips may have unwanted noise or still be too loud or too soft. Effects are the solution to these problems, although some clips cannot be completely fixed. This section discusses some of the most commonly used audio effects.
![]() Close-Up: Using Your Master Track
Close-Up: Using Your Master Track
Multiband Compressor
A compressor is the tool that can help raise or attenuate the relative level of the clip and gives your audio punch and strength (Figure 4.30). You may want to use a compressor when you need your audio levels not to go any louder than a certain value or to remain between a certain range of values. When editing for broadcast (usually commercials), I usually run all of my audio through a compressor/limiter on the master track, which helps me remain within the broadcast audio levels.
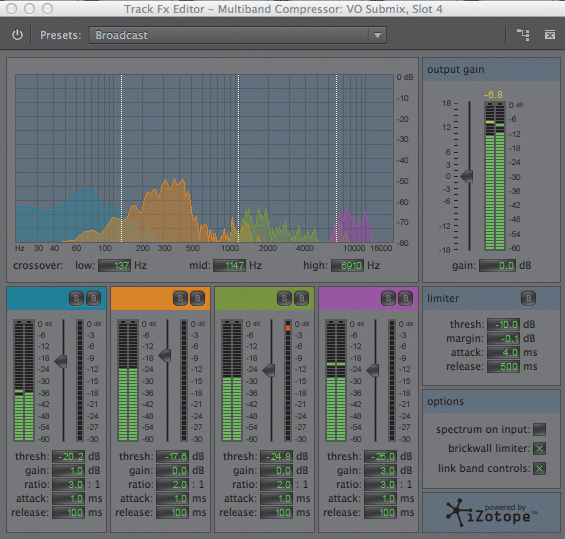
Figure 4.30 A compressor is one of the most commonly used tools; it lets you control the DR of voices and/or instruments.
![]() Notes
Notes
The Multiband Compressor is powered by iZotope and is the same compressor found in Adobe Audition.
You should think about audio levels in two different ways: One is the absolute level—the level that the meter displays—and the other one is the subjective level, which is how loud you perceive the volume.
Can you recall a certain bathroom tissue commercial where people were whispering? This gave the perceived level of being quiet. In reality the audio levels were just as loud as when the announcer was plugging that particular brand. What the meter displays and what you perceive are sometimes different.
![]() Tip
Tip
Do not overcompress your audio. Hypercompressed programs do not sound natural. Too much compression robs the mix of vivacity. In fact, they are tiresome and dull. Also, keep in mind that MP3s have difficulties encoding hypercompressed material. You can tell when audio has been over compressed not just by the sound but by how the waveforms look when you see them in the Timeline. Hardly any waves are displayed; they are all flat!
Adobe Premiere Pro’s Multiband Compressor effect separates the audio into different frequencies (or bands) and processes them separately; what this means is that you could affect some frequencies in one way and other frequencies in a different way. Based on frequencies, you could affect some instruments and not others. This could be useful if you are editing a music video and need to master the audio as well, for example, maybe the bass is too soft or too loud. Using this effect you could affect only the frequency in which the bass sound exists.
![]() Close-Up: Using a Limiter
Close-Up: Using a Limiter
Here are some controls in the Multiband Compressor that you should know:
![]() Threshold. Threshold is the minimum level that will make the compressor start working. Depending on the ratio (described next), the compressor will “kick in” when your audio levels reach the threshold you set on this effect. The threshold is commonly set in decibels; a lower threshold (e.g., -60dB) means more of the clip will be compressed.
Threshold. Threshold is the minimum level that will make the compressor start working. Depending on the ratio (described next), the compressor will “kick in” when your audio levels reach the threshold you set on this effect. The threshold is commonly set in decibels; a lower threshold (e.g., -60dB) means more of the clip will be compressed.
![]() Ratio. The amount of gain reduction is determined by the ratio: A ratio of 3:1 means that if the input level is 3dB over the threshold, the output signal level will be 1dB over the threshold. In this case, the gain (level) is reduced by 2dB. For example:
Ratio. The amount of gain reduction is determined by the ratio: A ratio of 3:1 means that if the input level is 3dB over the threshold, the output signal level will be 1dB over the threshold. In this case, the gain (level) is reduced by 2dB. For example:
![]() Threshold = −10dB
Threshold = −10dB
![]() Input = −7dB (3dB above the threshold)
Input = −7dB (3dB above the threshold)
![]() Output = −9dB (1dB above the threshold)
Output = −9dB (1dB above the threshold)
Try to keep the ratio at no more than 3:1 to maintain a gentle-sounding effect. If the ratio goes above 3:1, the audio might sound unnatural.
![]() Attack. Attack is the time that it takes to reach maximum level of compression. Attack will affect drums if the release is too fast, which will result in unnatural level changes.
Attack. Attack is the time that it takes to reach maximum level of compression. Attack will affect drums if the release is too fast, which will result in unnatural level changes.
![]() Release. Release is the time that it takes for the audio level to return to normal (no compression). You should have slow release times to minimize the unnatural level changes (pumping).
Release. Release is the time that it takes for the audio level to return to normal (no compression). You should have slow release times to minimize the unnatural level changes (pumping).
If your clip has a wide DR, you’ll notice the compression more because it will click more often and for a less amount of time.
EQ
An equalizer (EQ) is an effect that will let you balance different frequencies throughout your program (Figure 4.31). You will be able to select a specific frequency (or range of frequencies) and adjust their levels to increase or decrease their volume.
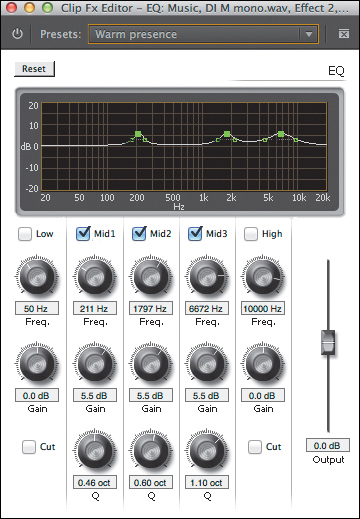
For example, if you are working with a music clip in which you can hardly hear bass, you could add the EQ effect and increase the volume of the bass only, making it more present in the mix.
To better accomplish this task, you can train your ears to recognize a well-balanced audio program by playing good audio through your system. Play audio that is similar to the program that you are mixing. If you are mixing a high-impact commercial, listen to something comparable. It’s best if the sample audio is the same genre as the program you’re working on.
As you become more familiar with the EQ tool and your ears begin to detect audio nuances, your changes will be very small. You will have changes in many places, but these changes will be minimal—for example, 2dB or 3dB at the very most.
When you want to use the EQ effect because you need to do more than make small adjustments, reconsider your microphone placement and your audio recording techniques.
When you’re working with the EQ, do not alter the volume of your speakers (seriously, don’t touch this volume at all). If you do, you might overcompensate and the EQ will not be accurate.
![]() Tip
Tip
Feathering is a commonly used technique where instead of increasing one frequency you increase a number of adjacent frequencies to produce a smoother curve.
Constantly compare the processed audio with the original version. Also, compare your clips with each other. Using the EQ is one of the ways to achieve audio continuity in your program.
To use the EQ effect, follow these steps.
1. Add the EQ effect to the clip (or the track).
2. Launch the clip Fx Editor by clicking the Edit button in the Effect Controls panel. To launch the Track Mixer, double-click the Fx slot where the EQ is located.
3. Choose from several presets that are available. Once you become familiar with this tool, you can even create your own. Sometimes it’s easier to start from a preset and then adjust it rather than starting from scratch.
4. Select the appropriate check boxes in the Fx Editor. To make adjustments, you can either use the knobs or simply click and drag the control points. Notice that the control points are “connected,” which means that the resulting feathering effect will sound more natural.
5. Adjust the Q control, which controls the smoothness of the curves that “connect” the control points. You can either adjust these control points by using the knob or by clicking and dragging the handles directly on the control points.
6. Adjust the overall gain by using the Output Gain slider to the right of the knobs.
![]() Tip
Tip
Double-check your levels. An EQ effect can increase the volume of specific frequencies, and it is common that in the process of EQing your audio clip or track you increase (or decrease) the overall level. This can easily be adjusted using the Output Gain slider in the Fx Editor.
EQ practice
To better understand how the EQ works, follow these steps.
1. Open the project Chapter04_Audio.prproj, and then open the sequence named EQ. The sequence contains two different groups of clips in the Timeline in two different tracks. The first one is unprocessed; the second clip has the EQ effect added to the track
2. Listen to both clips.
3. Open the Audio Track Mixer.
4. Open the Fx Editor for the EQ applied to the second track (by double-clicking on it).
5. Note how the frequencies were modified (Warm Presence preset), and try making some changes of your own
Start training your ears to distinguish between the sound qualities of the different changes.
Loudness Radar
The Loudness Radar effect (Figure 4.32) is a tool that lets you read the loudness of your program over time. If the audio will be used in a program destined for broadcast, you are probably aware that you’ll need to comply with loudness standards. If you don’t, the broadcast house may adjust your audio levels or it might simply reject your program. You could also use this effect to compare the levels of the different clips of your program; that is, how much louder than the music is the voice-over track?

Figure 4.32 The Loudness Radar effect is new in Adobe Premiere Pro CC. It lets you ensure that your program is compliant with broadcast standards.
The Loudness Radar displays audio levels in two rings: The outer ring shows current audio levels, and the inner ring shows the audio levels over time (a useful history of loudness). At the bottom of the Loudness Radar screen you can also see loudness range values and the overall program loudness.
The yellow area is the loudest level (don’t exceed this level). The blue level is too low (below the noise floor), so you want your audio to stay between the green and the yellow levels.
You can change the loudness standards, and see where your program falls within the different standards. These Loudness Standard presets are in the settings of the effect, and you can choose between BS.1770-3 and Leq(K). These standards are presets that change the values in the Settings tab. Here are some of those settings:
![]() Radar Speed. You can change this value to an appropriate time (the length of the program) to display the history of the program’s loudness.
Radar Speed. You can change this value to an appropriate time (the length of the program) to display the history of the program’s loudness.
![]() Radar Resolution. This is the space increment of the inner circles.
Radar Resolution. This is the space increment of the inner circles.
![]() Momentary Range. This sets the loudness for the momentary range. It offers two different choices: EBU +9 is meant for normal broadcast, and EBU +18 is meant for film, drama, and a wide range of music.
Momentary Range. This sets the loudness for the momentary range. It offers two different choices: EBU +9 is meant for normal broadcast, and EBU +18 is meant for film, drama, and a wide range of music.
![]() Low Level Below. With this setting you can set the shift between the green and blue colors on the momentary loudness ring. This could be set to indicate that the level may be below the noise floor level.
Low Level Below. With this setting you can set the shift between the green and blue colors on the momentary loudness ring. This could be set to indicate that the level may be below the noise floor level.
![]() Overall Audio Units. This sets the loudness units to be displayed on the radar. Choose between units for the International Telecommunications Union (ITU) and the European Broadcast Union (EBU).
Overall Audio Units. This sets the loudness units to be displayed on the radar. Choose between units for the International Telecommunications Union (ITU) and the European Broadcast Union (EBU).
![]() Loudness Standard. This sets the loudness standard. Choose between BS.1770-3 and the Leq(K) loudness standard.
Loudness Standard. This sets the loudness standard. Choose between BS.1770-3 and the Leq(K) loudness standard.
![]() Peak Indicator. This sets the value at which the peak indicator will be activated. The red peak indicator lights up if you exceed the indicated level.
Peak Indicator. This sets the value at which the peak indicator will be activated. The red peak indicator lights up if you exceed the indicated level.
![]() Tip
Tip
You can also apply the Loudness Radar effect to individual tracks in the Audio Track Mixer. This is useful when you want to monitor the levels of music on one track and dialogue on another to ensure that the music is quieter than the dialogue.
The Loudness Radar applied to just one clip isn’t that useful when you have multiple audio clips and multiple audio tracks.
This effect is best used in the master audio track. You can either nest your Timeline into a new sequence or add the effect directly to the master track in the Audio Track Mixer.
Loudness Radar practice
To better understand the Loudness Radar effect, follow these steps.
1. Open the project Chapter04_Audio.prproj, and then open the sequence named Loudness Radar.
2. In the Audio Track Mixer, open the Fx Editor for the Loudness Radar applied to the master track.
3. Mark In and Out points, and then click the “Loop playback” icon. This will place your playback in a repeat mode that will only stop when you manually pause the playback.
4. Start playing your Timeline.
5. As it plays, note how the effect works by changing the levels of the track (not the master), and notice how the radar display changes.
6. Increase levels so you can see the peak warning.
DeHummer
A DeHummer is an effect that will help you get rid of an unwanted frequency that is usually caused by power lines from lights and electronics. I’m sure you have heard a loud hum that seems to come from everywhere and almost totally ruins the good audio you want to retain. Hum in your audio is never good, and quite frankly, should have been caught during the recording process. However, sometimes you don’t have a say in which audio you get and who recorded it, so you might end up with audio with hum (Figure 4.33).

Figure 4.33 The DeHummer helps remove unwanted specific frequencies from the audio—more specifically 50Hz and 60Hz hum.
![]() Close-Up: Avoid Hum While Recording
Close-Up: Avoid Hum While Recording
![]() Power your camera with a battery instead of an AC adapter.
Power your camera with a battery instead of an AC adapter.
![]() Place your audio and video cables at least one foot apart, or (if you can) at right angles to each other.
Place your audio and video cables at least one foot apart, or (if you can) at right angles to each other.
![]() Use balanced audio cables.
Use balanced audio cables.
![]() Shut off fluorescent lights that can sometimes cause hum.
Shut off fluorescent lights that can sometimes cause hum.
More often than not, audio hum comes from improperly electrically grounded audio equipment or induction (audio lines next to power lines). The frequency of your ground hum will match your electrical power—60Hz in North America and 50Hz in Europe.
To use the DeHummer effect, follow these steps.
1. Add the DeHummer effect to the affected clip in your Timeline.
2. In the Effect Controls panel locate the DeHummer effect, and click Edit to launch the Clip Fx Editor for the DeHummer effect.
3. Select one of the available presets, which is a good place to start.
4. Adjust the following parameters until the hum is gone:
![]() Frequency. Specifies the frequency you target.
Frequency. Specifies the frequency you target.
![]() Q. Specifies the width of the frequency band. A frequency band is a small section of the spectrum of frequencies.
Q. Specifies the width of the frequency band. A frequency band is a small section of the spectrum of frequencies.
![]() Gain. Specifies the amount by which to decrease the band.
Gain. Specifies the amount by which to decrease the band.
![]() Number of Harmonics. Adjust this value to determine the number of harmonic frequencies to filter. In addition to the common 50Hz and 60Hz electrical hum, you can also experience hum at the multiples of the base frequency (100, 200, 400 or 120, 240, 480Hz, etc.).
Number of Harmonics. Adjust this value to determine the number of harmonic frequencies to filter. In addition to the common 50Hz and 60Hz electrical hum, you can also experience hum at the multiples of the base frequency (100, 200, 400 or 120, 240, 480Hz, etc.).
For example, if you choose 60Hz as the Frequency value and choose 4# as the Filter value, the DeHummer filters the 60Hz frequency along with three harmonic frequencies (120Hz, 240Hz, and 480Hz). A total of four frequencies are filtered, hence the value of 4#.
5. Preview changes to your audio, select the Output Hum Only check box, and resume playback. If you hear too much of your good audio, adjust your settings.
![]() Tip
Tip
The frequency of hum isn’t exactly at 50Hz or 60Hz because electrical frequency can vary. Adjust the base frequency +/- 5Hz to see if that makes a difference. The more precise your base frequency and the smaller your Q value, the less damage you do to the good audio. Use only the necessary number of harmonics.
DeHummer practice
To better understand how the DeHummer works, follow these steps.
1. Open the project Chapter04_Audio.prproj, and then open the sequence named Hum.
2. In the Audio Track Mixer, open the Fx Editor for the DeHummer applied to the master track.
3. Mark In and Out points, click the “Loop playback” icon, and start playing your Timeline.
4. As it plays, alter the values of the effect (not the master), and note the changes. To hear it work, choose the preset “Remove 60Hz and Harmonics.”
![]() Tip
Tip
To better pinpoint your base hum frequency, find a spot in your clip where there is no good audio and mark In and Out points. Loop this playback. Add the DeHummer effect and change the settings to a narrow notch (Q). Raise the gain as far as it goes and gradually change the frequency value. Once it gets awful, you have identified the base frequency to eliminate. Change the harmonics to a number that will work with your clip and then lower the gain, fixing the hum.
DeEsser
A DeEsser is an effect used to reduce the amount of sibilance (“sss”) in a clip. Some recordings can sound as though someone is scraping fingernails on a blackboard (Figure 4.34). This is the undesirable effect that a huge sibilance sound has on me. Sibilance is a short burst of high frequency sound where the “esses” are emphasized. In some voices the “esses” are very prominent. This is usually caused by a combination of voice quality, pattern of speech, and poor microphone placement.

Most DeEssers have two main controls: Threshold and Frequency, which are used to compress only a very narrow band of frequencies—anywhere between 3K and 10K to eliminate sibilance. Sibilance usually exists somewhere between 4Khz to 10Khz depending on the voice and the recording.
Apply the DeEsser to your clip and use one of the handy presets. If the preset is not quite right, you can adjust some of its settings. However, if you don’t want to use a preset, raise the Threshold control until the sibilance is gone but you can still hear the esses. Next, adjust the Frequency range until you find the exact setting that will fix the issue. Then go back to the Threshold again and adjust it until it sounds natural.
1. Open the project Chapter04_Audio.prproj, and then open the sequence named DeEsser.
2. In the Audio Track Mixer, open the Fx Editor for the DeEsser applied to the master track.
3. Mark In and Out points, and click the “Loop playback” icon.
4. Start playing your Timeline, and as it plays, experiment with the values of the effect (not the master) and note the changes.
5. Bypass the effect so you can get a clear idea of the before and after sound.
![]() Tip
Tip
You can use a DeEsser for more than just voice. You can control some of the frequencies produced by cymbals and snares, and even guitars!
Reverb
A reverb effect is a room simulator; it imitates the characteristics of a place and adds the necessary changes to the audio to give the audience the illusion that the sound is coming from a room of a particular size and acoustical properties (Figure 4.35).
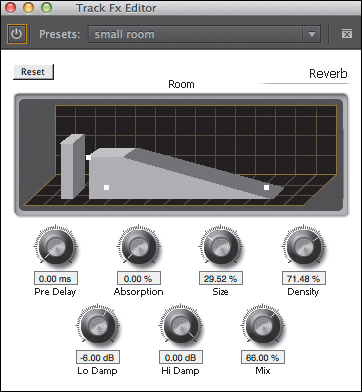
Arguably, reverb is one of the most commonly used effects. Actually, it is one of the most commonly misused effects. Therefore, you should use reverb to affect the acoustical continuity of your program—in other words, to put different sources of audio in the same room.
To use reverb in a clip, follow these steps.
1. Add the Reverb effect to the clip (available for 5.1, stereo, or mono clips).
2. Open the Fx Editor.
3. Choose the presets that will most closely resemble the environment you want to duplicate:
![]() Pre Delay. Specifies how long the sound will take to go from the originator of the sound to the virtual reflecting wall and back to the origin again.
Pre Delay. Specifies how long the sound will take to go from the originator of the sound to the virtual reflecting wall and back to the origin again.
![]() Absorption. Specifies how much of the sound will be absorbed by the material in the room.
Absorption. Specifies how much of the sound will be absorbed by the material in the room.
![]() Size. Specifies the size of the room (as a percentage).
Size. Specifies the size of the room (as a percentage).
![]() Density. Specifies the number of reflections in an ambient space and is related to the size. High-density values create rich-sounding reverbs.
Density. Specifies the number of reflections in an ambient space and is related to the size. High-density values create rich-sounding reverbs.
![]() Lo Damp. Specifies the amount of attenuation for low frequencies to preserve clarity.
Lo Damp. Specifies the amount of attenuation for low frequencies to preserve clarity.
![]() Hi Damp. Specifies the amount of dampening of high frequencies.
Hi Damp. Specifies the amount of dampening of high frequencies.
![]() Mix. Controls the amount of reverb.
Mix. Controls the amount of reverb.
Reverb practice
To better understand how the Reverb effect works, follow these steps.
1. Open the project Chapter04_Audio.prproj, and then open the sequence named Reverb.
2. In the Audio Track Mixer, open the Fx Editor for the Reverb applied to the VO track.
3. Play your Timeline, and as it plays, bypass the effect so you can get a clear idea of the before and after sound.
4. Experiment with the presets and the settings to start training your ears to hear what reverb does for your audio.
Adobe Audition
Adobe Premiere Pro CC is powerful in that it can mix, adjust, and even clean up your audio, but it can’t replace a professional, audio, postproduction, digital audio workstation (DAW) like Adobe Audition (Figure 4.36). Sometimes you’ll need to mix and fix your audio in a professional audio environment. I’ll demonstrate two of my favorite solutions in Adobe Audition: removing noise and fixing clipped audio.

Figure 4.36 Adobe Audition CC will help you process audio clips that are beyond Adobe Premiere Pro’s capabilities.
Removing Noise
Noise doesn’t always fit in a tidy frequency range notch, and it can be quicker, more effective, and much easier to fix your audio noise problem in Adobe Audition by using its effective, two-step, noise removal tool.
The process is to send a clip to Adobe Audition, select an area of the noise alone (without foreground audio) for Adobe Audition to “memorize,” and then select the entire clip to help it eliminate noise from the clip. What happens during this process is that Adobe Audition will generate the necessary signal to eliminate the noise and only the noise. To accomplish this task, follow these steps.
1. Right-click on the clip you want to send to Adobe Audition, and choose Edit Clip in Adobe Audition (Figure 4.37). This command renders your clip and replaces your audio with a dynamically linked audio clip, and launches Adobe Audition with this clip open. Adobe Premiere Pro will not send the original audio to Adobe Audition in order to preserve the original audio untouched, because any changes you make in Audition will permanently change this audio clip.

2. Using the Audition Time Select tool (T), select a portion of the waveform that contains the noise but no dialogue.
3. Right-click on the selected area, and choose Capture Noise Print (Figure 4.38). Alternatively, you can press Shift+P. Then deselect your selection on the audio waveform so that the next step will apply to the entire waveform, not just the sample audio selection.

![]() Tip
Tip
Be sure to leave the Effect Power State on (green) and the Output Noise Only option off before you apply a change, or you’ll either apply no changes or output the noise only.
4. In the Effects menu, choose Noise Removal/Restoration, and then select Noise Reduction (process) (Figure 4.39) to launch the Noise Reduction Effect panel. You can also access this panel by pressing Command+Shift+P (Ctrl+Shift+P).
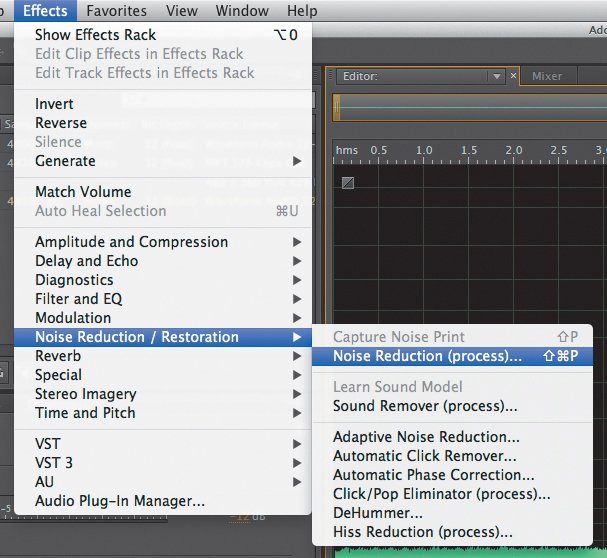
Figure 4.39 The Noise Reduction process in Adobe Audition is effective and easy to use. The best part is that you can send a copy of your audio clip directly to Adobe Audition from within Adobe Premiere Pro.
5. Play your clip by clicking the play icon. Toggle the Effect Power State on and off as well as the Output Noise Only option while playing back the clip to further refine the noise reduction settings.
6. Click the Apply button. Adobe Audition likely does a pretty good job of removing the unwanted noise floor automatically, but you can make further adjustments by using a noise gate or an EQ.
7. Save your changes by pressing Command+S (Ctrl+S), and return to Adobe Premiere Pro. Your audio file will update with the fixed audio.
Using Adobe Audition to remove background noise
To get a better understanding of how the noise removal process in Adobe Audition works, follow these steps.
1. Open the project Chapter04_Audio.prproj, and then open the sequence named Audition Noise.
2. On the Timeline, right-click the clip and choose Edit Clip in Adobe Audition.
3. Once in Audition, select a part of the clip that contains only the background noise and nothing else (click and drag to select). You can even zoom in if you desire (press +). This selects the background noise for that clip.
4. Choose Effects > Noise Reduction / Restoration > Capture Noise Print (or press Shift+P).
5. Click OK in the dialog that opens
6. Click anywhere in the wave to deselect.
7. Apply the effect by choosing Effects > Noise Reduction / Restoration > Noise Reduction (process).
8. When the panel opens, play the clip and move the sliders until the room noise disappears. I used the values of 92% for Noise Reduction and Reduce by 46dB.
9. While the clip plays, bypass the effect so you can get a good idea of the before and after (toggle the effect off and on again) sound.
10. When you’re happy with the settings, click Apply and save your clip.
11. Go back to Adobe Premiere Pro; your clip is waiting for you there!
![]() Tip
Tip
This noise removal process is amazing but it relies on there being a difference between the “room noise” and the sound you’re trying to keep in.
A conversation in front of an air conditioner? Fixable. In front of a coffeehouse where other people are talking? Probably the noise reduction won’t work.
Fix Clipped Audio
As mentioned earlier, it’s best to record your audio properly to begin with than have to fix it in postproduction. However, sometimes you have no choice but to work with what you have. If you do need to fix a clip that is clipped, you can fix it somewhat using Adobe Audition CC.
1. Right-click the clip you want to send to Adobe Audition, and choose Edit Clip in Adobe Audition. This command renders and replaces your audio with a dynamically linked audio clip, and launches Adobe Audition with this clip open.
![]() Notes
Notes
Disclaimer: Some clipped clips are unusable. Audition won’t be able to fix them.
2. In Audition, choose Window > Amplitude Statistics (Figure 4.40).

Figure 4.40 The Amplitude Statistics panel in Adobe Audition calculates statistics from an entire file or selection.
3. Click the Scan button, and look at the Possibly Clipped Samples property to get a good idea of how much clipping is in your clip. Using this value will let you set the correct preset when using the effect. (You will be able to determine if the clip is heavily or lightly clipped.)
4. Choose Effects > Diagnostics > DeClipper (process) to open a new panel (Figure 4.41 on the next page).

5. Choose the preset that best represents the amount of clipping in the clip. Experiment with different presets if you’re not sure.
6. Click the Scan button.
7. Click Repair All.
8. Save your changes by pressing Command+S (Ctrl+S), and return to Adobe Premiere Pro. Your dynamically linked audio file will update with the fixed audio.
Using Adobe Audition to restore clipped audio
To get a better understanding of how to restore clipped audio, follow these steps.
1. Open the project Chapter04_Audio.prproj, and then open the sequence named Audition DeClipper.
2. On the Timeline, right-click the clip and choose Edit Clip in Adobe Audition.
3. In Audition, choose Window > Amplitude Statistics to display the statistics and determine how much clipping is in the audio. This panel is for diagnostics only.
4. Click the Scan button.
5. Choose Effects > Diagnostics > DeClipper (process).
6. When the panel opens, choose Restore Heavily Clipped and click the Scan button to identify which parts of the clips need to be fixed. A list of the problem areas appears at the bottom of the panel.
7. Click Repair All and the effect will start working.
8. Look at the waveforms when it is done. Much better, right?
9. Experiment with the settings; repeat the process over and over to get a good idea of how the effect works and what the settings do (you can use undo to reverse your changes).
10. When you’re happy with the settings, save your clip and return to Adobe Premiere Pro.