Chapter 2. Setup and Organizing

Organizing is what you do before you do something, so that when you do it, it is not all mixed up.
—A. A. Milne
A recipe for disaster is setting out to scale a mountain, but instead packing for a trip to the beach. The one question you have to be able to answer is: Do you know where you’re going?
Regardless of what other people might tell you, editorial endeavors are nearly always hard work—scaling a mountain. Although there are some types of projects that have a quick turnaround (such as news-based projects), knowing the point at which you’re starting and “packing” correctly ensures the least amount of difficulty in the editorial process.
There’s no footage for this chapter; it’s far too custom to your specific work. Instead I’ll cover some of the big (and little) mistakes I see other editors make, as well as cover some key techniques to speed your workflow.
You’ve been using Adobe Premiere Pro for some time (after all, I know you’re not a novice). Let’s tweak some of the preferences to create a system that works better than it does now. Then, let’s deal with setting up projects and media.
In addition, we’ll focus on importing and organizing footage.
Optimized Setup
All default software preferences and layouts for any tool you ever use are ideal for a novice user. But you are not a novice user! And there are some great tweaks to improve the way Adobe Premiere Pro should be running.
Preferences
Adobe Premiere Pro has a variety of preference categories, many of which you never need touch. But when looking through the categories, there were some absolute areas that every author of this book agreed they wanted to adjust.
I won’t necessarily cover every choice or every category, but rather discuss those that are most often adjusted from the defaults. The following Preference sections aren’t in order, and the media and cache files get their own section because configuring these right is so important!
![]() Tip
Tip
Adobe Premiere Pro doesn’t have a keyboard command to open the Preferences; because some of them do get changed regularly, it’s smart to map them to a key such as Command+comma (Ctrl+comma).
General
The General preferences (Figure 2.1) tend to be the ones you might change more frequently than any of the other categories, so it’s best to learn the shortcut key to access the General category, which is Command+comma (Ctrl+comma). Many of these options will be changed for different projects:

Figure 2.1 The Preferences General category has the most settings that a more experienced editor needs to change.
![]() At Startup. Most likely you should change this option to Open Most Recent because you’ll probably continue to work on today’s project tomorrow. One situation where you should leave this at the default is in a multiple user environment. Then each user can switch to the project they’re working on.
At Startup. Most likely you should change this option to Open Most Recent because you’ll probably continue to work on today’s project tomorrow. One situation where you should leave this at the default is in a multiple user environment. Then each user can switch to the project they’re working on.
![]() Video and Audio Transition. Frankly, the durations of the defaults are too long. Nowadays, 12–15 frames (half a second or less) are a bit better to use.
Video and Audio Transition. Frankly, the durations of the defaults are too long. Nowadays, 12–15 frames (half a second or less) are a bit better to use.
![]() Still Image Default. Approximately 5 seconds is a good starting place, but this option often gets changed in projects based on need, for example, a series of stills cut to a musical beat. Figure out the beat length in frames and reimport your stills.
Still Image Default. Approximately 5 seconds is a good starting place, but this option often gets changed in projects based on need, for example, a series of stills cut to a musical beat. Figure out the beat length in frames and reimport your stills.
![]() Tip
Tip
When adding multiple audio transitions to smooth speech coming from/to silence, change the default transition value to a very small number–close to one tenth of a second (.1).
![]() Timeline Playback. Auto-scrolling, especially during client review sessions is a super easy way to keep the playhead in the middle of the Timeline. The sequence scrolls by the playhead the way that film editorial works. The only drawback is that with this option on, any placement of the playhead away from the center causes a “jump” as the playhead jumps back to the center of the screen.
Timeline Playback. Auto-scrolling, especially during client review sessions is a super easy way to keep the playhead in the middle of the Timeline. The sequence scrolls by the playhead the way that film editorial works. The only drawback is that with this option on, any placement of the playhead away from the center causes a “jump” as the playhead jumps back to the center of the screen.
![]() Set focus on the Timeline. If you’re a keyboard driven editor, particularly for three-point editing (see Chapter 3), you’ll likely want the Timeline active, not the source, after you make an edit.
Set focus on the Timeline. If you’re a keyboard driven editor, particularly for three-point editing (see Chapter 3), you’ll likely want the Timeline active, not the source, after you make an edit.
![]() Tip
Tip
You can turn on/off the S for snapping even while dragging an element.
![]() Snap playhead in Timeline. Although I navigate mostly by using the up and down arrow keys, turning on this option means the playhead jumps right to an edit. Toggling Snap is as easy as pressing S.
Snap playhead in Timeline. Although I navigate mostly by using the up and down arrow keys, turning on this option means the playhead jumps right to an edit. Toggling Snap is as easy as pressing S.
![]() Display out of sync indicators for unlinked clips. I almost never recommend unlinking clips. When you do, the default in Adobe Premiere Pro is to treat them as totally separate elements. Even when I do that I prefer this option to be on to make sure I visually see if those elements are out of sync.
Display out of sync indicators for unlinked clips. I almost never recommend unlinking clips. When you do, the default in Adobe Premiere Pro is to treat them as totally separate elements. Even when I do that I prefer this option to be on to make sure I visually see if those elements are out of sync.
![]() Tip
Tip
When editing, I never, ever turn off linked selections nor unlink clips. Doing this is nearly always a recipe for disaster because it becomes far too easy to break sync. Instead, press the Option (Alt) key to temporarily select just the video or audio of a clip.
![]() Default scale to frame size. This option is one of the most misunderstood preferences in Adobe Premiere Pro. Its purpose is to scale a clip or a still to match the image size of a sequence using a faster math to reduce the load on your system and in turn limiting the quality of zooming in beyond 100%.
Default scale to frame size. This option is one of the most misunderstood preferences in Adobe Premiere Pro. Its purpose is to scale a clip or a still to match the image size of a sequence using a faster math to reduce the load on your system and in turn limiting the quality of zooming in beyond 100%.
![]() Bins. Change Double-click to Open in New Tab. You’ve probably done this a hundred times: double-clicked on a bin and had a floating window, and then clicked and the window was behind the main interface. Nobody needs a floating window unless you’re going to tile loads of bins on a second display. Why should you hold down a modifier key when you can just set it to behave the way you need?
Bins. Change Double-click to Open in New Tab. You’ve probably done this a hundred times: double-clicked on a bin and had a floating window, and then clicked and the window was behind the main interface. Nobody needs a floating window unless you’re going to tile loads of bins on a second display. Why should you hold down a modifier key when you can just set it to behave the way you need?
![]() Close-Up: Smarter Workflows via Default Scale to Frame Size
Close-Up: Smarter Workflows via Default Scale to Frame Size
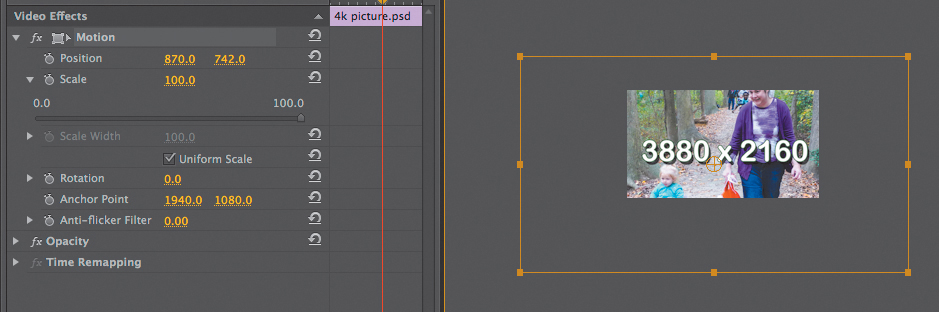
Figure 2.2 This image has access to its full information; when scaled to 100%, it’s 3880x2160. To get the whole image to fit in an HD sequence, you’d have to scale it down.

Figure 2.3 With Dstfs on, the image is downsampled; 100% now represents 100% of the sequence size. If you were to increase the Scale parameter of the clip, it would be blowing up a 1920x1080 element not a 3880x2160 one.
Audio
Not much needs to be changed in Audio preferences, but these two options are worth knowing about:
![]() Play Audio While Scrubbing. You’ll likely either love this option or hate it (I hate it.) So, it’s off for me most of the time.
Play Audio While Scrubbing. You’ll likely either love this option or hate it (I hate it.) So, it’s off for me most of the time.
![]() Automatic peak file generation. Most of us want this switch on unless we’re in a rush. When Adobe Premiere Pro first looks at a clip, it generates a waveform from analyzing the audio peaks (hence, a peak file). But what if you’re regularly working in a high-speed environment with XDCam, which may have eight audio tracks? You’ll need to wait until the peak files are generated. Or you can turn off this option completely. Then the only way to create a peak file is to reimport the file.
Automatic peak file generation. Most of us want this switch on unless we’re in a rush. When Adobe Premiere Pro first looks at a clip, it generates a waveform from analyzing the audio peaks (hence, a peak file). But what if you’re regularly working in a high-speed environment with XDCam, which may have eight audio tracks? You’ll need to wait until the peak files are generated. Or you can turn off this option completely. Then the only way to create a peak file is to reimport the file.
Memory
Adobe Premiere Pro shares its memory (Figure 2.4) with four other applications:
![]() Adobe After Effects
Adobe After Effects
![]() Adobe Prelude
Adobe Prelude
![]() Adobe Media Encoder
Adobe Media Encoder
![]() Adobe Photoshop
Adobe Photoshop

Figure 2.4 The more you use other applications (like browsing or email), the more important it is to protect some of your RAM.
If you constantly work with more of them open, you’ll need more RAM than 2–3 GB per core beyond what Adobe Premiere Pro requires.
It’s very important to occasionally check your available RAM as you work, or the RAM reserved for other applications may not be enough or may be too much, depending on what else you have going on while you work. See the section “Measuring System Performance” in Chapter 1.
If you ever get a Low Memory Warning alert when rendering, set the Optimize Rendering option for Memory.
Playback
A fantastic adjustment exists with the Playback preference for people who have two screens (even laptops can run a second screen!).
Use your second monitor as a playback monitor (Figure 2.5). By doing so, you can greatly reduce the size of the Source and Program Monitors on your main screen; all your video will be displayed on your other screen.

Figure 2.5 If possible, purchase a second monitor that matches or is larger than HD resolutions; you’ll be able to see a 1:1 pixel mapping.
However, keep in mind that this is not a broadcast monitor. Although it’s a bigger, better picture (and fantastic for client review), it’s not a monitor that you should have confidence in its color space.
Sync Settings
With Adobe Creative Cloud’s sync capability it’s trivial to back up your settings. Even if you don’t own Adobe Creative Cloud you can create a free account, and common settings like keyboard and preferences (Figure 2.6) can travel with you from system to system (see “Sync doesn’t rely on ownership of Adobe Creative Cloud” in Chapter 1).
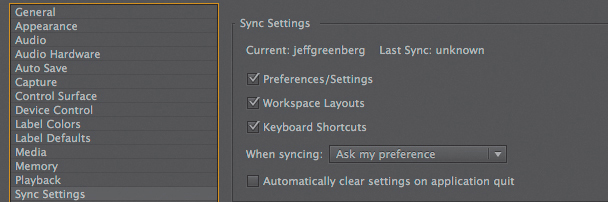
At multiuser facilities two items are important to tweak in Sync Settings:
![]() When syncing. Set this to either Ask my preference or Always download. The big danger is accidentally being logged into someone else’s user, modifying something, and then pushing your changes to their user.
When syncing. Set this to either Ask my preference or Always download. The big danger is accidentally being logged into someone else’s user, modifying something, and then pushing your changes to their user.
![]() Automatically clear settings on application quit. Set this to on if you’re at a multiuser facility. Then everyone is forced to log in at the start of their session, and Adobe Creative Cloud will wipe out any changes except Media Caches on quit.
Automatically clear settings on application quit. Set this to on if you’re at a multiuser facility. Then everyone is forced to log in at the start of their session, and Adobe Creative Cloud will wipe out any changes except Media Caches on quit.
Remember that there’s a dedicated set of Sync menu choices for further refinement. If you’re not signed in to Adobe Creative Cloud, this preference will display in the dialog as Sync Settings; if you are signed in, your email ID will appear (on OS X choose Premiere Pro Menu > Sync Settings; on Windows choose File > Sync Settings).
Trim
Frankly, many editors struggle with trimming. Chapter 3 explains some of the editorial side of trimming.
But as far as the configuration for trimming, quite a bit of trim flexibility is hidden from users to protect them from accidentally trimming when they don’t mean to, because trimming can shorten or lengthen footage, which could throw off sync.
Two Trim preferences have some cool features.
![]() Allow Selection tool to choose Roll and Ripple trims without modifier key. When you approach an edit point, Adobe Premiere Pro will automatically switch between Ripple and Roll trims depending on which side of an edit your mouse is on.
Allow Selection tool to choose Roll and Ripple trims without modifier key. When you approach an edit point, Adobe Premiere Pro will automatically switch between Ripple and Roll trims depending on which side of an edit your mouse is on.
Often, I’ll have this option on because it allows for quick and easy selection of edges of clips, making trims very quick either via dragging or via the keyboard. Just select and trim without switching tools!
![]() Allow current tool to change trim type of previously selected edit point. This allows a single modifier key (Command [Ctrl]) to switch between the single Red Trim to the single Yellow Trim. Normally, you’d have to deselect the trim and then reselect with the modifier key.
Allow current tool to change trim type of previously selected edit point. This allows a single modifier key (Command [Ctrl]) to switch between the single Red Trim to the single Yellow Trim. Normally, you’d have to deselect the trim and then reselect with the modifier key.
Having both of these options on together means you can easily get to an edit point and switch between the various types of trims without a modifier key.
An assembly edit is the first “build” of your Timeline, even before a rough cut. Usually, every clip is a little too long and needs to be adjusted. Having these options on makes it easy to have the type of trim tool you’d like for quick drag-and-drop Timeline trimming.
Everything else
The following Preferences settings are also important to consider. Often, there will be reasons to tweak or adjust some:
![]() Appearance. The only selection in this category is how bright or dark you want your interface. I like it a little brighter than the standard gray. Far more important is that if you change each Adobe Creative Cloud tool to be a different gray, you’ll never visually wonder which tool you’re in!
Appearance. The only selection in this category is how bright or dark you want your interface. I like it a little brighter than the standard gray. Far more important is that if you change each Adobe Creative Cloud tool to be a different gray, you’ll never visually wonder which tool you’re in!
![]() Auto Save. Change the max to a higher number. But be aware that Adobe Premiere Pro will auto save any time there are unsaved changes, meaning you haven’t saved and the application is running in the background. Every 15 minutes your unsaved project will be auto saved again. Therefore, if you’re not editing, save and quit.
Auto Save. Change the max to a higher number. But be aware that Adobe Premiere Pro will auto save any time there are unsaved changes, meaning you haven’t saved and the application is running in the background. Every 15 minutes your unsaved project will be auto saved again. Therefore, if you’re not editing, save and quit.
![]() Label Colors. This may sound nitpicky, but instinctively, I don’t know the difference between Cerulean, Iris, and Violet. Renaming the colors to what your brain calls them makes far more sense.
Label Colors. This may sound nitpicky, but instinctively, I don’t know the difference between Cerulean, Iris, and Violet. Renaming the colors to what your brain calls them makes far more sense.
Common Cache Files
Most of the Adobe Creative Cloud video applications utilize some cache files. Many of them overlap with the other applications, using a common cache, mostly for conforming footage. Because Adobe Premiere Pro is our hub, I’ll talk about configuring them for optimum efficiency here (Figure 2.7). In the section “Suite Relations” later in this chapter is a specific setup for the other most commonly used Adobe tools.

Figure 2.7 The key is to put these caches in a folder on a fast drive. The internal drive is better than the fastest USB 2 drive.
For general understanding, cache files are both critical and unimportant. They are critical in that formats like h.264 or formats with compressed audio need a cache file to perform optimally. They are unimportant in that these files can be regenerated if needed.
Several considerations are worth taking into account when it comes to cache files:
![]() You want them on fast drives. The whole concept of a cache file is that it’s a quick reference rather than handling the original media (or having to do a complex computation in real time).
You want them on fast drives. The whole concept of a cache file is that it’s a quick reference rather than handling the original media (or having to do a complex computation in real time).
![]() You should discard (delete) the cache files semi-frequently, such as monthly or quarterly. These folders will only grow larger over time.
You should discard (delete) the cache files semi-frequently, such as monthly or quarterly. These folders will only grow larger over time.
![]() The Clean option with the cache files removes only the caches for those files that aren’t online. If you use multiple media drives and forget to mount one, Clean will destroy cache files that you probably want to keep.
The Clean option with the cache files removes only the caches for those files that aren’t online. If you use multiple media drives and forget to mount one, Clean will destroy cache files that you probably want to keep.
![]() Although there’s a selection for storing the cache files with the media (based on the idea that you’d have greater flexibility if you move media drives from one station to another), it’s advisable not to do this. Corruption still seems to occur a little too frequently.
Although there’s a selection for storing the cache files with the media (based on the idea that you’d have greater flexibility if you move media drives from one station to another), it’s advisable not to do this. Corruption still seems to occur a little too frequently.
![]() If you need to move the caches, do so from within Adobe Premiere Pro. When you choose a new location, you’ll see the option to move the existing caches.
If you need to move the caches, do so from within Adobe Premiere Pro. When you choose a new location, you’ll see the option to move the existing caches.
You can adjust two types of Caches folders in Adobe Premiere Pro: the Media Cache folder and the Media Cache Database folder.
Create an _Adobe Caches folder
In a perfect world you’ll use your fast media drives (a RAID-5 or and SSD dedicated for caches) and create a folder called _Adobe Caches. Then target both the Media Cache folder and the Media Cache Database folder in the preferences to this folder. Doing so will keep your caches in a known place and easily accessible (Figure 2.8). The default location of your documents folder is necessary to install the software, but it’s not a good place for these files unless you have loads of room on your boot drive and it’s the fastest drive on your system.
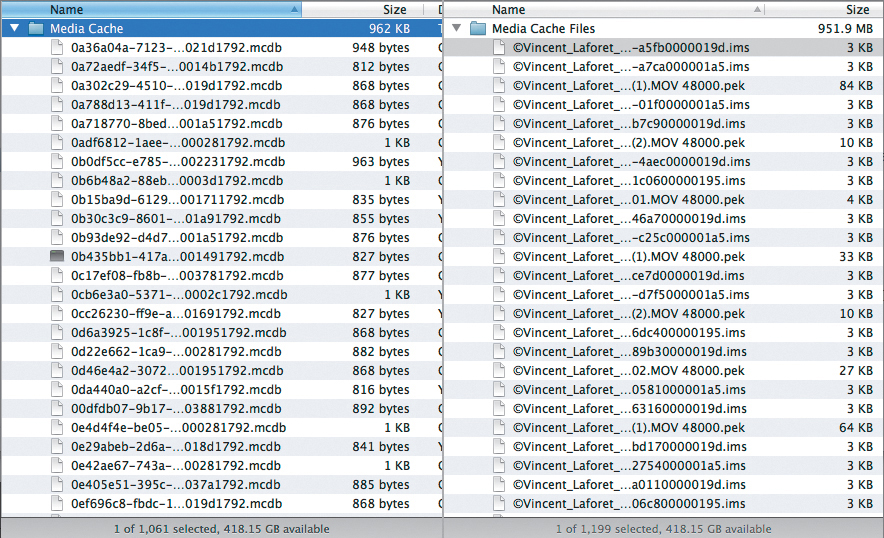
Figure 2.8 Here is just a small sampling of my Cache directories. It’s easy to store over 5,000 files in them.
Media Cache files folder
Adobe Premiere Pro automatically creates a folder called Media Cache. This folder contains a series of caches with strange extensions. Here’s a decoder ring for most of these files:
![]() .cfa – Conformed Audio. All these compressed formats have compressed audio, and Adobe Premiere Pro builds an uncompressed version for them.
.cfa – Conformed Audio. All these compressed formats have compressed audio, and Adobe Premiere Pro builds an uncompressed version for them.
![]() .pek – PEaK files. These PEaK files are a picture of the peaks that are turned into waveforms.
.pek – PEaK files. These PEaK files are a picture of the peaks that are turned into waveforms.
![]() .ims – Importer State files. These files refer to the status of an imported file.
.ims – Importer State files. These files refer to the status of an imported file.
![]() .mxfassoc - MXF associations. Some flavors of MXF have media attached; some don’t. This cache keeps track of the associations.
.mxfassoc - MXF associations. Some flavors of MXF have media attached; some don’t. This cache keeps track of the associations.
![]() .prmdc – Premiere Metadata Database Cache. This is a cache for the database.
.prmdc – Premiere Metadata Database Cache. This is a cache for the database.
![]() .mpegindex – MPEG Index Files. Some types of MPEG files require their own index.
.mpegindex – MPEG Index Files. Some types of MPEG files require their own index.
Media Cache Database folder
Adobe Premiere Pro automatically creates a second folder called Media Cache Database that contains the databases for the Media Cache files. This folder is considerably smaller because it contains the database “pointers” to the actual cache files.
The extensions translate to the following:
![]() .mcdb – Media Accelerator Database. These Media Common Database files are the heart of the database.
.mcdb – Media Accelerator Database. These Media Common Database files are the heart of the database.
![]() .prmdc – Premiere Metadata Database Cache. This is a cache for the database.
.prmdc – Premiere Metadata Database Cache. This is a cache for the database.
Interface Nuances
Although setting up quite a bit of the interface can and should be up to you, there are several adjustments to the interface that nearly every editor does to make life a little bit saner.
Dropped Frame Indicator
The Drop Frame indicator is the first setting I turn on in a brand-new install of Adobe Premiere Pro. It’s just too vital to have off.
The Drop Frame indicator (Figure 2.9) shows you if you’ve dropped frames (turns yellow) and by mousing over the indicator you’ll see how many frames were dropped. It’s the difference between thinking your system dropped frames and knowing that it did. One frame isn’t serious (it’s a system hiccup), but a hundred frames is a different story. The indicator option is located on the Settings menu (wrench) of the Program Monitor.

Figure 2.9 If you’ve dropped frames, the first course of action is to lower your playback resolution in the Program Monitor’s settings menu.
Dropped frames can result from a variety of causes. Some of the reasons for dropped frames are complex effects (even with Mercury acceleration), your drives can’t deliver data fast enough, or your system is overloaded in some other way.
Overlays
The Adobe Premiere Pro release in the last quarter of 2013 had a number of great new features. One of them was the ability to add and customize an Overlay (Figure 2.10) on the Source or Program Monitor.
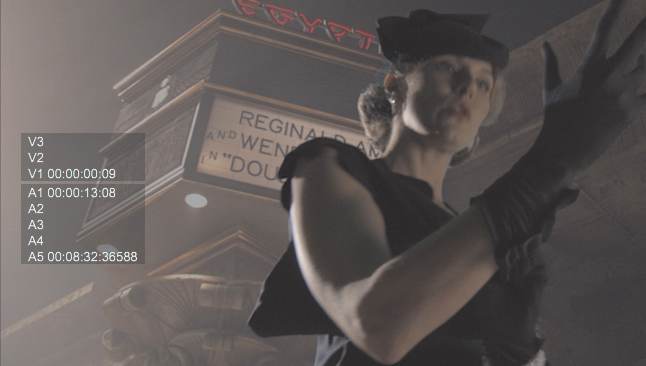
Figure 2.10 Overlays are fantastic ways to add important clip and marker information to the Program and Source Monitors. The yellow “L” in the lower-left corner tells you that the playhead is at the start of a clip.
Information such as timecode, clip names, markers, and even edit point indicators can be configured and displayed for quick recall. This gives you, the editor, the ability to see this information on top of the playing video. It is fantastic for client reviews, but I often like to have it on all the time.
To turn this feature on or off, just right-click on the Source or Program Monitor (usually the Program Monitor). I’d strongly suggest that you consider mapping it to something like Ctrl+O or some other variant of the letter O. Then you can turn it on or off very quickly.
Overlays may need some minor adjustments. The Overlay Settings are available only from the Settings menu (wrench) or the Panel menu.
![]() Tip
Tip
The Media Limit indicators add a little extra zebra stripe to the Edit Point indicators. These are great visual indicators for absolute edges clips.
Let’s look at two prebuilt configurations and one that might be worth building. It’s worth noting that you can save, import, and export in the top right of the Overlay Settings dialog (Figure 2.11):
![]() Editing Overlay preset. This default preset generally works well. It shows Source timecode on the left and markers along the bottom. I’m not a fan of the source timecode for all the tracks, just the V1 track. You could change that setting or use the V1 Only Overlay, which is a little cleaner. I prefer the font size a little smaller due to how much space this preset takes up.
Editing Overlay preset. This default preset generally works well. It shows Source timecode on the left and markers along the bottom. I’m not a fan of the source timecode for all the tracks, just the V1 track. You could change that setting or use the V1 Only Overlay, which is a little cleaner. I prefer the font size a little smaller due to how much space this preset takes up.
![]() V1 Only Overlay preset. This shows just the V1 information at the top of the screen. I prefer the font for this a little larger than the default.
V1 Only Overlay preset. This shows just the V1 information at the top of the screen. I prefer the font for this a little larger than the default.
![]() Edit Point and Media Limit indicators. I love to add an overlay that has the Edit Point indicators along with the Media Limit indicators. This gives me direct visual feedback that I’m at the head (or tail) of a clip, a feature that’s missing from Adobe Premiere Pro for everyday editing.
Edit Point and Media Limit indicators. I love to add an overlay that has the Edit Point indicators along with the Media Limit indicators. This gives me direct visual feedback that I’m at the head (or tail) of a clip, a feature that’s missing from Adobe Premiere Pro for everyday editing.

Figure 2.11 The Overlay Settings dialog allows you to configure the Overlay information that appears in specific locations on the screen. Adjust the font or opacity in the lower-right corner.
Buttons
A very controversial opinion/technique is to get rid of all the buttons. But I’ll guarantee that it’ll make you a faster editor.
Adobe Premiere Pro has the ability to customize the buttons at the bottom of the Source or Program panels. Originally, I was going to tell you to add the Safe Margins button; instead, I’ll suggest that you get rid of the all the buttons (Figure 2.12) to get a bigger, better-looking picture. You’ll be forced to use the keyboard; the less you move the mouse, the faster you’ll be as an editor (note that I didn’t say better, just faster).
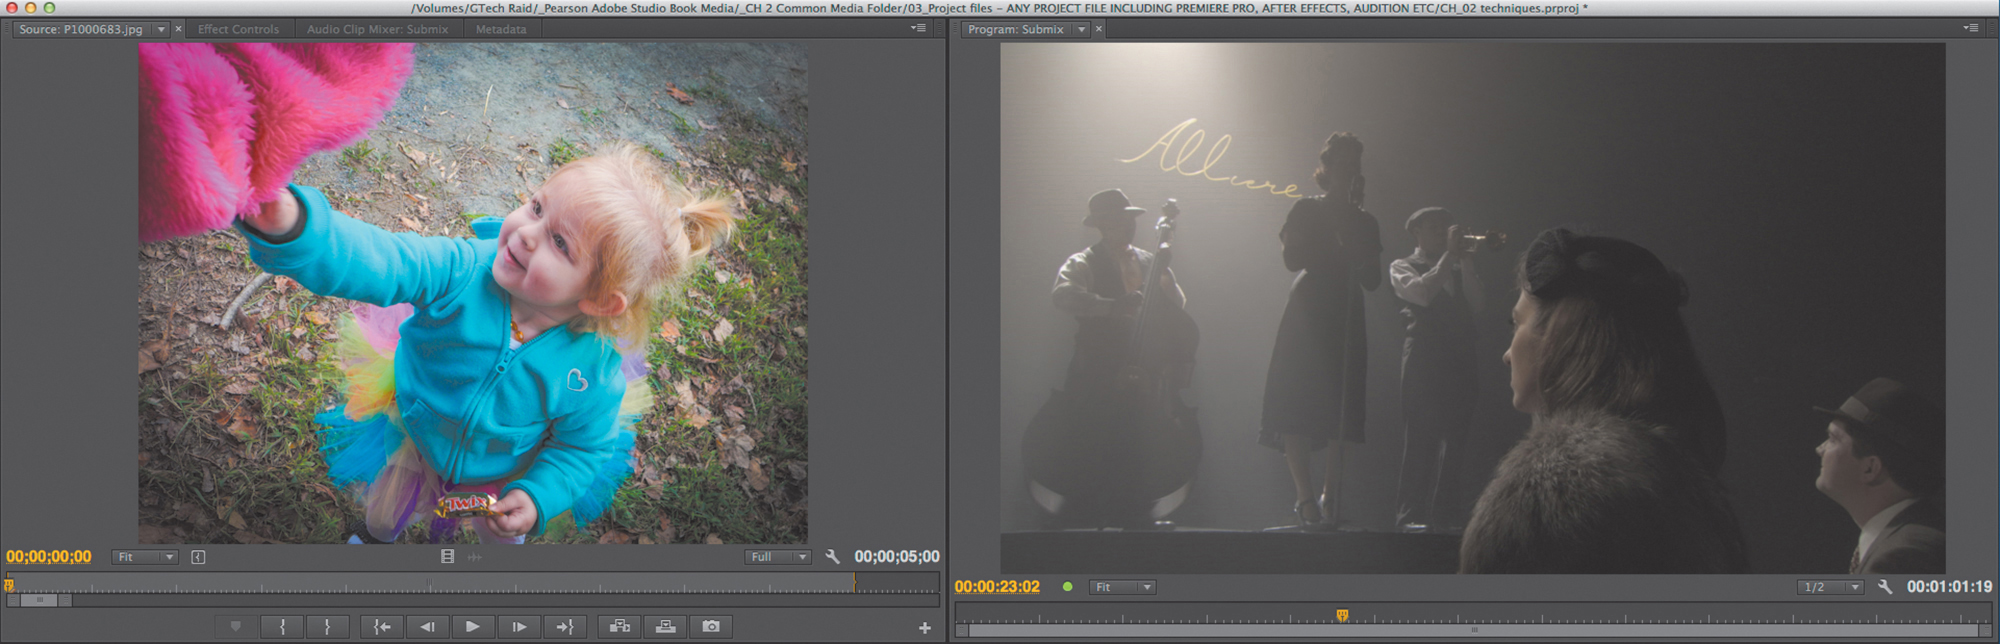
Figure 2.12 Note the different between the Source Monitor and the Program Monitor. The transport controls were removed from the Program Monitor.
If you work one week without the buttons, you’ll never go back.
To eliminate the buttons, go to the settings of either the Source or Program panel and deselect Show Transport Controls. There’s not a single button here you need. All of the important buttons are already accessible via the keyboard. The only one that I really miss (because it needs to be mapped to the keyboard) is Safe Margins.
Workspaces
All too frequently I watch editors open and close panels to adjust the interface. Every time they adjust some audio, they open the Clip or Audio mixer. If they need the list of markers, they open the Marker panel.
Don’t be that editor. Use workspaces.
What makes workspaces so much better than just opening and closing panels is simply that they are already mapped to the keyboard.
The first nine workspaces are mappable, and Adobe Premiere Pro handles them alphabetically. So if you build one of your own, you may need to be crafty with how you name it (either name it alphabetically or add a number prior to the name to force your favorite workspaces to the top of the list).
Even if you live mostly in two to three workspaces (Editing, Audio, Effects), it’s best to map them to the first three workspaces.
How to adjust a workspace
You can drag any panel by its textured tab to any other part of the interface.
When you drag the tab above another panel, you’ll see a trapezoid. Click the center and the panel becomes part of that frame. Click one of the four edges to subdivide the panel.
Workspace suggestions
Many of the other chapters suggest some adjustments of the default Workspace layouts. I usually leave most of the defaults as they are. But I’ll give you a couple of the little changes (Figure 2.13) I like to do to make the interface just a little more editorially friendly:
![]() I often place the meters above the Timeline.
I often place the meters above the Timeline.
![]() I don’t really need the tools (the icon list that includes items such as the Selection tool and the Razor tool). The keyboard choices you absolutely need to own should be in your head. I do have the tools share some of the space taken up by my meters to help me see which tool is currently selected.
I don’t really need the tools (the icon list that includes items such as the Selection tool and the Razor tool). The keyboard choices you absolutely need to own should be in your head. I do have the tools share some of the space taken up by my meters to help me see which tool is currently selected.
![]() If you’re working on two screens, absolutely use each of the default layouts and build a two-screen version of each.
If you’re working on two screens, absolutely use each of the default layouts and build a two-screen version of each.
![]() I generally have two different editorial layouts for two screens: one where the project window takes up the second screen and a different layout where the Timeline takes up the entire second screen.
I generally have two different editorial layouts for two screens: one where the project window takes up the second screen and a different layout where the Timeline takes up the entire second screen.
![]() There’s a great hidden panel called Options that should be called Workspace switcher.
There’s a great hidden panel called Options that should be called Workspace switcher.
![]() I often make the Timecode panel as large as I can get it when I’m with clients. It helps us all see where we are in the edit. Sometimes I’ll split the height of the Project panel or Source panel just to give the Timecode panel some real estate.
I often make the Timecode panel as large as I can get it when I’m with clients. It helps us all see where we are in the edit. Sometimes I’ll split the height of the Project panel or Source panel just to give the Timecode panel some real estate.
![]() I love the Markers panel and often display it during complex edits (when I have named markers). It makes navigation a breeze.
I love the Markers panel and often display it during complex edits (when I have named markers). It makes navigation a breeze.
![]() Currently, you cannot select individual tabs of a panel from the keyboard. But you can select different panels from the keyboard. The default keys—Command+Shift+period (Ctrl+Shift+period) and Command+Shift+comma (Ctrl+Shift+comma)—are super fast. Consider making individual key bins their own panel.
Currently, you cannot select individual tabs of a panel from the keyboard. But you can select different panels from the keyboard. The default keys—Command+Shift+period (Ctrl+Shift+period) and Command+Shift+comma (Ctrl+Shift+comma)—are super fast. Consider making individual key bins their own panel.
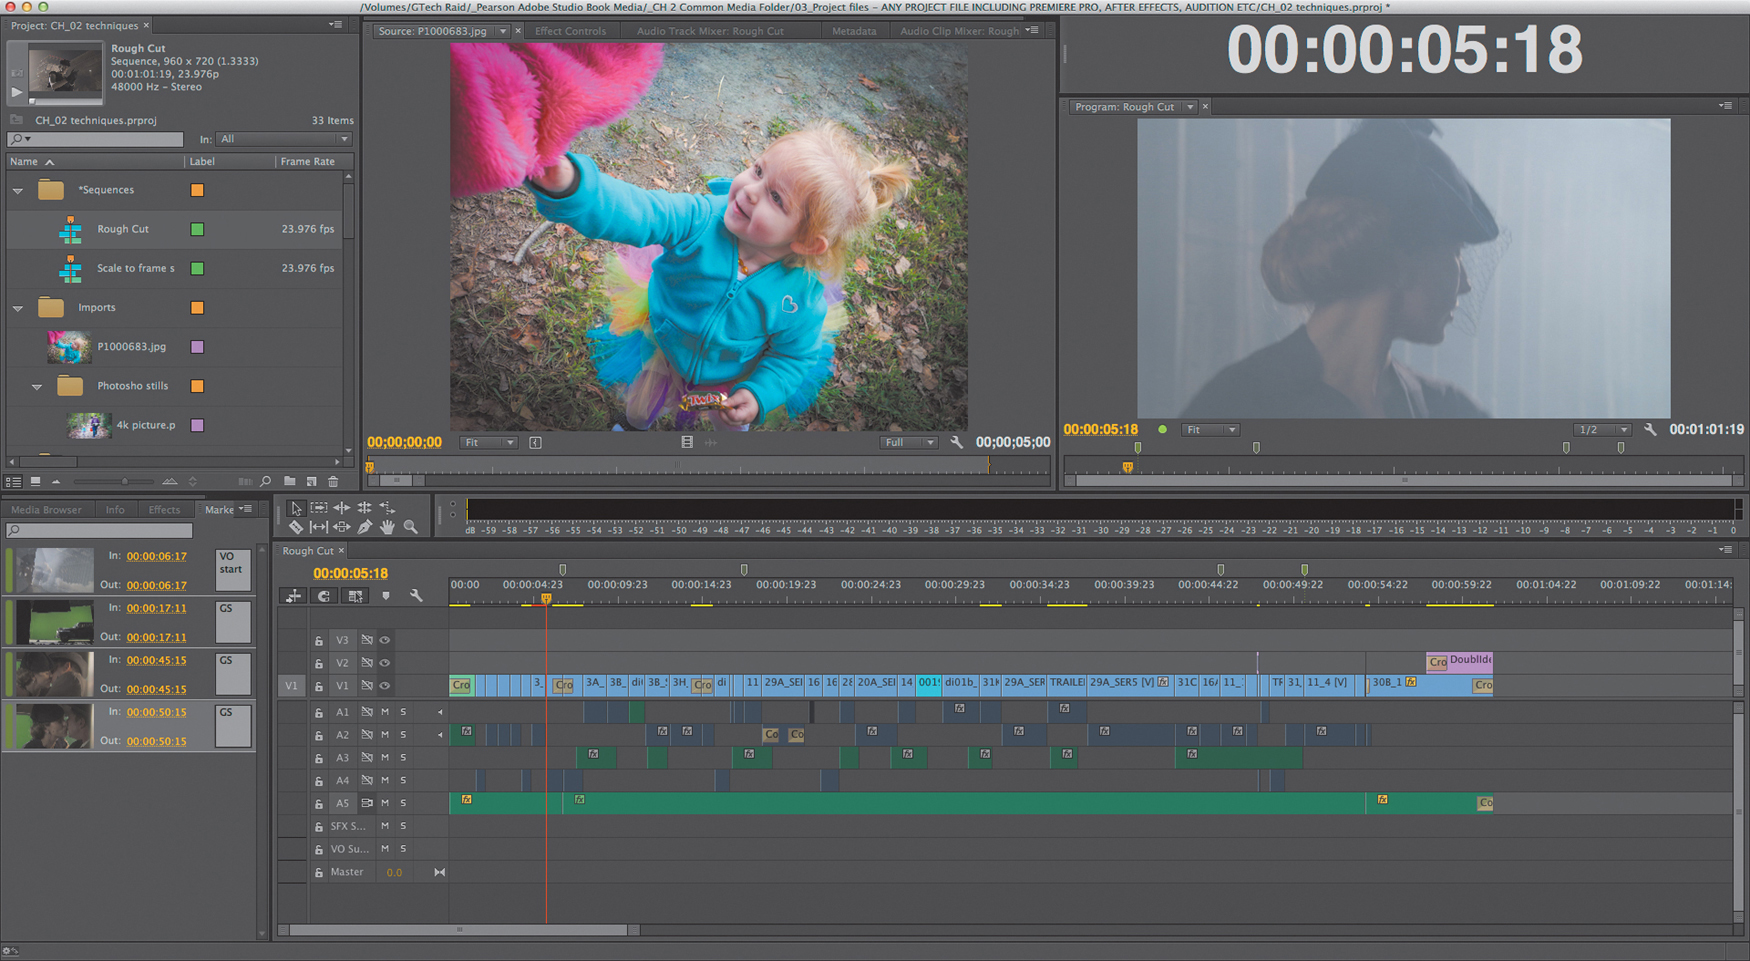
Figure 2.13 This was once the Adobe Premiere Pro Editing 5.5 workspace. The meters were moved over the Timeline, and the tools were docked next to them. The Timecode window is above the Program Monitor so the client can watch on the broadcast monitor. The bottom-left corner was switched to the Marker panel.
Keyboard Mapping
The fastest editors are very keyboard savvy. Keep your left hand on the entire keyboard (yes, you can operate the right side of your keyboard with your left hand) and your right hand on the mouse. Every time you take your hand off the mouse to use the keyboard, you’re wasting time. The keyboard is not for typing; instead, it’s a sophisticated control surface for editorial that allows you to be the fastest editor possible.
![]() Tip
Tip
The most important key to know is the accent (`) key. This key will maximize any panel that the mouse cursor hovers over, making it full screen. It’s such a valuable tip that certain authors will repeat it in their chapters in this book.
Although there are some great default key sets that I’m sure you use, there are numerous adjustments that would permit the keyboard to do more for you. For example, if you rarely edit multicam, the keys 0–9 are available for remapping.
Keyboard remapping is very personal. I’ve seen editors argue about which key belongs where, almost with a religious fervor.
But my one rule is to pick a key that makes sense. I set overlay to Ctrl+Shift+O because the other variations on the letter O are used (such as Shift+O to switch to the Out point).
Feel free to take this idea even further: Map keyboards specialized for different types of work; for example, documentary editing is different from promo editing. Or map a specialized keyboard just for audio mixing.
How to remap the keyboard
I expect that you already know how to remap the keyboard, but just in case, choose Premiere Pro > Keyboard Shortcuts (Mac OS) or Edit > Keyboard Shortcuts (Windows).
There are presaved keyboards for the following:
![]() Adobe Premiere Pro Default. This is the default keyboard. I recommend it over nearly everything else because the software designers tried to optimize the keys based on use.
Adobe Premiere Pro Default. This is the default keyboard. I recommend it over nearly everything else because the software designers tried to optimize the keys based on use.
![]() Adobe Premiere Pro CS6. This is great if you’re coming from the prior version of Adobe Premiere Pro. Some changes have been made compared to the default keyboard.
Adobe Premiere Pro CS6. This is great if you’re coming from the prior version of Adobe Premiere Pro. Some changes have been made compared to the default keyboard.
![]() Avid Media Composer. If you’re an Avid Media Composer user, this is the fastest way to jump into Adobe Premiere Pro. There are some things (like Avid’s Modes) that don’t directly replicate.
Avid Media Composer. If you’re an Avid Media Composer user, this is the fastest way to jump into Adobe Premiere Pro. There are some things (like Avid’s Modes) that don’t directly replicate.
![]() Final Cut Pro 7.0. If you’re an Apple Final Cut Pro 7 (and earlier) user, this keyboard is a close approximation to Final Cut. One of the differences is that Final Cut used multiple key presses; Adobe Premiere Pro does not.
Final Cut Pro 7.0. If you’re an Apple Final Cut Pro 7 (and earlier) user, this keyboard is a close approximation to Final Cut. One of the differences is that Final Cut used multiple key presses; Adobe Premiere Pro does not.
![]() Tip
Tip
Holding down Command+Shift (Ctrl+Shift) when opening the Keyboard Shortcuts yields a clipboard button. You can then copy the keyboard and paste it into your text editor of choice, allowing you to search or print all the keys.
Remapping the keyboard is performed by double-clicking in the field to the right of a command (note the search box at the top). If you pick a key binding that’s already in use, you’ll be able to choose whether to allow it (or not).
Keyboard suggestions
Polled from a number of editors, here are some thoughts about keyboard changes you might want to consider trying:
![]() Set Preferences > General to Command+comma (Ctrl+comma). This mirrors the preferences on the Mac (and a number of Windows apps). Now tasks like adjusting the default transition duration are just a key away.
Set Preferences > General to Command+comma (Ctrl+comma). This mirrors the preferences on the Mac (and a number of Windows apps). Now tasks like adjusting the default transition duration are just a key away.
![]() Try setting the Toggle Source/Program Monitor Focus to Shift+Esc (or Shift+F). It’s a quick and easy way to switch back and forth between the Source and Program Monitors.
Try setting the Toggle Source/Program Monitor Focus to Shift+Esc (or Shift+F). It’s a quick and easy way to switch back and forth between the Source and Program Monitors.
![]() Map the most common panels to Shift+a number if you’re not using multicam. Or remap them to a number of your choice without the Shift key.
Map the most common panels to Shift+a number if you’re not using multicam. Or remap them to a number of your choice without the Shift key.
![]() Deselect All is usually Command+Shift+A (Ctrl+Shift+A). But in Adobe After Effects, it’s F2. If you’re a heavy Adobe After Effects user, it makes way more sense on F2.
Deselect All is usually Command+Shift+A (Ctrl+Shift+A). But in Adobe After Effects, it’s F2. If you’re a heavy Adobe After Effects user, it makes way more sense on F2.
![]() Set the Audio Waveform of the Source panel to Shift+W. This allows you to shift the panel to the Waveform for easy audio selections. Then map the Composite Video of the Source to Shift+Q. Yes, this removes the two extend features, but I prefer them on variants of the letter E, not the keys next to it.
Set the Audio Waveform of the Source panel to Shift+W. This allows you to shift the panel to the Waveform for easy audio selections. Then map the Composite Video of the Source to Shift+Q. Yes, this removes the two extend features, but I prefer them on variants of the letter E, not the keys next to it.
![]() Although the search box at the top of the Keyboard Shortcuts is good, you don’t always know the name of what you’re looking for. Be sure to scroll all the way down to see the possibilities for every panel in Adobe Premiere Pro.
Although the search box at the top of the Keyboard Shortcuts is good, you don’t always know the name of what you’re looking for. Be sure to scroll all the way down to see the possibilities for every panel in Adobe Premiere Pro.
![]() In the Timeline settings are Track Height Presets. It’s possible to map them to the keyboard (a powerful way to assign and switch the heights of tracks). But first you need to go to the Timeline Display Settings (the wrench on the Timeline) and choose Manage Presets. From there you can assign Presets to the ten different keyboard slots.
In the Timeline settings are Track Height Presets. It’s possible to map them to the keyboard (a powerful way to assign and switch the heights of tracks). But first you need to go to the Timeline Display Settings (the wrench on the Timeline) and choose Manage Presets. From there you can assign Presets to the ten different keyboard slots.
![]() Because the Media Browser is the suggested place to import (see the section “Import” later in this chapter), it’s worth swapping the keyboard shortcut for Import and Import from Media Browser. Set the latter to Command+I (Ctrl+I).
Because the Media Browser is the suggested place to import (see the section “Import” later in this chapter), it’s worth swapping the keyboard shortcut for Import and Import from Media Browser. Set the latter to Command+I (Ctrl+I).
Media Setup Outside of Adobe Premiere Pro
The single greatest ongoing battle an editor deals with, that technically has nothing to do with the actual editorial process, is dealing with the volume of media that is created and produced for an editorial project.
Let’s get this out of the way: Adobe Premiere Pro organizes only media it creates—tape-based media and previews. It does nothing for imported elements. This likely means that none of your media is being managed.
The world has shifted to file-based media from cameras. With this shift, the user, that’d be you, should perform some level of media organization.
Although Adobe Prelude can help corral and back up file-based camera media, it’s best to keep everything organized from the start of a project. This also means you’ll have an easier time backing up and archiving projects.
Start Organized and Sleep at Night
Probably the biggest mistake novice editors make is just importing footage, audio, or stills across drives and folders. I’ll bet this has already caused you grief. Instead, collect all media prior to importing (linking) to Adobe Premiere Pro and put these assets in a Common Media folder.
![]() Tip
Tip
Be sure you use numbers at the start of each folder to force the sort order.
Build a project-based Common Media folder template
If you build a set of folders that you can easily duplicate every time you start a project, it will help you stay organized.
So, the process is this: Start a project, duplicate the Common Media folder template, and then rename it to match whatever unique method you use to name your projects.
![]() Notes
Notes
This folder template is available for download. Please see “A note about downloadable content” in the Introduction of this book.
The screen shot in Figure 2.14 shows a folder list that can store all the pieces of a project in a common location. If you do this, backing up the entire project is trivial. Just grab the folder and copy it.

Figure 2.14 If you’re organized prior to editing, you’ll never worry that you’ve misplaced a clip somewhere on your system. Organizing also makes projects a breeze to back up.
Creating a Common Media folder is merely a good start. You should still customize your version of this folder in such a way that makes the greatest amount of organizational sense.
Some recommended folders include the following:
![]() 01_Original Footage. A copy of your original file-based media from your cameras goes in this folder. Copy the entire folder structure, not just the individual files. If you use Adobe Prelude (which I’d recommend!), this is the primary destination for your media.
01_Original Footage. A copy of your original file-based media from your cameras goes in this folder. Copy the entire folder structure, not just the individual files. If you use Adobe Prelude (which I’d recommend!), this is the primary destination for your media.
![]() 02_Scratch Disk. Target any previews (renders) in this location. Optionally, this folder can be emptied prior to backup.
02_Scratch Disk. Target any previews (renders) in this location. Optionally, this folder can be emptied prior to backup.
![]() 03_Project Files. This is where all the project files should be located, including the Adobe Premiere Pro project along with project files created by any of the other tools in Adobe Creative Cloud. If you work on complex projects, creating a set of projects inside this folder for the other tools, such as Adobe After Effects or Adobe Audition, would be a good idea as well.
03_Project Files. This is where all the project files should be located, including the Adobe Premiere Pro project along with project files created by any of the other tools in Adobe Creative Cloud. If you work on complex projects, creating a set of projects inside this folder for the other tools, such as Adobe After Effects or Adobe Audition, would be a good idea as well.
![]() 04_Graphic Sources. Stills, logos, and any other elements to be imported into Adobe Premiere Pro should go here. Additionally, if anything is built in Adobe After Effects or Adobe Photoshop, those files should be moved here prior to import.
04_Graphic Sources. Stills, logos, and any other elements to be imported into Adobe Premiere Pro should go here. Additionally, if anything is built in Adobe After Effects or Adobe Photoshop, those files should be moved here prior to import.
![]() 05_Graphic Exports. Anything generated from Adobe After Effects would go here. Although dynamic linking is powerful, there are some users who additionally create the final render to place back in Adobe Premiere Pro’s Timeline.
05_Graphic Exports. Anything generated from Adobe After Effects would go here. Although dynamic linking is powerful, there are some users who additionally create the final render to place back in Adobe Premiere Pro’s Timeline.
![]() 06_Audio Sources. This folder should include any on-set captured audio (such as in dual-capture setups), music, and sound effects.
06_Audio Sources. This folder should include any on-set captured audio (such as in dual-capture setups), music, and sound effects.
![]() 07_Stock Footage. Any purchased materials, such as stock video, stills, or music would go here. Additional nested folders might be warranted. With these assets isolated, it’s easy to fill out paperwork necessary for licensing.
07_Stock Footage. Any purchased materials, such as stock video, stills, or music would go here. Additional nested folders might be warranted. With these assets isolated, it’s easy to fill out paperwork necessary for licensing.
![]() 08_Exported Files. Any export should be named and labeled in such a way that it is obvious what the file is. For more on exporting and specific naming conventions, see Chapter 7.
08_Exported Files. Any export should be named and labeled in such a way that it is obvious what the file is. For more on exporting and specific naming conventions, see Chapter 7.
![]() 09_Production Paperwork. Any scripts, budgets, PDFs, releases, copies of client communications that would be smart to keep with your project go here.
09_Production Paperwork. Any scripts, budgets, PDFs, releases, copies of client communications that would be smart to keep with your project go here.
And that’s just a short version of these Common Media folders. It’s best to use too many than to use too few. Also, don’t invent this structure on the fly: Plan, plan, plan.
For example, if you’re shooting with a cinema camera that has a lookup table (LUT), you should store that LUT with the project. And if you’re using multiple LUTs, consider creating a numbered folder that contains them.
![]() Tip
Tip
PostHaste is a wonderful free, third-party, cross-platform utility on the market at www.digitalrebellion.com that can automatically duplicate and serialize a series of folders like the Common Media folder project template.
If the folder structure described here doesn’t work for you, choose a folder structure that does. Believe me, most of your current media headaches will no longer be an issue.
Make Media Backups
Make sure you have a backup of your media! All too often I encounter editorial situations where some type of key footage is gone because a drive has died. And the question I ask is a frightening one: “What kind of liability insurance do you have?”
All camera media should be replicated at least once, preferably in the field, copied immediately from the camera cards.
Editorial systems should be running at RAID-5 (Figure 2.15) or some sort of drive system that has a live redundancy.

Figure 2.15 A RAID-5 has the speed capabilities of a RAID-0 (two or more drives striped as one larger drive) and the redundancy RAID-1 (mirroring).
And absolutely consider a Linear Tape Open (LTO) drive for long-term storage. These drives are not as fast as the slowest hard drive, but the current version (LTO-6) can contain 2.5 TB in a single cartridge prior to any sort of compression. Tapes are rated for at least 15 years of shelf life along with data verification.
![]() Close-Up: What’s the Minimum Number of Backups Necessary?
Close-Up: What’s the Minimum Number of Backups Necessary?
1. Save a pair of copies from the camera’s storage to a set of drives. One set goes to editorial, and the other set sits offsite and remains untouched. Optionally, back up set 2 to an LTO.
2. Copy one set to a RAID-5 that has the Common Media folder structure. Technically at this point, three copies are in play. Backups of any added or created material, such as the project, imported stills, and audio should be performed, possibly to a cloud service.
3. When finished, back up the entire Common Media folder twice to either a pair of hard drives or to an LTO tape.
Project Setup
Now that you have the software reconfigured, your caches, and your media setup, you need to address projects.
The following sections really boil down to the idea that if you build a project that represents your work, prepopulated with common bins and elements, you can get a jumpstart on the editorial process by reusing that project. Then you’re not reinventing the wheel each time you start a new project.
Optimizing New Projects
When you start a project, you’re faced with the dialog shown in Figure 2.16, which you’ve seen before. Of key importance is not to use the default project Location setting, which is in your documents folder.

Figure 2.16 The defaults for projects are not where you want to store them. You’re better off using a controlled folder collection like the Common Media folder for a project.
Instead, change the Location to your project’s unique Common Media folder’s 03_Project Files (Figure 2.16) folder. However, there is one caveat: Changing this location will (by default) also place your preview and auto-save files in the same location. These are all set by default to follow the project location, which is great for a novice, but painful once you really start generating media. Leaving these at the defaults will start to fill up your internal drive.
The following sections provide some thoughts on improvements for these default locations.
Captured video and audio
Video and audio is the only level of built-in media management that Adobe Premiere Pro does. Choose a known location that will be shared with other nontape-based elements, preferably the 02_Scratch Disk folder in the Common Media folder project template.
Video and audio previews
Although the Mercury Engine technology is amazing, sooner or later you’ll need to generate previews. Previews are less essential than any other sort of media; they can be regenerated at the cost of time.
Look at the Scratch Disks in Figure 2.17.

Figure 2.17 Here I’ve targeted the previews to my RAID-5 (called GTech Raid) and created a folder called _Adobe Previews.
![]() Probably the best choice is a folder called _Adobe Previews at the root level of your media drive. Each project will automatically generate its own PRV folder, which makes it easy to delete at the end of a project.
Probably the best choice is a folder called _Adobe Previews at the root level of your media drive. Each project will automatically generate its own PRV folder, which makes it easy to delete at the end of a project.
![]() An alternate strategy is to target a folder within the Common Media folder for the project. The advantage is that backing up the previews means a level of ease in restoring the project including previews in the future. I’m not a fan of this method because like cache files, previews are easily rebuilt.
An alternate strategy is to target a folder within the Common Media folder for the project. The advantage is that backing up the previews means a level of ease in restoring the project including previews in the future. I’m not a fan of this method because like cache files, previews are easily rebuilt.
![]() Close-Up: Manually Back Up Projects Separately
Close-Up: Manually Back Up Projects Separately
Project auto save
Hopefully, you’ll never need to use an auto-saved version of your project. The only rule is: Don’t have Auto-Save point to the same location or drive as your project. Instead, use a Cloud-based backup, or store it on your system drive (this is the one exception where this is permitted).
One day your media drive may die. If your project and the auto-save version is stored there, you’ll have nothing. So, the ideal choice is to save to a different physical location.
Choosing the Right Sequence Preset
All too often I’m asked: “Am I using the right sequence preset?” The answer is to consider two major questions that recur at the start of every project:
![]() What type of footage are you (mostly) working with? Likely, this will dictate the type of sequence settings you’ll use.
What type of footage are you (mostly) working with? Likely, this will dictate the type of sequence settings you’ll use.
![]() What are you delivering? Most likely it will be an HD size (1080 or 720) that matches your footage, but even when you’re working in larger formats (2k and beyond), HD is still the predominant delivery size.
What are you delivering? Most likely it will be an HD size (1080 or 720) that matches your footage, but even when you’re working in larger formats (2k and beyond), HD is still the predominant delivery size.
Although it’s common to work with more than one format (footage), it’s uncommon to always work with different formats. Even when this is the case, at the end what you actually have to deliver is often the most important consideration for your sequences.
The dialog in Figure 2.18 is overwhelming; if you’re like most editors, you’ve tried to pick the sequence preset that closely matches your footage.

Figure 2.18 It’s completely OK to pick the wrong choice. Dropping footage into an empty sequence will give you the option to change the sequence to match the footage.
Are you worried about what sequence type to choose? Probably not because you likely know one of two tricks to build a sequence that matches your format:
![]() Editing the first clip on any sequence will yield a dialog on a mismatch, giving you the opportunity to have Adobe Premiere Pro automatically set up the sequence for you.
Editing the first clip on any sequence will yield a dialog on a mismatch, giving you the opportunity to have Adobe Premiere Pro automatically set up the sequence for you.
![]() Additionally, you can right-click on a clip and choose New Sequence from Clip (or drag a clip to the New Item button on the bottom of the Project panel).
Additionally, you can right-click on a clip and choose New Sequence from Clip (or drag a clip to the New Item button on the bottom of the Project panel).
Although both methods work, they reveal a little-known truth: Sequence types don’t matter.
The great secret concerning sequences
As long as your sequence matches the frame size and frame rate of your clips, Adobe Premiere Pro will work fine. You don’t have to make sure your footage matches your rendering codec. You don’t have to believe me on this, you can just try it.
What may matter later in your workflow is the Preview codec in the Settings tab. By default, the preview files are ignored (and the Preview codec doesn’t matter). Everything is directly re-rendered in the final output format, yielding a higher quality output. If you choose to use the render files, then yes, the Preview codec does matter.
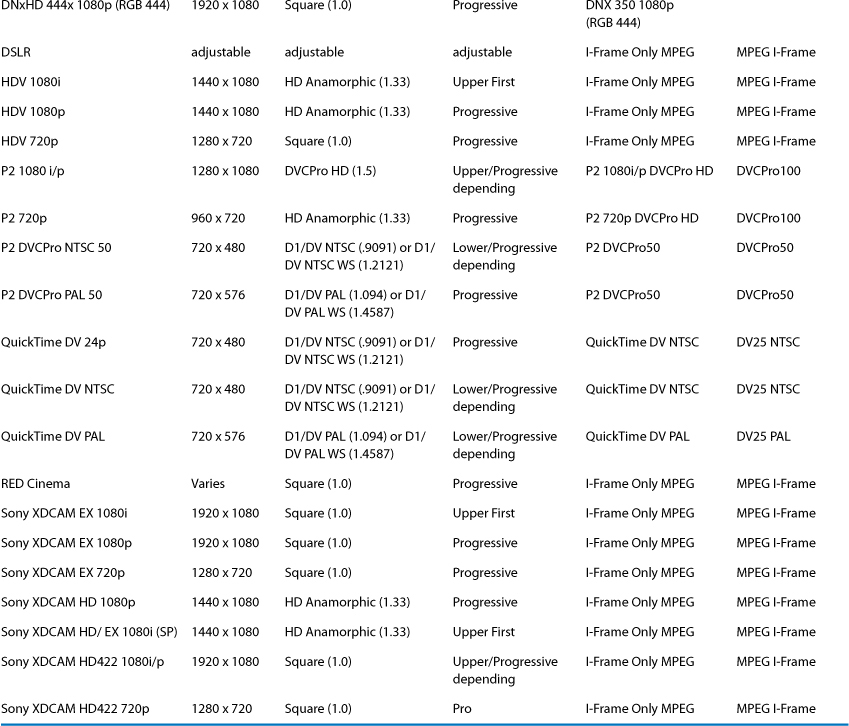
Editing modes
Table 2.1 contains a current list of every editing mode and preview codec combination. Refer to it when you need it. Just remember that as long as your footage matches your Timeline, you can edit!

Custom editing modes
There is also a custom editing mode choice (Figure 2.19), which allows you to adjust and build your own preset based on new formats or a hardware input/output device.
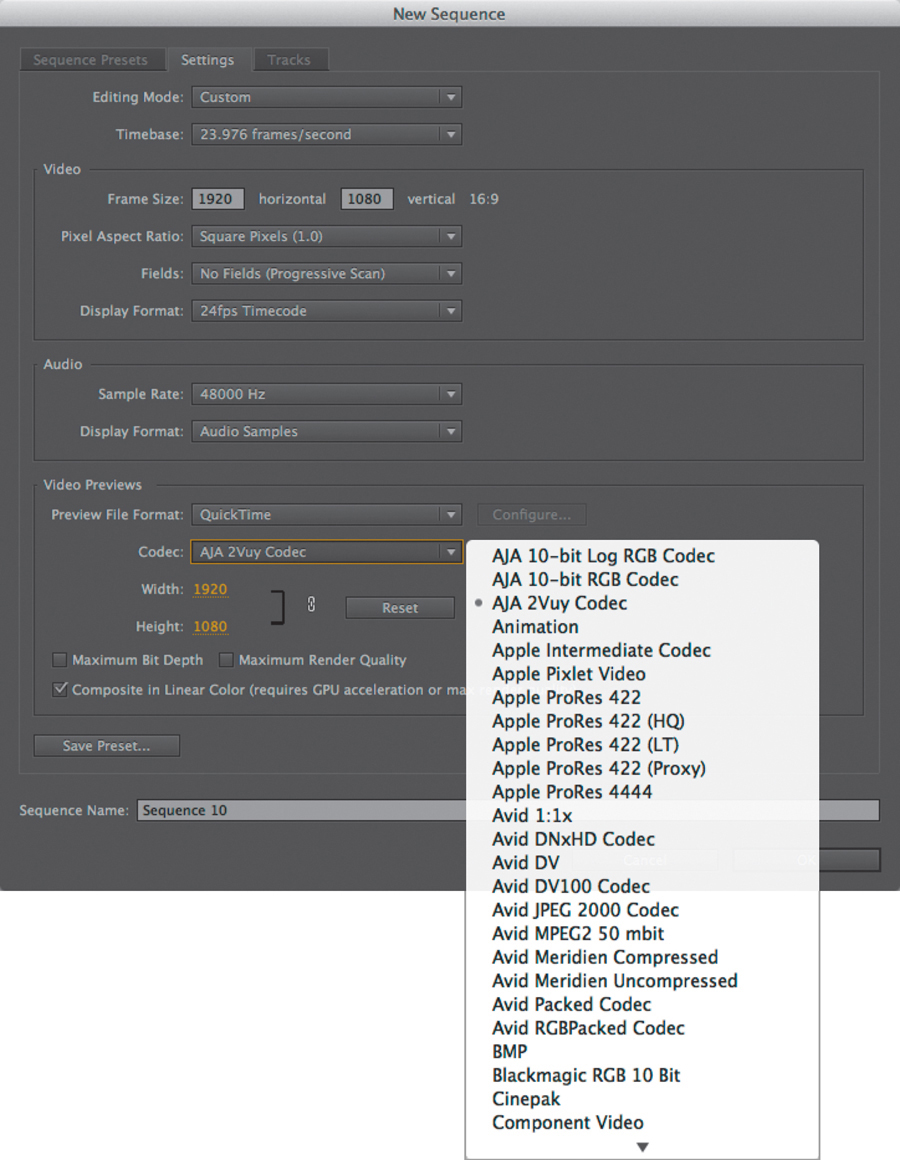
Figure 2.19 Choosing Custom at the top of the Settings tab unlocks the ability to change the Preview File Format.
There are some cool things you can do with custom editing modes (see “Building an Apple ProRes Preset” later in this chapter).
Custom modes have some important wrinkles:
![]() On a Mac the Custom choice is QuickTime and can access QuickTime codecs, even if they are a bad choice.
On a Mac the Custom choice is QuickTime and can access QuickTime codecs, even if they are a bad choice.
![]() On Windows the Custom choice is AVI and can access AVI codecs, even if they are a bad choice.
On Windows the Custom choice is AVI and can access AVI codecs, even if they are a bad choice.
![]() AVI and QuickTime are not cross platform. Switching platforms switches Adobe Premiere Pro to the I-Frame MPEG codec.
AVI and QuickTime are not cross platform. Switching platforms switches Adobe Premiere Pro to the I-Frame MPEG codec.
Creating a Sequence Template Preset
Going beyond just choosing a sequence type, you should build your own unique presets. By doing so, you’ll get a new Custom category in the Sequence list with only the presets you need.
Resave even the built-in preset you commonly use
Even if you use a built-in Adobe Premiere Pro preset for your sequences, you should still save a custom preset (Figure 2.20).
Then you can ignore the entire preset list except for the unique presets that you need, which are easily located at the bottom of the list (Figure 2.21). You’ll no longer accidentally create the wrong one!

Figure 2.21 The Custom category contains the presets you’ve saved. By resaving the Adobe presets you use most often, you have a shortcut to finding them!
As a bonus you can add the typical number of tracks and type of audio tracks you need already labeled, ready to go.
Smart Rendering codecs yield faster exports
It’s not for every workflow, but Smart Rendering may be able to accelerate your output (Figure 2.22). This can be done with certain codecs by not re-encoding existing material but rather copying it when the output matches the camera codec. For example, you can invoke Smart Rendering when you edit XDCam and output an OP1a MXF file that matches.
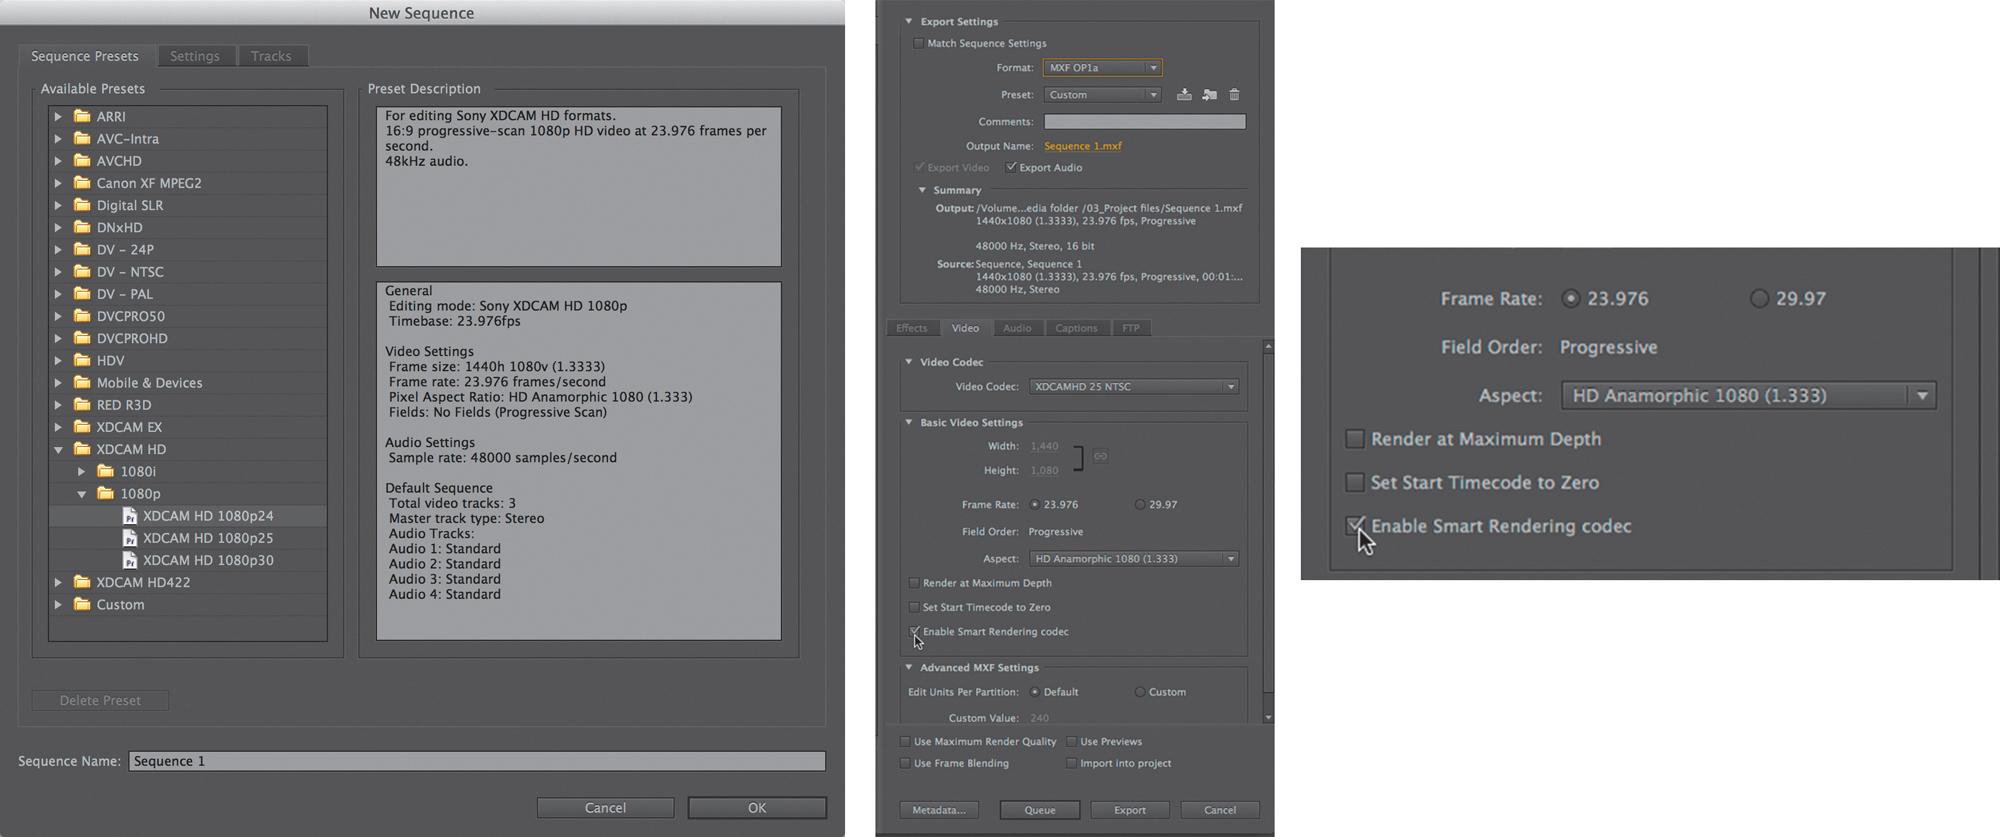
Figure 2.22 For Smart Rendering to work, the sequence settings (left) must match the Export (center) exactly. The switch to Enable Smart Rendering codec (right) must also be selected.
Smart Rendering can be fantastic when set up correctly. Matching the footage to the sequence setting will grant you this capability if those two match the output setting.
If some footage doesn’t match, it’s OK because Adobe Premiere Pro will just handle it normally, but you won’t get the benefit of Smart Rendering. Done right this acceleration occurs under the hood.
Two general workflows can utilize Smart Rendering:
![]() Camera cuts only. You start with some XDCam, edit, and then output XDCam (OP1a MXF). Outputs are super fast because it’s just copying the cut points, not re-encoding the video. If you create and render any effects, they’ll be I-Frame MPEGs (a different format) and so are automatically encoded. This workflow allows the “cut down” of longer clips exported from a sequence with no quality loss because no new encoding has been performed. Anything rendered will have to be encoded.
Camera cuts only. You start with some XDCam, edit, and then output XDCam (OP1a MXF). Outputs are super fast because it’s just copying the cut points, not re-encoding the video. If you create and render any effects, they’ll be I-Frame MPEGs (a different format) and so are automatically encoded. This workflow allows the “cut down” of longer clips exported from a sequence with no quality loss because no new encoding has been performed. Anything rendered will have to be encoded.
![]() An all DNxHD (or ProRes) workflow including renders. This idea is a setup where you start with DNxHD and you intend to finish with DNxHD. You started with it perhaps because you transcoded footage using Adobe Prelude. Because the preview codec matches, you’ll be able to accelerate this too.
An all DNxHD (or ProRes) workflow including renders. This idea is a setup where you start with DNxHD and you intend to finish with DNxHD. You started with it perhaps because you transcoded footage using Adobe Prelude. Because the preview codec matches, you’ll be able to accelerate this too.
The following codecs work with Smart Rendering:
![]() DV
DV
![]() DVCProHD
DVCProHD
![]() Long Gop 0P1a (XDCam)
Long Gop 0P1a (XDCam)
![]() AVCIntraframe (MXF)
AVCIntraframe (MXF)
![]() DNxHD (MXF) OP1a
DNxHD (MXF) OP1a
![]() ProRes (QuickTime)
ProRes (QuickTime)
![]() DNxHD (QuickTime)
DNxHD (QuickTime)
With many facilities built around DNxHD or QuickTime ProRes workflows, it becomes valuable to implement this workflow.
You’ll see a switch for the Smart Rendering Codec choice on output for all of the preceding formats except those built around QuickTime. For those, if you get everything to match, trust Adobe, it works.
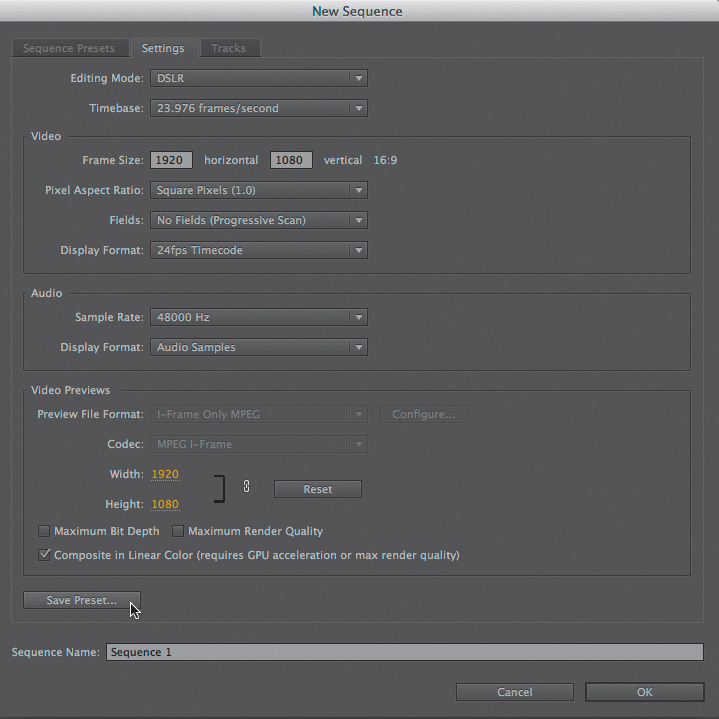
Building an Apple ProRes preset
Because Adobe Premiere Pro doesn’t come with a preset for ProRes, I’ll give you the recipe for how to adjust the sequence settings. This would work for Cineform (cross platform) as well.
1. Choose whichever preset you like. I usually start with an AVC-Intra preset that matches my frame size and frame rate.
2. Go to the Settings tab, and switch the Editing mode to Custom. This allows you to use a different format than the I-Frame MPEG file.
3. Change the Video Preview file format to QuickTime. The Codec drop-down menu will now be available.
4. Match the exact codec of your footage, most often Apple ProRes 422.
Maximum choices in sequence settings
The two Maximum settings (Figure 2.23) are set up incorrectly often enough that it’s worth giving them their own mention. They’re important to set up (and save!) as a part of preset.
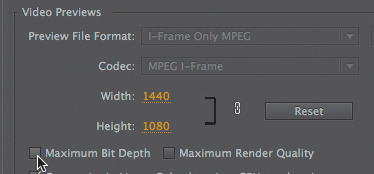
Figure 2.23 These two Maximum options slow down the rendering your previews. Use them only if needed!
Here, these only affect the preview (render) files. They’re only useful to turn on if you intend to render as you go and use your previews to accelerate your output:
![]() Maximum Bit Depth. Adobe Premiere Pro handles video in 8-bit depth unless you select this check box. It has benefits in that it doesn’t truncate your color correction material. Key elements that will be affected by this are effects that have the 32 bit switch on the Effects panel and 10-bit (and beyond) formats like RED, Alexa, and HDCAM SR. By processing the extra bit depth, Adobe Premiere Pro will handle all of the video data in 32 bits per channel.
Maximum Bit Depth. Adobe Premiere Pro handles video in 8-bit depth unless you select this check box. It has benefits in that it doesn’t truncate your color correction material. Key elements that will be affected by this are effects that have the 32 bit switch on the Effects panel and 10-bit (and beyond) formats like RED, Alexa, and HDCAM SR. By processing the extra bit depth, Adobe Premiere Pro will handle all of the video data in 32 bits per channel.
![]() Maximum Render Quality. Maximum Quality maintains sharpness when you’re doing up-converts (from SD to HD) or down-converts (from HD to SD). Be careful with its use; it requires more memory (especially to render).
Maximum Render Quality. Maximum Quality maintains sharpness when you’re doing up-converts (from SD to HD) or down-converts (from HD to SD). Be careful with its use; it requires more memory (especially to render).
Tracks
If you look back at the last ten sequences you cut, odds are you used two to three video tracks and somewhere between four and ten audio tracks.
Set up your common audio tracks in the Tracks tab and save a preset for future projects (Figure 2.24).

Figure 2.24 If you already have a sequence that has the names and number of audio tracks set up, the “Load from sequence” button will insert them for you. The Open switch will set those tracks larger when starting a new sequence.
For most of us, our standard output is stereo. When adding tracks, most of your needs will be with a standard track. If you place a mono clip there, it’ll play equally on both channels; if you put a stereo clip there, it’ll take up only one track with two waveforms perfectly panned.
Take the extra five seconds and name your tracks, such as Narration, VO, SFX, Music, and Music 2. Doing so will create new sequences with these already named. You’ll be less likely to make mistakes later when performing audio mixes.
![]() Notes
Notes
If you’re not seeing your track names, you need to increase the vertical height of the tracks.
Audio master output
When you create a sequence is the only time you can adjust what kind of audio master output you want Adobe Premiere Pro to do. Although sequence types are now adjustable (see “Changing sequence types”), audio master output is the one thing that you cannot change.
To get around this limitation, you would create a new sequence with the correct master output and overwrite your current sequence into that, making sure the Timeline button called “Insert and overwrite sequences as nests or individual clips” (Figure 2.25) is off.
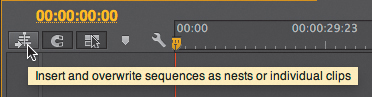
Figure 2.25 Depending on the toggle here, this switch allows you to drag one sequence into another and either get a nest (one clip for the entire sequence) or individual clips.
Multichannel (split channel) masters
It’s common in the broadcast world to need to build a master output with more than two channels. Normally, when you have two channels, your output is stereo.
What if you wanted a normal stereo mix but also a “split master” where the voice-over/narrator was on one channel and everything else was on the other channel in the same file?
This sort of output is very common for news:
![]() Listening to only A1+A2 as a “finished” show, ready for air, broadcasters mute the A3 + A4 output.
Listening to only A1+A2 as a “finished” show, ready for air, broadcasters mute the A3 + A4 output.
![]() In a different market, local talent re-records the audio on A3. A4 is the rest of the mix. A1+A2 are never heard. This gives the impression that the local broadcaster created the story.
In a different market, local talent re-records the audio on A3. A4 is the rest of the mix. A1+A2 are never heard. This gives the impression that the local broadcaster created the story.
If you’re not familiar with split masters, the idea (regardless of how many tracks you’re working with) is to output a stereo mix on A1+A2 but to also output all the narrator elements on A3 and everything else on A4.
Building this master is a little tricky. It requires four channels for output and a special track—the Adaptive track—a track that can route itself to one or multiple outputs.
Again, the four output tracks are two pairs: A1+A2 are a full mix; A3 is just the voice-over/narration (mono); and A4 is everything other than the narration.
Your edit can have as many Input tracks (Timeline tracks) as you like, but here is the basic idea of how to set this up.
1. Start a new sequence with Multichannel Output. For the standard four track split master, you need to give it four outputs (Figure 2.26).

2. Delete all the Audio tracks but one. Change it to an Adaptive track.
3. Change the name of the track to VO. Double-click the Map for the track and Assign Input 1 to Outputs 1 +2 + 3 (Figure 2.27). This track needs to be allowed to output to 1+2—that’s the stereo mix—but also it needs to output to track 3. VOs are always recorded as a mono element (1 input track); they have no Input 2–4, so we leave these alone.
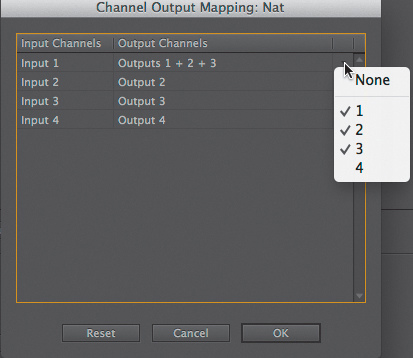
Figure 2.27 The VO track needs to output normally to A1+A2 but also to Output A3 for the split master.
4. Add any other “main” tracks, like narration, that are meant to match this. Because your last track is an Adaptive track, Adobe Premiere Pro will add a track of the same type, including track mapping.
5. To add the other side of the split, for tracks such as interviews, music, or sound effects (tracks that should be in the A1+A2 mix but should show up on the A4 split) the mapping works like this: Input 1 goes to Outputs 1+4. Input 2 goes to Outputs 2+4 (Figure 2.28).

Figure 2.28 Elements like an interview or music need to output normally on 1+2 but should be on the background track of the split master, A4.
Changing sequence types
A new feature for the late 2013 release is the ability to change the Sequence Settings. Anything except the audio mastering is changeable. But even though everything is changeable now, that doesn’t mean you should change everything.
You can find this feature by choosing Sequence > Sequence Settings.
You should probably never touch the timebase—the frames per second. Although Adobe Premiere Pro will try to adjust your Timeline for the new speed, it tends to create headaches. It’s best to cut your 29.97 Timeline into a 23.98 Timeline rather than just adjust the frame rate.
The biggest item that’s worth changing is the codec (Figure 2.29), which eases proxy (low resolution/high resolution) workflows.

Figure 2.29 Changing the codec permits the difference between generating proxy quality previews and final quality previews or working between two container types.
This proxy technique requires two other abilities:
![]() Create transcoded proxies. Although in Chapter 1 we looked at the merits of transcoding, it’s easy to have Adobe Prelude copy your camera media to one location while creating and saving a transcoded copy to a second location. For example, you could copy the RED camera files to a backup drive and transcode to Apple’s ProRes Proxy (or DNxHD) at the same time.
Create transcoded proxies. Although in Chapter 1 we looked at the merits of transcoding, it’s easy to have Adobe Prelude copy your camera media to one location while creating and saving a transcoded copy to a second location. For example, you could copy the RED camera files to a backup drive and transcode to Apple’s ProRes Proxy (or DNxHD) at the same time.
![]() Relink, even between different containers. The new relink dialog has a powerful feature, which is to ignore the file extension. That way you could edit while linked to proxy.mov files but finish utilizing the full quality R3D files.
Relink, even between different containers. The new relink dialog has a powerful feature, which is to ignore the file extension. That way you could edit while linked to proxy.mov files but finish utilizing the full quality R3D files.
Building a Master Template
Once you’ve built a project, targeted everything where you want to store it, and built the right sequence presets, it becomes a better starting point for future projects. Everything is already set correctly!
Place the project (template) in 03_Project Files folder, so when you duplicate the folder structure for a new project, there’s already a fresh project sitting there ready to go.
You could even go so far as to prepopulate your project with common bins (see “Common Bins for Every Project”) and other common elements.
Just make sure you rename the project prior to starting so the Preview and Auto Save folders create information that exactly matches the name of the project.
Import
You’ve probably built a number of projects, so you’re already familiar with the basics of importing. In this section we need to cover a couple of ideas: why you should focus on the Media Browser, handling dual sound, cinema cameras, and bad clips.
And yes, the biggest rule of importing is to stay organized from the beginning.
Media Browser vs. Import
You should stop using the File > Import choice and instead use the Media Browser (Figure 2.30) to import your files.

Figure 2.30 With the Media Browser maximized, it becomes trivial to look at multiple shots quickly—a necessity given the overshooting in the digital age.
There’s really only one reason to use the standard Import command and that is to do an OS level file search.
![]() Tip
Tip
There is one case where working with the Import command is better than working with the Media Browser and that is when you just want one specific clip. Don’t go to the File menu, don’t press Command+I (Ctrl+I); instead, double-click on the background of the project window and you’ll bring up an Import dialog.
But if you’re working, as this chapter suggests, from a Common Media project folder, you know that all your elements are already in one central place.
Meanwhile, the Import command has several limitations: There is no metadata, it can’t handle spanned files, and worst of all, there is no preview/hoverscrub of files.
Getting the Most Out of the Media Browser
Because the Media Browser is the core for bringing in material, there are a couple of techniques that can add value and mastery to how it works for you.
The first is a recap of the earlier tip: Maximize any window by pressing the accent (`) key to take the Media Browser full screen, which is vital for choosing clips.
Import directly to a bin
Be sure to select a bin prior to switching to the Media Browser. Select whichever clips you want to import. Pressing Command+Option+I (Ctrl+Alt+I) imports this selection. Better yet, remap it to Command+I (Ctrl+I). This permits very quick selection and import into Adobe Premiere Pro.
Thumbnail view vs. List view
Both Thumbnail and List views have their advantages. Like many techniques in this book, there isn’t a right or wrong choice. In fact, you should try both and see which helps you work smartest (Figure 2.31).

The argument for using thumbnails is simple. In the world of hundreds of clips named 001138.MXF, lists of clip names tell you nothing. Using hoverscrub in Thumbnail view permits super fast previews and clip selections.
You can use the JKL keys to play through the clips, which is fantastic for previewing interview clips (when you don’t want all of them) or music and sound effects.
The argument for using List view is the ability to see and select more clips and see metadata, particularly for certain formats and camera metadata, prior to importing.
![]() Tip
Tip
Double-clicking on a clip does not import it. It permits the clip to be loaded into the Source Monitor but not loaded into the project. Either drag it into the project from the Source Monitor, right-click and choose Import, or edit the clip onto the Timeline to add it to the project.
Filtering by file type
There are times when you’ll have a directory of your material with just too many files to make sense of. Perhaps you’ve saved many Adobe Photoshop files into a directory with some JPEGs and some audio.
The File Type Display filter (Figure 2.32) in the upper right of the Media Browser permits you to narrow down busy directories to just a specific format, including camera formats. There are over 35 different file filters available to narrow down what file type you’re looking at in the Media Browser!
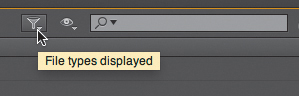
Figure 2.32 The File Type Display filter looks like a funnel and is found in the top right of the Media Browser.
Directory Viewers
In the top-right corner under the Panel menu of the Media Browser you can choose to Edit Columns and display more (or less) metadata. This could have the potential to be useful. But it really shines when the Directory Viewer drop-down menu is switched to a particular camera type (Figure 2.33), such as ARRI raw, Panasonic P2, XDCAMHD, and everything in between.

Figure 2.33 The advantage of professional cameras is the possibility of accessing metadata created in-camera.
Unique for each format, you’re able to add other metadata that the camera may or may not supply.
Use Adobe Prelude
In this tapeless world, Adobe Prelude is your camera media capture device. Consider it a “Prelude” to editorial.
Chapter 8 has a section dedicated to using Adobe Prelude. It’ll take you less than an hour to get your head around its three major features:
![]() Copying camera media from the card (to the Common Media folder for the project)
Copying camera media from the card (to the Common Media folder for the project)
![]() Backing up camera media to a different location
Backing up camera media to a different location
![]() Sending clips (and optionally bins) to Adobe Premiere Pro
Sending clips (and optionally bins) to Adobe Premiere Pro
Does it do more? Sure. But these three tasks are truly invaluable time-savers in the editing process.
While you’re in Adobe Prelude, it’s best to organize clips into bins that make sense. Then, when you start in Adobe Premiere Pro, you’re ready to edit.
![]() Close-Up: Viewing Without Importing
Close-Up: Viewing Without Importing
Dual Sound: Merge and Sync Clips
Many cameras with changeable lenses, particularly DSLRs, have been so focused on getting the best picture that their audio is an afterthought. Resourceful productions have learned quickly to resurrect the process used in film—dual capture.
Merge clips based on audio
The merge clips based on audio technique utilizes bad sound on the camera and great sound on an external recorder. Adobe Premiere Pro can “align’ the two waveforms, syncing the good sound with the picture. It’s best to use a slate (which, of course, you do, right?)
This method doesn’t require the slate clap, but a slate does help to identify shots if the sound alignment doesn’t work.
To process a take, follow these steps.
1. Select the video (with bad audio) and the good audio in the project window.
2. Choose Clip > Merge Clips to access the Merge Clips dialog (Figure 2.34).

Figure 2.34 Merging dual capture sound permits high-quality audio to be captured via a digital recording when a camera can’t do professional quality recordings.
3. Choose Synchronize Point Audio. Select the channel you want Adobe Premiere Pro to try (usually Track 1).
4. Optionally, Choose Remove Audio From AV Clip. This way the merged clip only has the high-quality audio. Do this after you test a couple of clips to make sure there are no sync issues.
This procedure will yield a new clip with the original video clip’s name but with Merged appended to the end of the filename. I usually store these in a bin called Merged Clips.
![]() Tip
Tip
Adobe Premiere Pro does a great job of merging audio on a clip-by-clip basis. But it’s one clip at a time. If your production workflow is based on doing this regularly, Red Giant Software makes a piece of software called PluralEyes that can perform this on multiple clips simultaneously, as long as they both have sound.
Merge clips based on other metadata
Sometimes the preceding method just doesn’t work. Perhaps the audio was too distorted. Frankly, it doesn’t matter. When it doesn’t work, you need to help out.
I’ll assume that if you’re reading this section, you didn’t have matching timecode. That leaves us with having to manually add a mark that Adobe Premiere Pro can use to merge and sync the video and audio together.
You’ll use the same Merge Clips dialog, but with slightly different selections (Figure 2.35).

Figure 2.35 When dual sync merge doesn’t work, the manual method of using a marker (not an In/Out point) is your best bet.
Having tried all the possibilities, I suggest manually using markers (that I name Sync Point on the video clip and the audio clip at the “sync” moment for the merge.
The reason is straightforward: If you use an In point (or Out point), when Adobe Premiere Pro does the merge, that’s the spot the clip will start. So, if you actually meant to look for the slate’s raw information (the shot, day, take, etc.), it’s gone.
Again, I prefer to select Remove Audio From AV Clip so it’s only the clean audio on the merged shot.
Modifying Clips for Great Slow Motion Shots
There’s a fantastic method of creating great-looking slow motion shots—shoot at a higher frame rate! In film, this was easy; it was called overcranking. You’d run the camera faster and play back slower, and get a great-looking slow motion shot at the cost of processing the extra film.
There’s a way to re-create this film technique using Adobe Premiere Pro. But don’t confuse this with changing the speed of a clip or using some of the advanced optical flow processing in Adobe After Effects.
This technique is possible with two requirements:
![]() You need to shoot at 60 fps (or 50 for your PAL fans). You really need to shoot significantly more frames per second.
You need to shoot at 60 fps (or 50 for your PAL fans). You really need to shoot significantly more frames per second.
![]() You need to edit your sequence with a slower frame rate—23.98 or 30 (or 25 for those using PAL—yes, I’m waving at you).
You need to edit your sequence with a slower frame rate—23.98 or 30 (or 25 for those using PAL—yes, I’m waving at you).
This likely means you’ll shoot at 720p60 because it has the highest frame rate possible. Yes, there are cameras that shoot higher frame rates. But 720p60 is the fastest broadcast standard.
Normally, if you drop a higher frame rate clip into a sequence at a different frame rate, Adobe Premiere Pro will automatically conform the footage (dropping frames) so it seems to play back normally.
The method described here is to select the clip and then choose Clip > Modify> Interpret Footage.
When the Modify Clip dialog (Figure 2.36) appears, in the Frame Rate section, select “Assume this frame rate” and type in the frame rate of the sequence (usually 23.98).

By doing so, Adobe Premiere Pro will then reinterpret the footage, slowing it down and conforming it so that one frame of the clip matches where the frames are on the Timeline. Audio will be slowed down as well, meaning you’ll probably want to throw it out.
![]() Tip
Tip
Here’s a great on-set audio tip. All too often there is nobody to adjust levels during a recording (and nobody should set a camera to automatically adjust levels!). Run the microphone twice into the camera via a splitter. One channel, A1, comes directly from the microphone, the other, A2, gets adjusted down 6 decibels (get an external pre-amp if your camera doesn’t permit this easily). Now you have your main recording on A. But, for example, if during an interview the subject suddenly gets loud, you can use the A2 channel instead.
The result is gorgeous slow motion before you do any retiming.
Stereo vs. Mono Audio
There seems to be some confusion about clips that have two waveforms—two audio recordings. In some cases they’re two elements and in other cases they’re one.
If the clip has two discrete audio channels (such as using A1 for an external microphone and A2 for the camera microphone), this clip should be considered as having two mono tracks.
If a clip has two mixed audio channels (such as music or even an interview recorded with a stereo microphone), it should considered as a having a single stereo track.
Take a look at Figure 2.37. Which is correct?

Figure 2.37 Depending on how the audio was recorded, a shot could be either of these two examples. Either way may have been correct: on the left, a stereo recording (with a stereo microphone); on the right, two separate microphones.
To complicate things, Adobe Premiere Pro interprets the clip on import based on what the file says about itself. Often, its description can be wrong. The clip could be mono when it should be stereo or vice versa.
When you encounter these situations where the audio is incorrect, it’s useful to know how to fix these problems quickly.
Adjusting two tracks to be a mono pair
When Adobe Premiere Pro has interpreted a clip as a stereo clip, but you want it to instead be a pair of mono clips, follow these steps.
1. Select the clip in the Project panel.
2. Choose Clip > Modify >Audio Channels (or press Shift+G).
3. Change the Preset drop-down menu to Mono (Figure 2.38).

Figure 2.38 The presets (such as Mono) allow quick and easy configurations to be stored. You can always play a specific track at the bottom of the window.
Adjusting two tracks to ignore one completely
You can adjust two tracks to ignore one completely when you know that the camera audio was recorded onto A1 and the microphone was recorded onto A2.
In a perfect world, you’d never see the camera audio, so let’s make that happen instead of you having to constantly unlink and delete that track on the Timeline!
![]() Tip
Tip
The modification of audio channels (or any modification for that manner) can be performed on multiple clips simultaneously.
1. Select the clip in the Project panel.
2. Choose Clip > Modify >Audio Channels (or press Shift+G).
3. Change the Preset drop-down menu to Mono.
4. Change the number of Audio tracks to 1. This means only one track will show up on the Timeline.
5. Change the Source Channel to Right. Left means A1; Right means A2 of the original clip.
6. Save this as a preset (Figure 2.39). Call it Good Audio On A2. Yes, you should build a second one for those situations where the good channel is on A1 and A2 needs to be ignored.
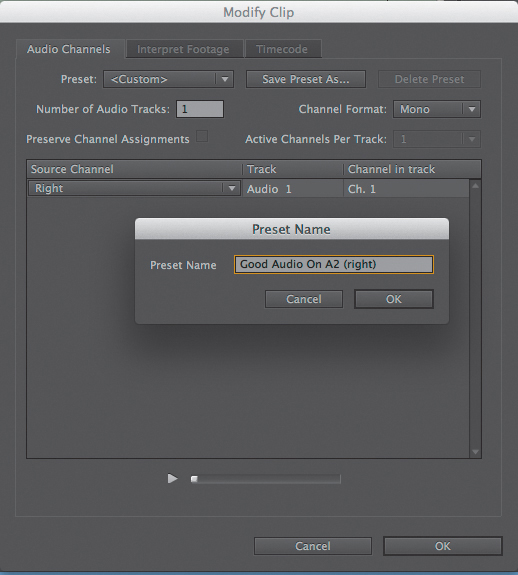
The clip is never permanently damaged. The information is still there, but Adobe Premiere Pro interprets it differently.
Adjusting a mono pair to be a stereo clip
The opposite case is when you want a clip with two audio tracks to be considered stereo.
1. Select the clip in the Project panel.
2. Choose Clip > Modify >Audio Channels (or press Shift+G).
3. Change the Preset drop-down menu to Stereo.
The only areas where people seem to get confused is that the value of Number of Audio Tracks is 1. It’s one track on the Timeline, but you can see that the value of Active Channels Per Track is now 2 (Figure 2.40).
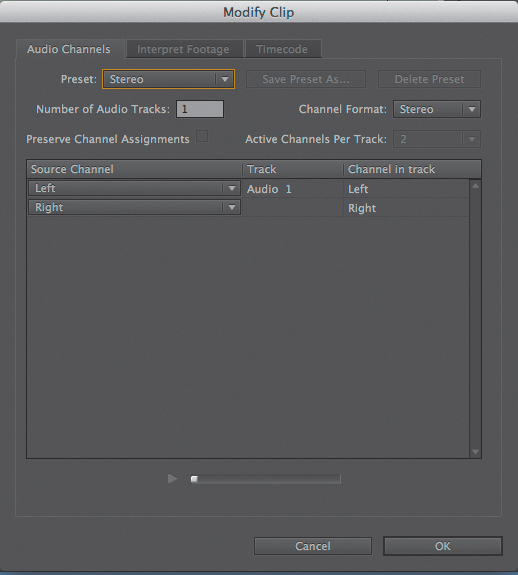
Figure 2.40 Setting the preset to stereo means that one track on the Timeline contains two channels.
Dealing with Too Many Dead Audio Tracks
Sometimes you’ll receive source footage with more audio channels than you need, and you want to adjust it after importing rather than dealing with all sorts of crazy Timeline patching. XDCam clips are often the culprit of this condition with eight tracks. Let’s look at a more extreme example in Figure 2.41.
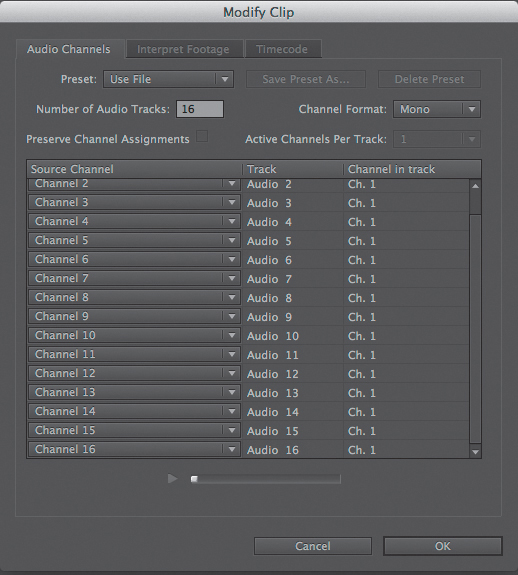
Figure 2.41 Imagine dealing with this on your Timeline and having to delete multiple unused audio tracks!
You might receive 16 channels of audio attached to a video clip, but you really only need Source channels 3, 4, 9 and 14, and you want those channels to patch into Timeline Tracks 1, 2, 3, and 4. And, most important, you want Adobe Premiere Pro to ignore the rest as if they didn’t exist.
1. Select the clip in the Project panel.
2. Choose Clip > Modify >Audio Channels (or press Shift+G).
3. Change the Preset drop-down menu to Mono.
4. Change the number of Audio tracks to 4. This means only four tracks will show up on the Timeline.
5. Change the Source Channels to the arrangement you want. In Figure 2.42, I’ve assigned channels 3, 4, 9, and 14 to 1, 2, 3, and 4.
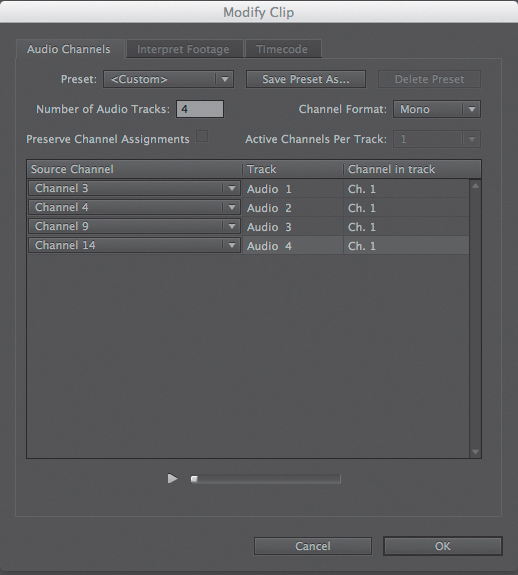
Figure 2.42 Taking a clip that has 16 channels and just displaying the four that are actually used means a greater level of ease for the editor.
6. Save this as a preset. Be precise in naming your preset. It’s likely that everything that came from that camera on that day of shooting will need these audio adjustments made.
Again, keep in mind that Adobe Premiere Pro doesn’t damage these clips. It just interprets them differently. The clips still have all the audio tracks; they’re just ignored.
Importing a “Generic” Project
Are there elements that you’re likely to use in every project—perhaps key pieces of music, an animated intro, or your logo? Rather than importing these elements into every project, it’s best to have a “generic” project that contains all of the small pieces that occur. You can then import your generic project into your project and instantly get all of those components.
And if you’re really clever, you can import it to the project template mentioned earlier in the “Project Setup” section. Then the new project will be set up with the right bins, sequence type, and all of the common media that will help you jumpstart your projects!
Organization
Do you have a sequence named Sequence 1 in your project or a bin named Bin?
Unless you’re working in a high-pressure environment where you don’t have the time to name files, you’re just asking for problems, especially in longer-form projects.
Some editors love the organization step. It gives them a chance to look at their clips, think organically about how they should be organized, and have the opportunity to really get to know the footage. Some editors hate it because it feels like drudgery (especially when the edit is work and not about passion).
But the best editors are great at organization. Editing isn’t just about storytelling. It’s about being familiar with the footage and being able to find the perfect shot as fast as possible.
If it seems like I’m recommending too much detail, keep in mind that the goal is simple: If you came back to a project after five years, could you figure out what was going on? If you had some life emergency and couldn’t continue working on it, could someone else figure it out?
Being organized now means that if the client comes back a year from now and asks for a small change, you don’t have to rebuild the project from scratch.
![]() Tip
Tip
As with the OS (Mac or Windows), you can search for an element if you know part of its name. For whatever reason, the Search box at the top of the project window gets forgotten by editors.
Common Bins for Every Project
There are common bins that you’ll need in nearly any sort of project (although they may be a little different for narrative film/TV). The following list of bins covers most needs. You don’t have to use all of them, but you should examine the basis behind each to see if you might want to start implementing them:
![]() Main Sequence(s). Although this is somewhat obvious, you want to make it easy to find. Prepend the name with either 01 or ** to force it to be at the top of the list.
Main Sequence(s). Although this is somewhat obvious, you want to make it easy to find. Prepend the name with either 01 or ** to force it to be at the top of the list.
![]() Old Sequences. Twice a day, every day, duplicate the sequences you’re working on—in the morning just as you start and in the afternoon when you come back from lunch. Add to the end of the sequence the date and terms morn or afternoon. Think of this strategy as a giant undo.
Old Sequences. Twice a day, every day, duplicate the sequences you’re working on—in the morning just as you start and in the afternoon when you come back from lunch. Add to the end of the sequence the date and terms morn or afternoon. Think of this strategy as a giant undo.
![]() Outputs. Every time you output for any reason, duplicate your sequence and rename it with the date, the client, watermark information (if needed), and, if possible, the type of compression (h.264 for iPad) used. If a client calls, you can bring up a sequence that mirrors the file they’re looking at.
Outputs. Every time you output for any reason, duplicate your sequence and rename it with the date, the client, watermark information (if needed), and, if possible, the type of compression (h.264 for iPad) used. If a client calls, you can bring up a sequence that mirrors the file they’re looking at.
![]() Raw Footage. Mirror your camera cards bin by bin as you import. This way you’ll know exactly what clip came from what card. If you end up looking for footage from a particular location or time, this will be an easy way to find it.
Raw Footage. Mirror your camera cards bin by bin as you import. This way you’ll know exactly what clip came from what card. If you end up looking for footage from a particular location or time, this will be an easy way to find it.
![]() Selects. When you’re watching footage and you say, “I have to use this shot,” put a copy in this bin. It’s my go-to bin when I have a client in the room and need to replace something. I know it’s full of good material.
Selects. When you’re watching footage and you say, “I have to use this shot,” put a copy in this bin. It’s my go-to bin when I have a client in the room and need to replace something. I know it’s full of good material.
![]() VO/Narration. I like to separate these elements from music. Optionally, you can create a bin called Audio for this bin to live in. It’s possible to have two of these bins—one for temp and one for final.
VO/Narration. I like to separate these elements from music. Optionally, you can create a bin called Audio for this bin to live in. It’s possible to have two of these bins—one for temp and one for final.
![]() Music. By separating all your music into its own bin, it’s organized and easy to find, but also gives you the ability to quickly adjust the gain lower so you don’t blow out your speakers. Again, it’s possible to have two of these bins—one for temp and one for final.
Music. By separating all your music into its own bin, it’s organized and easy to find, but also gives you the ability to quickly adjust the gain lower so you don’t blow out your speakers. Again, it’s possible to have two of these bins—one for temp and one for final.
![]() Interviews. Place all of your interviews together. Optionally, break them down further by person.
Interviews. Place all of your interviews together. Optionally, break them down further by person.
![]() Dual Sound. If you work with dual sound, you’ll want raw bins that contain the original import of camera clips plus audio along with a “Merged” bin.
Dual Sound. If you work with dual sound, you’ll want raw bins that contain the original import of camera clips plus audio along with a “Merged” bin.
![]() Nests. If you build nests (sequences inside of sequences), it’s very useful to place these in their own bin.
Nests. If you build nests (sequences inside of sequences), it’s very useful to place these in their own bin.
![]() Adobe Photoshop Files/Graphics. Use this bin to find that graphic quickly.
Adobe Photoshop Files/Graphics. Use this bin to find that graphic quickly.
![]() Titles. Why make titles hard to find? Go further and create a Lower Third bin and an Opening/Closing credits bin.
Titles. Why make titles hard to find? Go further and create a Lower Third bin and an Opening/Closing credits bin.
![]() Adjustment Layers/Color Mattes/Transparent Video. You don’t want any of these elements sitting in a project at the top level. Some editors call this bin Synthetics.
Adjustment Layers/Color Mattes/Transparent Video. You don’t want any of these elements sitting in a project at the top level. Some editors call this bin Synthetics.
![]() Linked Adobe After Effects Compositions. As with Adobe Photoshop files, if you need to open one of these compositions independently, it’s painful to find a specific item but far easier when you keep them in their own set of bins.
Linked Adobe After Effects Compositions. As with Adobe Photoshop files, if you need to open one of these compositions independently, it’s painful to find a specific item but far easier when you keep them in their own set of bins.
![]() Other Projects. Use this bin if you find you’re bringing in other projects (such as the generic project or other projects that you need material from).
Other Projects. Use this bin if you find you’re bringing in other projects (such as the generic project or other projects that you need material from).
Sequence Naming
To this day I still see outputs called Sequence 1. You waste time every time you have to rename Sequence 1.
For your main sequence, change it to the name of the project and add relevant details (Main vs. Promo vs. Trailer) to the name. The more you mirror the final name of the output you give your client, the less typing and retyping you’ll have to do later.
Add the word scratch to any sequence you decide to “play with” or experiment with. Perhaps add a bin for your scratch projects.
![]() Close-Up: Common Bins Used in Television
Close-Up: Common Bins Used in Television
![]() Cut 1 bin contains the cut that ends up going to air.
Cut 1 bin contains the cut that ends up going to air.
![]() VFX & Titles bin contains the Visual Effects (VFX) and titles that are created.
VFX & Titles bin contains the Visual Effects (VFX) and titles that are created.
1. Cuts Main. Cuts are seen, notes are given by each group—Directors, the Network and Show Runners. This is a series of bins that need to be created just to keep all of that straight!
2. Scenes. This bin has multiple bins, and each bin contains a sequence for each scene of the show. When all of the scenes are cut, the sequences are then assembled into the sequence that live in Cuts Main bin.
3. Yet To Be Cut. This bin contains a bin per scene that includes the footage for that scene that has yet to be cut. As sequences are cut, they are moved into the Scenes bins.
4. Elements. This bin contains bins for graphics, purchased stock footage, special effects, voice-overs, the main title, and existing stock footage.
5. Music and SFX. This bin contains bins of music and bins for elements like laugh tracks and Foley sound effects (SFX).
6. Dailies. For each scene, all the raw footage is placed in a bin per scene.
7. Outputs. Each sequence is duplicated and put in a bin of Outputs.
8. Assist. Each editor keeps a bin of favorite shots and materials for a possible gag reel.
Clip Naming
The old school of thought is to be specific when naming your clips. Add metadata where it helps to supplement your footage. If each shot is a take, it’s best to either add that information to the name of the shot or add that information to the Description or Comment column.
Don’t be afraid of changing the name of the clip because you fear it will in some way affect your ability to relink. Adobe Premiere Pro maintains a field called Media File Path, even if the clip is offline.
The newer school of thought is that because you’re dealing with more footage than ever and it’s file-based with strange names, you should use bins to organize your footage in a general way and visually find the clips you want.
Subclips
On long clips, it’s very common to break them into smaller pieces using subclips. Some common uses of subclips include:
![]() Dividing interviews into just the interviewee’s responses
Dividing interviews into just the interviewee’s responses
![]() Separating different takes in an actor’s performance
Separating different takes in an actor’s performance
![]() Breaking continuous camera movements into individual elements
Breaking continuous camera movements into individual elements
![]() Splitting long B-roll shots into smaller clips so it’s easier to avoid using the same shot multiple times in a project
Splitting long B-roll shots into smaller clips so it’s easier to avoid using the same shot multiple times in a project
![]() Identifying best takes and then hiding the original clips in a bin labeled Do Not Use.
Identifying best takes and then hiding the original clips in a bin labeled Do Not Use.
Making a subclip (Figure 2.43) is as simple as marking an In and Out point on a clip and choosing Clip > Make Subclip.

One footnote about subclips is that most of the time the default option of Restrict Trims To Subclip Boundaries is a great default choice. For example, if you break an interview into subclips, odds are you’ll want to make the limit of that subclip “hard” to prevent trimming beyond the sound bite. Of course, there are times when you’ll need to break this rule. By selecting the original subclip in the project window, you can choose Edit Subclip (Figure 2.44).

Figure 2.44 Most of the time when you need to adjust a subclip, it can be done by adjusting the end or start time to make it a little longer.
I’m all in favor of keeping those boundaries if you need to modify a clip. And if you need to shift the edges of the clip, just add a little bit at the start and end (instead of deselecting Restrict Trims To Subclip Boundaries).
Adjusting the Bin Views
So much time is spent in the bin view finding and viewing clips that I’m stunned that more editors don’t use these keyboard commands:
![]() Shift + will switch between Thumbnail view and List view. Command+Page Up/Down (Ctrl+Page Up/Down) will also switch between the two.
Shift + will switch between Thumbnail view and List view. Command+Page Up/Down (Ctrl+Page Up/Down) will also switch between the two.
![]() Shift + [ and Shift + ] will cycle between the smallest and largest sizes in both Thumbnail and List views. I like these keys because they sit next to the Page Up/Down keys.
Shift + [ and Shift + ] will cycle between the smallest and largest sizes in both Thumbnail and List views. I like these keys because they sit next to the Page Up/Down keys.
![]() In Thumbnail view you can use JKL, the spacebar, and I/O to play and set marks on a clip (there’s a great editorial technique about this in the “Using a Bin as a Source Monitor” section in Chapter 3).
In Thumbnail view you can use JKL, the spacebar, and I/O to play and set marks on a clip (there’s a great editorial technique about this in the “Using a Bin as a Source Monitor” section in Chapter 3).
![]() In List view, making clips larger means little unless you turn on thumbnails in the List view (via the Panel menu). Many clips will be black (or show a slate) because the thumbnail (poster frame) shows the first frame of the clip.
In List view, making clips larger means little unless you turn on thumbnails in the List view (via the Panel menu). Many clips will be black (or show a slate) because the thumbnail (poster frame) shows the first frame of the clip.
![]() You can set the poster frame in a few ways. In Thumbnail view, click a clip and use JKL to find the frame you want. Then press Command+P (Ctrl+P). Or load a clip into the Source Monitor, find a good frame, and use the same keyboard command. Or go to the Panel menu and choose Show Preview area. The Preview area has a button for the thumbnail. I like this method least because it takes up visual real estate at the top of the project.
You can set the poster frame in a few ways. In Thumbnail view, click a clip and use JKL to find the frame you want. Then press Command+P (Ctrl+P). Or load a clip into the Source Monitor, find a good frame, and use the same keyboard command. Or go to the Panel menu and choose Show Preview area. The Preview area has a button for the thumbnail. I like this method least because it takes up visual real estate at the top of the project.
Remember that the more you use the keyboard, the faster and easier it is to find and evaluate clips that you may want to use!
Maximizing List Views with Metadata
The more footage you have, the more important it will be for you to add information about the shots. If you have only 20 clips, you can pretty much keep all of them in your head. But if you have 100 clips (or more), you’ll have to rely on other methods.
Adobe Premiere Pro has a ridiculous amount of metadata for your footage. For some List views you might want to see the duration of your clips; in other cases you might want to see a description or a comment if you thought the shot was good.
Customizing and saving a Metadata view
Let’s customize and save a view. This is fairly straightforward.
1. While in a bin, go to the Panel menu and choose Metadata Display.
2. Roll open Premiere Pro Project Metadata (Figure 2.45). This metadata is saved with the project and is optimized for video needs. You could add other types of metadata (for example, EXIF information that is optimized for print), but they’re optimized for other uses.

Figure 2.45 By giving you “too many” choices for metadata, Adobe makes it possible to keep pace with nearly everyone’s needs.
3. Click the Premiere Pro Project Metadata check box twice. The first time activates all the fields; the second time deactivates them to quickly choose the fields you want.
4. Add the Video In Point, Video Out Point, Video Duration, and Media Duration. This will quickly let you see all sorts of information about the length of shots.
5. Click the Save Settings button and give the view a descriptive name, like In-Out+ Duration.
Some Metadata views you should save
Hopefully you can see the benefit of having some prebuilt, saved Metadata Display settings.
One oversight is the lack of a keyboard command to quickly switch between different Metadata views. I map the Metadata display to Ctrl+Shift+I. Mnemonically, this is about Information, hence the letter I; many of the other variants of the “I” key are bound to In/Out points.
Here are several views that you should build:
![]() A view of the In-Out Duration mentioned previously
A view of the In-Out Duration mentioned previously
![]() A view that has everything that the Premiere Pro Project Metadata supports
A view that has everything that the Premiere Pro Project Metadata supports
![]() A view of Descriptors, which would contain the following fields: Label, Description, Comment, Scene, Good, Shot
A view of Descriptors, which would contain the following fields: Label, Description, Comment, Scene, Good, Shot
![]() An Offline view. Add the fields Status and Offline Properties. The Offline Properties will show you specifically what parts of a clip are offline—video and/or audio.
An Offline view. Add the fields Status and Offline Properties. The Offline Properties will show you specifically what parts of a clip are offline—video and/or audio.
Suite Relations
Adobe has created powerful interoperability between the different applications in Adobe Creative Cloud. Although there are numerous references to where and how the other applications work throughout this book (and in other books), I really didn’t see any real reference for what files are created where or how to configure the cache files. Therefore, I felt it would be valuable to offer you some best practices.
Common Threads Among All Apps
There are some commonalities for utilizing any of the other tools in Adobe Creative Cloud. They involve file naming, media, and caches.
File naming
It’s crucial to give descriptive names to any and every file that you create. This is probably the greatest secret to maintaining your sanity, whether you’re the sole person working on a project or you end up handing off portions to other specialists. Providing meaningful names goes for clip and bin names as well, but also for Adobe After Effects projects, Adobe Photoshop files, and so on.
Media (in general)
I cannot stress enough the corralling and controlling of every element and asset that you’ll handle prior to using Adobe Premiere Pro (or other Adobe tools).
As mentioned earlier a Common Media folder can help you keep everything organized.
Caches
As mentioned at the beginning of this chapter, Adobe uses a series of common Media Caches. There are two directories: Media Cache (which is the database) and Media Cache files (which are the individual files). These two folders contain conforming caches along with the database that optimizes playback of some codecs. What makes them common is that these caches are shared by a number of applications the Creative Cloud suite.
What’s important is that you configure all the applications to point to the same Common Media Cache folder. And because cache files increase quickly and (by default) are stored on your system drive, I suggest moving them to a fast, nonsystem drive.
Be sure to use the convention of _Adobe Caches at the root of a fast drive to set all caches.
Adobe Prelude
The primary function of Adobe Prelude is to copy file-based media and optionally back up and/or transcode. It has additional capabilities to mark footage and build simple sequences. I consider the copying and backing up of media vital to the health and sanity of all my projects.
Project
An Adobe Prelude project will be created, so I recommend placing it in the project’s Common Media 03_Project Files folder. Adobe Prelude Project files use the extension of PLPROJ (PreLude PROJect).
Project cache
Found in the General category of the Preferences is an Adobe Prelude Project cache. The Project cache speeds up the opening of an Adobe Prelude project. You can realistically leave this setting alone (even though the default is to place these files on your internal hard drive).
You may want to experiment with turning it off entirely. If you’re working on smaller projects or not going to return to a past Prelude project, you might consider turning this setting off.
Common Media Cache folder
Point the Media Cache Location and the Media Cache folder Location (Figure 2.46) to the _Adobe Caches folder.

Media
Media will be created based on the destinations chosen in the Ingest panel. The default is a folder based on the current date and time, and should be targeted to your Common Media folder 01_Original footage folder (Figure 2.47).
These copies will not be a “set” format for media (such as QuickTime or AVI). Rather, copied media matches the original media format type. QuickTime files will remain QuickTime files. Video in a card format and MXF container will be copied into a folder structure that mirrors the original media.
Transcoded media may be in any format that you choose to transcode to.
It’s best to leave the transfer settings in the Ingest dialog at the default, adding date and time information. Additionally, the default of verification is crucial to make sure media is copied correctly.
To send the links of the media to Adobe Premiere Pro, right-click on the clips/bins and choose Send to Premiere Pro.

Figure 2.47 The Ingest dialog in Adobe Prelude allows you to target more than one destination. Here, the footage will be copied twice, once to the Common Media 01_Original footage folder and a second time to another drive as a backup.
Adobe After Effects
It’s likely that you already use Adobe After Effects. Its primary function is to build motion graphic animations and composite multiple images. Of course, I do it a disservice to describe it as simply as this.
After Effects utilizes Dynamic Linking—a process where you can replace footage on the Adobe Premiere Pro Timeline with a composition built in After Effects. When you make changes in After Effects, the Adobe Premiere Pro Timeline gets updated.
Just like Adobe Premiere Pro can have a project that can contain multiple sequences, Adobe After Effects can have a project that can contain multiple compositions.
Project
A project will be created each time you use any of the three Dynamic Link features:
![]() Selecting Timeline clips and choosing to replace them with an After Effects composition
Selecting Timeline clips and choosing to replace them with an After Effects composition
![]() Creating a new After Effects composition
Creating a new After Effects composition
![]() Importing an After Effects composition
Importing an After Effects composition
The projects should be placed in the 03_Project Files in the Common Media folder. Projects will be saved with an extension of AEP (After Effects Project).
I’d strongly suggest duplicating your sequence prior to sending materials to Adobe After Effects. You can think of it as a powerful undo. If you really want flexibility, copy the footage to a higher track and send that to Adobe After Effects. This will put the Linked Adobe After Effects composition above the clips that were used!
Composition naming
When you send over footage from Adobe Premiere Pro to Adobe After Effects, it gets replaced by a composition with the following naming protocol: Adobe Premiere Pro Project name + Linked Comp #/Adobe After Effects project name.aep.
Remember that Adobe Premiere Pro knows where the Adobe After Effects project is and which comp you used. It’s a good idea to rename this file now in the project and drag it from the project window to the Timeline, destroying the file that was initially sent but now has a better name than “Construction doc Comp 02/ AE project.aep” in your project window and on your Timeline.
Disk Cache
The Disk Cache (Figure 2.48) is unique to Adobe After Effects. Each layer in an Adobe After Effects composition is cached individually. Later, when rendering or being referenced by Adobe Premiere Pro, these caches speed up the dynamic display and playback.

Figure 2.48 Adobe After Effects can utilize the same conforming cache that Adobe Premiere Pro uses, but it also has its own unique Disk Cache.
The Disk cache is persistent. It survives quitting. It will empty oldest elements first.
This must be done on a regular basis. Remember that as with all caches, they’re merely time-savers. If you accidentally delete an important cache, it will rebuild itself.
Additionally, it’s crucial that you move this specific cache to your fastest drive. Although I advocate moving all of your caches to fast drives, this is the most important application to perform this behavior in the suite.
Because it caches each layer individually (Figure 2.49), fast access is crucial. These caches do build up quickly, so having saving them in their default location could easily grow out of control. Fortunately, Adobe After Effects has a default limit of 50 GB.

Figure 2.49 Although Adobe After Effects has a RAM cache for layers (in green), it also has a persistent disk cache in blue. To see this on your system, hold down the Command (Ctrl) key and turn on Show Cache indicators in the Timeline panel menu. Displaying these indicators does impact performance.
If you point the Adobe After Effects Disk Cache to the same folder as the rest of your caches, Adobe After Effects will automatically create a folder called “Adobe” and a folder called “After Effects” for you.
Common Media Cache folder (Conformed Media Cache)
Adobe After Effects calls the Common Media Caches folder the Conformed Media Cache.
Point the Media Cache files and the Media Cache folder to the _Adobe Cache folder.
Imported media
Any non–Adobe Premiere Pro media that you import to Adobe After Effects should be copied to the project Common Media folder prior to importing. As a result, you’ll ensure that media unique to Adobe After Effects is handled with the rest of your project.
Consider rendering for performance
A great performance technique to guarantee real-time playback is to render out of After Effects in a postproduction codec (Avid DNxHD, Apple ProRes, or the Animation codec) and manually bring that into Adobe Premiere Pro’s Timeline (Figure 2.50), putting it above the sources and linked After Effects composition.
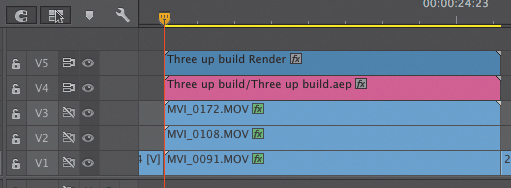
Figure 2.50 Here in Adobe Premiere Pro, tracks V1–3 are the sources that were sent to V4’s linked After Effects project. The composition was rendered there, imported back into Adobe Premiere Pro, and placed on V5.
A render like this should be labeled with the same name as the composition along with the word “Render.” This QuickTime movie file should be then laid above the After Effects composition it represents on the Timeline.
If you dedicate a track for these renders, it’s possible to generate the highest quality output by toggling the track off prior to output. By doing so, all those render files from Adobe After Effects will be ignored, forcing Adobe Premiere Pro to dynamically link and re-render at the final codec/resolution.
Adobe Media Encoder
Adobe Media Encoder is the engine for all compression throughout the Adobe Creative Cloud suite.
Common Media Cache folder
Point the Media Cache files Location and the Media Cache folder Location to the same _Adobe Cache file as the rest of the suite (Figure 2.51).
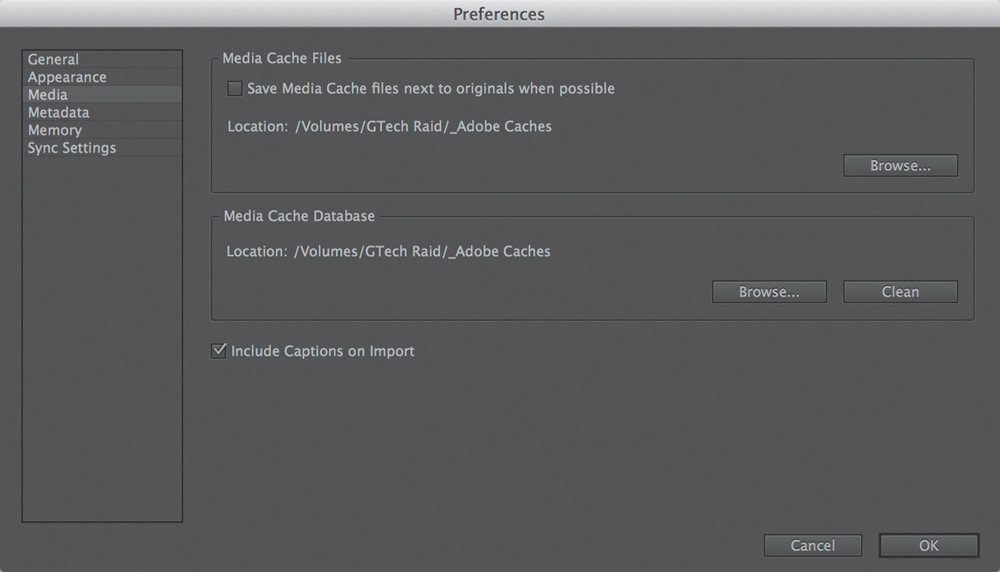
Figure 2.51 If all the Adobe products are targeted to the same cache files, once a clip is seen by one application it won’t need to be cached again.
Outputs/media
Adobe Media Encoder is the major method of output from Adobe Premiere Pro. Two best practices come to mind:
![]() Choosing a naming convention. This is vital to knowing what the file does and who it is for.
Choosing a naming convention. This is vital to knowing what the file does and who it is for.
In Chapter 7 I cover duplication of sequences and renaming directly for the purpose of output, meaning the filename automatically has the correct name.
![]() Targeting your Common Media 08_Exported files folder. Whether it’s QuickTime, OP1 MXF, MP4, or Flash files, targeting the outputs to the Common Media folder means easy location.
Targeting your Common Media 08_Exported files folder. Whether it’s QuickTime, OP1 MXF, MP4, or Flash files, targeting the outputs to the Common Media folder means easy location.
Adobe Photoshop
Adobe Photoshop serves a number of uses for the video editor: It’s a powerful title tool or a tool for the sizing, fixing, and repairing of still images.
A lesser-known capability of Photoshop is its ability to load individual video clips. This provides the benefit of being able to draw directly on frames or use filters that are Photoshop specific and not available to the rest of the tools.
![]() Tip
Tip
When using Photoshop as a tool to work directly on video, make sure you set the layout of your windows that includes a Timeline. Choose Windows > Workspace > Motion.
Performance cache
In Photoshop’s Preferences is a category called Performance (Figure 2.52), which is essentially a disk cache. Target the Scratch Disks to your fastest media drives.

If your fastest external drive is USB 2 or FireWire, the internal drive is a better choice.
Documents
Photoshop documents have the extension of PSD (PhotoShop Document). PSD files can be used directly in Adobe Premiere Pro. The biggest common mistake that editors tend to make is to have the document in a CMYK color space.
To change the color space to RGB, choose the Image > Mode > RGB Color.
Document setup
Documents can be started in Adobe Premiere Pro via the File menu. Choose File > New > Photoshop File to access a dialog where you can specify the dimensions of the Photoshop file. The dimensions default to the active sequence. I recommend placing the file created into the Common Media 04_Graphic Sources folder.
The import of Adobe Photoshop documents are preset to be a merged file (Figure 2.53). Some people who choose to use Photoshop as a titler will create multiple titles in a single file, each on its own separate layer. If this describes your workflow, you’ll have to import documents manually instead.

Figure 2.53 When importing a layered Photoshop file into Adobe Premiere Pro, you’ll likely want to switch the default (merged) option to a sequence.
Best practices
When you’re creating documents in Photoshop for import, use the prebuilt presets for Film & Video. You’ll likely want to use either HDTV 1080p for 1920 x 1080 or HDV/HDTV 720p for 1280 x 720 projects (Figure 2.54).
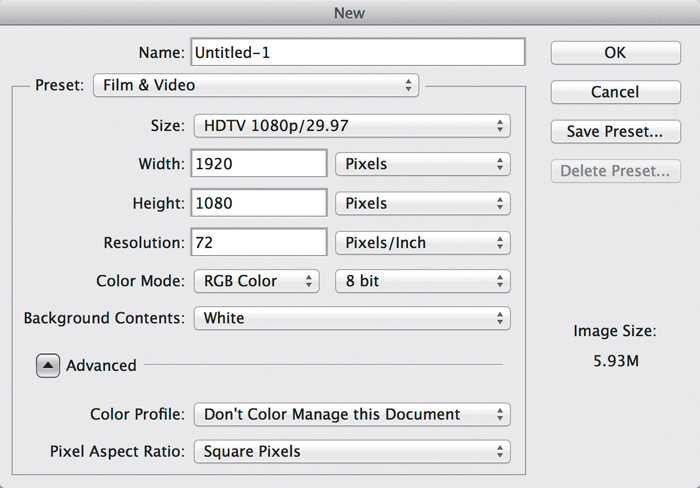
Figure 2.54 Photoshop lets you create a file with any dimensions you like. There are presets for Film & Video, which are especially valuable for titles.
There are times where nonstandard HD sizes are warranted, such as if you intend to pan and scan around an image or construct a title that’s larger than the format you’re working in.
In an ideal environment, with unlimited time, every photograph that will get loaded into Adobe Premiere Pro will travel to Photoshop for cleanup activities that can (and should) be automated, like applying Auto Tone. Advanced users may want to consider taking multiple steps and making them a Photoshop action to permit automation.
When documents are imported into Adobe Premiere Pro (which should be placed in the project’s Common Media folder prior to importing), a dialog offers a choice between four ways of handling layered documents:
![]() Merge All Layers. Results in a single file where all the layers have been merged into a single flattened file.
Merge All Layers. Results in a single file where all the layers have been merged into a single flattened file.
![]() Merged Layers. Identical to Merge All Layers except it’s possible to choose which layers will (or won’t) be merged.
Merged Layers. Identical to Merge All Layers except it’s possible to choose which layers will (or won’t) be merged.
![]() Individual Layers. A bin is created and each layer is imported (via a dialog) as individual elements.
Individual Layers. A bin is created and each layer is imported (via a dialog) as individual elements.
![]() Sequence. Identical to Individual Layers except that a sequence is created.
Sequence. Identical to Individual Layers except that a sequence is created.
![]() Tip
Tip
Adobe Bridge has an amazing ability to batch process a series of elements, such as a folder full of scanned pictures. Select the pictures in Adobe Bridge, and then choose Tools > Photoshop > Image Processor to access a dialog that permits the automated processing of images. Run an action (such as Auto Tone), convert formats from JPEG to TIFF, or perform a resize on a batch of images.
For 95 percent of cases I’d probably recommend the last choice, Sequence. Because each layer is imported, any individual layer can be used and animated. If necessary, using the sequence as a source item (a nest) will permit all of the layers to be treated as a single object.
Adobe Audition
Adobe Audition is a powerful audio mixing environment that focuses on sound design. Two interactions occur with Adobe Premiere Pro: sending individual clips, usually used for audio repair, and sending entire sequences, usually used as a full audio mixing environment.
Disk Cache
Disk Cache is slightly different from other applications’ cache adjustments. Although you should reconfigure the Primary Temp cache (Figure 2.55) to the _Adobe Cache folder, you need to nest the Primary Temp Disk Cache in its own unique folder. I suggest calling it Adobe Audition Cache.
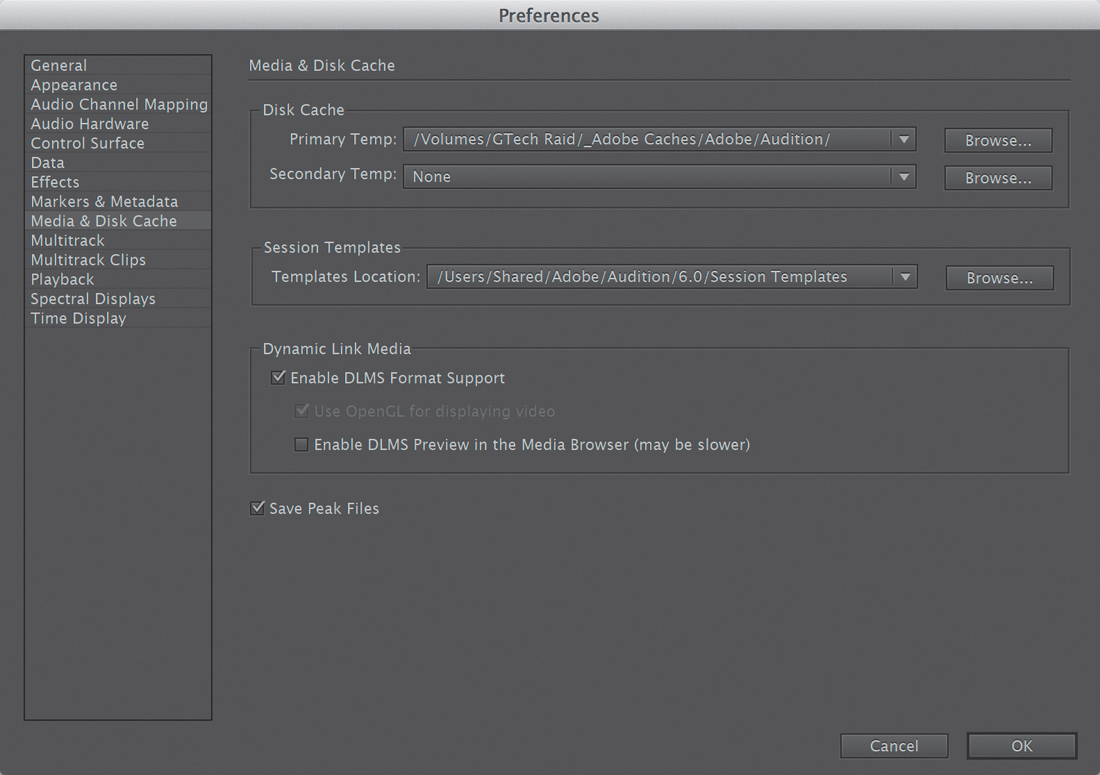
The Secondary Temp location can be left blank. It exists in case your Primary Temp location becomes full.
Clip
You send a single clip over to Adobe Audition to adjust that one clip by following these steps.
1. Right-click on the clip and choose Edit Clip in Adobe Audition. Or choose Edit > Edit in Adobe Audition > Clip.
Adobe Audition opens and your clip is loaded, ready for you to make changes.
2. Click Save and the clip is updated in Adobe Premiere Pro.
Now comes the messy part. In the project, in the same bin as the original footage, a new WAV clip appears with the original clip’s name plus extracted audio.
The audio portion of a clip is replaced in Adobe Premiere Pro by this extracted audio and linked to the video if there was any. This is easy enough to fix: Just add a bin of extracted audio (if you want, you may want to leave it there, next to the clip it came from).
More worrisome is that the WAV file was created where the project is on your computer. If you move it, you’ll have to relink it. And yes, I think you should move it into a different folder in the Common Media folder.
Entire sequences
Another way to work is to use Audition as a full-featured Digital Audio Workstation (DAW).
To send the sequence over to Adobe Audition, follow these steps.
1. Activate the Timeline window.
2. Choose Edit > Edit in Adobe Audition > Sequence.
The dialog in Figure 2.56 appears.
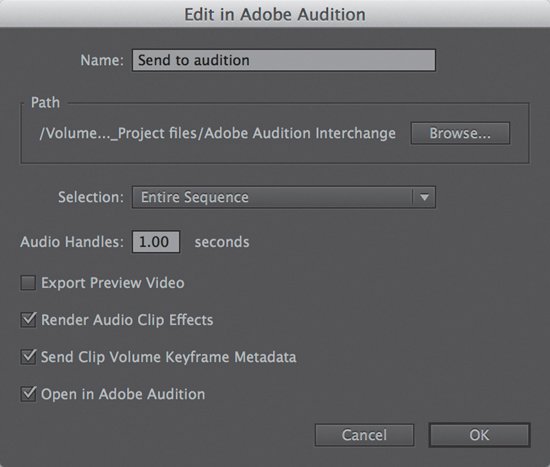
Figure 2.56 In addition to the defaults, you’ll likely want to select Export Preview Video to watch while you work in Audition.
Adobe Premiere Pro wants to (by default) place the Audition project where your Adobe Premiere Pro project is located (03_Project Files in the Common Media folder) in a folder called Adobe Audition Interchange. Within that folder will be the XML that Audition needs to re-create your sequence, a copy of all the audio from every track plus the handle length (default of one second), and a small mixed-down video in standard definition to act as a visual reference while working in Audition.
Back to Adobe Premiere Pro
When you send the material back to Adobe Premiere Pro, you won’t get every clip on every track. Classically in DAWs, you create a stereo “bounce” that you export and then import back in your video editor of choice. You can do this in Audition, but there’s a better way to work. Choose Multitrack > Export to Adobe Premiere Pro. A dialog that looks like Figure 2.57 appears.
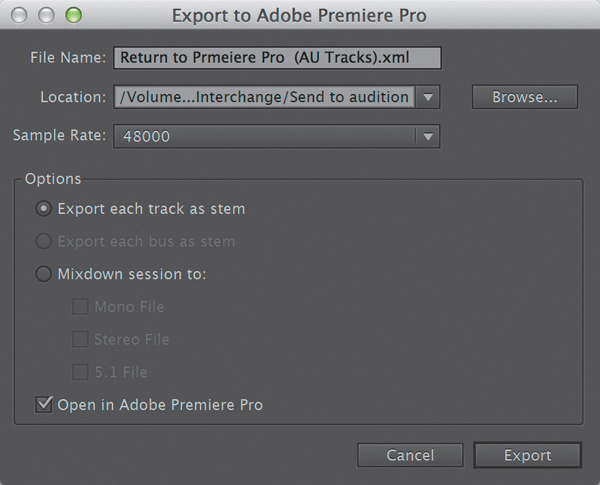
Figure 2.57 By exporting each track as a stem, you’ll have some ability to adjust the mix if necessary back in Adobe Premiere Pro.
Put the project (the new XML file) in the Common Media 03_Project Files folder. Make sure you add the words “Final Mix Return” to indicate that this XML file is coming back from Audition.
![]() Tip
Tip
Before you send anything back to Adobe Premiere Pro, make sure you duplicate the original sequence you sent over, open it, and add the name “audio mix.” When Audition sends the audio back, it’ll want to create tracks in your sequence. Having a separate sequence means you can look at your work before and after it went to Audition.
There are two choices for the actual audio:
![]() A mixdown of the final format. This is likely to be a Stereo or 5.1 file.
A mixdown of the final format. This is likely to be a Stereo or 5.1 file.
![]() Export each track as a stem. You’ll get one “stem” per track, which allows you the option of a last-second adjustment in Adobe Premiere Pro before final output.
Export each track as a stem. You’ll get one “stem” per track, which allows you the option of a last-second adjustment in Adobe Premiere Pro before final output.
Typically, when a project comes back from Audition (or any other DAW), the original tracks are muted and you listen to the final mix instead.
Adobe SpeedGrade
Adobe SpeedGrade is the dedicated color correction environment that exists beyond the color correction filters in Adobe Premiere Pro.
Choosing to include it in your workflow creates very few extra files (compared to the other tools in Adobe Creative Cloud). Adobe SpeedGrade just ends up feeling like a very special “effect” that’s external to Adobe Premiere Pro.
LUTs and Looks
Some projects use custom look-up tables (LUTs) to help visually represent the media from the camera. These files will have the extensions of either .ilut or .cube (depending on if they’re a one-dimensional LUT or a three-dimensional LUT). If these are created outside of Adobe SpeedGrade, it’s best to add them to a dedicated folder in the project Common Media folder.
Lumetri Looks are automatically added as effects on the return trip from SpeedGrade to every clip. If you create any additional Look preset files (.look), they should also be added to a dedicated folder in the project Common Media folder.
Media Setup Summary
Table 2.2 (facing page) provides a summary of what should be created and where for your system setup.
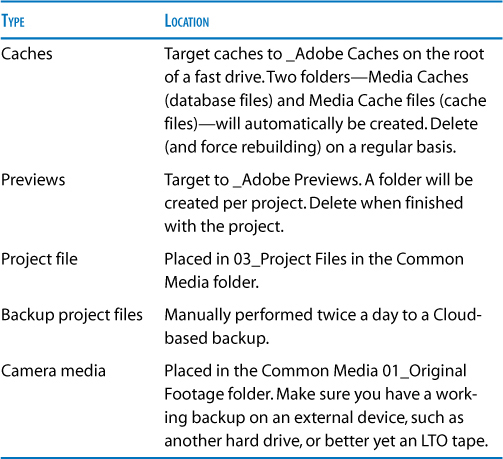
Speech and Script Technologies
Adobe Premiere Pro has a speech recognition engine (in Adobe Media Encoder) that produces adequate results with a clean professional speaker. But even 98 percent recognition means that every minute you’ll have something that you need to adjust.
On the other hand, when paired with a transcript or script, via Adobe Story, Adobe Premiere Pro has a whole new capability—the technique of editing directly from text.
Adobe Story (Figure 2.58) is really two applications in one.
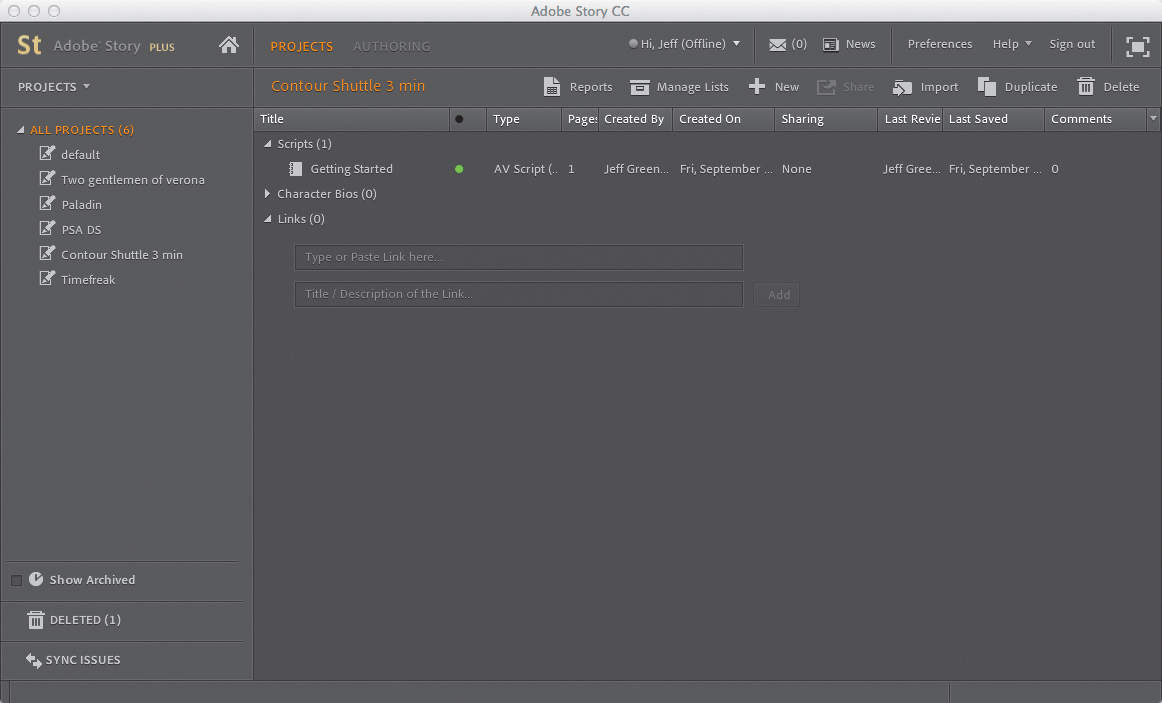
If you’re working on narrative fiction or AV scripts, you’ll benefit from the fast, efficient writing and editing tools. No regular word processor can compete for speed and flow when it comes to script writing with Story.
As you move into preproduction and production, you’ll find that Story offers a range of project management tools, including the creation of production reports based on your script, schedules that can be updated as your script changes, and the ability to generate useful production documents like call sheets or shooting scripts. If you haven’t taken the time to explore Adobe Story, I encourage you to do so. You have access to the Plus version as part of Adobe Creative Cloud.
Fast Scriptwriting
Plenty of books and training courses are available on how to write a script well (good luck with that!).
There are also excellent training courses on how to use the advanced features available in Adobe Story. More as encouragement to explore than as a set of full instructions, here are some of the valuable script-writing features in Adobe Story:
![]() Story is cloud-based and provides flexible collaboration tools (Figure 2.59). Share your creative work with anyone (whether or not they have a paid subscription to Creative Cloud). You can share individual documents or whole projects (click the Share button).
Story is cloud-based and provides flexible collaboration tools (Figure 2.59). Share your creative work with anyone (whether or not they have a paid subscription to Creative Cloud). You can share individual documents or whole projects (click the Share button).
![]() The Project view (Figure 2.60) provides a home for multiple document types, not just scripts. This makes a shared project a great place to store key documents and information associated with a creative project.
The Project view (Figure 2.60) provides a home for multiple document types, not just scripts. This makes a shared project a great place to store key documents and information associated with a creative project.

Figure 2.60 The Project view helps keep everything organized with all sorts of useful preproduction documentation.
![]() Script writing can be tedious, in part because layout and text formatting (Figure 2.61) must generally match carefully prescribed standards. Story knows what each type of text is (Character name, Scene Heading, Dialogue, etc.) and automates the writing process. When you press Enter to move to the next line, Story presumes you’ll want a different type of text.
Script writing can be tedious, in part because layout and text formatting (Figure 2.61) must generally match carefully prescribed standards. Story knows what each type of text is (Character name, Scene Heading, Dialogue, etc.) and automates the writing process. When you press Enter to move to the next line, Story presumes you’ll want a different type of text.

Figure 2.61 By supporting the standard industry formatting, scripts from Adobe Story look professional.
![]() Once Adobe Story knows what each part of your script is, production reports and schedules can be automatically generated. Just click the Create button in the Project view (Figure 2.62).
Once Adobe Story knows what each part of your script is, production reports and schedules can be automatically generated. Just click the Create button in the Project view (Figure 2.62).

These features and more make Story an excellent starting place for production. If you’re working on reality/actuality television—an unscripted format—you may not get as much out of the application as a fiction/narrative filmmaker.
But one feature stands out, especially for interviews: support for the speech to text workflow in Adobe Premiere Pro.
Speech to Text
As you should already know, Adobe Premiere Pro can analyze clip audio and convert dialogue into typed words displayed in the Metadata panel. Simply right-click on a clip in the Project panel, choose Analyze, select some straightforward options, and the Adobe Media Encoder will perform the analysis.
Once the analysis is complete, you can select words in the Metadata panel and the clip playhead will jump to that moment in time. You can then edit based on the text rather than having to listen to the words—amazing!
The problem is that the analysis is often wrong, and quite a few words won’t match the original dialogue. It’s impossible for the system to recognize every word perfectly, so it makes a best guess (in fact, every word it identifies is the product of different levels of probability).
So how can you improve the results? Use Adobe Story.
If you have interviews professionally transcribed (which costs far less than it used to), you can then use that transcription text as a reference for the speech to text analysis. The result will be a perfect word for word, exactly as spoken, with no errors (at least as long as the transcription is accurate).
Setting up in Adobe Story
To understand the Story workflow, download the Maxim_Intro.mov clip and the Maxim_Intro.stdoc script file, and then follow these steps.
![]() Notes
Notes
This material is available for download. Please see “A note about downloadable content” in the Introduction of this book.
We’ll use the integrated Adobe Story panel right inside Adobe Premiere Pro. There are other ways to do this, so consider taking the time to research the options before you decide which workflow is best for you.
1. To access Adobe Story, go to story.adobe.com (not www.adobe.com). Log in using your Adobe ID, and click the Projects button (Figure 2.63) at the top of the screen.
2. Choose Projects > New Project, give the new project a name, and click Create.
3. Click Import, browse to the file Maxim_Intro.stdoc and click Open. Although Story is cloud-based, you can save documents to your desktop like any other application and import or export final draft files among others.
4. Switch over to Adobe Premiere Pro. Create a new project and import the file Maxim_Intro.mov. The file is included as a ZIP file because the text that is added during this workflow is stored in the media file, not the Adobe Premiere Pro project. If you want to try the workflow again, unzip another copy of the file.
5. Choose Window > Adobe Story. Log in using your Adobe ID, and you should find the Maxim_Intro script waiting for you. Double-click on it to open it.
This is a very simple script with just one piece of dialogue. If you’ve recorded an interview and you want to include the questions as well as the answers, be sure to put the speaker’s name in where appropriate.
Here’s the wonderful shortcut: To the left of the Adobe Story panel is a scene navigator. Actually, there’s only one scene in this script (Figure 2.64) so it’s a list with just one item.
Drag that scene listing from the Adobe Story panel onto the Maxim_Intro.mov clip (in Icon view) in the Project panel.
When you do so, very little will appear to happen, but if you look in the Metadata panel, you’ll notice that the Speech Analysis heading now mentions an Embedded Adobe Story Script. You have just associated the dialogue from that scene with the clip in the bin using a simple drag-and-drop workflow. How amazing is that!?
All that remains is to click the Analyze button (Figure 2.65) at the bottom of the Metadata panel and click OK.

In the Analyze content dialog, you should not need to change any of the settings unless you’re working in a language other than US English. If there are multiple speakers, consider selecting the Identify Speakers option. Adobe Premiere Pro will show the speaker names as they appear in the script.
Using the Metadata panel to edit
Story’s simple workflow might just save you hours of preparation time in post. Once the analysis is complete, the words are highlighted as they are spoken in the Metadata panel, making it easy to locate content. This works in reverse too: Click on a word and the playhead moves to it.
You can even use the Quick Search box at the top of the Metadata panel to locate words. Now that paper edit is more useful than ever. In fact, you could even copy and paste words from the typed transcription into the Quick Search box to locate them.
But best of all, at the bottom of the Metadata panel (Figure 2.66) you have the ability to play, mark, and insert/overwrite into the sequence via the buttons or keys.