8. Creating Interactive Animations
What You’ll Do
Use Show and Hide Element Snippets
Use Create and Delete Snippets
Swap Images in a Photo Gallery
Introduction
JavaScript is a scripting language that adds functionality to a web page. Many elements that you find on a web page, such as menus, are created with JavaScript code. Since JavaScript is so common in web page development, Edge Animate uses JavaScript as part of the structure behind a composition. When you save a composition, Edge Animate creates and includes JavaScript files (denoted by a .js extension) in the project folder.
Within Edge Animate, you can use JavaScript as a way to add interactivity and animation effects to a composition. If you’re not very comfortable working with JavaScript code, you can use code snippets to help get started. A code snippet is a predefined segment of JavaScript code. In Edge Animate, you can insert and work with code snippets in any of the script panels, either Trigger, Open Actions, or Code.
You can create interactivity in a composition by adding actions to elements or triggers to the Timeline. An action or trigger enables you to invoke a script with JavaScript code to perform a function. The script is invoked when a certain “event” occurs, such as the click of the mouse or the position of the Playhead. For example, you can attach the Click event action script to a button that runs whenever the user clicks the button.
Inserting Labels
Creating a label in the Timeline allows to reference a specific timeline location in a script. For example, you can label the beginning of an animation “start,” and then create an action to send the animation back to the label (which is the start in this case) when it’s done, thus creating a loop. After you create a label, you can move it to another place in the Timeline, and not have to make any changes to the script. You can also quickly rename a label, and if you no longer need it, you can delete it too.
Insert a Label
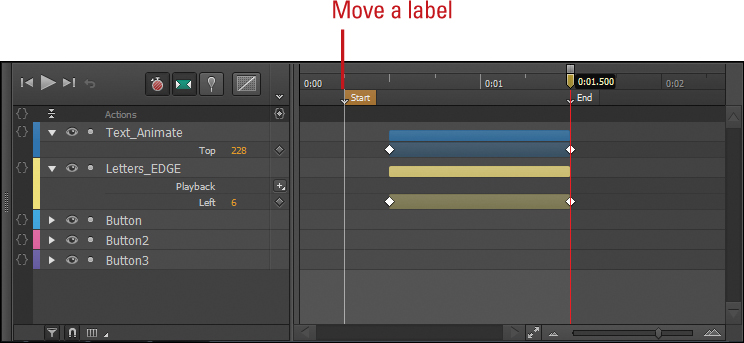
![]() Position the playhead where you want to insert a label.
Position the playhead where you want to insert a label.
![]() Click the Insert Label button in the Timeline or click the Timeline menu, and then click Insert Label.
Click the Insert Label button in the Timeline or click the Timeline menu, and then click Insert Label.
Timesaver
Press ![]() +L (Mac).
+L (Mac).

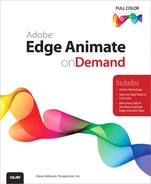
![]() Type the label text you want, and then press Enter (Win) or Return (Mac).
Type the label text you want, and then press Enter (Win) or Return (Mac).
An arrow and black line going down the Timeline appear to the left of the label name.
Did You Know?
You can use a label to create a loop. A loop allows you to repeat all or part of an animation. Create a start label at the Playhead start of the loop. Create a trigger at the Playhead location where you want to loop (jump) back, and then use the script.sym.play(start);
Work with Labels in the Timeline Panel
• Select a Label. Click the label to highlight and select it.

• Delete a Label. Click the label, and then press Delete.
• Rename a Label. Double-click the label, type label text, and then press Enter (Win) or Return (Mac).

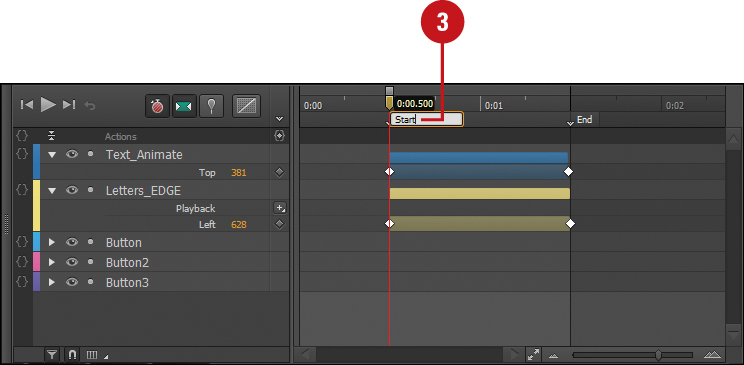
• Move a Label. Point to the label (cursor changes to a hand), and then drag it.
Inserting and Editing Triggers
A trigger enables you to invoke a script to perform a function. The script is invoked when a certain “trigger” occurs. You attach a trigger to the Timeline. When the Playhead reaches the trigger, the script executes the code. You can enter in your own JavaScript code or insert predefined snippet code. For example, you can attach a trigger in the Timeline with the Stop snippet code. When the Playhead reaches the trigger, it stops the Playhead in the Timeline. A trigger appears on the Timeline under Actions (at the top) as a keyframe diamond between brackets. You can drag a trigger in the Timeline to change its position. If you want to use the same trigger in another place, you can copy and paste it. If you no longer need a trigger, you can delete it.
Insert a Trigger
![]() In the Timeline, drag the Playhead to the place where you want to insert a trigger.
In the Timeline, drag the Playhead to the place where you want to insert a trigger.
![]() Click the Insert Trigger button in the Timeline or click the Timeline menu, and then click Insert Trigger.
Click the Insert Trigger button in the Timeline or click the Timeline menu, and then click Insert Trigger.
Timesaver
Press Ctrl+T (Win) or ![]() +T (Mac).
+T (Mac).
A script panel appears for the trigger with a code editor and snippet buttons.
![]() Click to place the insertion point where you want to insert code.
Click to place the insertion point where you want to insert code.
![]() Type in your own code or click a snippet button to insert predefined snippet code.
Type in your own code or click a snippet button to insert predefined snippet code.
![]() For a code snippet, select the red code (placeholder), and then replace it with your own.
For a code snippet, select the red code (placeholder), and then replace it with your own.
![]() Click the Close button to exit the script panel.
Click the Close button to exit the script panel.

Work with Triggers in the Timeline Panel
• Edit a Trigger. Double-click a trigger in the Timeline to open the script panel. Edit the script code. When you’re done, click the Close button.
• Select a Trigger. Click the trigger in the Timeline to select it. The keyframe diamond turns orange.

• Move a Trigger. Point to the trigger under Actions in the Timeline (cursor changes to a hand), and then drag it.

• Delete a Trigger. Click the trigger in the Timeline to select it, and then press Delete.
• Copy and Paste a Trigger. Click the trigger in the Timeline to select it, click the Edit menu, click Copy, position the Playhead where you want, click the Edit menu, and then click Paste.
Did You Know?
You can change the code font size in a script panel. In a script panel, click the Options button, point to Font Size, and then click Small, Medium, or Large to select (show) the check mark.
You can show or hide code line numbers in a script panel. In a script panel, click the Options button, and then click Show Line Numbers to select (show) the check mark.
You can include or not include snippet comments in a script panel. In a script panel, click the Options button, and then click Include Snippet Comments to select (show) the check mark.
Inserting and Editing Action Events
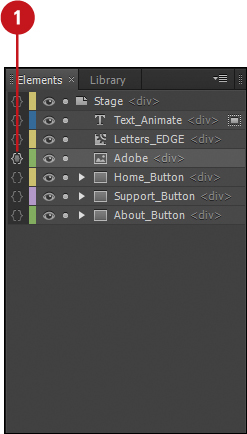
An action enables you to invoke a script to perform a function. The script is invoked when a certain “event” occurs, such as the click of the mouse. You can attach an action script to an element (including the Stage and Timeline) that responds when a specific event occurs. For example, you can attach the Click event action script to a button that runs whenever the user clicks the button. You can attach a script to an element by using the Actions panel by using an Open Actions button (appears with brackets) for an element in the Elements, Properties, or Timeline panels. You can enter in your own JavaScript code or insert predefined snippet code. When an element contains an action event, it appears with a square between the brackets. You can attach multiple actions to the same element.
Insert an Action
![]() In the Elements, Properties (with a selected element), or Timeline panel, click the Open Actions button for an element.
In the Elements, Properties (with a selected element), or Timeline panel, click the Open Actions button for an element.
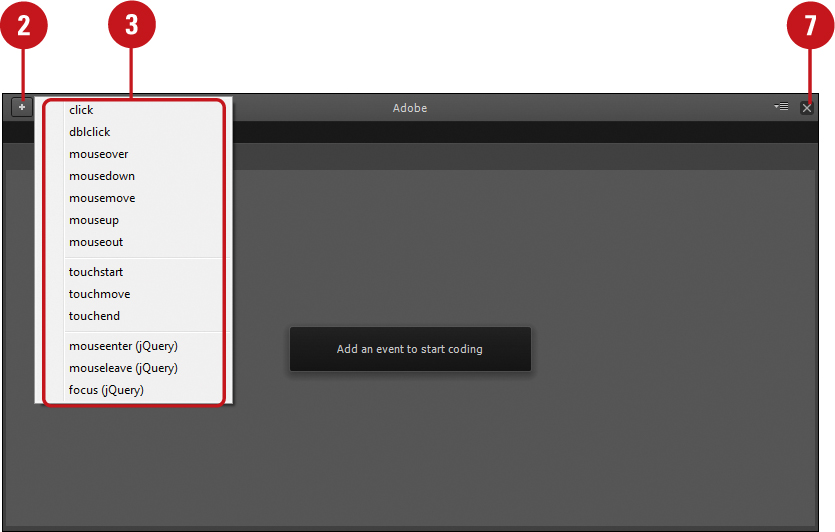
A script panel appears with a code editor and snippet buttons. For a new action, a menu appears.


![]() To add another action, click the Add button (+).
To add another action, click the Add button (+).
![]() Click an event action on the menu.
Click an event action on the menu.
An event action tab appears where you can enter code to respond to the action.
![]() Click to place the insertion point where you want to insert code.
Click to place the insertion point where you want to insert code.
![]() Type in your own code or click a snippet button to insert predefined snippet code.
Type in your own code or click a snippet button to insert predefined snippet code.
![]() For a code snippet, select the red code (placeholder), and then replace it with your own.
For a code snippet, select the red code (placeholder), and then replace it with your own.
![]() Click the Close button to exit the script panel.
Click the Close button to exit the script panel.
Edit an Action
![]() In the Elements, Properties (with a selected element), or Timeline panel, click the Open Actions button for the element (a square appears between the brackets).
In the Elements, Properties (with a selected element), or Timeline panel, click the Open Actions button for the element (a square appears between the brackets).
![]() Click an action tab.
Click an action tab.
![]() Click to place the insertion point where you want to insert code.
Click to place the insertion point where you want to insert code.
![]() Edit the code or click a snippet button to insert predefined snippet code.
Edit the code or click a snippet button to insert predefined snippet code.
![]() For a code snippet, select the red code (placeholder), and then replace it with your own.
For a code snippet, select the red code (placeholder), and then replace it with your own.
![]() Click the Close button to exit the script panel.
Click the Close button to exit the script panel.
Delete an Action
![]() In the Elements, Properties (with a selected element), or Timeline panel, click the Open Actions button for the element (a square appears between the brackets).
In the Elements, Properties (with a selected element), or Timeline panel, click the Open Actions button for the element (a square appears between the brackets).
![]() Click an action tab for the action you want to delete (if more than one).
Click an action tab for the action you want to delete (if more than one).
![]() Click the Delete button (-).
Click the Delete button (-).
![]() Click the Close button to exit the script panel.
Click the Close button to exit the script panel.

Listing of Action Events
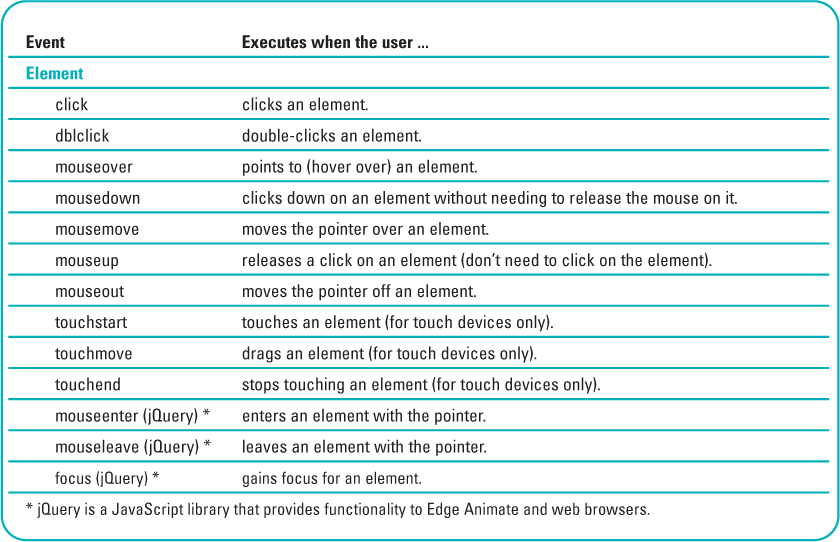
An action enables you to invoke a script to perform a function that responds when a specific event occurs. You can attach an action script to an element (including the Stage and Timeline) that responds when a specific event occurs. For example, you can attach the Click event action script to a button that runs whenever the user clicks the button.
There are a variety of different action events available in Edge Animate. The most common ones are probably click or mouseover, for a computer, however, you can also use events—such as touchstart, touchend, or orientationchange—for a touch-based tablet or mobile device.
In addition to attaching events to an element, such as a shape or graphic, you can also attach an event to the Stage or Timeline. For example, you can attach a keyboard event, such as keydown, to the Stage. When you press a specified key on the keyboard, an event can take place. If you need to load one or more time consuming graphics, you can use the compositionReady event to start an animation when the composition is fully loaded.
Element Action Events
Stage and Timeline Action Events

Inserting Code Snippets
A code snippet is a predefined segment of JavaScript code. In Edge Animate, you can insert and work with code snippets in any of the script panels, either Trigger, Open Actions, or Code. You can open the Trigger panel when you insert or edit a trigger in the Timeline. You can open the Open Actions panel when you create or edit an action for an element. And finally, you can open the Code panel from the Windows menu. In the Code panel, you may need to use the Toggle Display of Code Snippets button to show the snippet. You can insert JavaScript code by clicking a snippet button. You can insert as many code snippets as you want into the script. After you insert a code snippet, you can edit it. Code in red is placeholder text that you can modify to suit your own needs.
Insert a Code Snippet
![]() Open a script panel, either Trigger, Open Actions, or Code.
Open a script panel, either Trigger, Open Actions, or Code.
• Trigger Panel. Position the Playhead in the Timeline, and then click the Insert Trigger button, or double-click an existing trigger in the Timeline.
• Open Actions Panel. Click an Open Actions button in the Timeline, Elements or Properties panel. For a new action, click an event on the menu.
• Code Panel. Click the Window menu, click Code, and then click the Toggle Display of Code Snippets button to show the snippet buttons.
![]() To include or not include snippet comments, click the Options button, and then click Include Snippet Comments.
To include or not include snippet comments, click the Options button, and then click Include Snippet Comments.
![]() Click to place the insertion point where you want to insert the snippet code.
Click to place the insertion point where you want to insert the snippet code.
![]() Click the snippet button with the code you want to insert.
Click the snippet button with the code you want to insert.
![]() Select the red code (placeholder), and then replace it with your own.
Select the red code (placeholder), and then replace it with your own.
![]() Click the Close button to exit the script panel.
Click the Close button to exit the script panel.

Listing of Code Snippets
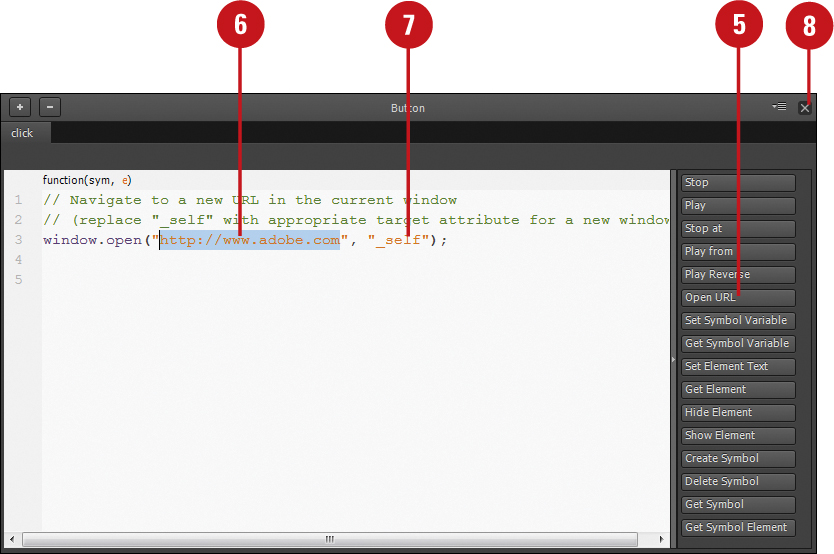
A code snippet is a predefined segment of JavaScript code. You can access code snippets in a script panel, either Trigger, Open Actions, or Code. You can access the Trigger panel when you insert or edit a trigger; click the Insert Trigger button or double-click an existing trigger. You can access the Open Actions panel when you create or edit an action for an element; click an Open Actions button in the Timeline, Elements, or Properties panel. You can access the Code panel from the Windows menu; click the Window menu, and then click Code. In the Code panel, click the Toggle Display of Code Snippets button to show or hide it. You can insert code by clicking a snippet button. For example, the Open URL snippet button inserts the following code:
window.open("http://www.adobe.com","_self");
After you insert a code snippet, you can edit it. Code in red is placeholder text that you can modify to suit your own needs.
Code Snippets

Working with JavaScript Code
JavaScript code is made up of individual statements. Each statement follows a basic syntax, which is the grammar of a programming language. For example, when you insert the Play code snippet, the following statement is inserted into a script panel:
sym.play(0);
When you insert the Show Element code snippet, the following statement is inserted into a script panel:
sym.$("Text1").show();
The word sym stands for symbol and represents the element (including the Stage and Timeline). The dot (.) is a separator between elements, functions, and attributes. The dollar sign ($) is the jQuery selector that looks up the element in the parenthesis (in this case, Text1) by name (ID). The word play or show represent the function command, and the value or variable in the parenthesis represents attributes for the command. The statement ends with a semicolon (;). If a statement becomes too long to fit on a line, you can add a backward slash () to continue the statement on the next line.
JavaScript is case sensitive, which means that capitalization matters when you write code. For example, the following names are different: “addvideo,” “Addvideo”, or “AddVideo.” JavaScript ignores whitespace, including spaces, tabs, and new lines. This allows you to add whitespace to your code in order to make it easier to read. JavaScript includes reserved word or keywords that have special meaning and functionality to the programming language. For example, JavaScript uses the following common reserve words: var, function, new, if, else, and while. You can’t use these in your code.
Working with Comments
When you insert a snippet, the code also includes a comment at the top by default. A comment appears after two forward slashes (//). A comment can start anywhere on the line, like after a statement. When you want to make a comment block (multiple lines), JavaScript uses /* at the beginning and */ a the end. Comments are ignored by JavaScript. If you don’t want a snippet to include comments, you can set an option to do so. In a script panel, click the Options button, and then click Include Snippet Comments to deselect (hide) the check mark.
Working with Variables
When you insert some snippets—such as Get Element, Create Symbol, Get Symbol, Get Symbol Variable or Get Symbol Element—the JavaScript code includes a variable. A variable is a container for storing information. A variable can hold data, such as a number or text, known as a string. A string appears inside quotes, either single or double. You declare a variable in JavaScript with the var keyword. Variable names must begin with a letter, $, or _ (no numbers). The characters that follow can only be letters, $, _, or numbers. After you specify a variable name, you can assign it a value. To assign a value to a variable, you use an equal sign followed by a value or element.
For example, when you insert the Get Element code snippet, the following statement is inserted into a script panel:
var element = sym.$("Text1");
The word var stands for variable. The word element is the variable name, which you can change. The equal sign makes the assignment. The assignment value is sym.$("Text1"), which is the contents of the Text1 element.
After declaring the variable, you can use JavaScript code to modify it. For example, you can modify the Text1 element by using the following statements:
element.hide();
element.animate('opacity', 0.25);
element.attr('src, 'images/trees.jpg'),
Using HTML and CSS Code
JavaScript gives you the ability to use HTML and CSS code in Edge Animate. When you create a shape, add text, or import a graphic, Edge Animate automatically assigns the element an HTML ID name and division (DIV) tag, and creates CSS based on the attributes set in the Properties panel. A tag is HTML’s basic way to identify items. An ID name creates a unique identifier for an element. If you want to work with multiple elements for a similar purpose, you can assign them a common class name. You can access and change these options in the Properties panel.
Adding HTML Code
HTML is the code behind a web page. In a script panel, you can add HTML in JavaScript code. When you view HTML code, tags always appear with angle brackets (< >), such as <div>. Here are a few HTML examples:
sym.$("Text1").html("NewText");
sym.$("Text1").html("<a href='http://www.adobe.com'>Adobe</a>");
If you want to add straight HTML code (no JavaScript) to your composition, you can open the HTML document in an external editor, such as Adobe Edge Code.
Adding CSS Code
CSS (Cascading Style Sheets) is an industry standard method for formatting and positioning HTML content on a web page. Edge Animate uses CSS behind the scenes. Here are a few CSS examples:
sym.$("Text1").css('cursor','pointer'),
sym.$("RoundRec").css('width','640px'),
sym.$("RoundRec").css('height','360px'),
sym.$("RoundRec").css('backgroundColor','blue'),
If you want to add multiple CSS attributes, you can use curly brackets ({ }). Here is an example:
sym.$("RoundRec").css({ "width": "640px", "height": "360px"
"backgroundColor": "blue" });
If you want to add straight CSS code (no JavaScript) to your composition, you can open the HTML document in an external editor, such as Adobe Edge Code, or create an external .css file. For more information, see “Working with CSS,” on page 254.
Getting JavaScript Help
If you need more detailed information about JavaScript in Edge Animate, you can find out on the web. Edge Animate JavaScript API provides information on how Edge Animate uses JavaScript and how you can too. To access the online help, click the Help menu, click Edge Animate JavaScript API, and then click a link to the topic you want to find out more about. If you like to learn by example, the online JavaScript resource provides example code throughout the site to give you perspective on how to use it.
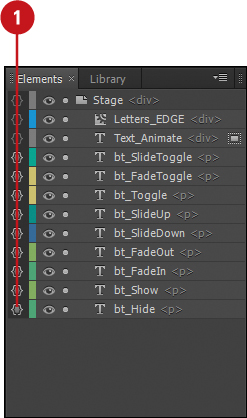
Using Show and Hide Element Snippets
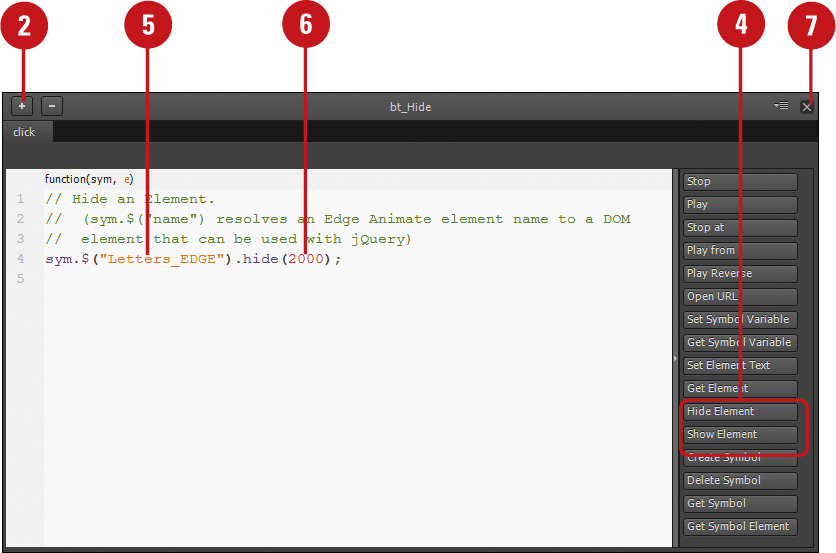
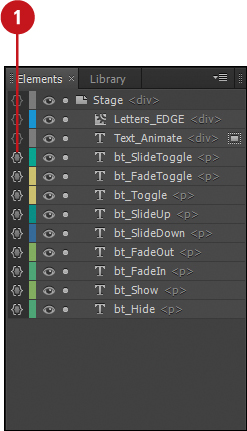
The Show Element and Hide Element snippets allow you to show or hide an element on the Stage. It’s a simple function, however it’s very useful for showing and hiding elements on the screen. After you insert the Show Element or Hide Element snippet, you can specify the element that you want to change, as well as indicate how long you want to wait before the action takes place. For example, the Hide Element JavaScript code sym.$("RoundRec').hide(1000); hides the RoundRec element after a one second (or 1000 milliseconds) delay. In addition to the code snippets, you can also use other JavaScript code to show and hide elements with an added fade in and out or slide up and down. You can also use JavaScript code to toggle that shows or hides an element based on its current state. If the element is currently shown, toggle hides it; if its currently hidden, toggle shows it.
Use Show and Hide Element Snippets
![]() In the Elements, Properties (with a selected element), or Timeline panel, click the Open Actions button for an element.
In the Elements, Properties (with a selected element), or Timeline panel, click the Open Actions button for an element.
For a new action, a menu appears. If not, click the Add button (+).
![]() Click an event action on the menu.
Click an event action on the menu.
![]() Click to place the insertion point where you want to insert code.
Click to place the insertion point where you want to insert code.
![]() Click Show Element or Hide Element.
Click Show Element or Hide Element.
Either of the following statements gets inserted in the script panel.
sym.$("Text1").show();
sym.$("Text1").hide();
![]() Replace Text1 with the name of the element you want to show or hide.
Replace Text1 with the name of the element you want to show or hide.
![]() If you want to add a delay, enter a time in milliseconds in the parenthesis after
If you want to add a delay, enter a time in milliseconds in the parenthesis after show or hide.
![]() Click the Close button to exit the script panel.
Click the Close button to exit the script panel.
Use Fade, Slide, and Toggle Element Code
![]() In the Elements, Properties (with a selected element), or Timeline panel, click the Open Actions button for an element.
In the Elements, Properties (with a selected element), or Timeline panel, click the Open Actions button for an element.
For a new action, a menu appears. If not, click the Add button (+).
![]() Click an event action on the menu.
Click an event action on the menu.
![]() Click to place the insertion point where you want to insert code.
Click to place the insertion point where you want to insert code.
![]() Enter any of the following code statements:
Enter any of the following code statements:
sym.$("Element").toggle();
sym.$("Element").fadeIn();
sym.$("Element").fadeOut();
sym.$("Element").fadeToggle();
sym.$("Element").slideUp();
sym.$("Element").slideDown();
sym.$("Element").slideToggle();
![]() If you want to add a delay, enter a time in milliseconds or the attributes ‘
If you want to add a delay, enter a time in milliseconds or the attributes ‘slow', ‘normal', or ‘fast' in the parenthesis.
sym.$("Element").fadeIn(2000);
sym.$("Element").fadeIn('slow'),
![]() Click the Close button to exit the script panel.
Click the Close button to exit the script panel.

Using Element Text Snippets
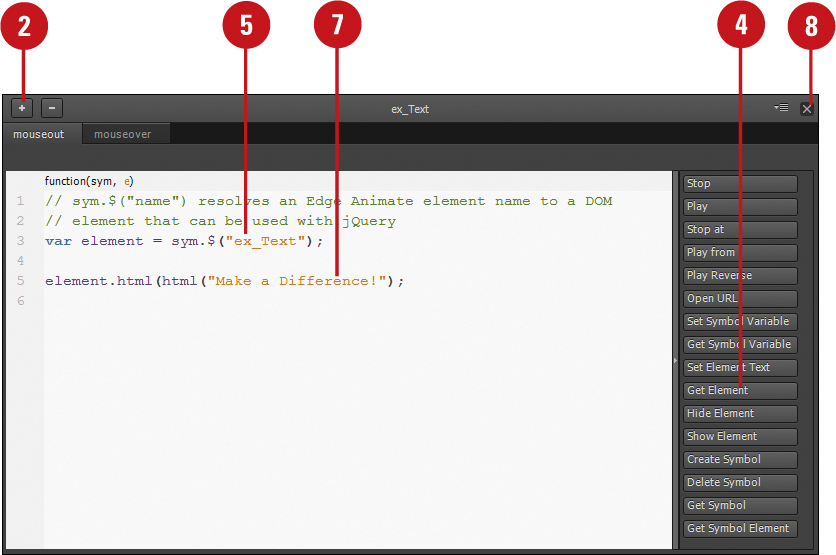
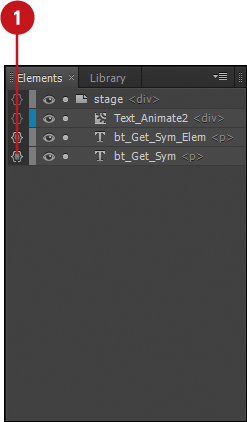
Sometimes you want to change the text as part of an action. For example, you can point to a text box and have the text change from one message to another or from one style to another. You can accomplish the text change by using the Get Element or Set Element Text snippets. The Get Element snippet creates a variable (a container) where you can store information and then modify it using additional JavaScript code. The Set Element Text snippet replaces the current contents of an element with HTML text (by default). However, you can integrate HTML tags, such as a URL web address, in the code.
Use the Get Element Snippet
![]() In the Elements, Properties (with a selected element), or Timeline panel, click the Open Actions button for an element.
In the Elements, Properties (with a selected element), or Timeline panel, click the Open Actions button for an element.
For a new action, a menu appears. If not, click the Add button (+).

![]() Click an event action on the menu.
Click an event action on the menu.
![]() Click to place the insertion point where you want to insert code.
Click to place the insertion point where you want to insert code.
![]() Click Get Element.
Click Get Element.
var element = sym.$("Text1");
![]() Replace Text1 with the name of the element you want assign to the variable.
Replace Text1 with the name of the element you want assign to the variable.
![]() Click to place the insertion point on the next line.
Click to place the insertion point on the next line.
![]() Type the following code:
Type the following code:
element.html("NewText");
This assigns the variable element to the HTML text NewText.
This example replicates the functionality of the Set Element Text snippet. You can use the variable with other attributes.
![]() Click the Close button to exit the script panel.
Click the Close button to exit the script panel.
Use the Set Element Text Snippet
![]() In the Elements, Properties (with a selected element), or Timeline panel, click the Open Actions button for an element.
In the Elements, Properties (with a selected element), or Timeline panel, click the Open Actions button for an element.
For a new action, a menu appears. If not, click the Add button (+).

![]() Click an event action on the menu.
Click an event action on the menu.
![]() Click to place the insertion point where you want to insert code.
Click to place the insertion point where you want to insert code.
![]() Click Set Element Text.
Click Set Element Text.
sym.$("Text").html("NewText");
![]() Replace Text with the name of the element you want to use, and then replace NewText with the HTML text you want to exchange it with.
Replace Text with the name of the element you want to use, and then replace NewText with the HTML text you want to exchange it with.
The .html("") code uses text in the default case. However, you can insert HTML tags.
![]() Click the Close button to exit the script panel.
Click the Close button to exit the script panel.

Using the Open URL Snippet
The Open URL snippet makes it quick and easy to add a URL (a web address) link to an element in Edge Animate. The URL link allows a user to open a web page from within your animation. For example, you can click a button or image to open a web address. The Open URL snippet provides a default URL for Adobe (http://www.adobe.com), however, you can change it to anyone you want. You can also specify a target attributes that indicates how the URL opens. The Open URL snippet doesn’t display with the pointing finger or as an underlined text link. You can add a pointing finger with the Cursor button in the Properties panel or with JavaScript code. If you want the URL to have an underlined text link, you can create a URL link using HTML code.
Use the Open URL Snippet
![]() In the Elements, Properties (with a selected element), or Timeline panel, click the Open Actions button for an element.
In the Elements, Properties (with a selected element), or Timeline panel, click the Open Actions button for an element.
For a new action, a menu appears. If not, click the Add button (+).

![]() Click an event action on the menu.
Click an event action on the menu.
![]() Click to place the insertion point where you want to insert code.
Click to place the insertion point where you want to insert code.
![]() Click Open URL.
Click Open URL.
window.open("http://www.adobe.com", "_self");
![]() Replace the URL in red, and then keep the _self target attribute or replace it with another one:
Replace the URL in red, and then keep the _self target attribute or replace it with another one:
• _blank. Loads the URL into a new window.
• _parent. Loads the URL into the parent frame.
• _self. Replaces the URL with the current page.
• _top. Replaces the URL with any frameset that may be loaded.
• name. Names the window.
![]() Click the Close button to exit the script panel.
Click the Close button to exit the script panel.

Open a URL with HTML Code
![]() In the Elements, Properties (with a selected element), or Timeline panel, click the Open Actions button for the Stage.
In the Elements, Properties (with a selected element), or Timeline panel, click the Open Actions button for the Stage.
For a new action, a menu appears. If not, click the Add button (+).

![]() Click compositionReady on the menu.
Click compositionReady on the menu.
This attaches the action to the Stage which plays when the composition starts in a web browser.
![]() Click to place the insertion point where you want to insert code.
Click to place the insertion point where you want to insert code.
![]() Click Get Element.
Click Get Element.
var element = sym.$("Text1");
![]() Replace element with your own variable name, and then replace Text1 with the name of the element you want to assign to the variable.
Replace element with your own variable name, and then replace Text1 with the name of the element you want to assign to the variable.
![]() Click to place the insertion point on the next line.
Click to place the insertion point on the next line.
![]() Type the following code:
Type the following code:
element.html("<a href='http://www.standup2cancer.org'>SU2C</a>");
Replace the web address and link text in red.
![]() Click the Close button to exit the script panel.
Click the Close button to exit the script panel.


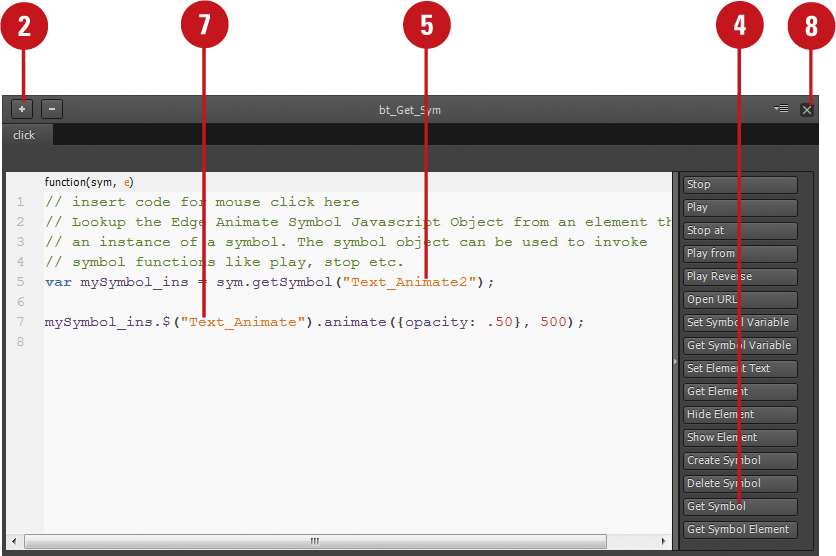
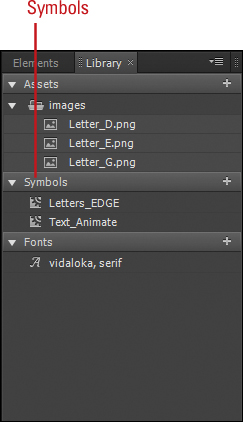
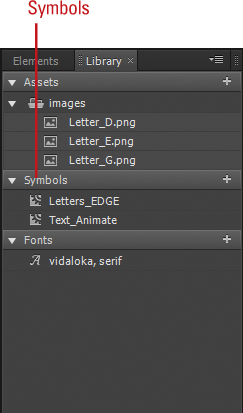
Using Get Symbol Snippets
Edge Animate provides several snippets that allow you to work with symbol instances. The snippets include Create Symbol, Delete Symbol, Get Symbol, and Get Symbol Element. With the Create Symbol snippet, you can create an instance element of a symbol as a child of the given parent (an existing symbol). After you create an instance of an element, either with a snippet using JavaScript code or manually using Edge Animate tools, you can modify it using the Get Symbol and Get Symbol Element snippets. Both Get Symbol snippets create a variable that you can use to modify elements within an instance.
Use the Get Symbol Snippets
![]() In the Elements, Properties (with a selected element), or Timeline panel, click the Open Actions button for an element.
In the Elements, Properties (with a selected element), or Timeline panel, click the Open Actions button for an element.
For a new action, a menu appears. If not, click the Add button (+).
![]() Click an event action on the menu.
Click an event action on the menu.
![]() Click to place the insertion point where you want to insert code.
Click to place the insertion point where you want to insert code.
![]() Click Get Symbol.
Click Get Symbol.
var mySymbolObject = sym.getsymbol("Symbol1");

![]() Replace mySymbolObject with your own variable name, and then replace Symbol1 with the name of the symbol instance you want to assign to the variable.
Replace mySymbolObject with your own variable name, and then replace Symbol1 with the name of the symbol instance you want to assign to the variable.
![]() Click to place the insertion point on the next line.
Click to place the insertion point on the next line.
![]() Type a statement that references the symbol variable. Here are some examples:
Type a statement that references the symbol variable. Here are some examples:
mySymbolObject.play();
mySymbolObject.stop();
mySymbolObject.$("Square") .css("backgroundColor","blue");
This changes the Square element in the symbol instance to a blue background color.
![]() Click the Close button to exit the script panel.
Click the Close button to exit the script panel.
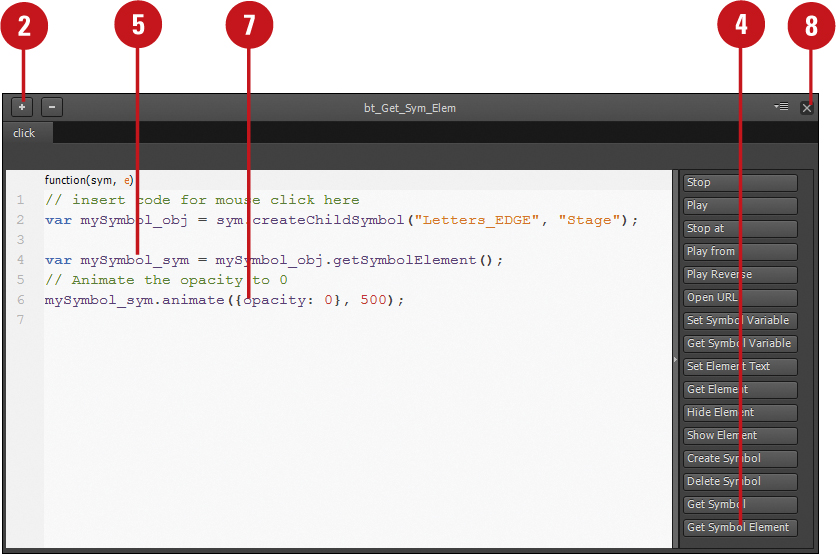
Use the Get Symbol Element Snippet
![]() In the Elements, Properties (with a selected element), or Timeline panel, click the Open Actions button for an element.
In the Elements, Properties (with a selected element), or Timeline panel, click the Open Actions button for an element.
For a new action, a menu appears. If not, click the Add button (+).
![]() Click an event action on the menu.
Click an event action on the menu.
![]() Click to place the insertion point where you want to insert code.
Click to place the insertion point where you want to insert code.
![]() Click Get Symbol Element.
Click Get Symbol Element.
var symbolElement = sym.getsymbolElement();
![]() Replace symbolElement with your own variable name.
Replace symbolElement with your own variable name.
![]() Click to place the insertion point on the next line.
Click to place the insertion point on the next line.
![]() Type a statement that references the symbol variable. Here are some examples:
Type a statement that references the symbol variable. Here are some examples:
symbolElement.play();
symbolElement.animate({opacity: 0}, 5000);
This animates the symbol instance to the opacity of 0 after a 5000 millisecond delay.
![]() Click the Close button to exit the script panel.
Click the Close button to exit the script panel.
For Your Information: Accessing a Nested Symbol
sym.getSymbol("symbolName").getSymbol("nestedElementName").play();
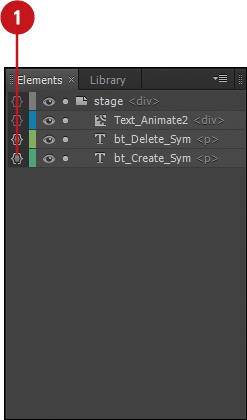
Using Create and Delete Symbol Snippets
You can create a symbol in Edge Animate by converting an existing element or importing external ones. However, you if you need to create a symbol on the fly during an animation, you can do it using JavaScript code. With the Create Symbol snippet, you can create an instance element of a symbol as a child of the given parent (an existing symbol). After you create an instance of an element, either manually or with JavaScript code, you can use the Delete Symbol snippet to remove it. If you want to modify a symbol instance element, you can use the Get Symbol and Get Symbol Element snippets.
Use the Create Symbol Snippet
![]() In the Elements, Properties (with a selected element), or Timeline panel, click the Open Actions button for an element.
In the Elements, Properties (with a selected element), or Timeline panel, click the Open Actions button for an element.
For a new action, a menu appears. If not, click the Add button (+).
![]() Click an event action on the menu.
Click an event action on the menu.
![]() Click to place the insertion point where you want to insert code.
Click to place the insertion point where you want to insert code.
![]() Click Create Symbol.
Click Create Symbol.
var mySymbolObject = sym.createChildSymbol("Symbol_1", "ParentElement1");

![]() Replace Symbol_1 with the name of the symbol, and then replace ParentElement1 with the parent element where you want the symbol, such as the Stage.
Replace Symbol_1 with the name of the symbol, and then replace ParentElement1 with the parent element where you want the symbol, such as the Stage.
![]() Click to place the insertion point on the next line.
Click to place the insertion point on the next line.
![]() Type the following code:
Type the following code:
mySymbolObject.play();
mySymbolObject.$("Square").css("backgroundColor", "blue");
This creates a new instance from the existing symbol and changes the Square element in the symbol instance to a blue background color.
![]() Click the Close button to exit the script panel.
Click the Close button to exit the script panel.

Use the Delete Symbol Snippet
![]() In the Elements, Properties (with a selected element), or Timeline panel, click the Open Actions button for an element.
In the Elements, Properties (with a selected element), or Timeline panel, click the Open Actions button for an element.
For a new action, a menu appears. If not, click the Add button (+).

![]() Click an event action on the menu.
Click an event action on the menu.
![]() Click to place the insertion point where you want to insert code.
Click to place the insertion point where you want to insert code.
![]() Click Delete Symbol.
Click Delete Symbol.
sym.getSymbol("Symbol1").deleteSymbol();
![]() Replace Symbol1 with the name of the instance of the element you want to delete.
Replace Symbol1 with the name of the instance of the element you want to delete.
![]() Click the Close button to exit the script panel.
Click the Close button to exit the script panel.

Did You Know?
You can use the Set Symbol Variable snippet. If you need to set the value of a symbol variable, you can use the Set Symbol Variable snippet.
sym.setVariable("myVariableName", "variableValue");
You can use the Get Symbol Variable snippet. If you need to get the value of a symbol variable that you set, you can use the Get Symbol Variable snippet.
var myVariable = sym.getVariable ("myVariableName");
Creating a Rollover Button
A rollover button is a button element that changes, or reacts, when a user rolls the cursor over it. A rollover button is a nice way to provide feedback to the user when a button is available. Another way to provide feedback for a user is to change the cursor when it hovers over a button. The cursor is set to auto by default, which lets the web browser set the cursor, which for an element is the black pointer. With the Cursor button in the Properties panel, you can select from 24 different cursors, including pointer and busy.
Project: Create a Rollover Button
![]() Open the RolloverButton_start.html file in the chapter folder, and then save it in a new folder.
Open the RolloverButton_start.html file in the chapter folder, and then save it in a new folder.
![]() Select the buttonRect element on the Stage or in the Elements panel.
Select the buttonRect element on the Stage or in the Elements panel.
![]() Click the Modify menu, click Convert to Symbol, type Button, deselect the Autoplay timeline check box, and then click OK.
Click the Modify menu, click Convert to Symbol, type Button, deselect the Autoplay timeline check box, and then click OK.

![]() Double-click the Button instance on the Stage.
Double-click the Button instance on the Stage.
The symbol opens, displaying its own Timeline and Stage.
![]() With the Playhead at 0:00, click the Insert Label button in the Timeline, type normal, and then press Enter (Win) or Return (Mac).
With the Playhead at 0:00, click the Insert Label button in the Timeline, type normal, and then press Enter (Win) or Return (Mac).
![]() Select the buttonRect element on the Stage.
Select the buttonRect element on the Stage.
![]() Click the Auto-Keyframes Mode button to select it, and then click the Auto-Transition Mode button to deselect it.
Click the Auto-Keyframes Mode button to select it, and then click the Auto-Transition Mode button to deselect it.
![]() In the Properties panel, click the keyframe diamond next to Opacity, and then change Opacity to 65%.
In the Properties panel, click the keyframe diamond next to Opacity, and then change Opacity to 65%.
Use the selected background color and 65% opacity.
![]() Move the Playhead to 0:01, and then create another label named over.
Move the Playhead to 0:01, and then create another label named over.

![]() In the Properties panel, click the keyframe diamond next to Opacity, and then change Opacity to 35%.
In the Properties panel, click the keyframe diamond next to Opacity, and then change Opacity to 35%.
![]() In the Elements, click the Open Actions button for the buttonRect element.
In the Elements, click the Open Actions button for the buttonRect element.

![]() Click mouseover on the menu.
Click mouseover on the menu.

![]() Click Stop at, and then type ‘over’ to replace the selected value.
Click Stop at, and then type ‘over’ to replace the selected value.
![]() Click the Add button (+), and then click mouseout on the menu.
Click the Add button (+), and then click mouseout on the menu.
![]() Click Stop at, and then type ‘normal’ to replace the selected value.
Click Stop at, and then type ‘normal’ to replace the selected value.
![]() Click the Close button to exit the script panel.
Click the Close button to exit the script panel.

![]() Click the Back button or Stage on the Edit bar to exit symbol editing mode.
Click the Back button or Stage on the Edit bar to exit symbol editing mode.
![]() Select the Button instance on the Stage or in the Elements panel.
Select the Button instance on the Stage or in the Elements panel.
![]() In the Properties panel, click the Cursor button, and then select the pointer cursor (third one top row).
In the Properties panel, click the Cursor button, and then select the pointer cursor (third one top row).
![]() In the Elements panel, click the Visibility icon next to the bt_Text element to display the text.
In the Elements panel, click the Visibility icon next to the bt_Text element to display the text.
![]() Click the File menu, and then click Preview In Browser or press Ctrl+Enter (Win) or
Click the File menu, and then click Preview In Browser or press Ctrl+Enter (Win) or ![]() +Return (Mac).
+Return (Mac).
![]() In the example page, point to the Donate button to display the opacity change for the button.
In the example page, point to the Donate button to display the opacity change for the button.
![]() Click the Close button to exit your web browser.
Click the Close button to exit your web browser.
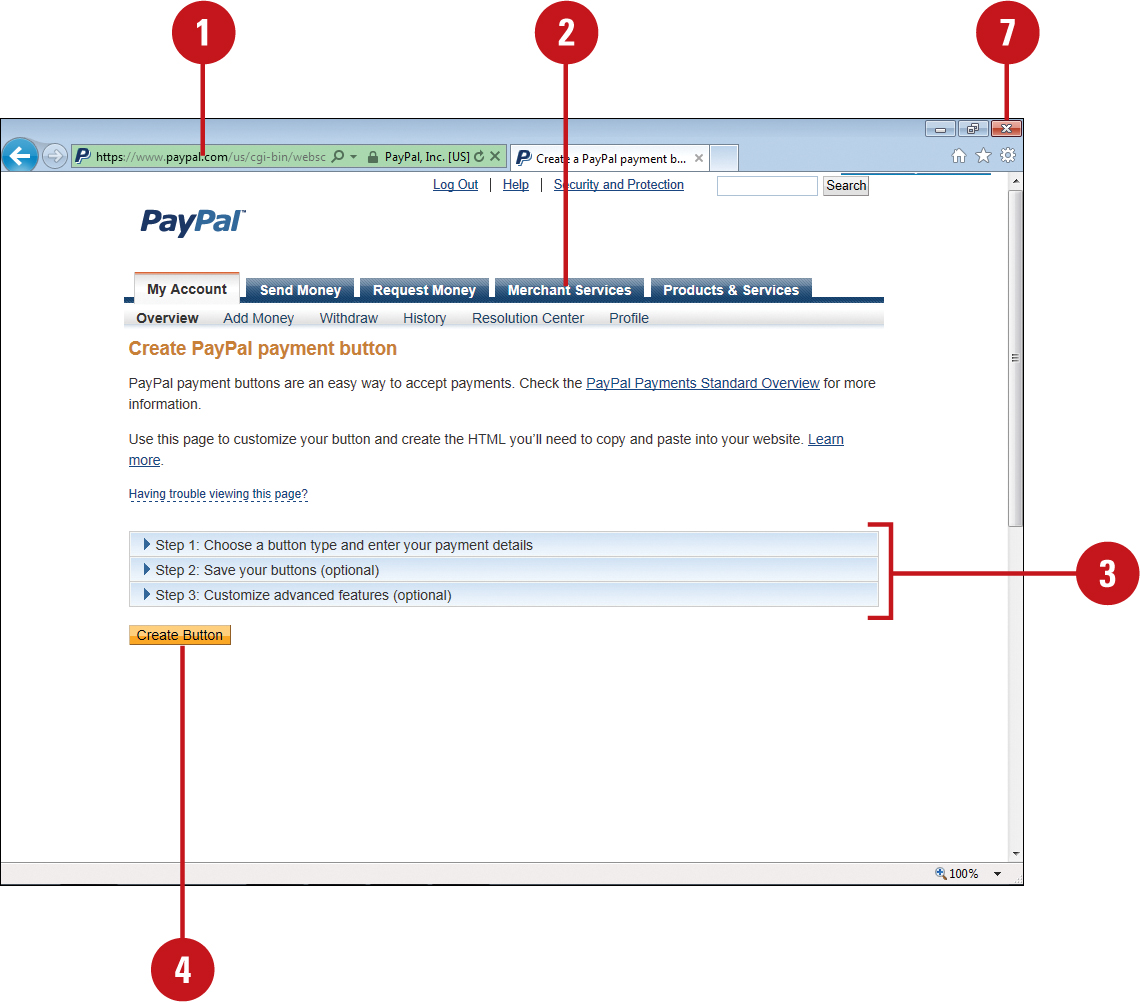
Creating a Shopping Cart Button
PayPal is a popular merchant service provider that allows you to buy and sell products or send money. If you want to provide the ability to use PayPal in a composition, you need to create a PayPal account at www.paypal.com. Once you create an account, you can use the service to create a shopping cart for an item, and then copy the embed code into a selected button (using the Open URL snippet) for use in a composition. When you click the shopping cart button, the PayPal site opens displaying the product information that you created in PayPal.
Project: Get the PayPal Shopping Cart Embed Code
![]() In your web browser, go to www.paypal.com, and then sign in to your PayPal account.
In your web browser, go to www.paypal.com, and then sign in to your PayPal account.
![]() Click Merchant Services, and then click Create payment buttons for your website.
Click Merchant Services, and then click Create payment buttons for your website.
![]() Type information in the form to create a Shopping Cart button.
Type information in the form to create a Shopping Cart button.
![]() Click Create Button.
Click Create Button.
Paypal creates the embed needed to access Paypal to purchase the item.
![]() Click the Email tab, and then select the URL embed code for the Shopping Cart button.
Click the Email tab, and then select the URL embed code for the Shopping Cart button.
![]() Press Ctrl+C (Win) or
Press Ctrl+C (Win) or ![]() +C (Mac) to copy the selected embed code.
+C (Mac) to copy the selected embed code.
![]() Click the Close button to exit your web browser.
Click the Close button to exit your web browser.

Project: Create a PayPal Shopping Cart Button
![]() Open the AddCart_start.html file in the chapter folder, and then save it in a new folder.
Open the AddCart_start.html file in the chapter folder, and then save it in a new folder.
![]() Select the Button instance on the Stage or in the Elements panel.
Select the Button instance on the Stage or in the Elements panel.

![]() In the Properties panel, click the Cursor button, and then select the pointer cursor (third one top row).
In the Properties panel, click the Cursor button, and then select the pointer cursor (third one top row).
![]() Click Open Actions next to Button in the Elements panel.
Click Open Actions next to Button in the Elements panel.
![]() Click click on the menu, and then click Open URL.
Click click on the menu, and then click Open URL.
![]() Select the default URL http://www.adobe.com, and then paste in the Paypal embed code.
Select the default URL http://www.adobe.com, and then paste in the Paypal embed code.
See the previous page for details to copy the embed code to the Clipboard.
![]() Change “
Change “_self” to “_top”.
This allows you to click Continue Shopping on the PayPal page and return to your page.
![]() Click the Close button to exit the script panel.
Click the Close button to exit the script panel.
![]() Click the File menu, and then click Preview In Browser or press Ctrl+Enter (Win) or
Click the File menu, and then click Preview In Browser or press Ctrl+Enter (Win) or ![]() +Return (Mac).
+Return (Mac).
![]() In the example page, click the Donate button to open the PayPal page, and then click Continue Shopping to return to your page.
In the example page, click the Donate button to open the PayPal page, and then click Continue Shopping to return to your page.
![]() Click the Close button to exit your web browser.
Click the Close button to exit your web browser.
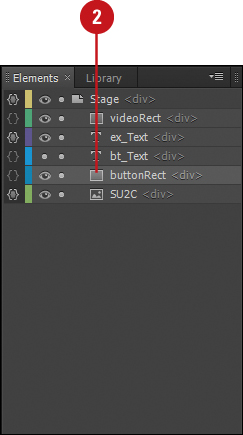
Embedding and Playing a Video
Video is everywhere on the web, so why not add it to your composition in Edge Animate. With JavaScript code, you can embed a video into a composition. You can trigger the video to play when you click an element or when you start the composition. If you want to start the video when you start the composition, you can attach the compositionReady action event to the Stage. Edge Animates waits until the composition and its resources are loaded before executing the script.
Project: Embed and Play a YouTube Video
![]() Open the EmbedVideo_start.html file in the chapter folder, and then save it in a new folder.
Open the EmbedVideo_start.html file in the chapter folder, and then save it in a new folder.
![]() Select the Rectangle Tool on the Tools panel, and then draw a rectangle shape.
Select the Rectangle Tool on the Tools panel, and then draw a rectangle shape.
![]() In the Properties panel, set the rectangle shape W to 640 and H to 360.
In the Properties panel, set the rectangle shape W to 640 and H to 360.
This is one of the default sizes for a YouTube video.
![]() In the Elements panel, rename the rectangle shape to videoRect.
In the Elements panel, rename the rectangle shape to videoRect.
![]() In the Elements panel, select the Stage.
In the Elements panel, select the Stage.
![]() Click the Open Actions button for the Stage element in the Elements panel.
Click the Open Actions button for the Stage element in the Elements panel.

![]() Click compositionReady on the menu.
Click compositionReady on the menu.
![]() Type in the code as shown in the illustration.
Type in the code as shown in the illustration.
![]() Click the Close button to exit the script panel.
Click the Close button to exit the script panel.

![]() Click the File menu, and then click Preview In Browser or press Ctrl+Enter (Win) or
Click the File menu, and then click Preview In Browser or press Ctrl+Enter (Win) or ![]() +Return (Mac).
+Return (Mac).
The video plays in the element.
![]() Click the Close button to exit your web browser.
Click the Close button to exit your web browser.
Adding and Playing a Sound
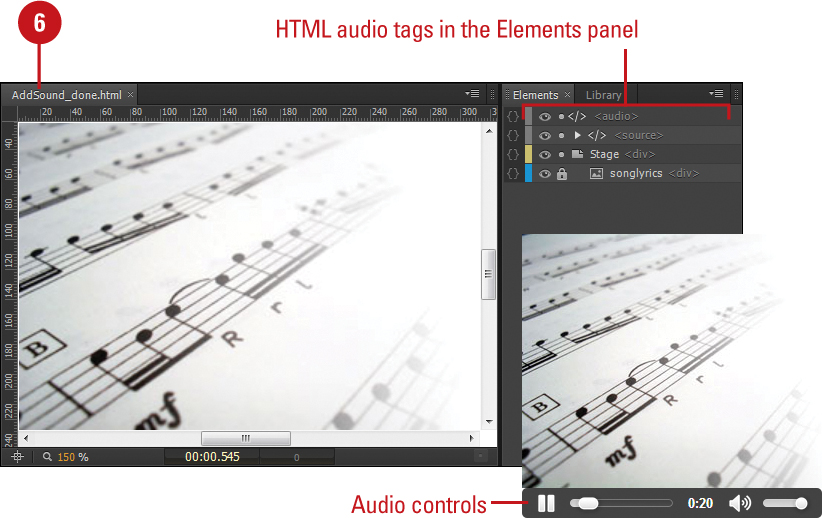
Adding sound to a composition is a nice way to enhance it. Edge Animate doesn’t provide a directly solution for sound at this point. However, you can take advantage of HTML5 to do the job. You can use the HTML5 <audio> tag to provide progressive playback for MP3, OGG, or WAV audio files. The audio tag is similar to the <img> or <video> tags that also come with HTML5. It provides attributes to display playback controls, autoplay, loop, and preload. The audio tag is supported by Internet Explorer 9, Firefox, Opera, Chrome, and Safari. However, not all formats are supported by each. So, you can provide multiple format sources and the browser will use the first recognized format. You can add sound by creating a composition in Edge Animate, and then adding HTML5 audio tags in an HTML editor, such as Adobe Edge Code.
Project: Add and Play a Sound
![]() Start Adobe Edge Code or another HTML editor.
Start Adobe Edge Code or another HTML editor.
![]() Open the AddSound_start.html file in the chapter folder, and then save it in a new folder.
Open the AddSound_start.html file in the chapter folder, and then save it in a new folder.
![]() Enter the HTML code in the illustration between the
Enter the HTML code in the illustration between the <audio> and </audio> tags.
![]() Click the File menu, and then click Save.
Click the File menu, and then click Save.
![]() Click the Close button to exit the HTML editor.
Click the Close button to exit the HTML editor.

![]() Start Edge Animate, and then open the AddSound_done.html file.
Start Edge Animate, and then open the AddSound_done.html file.
![]() Click the File menu, and then click Preview In Browser or press Ctrl+Enter (Win) or
Click the File menu, and then click Preview In Browser or press Ctrl+Enter (Win) or ![]() +Return (Mac).
+Return (Mac).
The video plays in the element.
![]() Click the Close button to exit your web browser.
Click the Close button to exit your web browser.
Swapping Images in a Photo Gallery
A photo gallery is a popular feature to have on a web site. In order to create one, you need to swap images. You can swap images on the screen by using JavaScript code that changes the source attribute for an image. You can trigger the image swap by hovering over or clicking an image or button. When you point to the image or button, you can also change the cursor to a pointing finger to let the user know the element contains some interactivity.
Project: Swap an Image in a Photo Gallery
![]() Open the SwapImages_start.html file in the chapter folder, and then save it in a new folder.
Open the SwapImages_start.html file in the chapter folder, and then save it in a new folder.
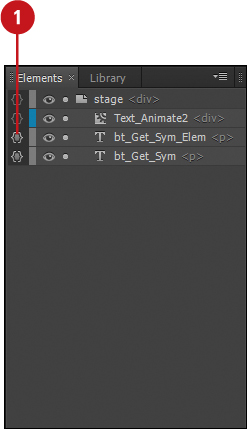
![]() Select the Bg_Photo element on the Stage or in the Elements panel.
Select the Bg_Photo element on the Stage or in the Elements panel.
![]() In the Properties panel, click the Tag button, and then click img.
In the Properties panel, click the Tag button, and then click img.
![]() Select the Sm_Bridge element on the Stage or in the Elements panel.
Select the Sm_Bridge element on the Stage or in the Elements panel.
![]() In the Properties panel, click the Cursor button, and then select the pointer cursor (third one top row).
In the Properties panel, click the Cursor button, and then select the pointer cursor (third one top row).
![]() Click the Open Actions button for the Sm_Bridge element in the Elements panel.
Click the Open Actions button for the Sm_Bridge element in the Elements panel.

![]() Click mouseover on the menu.
Click mouseover on the menu.
![]() Type in the following code:
Type in the following code:
sym.$("Bg_Photo").attr('src','images/bridge.jpg'),
![]() Click the Close button to exit the script panel.
Click the Close button to exit the script panel.

![]() Select each element (Sm_Trees, Sm_Barn, and Sm_Farm), and then repeat Steps 4 thru 9.
Select each element (Sm_Trees, Sm_Barn, and Sm_Farm), and then repeat Steps 4 thru 9.
![]() Click the File menu, and then click Preview In Browser or press Ctrl+Enter (Win) or
Click the File menu, and then click Preview In Browser or press Ctrl+Enter (Win) or ![]() +Return (Mac).
+Return (Mac).
![]() Move the mouse over each thumbnail to view the image swap.
Move the mouse over each thumbnail to view the image swap.
![]() Click the Close button to exit your web browser.
Click the Close button to exit your web browser.