3. Taking In-App Lessons
Introduction
From the Welcome screen or the Lessons panel, you can use In-App Lessons to help you get started with the project in Edge Animate. The In-App Lessons provide seven step-by step topics with the aid of the Lessons panel to walk you through the process of creating animations with Edge Animate. The lessons include Quick Start to help you get going, Create to teach you how to work with shapes, text and images, Animate I: Keyframes and II: The Pin to show you how to use keyframes and pins, Resize to learn how to respond to size changes, Extend to learn how to loop and handle user interaction, and Reuse to show you how to create reusable elements with symbols.
If you want further help and instructional materials, you can use links in the Welcome screen to access a list of key features and product release notes, and helpful resources from online content, including Help and Tutorials, videos on Adobe TV, community forums, and sample projects. In addition, you can access Facebook and Twitter to get more information about Edge Animate.
Starting a Lesson
Within Edge Animate you can take In-App Lessons to help you get started with the project. Edge Animate provides seven In App step-by step lessons with the aid of the Lessons panel. The lessons include Quick Start to help you get going, Create to teach you how to work with shapes, text and images, Animate I: Keyframes and II: The Pin to show you how to use keyframes and pins, Resize to learn how to respond to size changes, Extend to learn how to loop and handle user interaction, and Reuse to show you how to create reusable objects with symbols. You can start an In App Lesson from the Welcome screen or the Lessons panel. After you start a lesson, the Lessons panel walks you through topic as you perform the steps in the Edge Animate window.
Start a Lesson from the Welcome Screen
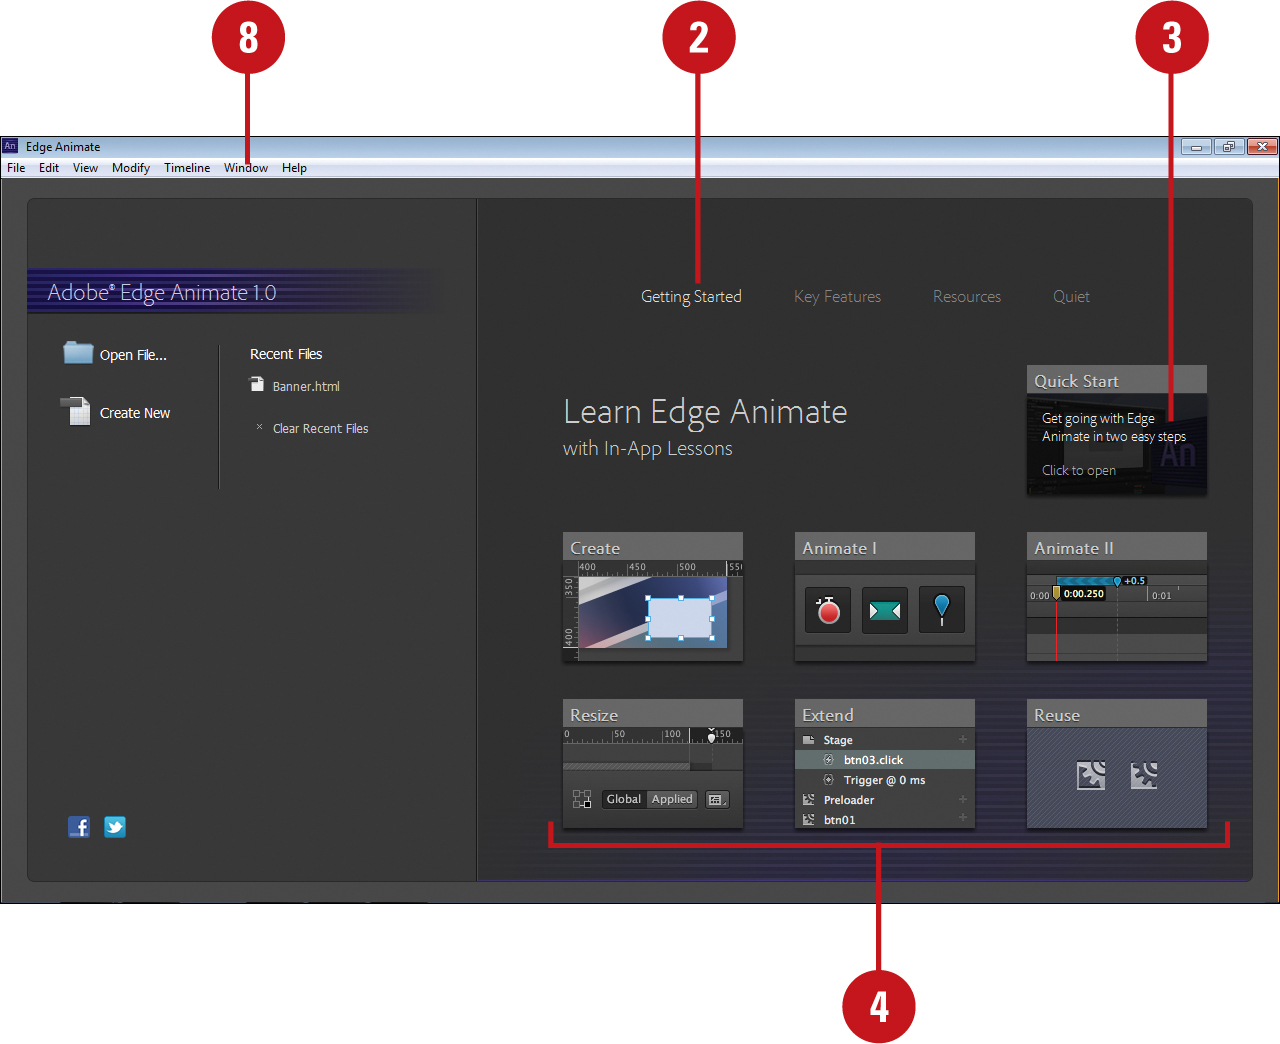
![]() Start Adobe Edge Animate, or close all open documents (click the File menu, and then click Close All).
Start Adobe Edge Animate, or close all open documents (click the File menu, and then click Close All).
![]() Click Getting Started, if necessary.
Click Getting Started, if necessary.
![]() Point to a lesson tile to view a brief description.
Point to a lesson tile to view a brief description.
![]() Click a lesson tile to start it.
Click a lesson tile to start it.
The Welcome screen closes, Edge Animate creates a new Untitled project, and the Lessons panel opens with the selected lesson.
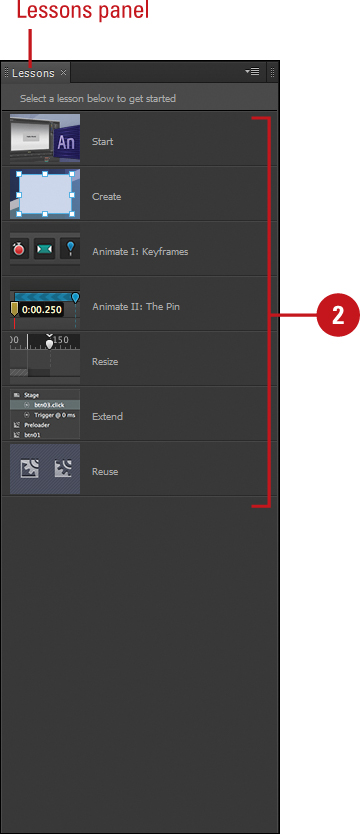
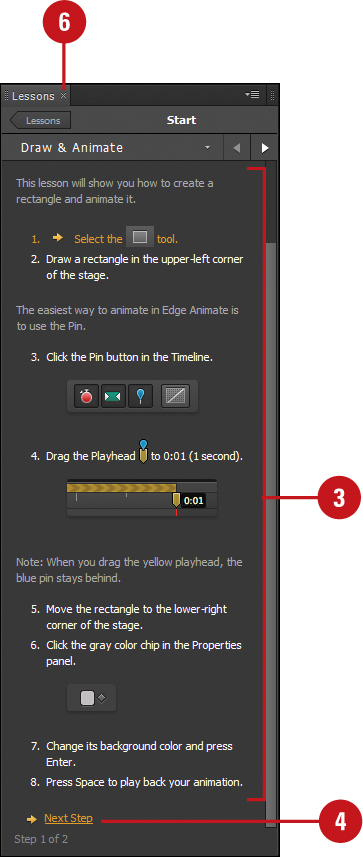
![]() Read and perform the lesson steps in the Edge Animate window as indicated in the Lessons panel.
Read and perform the lesson steps in the Edge Animate window as indicated in the Lessons panel.
![]() At the bottom of the Lessons panel, click the Next Step link.
At the bottom of the Lessons panel, click the Next Step link.
![]() Follow the additional steps or click links to start other lessons.
Follow the additional steps or click links to start other lessons.
After you complete the lesson, you can save or close the Untitled project.
![]() To close the Lessons panel, click the Window menu, and then click Lessons or click the Close button on the panel.
To close the Lessons panel, click the Window menu, and then click Lessons or click the Close button on the panel.
Start a Lesson from the Lessons Panel
![]() Click the Window menu, and then click Lessons to select (show) the check mark.
Click the Window menu, and then click Lessons to select (show) the check mark.
The Lessons panel opens, displaying a list of In-App Lessons.
![]() Click a lesson tile to start it.
Click a lesson tile to start it.
Edge Animate creates a new Untitled project, and the Lessons panel displays the start of the selected lesson.
![]() Read and perform the lesson steps in the Edge Animate window as indicated in the Lessons panel.
Read and perform the lesson steps in the Edge Animate window as indicated in the Lessons panel.
![]() At the bottom of the Lessons panel, click the Next Step link.
At the bottom of the Lessons panel, click the Next Step link.
![]() Follow the additional steps or click links to start other lessons.
Follow the additional steps or click links to start other lessons.
After you complete the lesson, you can save or close the Untitled project.
![]() To close the Lessons panel, click the Window menu, and then click Lessons or click the Close button on the panel.
To close the Lessons panel, click the Window menu, and then click Lessons or click the Close button on the panel.
Using the Lessons Panel
After you start a lesson, you use the Lessons panel to walk you through the step by step instructions to complete the topic. If the Lessons panel takes up too much room in the Edge Animate window, you can dock it to another panel—the Properties panel is a good place to put it—or undock it as a separate window. As you work through a lesson, you can use the navigation at the top of the Lessons panel to get around. You can use the Lessons button to display all the lessons or the navigation buttons to switch between panels in the Lessons panel.
Use the Lessons Panel
![]() Click the Window menu, and then click Lessons to select (show) the check mark.
Click the Window menu, and then click Lessons to select (show) the check mark.
The Lessons panel opens, displaying a list of In-App Lessons.
![]() Click a lesson tile to start it.
Click a lesson tile to start it.
Edge Animate creates a new Untitled project, and the Lessons panel displays the start of the selected lesson.
![]() Follow the lesson steps in the Edge Animate window, and then click the Next Step link at the bottom of the panel.
Follow the lesson steps in the Edge Animate window, and then click the Next Step link at the bottom of the panel.
![]() To go back and forth between the Step panels, click the Previous or Next button or click the Pane Name list arrow, and then click a pane name.
To go back and forth between the Step panels, click the Previous or Next button or click the Pane Name list arrow, and then click a pane name.
![]() To display the list of lessons, click the Lessons button.
To display the list of lessons, click the Lessons button.
![]() To close the Lessons panel, click the Window menu, and then click Lessons or click the Close button on the panel.
To close the Lessons panel, click the Window menu, and then click Lessons or click the Close button on the panel.

Taking the Quick Start Lesson
With the Quick Start lesson, you can quickly create your first animation in Edge Animate. It’s quick and easy, but it gives you simple way to see how an animation works. You’ll create a rectangle on the Stage and then use the Pin button and the Playhead in the Timeline to make the shape move across the screen. After you create the animation, you’ll play it back on the Stage and in the Timeline to see how it works.
Take the Quick Start Lesson
![]() From the Welcome screen under Getting Started or the Lessons panel, click the Quick Start lesson tile to start it.
From the Welcome screen under Getting Started or the Lessons panel, click the Quick Start lesson tile to start it.
The Welcome screen closes, Edge Animate creates a new Untitled project, and the Lessons panel displays the start of the lesson.
![]() Select the Rectangle Tool on the Tools panel.
Select the Rectangle Tool on the Tools panel.
![]() Draw a rectangle in the upper-left corner of the Stage.
Draw a rectangle in the upper-left corner of the Stage.
![]() Click the Pin button in the Timeline.
Click the Pin button in the Timeline.
![]() Drag the Playhead to 0:01 (1 second).
Drag the Playhead to 0:01 (1 second).
![]() Move the rectangle to the lower-right corner of the Stage.
Move the rectangle to the lower-right corner of the Stage.
![]() Click the gray color chip (diamond) in the Properties panel.
Click the gray color chip (diamond) in the Properties panel.
![]() Click the Background Color box on the Tools panel, and then select a color from the palette.
Click the Background Color box on the Tools panel, and then select a color from the palette.
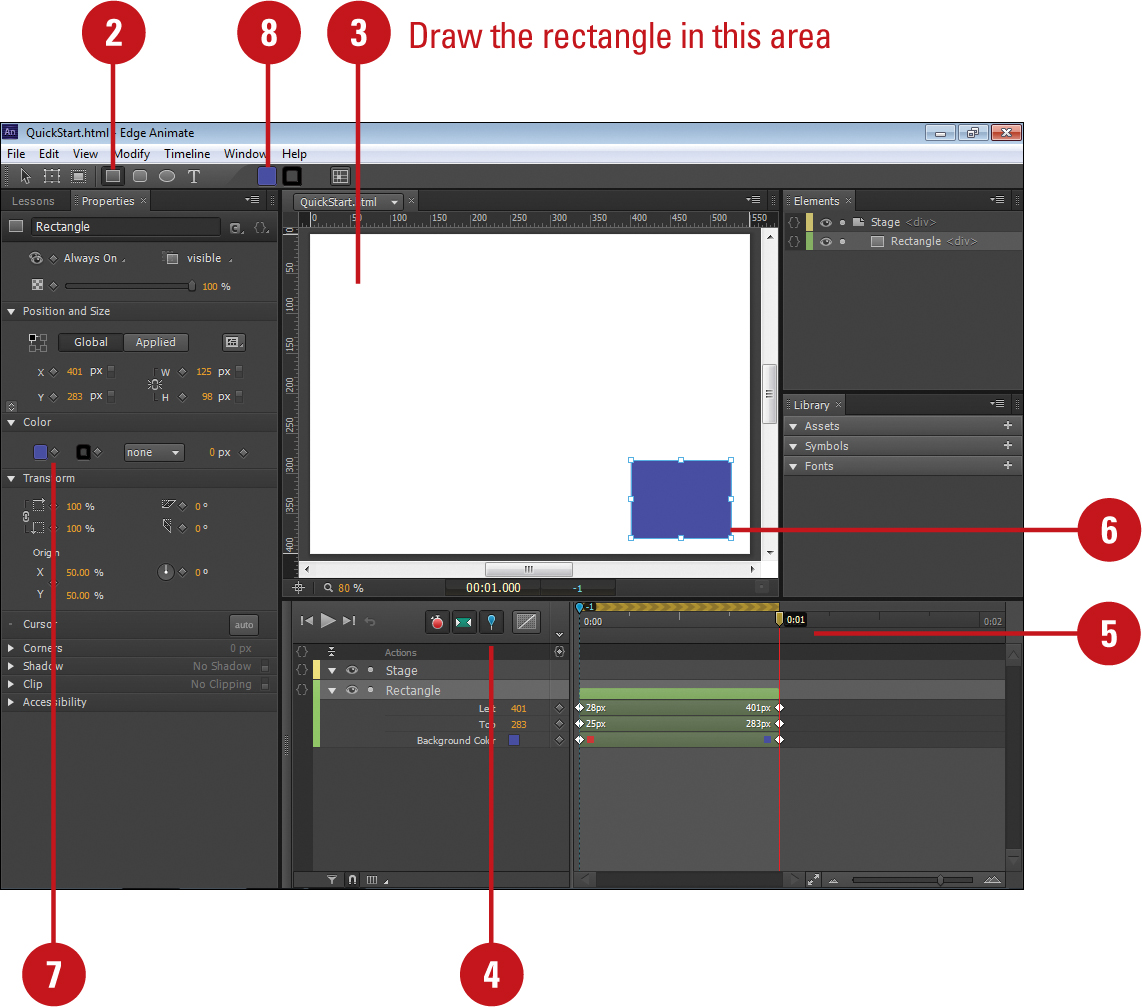
![]() Click the Play button or press Space to play back the animation.
Click the Play button or press Space to play back the animation.
![]() At the bottom of the Lessons panel, click the Next Step link.
At the bottom of the Lessons panel, click the Next Step link.
The lesson is complete.
![]() Click the File menu, click Save, navigate to a folder, create a folder, enter a name for the composition, and then click Save.
Click the File menu, click Save, navigate to a folder, create a folder, enter a name for the composition, and then click Save.
Taking the Create Lesson
With the Create lesson, you’ll learn how to quickly draw and work with assets in Edge Animate. An asset is any artwork or element, such as shapes, images, buttons, and fonts, you have created or imported into your composition. In this lesson, you start from a sample file, and then use it to work create and work with elements. You’ll create a rounded rectangle, add text, add graphics from the Library panel, and organize elements in the Elements panel.
Take the Create Lesson
![]() From the Welcome screen under Getting Started or the Lessons panel, click the Create lesson tile to start it.
From the Welcome screen under Getting Started or the Lessons panel, click the Create lesson tile to start it.
The Welcome screen closes, Edge Animate creates a new Untitled project, and the Lessons panel displays the start of the lesson.
![]() Click the Click to open the sample link.
Click the Click to open the sample link.
The content_creation.html file opens, displaying a blank Stage.
![]() Click the Next Step link to create content (Step 2 of 5).
Click the Next Step link to create content (Step 2 of 5).
![]() Select the Rounded Rectangle Tool on the Tools panel.
Select the Rounded Rectangle Tool on the Tools panel.
![]() Draw a rounded rectangle in the center of the Stage.
Draw a rounded rectangle in the center of the Stage.
![]() In the Properties panel, click on the link between W and H, and then set the size of W to 220 and H to 130.
In the Properties panel, click on the link between W and H, and then set the size of W to 220 and H to 130.

![]() Click the Next Step link to add text (Step 3 of 5).
Click the Next Step link to add text (Step 3 of 5).
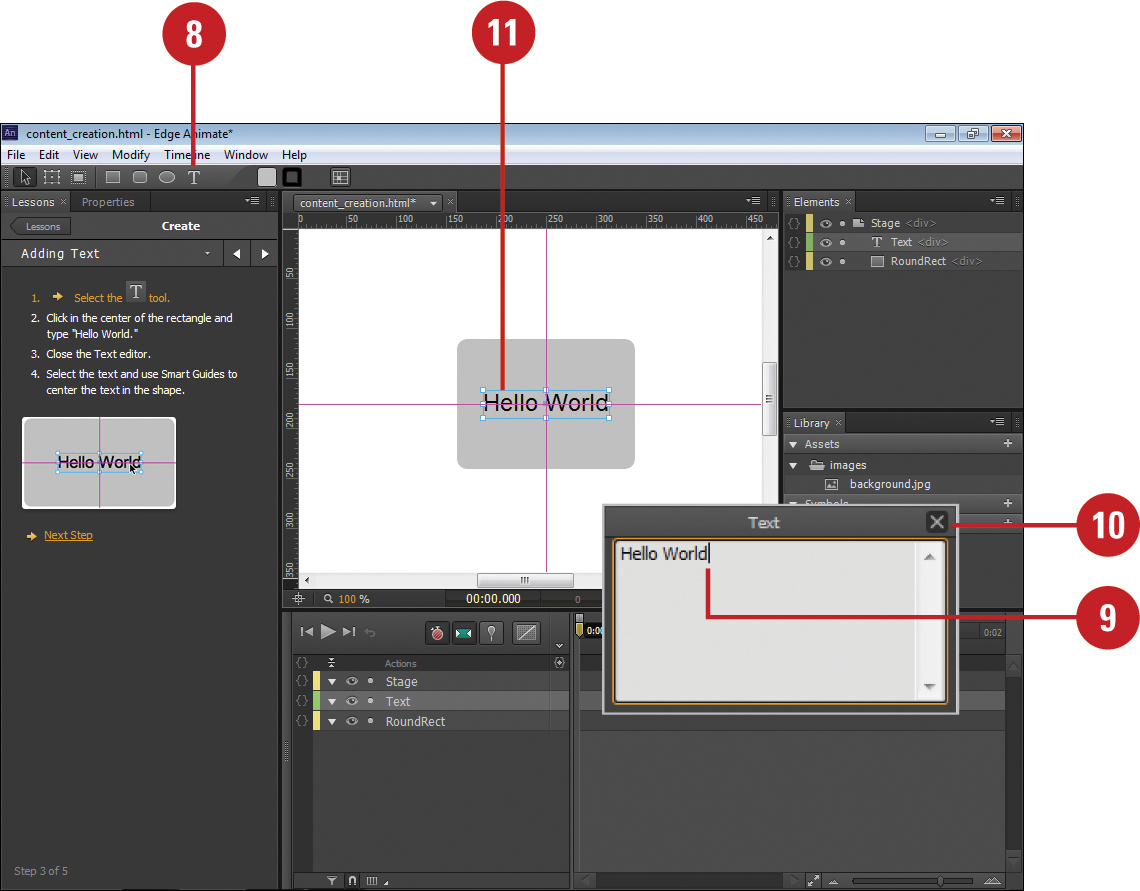
![]() Click the Text Tool on the Tools panel.
Click the Text Tool on the Tools panel.
![]() Click in the center of the rectangle and type Hello World.
Click in the center of the rectangle and type Hello World.
![]() Click the Close button in the Text editor.
Click the Close button in the Text editor.
![]() Select the text, and then drag to center the text in the shape.
Select the text, and then drag to center the text in the shape.
As you drag towards the center, Smart Guides (horizontal and vertical) appear to indicate the center.
![]() Click the Next Step link to import graphics (Step 4 of 5).
Click the Next Step link to import graphics (Step 4 of 5).
![]() Drag the background.jpg icon from the Library pane onto the Stage and place it at 0,0 (the upper-left corner of the Stage). As you drag, the position appears on the Stage.
Drag the background.jpg icon from the Library pane onto the Stage and place it at 0,0 (the upper-left corner of the Stage). As you drag, the position appears on the Stage.
The background image covers all the other elements on the Stage.
![]() In the Elements panel, drag the background.jpg <div> element below the RoundRect <div> element. As you drag a black bar appears indicating the new location.
In the Elements panel, drag the background.jpg <div> element below the RoundRect <div> element. As you drag a black bar appears indicating the new location.
The background image moves to the back of the Stage.

![]() Click the Next Step link to organize elements (Step 5 of 5).
Click the Next Step link to organize elements (Step 5 of 5).
![]() In the Elements panel, drag the Text <div> element onto the RoundRect <div> element. As you drag on top, the destination element changes to gray.
In the Elements panel, drag the Text <div> element onto the RoundRect <div> element. As you drag on top, the destination element changes to gray.
The Text element is now associated with the Rounded Rectangle element.
The lesson is complete.
![]() Click the File menu, click Save As, navigate to a folder, create a folder, enter a name for the composition, and then click Save.
Click the File menu, click Save As, navigate to a folder, create a folder, enter a name for the composition, and then click Save.
![]() To open a finished version of the lesson, click the Click to open the finished sample link.
To open a finished version of the lesson, click the Click to open the finished sample link.

Taking the Animate with Keyframes Lesson
With the Animate I: Keyframes lesson, you can create an animation by setting keyframes at specific times on the Timeline and changing property values between them. The property changes from one keyframe to another over time on the Timeline creates animation. As an indicator, when a keyframe is hollow, it means that it has different value than the previous keyframe. Using keyframes is a little more time consuming, however, you have more control over the results. To help make it easier, you can use Auto Keyframe Mode, which automatically creates keyframes when a property is modified, and Auto Transition Mode, which automatically creates a transition as needed.
Take the Animate with Keyframes Lesson
![]() From the Welcome screen under Getting Started or the Lessons panel, click the Animate I: Keyframes lesson tile to start it.
From the Welcome screen under Getting Started or the Lessons panel, click the Animate I: Keyframes lesson tile to start it.
The Welcome screen closes, Edge Animate creates a new Untitled project, and the Lessons panel displays the start of the lesson.
![]() Click the Click to open the sample link.
Click the Click to open the sample link.
The keyframe_animation.html file opens, displaying a blank Stage.
![]() Click the Next Step link to create keyframes (Step 2 of 7).
Click the Next Step link to create keyframes (Step 2 of 7).
![]() Move the Playhead to 0:01.
Move the Playhead to 0:01.
![]() Select the E element on the Stage.
Select the E element on the Stage.
![]() In the Properties panel, click the Y keyframe (diamond) to add a keyframe on the Timeline.
In the Properties panel, click the Y keyframe (diamond) to add a keyframe on the Timeline.
![]() Move the Playhead to 0:00.
Move the Playhead to 0:00.
![]() In the Properties panel, click the Y keyframe again.
In the Properties panel, click the Y keyframe again.
![]() Change the Y value to -90.
Change the Y value to -90.
![]() Click the Play button or press Space to play back the animation.
Click the Play button or press Space to play back the animation.
The E letter jumps to its position.

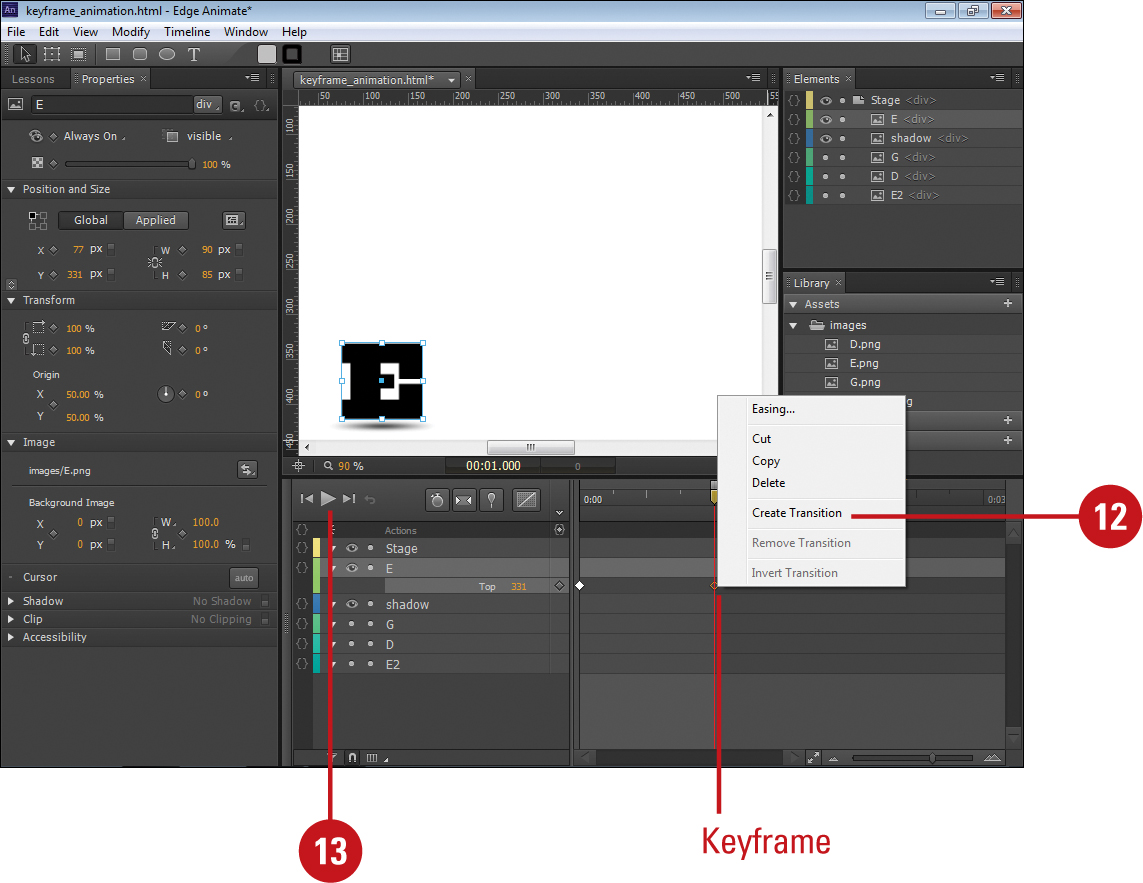
![]() Click the Next Step link to add a transition (Step 3 of 7).
Click the Next Step link to add a transition (Step 3 of 7).
When two keyframes have different values, you can add a transition between the two values.
![]() Right-click (Win) or Control-click (Mac) either of the keyframes, and then click Create Transition.
Right-click (Win) or Control-click (Mac) either of the keyframes, and then click Create Transition.
A transition appears connecting the keyframes in the Timeline.
![]() Click the Play button or press Space to play back the animation.
Click the Play button or press Space to play back the animation.
The E letter smoothly transitions to its position.
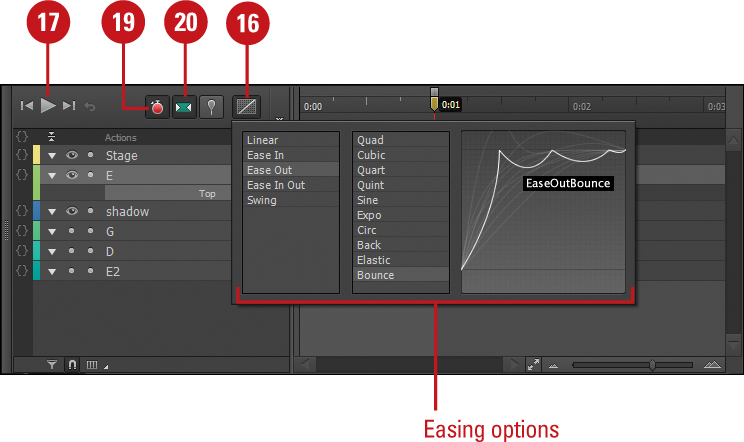
![]() Click the Next Step link to specify easing for the transition (Step 4 of 7).
Click the Next Step link to specify easing for the transition (Step 4 of 7).
![]() Click the transition in the Timeline to select it.
Click the transition in the Timeline to select it.

![]() Click the Easing button in the Timeline, select Ease Out, select Bounce, and then press Enter (Win) or Return (Mac).
Click the Easing button in the Timeline, select Ease Out, select Bounce, and then press Enter (Win) or Return (Mac).
![]() Click the Play button or press Space to play back the animation.
Click the Play button or press Space to play back the animation.
The E letter falls and lands with a bounce to its position.
![]() Click the Next Step link to animate the shadow element (Step 5 of 7).
Click the Next Step link to animate the shadow element (Step 5 of 7).
![]() Click the Auto Keyframe Mode button in the Timeline to select it.
Click the Auto Keyframe Mode button in the Timeline to select it.
This automatically creates keyframes when a property is modified.
![]() Click the Auto Transition Mode button in the Timeline to select it.
Click the Auto Transition Mode button in the Timeline to select it.
This automatically adds a transition when a property is modified.
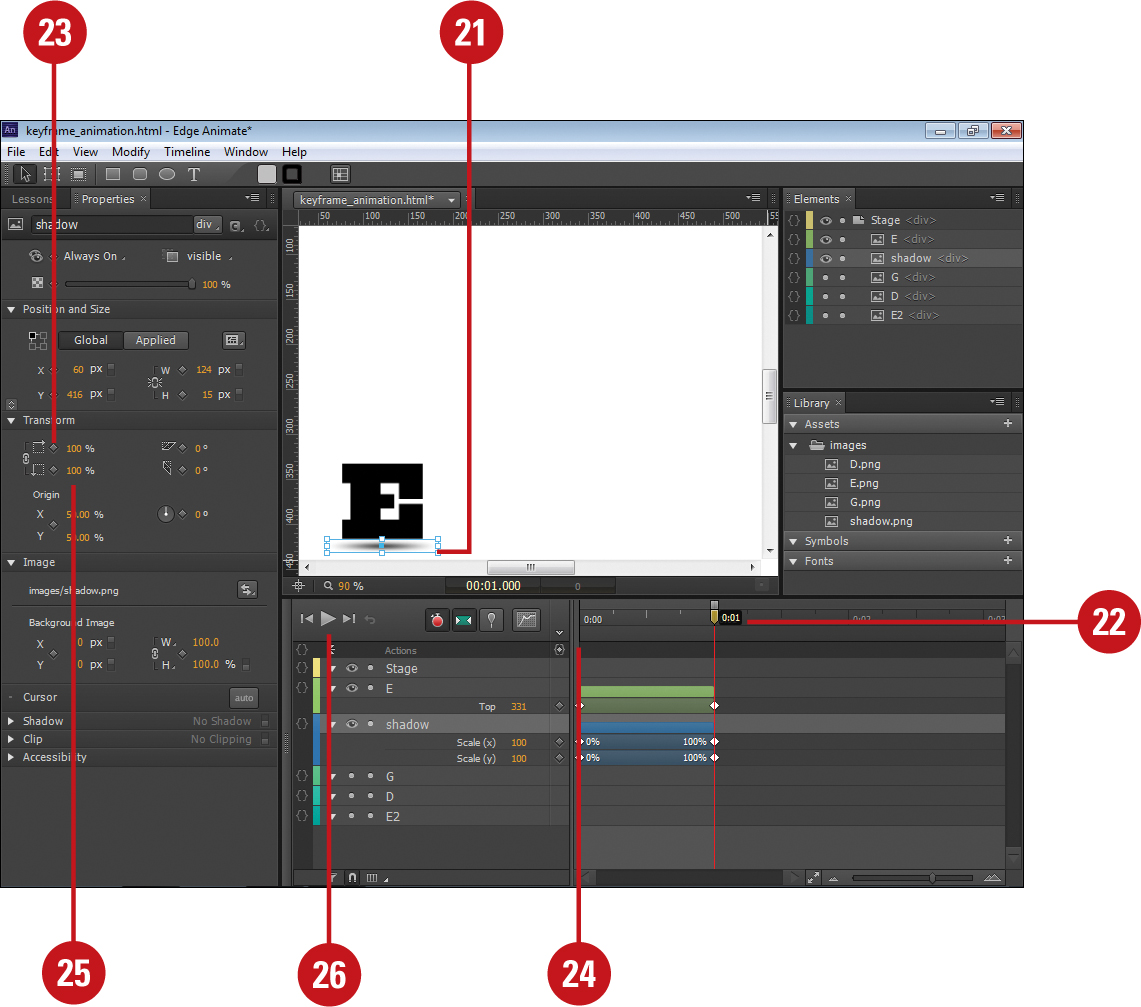
![]() Select the shadow element on the Stage.
Select the shadow element on the Stage.
![]() Move the Playhead to 0:01.
Move the Playhead to 0:01.
![]() In the Properties panel under Transform, click the Scale X and Scale Y keyframe.
In the Properties panel under Transform, click the Scale X and Scale Y keyframe.
![]() Move the Playhead to 0:00.
Move the Playhead to 0:00.
![]() In the Properties panel under Transform, set the Scale X value to 0. Since the X and Y are linked, both values change.
In the Properties panel under Transform, set the Scale X value to 0. Since the X and Y are linked, both values change.
This creates an automatic animation and transition using the current one (Bounce).
![]() Click the Play button or press Space to play back the animation.
Click the Play button or press Space to play back the animation.
The shadow animates along with the E element.
![]() Click the Next Step link to reuse keyframes (Step 6 of 7).
Click the Next Step link to reuse keyframes (Step 6 of 7).
![]() Select the E element on the Stage.
Select the E element on the Stage.
![]() Click the Time Snapping button in the Timeline to deselect it.
Click the Time Snapping button in the Timeline to deselect it.
![]() Move the Playhead to where the E first hits bottom, around 0.364.
Move the Playhead to where the E first hits bottom, around 0.364.
![]() In the Properties panel, click the Rotation keyframe.
In the Properties panel, click the Rotation keyframe.
![]() Move the Playhead to where the E reaches the top of the bounce, around 0.544.
Move the Playhead to where the E reaches the top of the bounce, around 0.544.
![]() In the Properties panel, set the Rotate value to -10.
In the Properties panel, set the Rotate value to -10.
![]() Move the Playhead to where the E hits bottom again, around 0.729.
Move the Playhead to where the E hits bottom again, around 0.729.
![]() Select the first rotation keyframe, making sure that only the one keyframe is selected.
Select the first rotation keyframe, making sure that only the one keyframe is selected.

![]() Press Ctrl+C (Win) or
Press Ctrl+C (Win) or ![]() +C (Mac) to copy the keyframe, and then press Ctrl+V (Win) or
+C (Mac) to copy the keyframe, and then press Ctrl+V (Win) or ![]() +V (Mac) to paste it.
+V (Mac) to paste it.
![]() Click the Next Step link to reuse transitions (Step 7 of 7).
Click the Next Step link to reuse transitions (Step 7 of 7).
![]() Click the Time Snapping button in the Timeline to select it.
Click the Time Snapping button in the Timeline to select it.
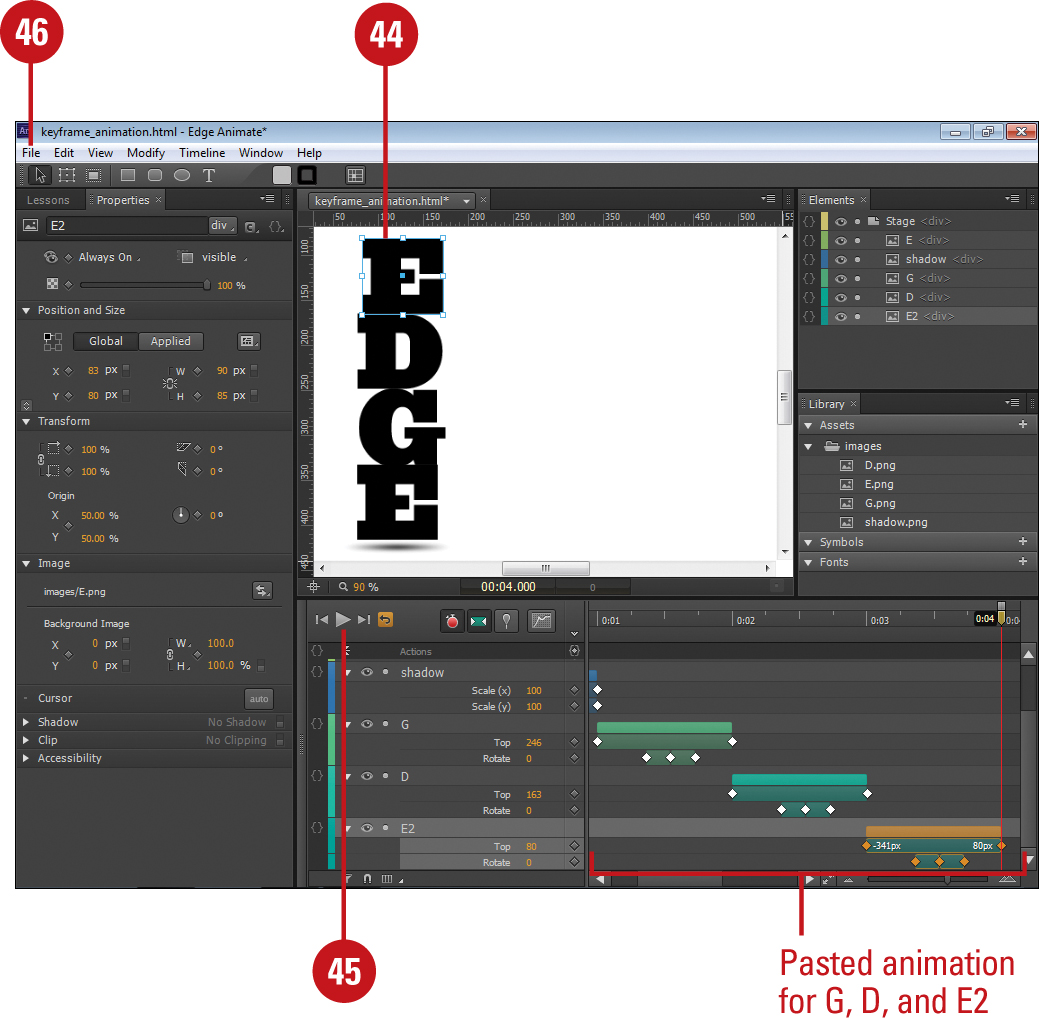
![]() In the Elements panel, click the gray dot under Visibility for G, D, and E2 to display them on the Stage.
In the Elements panel, click the gray dot under Visibility for G, D, and E2 to display them on the Stage.
![]() In the Timeline, select the bar on top of the transitions for the E animation to select all transitions.
In the Timeline, select the bar on top of the transitions for the E animation to select all transitions.
![]() Press Ctrl+C (Win) or
Press Ctrl+C (Win) or ![]() +C (Mac) to copy it.
+C (Mac) to copy it.
![]() Select the G element on the Stage, move the Playhead to 0:01, and then press press Ctrl+V (Win) or
Select the G element on the Stage, move the Playhead to 0:01, and then press press Ctrl+V (Win) or ![]() +V (Mac) to paste it.
+V (Mac) to paste it.

![]() Select the D element on the Stage, and then press press Ctrl+V (Win) or
Select the D element on the Stage, and then press press Ctrl+V (Win) or ![]() +V (Mac) to paste it.
+V (Mac) to paste it.
![]() Select the E2 element on the Stage, and then press press Ctrl+V (Win) or
Select the E2 element on the Stage, and then press press Ctrl+V (Win) or ![]() +V (Mac) to paste it.
+V (Mac) to paste it.
![]() Click the Play button or press Space to play back the animation.
Click the Play button or press Space to play back the animation.
Each letter bounces in, one after the other..
The lesson is complete.
![]() Click the File menu, click Save As, navigate to a folder, create a folder, enter a name for the composition, and then click Save.
Click the File menu, click Save As, navigate to a folder, create a folder, enter a name for the composition, and then click Save.
![]() To open a finished version of the lesson, click the Click to open the finished sample link.
To open a finished version of the lesson, click the Click to open the finished sample link.
Taking the Animate with the Pin Lesson
With the Animate II: The Pin lesson, you can quickly create an animation by using the Pin to help you create keyframes. You’ll learn how to work with the Playhead and the Pin to create an animation region. You’ll use the completed file from the Create lesson (Hello World) and then add an entrance and exit animation to it.
Take the Animate with the Pin Lesson
![]() From the Welcome screen under Getting Started or the Lessons panel, click the Animate II: The Pin lesson tile to start it.
From the Welcome screen under Getting Started or the Lessons panel, click the Animate II: The Pin lesson tile to start it.
The Welcome screen closes, Edge Animate creates a new Untitled project, and the Lessons panel displays the start of the lesson.
![]() Click the Click to open the sample link.
Click the Click to open the sample link.
The animation_start.html file opens, displaying Hello World.
![]() Click the Next Step link to add easing (Step 2 of 5).
Click the Next Step link to add easing (Step 2 of 5).
![]() Click the Easing button in the Timeline, select Ease Out, select Quad, and then press Enter (Win) or Return (Mac).
Click the Easing button in the Timeline, select Ease Out, select Quad, and then press Enter (Win) or Return (Mac).
![]() Click the Next Step link to add an entrance animation (Step 3 of 5).
Click the Next Step link to add an entrance animation (Step 3 of 5).
![]() Move the Playhead to 0:00.250 (0.25 seconds).
Move the Playhead to 0:00.250 (0.25 seconds).
![]() Double-click the Playhead to display a blue pin on top.
Double-click the Playhead to display a blue pin on top.
![]() Drag the Pin (blue) to 0:00.750 (0.75 seconds). This displays a blue region for the animation.
Drag the Pin (blue) to 0:00.750 (0.75 seconds). This displays a blue region for the animation.

![]() In the Elements panel, select the RoundRec <div> element.
In the Elements panel, select the RoundRec <div> element.
![]() Shift-drag the shape element off the Stage to the left.
Shift-drag the shape element off the Stage to the left.
![]() In the Properties pane, set the Rotate value to 720, and then click the Stage.
In the Properties pane, set the Rotate value to 720, and then click the Stage.

![]() Click the Next Step link to add an entrance animation (Step 4 of 5).
Click the Next Step link to add an entrance animation (Step 4 of 5).
![]() Drag the left Rotate keyframe right to 0:00.500 (0.5 seconds).
Drag the left Rotate keyframe right to 0:00.500 (0.5 seconds).
![]() Press Enter (Win) or Return (Mac) to activate the blue region.
Press Enter (Win) or Return (Mac) to activate the blue region.
![]() Drag the blue region right to 0:00.750 (0.75 seconds).
Drag the blue region right to 0:00.750 (0.75 seconds).
![]() Select the Hello World text element on the Stage.
Select the Hello World text element on the Stage.
![]() In the Properties panel, set the Scale X or Y value to 0, and set the Opacity value to 0.
In the Properties panel, set the Scale X or Y value to 0, and set the Opacity value to 0.

![]() Click the Next Step link to add an exit animation (Step 5 of 5).
Click the Next Step link to add an exit animation (Step 5 of 5).
![]() Click the Easing button in the Timeline, select Ease In, select Quad, and then press Enter (Win) or Return (Mac).
Click the Easing button in the Timeline, select Ease In, select Quad, and then press Enter (Win) or Return (Mac).
![]() Drag the Pin (blue) to 0:01.75 (1.75 seconds).
Drag the Pin (blue) to 0:01.75 (1.75 seconds).
![]() Drag the Playhead (gold) to 0:02.250 (2.25 seconds).
Drag the Playhead (gold) to 0:02.250 (2.25 seconds).
![]() Select the Hello World text element on the Stage.
Select the Hello World text element on the Stage.
![]() In the Properties panel, set the Opacity value to 0.
In the Properties panel, set the Opacity value to 0.
![]() Drag the Yellow region to 0:00.500 (0.5 seconds) so the pin is at 0:02.
Drag the Yellow region to 0:00.500 (0.5 seconds) so the pin is at 0:02.
![]() Select the RoundRect element on the Stage, and then Shift-drag it off the Stage to the right.
Select the RoundRect element on the Stage, and then Shift-drag it off the Stage to the right.
![]() Click the Go to Start button, and then click the Play button or press Space to play back the animation.
Click the Go to Start button, and then click the Play button or press Space to play back the animation.
The lesson is complete.

![]() Click the File menu, click Save, navigate to a folder, create a folder, enter a name for the composition, and then click Save.
Click the File menu, click Save, navigate to a folder, create a folder, enter a name for the composition, and then click Save.
Taking the Resize Lesson
With the Resize lesson, you can create an animation that is responsive to the size of the screen. For example, when you resize your browser window, the composition resizes too. You can make the Stage and individual elements responsive to the screen size by changing their units from pixels (fixed) to percentage (adjustable). In addition, you can change the relative change position to any corner of an element. Instead of testing changes to your composition in your browser, you can quickly check them on the Stage in Edge Animate.
Take the Resize Lesson
![]() From the Welcome screen under Getting Started or the Lessons panel, click the Resize lesson tile to start it.
From the Welcome screen under Getting Started or the Lessons panel, click the Resize lesson tile to start it.
The Welcome screen closes, Edge Animate creates a new Untitled project, and the Lessons panel displays the start of the lesson.
![]() Click the Click to open the sample link.
Click the Click to open the sample link.
The resize_start.html file opens, displaying an animation.
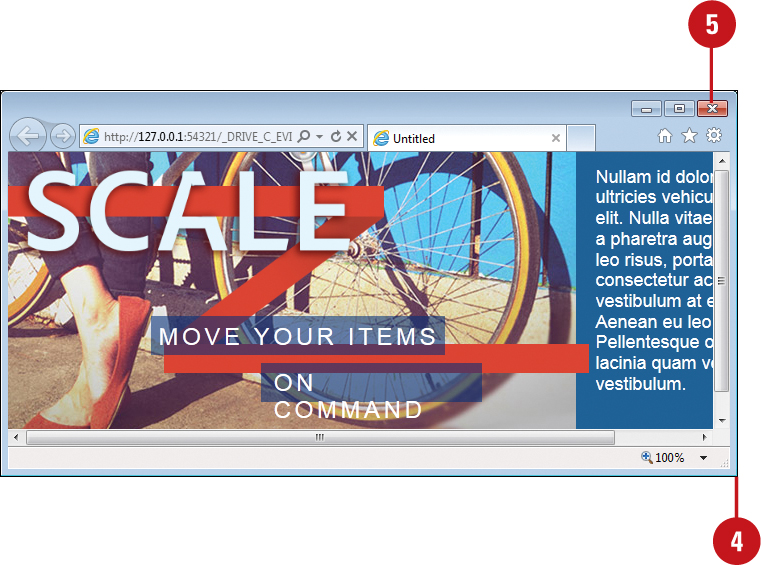
![]() Click the File menu, and then click Preview In Browser or press Ctrl+Enter (Win) or
Click the File menu, and then click Preview In Browser or press Ctrl+Enter (Win) or ![]() +Return (Mac).
+Return (Mac).
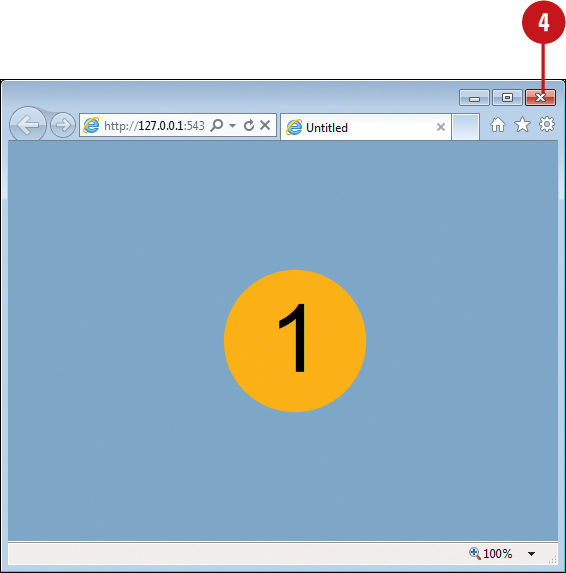
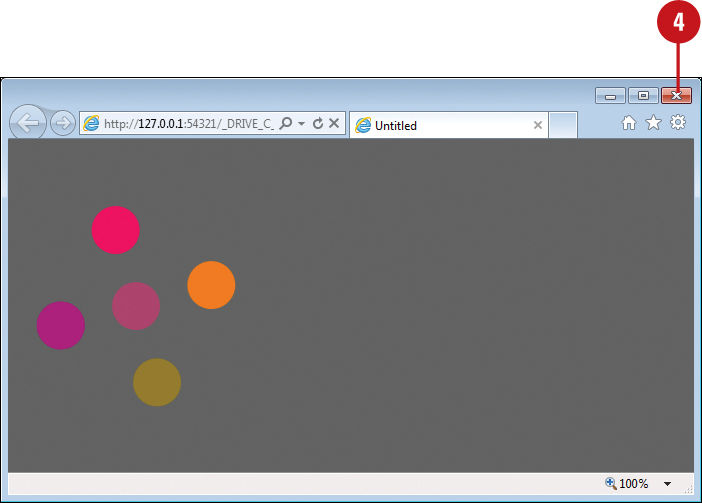
![]() Resize the browser window to see how it responds.
Resize the browser window to see how it responds.
The animation doesn’t respond to changes in the windows size.
![]() Click the Close button to exit your browser.
Click the Close button to exit your browser.
![]() Click the Next Step link to % resize the Stage (Step 2 of 8).
Click the Next Step link to % resize the Stage (Step 2 of 8).
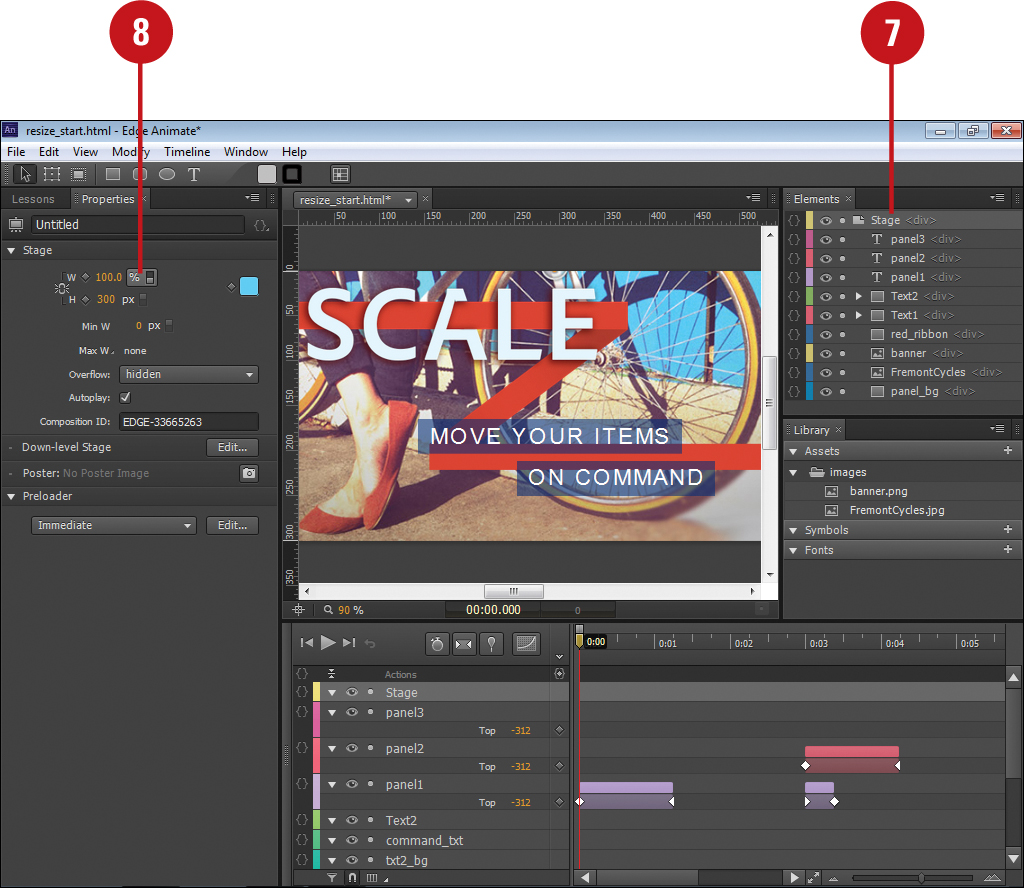
![]() In the Elements panel, select the Stage <div> element.
In the Elements panel, select the Stage <div> element.
![]() In the Properties panel, point to the units for W, and then change from pixels (px) to percentage (%).
In the Properties panel, point to the units for W, and then change from pixels (px) to percentage (%).
![]() Click the File menu, and then click Preview In Browser or press Ctrl+Enter (Win) or
Click the File menu, and then click Preview In Browser or press Ctrl+Enter (Win) or ![]() +Return (Mac).
+Return (Mac).
![]() Resize the browser window to see how it responds, and then click the Close button to exit.
Resize the browser window to see how it responds, and then click the Close button to exit.
The Stage fills the width of the browser with its light blue background to the right of the animation.
![]() Click the Next Step link to % resize on the Stage (Step 3 of 8).
Click the Next Step link to % resize on the Stage (Step 3 of 8).
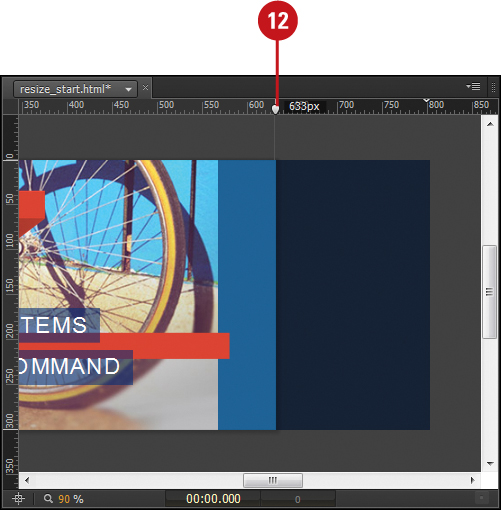
![]() Move the Stage adjustment handle on the top ruler back and forth to preview, and then return it to its original position at 800 px.
Move the Stage adjustment handle on the top ruler back and forth to preview, and then return it to its original position at 800 px.
![]() Click the Next Step link to % resize object’s location on the Stage (Step 4 of 8).
Click the Next Step link to % resize object’s location on the Stage (Step 4 of 8).
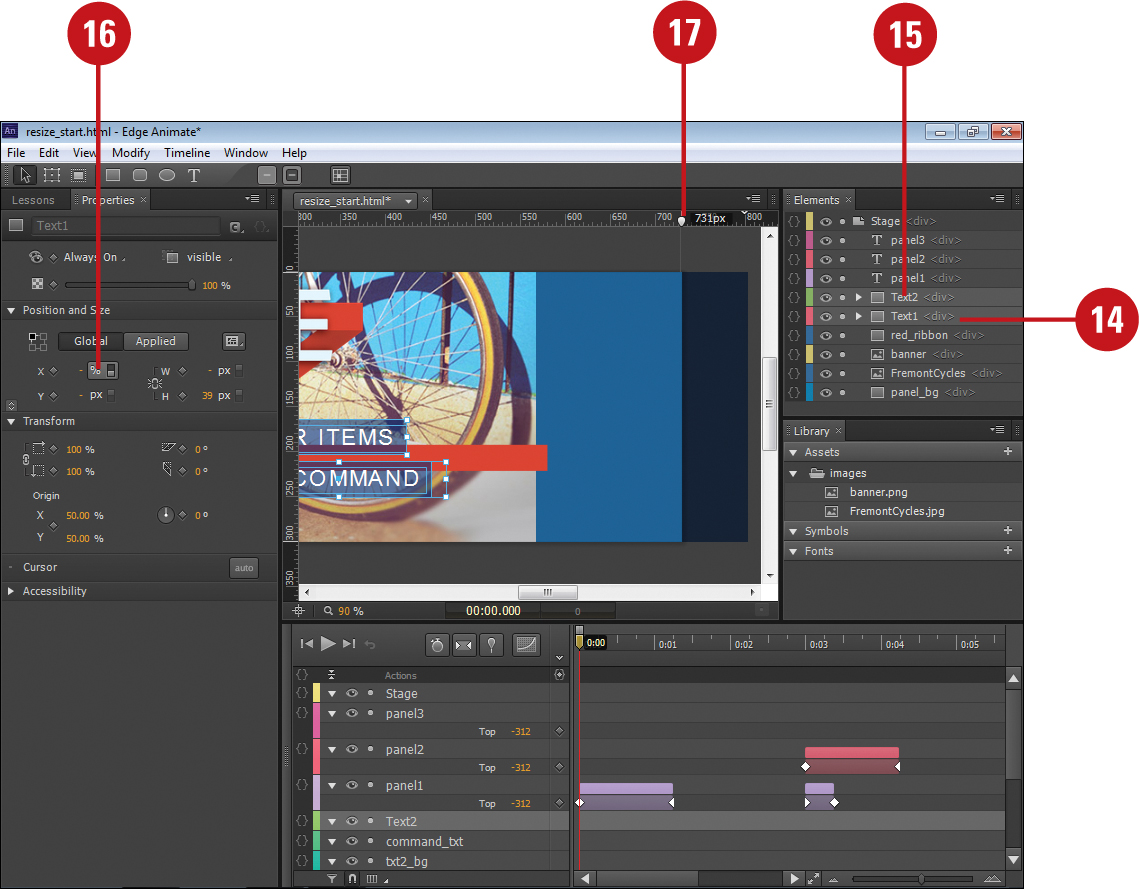
![]() In the Elements panel, select the Text1 <div> element.
In the Elements panel, select the Text1 <div> element.
![]() Hold down Shift, and then select the Text2 <div> element.
Hold down Shift, and then select the Text2 <div> element.
![]() In the Properties panel, point to the units for X, and then change from pixels (px) to percentage (%).
In the Properties panel, point to the units for X, and then change from pixels (px) to percentage (%).
![]() Move the Stage adjustment handle on the top ruler back and forth to preview, and then return it to its original position at 800 px.
Move the Stage adjustment handle on the top ruler back and forth to preview, and then return it to its original position at 800 px.
The text boxes adjust as the Stage is resized.
![]() Click the Next Step link to resize objects of the parents (Step 5 of 8).
Click the Next Step link to resize objects of the parents (Step 5 of 8).
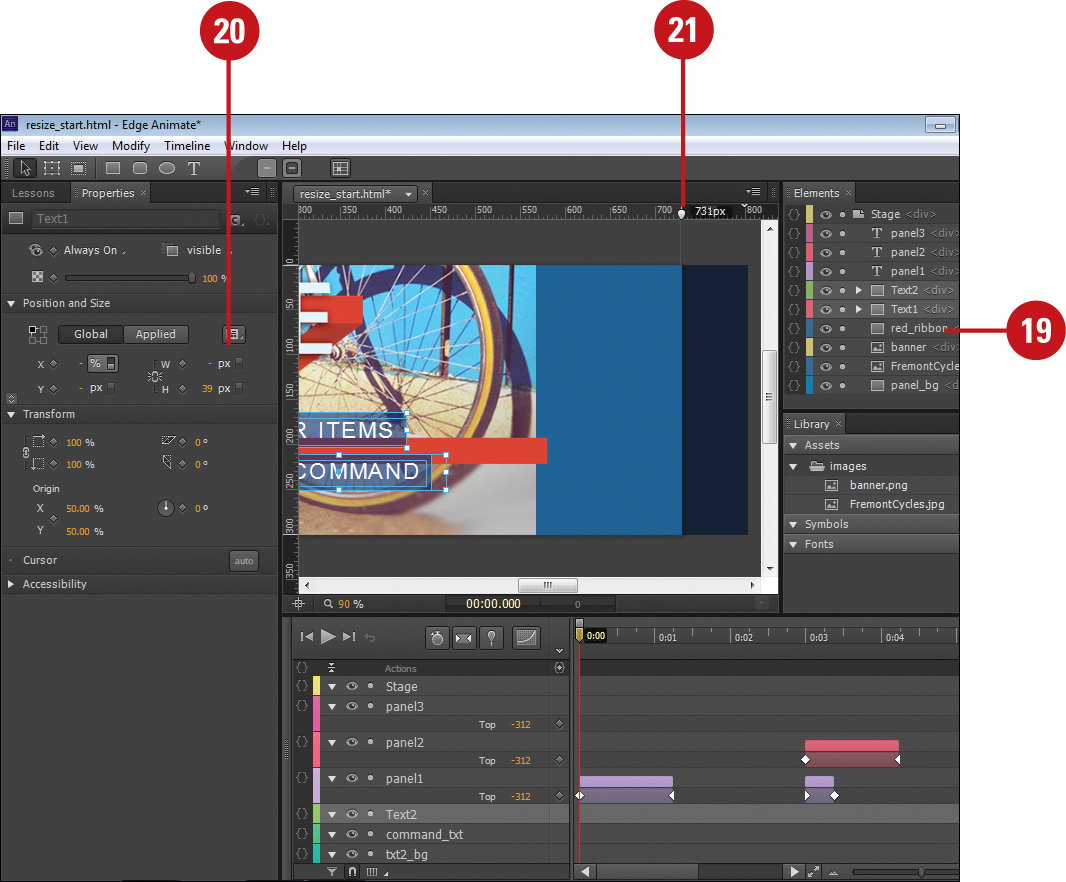
![]() In the Elements panel, select the red_ribbon <div> element.
In the Elements panel, select the red_ribbon <div> element.
![]() In the Properties panel, point to the units for W, and then change from pixels (px) to percentage (%).
In the Properties panel, point to the units for W, and then change from pixels (px) to percentage (%).
![]() Move the Stage adjustment handle on the top ruler back and forth to preview, and then return it to its original position at 800 px.
Move the Stage adjustment handle on the top ruler back and forth to preview, and then return it to its original position at 800 px.
![]() Click the Next Step link to resize the relative position of objects their parents (Step 6 of 8).
Click the Next Step link to resize the relative position of objects their parents (Step 6 of 8).
By default, objects are positions relative to the upper-left corner of their parent. You can change the relative position to any corner using the Coordinate Space Picker in the Properties panel.
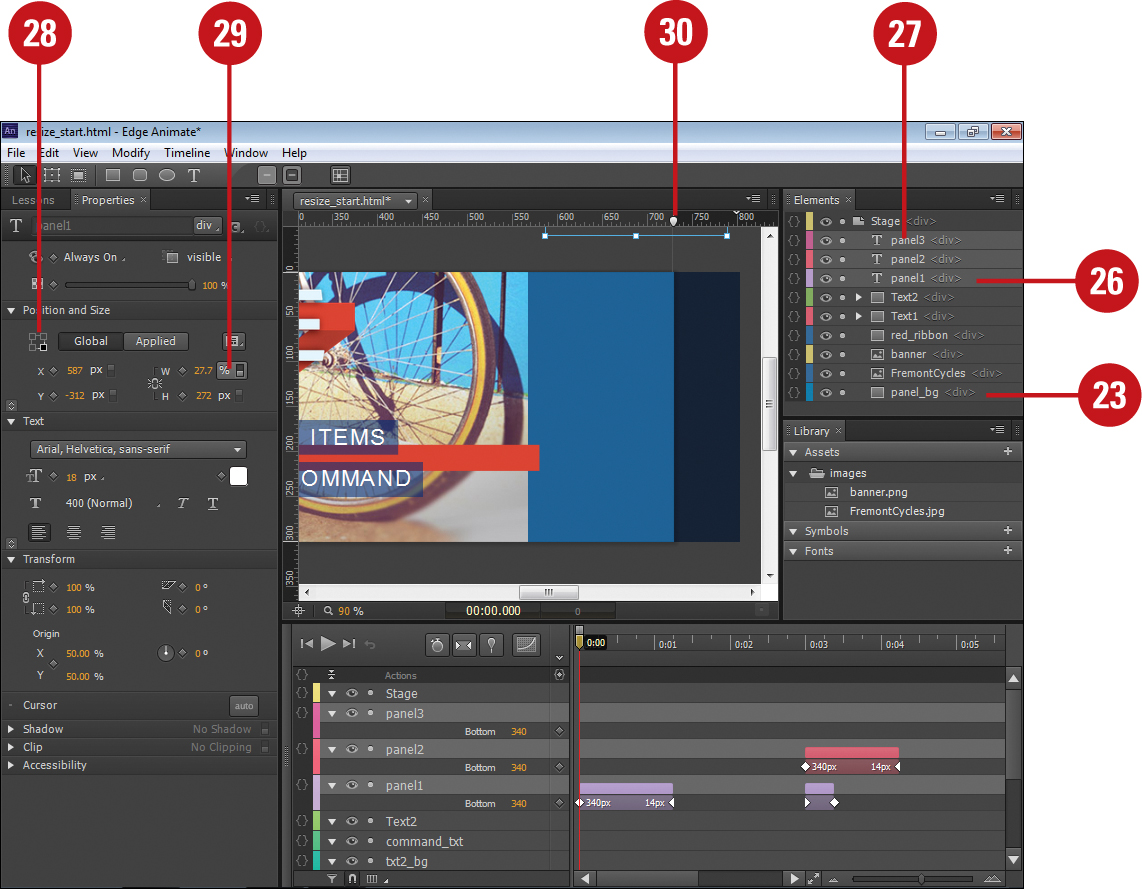
![]() In the Elements panel, select the panel_bg <div> element.
In the Elements panel, select the panel_bg <div> element.
![]() In the Properties panel, select the Bottom Right square in the Coordinate Space Picker.
In the Properties panel, select the Bottom Right square in the Coordinate Space Picker.
![]() Point to the units for W, and then change from pixels (px) to percentage (%).
Point to the units for W, and then change from pixels (px) to percentage (%).
![]() In the Elements panel, select the panel1 <div> element.
In the Elements panel, select the panel1 <div> element.
![]() Hold down Shift, and then select the panel3 <div> element.
Hold down Shift, and then select the panel3 <div> element.
This selects panel1, panel2, and panel3.
![]() In the Properties panel, select the Bottom Right square in the Coordinate Space Picker.
In the Properties panel, select the Bottom Right square in the Coordinate Space Picker.
![]() Point to the units for W, and then change from pixels (px) to percentage (%).
Point to the units for W, and then change from pixels (px) to percentage (%).
![]() Move the Stage adjustment handle on the top ruler back and forth to preview, and then return it to its original position at 800 px.
Move the Stage adjustment handle on the top ruler back and forth to preview, and then return it to its original position at 800 px.
This keeps the blue panel and the animated text relative to the right side of the Stage.
![]() Click the Next Step link to apply layout presets to objects (Step 7 of 8).
Click the Next Step link to apply layout presets to objects (Step 7 of 8).
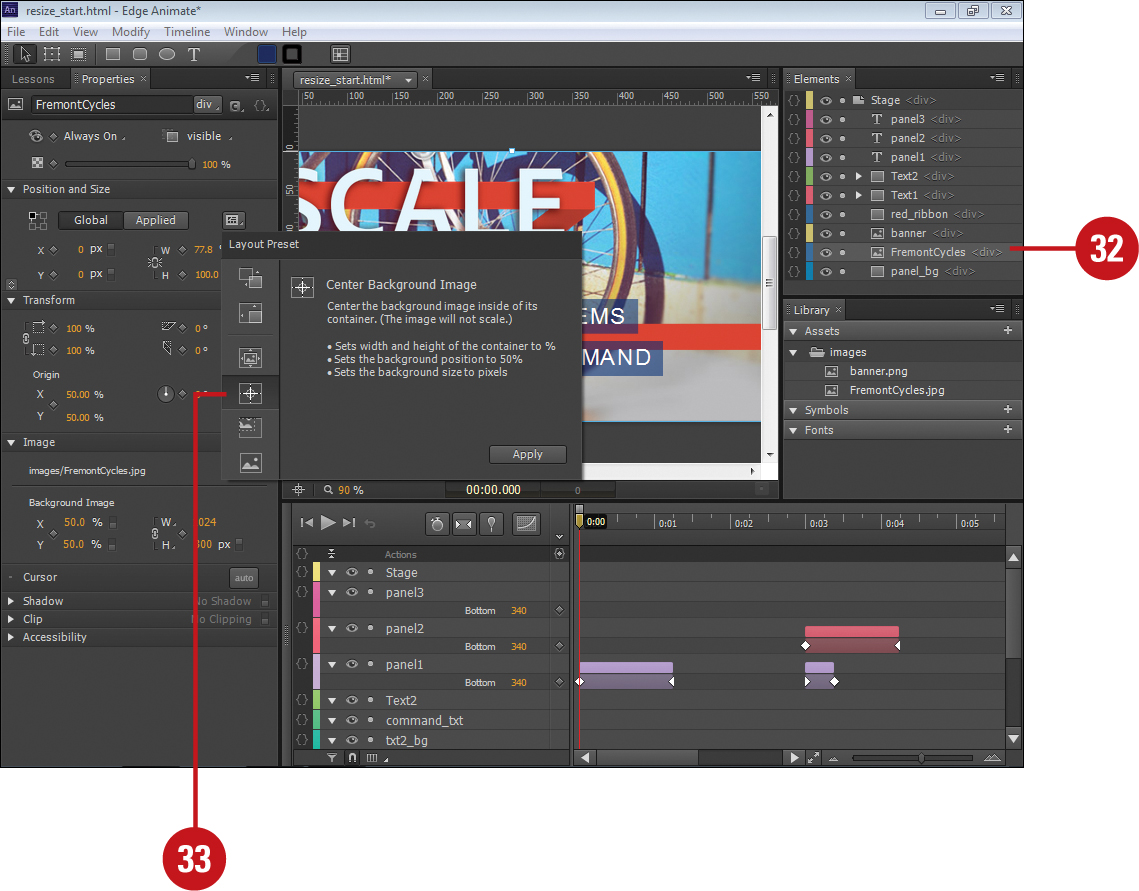
![]() In the Elements panel, select the FremontCycles <div> element.
In the Elements panel, select the FremontCycles <div> element.
![]() In the Properties panel, click the Layout Presets button, click the Center Background Image preset, and then click Apply.
In the Properties panel, click the Layout Presets button, click the Center Background Image preset, and then click Apply.
![]() Move the Stage adjustment handle on the top ruler back and forth to preview, and then return it to its original position at 800 px.
Move the Stage adjustment handle on the top ruler back and forth to preview, and then return it to its original position at 800 px.
This makes the element resize on both X and Y axis while keeping the image centered.
![]() Click the Next Step link to set resize constraints of objects their parents (Step 8 of 8).
Click the Next Step link to set resize constraints of objects their parents (Step 8 of 8).
![]() In the Elements panel, select the Stage <div> element.
In the Elements panel, select the Stage <div> element.
![]() In the Properties panel, set the Min W value to 650 px.
In the Properties panel, set the Min W value to 650 px.
![]() Click Max W, and then deselect None.
Click Max W, and then deselect None.
![]() Set the Max W value to 1280 px.
Set the Max W value to 1280 px.

![]() Click the File menu, and then click Preview In Browser or press Ctrl+Enter (Win) or
Click the File menu, and then click Preview In Browser or press Ctrl+Enter (Win) or ![]() +Return (Mac).
+Return (Mac).
![]() Resize the browser window to see how it responds, and then click the Close button to exit.
Resize the browser window to see how it responds, and then click the Close button to exit.
This keeps the size range of the composition between 650 px and 1280 px.
The lesson is complete.
![]() Click the File menu, click Save, navigate to a folder, create a folder, enter a name for the composition, and then click Save.
Click the File menu, click Save, navigate to a folder, create a folder, enter a name for the composition, and then click Save.
Taking the Extend Lesson
With the Extend lesson, you can code to your composition to extend the functionality of your animation. With the code you can add interactivity to animation. For example, you can add code to start an animation when you click a button. When you click the button, it triggers an event to take place. With Edge Animate, you don’t have to be a programmer to add interactivity. It comes with Code snippets, segments of code, that you can quickly insert to perform a task.
Take the Extend Lesson
![]() From the Welcome screen under Getting Started or the Lessons panel, click the Extend lesson tile to start it.
From the Welcome screen under Getting Started or the Lessons panel, click the Extend lesson tile to start it.
The Welcome screen closes, Edge Animate creates a new Untitled project, and the Lessons panel displays the start of the lesson.
![]() Click the Click to open the sample link.
Click the Click to open the sample link.
The interactivity_start.html file opens, displaying an animation.
![]() Click the File menu, and then click Preview In Browser or press Ctrl+Enter (Win) or
Click the File menu, and then click Preview In Browser or press Ctrl+Enter (Win) or ![]() +Return (Mac).
+Return (Mac).
The animation plays in your browser.
![]() Click the Close button to exit your browser.
Click the Close button to exit your browser.
![]() Click the Next Step link to add a trigger (Step 2 of 7).
Click the Next Step link to add a trigger (Step 2 of 7).
![]() Move the Playhead to 0:00 in the Timeline.
Move the Playhead to 0:00 in the Timeline.
![]() Click the Timeline menu, and then click Insert Trigger or press Ctrl+T (Win) or
Click the Timeline menu, and then click Insert Trigger or press Ctrl+T (Win) or ![]() +T (Mac).
+T (Mac).
![]() In the Snippets list, click the Stop button.
In the Snippets list, click the Stop button.
![]() Click the Close button to exit.
Click the Close button to exit.

![]() Click the Next Step link to add an action (Step 3 of 7).
Click the Next Step link to add an action (Step 3 of 7).
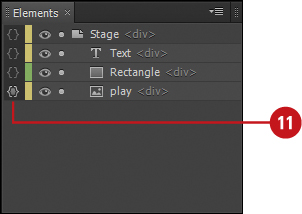
![]() In the Elements panel, click the Open Actions button for the play <div> element.
In the Elements panel, click the Open Actions button for the play <div> element.
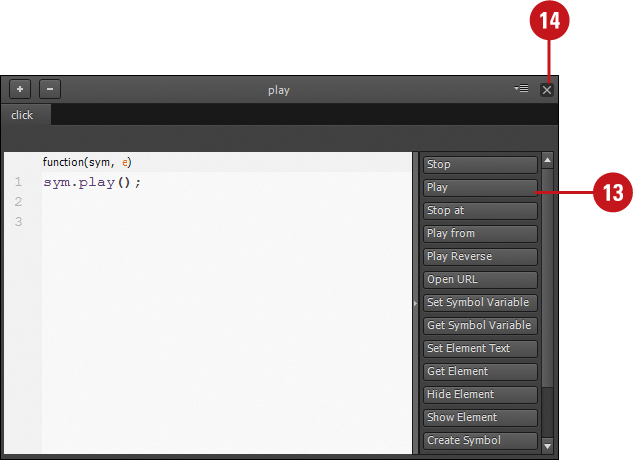
![]() Select click from the menu.
Select click from the menu.
![]() In the Snippets list, click the Play button.
In the Snippets list, click the Play button.
![]() Click the Close button to exit.
Click the Close button to exit.
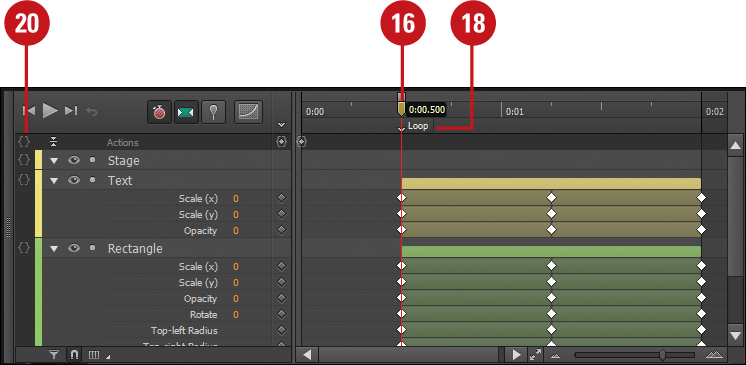
![]() Click the Next Step link to add a label on the Timeline (Step 4 of 7).
Click the Next Step link to add a label on the Timeline (Step 4 of 7).
![]() Move the Playhead to 0:00.500 (0.5 seconds).
Move the Playhead to 0:00.500 (0.5 seconds).
![]() Click the Timeline menu, and then click Insert Label or press Ctrl+L (Win) or
Click the Timeline menu, and then click Insert Label or press Ctrl+L (Win) or ![]() +L (Mac).
+L (Mac).
![]() Type Loop for the label, and then press Enter (Win) or Return (Mac).
Type Loop for the label, and then press Enter (Win) or Return (Mac).
![]() Click the Next Step link to add a timeline action (Step 5 of 7).
Click the Next Step link to add a timeline action (Step 5 of 7).
![]() In the Timeline, click the Timeline Actions button to the left of the Actions row.
In the Timeline, click the Timeline Actions button to the left of the Actions row.
![]() Select complete from the menu.
Select complete from the menu.
![]() In the Snippets list, click the Play button.
In the Snippets list, click the Play button.
![]() Replace 1000 with loop.
Replace 1000 with loop.
![]() Click the Close button to exit.
Click the Close button to exit.
![]() Click the File menu, and then click Preview In Browser or press Ctrl+Enter (Win) or
Click the File menu, and then click Preview In Browser or press Ctrl+Enter (Win) or ![]() +Return (Mac).
+Return (Mac).
![]() Click the Play button to start the animation in your browser, and then click the Close button to exit.
Click the Play button to start the animation in your browser, and then click the Close button to exit.
![]() Click the Next Step link to open the Code window (Step 6 of 7).
Click the Next Step link to open the Code window (Step 6 of 7).
![]() Click the Window menu, and then click Code.
Click the Window menu, and then click Code.
The Code panel opens in a separate window.
![]() Click the Next Step link to create a loop counter (Step 7 of 7).
Click the Next Step link to create a loop counter (Step 7 of 7).
![]() In the tree, select play.click.
In the tree, select play.click.
![]() Click to place the insertion point below the code:
Click to place the insertion point below the code: sym.play();
![]() Click the Code Snippets button to display the Snippets panel.
Click the Code Snippets button to display the Snippets panel.
![]() Click Set Symbol Variable from the Snippets list.
Click Set Symbol Variable from the Snippets list.
![]() Modify the code to the following:
Modify the code to the following: sym.setVariable("count",1);
This stores a value that you’ll use to count the number of loops.

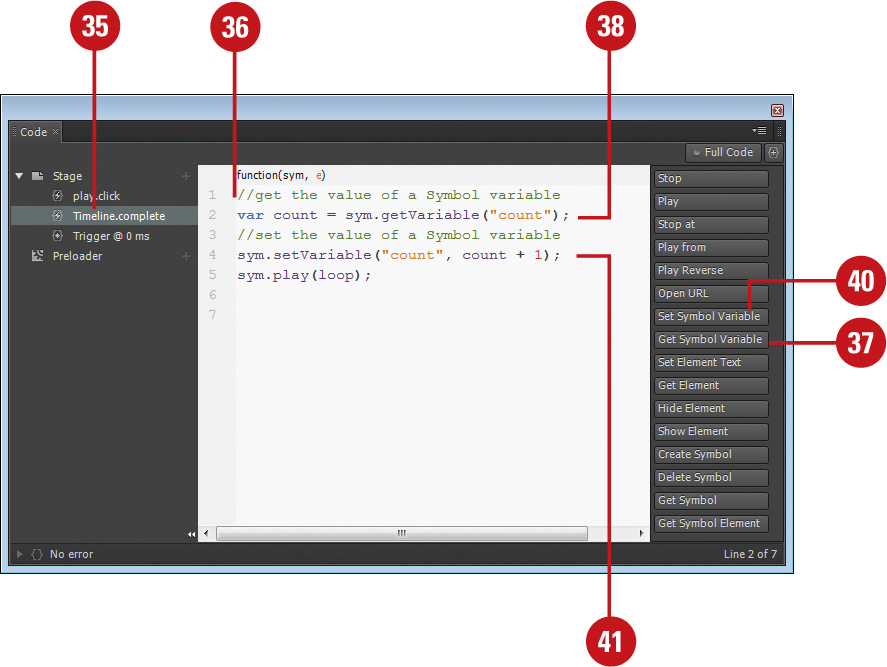
![]() In the tree, select Timeline.complete.
In the tree, select Timeline.complete.
![]() Click to place the insertion point before the code:
Click to place the insertion point before the code: sym.play(loop);
![]() Click Get Symbol Variable from the Snippets list.
Click Get Symbol Variable from the Snippets list.
![]() Modify the code to the following:
Modify the code to the following: var count =sym.getVariable ("count");
![]() Click to place the insertion point on the line after the code:
Click to place the insertion point on the line after the code: var count =sym.getVariable ("count");
![]() Click Set Symbol Variable from the Snippets list.
Click Set Symbol Variable from the Snippets list.
![]() Modify the code to the following:
Modify the code to the following: sym.setVariable ("count", count + 1);
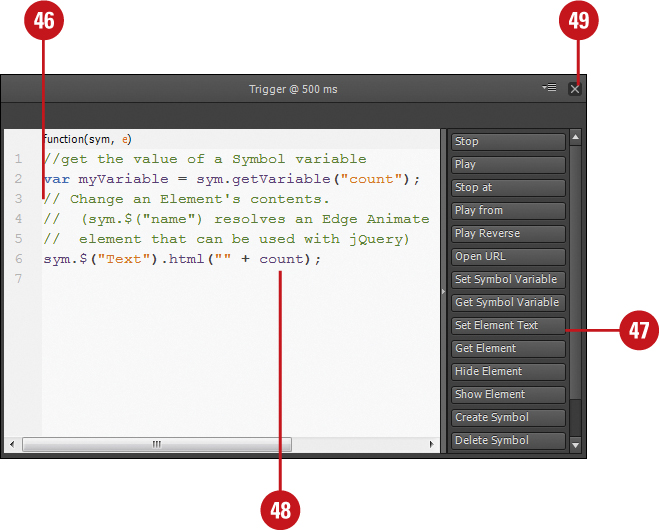
![]() Move the Playhead to 0:00.500 in the Timeline.
Move the Playhead to 0:00.500 in the Timeline.
![]() Click the Timeline menu, and then click Insert Trigger or press Ctrl+T (Win) or
Click the Timeline menu, and then click Insert Trigger or press Ctrl+T (Win) or ![]() +T (Mac).
+T (Mac).
![]() In the Snippets list, click the Get Symbol Variable button.
In the Snippets list, click the Get Symbol Variable button.
![]() Modify the code to the following:
Modify the code to the following: var count = sym.getVariable ("count");
This displays the count.

![]() Click to place the insertion point on the line after the code:
Click to place the insertion point on the line after the code: sym.getVariable ("count");
![]() Click Set Element Text from the Snippets list.
Click Set Element Text from the Snippets list.
Set Element Text uses jQuery code to modify the text of an element.
![]() Modify the code to the following:
Modify the code to the following: sym.$("Text").html("" + count);
![]() Click the Close button to exit.
Click the Close button to exit.
![]() Click the File menu, and then click Preview In Browser or press Ctrl+Enter (Win) or
Click the File menu, and then click Preview In Browser or press Ctrl+Enter (Win) or ![]() +Return (Mac).
+Return (Mac).
![]() Click the Play button to start the animation in your browser.
Click the Play button to start the animation in your browser.
The animation continue to count until you close your browser.
![]() Click the Close button to exit.
Click the Close button to exit.
The lesson is complete.
![]() Click the File menu, click Save, navigate to a folder, create a folder, enter a name for the composition, and then click Save.
Click the File menu, click Save, navigate to a folder, create a folder, enter a name for the composition, and then click Save.
Taking the Reuse Lesson
With the Reuse lesson, you can create symbols of an element so that you can reuse it multiple times in you composition. When you import an asset as a symbol or convert an existing element to a symbol, it’s known as a definition. When you use the symbol definition in your animation, it becomes an instance, which you can uniquely modify. You can add multiple instances of the same symbol and animate them differently. By using the same symbol definition, you’re only using the asset once, which reduces time it takes to load it.
Take the Reuse Lesson
![]() From the Welcome screen under Getting Started or the Lessons panel, click the Reuse lesson tile to start it.
From the Welcome screen under Getting Started or the Lessons panel, click the Reuse lesson tile to start it.
The Welcome screen closes, Edge Animate creates a new Untitled project, and the Lessons panel displays the start of the lesson.
![]() Click the Click to open the sample link.
Click the Click to open the sample link.
The interactivity_start.html file opens, displaying an animation.
![]() Click the File menu, and then click Preview In Browser or press Ctrl+Enter (Win) or
Click the File menu, and then click Preview In Browser or press Ctrl+Enter (Win) or ![]() +Return (Mac).
+Return (Mac).
The animation plays in your browser.
![]() Click the Close button to exit your browser.
Click the Close button to exit your browser.
![]() Click the Next Step link to convert an object to a symbol (Step 2 of 5).
Click the Next Step link to convert an object to a symbol (Step 2 of 5).
![]() Move the Playhead to 0:01 (1 second).
Move the Playhead to 0:01 (1 second).
![]() In the Elements panel, select the SpinRect <div> element.
In the Elements panel, select the SpinRect <div> element.
![]() Click the Modify menu, and then click Convert to Symbol.
Click the Modify menu, and then click Convert to Symbol.

![]() Type Spin, and then click OK.
Type Spin, and then click OK.
This creates a symbol, which you can reuse. These are known as instances.
![]() Click the Next Step link to create instances of a symbol (Step 3 of 5).
Click the Next Step link to create instances of a symbol (Step 3 of 5).
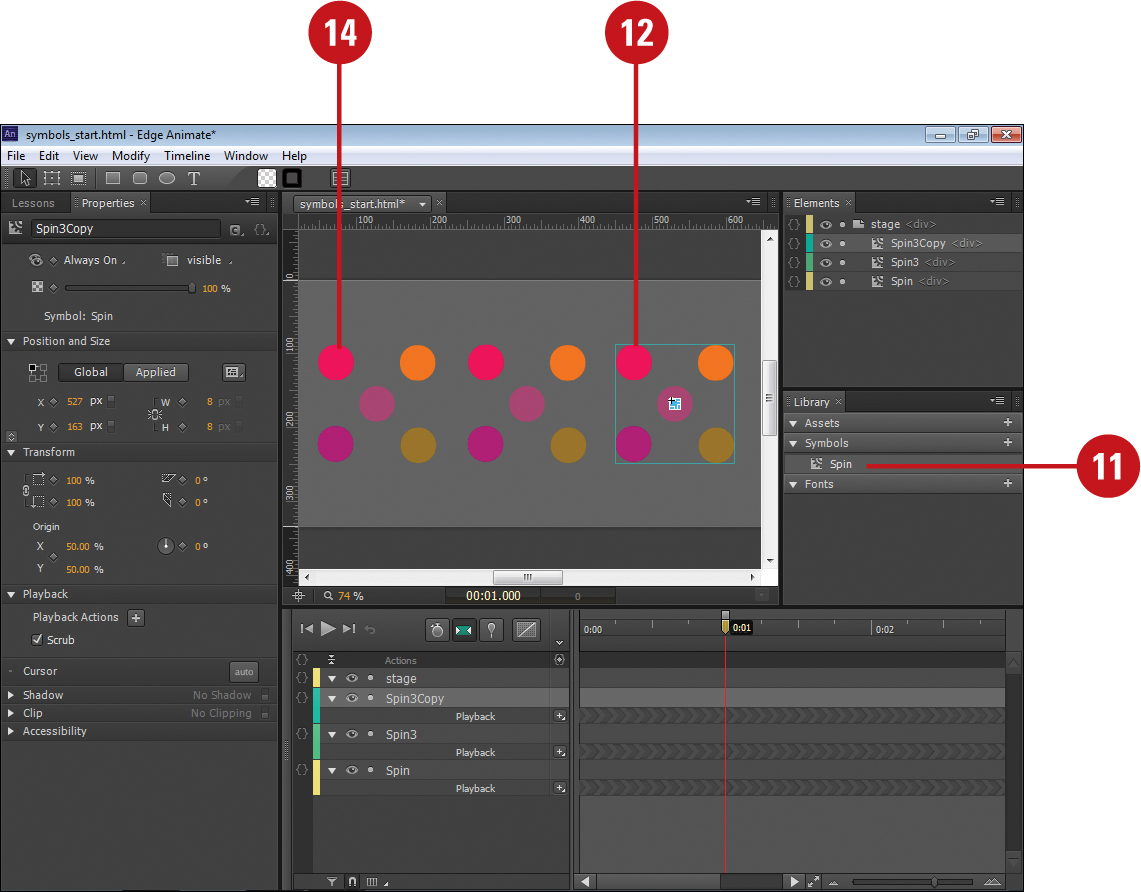
![]() In the Library panel, drag the Spin icon from Symbols to the right of the first instance.
In the Library panel, drag the Spin icon from Symbols to the right of the first instance.
![]() Alt-drag the second instance on the Stage to create another copy to the right of it.
Alt-drag the second instance on the Stage to create another copy to the right of it.
![]() Click the Next Step link to convert an object to a symbol (Step 4 of 5).
Click the Next Step link to convert an object to a symbol (Step 4 of 5).
![]() Double-click one of the instances on the Stage.
Double-click one of the instances on the Stage.
The symbol opens to in-place symbol editing mode.
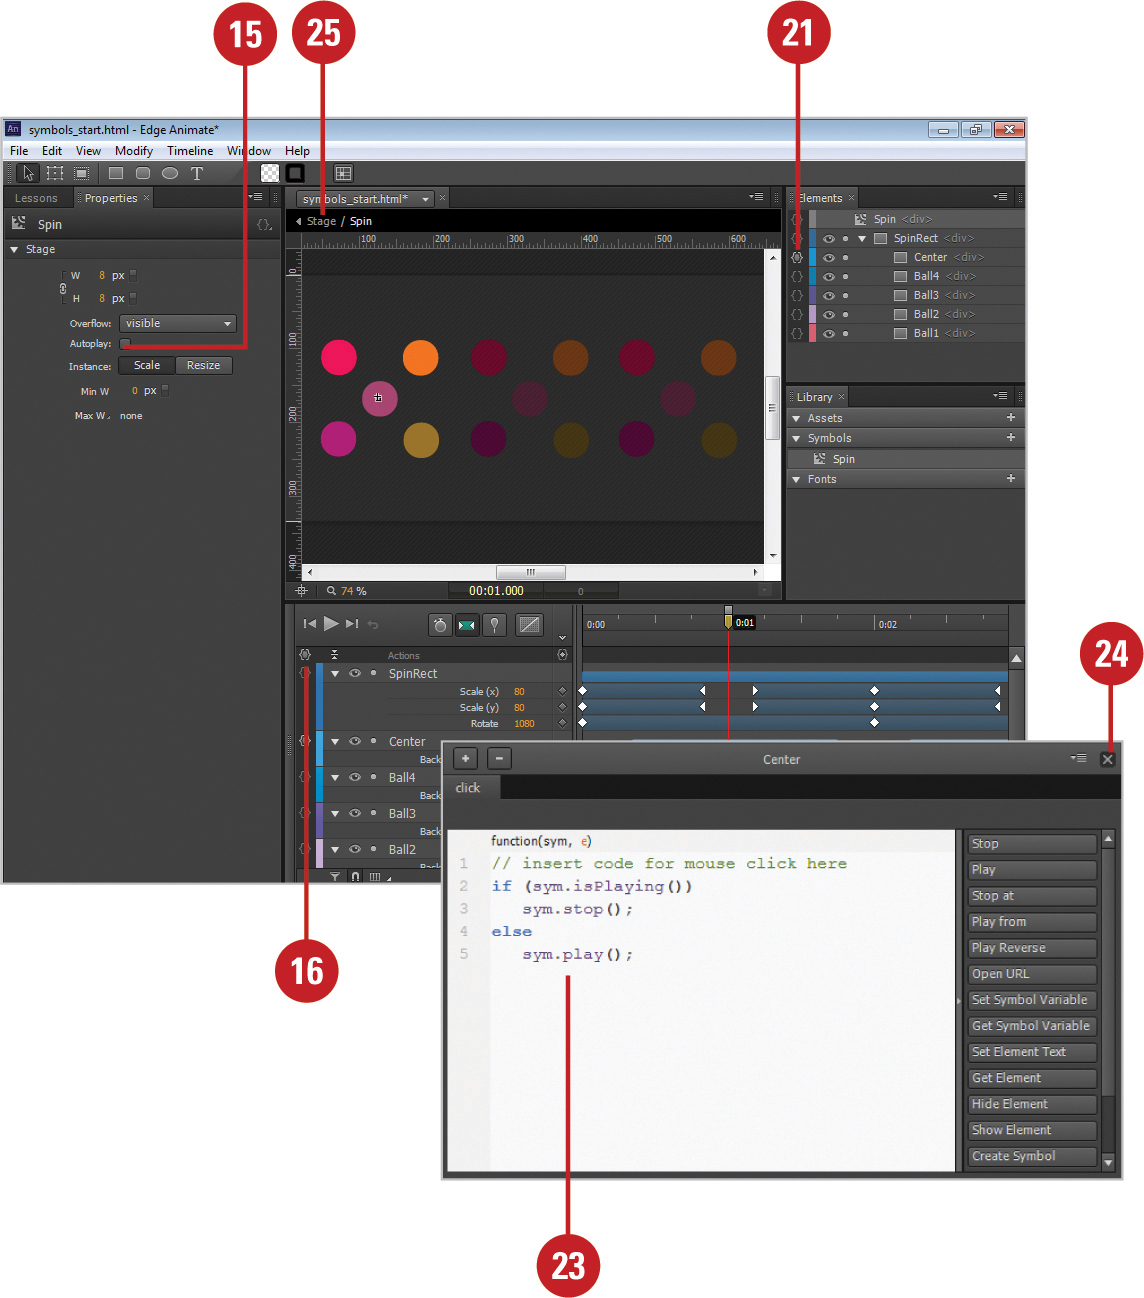
![]() In the Properties panel, deselect the Autoplay check box, so the symbol doesn’t play automatically.
In the Properties panel, deselect the Autoplay check box, so the symbol doesn’t play automatically.
![]() In the Timeline, click the Timeline Actions button to the left of the Actions row.
In the Timeline, click the Timeline Actions button to the left of the Actions row.
![]() Select complete from the menu.
Select complete from the menu.
![]() To loop, click the Play from button in the Snippets list.
To loop, click the Play from button in the Snippets list.
![]() Change the time of 1000 to 0. The time is in milliseconds.
Change the time of 1000 to 0. The time is in milliseconds.
![]() Click the Close button to exit.
Click the Close button to exit.
![]() In the Elements panel, click the Open Actions button for the Center <div> element.
In the Elements panel, click the Open Actions button for the Center <div> element.
![]() Select click from the menu.
Select click from the menu.
![]() Add the code from the illustration.
Add the code from the illustration.
![]() Click the Close button to exit.
Click the Close button to exit.
![]() Click Back button or Stage on the Edit bar to exit symbol editing mode.
Click Back button or Stage on the Edit bar to exit symbol editing mode.
![]() Move the Playhead to 0:00 (0 seconds).
Move the Playhead to 0:00 (0 seconds).
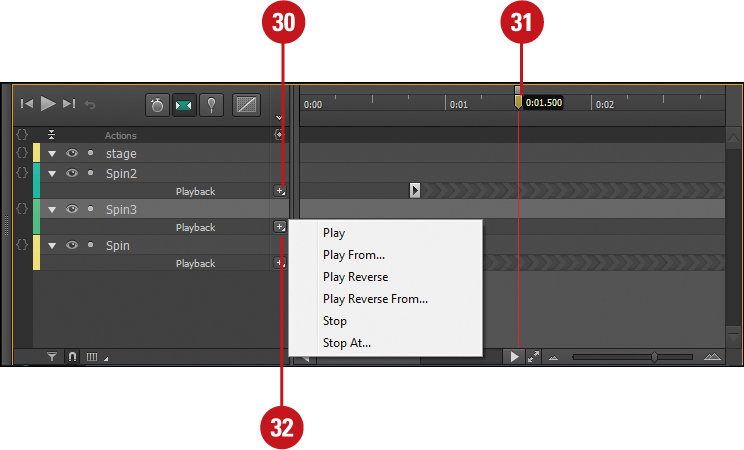
![]() In the Timeline, click the Add button (+) in the Playback row for the Spin element.
In the Timeline, click the Add button (+) in the Playback row for the Spin element.
![]() Click Play from the menu.
Click Play from the menu.

![]() Move the Playhead to 0:00.750 (0.75 seconds).
Move the Playhead to 0:00.750 (0.75 seconds).
![]() Click the Add button (+) in the Playback row for the Spin2 element, and then click Play.
Click the Add button (+) in the Playback row for the Spin2 element, and then click Play.
![]() Move the Playhead to 0:01.500 (1.5 seconds).
Move the Playhead to 0:01.500 (1.5 seconds).
![]() Click the Add button (+) in the Playback row for the Spin3 element, and then click Play.
Click the Add button (+) in the Playback row for the Spin3 element, and then click Play.
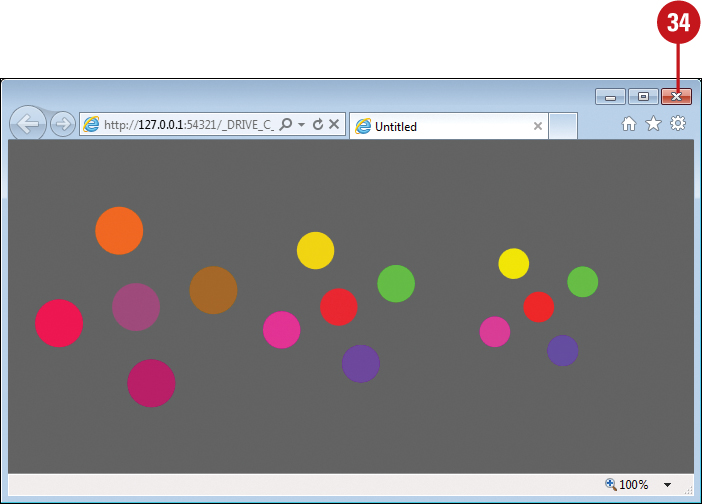
![]() Click the File menu, and then click Preview In Browser or press Ctrl+Enter (Win) or
Click the File menu, and then click Preview In Browser or press Ctrl+Enter (Win) or ![]() +Return (Mac).
+Return (Mac).
![]() Click the Close button to exit.
Click the Close button to exit.
The lesson is complete.
![]() Click the File menu, click Save, navigate to a folder, create a folder, enter a name for the composition, and then click Save.
Click the File menu, click Save, navigate to a folder, create a folder, enter a name for the composition, and then click Save.