4. Using Templates, Styles, and Themes
What You’ll Do
Introduction
Microsoft Word documents are based on templates, which are predesigned and preformatted files that serve as the foundation of the documents. Each template is made up of styles that have common design elements, such as coordinated fonts, sizes, and colors, as well as, page layout designs. Start with a Word template for memos, reports, fax cover pages, Web pages, and so on. Apply the existing styles for headings, titles, body text, and so forth. Then modify the template’s styles, or create your own to better suit your needs. Make sure you get the look you want by adding emphasis using italics, boldface, and underline, changing text alignment, adjusting line and paragraph spacing, setting tabs and indents, or creating bulleted and numbered lists. When you’re done, your document is sure to demand attention and convey your message in its appearance.
Not everyone has an eye for color, and pulling it all together can be daunting, so Word provides you with professionally designed themes, which you can apply to any document. A theme is a set of unified design elements that provides a consistent look for a document by using color themes, fonts, and effects, such as shadows, shading, and animations. By using templates, styles, and themes, you can create professional looking documents in no time.
Creating a Template
You can create your own template as easily as you create a document. Like those that come with Office, custom templates can save you time. Perhaps each month you create an inventory document in which you enter repetitive information; all that changes is the actual data. By creating your own template, you can have a custom form that is ready for completion each time you take inventory. A template file saves all the customization you made to reuse in other documents. Although you can store your template anywhere you want, you may find it handy to store it in the Templates folder that Microsoft Office uses to store its templates. If you store your design templates in the Templates folder, those templates appear as options when you choose the New command on the File tab, and then click My Templates.
Create a Template
![]() Enter all the necessary information in a new document—including formatting and graphics.
Enter all the necessary information in a new document—including formatting and graphics.
![]() Click the File tab, and then click Save As.
Click the File tab, and then click Save As.
![]() Click the Save as type list arrow, and then select a template format.
Click the Save as type list arrow, and then select a template format.
![]() Word Template. Creates a template for Word 2007-2010.
Word Template. Creates a template for Word 2007-2010.
![]() Word Macro-Enabled Template. Creates a template for Word 2007-2010 with macros.
Word Macro-Enabled Template. Creates a template for Word 2007-2010 with macros.
![]() Word 97-2003 Template. Creates a template for Office Word 97-2003.
Word 97-2003 Template. Creates a template for Office Word 97-2003.
Microsoft Office templates are typically stored in the following location:
Windows 7 or Vista. C:/Users/your name/AppData/Roaming/Microsoft/Templates
Windows XP. C:/Documents and Settings/your name/Application Data/Microsoft/Templates
![]() Type a name for your template.
Type a name for your template.
![]() Click Save.
Click Save.

Opening a Template
You may not realize it, but every document you create is based on a template. When you start a new document without specifying a template, Word creates a new document based on the default template, called Normal. When you specify a particular template in the New dialog box, whether it’s one supplied by Word or one you created yourself, Word starts a new document that contains the formatting, and any graphics and text contained in that template. The template itself does not change when you enter data in the new document, because you are working on a new file, not with the template file.
Open a Template
![]() Click the File tab, and then click Open.
Click the File tab, and then click Open.
![]() Click the Files of type list arrow, and then click Word Templates.
Click the Files of type list arrow, and then click Word Templates.
![]() Click the Look in list arrow, and then select the drive and folder that contain the template you want to open.
Click the Look in list arrow, and then select the drive and folder that contain the template you want to open.
Microsoft Office templates are typically stored in the following location:
Windows 7 or Vista. C:/Users/your name/AppData/Roaming/Microsoft/Templates
Windows XP. C:/Documents and Settings/your name/Application Data/Microsoft/Templates
![]() Click the file name of the template you want to open.
Click the file name of the template you want to open.
![]() Click Open.
Click Open.
Changing a Template
Microsoft Word has a selection of pre-made templates designed for you to use. These templates are available in the New Document dialog box under the Installed Templates. If you like one of these templates, you can use it as the basis to create your own template. To customize one of the Microsoft Installed Templates, open the actual template, make the changes you want, and then save it. If you save the original template back in the same location with the same name as the original, you create a new default template. The original one is replaced by the newly saved template. If you don’t want to change the original, save the template with a new name. You can also use the same procedure to change one of your own templates.
Change a Word Template
![]() Click the File tab, and then click New.
Click the File tab, and then click New.
![]() Open the template you want to change using the following:
Open the template you want to change using the following:
![]() Microsoft Templates. Click Installed Templates, click the template you want, and then click Create.
Microsoft Templates. Click Installed Templates, click the template you want, and then click Create.
![]() My Templates. Click My Templates, click the template you want, and then click OK.
My Templates. Click My Templates, click the template you want, and then click OK.
![]() Make the changes you want to the template.
Make the changes you want to the template.
![]() Click the File tab, and then click Save As.
Click the File tab, and then click Save As.
![]() Click the Save as type list arrow, and then click Word Template.
Click the Save as type list arrow, and then click Word Template.
The location defaults to the folder for My Templates.
If you want to save your template with Installed Templates, then navigate to the following:
C:/Program Files/Microsoft Office/Templates/1033/
![]() Type a new file name or the same as the existing name to replace it.
Type a new file name or the same as the existing name to replace it.
![]() Click Save, and then click Yes, if necessary, to replace the file.
Click Save, and then click Yes, if necessary, to replace the file.


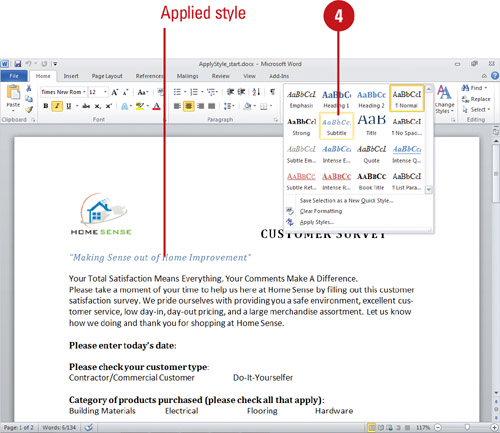
Applying a Quick Style
A style is a collection of formatting settings saved with a name in a document or template that you can apply to text at any time. Word provides different style sets to make it easy to format text. Each style set consists of a variety of different formatting style combinations, which you can view using the Quick Style gallery. To quickly see if you like a Quick Style, point to a thumbnail in the gallery to display a live preview of it in the selected text. If you like it, click the thumbnail to apply it.
Apply a Style
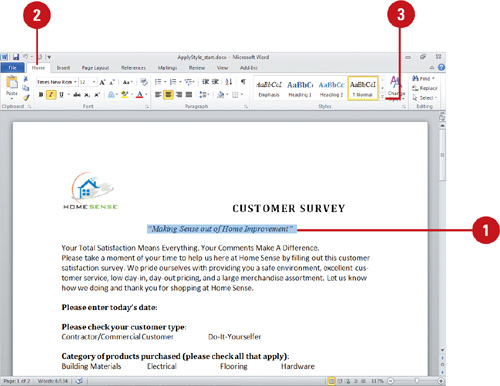
![]() Select the text to which you want to apply a style.
Select the text to which you want to apply a style.
![]() Click the Home tab.
Click the Home tab.
![]() Click the scroll up or down arrow, or click the More list arrow in the Styles group to see additional styles.
Click the scroll up or down arrow, or click the More list arrow in the Styles group to see additional styles.
![]() Click the style you want to apply from the gallery.
Click the style you want to apply from the gallery.
Did You Know?
You can clear style formatting. Select the text you want to clear, click the Home tab, and then click the Clear Formatting button.
You can reset the document back to document Quick Styles. Click the Home tab, click the Change Styles button, point to Style Set, and then click Reset Document Quick Steps.
You can reset the document back to document Quick Styles from a template. Click the Home tab, click the Change Styles button, point to Style Set, and then click Reset To Quick Steps From Template, locate and select the template, and then click OK.
Changing a Style Set
Not sure where to begin to create a fancy invitation or flyer? You can use style sets in Word to quickly format a document with a distinct style. Word provides predefined style sets—such as Classic, Elegant, Simple, Modern, Formal, Fancy, and Distinctive—to make it easy to format an entire document. Each style set consists of a variety of different formatting style combinations, which you can view using the Quick Style gallery.
Change a Style Set
![]() Click the Home tab.
Click the Home tab.
![]() Click the Change Styles button.
Click the Change Styles button.
![]() Point to Style Set, and then click the style set you want.
Point to Style Set, and then click the style set you want.

Did You Know?
You can reset the document back to document Quick Styles. Click the Home tab, click the Change Styles button, point to Style Set, and then click Reset Document Quick Steps.
You can reset the document back to document Quick Styles from a template. Click the Home tab, click the Change Styles button, point to Style Set, click Reset To Quick Steps From Template, locate and select the template, and then click OK.
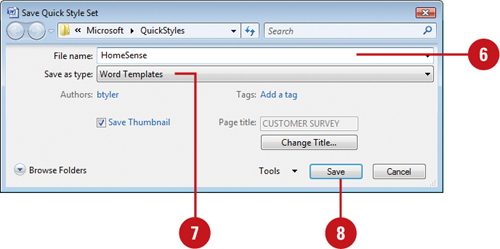
![]() Format a document with the style that you want to save.
Format a document with the style that you want to save.
![]() Click the Home tab.
Click the Home tab.
![]() Click the Change Styles button.
Click the Change Styles button.
![]() Point to Style Set.
Point to Style Set.
![]() Click Save as Quick Style Set.
Click Save as Quick Style Set.
The Save Quick Style Set dialog box opens, displaying the Quick Styles folder.
![]() Type a file name.
Type a file name.
![]() If necessary, click the Save as type list arrow, and then click Word Templates.
If necessary, click the Save as type list arrow, and then click Word Templates.
![]() Click Save.
Click Save.
Did You Know?
You can set the default style set. Click the Home tab, click the Change Styles button, point to Style Set, and then click the style set you want to use as the default. Click the Change Styles button, and then click Set As Default.
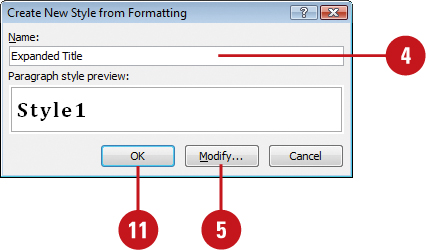
Creating and Modifying Styles
Word provides a variety of styles to choose from. But sometimes you need to create a new style or modify an existing one to get the exact look you want. When you create a new style, specify if it applies to paragraphs or characters, and give the style a short, descriptive name that describes its purpose so you and others recall when to use that style. A paragraph style is a group of format settings that can be applied only to all of the text within a paragraph (even if it is a one-line paragraph), while a character style is a group of format settings that is applied to any block of text at the user’s discretion. To modify a style, adjust the formatting settings of an existing style.
Create a New Style
![]() Select the text whose formatting you want to save as a style.
Select the text whose formatting you want to save as a style.
![]() Click the Home tab.
Click the Home tab.
![]() Click the scroll up or down arrow, or click the More list arrow in the Styles group, and then click Save Selection as a New Quick Style.
Click the scroll up or down arrow, or click the More list arrow in the Styles group, and then click Save Selection as a New Quick Style.
![]() Type a short, descriptive name.
Type a short, descriptive name.
![]() Click Modify.
Click Modify.
![]() Click the Style type list arrow, and then click Paragraph to include the selected text’s line spacing and margins in the style, or click Character to include only formatting, such as font, size, and bold, in the style.
Click the Style type list arrow, and then click Paragraph to include the selected text’s line spacing and margins in the style, or click Character to include only formatting, such as font, size, and bold, in the style.
![]() Click the Style for following paragraph list arrow, and then click the name of style you want to be applied after a paragraph with the new style.
Click the Style for following paragraph list arrow, and then click the name of style you want to be applied after a paragraph with the new style.
![]() Select the formatting options you want.
Select the formatting options you want.
![]() To add the style to the Quick style gallery, select the Add to Quick Style list check box.
To add the style to the Quick style gallery, select the Add to Quick Style list check box.
![]() Click OK.
Click OK.
![]() Click OK.
Click OK.

![]() Click the Home tab.
Click the Home tab.
![]() Click the scroll up or down arrow, or click the More list arrow in the Styles group.
Click the scroll up or down arrow, or click the More list arrow in the Styles group.
![]() Right-click the style you want to modify, and then click Modify.
Right-click the style you want to modify, and then click Modify.
![]() Specify any style changes (Style based on or Style for following paragraph) you want.
Specify any style changes (Style based on or Style for following paragraph) you want.
![]() Click Format, and then click the type of formatting you want to modify:
Click Format, and then click the type of formatting you want to modify:
![]() To change character formatting, such as font type and boldface, click Font.
To change character formatting, such as font type and boldface, click Font.
![]() To change line spacing and indents, click Paragraph.
To change line spacing and indents, click Paragraph.
![]() Select the formatting options you want.
Select the formatting options you want.
![]() Check the Preview box, and review the style description. Make any formatting changes as needed.
Check the Preview box, and review the style description. Make any formatting changes as needed.
![]() To add the style to the Quick style gallery, select the Add to Quick Style list check box.
To add the style to the Quick style gallery, select the Add to Quick Style list check box.
![]() Click OK.
Click OK.


Did You Know?
You can view the list of styles. Click the Home tab, click the More list arrow in the Styles group, click Apply Style, and then click the Styles button to display the Styles list. From the Styles list pane, you can create a new style, inspect styles, manage styles, and change style options.
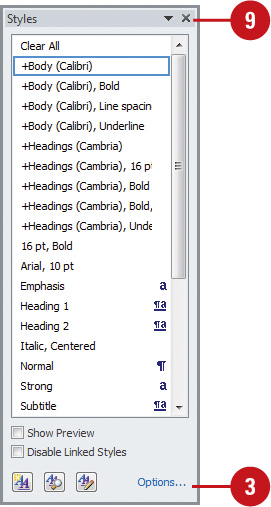
Managing Styles
The Styles pane give you another way to work with styles. You can view a master list of individual styles, preview styles as shown in the document, disable linked styles, and manage styles. The Styles pane allows you to work with the main document styles, such as body and heading text. You can modify or delete a style, select all instances of a style, or add a style to the Quick Styles gallery. If you want to work with the more indepth styles that Word uses to create lists, comment text, footer, header, index, tables, table of contents, and other stylized elements, you can use the Manage Styles dialog box.
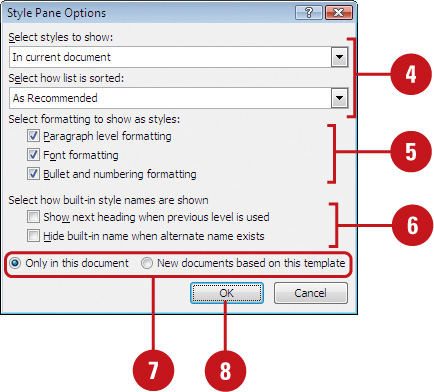
Change Styles Pane Options
![]() Click the Home tab.
Click the Home tab.
![]() Click the Styles Dialog Box Launcher.
Click the Styles Dialog Box Launcher.
![]() Click Options.
Click Options.
![]() Click the list arrows, and then select the styles you want to show and how the list is sorted.
Click the list arrows, and then select the styles you want to show and how the list is sorted.
![]() Select the check boxes to show the types of formatting (paragraph, font, or bullet and numbering) you want to show in the Styles pane.
Select the check boxes to show the types of formatting (paragraph, font, or bullet and numbering) you want to show in the Styles pane.
![]() Select or clear the check boxes to show or hide built-in styles in the Styles pane.
Select or clear the check boxes to show or hide built-in styles in the Styles pane.
![]() Click the Only in this document or New document based on this template option.
Click the Only in this document or New document based on this template option.
![]() Click OK.
Click OK.
![]() When you’re done, click the Close button on the task pane.
When you’re done, click the Close button on the task pane.
![]() Click the Home tab.
Click the Home tab.
![]() Click the Styles Dialog Box Launcher.
Click the Styles Dialog Box Launcher.
![]() To preview styles, select the Show Preview check box.
To preview styles, select the Show Preview check box.
![]() Use the Styles pane to make the any of the following changes:
Use the Styles pane to make the any of the following changes:
![]() Modify. Point to the style, click the list arrow, and then click Modify Style.
Modify. Point to the style, click the list arrow, and then click Modify Style.
![]() Delete. Point to the style, click the list arrow, click Delete, and then click Yes.
Delete. Point to the style, click the list arrow, click Delete, and then click Yes.
![]() Select All. Point to the style, click the list arrow, and then click Select All x Instance(s).
Select All. Point to the style, click the list arrow, and then click Select All x Instance(s).
![]() Add to Quick Style Gallery. Point to the style, click the list arrow, and then click Add to Quick Style Gallery.
Add to Quick Style Gallery. Point to the style, click the list arrow, and then click Add to Quick Style Gallery.
![]() Click Manage Styles.
Click Manage Styles.
![]() Click the tab with the operation you want to perform: Edit, Recommend, Restrict, or Set Defaults.
Click the tab with the operation you want to perform: Edit, Recommend, Restrict, or Set Defaults.
![]() Click the Sort order list arrow, and then select the way you want to display the styles.
Click the Sort order list arrow, and then select the way you want to display the styles.
![]() Select the style you want, and then use the options and commands to make the changes you want.
Select the style you want, and then use the options and commands to make the changes you want.
![]() When you’re done, click OK.
When you’re done, click OK.
![]() Make any additional changes, and then click the Close button on the task pane.
Make any additional changes, and then click the Close button on the task pane.


Revealing Formatting Styles
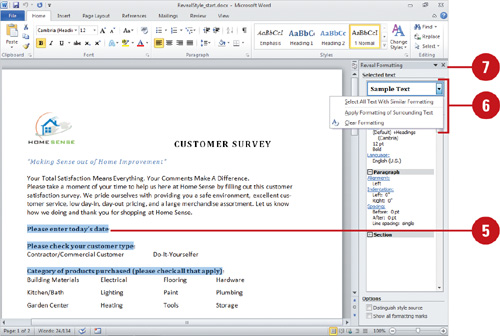
Word uses wavy blue underlines to indicate possible instances of inconsistent formatting. If you see a wavy blue underline while formatting a document, you can open the Reveal Formatting task pane to display the format of selected text, such as its font and font effects. The Reveal Formatting task pane allows you to display, change, or clear formatting for the selected text. You can also select text based on formatting so that you can compare the formatting used in the selected text with formatting used in other parts of the documents. To open the Reveal Formatting task pane, you use the Style Inspector on the Styles pane.
Select or Clear Text Formatting
![]() Select the text whose formatting you want to select or clear away.
Select the text whose formatting you want to select or clear away.
![]() Click the Styles Dialog Box Launcher.
Click the Styles Dialog Box Launcher.
![]() Click the Style Inspector button.
Click the Style Inspector button.
![]() Click the Reveal Formatting button.
Click the Reveal Formatting button.
![]() To provide more screen space to work, you can close the Style Inspector and Styles task pane.
To provide more screen space to work, you can close the Style Inspector and Styles task pane.
![]() Select the text you want to reveal.
Select the text you want to reveal.
![]() Point to the Selected Text box, click the list arrow, and then click either Select All Text With Similar Formatting or Clear Formatting.
Point to the Selected Text box, click the list arrow, and then click either Select All Text With Similar Formatting or Clear Formatting.
![]() To apply the formatting to your surrounding text, click Apply Formatting of Surrounding Text.
To apply the formatting to your surrounding text, click Apply Formatting of Surrounding Text.
![]() When you’re done, click the Close button on the task pane.
When you’re done, click the Close button on the task pane.


See Also
See “Selecting Text with Similar Formatting” on page 69 for information on using the Select Text With Similar Formatting command available on the Home tab.
![]() Select the first instance of formatting you want to compare.
Select the first instance of formatting you want to compare.
![]() Click the Styles Dialog Box Launcher.
Click the Styles Dialog Box Launcher.
![]() Click the Style Inspector button.
Click the Style Inspector button.
![]() Click the Reveal Formatting button.
Click the Reveal Formatting button.
![]() To provide more screen space to work, you can close the Style Inspector and Styles task pane.
To provide more screen space to work, you can close the Style Inspector and Styles task pane.
![]() Select the first instance of formatting you want.
Select the first instance of formatting you want.
![]() Select the Compare to another selection check box.
Select the Compare to another selection check box.
![]() Select the second instance of formatting to compare.
Select the second instance of formatting to compare.
![]() When you’re done, click the Close button on the task pane.
When you’re done, click the Close button on the task pane.


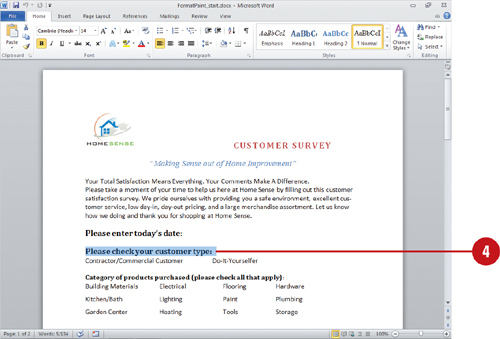
Using the Format Painter
After formatting text in a document, you might want to apply those same formatting changes to other areas in the document. For example, redoing the same formatting, you can paint (that is, copy) the formatting from one area to others. The Format Painter lets you “pick up” the style of one section and apply, or “paint,” it to another. To apply a format style to more than one item, double-click the Format Painter button on the Home tab instead of a single-click. The double-click keeps the Format Painter active until you want to press Esc to disable it, so you can apply formatting styles to any text or object you want in your document.
Apply a Format Style Using the Format Painter
![]() Select the text containing the formatting you want to copy.
Select the text containing the formatting you want to copy.
![]() Click the Home tab.
Click the Home tab.
![]() Click the Format Painter button.
Click the Format Painter button.
If you want to apply the format to more than one item, double-click the Format Painter button.
![]() Drag to select the text or click the object to which you want to apply the format.
Drag to select the text or click the object to which you want to apply the format.
![]() If you double-clicked the Format Painter button, drag to select the text or click the object to which you want to apply the format, and then press Esc when you’re done.
If you double-clicked the Format Painter button, drag to select the text or click the object to which you want to apply the format, and then press Esc when you’re done.

Did You Know?
You can use the Esc key to cancel format painting. If you change your mind about painting a format, cancel the marquee by pressing Esc.
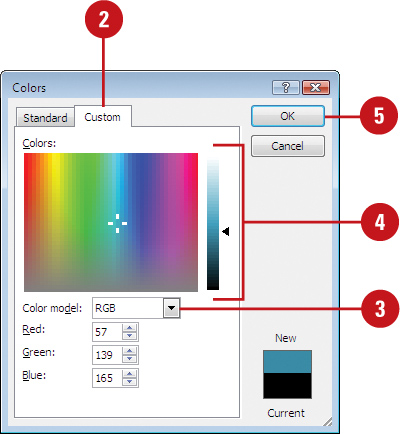
Adding Custom Colors
In addition to the standard and theme colors, Word allows you to add more colors to your document. These additional colors are available on each color button palette on the Ribbon or in a dialog box, such as the Fill Color or Font Color button. These colors are useful when you want to use a specific color, but the document color theme does not have that color. Colors that you add to a document appear in all color palettes and remain in the palette even if the color theme changes.
Add a Color to the Menus
![]() Click the Font Color button on the Home tab, and then click More Colors.
Click the Font Color button on the Home tab, and then click More Colors.
This is one method. You can also use other color menus to access the Colors dialog box.
![]() Click the Custom tab.
Click the Custom tab.
![]() Click the Color Model list arrow, and then click RGB or HSL.
Click the Color Model list arrow, and then click RGB or HSL.
![]() Select a custom color using one of the following methods:
Select a custom color using one of the following methods:
![]() If you know the color values, enter them, either Hue, Sat, Lum, or Red, Green, and Blue.
If you know the color values, enter them, either Hue, Sat, Lum, or Red, Green, and Blue.
![]() Drag across the palette until the pointer is over the color you want. Drag the black arrow to adjust the amount of black and white in the color.
Drag across the palette until the pointer is over the color you want. Drag the black arrow to adjust the amount of black and white in the color.
The new color appears above the current color at the bottom right.
![]() Click OK.
Click OK.
The current selection is changed to the new color, plus the new color is added to the Recent Colors section of all document color menus.

Understanding Themes
A theme helps you create professional-looking documents that use an appropriate balance of color for your document content. You can use a default color theme or create a custom one.
Themes in Office are made up of a palette of twelve colors. These colors appear on color palettes when you click a color-related button, such as Fill Color or Font Color button on the Home tab or in a dialog box. These twelve colors correspond to the following elements in a document:
Four Text and Background. The two background colors (light and dark combinations) are the canvas, or drawing area, color of the document. The two text colors (light and dark combinations) are for typing text and drawing lines, and contrast with the background colors.
Six Accent. These colors are designed to work as a complementary color palette for objects, such as shadows and fills. These colors contrast with both the background and text colors.
One hyperlink. This color is designed to work as a complementary color for objects and hyperlinks.
One followed hyperlink. This color is designed to work as a complementary color for objects and visited hyperlinks.
The first four colors in the Theme Colors list represent the document text and background colors (light and dark for each). The remaining colors represent the six accent and two hyperlink colors for the theme. When you apply another theme or change any of these colors to create a new theme, the colors shown in the Theme Colors dialog box and color palettes change to match the current colors.


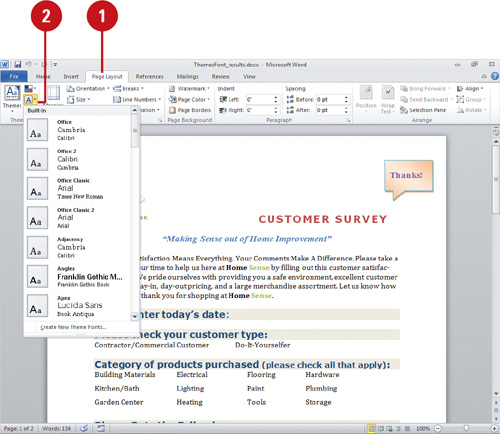
Viewing and Applying a Theme
A document theme consists of theme colors, fonts, and effects. You can quickly format an entire document with a professional look by applying a theme. Office comes with more themes and styles (New!). To quickly see if you like a theme, point to one on the themes gallery to display a ScreenTip with name and information about it, and a live preview of it on the current document. If you like the theme, you can apply it. When you apply a theme, the background, text, graphics, charts, and tables all change to reflect the theme. You can choose from one or more standard themes. When you add new content, the document elements change to match the theme ensuring all of your material will look consistent. You can even use the same theme in other Microsoft Office programs, such as Excel and PowerPoint, so all your work matches. Can’t find a theme you like? Search Office.com online.
View and Apply a Theme
![]() Open the document you want to apply a theme.
Open the document you want to apply a theme.
![]() Click the Page Layout tab.
Click the Page Layout tab.
![]() Click the Themes button to display the themes gallery.
Click the Themes button to display the themes gallery.
![]() Point to a theme.
Point to a theme.
A live preview of the theme appears in the document, along with a ScreenTip.
![]() Click the theme you want to apply to the active document.
Click the theme you want to apply to the active document.

Did You Know?
You can apply themes from Office.com. Click the Page Layout or Design tab, click the Themes button, scroll to the bottom of the list, and then select an available Office.com theme. Go to www.office.com to download and use other online themes.
You can search for themes at Microsoft Office Online. Open your browser, go to www.office.com, click in the Search Office Online box, type themes, and then press Enter. Review the results list to find the theme you want. Follow the site instructions to download and use online themes.
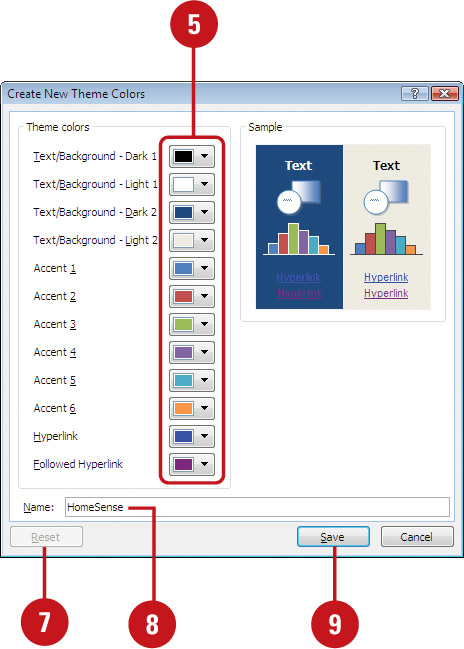
Creating Theme Colors
You may like a certain color theme except for one or two colors. You can change an existing color theme and apply your changes to the entire document. You can add other custom colors to your theme by using RGB (Red, Green, and Blue) or HSL (Hues, Saturation, and Luminosity) color modes. The RGB color mode is probably the most widely used of all the color modes. You can accomplish this by using sliders, dragging on a color-space, or entering a numeric value that corresponds to a specific color. Once you create this new color theme, you can add it to your collection of color themes so that you can make it available to any document.
Apply or Create Theme Colors
![]() Open the document you want to apply a color theme.
Open the document you want to apply a color theme.
![]() Click the Page Layout tab.
Click the Page Layout tab.
![]() To apply theme colors to a document, click the Theme Colors button, and then click a color theme.
To apply theme colors to a document, click the Theme Colors button, and then click a color theme.
![]() To apply individual theme colors, select the element, click a color button, such as Font Color on the Home tab, and then click a theme color.
To apply individual theme colors, select the element, click a color button, such as Font Color on the Home tab, and then click a theme color.
![]() To create theme colors, click the Theme Colors button, and then click Create New Theme Colors.
To create theme colors, click the Theme Colors button, and then click Create New Theme Colors.
![]() Click the Theme Colors button arrows (Text/Background, Accent, or Hyperlink, etc.) for the colors you want to change.
Click the Theme Colors button arrows (Text/Background, Accent, or Hyperlink, etc.) for the colors you want to change.
![]() Click a new color, or click More Colors to select a color from the Standard or Custom tab, and then click OK.
Click a new color, or click More Colors to select a color from the Standard or Custom tab, and then click OK.
![]() If you don’t like your color choices, click the Reset button to return all color changes to their original colors.
If you don’t like your color choices, click the Reset button to return all color changes to their original colors.
![]() Type a new name for the color theme.
Type a new name for the color theme.
![]() Click Save.
Click Save.

![]() Select the text you want to apply a custom color.
Select the text you want to apply a custom color.
![]() Click the Font Color button on the Home tab, and then click More Colors.
Click the Font Color button on the Home tab, and then click More Colors.
This is one method. You can also use other color menus to access the Colors dialog box.
![]() Click the Custom tab.
Click the Custom tab.
![]() Click the Color Model list arrow, and then click RGB or HSL.
Click the Color Model list arrow, and then click RGB or HSL.
![]() Select a custom color using one of the following methods:
Select a custom color using one of the following methods:
![]() If you know the color values, enter them, either Hue, Sat, Lum, or Red, Green, and Blue.
If you know the color values, enter them, either Hue, Sat, Lum, or Red, Green, and Blue.
![]() Drag across the palette until the pointer is over the color you want. Drag the black arrow to adjust the amount of black and white in the color.
Drag across the palette until the pointer is over the color you want. Drag the black arrow to adjust the amount of black and white in the color.
The new color appears above the current color at the bottom right.
![]() Click OK.
Click OK.

Did You Know?
You can edit a custom color theme. On the Page Layout tab, click the Theme Colors button, right-click the theme color you want to edit, click Edit, make changes, and then click Save.
You can delete a custom color theme. On the Page Layout tab, click the Theme Colors button, right-click the theme color you want to edit, click Edit, click Delete, and then click Yes.
The Properties of Color

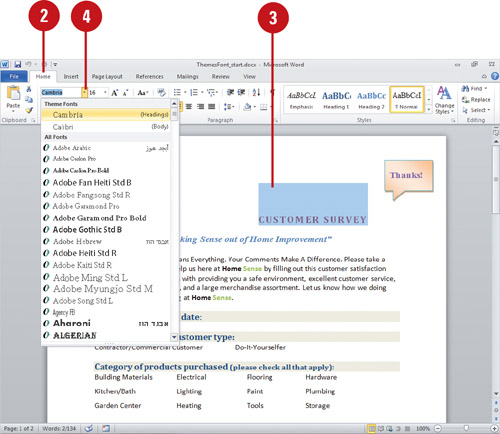
Choosing Theme Fonts
A document theme consists of theme colors, fonts, and effects. Theme fonts include heading and body text fonts. Each document uses a set of theme fonts. When you click the Theme Fonts button on the Page Layout tab, the name of the current heading and body text font appear highlighted in the gallery menu. To quickly see if you like a theme font, point to one on the menu, and a live preview of it appears on the current document. If you want to apply the theme, click it on the menu. You can apply a set of theme fonts to another theme or create your own set of theme fonts.
Apply and Choose Theme Fonts
![]() Open the document you want to apply theme fonts.
Open the document you want to apply theme fonts.
![]() Click the Home tab.
Click the Home tab.
![]() Select the text you want to change.
Select the text you want to change.
TIMESAVER To select the entire document, press Ctrl+A.
![]() Click the Font list arrow, and then click the theme font you want.
Click the Font list arrow, and then click the theme font you want.
![]() Click the Page Layout or Design tab.
Click the Page Layout or Design tab.
![]() Click the Theme Fonts button.
Click the Theme Fonts button.
The current theme fonts appear highlighted in the menu.
TIMESAVER Point to the Fonts button to display a ScreenTip with the current theme fonts.
![]() Click the theme fonts you want from the gallery menu.
Click the theme fonts you want from the gallery menu.

![]() Click the Page Layout tab.
Click the Page Layout tab.
![]() Click the Theme Fonts button, and then click Create New Theme Fonts.
Click the Theme Fonts button, and then click Create New Theme Fonts.
![]() Click the Heading font list arrow, and then select a font.
Click the Heading font list arrow, and then select a font.
![]() Click the Body font list arrow, and then select a font.
Click the Body font list arrow, and then select a font.
![]() Type a name for the custom theme fonts.
Type a name for the custom theme fonts.
![]() Click Save.
Click Save.

Did You Know?
The Font Color button on the Ribbon displays the last font color you used. To apply this color to another selection, simply click the button, not the list arrow.
Choosing Theme Effects
Theme effects are sets of lines, fills, and special effects styles for shapes, graphics, charts, SmartArt, and other design elements. By combining the lines, fills, and special effects styles with different formatting levels (subtle, moderate, and intense), Word provides a variety of visual theme effects. Each document uses a set of theme effects. Some are more basic while others are more elaborate. When you click the Theme Effects button on the Page Layout tab, the name of the current theme effects appears highlighted in the gallery menu. While you can apply a set of theme effects to another theme, you cannot create your own set of theme effects at this time.
View and Apply Theme Effects
![]() Open the document you want to apply a theme effect.
Open the document you want to apply a theme effect.
![]() Click the Page Layout tab.
Click the Page Layout tab.
![]() Click the Theme Effects button.
Click the Theme Effects button.
The current theme effects appear highlighted in the menu.
TIMESAVER Point to the Effects button to display a ScreenTip with the current theme effects name.
![]() Click the theme effects you want from the menu.
Click the theme effects you want from the menu.

Did You Know?
You can delete a custom theme effects or fonts. On the Page Layout or Design tab, click the Theme Effects or Theme Fonts button, right-click the theme you want to edit, click Edit, click Delete, and then click Yes.
See Also
See “Viewing and Applying a Theme” on page 101 for information on applying a theme from the Themes gallery.
Creating a Custom Theme
If you have special needs for specific colors, fonts, and effects, such as a company sales or marketing document, you can create your own theme by customizing theme colors, theme fonts, and theme effects, and saving them as a theme file (.thmx), which you can reuse. You can apply the saved theme to other documents. When you save a custom theme, the file is automatically saved in the Document Themes folder and added to the list of custom themes used by Word and other Office programs. When you no longer need a custom theme, you can delete it.
Create a Custom Theme
![]() Click the Page Layout tab, and then create a theme by customizing theme colors, theme fonts, and theme effects.
Click the Page Layout tab, and then create a theme by customizing theme colors, theme fonts, and theme effects.
![]() Click the Themes button, and then click Save Current Theme.
Click the Themes button, and then click Save Current Theme.
![]() Type a name for the theme file.
Type a name for the theme file.
![]() Click Save.
Click Save.

Did You Know?
You can remove a custom theme from the gallery menu. Simply move or delete the theme file from the Document Themes folder into another folder.
Choosing a Custom Theme
When you create your own theme by customizing theme colors, theme fonts, and theme effects, and saving them as a theme file (.thmx), you can apply the saved theme to other documents. When you save a custom theme file in the Document Themes folder, you can choose the custom theme from the Themes gallery. If you save a custom theme file in another folder location, you can use the Browse for Themes command to locate and select the custom theme file you want to reuse.
Choose and Apply a Custom Theme
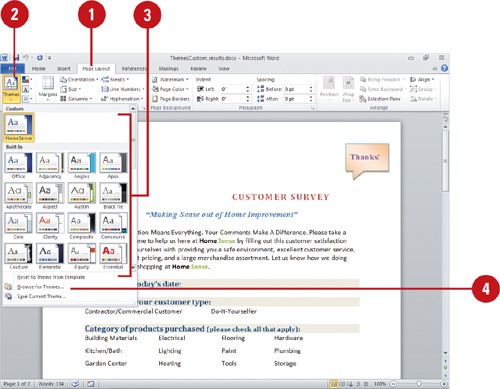
![]() Click the Page Layout tab.
Click the Page Layout tab.
![]() Click the Themes button to see additional themes.
Click the Themes button to see additional themes.
![]() Point to the gallery you want to display the theme name, and then click the one you want.
Point to the gallery you want to display the theme name, and then click the one you want.
![]() To select and apply a custom theme from a file, click the Themes button, and then click Browse for Themes.
To select and apply a custom theme from a file, click the Themes button, and then click Browse for Themes.
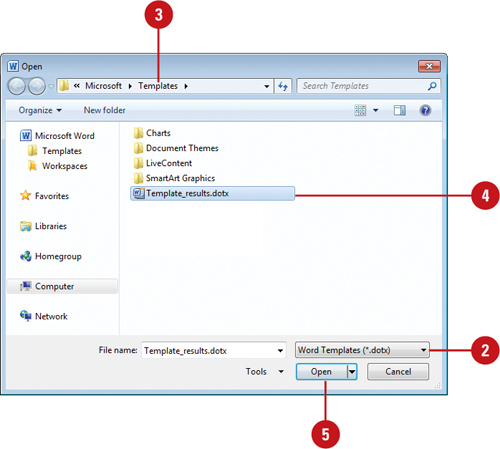
![]() If you want to open a specific file type, click the Files of type list arrow, and then select an Office Theme file type:
If you want to open a specific file type, click the Files of type list arrow, and then select an Office Theme file type:
![]() Office Themes and Themed Documents.
Office Themes and Themed Documents.
![]() Office Themes.
Office Themes.
![]() If the file is located in another folder, click the Look in list arrow, and then navigate to the file.
If the file is located in another folder, click the Look in list arrow, and then navigate to the file.
Microsoft Office templates are typically stored in the following location:
Windows 7 or Vista. C:/Users/your name/AppData/Roaming/Microsoft/Templates
Windows XP. C:/Documents and Settings/your name/Application Data/Microsoft/Templates
![]() Click the theme file you want.
Click the theme file you want.
![]() Click Open.
Click Open.