
Lesson 10. Using Your PowerBook or iBook Portable
Time
This lesson takes approximately 10 minutes to complete.
Goals
To learn strategies for maximizing your PowerBook’s or iBook’s battery life.
When it comes to Mac OS X Tiger, it really doesn’t matter which type of Mac you run it on (iMac, G5, Mac mini, etc.) because it’s pretty much a consistent experience, and that’s a good thing. However, if you have a PowerBook or an iBook (Apple’s versions of the “laptop” computer), you’ll want to become a master of battery management, and you’ll be exploring a few areas of Mac OS X Tiger that people with desktop Macs will never see. This lesson looks at some simple things you can do to keep from needlessly draining your battery. That way, you don’t wind up on an airplane, finishing the last chapter of your book, when suddenly the battery runs out, and....

STEP ONE (Putting Your PowerBook/iBook to Sleep):
If you shut down your computer, it completely turns off, and when you want to use it again, you’ll need to start it up from scratch (which takes a minute or two). However, if you’re just stepping away from your computer for a few minutes (or even an hour or so), rather than turning the computer off, you can just put it to “sleep.” An advantage of putting it to sleep (rather than shutting down) is that it “wakes up” almost instantly, so you can immediately get back to whatever it was you were doing before it went to sleep. This means that when it wakes, all of the documents and applications you had open are still in place from when you last left it (versus when you shut down, which closes all applications and open documents). The Sleep option also saves battery power, because if you stop using your computer for a few minutes, it automatically goes to sleep. You can put your PowerBook/iBook to sleep in one of four ways:
1. Just close the lid and it will immediately go to sleep.
2. Choose Sleep from the Apple menu.
3. You can configure your PowerBook/iBook so it goes to sleep on its own after a period of inactivity that you choose (you’ll learn how in the next step).
4. Press your PowerBook’s/iBook’s Power On button and a dialog will appear with a Sleep button. Click on that button to put your Mac to sleep.
To wake from the Sleep mode, open the lid or (if it’s already open) press any key or click using the scrolling touchpad (or if you have one, use your two-finger scrolling touchpad).

STEP TWO (Setting It Up to Sleep Automatically):
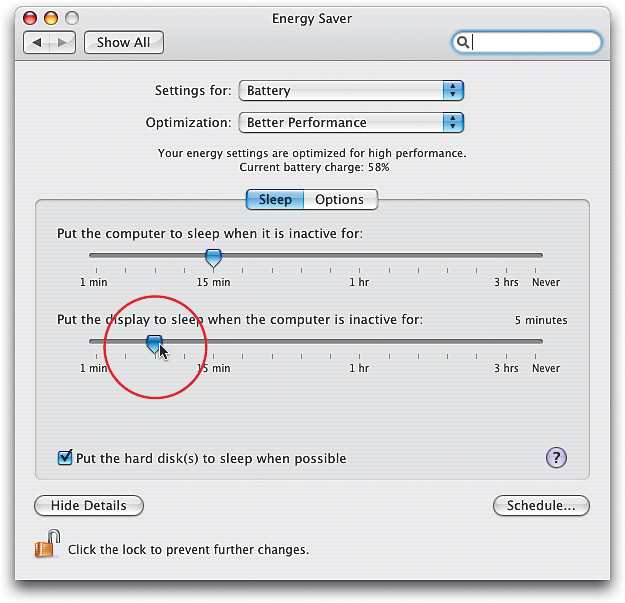
Apple has set up your PowerBook/iBook to automatically go to sleep if there’s no activity for 15 minutes. This means if you haven’t moved/clicked the mouse, pressed a key on the keyboard, etc. in the past 15 minutes, your computer figures you must be doing something else, so to save battery power, it goes to sleep. Apple chooses 15 minutes, but you can adjust that amount (you can even set it so it doesn’t go to sleep at all, which is helpful if you’re doing slide show presentations or watching a DVD movie). You do this by first going under the Apple menu and choosing System Preferences. When the System Preferences dialog appears, click on the Energy Saver icon (it’s in the center). When the Energy Saver options appear, the Sleep preferences are displayed. At the top of the window, there’s a pop-up menu called “Settings For.” Click on the menu and choose Battery. Below that, where it says “Put the computer to sleep when it is inactive for,” there’s a slider (and it’s likely set to 15 minutes). For a longer duration, drag the slider to the right. If you don’t want it to sleep at all, drag it all the way to the right (to Never). Now click on the small red button in the top-left corner of the window to close System Preferences.
STEP THREE (Saving Battery Power by Putting Your Display to Sleep):
It’s helpful to know multiple ways to lengthen the life of your battery (especially if you’re using your PowerBook/iBook on a flight). First, you need to determine which activities drain your battery the most. One of the worst offenders of battery drain is the display (also known as your monitor). Hey, it takes a lot of juice to run that big bright display, so it only makes sense that if you’re not using your computer for a few minutes, you’ll want that display to turn itself off, even before your computer goes to sleep. You can set the time for your display to “go to sleep” in the same place where you set your entire computer to go to sleep—under System Preferences, in the Energy Saver section. If you look under the “Put this computer to sleep...” slider, you’ll see another slider that says, “Put the display to sleep when the computer is inactive for.” Drag this slider to adjust the duration that your display is active. Choose a length that is less than the sleep time for your system; you want the display to sleep before the computer does to preserve the battery charge. For example, if you have the computer set to sleep at 15 minutes, you might want the display to sleep after only 5 minutes of inactivity. Don’t worry—the display wakes up even faster than when the computer itself is asleep, so having the display sleep is even less of bother. To get the display to spring back to life, just press a key or move/click with the scrolling touchpad. Note: Because the screen saver can conflict with your display going to sleep, you might want to turn it off. Just click on the Desktop & Screen Saver icon in the System Preferences window, and when the Screen Saver options appear, drag the slider to the right (toward Never).

STEP FOUR (Saving Battery Power by Dimming the Screen):
Now that you know the display is a big battery hog, here’s something else you should be aware of: The brighter it is, the more battery juice it uses. If you’re working on something that doesn’t require a very bright screen (for example, you’re working on a spreadsheet, a text document, or listening to music), you can dim your screen so your battery will last longer. You can dim the screen in two ways: Go under the Apple menu and choose System Preferences. In the System Preferences dialog, click on the Displays icon. When the Displays options appear, start dragging the Brightness slider at the bottom of the window to the left until your screen gets darker (but not so dark that you can’t see). Then, close System Preferences by clicking on the small red button in the top-left corner of the window. Now that was easy enough. For an even faster way, just press the F1 key on your keyboard a couple of times and a large Brightness indicator will appear near the bottom third of your display (the icon kind of looks like the sun). Each time you press the F1 key on your keyboard, your display gets dimmer. Set it as low as you can (while still being able to see what you’re working on, of course) to get the maximum battery savings. To increase the brightness again, press (you guessed it) the F2 key.
STEP FIVE (Another Battery-Saving Strategy):
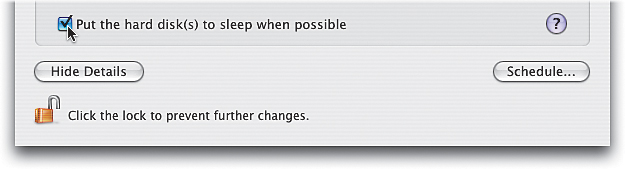
There’s another little thing you can do make your battery last longer. In the Energy Saver options under the System Preference (where you set the time for when your PowerBook/iBook goes to sleep), there’s a checkbox you should turn on. It’s named “Put the hard disk(s) to sleep when possible.” Ensure this is selected for another way of saving battery life so you can work without power interruptions.
STEP SIX (Shutting Down):
If you want to shut down (turning your Mac completely off), you have two options:
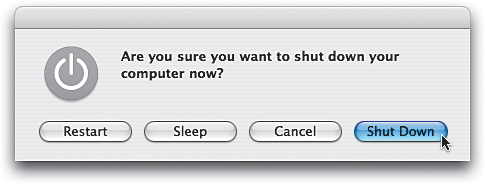
1. Go under the Apple menu and choose Shut Down. A dialog will appear asking, “Are you sure you want to shut down your computer now?” You can click the blue Shut Down button to shut down immediately or you can just relax, sit tight, and in a few minutes your Mac will automatically shut down.
2. Press the Power On button once. This brings up a dialog that asks, “Are you sure you want to shut down your computer now?” Click the blue Shut Down button and your Mac will close any open applications and documents, and shut down.
Don’t worry if you choose one of these accidentally (or if you just change your mind) because there’s a Cancel button you can click to terminate your shut down.