
Chapter 5. Organizing Your Work
Good portfolios are not created the night before you present them. You need to look at your entire body of work to evaluate its condition and current relevance. And that’s hard to do when it’s scattered on multiple discs, file folders, and flat files.
Let’s face it: organizing isn’t sexy. Creatives aren’t supposed to be organized...it’s part of our mystique. But wouldn’t you rather be a little less exotic and a little more rested? When developing a portfolio, being organizationally challenged will set you up for extra work every time you need to redo or revise. If revising is a chore, you’ll wait until the eleventh hour to do it. Unpaid work on a personal deadline is just about the worst creative nightmare. Inevitably, you’ll cut corners, make mistakes, and miss important details.
It’s better to approach your working process with the idea of making your work “portfolio ready.” Take the time to organize as you go—it’s only hard at the beginning. Once you get used to the process, organizing your work becomes second nature.
Collecting material
Unlike people in other lines of work, everything you do results in a unique creative product. Don’t trust your employer or client to archive your work. Everything you do should remain in your possession in some form: original, sample, slide, print, or disc. For some professions, ideas and work leading up to the finished piece also should be retained. This might seem obvious, but it bears emphasis. To keep your work secured and up to date:
Keep process materials
Ask yourself at the beginning of every new project if this piece might be a keeper. If so, hold onto your process work. From quick pencil sketches to detailed storyboards, the first stages of creativity are seldom found on disc. Your concepts can be a powerful tool to help you illustrate your creative process in your portfolio.
Keep editable backups of computer files
If your artwork is digital, keep the original, editable files, not just player versions or PDFs. You may want to change frame rate or scale them later. If your final product is a printed piece, don’t assume that’s all you need, especially if the work is product packaging or oversized flat art. As you’ll see in later chapters, the original art is sometimes more useful in a portfolio than a photograph of the piece would be.
Students: retrieve your graded work
Between summer break, co-op stints, and faculty requests to borrow student work for their own needs, student work often falls into limbo. (Limbo is also known as the trash.) Instructors often don’t have a permanent affiliation with the schools where they teach, and work left with them can easily be misplaced. In addition, most art and design departments discard unclaimed student work. Does it sound as if you shouldn’t trust your school and faculty to get your work back to you? Exactly. Be responsible for your own career and get your work before the school year ends.
Request samples when working for hire
If you’re freelancing, don’t neglect to ask your employer about sample copies before you start your work. Even if you are not retaining copyright (see Chapter 12, “Copyright and Portfolio”), in most situations you’ll be allowed to use a sample in your portfolio or reel. If you can’t, you’ll know the limitations before you imagine the project as your portfolio’s centerpiece.
Get plenty of samples
You can never be too rich or have too many samples. Speak to the printer directly if you can. If the client is handling the printing, request your samples from them in advance. Print runs are not an exact science and most jobs result in more finished impressions than the quote specified.
Photograph artwork
Most artwork is one of a kind. Even computer art is often output large in a variety of individual forms or on special materials. As soon as the piece is dry, shoot it yourself, even if you plan to hire a professional later. If the worst happens and your artwork is stolen, damaged, fades, or ends up sold to someone who disappears, you still have a portfolio record. See Chapter 6, “Transferring Physical Media to Digital,” for the best ways to get your work into the computer.
Storing original art
Mounted boards bend, glues lift and yellow, and badly framed prints bubble with moisture. You learn these lessons in school or from miserable experience. Yet people who are craft-conscious in traditional media can be remarkably careless with digital output or samples. Could you afford to reprint a poster? Store the work you’re saving with care no matter whether it’s made of atoms or bytes.
Storing traditional materials
Always store your two-dimensional work flat, between acid-free paper, out of direct light, and in a cool place. If you must roll the work, store it in a closable tube with as large a diameter as you can find. If you have a portfolio case full of work, store it on a shelf without any bulky items or additional folders inserted, and never place anything on top of it. Keep it away from damp places, and never leave your portfolio case in the trunk of your car on a hot day. If you need to take it on an airplane, carry it on. Baggage handling can be hard on your case and the things in it.
If you are storing process work, set aside a sketchbook or file folder for these non-digital project materials. Keep these folder materials off your working surface. Coffee rings and grease smears do not improve marker sketches.
Storing digital output
Some work is only output digitally, not offset printed or chemically developed. The quality may look great initially, but some inks, toners, dyes, and even the papers you print them on are unstable. If you are unsure of your digital printer’s (or its inks’) archival quality, see the sidebar, “Is your digital output stable?,” that follows.
Other problems can arise with stored digital output, even when the ink and paper archive well. Some inks chemically react with portfolio books’ plastic sleeves. Copier and laser prints can stick to the inside of vinyl, ruining both the sample and the portfolio page. And almost all output—even the very best—will eventually fade, especially if left in full daylight. If your only original version of the piece is a digital print, store it just like traditional art.
Organizing samples and artwork
Keeping your work in prime portfolio condition is an imperative first step, but it isn’t enough. You need a storage or documentation system as well so you can find a piece later, either to use in a traditional book or to shoot or scan for a digital portfolio. Being organized is particularly important if you create unique works of art. If you ever have to put in an insurance claim because of theft or damage, you’ll need to show physical proof of the work’s existence before you can recoup any losses.
The simplest and easiest way to handle small-format printed pieces is to use a good, old-fashioned file drawer with Pendaflex folders. Most people file work either alphabetically by client or consecutively by date. Some people create folders based on the type of work (like branding or identity) or client industry (like biotech or fashion). You can use any quirky system, just apply it consistently.
Store original, non-printed art, or printed pieces too big for a file folder in flat files, shelves, or artist racks. But wherever you put it, keep a record of it (see archiving strategies in the next section) as well. Use a camera to shoot the piece for identification, add text (including where you’ve stored it if you’re absent-minded!), and print the page.
Is your digital output stable?
To check for fading, run a CMYK bar test (a full page of output with each of the four printing primary colors running vertically) on the paper you’re using for output. Cut the output in thirds so each portion has all four ink colors. Pin one up on a sunlit wall. Put one in a flat box with a lid, and put the box someplace dark. Leave the third one out of direct light, but uncovered. A month later, run the CMYK test again.

Now pull out all three pieces and look at them, using the newly printed copy as a guide. In many cases, there will be color degradation in the print that was hung in unprotected bright light. (That happens to traditional photographic prints, too.) Has there also been a shift in the other two pieces? If you see color problems in the third piece, you should use a different printer for your portfolio work. If you see any change in the copy you left in the dark, the inks are chemically degrading. Not only is the printer wrong for your portfolio, you shouldn’t use it for anything other than quick proofing.
Document now: the further you are from creating the artwork, the more you won’t remember. It’s most efficient to do this all at once—scanning batched photos, or hiring someone to shoot your work—but it’s better to do this work in smaller clumps than to be caught empty-handed.
Organizing digital files
Keeping traditional materials in good order is painless compared with organizing computer files. They are hard to recognize, harder to find than a buried piece of paper on a messy desk, and all too easy to delete. Even if you start naming and filing every project starting today, reorganizing all your previous projects is exquisite torture. Fortunately, there are useful strategies that can at least deaden the pain. Most of them work best if you combine them with an archive made with database or catalog software.
To organize your files, you’ll have to master six disciplines:
• Group
• Name
• Show
• Weed
• Catalog
• Back up
Group
The first step is to keep your working files in order. Everyone is occasionally guilty of hurriedly saving a file on the desktop. But if your desktop becomes the home for all your files and folders, you’ll waste valuable time hunting for work when you need it, and even more time trying to clean up between projects. Here are some grouping guidelines:
• Use folders. Create a separate folder for each client or project series. Each time you start a new project, create a new folder inside the client’s folder. Put new files in the appropriate folders when you save them the first time.
• Link folders. Make aliases of your folders so you can jump directly to them. Put one set of aliases on the desktop, but don’t stop there. Make multiple aliases of each folder, and put them inside your other live job folders. You’ll be able to reach any folder almost immediately, and you’ll be less tempted to put files in the current directory or on the desktop to “save time.”
Name
Once you’ve found the folder, you still have to find the right files inside it. One of the best timesavers is to develop a file naming method. Here are some guidelines:
• Name uniquely. Avoid generic folder and file names. Be concise but descriptive. Filling a hard drive with multiple versions named “image1,” “newproject,” or “brochure” can be almost as useless as deleting them.

If you create an alternate version of a file, describe what’s different in the name. These file names document variations in typeface and color.
Making a folder icon
Mac OS X makes it easy to create custom icons for folders. Anything that you can copy into the OS X clipboard can be used as a folder icon, including text. The process is simplicity itself. Once you’ve copied your desired image or text (Command+C), open the file in an application and then select all or part of it. Highlight the folder you want to change, and press Command+I to Get Info. Click the folder icon in the Get Info box to highlight it, then paste (Command+V).
Replace generic icons with unique ones, and you can quickly zero in on what you need. In the top row of icons, the first is PostScript text from Adobe Illustrator and the second came from a Word document. In the next row, the left icon is a JPG and the right is a Photoshop file.

You can use a similar strategy in Windows. File icons themselves must be ICO files, and you’ll need third-party software to create them from BMP artwork. The artwork will have to be square and created to the right size. But Windows XP and Vista let you add a picture to the generic folder icon instead of completely replacing the icon with another picture.
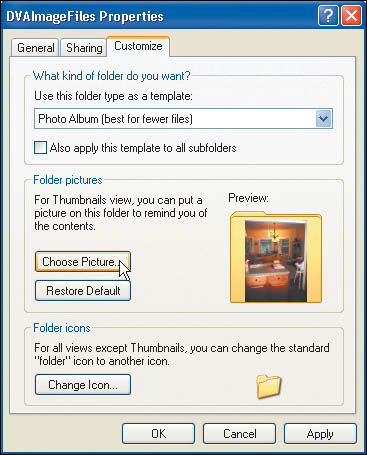
To make a folder more visual in Windows XP, right-click the generic folder icon you want to personalize, then click Properties. Click the Customize tab and then click Choose Picture from the Folder pictures section. Browse to the image and select it.
• Name descriptively. If you are designing a homepage image for a new website, HomeHeader_Greenway—what the image is, and the client it’s for—might be a good naming convention. Calling alternative files “JimBroV1” and “JimBroV2” may seem to make sense, but if you do many versions, will you remember what was different about each one? Add a little description and you will. Avoid numbers in file names unless they refer to a series (like pages or book folios). Numbers work best as “save as” devices for chronological stages of one working session.
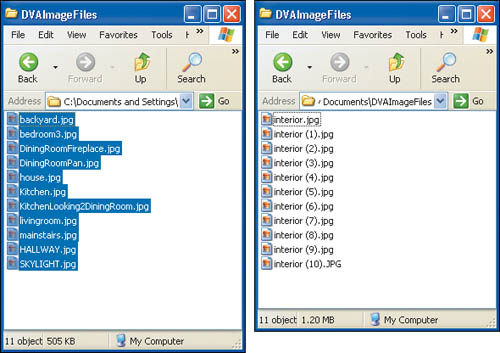
• Name briefly. Really long names truncate (get cut off) in directory displays and make poor icon labels. If you must use a long file name, start it with the most unique information, moving toward the least unique. For example, if you are archiving artwork for specific pages of a book, try “Fig57ARev-P210-Ch5-DDP.psd” rather than “DDP-Ch5-P214-Fig67ARev.psd.” You’ll be able to scan for the most unique portion of the name more easily.

Long file names are easier to read in list view but are still not always clear. Some operating systems truncate in the middle like this one, others at the end. Since the bottom three names start with the most important information, it’s easy to identify them anywhere.
• Name inclusively. You might need to show your digital portfolio on different platforms. When possible, use naming conventions that are legal on all operating systems. For example, avoid colons, semi-colons, and slashes.
If you haven’t been good about file naming, you aren’t condemned to disorganization. See the following sidebar, “Bulk renaming,” for strategies for name cleanup.
Show
Since you’re a visual person, identify files by using a visual method—icons.
• Use catalog thumbnails. You can’t depend on the little image icons on your files. It’s too easy to confuse images that look the same but have radically different resolutions or sizes. Cataloging software (more on this under the “Back up” section) creates bigger thumbnails, and can identify the difference between files by their file size. If your work is cataloged, it’s really easy to pull up a file in the middle of a presentation, even if you hadn’t originally planned on including it.
• Customize folder icons. You can replace a generic folder icon with a custom one, although older operating system versions (such as pre-XP Windows) limit you to specific file icon types and work best with square images. Windows XP and beyond and the Mac OS X give you wide latitude on the file format you use for the icon and will display rectangular images without distortion. See the previous sidebar, “Making a folder icon,” for the basic how-tos on each platform.
Weed
Sometimes the best way to stay organized is to throw things out.
• Simplify. When you’re certain your project is finished and billed, review your project folder and hard drive. Put any process ideas in a “process” folder and then throw out errors while the project is fresh in your mind.
• Update. When last-minute changes happen while a job is on press, it’s tempting to say, “Whatever,” and be glad the job is done. Don’t give in to temptation. Unless the correction won’t affect some future version of the piece, make the edit in the original file. Guaranteed: you won’t remember the change if you need to output the file again.
Catalog
If you are a prolific imagemaker, archive your images in a program designed for photographers. Apple Aperture or Adobe Lightroom both have excellent tools for archiving, tagging, and organizing.
If the file formats you’re using are more of a non-photo mix, try catalog software. Windows Expression Media is available in both Windows and Mac versions. I use it because it recognizes and manages not just image files, but also all Adobe Creative Suite extensions and other program-specific formats. It’s the software I used for the examples in this chapter.
All good catalog software offers a slideshow feature, and some export the slideshow to a player. If you’re in a desperate hurry or are not in a field where portfolio technology and sophistication are crucial, your archive can become a portfolio in minutes. All you need is the catalog software and a drive containing your selected images.
You can drag whole folders into the catalog or bring in individual files. As long as the original images remain where the cataloging software can find them, they can display at full size onscreen. If you change your mind and don’t want to show something, you can just delete it from the catalog. (It won’t delete from the drive.)
After you’ve arranged your material in order, it’s easy to set the slide show options for how long each image remains on screen or whether there are transitions between images. You can even choose a typeface and font size for any captions.
Back up
All of these techniques make it easier to retrieve your files for portfolio building. But the job is even easier if everything is in one place. As you finish a project, copy the final version to a dedicated disc or removable hard drive, either by hand or by using your operating system’s tools, like the Mac’s Time Machine. If you have to create your portfolio fast, everything you need will be there—ready for output, presentation, or web conversion.
Bulk renaming
There are strategies on both Windows and Mac computers to rename groups of files.
Windows XP/Vista lets you rename groups of files alphabetically or by date. Select all the files, sort by name or date, press F2, then type the text you want them all to share. Windows will rename and number them from top to bottom in the window, maintaining the file extensions. To do more sophisticated renaming in Windows, you’ll need a software program for batch conversions. Several programs can do this for you, Microsoft Expression Media among them. You can browse a file download site such as www.shareware.com for others.
Macs come with the Automator app. It uses actions like those in Photoshop to help you automate tedious tasks. Although you can write your own, the actions you need for failsafe file renaming come with the program. Open Automator, making sure that Applications is highlighted so you’ll see all the Finder-related actions. They’re alphabetical, so drag these actions to the workflow window in this order:
1. Get Specified Finder Items
Click the + symbol in the lower left of the window, navigate to the folder that holds the files you want to rename, then click Open.
2. Copy Finder Items
Select a folder from the dropdown list to put a copy of these files into it temporarily. Doing this saves a copy of the files in the original naming state in case something goes wrong. Once you’ve renamed, you can’t undo!
Click the + symbol, navigate to the folder that holds the files you want to rename and open it. Select all (or just the ones you want to rename) and click Open.
4. Rename Finder Items
Select the change you want to make from the dropdown list. In this example, I’ve searched for the file name I want to replace, then typed the text I want to replace it with.
Click the Run button at the top right of the main Automator window above the Actions section, and you’re done.
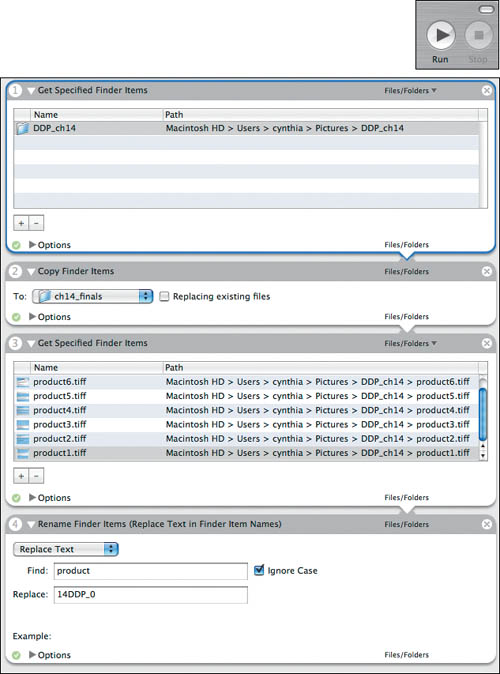
When you drag an action from the alphabetical list to the window, it becomes part of a series of small dialog boxes in the action section. The numbers in the upper left of each action indicate the step order.

Automator’s actions will rename all the files in the folder you select in the order they appear in the folder.
Portfolio highlight: John Locke | Left brain, right brain
GRACEFULSPOON.COM | ISSUU.COM/GRACEFULSPOON | LIONINOIL.NET
When we can’t find a sketch on our desks or a file on the computer, we use the excuse that our analytical left brain is underdeveloped. Yet we can cook a tasty three-course meal, micromanage a party, or arrange our clothes in color groups. Lack of organization in our work is a bad habit, not a missing gene. Talented creatives who recognize the virtues of organization generate precious free time that others waste. Instead of struggling to finish just one thing, they prolifically explore new ideas and ultimately excel in their chosen field. Architect John Locke is one of these happy souls. He proves that both sides of the brain can coexist in perfect harmony.
Locke’s creativity is not debatable. He has two beautifully produced PDF portfolios on Issuu (issuu.com/gracefulspoon), one created for admission to graduate school, the other as a final statement of his work as a graduate student at Columbia University. These generate extensive feedback, particularly from college applicants who ask for advice or help. He shares a blog of non-architectural projects with his creative partner, photographer and designer Jackie Caradonio (lioninoil.net). His personal portfolio website (gracefulspoon.com) is the most comprehensive record of his work, and links to everything else.
Navigation and architecture
Most people reach Gracefulspoon.com from Locke’s elegantly designed Issuu publications. Based on these books, you expect a certain style of navigation: perhaps a Flash splash page introducing categories of work, that in turn lead to projects. Instead, everything in the site loads into one infinitely expanding, vertically scrolling page. As you explore, it dawns on you that you are looking at something rare: a portfolio that is both open-ended and extremely well-organized.
There are echoes of a print newspaper both in the site’s initial layout and its sense of immediacy. Above the fold are the main topics, masthead and wayfinding info. A Twitter feed styled as a bold headline speaks directly to the viewer. Images, each a link to one of Locke’s featured works, fill the bottom half of the window.

Select any category or project, and links to all of Locke’s other portfolios, self-publishing sites, and social networks appear in the top bar.

Sited compactly at the top of the page is a text nav bar of work categories, alongside a bio and a list of contact options.
A 4×4 rectangular grid contains large thumbnails linked to each featured project.
Click a grid image, and a link to Locke’s design studio replaces the grid, loading the selected project.
Each thumbnail has a label with the project title, type of project, and date.

In the design blog window on gracefulspoon.com, research, process work, and the evolution of Locke’s design concept for a project (in this case, Global Panopticon) are presented in chronological stages.
By scrolling down through the vertical presentation, viewers can follow the way Locke approaches a project. The goal is to make his design thinking transparent.
Anyone who wants a closer look at each graphic can click on it, and it will launch in its own window.

Locke presents his content differently depending on his audience and purpose. Here, the material from the gracefulspoon site is reorganized into a formal portfolio book. Although static and carefully composed, each of the project sections in the book version could be easily reconfigured to create subset portfolios of his work.
The newspaper analogy, however, is not adequate to the navigation. There are two obvious navigation methods—the topic menu and the project image grid. But every project is in a database that can be accessed by descriptive tags located above its header. Want to see Locke’s studio work at Columbia University’s Graduate School of Architecture, Planning and Preservation (GSAPP)? Select the Studio tag at the top of a project and the window will reload with only the relevant material. No matter how many high-resolution images there are in a project, the reload is extremely fast, so skipping around is encouraged.
Lion in Oil’s design and photography often appear as featured projects on Locke’s Gracefulspoon site, making it more than just a record of school projects.
Content
Gracefulspoon contains not just finished project images: it is the repository of Locke’s creative history. All work Locke creates is digitized and organized as it’s completed. As he says, “Any process work—including physical models—I’ll extensively photograph, then discard. I scanned my pre-2005 work, which included hand-drawn plans and sketches, at a high resolution, then archived it digitally for easy dissemination and sharing.”
As an architectural designer who has lately spent a significant amount of time on graduate projects, his content is dominated by his concept work. Each project begins with a final image and a project description. His renderings, which combine his photography with physical and computer models, are interspersed with research material and side comments, all in the form of a linear presentation.
However, the flexible way Locke has organized and divided all of his creative work allows him to highlight his photography and design interests without changing his primary identity. His photography actually lives at Flickr, and his non-architectural design is at lioninoil. Each can be experienced separately, or loaded into the grid space without the viewer having to leave his main site.
Future plans
Locke’s PDF portfolios are static, complete works. They’ll probably be joined by at least one new PDF book now that his student days are over. With all his content accessible, he can create smaller, targeted portfolios for various markets and opportunities: architectural firms, academic positions, or freelance jobs in a variety of other realms.
Gracefulspoon’s content will undoubtedly change on a regular basis. As Locke says, “I see the ‘design blog’ section as being a constantly updating, thorough record of my work; while the ‘featured work’ section is more selective, static, and includes 16 projects that are the most highly indicative of how I want to present myself. This selection of ‘featured work’ is also partly generated by what is most popular on the site.” This volatile and responsive tool will likely continue to be the access point for all of Locke’s interests, and the real-time repository of future work.