
WHICH SOFTWARE TO USE?
Unless you're working for a client that requests a project to be edited on specific software, the choice is up to you, and that will depend upon the type of interface you like, the performance of the software engine, and the type of computer you choose to use. In many respects, a lot of student filmmakers—especially multimedia journalism students—have to tackle a large learning curve before mastering such complex software.
Avid Media Composer (version 6 as of this writing) is the industry standard, but at ~$2400 it's out of many low budget filmmakers’ and video journalists’ budget (a student price of about $300 is a different story!)—and it can be used on a PC or Mac. It's a complex piece of software and not intuitive to learn.
Apple's Final Cut Pro became an industry standard for the indie filmmaker and with its full studio suite, a lot of pros became attracted to the Mac-based software. However, it was originally designed by Macromedia and never had the intuitive design feel of an Apple product—and with its long pre-render times it was clunky to use and required patience to master. It also never engaged the 64-bit hardware architecture of Apple's computers. But with the release of Final Cut X, Apple threw out the Macromedia engine and rebuilt it from scratch, engaging a more intuitive software design, placing renders in the background, and utilizing Apple's 64-bit architecture and multiple CPU cores. At its initial launch, however, it lacked many of the features professionals were used to in its earlier manifestations, so they either stuck with version 7 or jumped ship and switched to Avid or Adobe Premiere Pro. Since Final Cut 7 is outdated, it will not be covered in this book (see the first edition of DSLR Cinema for that workflow).
This chapter will examine the workflow for Final Cut Pro X and Adobe Premiere Pro for a DSLR workflow. The workflow for other large sensor cameras will be similar and may require adjusting the types of settings you use. (However, this book will not teach you how to edit, since there are numerous books, manuals, and video tutorials for beginning filmmakers to learn software.) The first step before editing is to transcode the footage.
TRANSCODING FOOTAGE
Most HDSLR cameras shoot in some form of the H.264 codec, which is essentially a finishing or output mode designed for the Web and Blu-ray DVDs. It is not designed to be edited. Why is this codec used then? Because it's what allows HD to be a viable form—putting a lot of data onto a memory card. When these cameras begin to shoot RAW, there will be a lot more data space needed. The d16 Digital Bolex camera shoots 2K RAW, and may be an option for indie film shooters—because it shoots raw, you'll only get 8–10 minutes on a 32 GB card!
Both Premiere 5 (and higher) and Final Cut X will allow you to edit H.264 files natively, but it is highly recommended that you transcode to Apple ProRes 422 when using Final Cut—and professional editors would agree. On the other hand, Premiere 5 utilizes a software engine where the native files work without needing to transcode—professional filmmakers, such as Shane Hurlbut, ASC utilize this approach. However, if you're using software other than Final Cut X or Premiere Pro, you may need to transcode your footage using an external application, such as the freeware, MPEG Streamclip or Cinemform's NeoScene (a high end professional transcoding software, running at $129, as of this writing). Take your footage through the workflow and test out various options.
In most cases, a transcoded file will provide much more “headroom” in post and allow for a smoother workflow when you're editing. The transcoding process, whether you're using Squared 5’s MPEG Streamclip, Cineform's codec, Rarevision's 5DtoRGB, or Final Cut's ProRes, will expand the footage to a 4:4:4 or 4:2:2 color space (see Appendix 4 on chrominance and luminance compression).
This section includes a step-by-step guide in converting your DSLR footage using Squared 5’s MPEG Streamclip (freeware for both Mac and PC), Cineform's NeoScene (which can be used for Apple and PC computers), and Final Cut Pro X's settings for transcoding to Apple ProRes 422. You may choose to use MPEG Streamclip or NeoScene for Premiere Pro, but it is not needed—test out the workflow to see what works best for you. Later in the chapter, I will also provide the workflow necessary to convert external audio recording (such as with the Tascam DR-40 or Zoom H4n) using DualEyes syncing software, as well as with Final Cut X's easy to use sync feature. Lastly, it covers some of the basics of color grading with Magic Bullet, a powerful tool for filmmakers to put the final touches on their project in crafting a film look.
Another software for transcoding footage is Rarevision's 5DtoRGB (http://rarevision.com/5dtorgb/). The “Lite” version is available for free on Apple's App Store. The advanced version allowing for batch processing costs about $50.
Deinterlace Your Video
Most DSLRs, such as the Canons, shoot in 1080p, progressively scanned. A few may shoot in 1080i (interlaced mode, such as Panasonic's GH1). Deinterlacing a digital movie if shot in 1080i is one of the key tools a cinematographer must utilize to avoid the video look. It is far, far better to get a camera that shoots progressive scan. If you need to deinterlace, use Magic Bullet Frames.
GETTING FILES INTO THE COMPUTER
One of the benefits of DSLRs is their tapeless recording. Cameras such as the Canon 5D Mark II and 7D record on Compact Flash, whereas the Rebel T2i (550D), T3i (600D), 60D, and Panasonic's GH1 and GH2 record on the smaller-sized SDHC cards (which are about half the price). It's not practical to buy dozens of memory cards and keep them as permanent archive media (unless you have the money!).
| 1. | Drag and drop files onto the computer (and I recommend at least two other hard drives: one as a backup; the other as an archive).1 |
| 2. | If you're editing on Final Cut X, you may choose to copy files to the “event folder” on import and it'll back up the original files as well as transcode them into ProRes 422. |
SQUARED 5 MPEG STREAMCLIP WORKFLOW
To use Squared 5’s MPEG Streamclip freeware, follow these steps:
| 1. | Download and install MPEG Streamclip from <http://www.squared5.com/>. |
| 2. | If you're converting one file at a time, go to File→Open and search for the files you want to decompress. However, if you're doing more than one file, then batch process the files. Go to List—Batch List (see Figure 6.1a), then click the button, Add Files (see Figure 6.1b)—while Canon's 5D Mark III uses both. |
| 3. | Your file appears in the main window. You may set in and out points (I and O) if you need to convert only a section of the clip. Choose File→Export and select Export to QuickTime (see Figure 6.2) or another format if desired. |
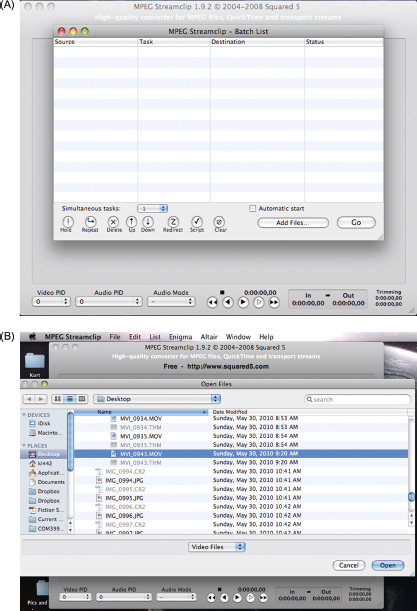
FIGURE 6.1
Open the files you need to convert using MPEG Streamclip.
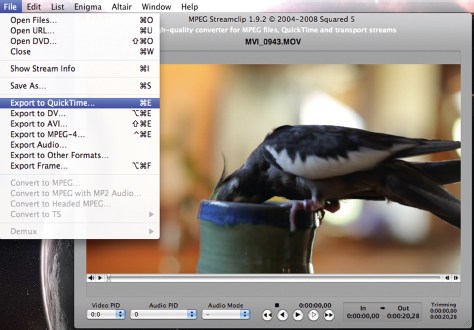
FIGURE 6.2
Select the export type you need (typically QuickTime for Mac users); in this case, I chose Export to QuickTime
| 4. | The Exporter window (for Mac) defaults to Apple Motion JPEG A and places the quality of your clip at 50% and with interlacing (see Figure 6.3). You will need to change these parameters. Slide the quality to 100%. Deselect Interlaced Scaling (if your footage was shot progressive, which the Canon HDSLRs do). The Frame size should default to the original footage size (in this case, 1920x1080). |
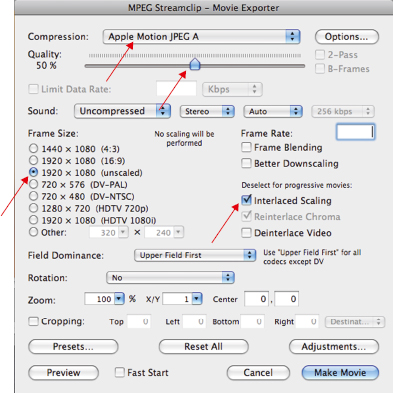
FIGURE 6.3
You will need to change the default settings to make your footage look as good as possible: Deselect Interlaced Scaling (for progressive cameras, such as the Canon), slide Quality to 100%, and change Apple Motion JPEG compression.
| 5. | For Mac users, select Apple ProRes 422 for a fast render (see Figure 6.4). Higher-quality renders should be used for work exporting to film (ProRes 4444). Philip Bloom uses 422 for web-produced work, and it works just fine. Use 4444 if you're going to film-out or full-screen project—but it will increase your file size a lot, so be sure to have enough hard drive space. PC users should test what best works for them. A test I did of an AVI file failed to import the video track in Vegas Pro (only audio came in). |
| 6. | After completing the Compression format selection (Apple ProRes 422 (LT)), placing the Quality to 100%, and removing Interlaced Scaling (see Figure 6.5), click on the Make Movie button. |
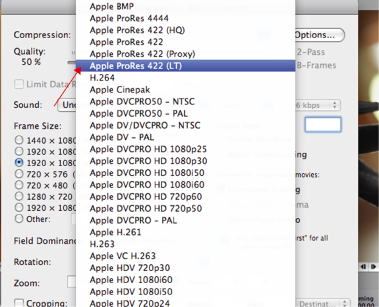
FIGURE 6.4
You can choose from a variety of codecs when exporting with MPEG Streamclip. Apple ProRes is the standard for Final Cut Pro users.
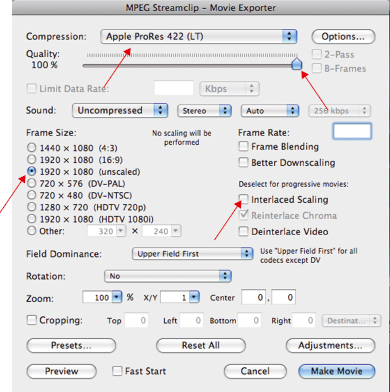
FIGURE 6.5
The screen as it appears when ready to convert the file.
| 7. | After you click Make Movie, the file is encoded into a file size about twice the original (when using Apple ProRes 422; see Figure 6.6). You may choose the LT version which has a much faster rate than files used by Apple's transcoding process in Final Cut 7 and is faster than CineForm's NeoScene. Because of its faster speed, I recommend that video journalists use MPEG Streamclip when working on tight deadlines. |
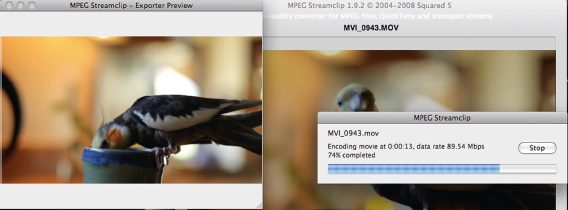
FIGURE 6.6
The file transcodes, nearly doubling the file size in LT mode after the render is completed.
CINEFORM NEOSCENE WORKFLOW
The Cineform Neo Scene Workflow software is available for about $130 and will convert your files into a form that can be edited in just about any software you choose to use. The software can be installed on a PC or Mac. When transcoding, follow these steps:
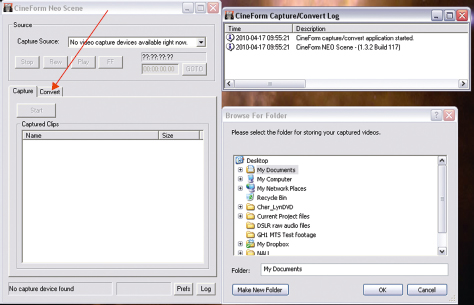
FIGURE 6.7
As soon as you open Cineform's NeoScene on a PC, it will ask for a destination folder. Select it and then choose the Convert tab.
| 1. | Open Cineform Neo Scene and select a destination folder for converted videos (see Figure 6.7). |
| 2. | Import your files and click on the Convert tab. You may use the Capture window which appears when you plug in a camera, but this is not recommended. Rather, copy your folder and/or files over to the computer and copy them again onto at least one other external drive as a backup (having two backups is even better). |
| 3. | Click on Select Files or Select Folder and browse to the folder containing the files and select them (see Figure 6.8). Click on Open to bring them into the SourceClips window (see Figure 6.9). |
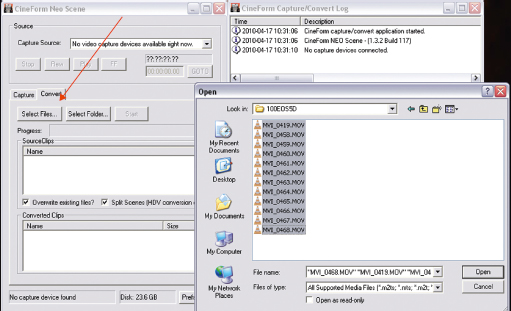
FIGURE 6.8
Select files or folders and import the files needing conversion.
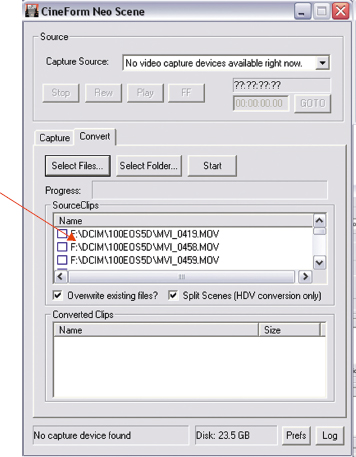
FIGURE 6.9
Files are imported into the SourceClips window.
| 4. |
Click on the Prefs button for preferences. Choose the following (see Figure 6.10):
|
| 5. | Click OK. |
| 6. | Click the Start button. As the files are converted, they'll appear in the Converted Clips window (see Figure 6.11). If you click the Log button, you can see the conversion status of each file (see Figure 6.12). In addition, the files are checked off in the SourceClips window as they are completed. |
The converted files will appear in the destination folder you chose, and you can now import them into your computer's editing software.

FIGURE 6.10
Select the capture and encoder options, output frame format, and the destination folder of the converted clips.
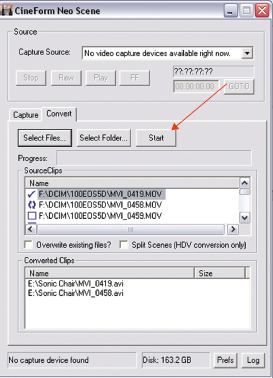
FIGURE 6.11
After you click the Start button, the files are automatically converted and appear in the Converted Clips window.
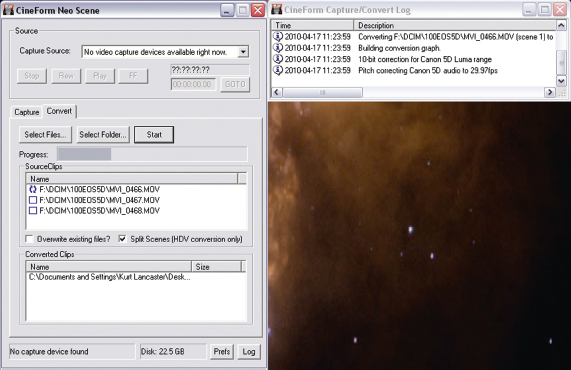
FIGURE 6.12
As the files are converted, the Log window (which opens when you click the Log button) shows the progress of each file being converted.
In Praise of Dissent: Adobe CS5 Paves The Way by Shane Hurlbut, ASC
Dissent. Voicing opinions that conflict with those that are commonly accepted or officially espoused.
When my Elite Team and I started blazing this trail, we had already become dissenters. We embraced a technology that in Hollywood was a joke, a fad, not viable. This is one of the great paradoxes of the human condition. On one hand the movie industry is built upon the ability of diverse groups of people to conform to common sets of rules and principles. Yet, there is an enormous benefit that awaits when somebody or a
group is brave enough to disrupt this coveted social harmony and challenge prevailing convention. That is what all of you are, dissenters. Now that we all know who we are, why fall for conformity? Why not continue the dissent?
If you had a choice of an editing system on a system that was designed for your Canon camera's color space and codec or one that wasn't, which one would you choose? Personally I would pick the one that was designed for the camera, because to me that means faster, better, more latitude, more options, it just makes sense.
The first time I saw our Act of Valor footage loaded into CS5, I was hooked as a cinematographer. The range, dimension, the filmic quality was so apparent. I went to Jacob Rosenberg who is the head of Bandito Brothers Post and asked him why this looks so different. He said two things. backward engineering and understanding the platform.
This is why CS5 is so special. Adobe went to Canon and asked them to open up their color space to them so that they could do their best to understand it and to expand it. They worked together to find a cocktail to increase depth, dimension in this limited 8 bit compressed color space. The next was to the camera's codec. They designed Premiere Pro specifically to deal with the h.264 codec. How many times has this codec failed in Final Cut Pro 7?
How about an editing system that requires no converting? You can input directly from the CF cards if you would like. This is huge. We all know how long it takes to convert. Adobe is investing in their software as they see this as the future. Everything is shrinking to your desktop. Save time, edit faster, expanded organic looking 4:2:2 color space, filmic looking blacks, no conversion, REAL TIME editing without the barber shop blue scroll. WOW!!!
When we talked about doing the Hurlbut Visuals HDSLR Bootcamp and giving the students the ability to color correct their edited footage on a 25’ screen by the end of the day, CS5 and Premiere Pro was the only viable option. When I started to use it, I quickly understood the power of this amazing tool. Be a dissenter, go against the grain, go the distance, expand your creativity.
Hurlbut, S, (2010, Dec. 2) Hurlblog. <http://www.hurlbutvisuals.com/blog/2010/12/in-praise-of-dissent-adobe-cs5-paves-the-way/>.
PREMIERE PRO WORKFLOW
The strengths of using Premiere Pro for DSLR shooters cannot be under-estimated when Shane Hurlbut, ASC—one of the top leaders in the DSLR filmmaking movement—recommends it in his workflow. Vincent Laforet—one of the first to adopt DSLRs in his shoots—also recommends it.
| 1. | Setup: Create new project (Figure 6.13). I set my scratch disks to the folder on my external hard drive and the location of the project. |
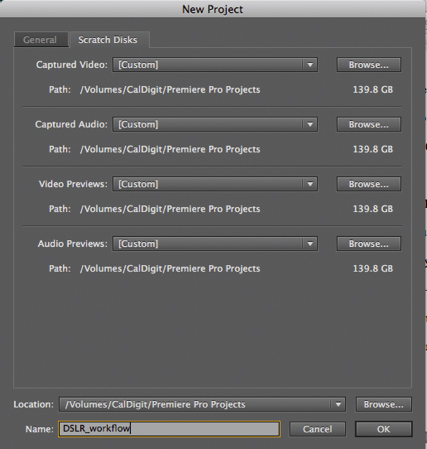
FIGURE 6.13
Adobe Premiere Pro New Project window.
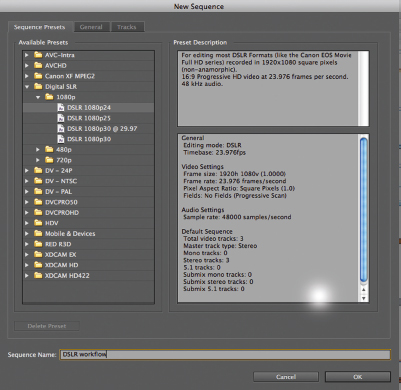
FIGURE 6.14
Select the correct format and frame rate from the folder of the New Sequence window.
| 2. | Select Sequence Presets for the project's sequence (Figure 6.14). Choose the Digital SLR folder and select the proper format and frame rate (such as DSLR 1080p24). |
| 3. | Go to the “General” tab of the New Sequence window and make sure your settings are accurate (Editing Mode: DSLR Audio Sample Rate, and so forth)—Figure 6.15. |

FIGURE 6.15
The General tab of New Sequence provides an overview of the sequences settings.
| 4. | With your project properties setup you can select your files by choosing the hard drive and folder in the lower left Media Browser window, then double-click the file to bring it up to the preview window, setting your in and out points, and dragging it to the timeline to edit (Figure 6.16.). No transcoding needed. The files can be edited natively. |
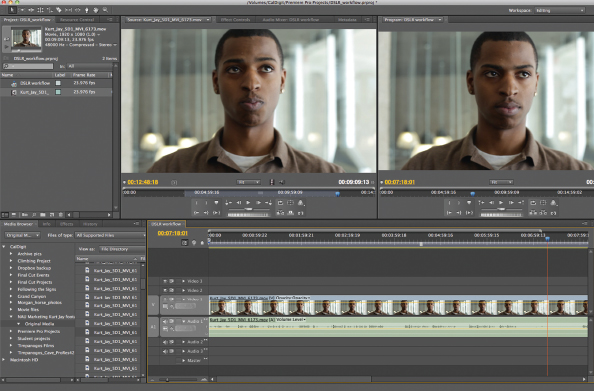
FIGURE 6.16
The editing layout window of Adobe Premiere 5. The media files can be found in the lower left under Media Browser, where you can then select files for preview and editing.
APPLE FINAL CUT PRO WORKFLOW
A lot of controversy occurred when Apple decided reset the design and parameters of Final Cut Pro X. However, after having taught with the software for a year at Northern Arizona University to beginning film production and multimedia journalism students, I actually find it easy to teach and learn. I've also edited a series of videos for the National Park Service and Northern Arizona University's marketing department using this software and find it a pleasure to edit with as well as attaining features (such as color grading and audio mixing) that are easy to use and powerful enough for professional work. It is a breakthrough in editing styles, and as Apple updates newer versions of it—bringing in the features professional editors need for their projects—it is likely to receive wider adoption. Fundamentally, it removes some of the clunkiness found in its earlier iterations (it renders effects in the background so you can edit at the same time), and it provides a sleek and mostly intuitive interface, using a nondestructive “magnetic” timeline.
| 1. | Create a new event |
Final Cut X names folders as events. You can move files in between folders (events) and access multiple files in a variety of events for you project. If the project is small, I'll create one event and import all of my media into it. Right click on the hard drive icon where you want to create your event folder (Figure 6.17).
TIP
When using external hard drives, make sure that they are formatted for Mac—not the standard setup where a drive can be read by both PC and Mac (FAT 32 format), otherwise Final Cut Pro will not recognize the drive and you will not be able to create projects on the external drive.

FIGURE 6.17
Right click on the hard drive and choose “New Event” to create an event folder in Final Cut Pro.
| 2. | Import media files |
Browse your hard drive (or the memory card containing the original media files) and select the files you want to import. There are several menu events to choose (Figure 6.18).

FIGURE 6.18
Browse the hard drive or the memory card to choose the files you want to import. Follow the steps below for choosing the different menu options.
| 3. | Create a new project |
Open Final Cut X and select New Project (name the project)—Final Cut will keep (and show) your entire media library for all of your projects, so naming them and storing your footage in organized folders is essential and wise, but use the structure within Final Cut X. If you start renaming folders and moving files outside the software, you'll run into errors.
|
|
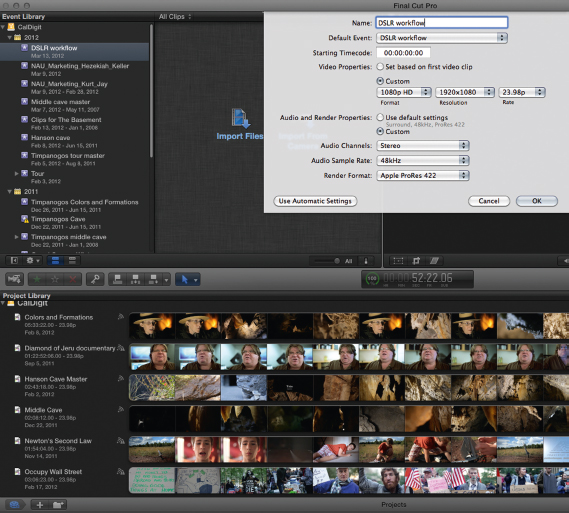
FIGURE 6.19
Right click on the hard drive and choose “New Event” to create an event folder in Final Cut Pro.
|
|
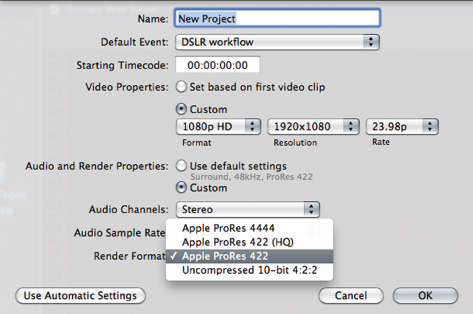
FIGURE 6.20
Drop-down menu for choosing the render settings of your project in Final Cut Pro.
Once you import the files, they will begin to render in the background. You may begin previewing footage, setting in and out points, as well as editing. The shots will eventually get replaced as they become converted to ProRes.
SYNCING AUDIO—FINAL CUT PRO WORKFLOW
Final Cut Pro X includes an audio syncing feature for filmmakers recording on external audio (such as the Zoom H4n or Tascam DR-40). It takes the reference audio from the camera, analyzes the waveform data and matches with the external audio's data, creating a new compound synchronized clip. This feature works easily and I have not run into any issues using it.
| 1. | Choose the proper audio and video clips (Command-click) once on the audio and once on the video, then right-click, Synchronize Clips. The files will process, creating a new compound clip, labeled, “Synchronized Clip” (See Figure 6.21) |
| 2. | On the bottom left of the browser window, you can see the Synchronized clip. I review it and place it in the timeline, which is highlighted in yellow. |
| 3. | After selecting the Synchronized clip, I select the info panel and choose Audio, then choose the “Channel Configuration,” unchecking the clip's audio, while keeping the Tascam audio (from the external recorder). This replaces the noisier reference audio from the camera with the cleaner audio from the external recorder (See Figure 6.22). |

FIGURE 6.21
Right-click on the one proper audio and one correct video file, then right click, choosing Synchronize Clips. This will create a new compound clip.
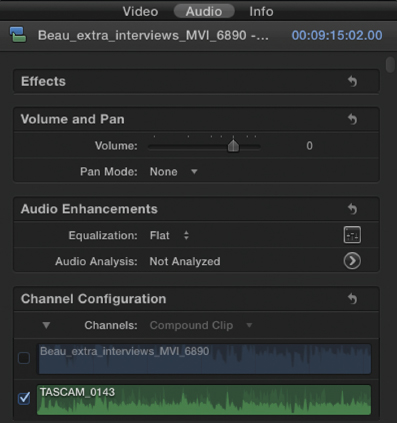
FIGURE 6.22
Change the channel configuration from stereo to dual mono, then de-select the camera's audio and use only the external audio (Tascam, in this case).
SYNCING AUDIO—DUALEYES WORKFLOW
Red Giant Software's DualEyes is a stand-alone software designed to sync external audio files with on-camera audio. If you're not using Final Cut Pro X, this is a good option for syncing your files.
| 1. | Open DuelEyes and select New Project. Select the directory to where you want to save the project (Figure 6.23). |
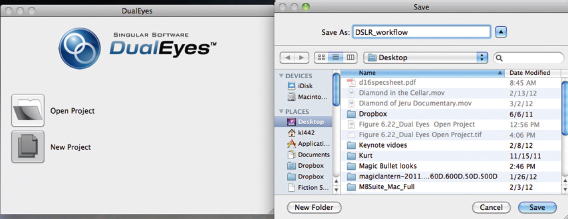
FIGURE 6.23
Singular Software's DualEyes. Choose New Project and select your Save directory.
| 2. | After you've imported your video and audio files, select the files you want to sync. Hit the + icon and choose the files you want to import (Figure 6.24). Click on the – icon to remove files from the list. |

FIGURE 6.24
Hit the + icon and choose the files you want to import.
| 3. | Set the Output Directory—where you want your synced files to appear. Go to File→Set Output Directory. You may choose to place them in the original directory alongside the original or chose a new folder (Figures 6.25 and 6.26). |
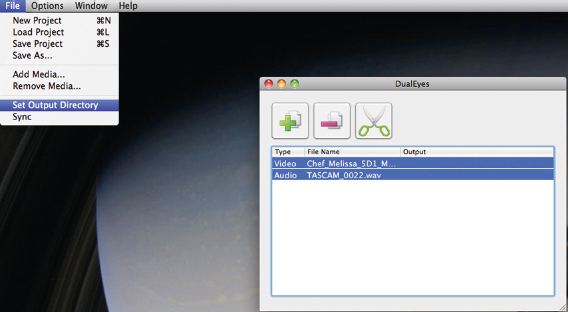
FIGURE 6.25
Go to File→Set Output Directory to place where you synced files will go.
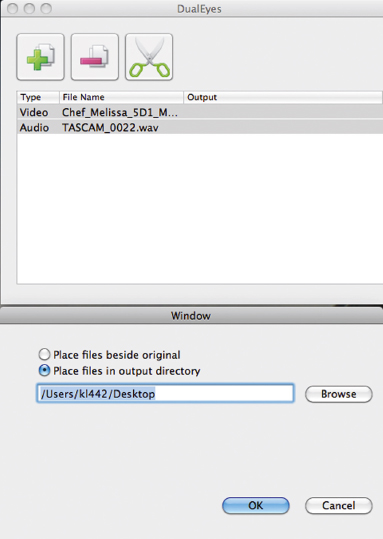
FIGURE 6.26
You can choose to place them in the original directory alongside the original or chose a new folder.
| 4. | Click on the scissor icon and it'll process the files and place them in the folder you chose in 3 (Figure 6.27). It will say, “Extracting Audio.” |
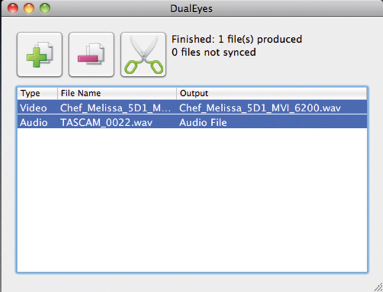
FIGURE 6.27
Click on the scissor icon and it'll process the files.
| 5. | Import the synced files to your editing software. |
Menu options allow you to choose replacement of audio in the .mov files, among other choices.
A recommended alternative to using DualEyes when using a dual-audio recording system setup is one developed by David Anselmi of Practical Mystic Productions (<http://www.practicalmysticproductions.com/>).
| 1. | Separate the audio tracks of the two separate recordings. |
| 2. | Pan hard left on the first track and hard right on the other track. |
| 3. | Adjust relative volume so both tracks match. |
| 4. | Listen on headphones. |
| 5. | Nudge one of the audio tracks back and forth, until the flanging—the audio delay between the two—stops. You've just synced the audio! |
COLOR CORRECTION WORKFLOW
After you've synced up your audio, edited the piece, mixed proper audio levels, added text (such as lower thirds), your final step in the postproduction workflow is to color correct your images. Although most professional editing software packages include tools for post production color work, I don't have the space in this book to cover how to use them all. However, I will show the steps of basic color correction and color grading in Final Cut Pro, and then, following this section, I examine how you can use some of the tools in Red Giant Software's Magic Bullet Looks to create your film look, an easy to use plug-in software.
BASIC STEPS IN COLOR CORRECTION AND COLOR GRADING
A nice overview of color correction and grading can be found at <http://www.hurlbutvisuals.com/blog/2012/01/20/7-tips-for-hd-color-correction-and-dslr-color-correction>. Here, Shane Hurlbut's editor, Vashi Nedomanksy provides some of the major tools and information needed to do fundamental postproduction work in Adobe Premiere. As Vashi defines it:
COLOR CORRECTION is the process where every clip is manually tweaked to get a good exposure and balance of light. Each clip is adjusted to match color temperature to a predefined choice for each scene. This tedious and mechanical process is essential and in its own way, an art form. The use of SCOPES (Waveform, Vectorscope, Parade) is critical to this step and luckily most NLE's and Grading software have them built-in. Without them you are literally flying blind and solely trusting your eyes, which have to adjust to room light ambience, fatigue, funky monitors and other factors constantly. Trust the SCOPES and let them guide you into accurate and creative decision making.
COLOR GRADING is the creative process where decisions are made to further enhance or establish a new visual tone to the project through software including: introducing new color themes, re-lighting within a frame, film stock emulations, color gradients and a slew of other choices. Being that this is purely creative, there is no wrong or right … only what the DP, director and colorist feel is appropriate for the story. It can be subtle and invisible or over-the-top and uber-stylized. Therein lies the challenge … The challenge of choices. The tools available are so numerous, powerful and often free (Davinci Resolve Lite!) that you have no excuse not to explore these options further before you embark on the Grading journey.
Vashi recommends the following steps in the process (not all steps will be used in all situations):
(Nedomanksy, V. (January 20, 2012). “7 Tips for HD Color Correction and DSLR Color Correction.” Hurlbut Visuals. <http://www.hurlbutvisuals.com/blog/2012/01/20/7-tips-for-hd-color-correction-and-dslr-color-correction/>, accessed March 14, 2012) Used with permission.
As mentioned in Chapter 4, shooting flat (such as with Technicolor's CineStyle) is the best way to go when doing postproduction color correction. It leaves a lot of data that you can dig out using these tools, explained below.
Eyeballing your correction work is important, but more important is to utilize the variety of scopes to make sure what you see is as precise as you can get it. In this example, I've laid out the waveform monitor for luminance, the RGB parade (color values of red, blue, and green), and the vectorscope (showing a diagonal line where the values of the skin tones should fall) (see Figure 6.28). As can be seen in the Luma scope, the highlights are a bit low. Also, the Vectorscope reveals what the eye is telling us—the image is too yellow (notice the vector of the color falls below the diagonal “flesh tone” line, edging towards yellow). And the RGB tells us that there is a lot of red in the image (which is obvious, the tool will allow us to even out the red, green, and blue—unless we want a particular hue to increase in value).
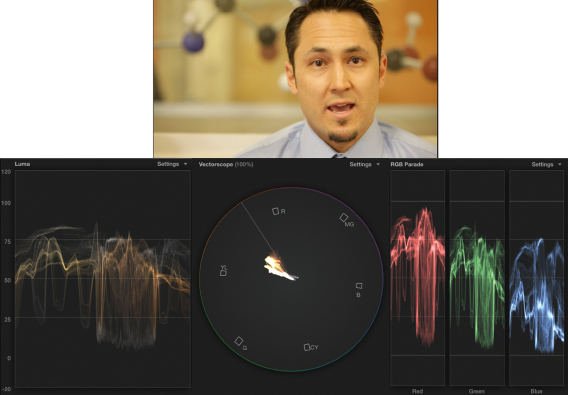
FIGURE 6.28
The uncorrected image in Final Cut Pro with the uncorrected values found in the waveform monitor, vectorscope, and RGB parade.
Here are the basic steps needed and how they work in Final Cut Pro:
| 1. | Adjust the blacks, then the highlights, then the midtones (which correspond to skin tones) (Figure 6.29). |
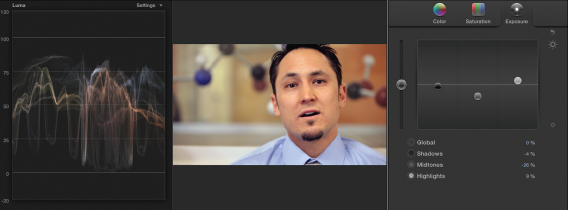
FIGURE 6.29
The image corrected along the luminance. The shadows were adjusted down, making the blacks touch just near 0, and then the highlights were raised 9%, just so there's enough contrast spread—but not so much the images blows out. Finally, the midtones were adjusted –26% in order to compensate for the high level of midtones in the exposure.
| 2. | I next adjust the image to even out as much as possible the reds, greens, and blues using the RGB Parade (Figure 6.30). |
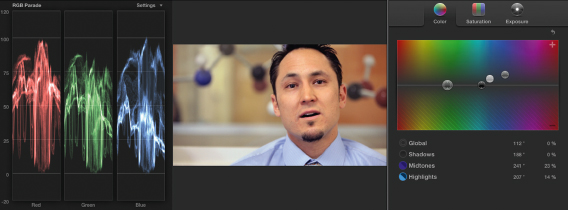
FIGURE 6.30
I adjust the midtone wheel, bringing up the blues (+23%) in order to negate some of the yellow. I also bring up the highlights 14% in the blues as well, since these were still coming in too yellow on the subject's face.
| 3. | Lastly, I adjust the Vectorscope, moving the midtone and highlight colors until the spread of color falls on the skin tone line (Figure 6.31). |

FIGURE 6.31
I continue to adjust the midtones and highlights until the vector of colors fall along the skin tone line. If the colors reach too far to the edge of the circle, indicating the colors are oversaturated, I can use the Saturation tool to desaturate.
| 4. | All of these steps are not linear. I continually shift among the three scopes, making minor adjustments until I'm happy with the overall look of the image. |
No matter which software you use, the steps examined above on color correction and the use of scopes is essential to getting an accurate film-like look for your projects. In the next section, I'll examine Magic Bullet as an additional tool where you can make further adjustments for your film—this takes you to the color grading process by which you shape the look of the film (after it has been color corrected).
Filmmaker Khalid Mohtaseb used Magic Bullet Looks to grade his short, titled Haiti Earthquake Aftermath Montage (<http://vimeo.com/9608637>), shot on a Canon 5D Mark II. The two examples in Figures 6.32 and 6.33 show the power of this software in helping to create the film look. Mohtaseb actually uses Photoshop for his first step, “retouching a screenshot from the clip,” using that retouched still as a reference point. Then he utilizes Final Cut Pro's three-way color corrector “to shift the mids and shadows to a warmer color tone.” Lastly, he fires up Magic Bullet Looks “to fine-tune the exposure and colors. I rarely ever use the Looks presets as they are overused and [I] can get more precise results by building my own” (Mohtaseb, K. (March 25, 2010). Into the Haiti Earthquake Zone—Khalid Mohtaseb Covers the Aftermath on 5DMKII. DSLR News Shooter. <http://www.dslrnewsshooter.com/2010/03/25/into-the-haiti-earthquake-zone-khalid-mohtaseb-covers-the-aftermath-on-5dmkii/>, accessed April 19, 2010). He shot in Standard picture style, with some of the shots’ contrast pulled all the way down.

FIGURES 6.32 AND 6.33
Cinematographer Khalid Mohtaseb utilizes Magic Bullet Looks to color-grade his film projects. The before image (6.32) is on the left, while the postgrading process (6.33) is on the right.
(© 2010 Khalid Mohtaseb. Used with permission.)
Noise Reduction Software
A lot of video picks up noise—especially at high ISO settings. Noise reduction software is a useful tool that can help offset such noise. One such application can be found at <http://www.neatvideo.com/>. The plug-in is available for After Effects, Premiere, Final Cut, VirtualDub, Sony Vegas, and Pinnacle Studio. A limited functionality demo is available for free. The Pro version, which allows for HD 1920x1080 noise removal, costs just under $100. To see an example of the result of this software, read the case study for Casulo, a Brazilian short transferred to 35 mm film, in Chapter 8. For the same price, Red Giant Software sells Magic Bullet Denoiser II at <http://www.redgiantsoftware.com/products/all/denoiser-II/>.
COLOR GRADING WITH MAGIC BULLET LOOKS WORKFLOW
Follow these steps for doing basic color grading with Magic Bullet Looks:
| 1. | Once the software is installed (actually a plug-in), open your Final Cut Pro project and click on the effects icon. Scroll down to Magic Bullet Looks (Figure 6.34). |
WEBLINK
Video tutorials of Magic Bullet can be found here: <http://www.redgiantsoftware.com/videos/tutorials/#magic-bullet-looks>
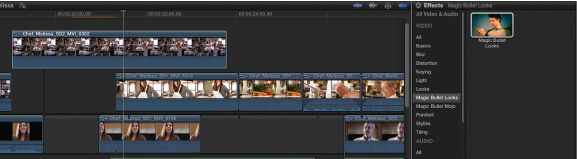
FIGURE 6.34
The Magic Bullet Looks plug-in for Final Cut Pro.
| 2. | Drag and drop the Magic Bullet Looks icon onto the clip you want to color grade. Click on the Edit box in the Look row. (If you're using a trial version of Magic Bullet Looks, a Register button will appear above the Edit box; it's a shortcut that will take you to Red Giant's registration/purchasing page.) |
| 3. | You will be taken to the LooksBuilder, or editor, of Magic Bullet Looks. Your clip will appear as a large image in the center of the screen. When you hover the mouse along the left edge of the screen, the Looks window will slide out and you'll see a variety of preset looks from which you can choose. When you hover the mouse along the right edge of the screen, another window containing a variety of tools slide out. These are the tools used to shape a variety of looks from color correction to shaping a graduated exposure. |
| 4. | Hover the mouse along the left edge and scan through the dozens of pre-built effects plug-ins—everything from film stock emulation to crime show TV drama (see Figure 6.35). The software engineers have gone through the tools of Magic Bullet Looks and emulated a variety of looks found on television shows, movies, and music videos, among others. You can click on any one of the looks, and you'll see an immediate preview in the center image of the main page. Take the time to experiment to get the one that's closest to the emotional look you want to convey—the one that most closely fits your story. |

FIGURE 6.35
Magic Bullet FCP Classic Stock Emulation table. Note the variety of tools the Colorist can use.
| 5. | See Figure 6.36 for the original image. Once you've selected the effect plugin you desire (I choose No 85 from the Classic Stock Emulation), notice the series of icons along the bottom of the main screen—these were the tools (found on the right edge of the screen when you hover the mouse there) used to design the particular look you chose (Figure 6.37). Click on the icon and you can see the specific parameters used for that tool—and you can adjust them to further shape the look. |

FIGURE 6.36
Here's the original image from Final Cut, before the effect is applied to it.
(Still from NAU Marketing video, Chef and Melissa by Jay Butler, Kurt Lancaster, and Jenna Lyter.)
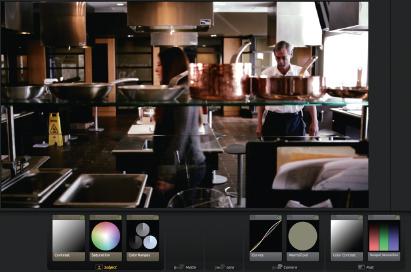
FIGURE 6.37
Here you can see how the effect of No. 85 shapes the look of the clip I chose in Final Cut. In addition, you can see a series of tools that were used to create that look. Each one can be manipulated further to fine-tune the look you want. The tools used to create the No. 85 look include Contrast, Saturation, Color Ranges, Curves, Warm/Cool, Color Contrast, and Ranged Saturation.
(Still from NAU Marketing video, Chef and Melissa by Jay Butler, Kurt Lancaster, and Jenna Lyter.)
| 6. | Click on any one of the tools along the bottom row, and you'll see the parameters of the particular tool in the far-right column. For example, Figure 6.38 is a close-up of the Curves tool. Different effects plug-ins will reveal different tools. |
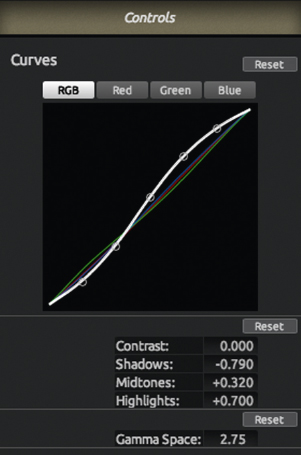
FIGURE 6.38
The Curves tool as used in helping to create the “No. 85” effect plug-in. The look can be manipulated further by adjusting the full RGB curve or individual RGB curves. You will be given instant feedback as you adjust them.
TIP
Right click on the clip you just changed and select Copy (or Command C), then go to Edit→Paste Effects on another clip where you want to apply the same effect. You may need to go into the Magic Bullet editor to fine turn it, but all of the changes will be applied.
The variety of tools allow you to manipulate the look of the scene—such as adding a filter that would normally be applied in-camera when shooting, but can be done in post with Magic Bullet. You could spot-meter a section and change the exposure of it. These powerful tools can help change the entire look of your film, but the goal is to adjust it so that it feels right for the story, not to have it stand out and look as though it was color-graded. (See Figures 6.39 and 6.40 for examples for Camera and Lens.)
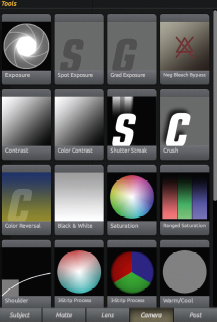
FIGURE 6.39
The Tools menu for Camera (click on the tab on the bottom of the menu to see the different menu choices). For Camera, such tools include Exposure, Spot Exposure, Graduated Exposure, Negative Bleach Bypass, Contrast, Color Contrast, Shutter Streak, Crush, Color Reversal, Black & White, Saturation, Ranged Saturation, Shoulder, 2-Strip Process, 3-Strip Process, and Warm/Cool.

FIGURE 6.40
The Lens tool pvrovides for postproduction changes in Exposure, Spot Exposure, Grad Exposure, Vignette, Anamorphic Flare, Deflare, Chromatic Aberration, Edge Softness, Swing-Tilt, Lens Distortion, and Haze/Flare.
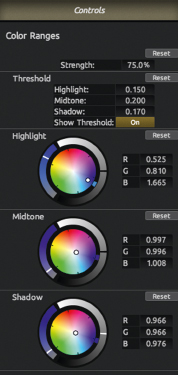
FIGURE 6.41
The Magic Bullet Looks 3-Way color corrector (called Color Ranges) allows you to adjust the colors of shadow areas, midtones, and highlights by using a slider along the curves of the color wheels.

FIGURE 6.42
The Magic Bullet Looks Grad Exposure filter applied to the color-corrected shot with exposure drop-off applied from screen, graduated to the left end of the dashed line hovering near the middle of the screen.
(Still from NAU Marketing video, Chef and Melissa by Jay Butler, Kurt Lancaster, and Jenna Lyter.)
Using Magic Bullet Looks is a great way to experiment and explore with the film look. In Part II of the book, there are examples of before and after shots of several films, showing how the color grading process worked for those projects. But to just show some of the potential power of this software, the examples shown here in Figures 6.41 through 6.43 reveal how you can change an image through Magic Bullet Looks’ color correction tool, adjust the settings of the f-stop along a graduated filter, and see what happens when you apply the Swing-Tilt (similar to the Tilt-Shift lens effect) to a shot in post.

FIGURE 6.43
The Magic Bullet Looks Swing-Tilt effect applied to the shot (before color correction). Notice the foreground blur along the edge of the counter with the copper pots and pans, while the subject's face stays in focus. The horizontal solid line marks the depth of field, whereas the dashed vertical indicates the center point and angle of the tilt shift.
(Still from NAU Marketing video, Chef and Melissa by Jay Butler, Kurt Lancaster, and Jenna Lyter.)
In addition, Magic Bullet works well with doing color correction with neutral “flat” settings. The frame grabs in Figures 6.44 and 6.45 were shot with Technicolor CineStyle on a Canon 5D Mark II and corrected using Magic Bullet Looks.
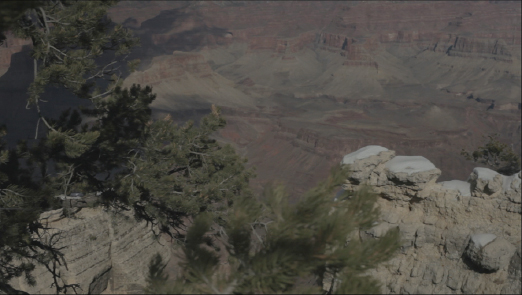
FIGURE 6.44
Frame grab of a shot utilizing Technicolor's CineStyle picture style. Note the washed-out milky look; the colors do not pop, but when put into Magic Bullet Looks, the richness of the colors comes out (see Figure 6.45).

FIGURE 6.45
Applying Curves removes the milky washed out flat look, adjusting Color Ranges adds a bit of red, while the application of Exposure provides an extra stop of open exposure to compensate for over-compensated underexposure occurring from an ND fader filter. The image pops with color and contrast. Notice the details in the highlights and shadows.
Here's some final advice on color grading. No matter what effect you use—from applying a little bit of tone to shaping a complex graduated exposure—as you go through your scenes, shot by shot, be sure to remain consistent in matching shots in a sequence, as well as when making the transitions between sequences. You don't want images to stand out because you improperly graded a shot or failed to match it with the previous shot. You may want to save presets in Magic Bullet, such as “Scene 1,” so you have the look down for that scene and then apply it to the other shots in that scene. If the tones need to change from shot to shot, be sure you color grade by matching the skin tones of your performers from shot to shot. If the facial tones don't match, then the audience will notice it. Save the profile and apply it to the other shots in the scene.
This chapter covered the basics of working with a postproduction workflow to decompress your DSLR footage into a form that can be easily edited, and with increased chrominance and luminance color space—it makes it better for color grading. The chapter showed the steps for converting these files with Squared 5’s MPEG Streamclip, Cineform's NeoScene, and Apple's Final Cut Pro. In addition, it provided the steps to sync up externally recorded audio using DualEyes and the sync feature of Final Cut Pro. It then shifted into the process to convert the look of your project using Magic Bullet Looks—a powerful postproduction tool to finalize the look of your footage so you can fully apply the final touches in achieving a cinematic look.
1 Don't use a hard drive as a long-term archive solution. Use it as a backup throughout production and postproduction. If you know you no longer need the footage, then you're good. However, if you're working for a client or you work at a production company, keeping an archive is essential—and making hard drive backups is not recommended as the best solution for long-term archival purposes. Rather, going with an Enterprise Tape solution (LTO-4 800GB tapes) with an archival drive will cost about $7,000, which is a much wiser choice, and if you have a client needing archive material, that price is a lot cheaper than having to go back in the field and get new footage.