
THE ZONE SYSTEM, HISTOGRAMS, AND ISOS
One of the tools to shape the ratio of light and shadow revolves around the zone scale—an arbitrary scale indicating the tonal values from dark to light in an 11-step black–grey–white gradation, numbered 0–10 (0 = black; 10 = white; see Figure 3.1). Zones 0–3 represent black and deep shadow values (details and texture in an image can begin to be seen in zone 2, while 3 shows dark details and some texture, and 4 reveals landscape shadows and dark foliage). In addition, zones 4–6 represent face tones (from dark-skinned to Caucasian facial tones). The mid-gray of 5 represents brown skin tones and sky; this is also the value of an 18% gray card used for white balance. Zones 7–9 hit lighter greys and highlights (an 8 would reveal texture in snow, whereas 9 would represent blown-out highlights, and 10, pure white). Each zone number indicates a doubling in brightness from the previous zone; the gray in 6 is twice as bright as the gray in 5; the gray in 7 is four times brighter than 5 (each step is a multiple of two). The black in 1 is half as bright as in 2. The doubling and halving of the grey scale is similar to the doubling and halving of the exposure range in f-stops.

FIGURE 3.1
Zone scale from 0–10, referring to a quantification of a black-to-white gradation. One zone is twice as bright as the next when moving toward the white, while it's half as bright when moving toward the black. This matches the changing values of f-stop settings.
(Based on Zone System. Wikipedia.com. <http://en.wikipedia.org/wiki/Zone_system,> accessed 28.02.10)
Shane Hurlbut, ASC, explains, “Film has about 13.5 stops of latitude. Eight of these fall in the over-exposure (highlights) while 5.5 falls in the underexposed areas (the shadows).” The Canon 5D Mark II “goes in the other range,” Hurlbut explains. “It's got 7 in the under and 4–5 in the over.” He adds: “So you're not able to handle highlights as well” as in film with the 5D.
Simply put, the zone scale is a tool filmmakers can use to train their eye in controlling how much light should be in a scene—to properly shape the exposure range of cameras. Don't use it as a technical tool for every shot, but practice with it so you can begin to see the potential range of darks to brights and learn where your camera can handle the exposure range.1
SHOOTING TIP FOR ADVANCED DSLR SHOOTERS
For those who really want to master this material and get the most out of postproduction imaging—especially if you want to use Magic Bullet Looks, shoot in a “flat” mode (such as Technicolor's CineStyle for Canon DSLRs), making the image low contrast; don't crush the blacks and avoid blowing out the image. The shot may look flat in-camera, but in post, you can make it shine. If you have a laptop on set, you can test the flat look, shoot an image, and color grade it to see how it looks. You could also switch to a different non-flat picture style to test the look. Shooting flat will give you the most flexibility in post. Details on how to engage a “flat” picture style are covered in the next chapter, “Using DSLR Picture Styles: Pitfalls of Presets and Creating Custom Styles.”
Let's look at an indoor night shot from Laforet's Reverie to see how we can use the zone system practically. In Figure 3.2, we see tonal values of 0–6—black to brightly lit skin tones.

FIGURE 3.2
We could re-create Laforet's interior night shot using the zone system by quantifying the tonal range of black-gray-white. To accent the darkness, Laforet lets the blacks fall off, revealing little to no detail in much of the setup (0–1). We can begin to see details in the 2–3 range, while 4 and 5 allow us to clearly see the patterns on the pillow, the texture of the t-shirt, the man's arm and hand, as well as the table. Zone 6 is typically the value of Caucasian skin tones, and, save for the soft focus on his feet, we would clearly see the detail. The screen-right side of his face is shadowed, and we lose detail here, whereas the screen-left side of his face reveals details in the skin tone, edging on being a bit bright (7). The blue's brightness (tint and shade) changes depending on the tonal values; it's really dark in the background (where the 3 is), and a bit brighter in the zone 5 areas, to being really light in zone 6.
(Still from Reverie. ©2009 Vincent Laforet. Used with permission.)
By keeping the dynamic range within six stops and exposing the brightest part of the face at 6, Laforet is able to shape the rest of the scene around the blacks, letting the exposure of the man's body fall down to 0; blacks dominate the scene (stressing the nighttime feel of the shot). He allows the Caucasian skin tone to shine the brightest with the face and feet, while part of the arm and hand to hit zone 5, and leaving the shadows falling off into the blacks.
The ISO setting of the DSLR camera allows you to change the “speed” of the film—the higher the number, the less light you need to expose it (but it will get noisier—putting grainy patterns in your shots); the lower the number, the more light you need.
Tip: Zone Scale in Practice
A typical Caucasian face has a reflectivity of 36%; a brown face, about 16%; a black face, 10%. Green leaves have a 14% reflectance, while black velvet is at 2%. Light grays reflect 70% of light, while off-whites reflect 80% (see Viera, D., & Viera, M. (2005). Lighting for Film and Digital Cinematography, (p.54). Wadsworth).
If you want to expose for zone 5 (the “correct” exposure for an 18% mid-range gray card), set your lights and place your subject, angle the 18% gray card so that it reflects the same light as your subject, and take your reading. The 18% gray card refers to the reflection and absorption of light (18% of the light is reflected, while 82% is absorbed). If you get an exposure reading of f/5.6 on your light meter for your particular ISO setting, then that's your f-stop setting, and the rest of the tonal range will fall off or increase depending on the amount of light in other areas of the shot. If you're trying to control the amount of detail in the shadows and/or highlights, you can adjust your lights accordingly. (The light meter in the Canon DSLRs provide an average exposure in video mode—if you need a spot meter, install Magic Lantern covered in Chapter 5, or, even better, purchase a light meter.)
Most independent filmmakers and video journalists will usually just eyeball the exposure so that the image on the LCD screen looks right. But if you're really trying to control the image and know that you want the audience to see details in the background, you could plan for it to be two stops dimmer than your main subject in the foreground (which you've exposed at f/5.6 on zone 6), for example. You would light the background for zone 4, and you would know you're in zone 4 when you get a metered reading of f/2.8 at the same speed (ISO setting). At the same time, if you want your audience to see details in the highlights, you could keep the exposure of your highlights in zone 7 (one stop above your main subject of 6, setting your lights and scrims so your meter would not go above f/8).
Tip: Lighting and the Zone Scale
A fast way to set your lights so as to brighten or dim your subject is to remember the inverse square law as a main property of light. Doubling the distance of the light from your subject (by either moving the light or your subject) drops off the brightness four times. If you halve the distance, the brightness increases by four. So if your subject is being lit inside by a window, and she's too bright for your exposure range, you can move the subject farther away (or scrim or place a gel filter on the window). If you're using lights, then you can simply move the lights farther away or closer to the subject to change the intensity (or you could use a dimmer on the light—although this will tend to change the color temperature of the light, thus impacting your white balance).
In either case, moving the light or moving the subject toward or away from the light source will change your zone scale.
Most small image sensors in video cameras have about a 4½ to 5 stop range (meaning you can expose along nearly five zones; film contains at least 8 stops), but large sensor cameras, such as the Canon 5D Mark II, have achieved around 9 stops, according to Philip Bloom. So choosing which zone to expose provides an idea of where your highlights and shadows will fall out of the exposure range. Choosing to properly expose at zone 5, for example, allows you to capture a fair amount of detail when exposing in zones 4–8 or 3–7.
Tip: The Histogram
If you don't have a light meter, you could use the histogram graph found on most cameras to “read” the range of tonal values in the shot, and adjust the camera's exposure or ISO setting accordingly (see Figure 3.3). The histogram represents the amount of your scene that's bright or dark (the tonal values). If the meter shows a high amount on the left side of the screen, the image is overall dark, showing the image to be “crushed” (a lot of detail lost in the blacks); high values on the right side of the meter reveal the image to be mostly bright and could be blown out. The gray values fall in the middle, so the 18% gray card reference representing the midrange point will be equivalent to a histogram reading in the middle of the graph. When applied to the zone scale, the readings on the left 40% of the graph would represent 0–3 (the dark grays and blacks), 4–6 (the middle gray tones) would fall into the middle of the graph (20–30%); while brighter gray tones, highlights, and white would fall along the right 30–40% of the graph.
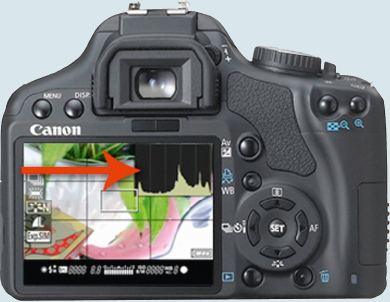
FIGURE 3.3
The Canon Rebel's histogram, which indicates the spread of darks to brights—the shadows to highlights from left to right. Essentially, it allows you to quickly monitor whether the blacks have been crushed or the highlights blown out. Most DSLRs don't include the histogram when recording. Install Magic Lantern, covered in Chapter 5, if you want this capability. Regular video cameras have this feature built in.
(Photo courtesy of Canon.)
Photographer Michael Reichmann tells his students that when he shoots, “I'm barely even aware of the image on the LCD; it's the histogram that commands my attention.” Perhaps this is an exaggeration because getting good composition is key, but once the composition has been chosen, getting proper exposure is just as important, and the histogram is one of the tools to show what your image looks like across the tonal range. Reichmann believes that there is no “bad” histogram because it's simply giving you what the reading is. Histograms are valuable for showing you how much of an image is blown out or crushed. But you can adjust your light and shadows accordingly if you're trying to place your subject in the middle of the histogram exposure zone. (See Reichmann, M. Understanding Histograms. <http://www.luminous-landscape.com/tutorials/understanding-series/understanding-histograms.shtml>).
Furthermore, if you're using a low-contrast picture style for postproduction work, the histogram becomes a useful tool for you to engage in order to watch whether or not you're crushing blacks or blowing highlights.
EXPOSURE AND DEPTH OF FIELD
Exposure represents the amount of light allowed to fall on a camera's sensor—and it also determines the depth of field of the focal plane—what's in focus.2 Manual prime lenses, such as the Zeiss and Leica, have f-stops placed on the barrel of the lens, and you adjust the stop manually rather than through the in-camera setting (see Figure 3.4). An iris—like the pupil of your eye—controls this. When it is opened all the way (low f-stop number), more light falls in. When it is nearly closed (high f-stop number), less light enters (see Figure 3.5).
For DSLR cameras, the range of the aperture opening is measured with f-stops3 : 1, 1.4, 2, 2.8, 4, 5.6, 8, 11, 16, 22, 32 (most video cameras don't have the 22 or 32, but many DSLR cameras do). F/1 (or the lowest number available on the lens) represents the iris opened all the way, whereas 32 (or the highest available on the lens) is nearly closed. Each number in the sequence represents a doubling of light when opening up (f/1.4 lets in twice as much lights as f/2), while a stopping down of the exposure halves the amount of light (f/2 receives half as much light as f/1.4; see Figure 3.6 for the iris range of a Zeiss Contax 50 mm f/1.4 lens).
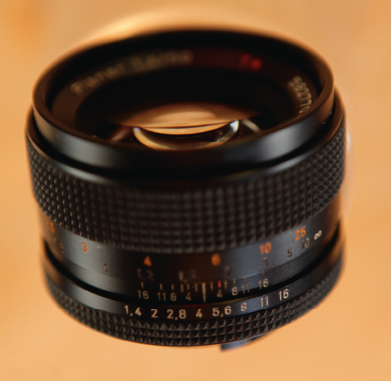
FIGURE 3.4
This Zeiss Contax 50 mm/1.4 prime lens places the f-stop settings on the lens itself. This lens has an f-stop range from f/1.4 to f/16.
(Photo by Kurt Lancaster.)
Furthermore, different f-stop settings will also influence the depth of field of your lens. The lower the f-stop, the more shallow the depth of field becomes. Higher f-stops increase the depth of field. You can download a depth of field calculator for a portable device (such as an iPhone), as well as use the one on this website: <http://www.dofmaster.com/dofjs.html>. You input the type of camera, the distance to the subject in inches, feet, centimeters, or meters and it'll calculate the proper distance. (Choose the 7D camera from the dropdown menu when using a Canon 60D or Rebel (550D/600D), since the sensor size is the same.) See Figures 3.5. Note how the depth of field increases with the corresponding higher f-stop values. Also note, as the distance to the subject decreases the depth of field decreases and with a subject farther away, you'll also get increased depth of field. For example, a subject 20 feet away with a 50 mm lens at f/1.4 has a depth of field of 4.15 feet, while a subject at two feet has a depth of field of less than half an inch!


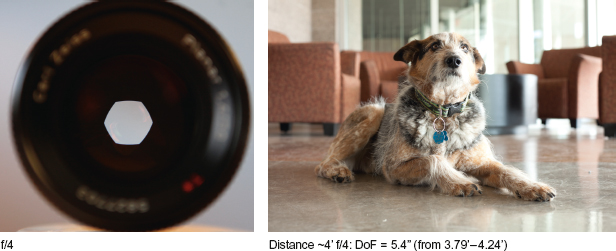

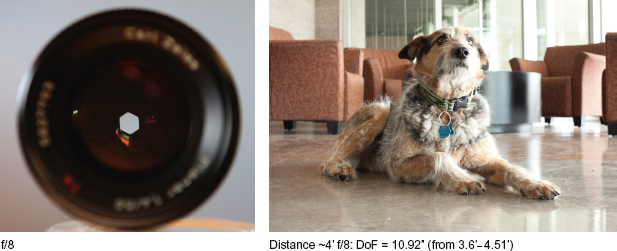


FIGURE 3.5
The f-stops represent the opening and closing of the iris of a camera. The lower the f-stop, the more open it is, letting in more light. The higher the number, less amount of light enters. Each f-stop number represents a halving (closing) or doubling (opening) of light. An f/2.8 prevents half the light of f/2, whereas f/11 allows twice the light of an f/16. In addition, the f-stop setting determines the depth of field, as can be seen with the focal plane changing in the corresponding images with Preston the dog. At f/1.4, 2, 2.8, and 4, the background chairs are out of focus, while they begin to get sharper at f/5.6 and above. Depth of field calculation based on 5D Mark II, Zeiss Contax 50 mm/1.4 at a distance of approximately 4 feet (using the depth of field calculator at: http://www.dofmaster.com/dofjs.html
(Photos by Kurt Lancaster; model: Preston.)
Most people eyeball the exposure by using the LCD or an external monitor, but this approach will not provide an accurate reading. Philip Bloom doesn't recommend it. “Don't use the LCD screen to expose,” he says. By using the camera's metering system, Bloom feels you can get a more accurate read—important for professional use. You can meter an average exposure with Canon DSLR cameras, but the spot meter doesn't work in video mode.
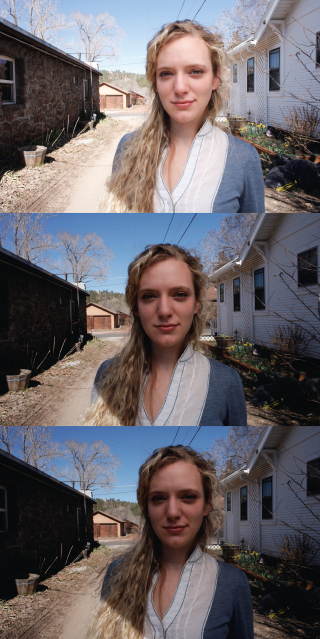
FIGURE 3.6
The same shot with three different f-stop settings. The top image is at f/8, the middle is f/11, and the bottom is f/16, each one letting in half the light as the one previous. F/8 is the proper exposure where you can still see some details in the shadows without the subject's face being blown out. Notice that the depth of field of the subject is sharp throughout, because of the high f-stop settings providing a depth of field between 2.11’ to 4.64’. Zeiss 25 mm, f/2.8.
(Photos by Kurt Lancaster.)
CINEMATOGRAPHER TIP
Film Look with Exposure, Shutter Speed, and Filters
Shane Hurlbut, ASC, says, “Making HD video look like film has a cocktail and one of the essential ingredients to this flavorful recipe is neutral density (ND). You have to keep your exposure on a [Canon 5D Mark II] around a 5.6 to get that beautiful shallow depth of field. The 7D should be around a 2.8, and the 1D around a 4.0. This gives the focus puller a chance and still retains a beautiful fall off of focus.”
The 7D has close to a 35 mm sensor so you would shoot around a 2.0/2.8 split to give a decent focus range but keep the background out of focus enough to battle aliasing and moiré issues. Use a shutter speed of 1/50 or 1/40 all the time. I do not like to go above it. When you go at a 1/60 or higher it starts to look like video, and it's too sharp for me. I use the motion blur at a 1/50 and 1/40 to help with the crispness of HD and make it look more like film.
In addition, Hurlbut, who shot Terminator Salvation (2009) and Act of Valor (2012), recommends using neutral density filters to change the exposure value without altering the f-stop setting). “Tiffen's Water White NDs and Water White IR NDs looked the cleanest of all the available filters. This filter was specifically designed for the HD world. It is very pure glass to give you the best image for your post color correction. The filters that were originally made for film had brown and green in the glass that was no problem to dial out in film because of the uncompressed 4:4:4 color space. But now with HD 8-bit compressed color space [of DSLRS and many video cameras], you do not have that range of manipulation in color correction. In addition, by using neutral density at higher levels to achieve a shallow depth of field, you must deal with the problem of infrared (IR) pollution. The Water White IR NDs counteract this issue and give an image that does not have so much pink/magenta. As a cinematographer, I want to limit this contamination because it ends up showing in the blacks as well as skies in day exteriors.” (Shane Hurlbut, personal notes. See Hurlbut, S. (2010, Feb. 10). Filtration: Beware of the Reaper of Cheap Glass. Hurlblog. <http://hurlbutvisuals.com/blog/2010/02/10/filtration-beware-of-the-reaper-of-cheap-glass/.>)
Tip
If you need the exposure wide open for best shallow depth of field work, then you may want to add neutral density filters so you can lock your iris open. If you don't have an ND filter, then you can increase shutter speed—it'll make the image sharper, but you'll maintain a shallow depth of field.
Use a light meter to determine the precise value of the exposure, moving it if you want to get a reading on another part of the scene. A small exposure index meter on the bottom of the LCD screen provides a meter with a center scale indicating proper exposure with a latitude of two stops in either direction—another tool to use in your zone scale if you don't have a spot meter (see Figure 3.7). However, it provides an average exposure based on the lighting in the composition of the entire scene. The spot meter function does not work in video mode. Installing Magic Lantern (covered in Chapter 5) will give you a spot meter in percentages (0% for black 100% for white).
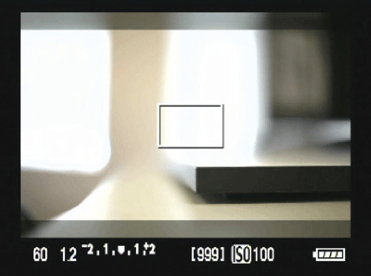
FIGURE 3.7
Canon's exposure meter on the bottom of the LCD screen provides an average exposure of your composition. The spot meter function does not work in video mode. The scale is set at 1/3 increments and can go up to plus two or minus two stops. When you press the shutter halfway, a bar below the exposure index will appear, indicating where your average exposure is—it will flash when it falls below –2 or above +2. By adjusting the f-stops and/or ISO, you can find the average center point. You can also force over- or underexposure by turning the quick control dial while pressing down the shutter halfway.
(Image courtesy of Canon.)
Get the Canon 5D or 7D? It's the Chip Size that Offers a Smoother Tonal Range for Shane Hurlbut, ASC
“The 5D is the king of the hill,” Hurlbut says. “And the 7D and the 1D are climbing that hill and they don't even have a rope. The 7D is not bad, but it's a 24 mm sensor. And you're not able to get that depth of field you get with the 5D—to have the ability to go really shallow. In a shot from The Last 3 Minutes with that carpet line, I've never seen anything like it. 35 mm never gave me that line before—it was extreme. And the camera was at f/5.6 with the ISO at 320, and shot with a Canon L 100 mm Macro lens. So when you need the added f-stop, you can go there; you can go shallow. (see Figure 3.8)
Hurlbut feels that the 5D provides a “broader range of visual creativity” than the 7D. The 7D “has […] more depth of field for [a] filmmaker that doesn't have a focus puller,” Hurlbut explains. What makes the difference, Hurlbut argues, is the pixel size. “The Vista Vision-size sensor on the 5D is 2.3 times the size of the 7D sensor. So the image, the pixel sizes—they are larger. The bigger the pixel, the easier it is for light to enter and give a more graduated fall off into the shadow areas, so it looks more filmic.”
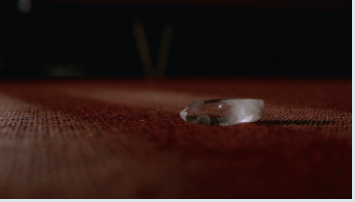
FIGURE 3.8
A shot from The Last 3 Minutes reveals the potential narrow depth of field with the Canon 5D Mark II. Canon 100 mm L, aperture set at f/5.6, and ISO 320.
(©2010 Hurlbut Visuals. Used with permission.)
What does he mean by this? The larger pixel sizes, Hurlbut explains, relate to “how the contrast range falls from light hitting somebody on the face and then the shadow area that goes underneath their chin, for example. But the 7D is going to see that more like a black diamond run on a ski slope.” The 5D will graduate into the shadow area and make more of a filmic fall off because of the pixel size and its light-gathering ability, which would feel more like a bunny slope. The 7D has the advantage of slow motion, a
film gate that's closer to regular 35 mm film, and a depth of field that isn't as hard to fight with as the 5D Mark II. (Notes from personal interview, March 2010.)
CINEMATOGRAPHER TIP
Jim Mathers, president (and co-founder) of the Digital Cinema Society, discusses how he approaches exposure:
With exposure tests, what I'm basically looking for is the sweet spot somewhere between two competing extremes of underexposure on one side, where the image would start to become unacceptably noisy; and on the other, the point where I would start to clip, or lose detail in the highlights. It would seem logical to flatly expose a chip chart, then simply count out the number of steps between the two limits to find the median value. However, I find that this is not always the exact center between these poles; it can be more of a creative choice, and it can vary depending on the subject. And while it would be nice to assign a corresponding ASA/ISO number to a given sensor, this also depends on the shooting situation. For example, in a high contrast daylight exterior, I might tend to rate the sensor a little higher, looking to protect the highlights, which would lead me to allow less exposure to reach the sensor. However, in a low key setup I might be looking to capture shadow detail, treating the sensor as if it is less sensitive, allowing more light to pass through to help insure my shadow areas stay free of too much noise. Now, I'm way too pragmatic to have a different meter setting for every scene, but I have found two or three different ratings varying with the broad category of the shot to be appropriate, just as I might shoot a movie on two or three different stocks.
(Digital Cinema Society Newsletter. 26 March 2010: #6.2)
CINEMATOGRAPHER TIP
Shane Hurlbut, ASC, discusses the importance of ISO settings on the 5D Mark II and how it relates to compression of the color bit depth:
In the beginning, I was scared to go above 500 ISO but 500 ISO is actually noisier than 1600 ISO. You have to give this sensor light. If you don't give the sensor enough light, then your 8 BIT compressed color space will go down to 6 BIT then 4 BIT then 2 BIT color space at which point you have no control in post. It is better to feed it a little more light and then adjust your color and contrast in post.
(Jan. 5, 2010 newsletter: http://hurlbutvisuals.com/newsletter_archive.php)
Hurlbut Visuals conducted a series of ISO tests and determined that the best settings for reduced noise levels for Canon's 5D Mark II and 7D are ISO 160, 320, 640, 800, and 1250. (See Appendix 2.)
However, Josh Silfen, a cinematographer in New York, offers a different explanation about this:
So, if the 160-multiple ISOs are not the native ones, why are they cleaner, and how are they derived? Well, it is correct that the 125-multiple ISOs are the noisiest because they are derived by a digital exposure push. ISO 125 is actually ISO 100 with a 1/3 stop digital exposure push, ISO 250 is ISO 200 with a 1/3 stop digital exposure push, etc. However, the 160-multiple ISOs are actually the cleanest not because they are “native”, but because they are a result of a digital exposure pull. This pull brings down the exposure of the entire image, and hides much of the noise that would be visible at the next higher ISO. ISO 160 is the cleanest because it is the native ISO 200 with a 1/3 stop digital exposure pull, yielding even less noise. ISO 320 is actually ISO 400, with a 1/3 stop exposure pull, etc.
Because ISO 320 is actually ISO 400 pulled 1/3 of a stop, that means that the highlights are going to clip at exactly the same point as they would at ISO 400. The 1/3 stop pull is just making that point 1/3 stop darker than pure white. The entire image at ISO 320 is 1/3 stop darker (and may be less noisy) than the image at ISO 400, so the blacks lose detail 1/3 stop sooner, but you don't get that 1/3 stop back at the highlight end of the range—it's still gone. Therefore, at ISO 320 you're losing a net 1/3 stop from the total usable dynamic range that you would have if you were shooting at ISO 400.
If you need more exposure, you're better off going up to the next exposure-pulled ISO, or the next native ISO, rather than shooting with the increased noise and decreased dynamic range that comes along with the pushed ISOs. In general, if I am shooting a bright scene with a large contrast range, such as a daytime exterior, I will prefer to use the full-stop, native ISOs. In that situation, since I will likely be using the lower ISOs (100 or 200), noise really isn't much of a factor anyway, and I will prioritize dynamic range to prevent the highlights from blowing out as much as possible. If I am shooting a dimly lit scene, I will likely be using the higher ISOs where noise is more of an issue. In that case, keeping the highlights in check isn't usually a problem, so I will prefer to use the 160-multiple ISOs (320, 640, or 1250) so I can get more exposure with less noise.
(Silfen, J. (2010). Canon HD DSLR “Native ISO”. Shootin’ The Shoot: Camera Tech Talk and General Pontification. Accessed 11 March 2012. http://shootintheshot.joshsilfen.com/2010/05/13/canon-hd-dslr-native-iso/)
High ISO settings lead to noise, as can be seen in the test conducted by Hurlbut Visual (see Appendix 2). With the release of Canon's 5D Mark III in 2012, the engineers shaped their ISO in the sensor so there's less noise. In a comparison test between the Canon 5D Mark II and III shot by Saika, he set the ISO at 12800 (see http://vimeo.com/37879608), and when compared to the 5D Mark II, there is a significant difference in the noise level (see Figure 3.9).
CINEMATOGRAPHER TIP
Lens and Sensor Size on the Canon 5D Mark II
Shane Hurlbut, ASC, says, “The 5D's sensor is the size of the 70 mm Vista Vision. Focus is nearly impossible at a f/1.4 or a f/2 unless you are shooting lock-off shots with little or no motion. Shooting the 5D at a f/5.6 is equivalent to a f/1.4/2 split on 35 mm film. Nobody shoots movies at a 1.4/2.0 split because the focus puller does not have a chance to get anything in focus. If you shoot action or move the camera around with a bit of handheld, you will not have a prayer” (Notes from personal interview, March 2010).
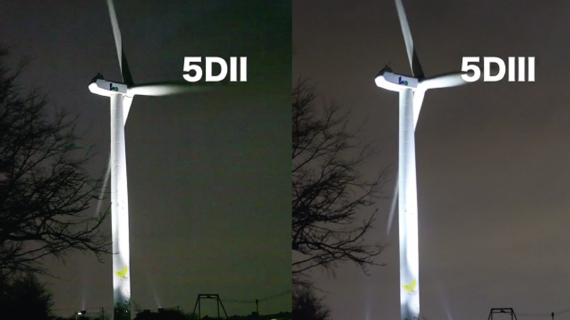
FIGURE 3.9
Saiko's side by side comparison of the Canon 5D Mark II and III at ISO 12800. The Mark Il's image contains a lot of green noise. Although noise still can be seen in the Mark III image, it is significantly less. Saika. (2012). Eos 5D Mark III ISO 12800 Movie. Vimeo.com. <http://vimeo.com/37879608> Accessed 25 March 2012
USING NEUTRAL DENSITY FILTERS
Filters can change the quality of a lens, diffusing an image to make it slightly soft. The most important ones are designed not only to protect your lenses from scratches, but filter the amount of light hitting the lens; they are called neutral density (ND) filters. This type of filter allows you to keep the aperture open under bright light conditions; the filter essentially stops down the f-stop aperture setting—without closing the iris—the amount depending on the type of filter used, allowing the filmmaker to keep the shallow depth of field of an open iris. Filters can be screwed onto the lens or dropped in front of the lens when using a matte box, or they can be conveyed electronically if the camera has a built-in neutral density function; none of the current HDSLRs have electronic ND filters.
Filters are assigned different numbers depending on their density, their ability to block out light. ND2 will be labeled 0.3, providing for a one f-stop equivalent reduction (see Table 3.1). Companies also make variable ND filters (called ND faders) so you can adjust the filter without having to switch them out.
In addition, when you're choosing an ND filter, consider getting one that includes infrared filtration. The IR is especially useful for DSLR cameras because they're sensitive to infrared, causing oversaturation of red, as well as focusing interference issues.
| Table 3.1 | Filter Name, Density, and f-Stop Reduction | |
| ND Filter Type | Density | f-Stop Reduction |
| ND2 | 0.3 | 1 |
| ND4 | 0.6 | 2 |
| ND8 | 0.9 | 3 |
| ND16 | 1.2 | 4 |
| ND32 | 1.5 | 5 |
| ND64 | 1.8 | 6 |
Questions to Consider When Using Filters
| 1. | What is your exposure latitude? Are you shooting in bright sunlight, for example? Set your ISO level where you want it and then set the exposure. If you're blowing out the highlights, then it's too bright. Adding a neutral density filter will change your exposure latitude and allow you to get the shot you need. |
| 2. | Do you need shallow depth of field in bright light? Use an ND filter when you want to open up your iris and maintain shallow depth of field without overexposing your shots. |
| 3. | How much light do you want to come through? The density determines the strength of the filter. The higher the number, the less light will come through. Be aware of the changing exposure latitude with ND filters. A 0.9 filter, for example, provides 3 stops of exposure across your entire range. So if you're using an ND filter only to prevent a blowout of the highlight, be aware that your shadows will deepen, and you may lose detail, although before the ND placement, it was fine. You'll need to brighten the shadow if you don't want to lose the detail. |
CINEMATOGRAPHER TIP
Philip Bloom recommends using variable neutral density filters. He prefers the Singh-Ray 77 mm screw-on because it dials in 2 to 8 stops of neutral density by rotating the filter. (Personal notes from Hdi RAWworks workshop, March 2010.)
In addition, if you're shooting flat/superflat, use filters only to change the light quality, such as ND filters, ND graduated filters, and polarizers. Other filters, such as soft and frost, and so on can be applied in postproduction using Magic Bullet, for example.
CONSIDERING SHUTTER SPEED
Typically, you would follow the 180-degree shutter speed rule. The shutter in a film camera would normally be half a circle (180 degrees), so if the film speed is 1/24 of a second (24 fps), you would double that to get the shutter speed (1/48). NTSC video shoots at 30 fps, while PAL (European standard) is 25 fps, so with NTSC you would typically shoot at 1/60 of a second shutter speed. Shane Hurlbut, ASC, however, considers this “a recipe for delivering images that look like video, not film”:
I use a 1/40th or a 1/50th of a shutter. You never go above that. Anytime you go above, it starts looking like video. By just going up to 1/60th of a second it instantly takes a beautiful 5D that gives filmic images and turns it into a video camera. The more you sharpen the image, the more it looks plastic. I use the motion blur to soften the crispness of HD video. Shooting at a 1/50th is like shooting with a 200 degree shutter. I shot the whole Rat Pack (1998) on a 200 degree shutter—I loved that look.4
So setting the proper shutter speed is important in helping to attain the film look with DSLR cameras.
CONSIDERING FRAME RATES
Before addressing in-camera settings, I want to address frame rate. Currently, film has a 24 frames per second rate, and provides one of the benchmarks for getting the film look (video shooting at 24p), which engages a judder effect when shooting (and that's part of the film look).
However, such filmmakers as James Cameron offer a different opinion. He feels that unless you're transferring your project to film or have it projected on a 24 frames per second (fps) player, then you don't need to shoot 24p. In an interview with David Cohen of Variety, Cameron actually argues for a faster frame rate in order to create a smoother quality of the image:
I've run tests on 48 frame per second stereo and it is stunning. The cameras can do it, the projectors can (with a small modification) do it. So why aren't we doing it, as an industry?
Because people have been asking the wrong question for years. They have been so focused on resolution, and counting pixels and lines, that they have forgotten about frame rate. Perceived resolution + pixels = replacement rate. A 2 K image at 48 frames per second looks as sharp as a 4 K image at 24 frames per second with one fundamental difference: the 4 K/24 image will judder miserably during a panning shot, and the 2 K/48 won't. Higher pixel counts only preserve motion artifacts like strobing with greater fidelity. They don't solve them at all.5
Cameron argues for 48 frames per second because the quality doesn't vastly increase at a higher number and it's compatible with film projection (doubling the standard 24 frame rate). Indeed, Peter Jackson shot The Hobbit: An Unexpected Journey (2012) using Red cameras at 48fps—which he feels will provide a smoother look to the 3D film.
For DSLR shooting, 24p will best represent the film look because that's the current aesthetic of film and best engages the film look when shooting with video. But getting the film look isn't just about shooting 24p. You need to sculpt light and shadow and work within a specified dynamic range, engage smooth and stable camera work, choose lenses and filters, and get proper exposure at the proper shutter speed when telling your story as powerfully as possible.
Checklist for Exposure
| 1. | Set your camera to manual video mode. |
| 2. | Determine your exposure latitude. Knowing your latitude range from shadows to highlight will help determine how much light you need for your subject, foreground, and background. If you know the dynamic range of the camera, you can determine how much light and light blockage you need to control the amount of light throughout your entire exposure range. A light meter is helpful for this process, but you can also use the histogram to see the dynamic range from dark to bright. And you can use the exposure meter in the camera to get an average reading. As you practice with image, light, and shadow, you'll be able to eyeball the exposure range for your particular camera. |
| 3. | How rich do you want the image? The I SO level—the “speed” of the exposure—determines the richness of the image. The higher the number, the more light sensitive it will be but will result in more video noise; the lower the number, the richer the image will look but will require more lighting. Outdoor daylight will allow for ISO 100, whereas outdoor night shots will require a high ISO setting. The lower the setting the lower the noise. Increasing the ISO will add more noise to the image. Recommended indoor ISO = 320, 640, 1250 (or 200, 400, 800 on Rebels 550D/600). Recommended outdoor day ISO: 100 or 200. |
| 4. | How much light do you want? Set your aperture's f-stop (the lower the number, the more open the iris, letting in more light; higher numbers close up the iris, cutting off the amount of light falling on the sensor). Neutral density filters are used to cut out light without changing your f-stop. (See page 53.) |
| 5. | How much depth of field do you want? When the aperture is more open, you'll have a shallow depth of field; when the aperture is more closed, the depth of field will increase. If you need shallow depth of field and you're too overexposed when the aperture is wide open, decrease your ISO setting and/or use neutral density filters—or as a backup, increase your shutter speed. |
| 6. | Set your shutter speed. It should remain at 1/40 or 1/50 of a second to maintain a nonvideo look and get you closer to the film look. |
LENSES
The human eye can see about 240 degrees with peripheral vision. Lenses do not reveal what the natural unaided eye sees. Rather, the cinematographer uses lenses as a way to shape the emotional equivalency of what the human eye perceives and feels. If you stand within typical talking distance from someone, this is what may translate on film as a medium shot. If the person is in a wide or long shot, this may be equivalent to someone standing on the other side of a room—shouting distance. A close-up would be equivalent to an intimate conversation, a kiss or a fight—where you are inches from someone.
Different lenses render how we perceive the subject and setting descriptively and emotionally. Practically, a variety of lenses allow us to change the angle of what can be seen; they're measured by the focal length (a wide angle lens on a 35 mm camera would be a 20 mm focal length), and a long lens might contain a 100 mm focal length; a “normal” lens would be 35 mm or 50 mm focal length. The focal length on a DSLR camera is simply the distance of the lens to the imaging sensor when the focus is set to infinity.
A short focal length lens (a wider convex lens) bends the light sharply, bringing the image in focus only a short distance from the lens, but the image is smaller and therefore can capture more of the scene (and place much of the foreground and background in sharp focus). A long focal length lens is less convex, bending the light at a smaller angle, placing the focal distance farther away, making the image larger (with less of the foreground and background of the scene in focus).
As a comparison, the angle of view can be broken down to a 25 mm lens containing a field of view of 80 degrees, 50 mm at 46 degrees, 100 mm at 24 degrees, and 180 mm with 13 degrees.6 In effect, the sharper the angle, the closer the view you can capture with the lens, if the camera is placed at the same distance (see Figures 3.10–3.14).
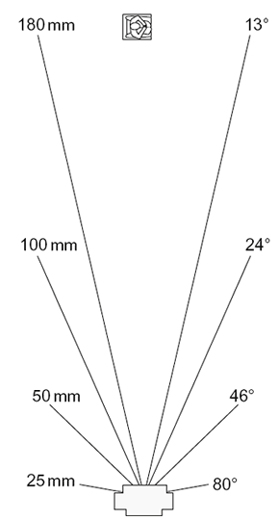
FIGURE 3.10
Angle of view illustration for Figures 3.11–3.14
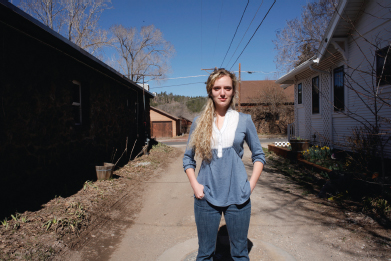
FIGURE 3.11
Zeiss 25 mm. About six feet from the subject.
(Photo by Kurt Lancaster)
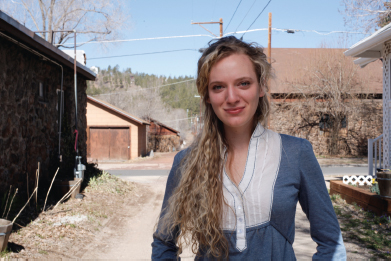
FIGURE 3.12
Zeiss 50 mm. Same distance
(Photo by Kurt Lancaster)
One of the selling points of shooting HD video with DSLR cameras (and now many large sensor video cameras) is the ability of the cinematographer to use a variety of lenses to shape the look of the project. While most prosumer HD video cameras allow for good HD clarity, digital filmmakers were limited by the fixed zoom lenses and small sensors. Larger sensors and removable lenses of the hybrid DSLR cameras was one of the main reasons filmmakers gravitated to DSLRs—opening up important creative elements not readily available on standard HD video cameras (without complex and expensive 35 mm lens adaptors). Some prosumer video cameras evolved to include interchangeable lenses. The ability to play with depth of field with large sensors opens up the possibilities of utilizing more of the cinematographer's film tools to craft better and stronger visual stories.
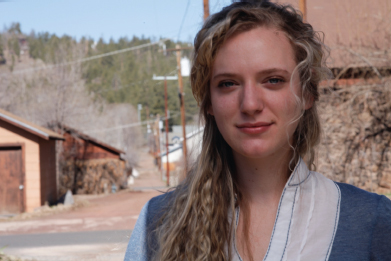
FIGURE 3.13
Zeiss 100 mm. Same distance.
(Photo by Kurt Lancaster)
FIGURE 3.14
Leica 180 mm. Same distance.
(Photo by Kurt Lancaster)
In Laforet's Reverie, for example, the opening shot (see Figure 3.15) and a shot later in the film (see Figure 3.16) are from the same setup using the same lighting conditions and position. However, the angle of the lens is different. Laforet uses a tilt-shift lens (45 mm shot at f/2.8) in Figure 3.15, which allows for selective focus. The first one looks as though it utilizes the shallow depth of field of a longer lens but was used with the tilt-shift lens (see Figure 3.17), allowing Laforet to change the depth of field in the shot, placing the background out of focus, while his main subjects (the man and woman kissing) are in focus. If you look closely, you can see that in this moment of the shot (which changes focus over time), the arms of the man and woman are sharply focused while the heads are in soft focus. The second shot (Figure 3.16) reveals the woman waiting, and the Brooklyn Bridge and skyline are in sharp focus.

FIGURE 3.15
Laforet uses a tilt-shift lens (45 mm, f/2.8) to attain selective focus. Light from above on Profoto 7B with a head and beauty dish and grid. Modeling lamp from 7B head only. A small LED flashlight was used from the ground for backlight—a rim light glow edging along the woman's back.
(Still from Reverie. ©2009 Vincent Laforet. Used with permission.)
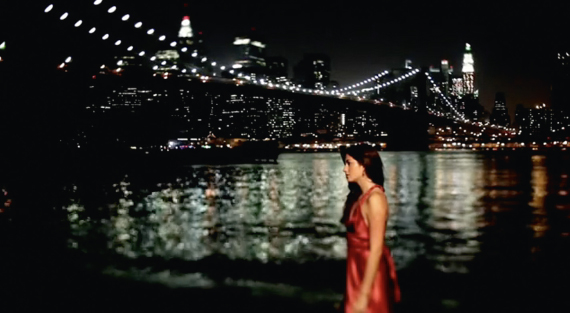
FIGURE 3.16
Laforet uses the same tilt-shift lens as in Figure 3.15, but alters the selective focus to bring the entire shot in focus, similar to the effect with a wide angle lens. Same lighting as in the previous shot (Still from Reverie. © 2009 Vincent Laforet. Used with permission.)
In addition to the focal length and depth of field of lenses, another important factor is the speed of the lens. A “fast” lens has a wider maximum open aperture (iris). Less light is needed to expose the film—better for low light and night setups (and allowing for shallow depth of field). A “slow” lens means that it contains a narrower maximum aperture opening; more light is needed for proper exposure (with increased depth of field). A fast lens could be f/1.4 or f/2, for example, whereas a slow lens would be f/5.6. The difference in the two is significant: an f/1.4 lens lets in 16 times more light than an f/5.6 lens! The terms fast and slow refer to the shutter speed when taking still shots. Typically, a slow lens would need to keep the shutter open longer to let in the same amount of light, whereas the fast lens allows for less time to let in light, thus a faster shutter speed.

FIGURE 3.17
Canon's 45 mm tilt-shift lens used by Laforet to change physical alignment of the lens and thus a shifting focal plane. A low-cost alternative to the tilt-shift lens is the Lensbaby.
(Image courtesy of Canon.)
The Director's Lens App for iPhone
To help you make the right lens choice, you could use Artemis, the director's digital viewfinder iPhone app, which allows you to set the format and angle of the lens, the iPhone acting as a viewfinder, including settings for the Canon 5D and 7D (see Figure 3.18).
The formats, with more in development, include:
![]() 16 mm Standard, Super, and 1.3 Anamorphic
16 mm Standard, Super, and 1.3 Anamorphic
![]() 35 mm Standard, Super, and Anamorphic
35 mm Standard, Super, and Anamorphic
![]() 65 mm
65 mm
![]() 35 mm Digital (ARRI D-21, RED One, Sony F35, Panavision Genesis)
35 mm Digital (ARRI D-21, RED One, Sony F35, Panavision Genesis)
![]() 2/30 Digital (Sony F23, Thompson Viper, Panasonic Varicam)
2/30 Digital (Sony F23, Thompson Viper, Panasonic Varicam)
![]() 1/20 Digital (including Sony EX3 & EX1)
1/20 Digital (including Sony EX3 & EX1)
![]() 1/30 Digital (including Panasonic HVX200)
1/30 Digital (including Panasonic HVX200)
![]() 5D Mark II and 7D
5D Mark II and 7D
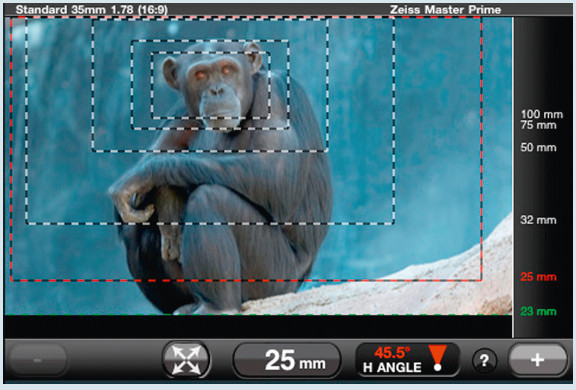
FIGURE 3.18
Screen shot from the Artemis iPhone director's digital viewfinder app. It provides lens size, angle, and a visual outline representing the field of view onscreen. Developed by Chemical Wedding (http://www.chemicalwedding.tv/artemis.html)
(Image used with permission.)
The type of lens determines not only what you will see, but how much light will be exposed, as well as the potential depth of field. With most prosumer HD video cameras, filmmakers are stuck with the fixed zoom lens. Expensive adaptors allowed for the addition of a 35 mm lens, but with DSLRs, changing lenses is now a standard option—as it is now the case with some of the advanced prosumer video cameras. A zoom lens may be good for shooting documentaries, but many of these lenses adjust the exposure speed. Zooming all the way in requires more light to expose, whereas zooming back out to the widest angle requires less light. Many lenses have fixed angles, so when you place a 50 mm lens on your camera, the only way to change the size of the composition would be to move the camera closer or farther away from the subject. The type of lens determines not only what you will see, but how much light will be exposed, as well as the potential depth of field.
The type of lens determines not only what you will see, but how much light will be exposed, as well as the potential depth of field.
| 1. | Zoom or primes? Cheaper zoom lenses change the aperture speed rating. For example, an f/4-5.6 means that the lens pulled wide will provide the greatest exposure of f/4; zoomed all the way in will provide the widest exposure of f/5.6. Effectively, this means that you need to expose everything for f/5.6 or higher because you should not change the f-stop when shooting a scene (or the shots will look different). If you have the budget, more expensive zoom lenses will maintain their aperture rating all the way through the zoom—such as Canon's L series lenses. |
| 2. | Prime lenses have a fixed focal length and aperture rating. These are the best lenses but can be limiting in documentary and video journalism work because you may want to change lens angles quickly without having to change lenses. |
| 3. | What is the manufacturer's brand? Different lenses require different mounts to fit different brands and different lens sizes. PL mounts are used for cinema lenses. The Panasonic GH1 uses a micro 4/3 mount, whereas the Canon 5D uses a full-frame 35 mm EF mount, and so forth. It's recommended that you do not buy a camera with the kit lens, but invest in high-quality zooms and a couple of primes. What to look for: does the focus ring stop or is it mushy—free spinning past the point where it should stop? If you're using DSLRs in cinema projects with focus pullers or shooters needing precision, getting a lens type that stops is essential, especially when using different manufacturers’ focus assists. Zeiss primes, for example, are designed for manual focusing with a lower turn ratio (a half turn usually covers the full focal range). Also, image stabilization is important because a slight shake or vibration can cause ruined shaky shots, especially on longer lenses. Furthermore, when swapping out lenses, be aware of dust. You should get into a car or go inside if the wind is blowing or cover your camera with a jacket. |
| 4. | How much of the scene do you want the audience to see? Wide angle lenses present a wider field of view, whereas long lenses narrow what can be seen. |
| 5. | How much of the scene do you want in focus? Wide angle lenses put more of the scene in focus, whereas longer lenses decrease depth of field and narrow what's in focus. Both of these questions are answered by the length of the lens and the placement of the camera. If you want the audience to see more of the scene, then use a wide angle lens. If you want them to see less, use a long lens. If you want more of the scene in focus, then use a wide to normal length lens; if you want a shallow depth of field, then use a long lens. |
| 6. | Decide the speed of the lens. A fast lens (such as f/1.4) will allow you to shoot in low and natural light, better than a slow lens (such as f/4). Faster lenses will also allow you to lower the ISO setting, giving you more room to choose a richer look. Fast lenses allow you to open wide and get shallow depth of field, while slower lenses limit your depth of field choices. |
Now that we've covered some of the basics of cinematography, the next chapter will examine how you can shape the picture style of Canon's DSLRs, so you can get the look you want in-camera before you begin shooting.
1The dynamic range refers to the luminance range of the setup—the ratio of brightest to darkest areas of the shot. In general, video has about a 4% zone scale range (different formats will go higher or lower, whether you're using miniDV—less, or DigiBeta—more), whereas DSLR cameras with large sensors can double that. Generally, video can express a contrast latitude ratio of 25:1, whereas film has 256:1 ratio (each zone is a doubling of brightness, so four zones is 16 times difference, 8 zones is 256 times difference). Knowing this, you can make choices as to proper exposure for a person's face; for example, lighting the set accordingly so that your ratio stays within four to five zones and letting the rest fall off. And if you want the audience to see details throughout the shot, you can set up your lights so that everything stays within four zones, for example. The contrast ratio for video cameras reflects their small chip sizes V to ‘V inch. Such DSLR cameras as the Canon 5D and 7D contain much larger chips, the 5D provided the largest, allowing over eight zones of exposure according to Shane Hurlbut, ASC. Jeremy Ian Thomas, a colorist at Hdi RAWworks in Hollywood, says he can get two stops of latitude in the shadows with the Canon 7D if it is shot “superflat,” a picture style mode that provides low contrast.
Each of the camera's exposure settings (the f-stop or T-stop), matches the change in the zone scale; a stop down will halve the value of the exposure, whereas opening one stop will double the brightness. So the filmmaker can take advantage of the zone system by either setting up lights and adjusting exposure or using natural lighting and adjusting exposure. The f-stop doesn't measure tonal values; it's simply a representation of how much light is reflected on the surface of what's being shot—the light coming through the lens. Looking at an image doesn't reveal the f-stop setting, but when you use the zone system, you can get a fairly accurate read of the tonal values to the point that you could re-create the look of the shot.
The typical place to start with exposure is to measure your primary subject in the setup with an 18% gray card. Set your ISO and take the measurement. This will set your proper exposure (you'll get the correct f-stop setting), placing it in the middle (zone 5). If you control the lights, you could also go the other way. Open the aperture all the way and then adjust the lights until you have the 18% gray card at the proper exposure.
2 For a technical rundown of video versus film exposure, as well as dynamic range, see Appendix 3.
3T-stops are also used in this terminology; f-stops are determined mathematically (focal length divided by the diameter of the aperture), whereas T-stops are similar but take in effect the light absorption quality of lenses. For practical purposes, they're nearly the same. The author uses f-stops throughout this book.
4 Red centre #056. fxguide.com. <http://media.fxguide.com/redcentre/redcentre-056.mp3>, accessed March 24, 2010
5 Cohen, D. S. (April 10, 2008). James Cameron supercharges 3-D. Variety. <http://www.variety.com/article/VR1117983864.html?categoryid51009&cs51>.
6 The field of view ultimately depends on the lens size and the size of the sensor chip of the camera. A 35 mm on a 7D has a 1.6 times difference in the field of view than a 35 mm on a 5D, for example. The 35 mm on the 7D will be similar to a 56 mm on the 5D. See Collins, M. (2010). 5Dmk2/7D lens comparison test. <http://vimeo.com/14832168>.