
If the composition, blocking, and camera movement shapes the visual look of your film, lighting determines what the look feels like. No matter your lens choice, proper exposure, and ISO setting, a lack of understanding how to utilize light will destroy your cinematic look. A cinema-like camera will not provide a film look alone. Lighting is your most powerful ally in helping you sculpt a film look. Vilmos Zsigmond, ASC (The Deer Hunter), says that the “type of lighting we use actually creates the mood for the scene.”1
This mood is what you, as the shooter, must try to shape and capture with your camera. It helps provide visual depth to your picture. If you shoot an off-white subject against a white wall, there's not much contrast—not much light and shadow—and the picture appears flat. If you shoot somebody white against a dark background, the person stands out, and if you add background lighting to the scene, the depth increases. Because of the large sensor of DSLRs and some advanced video cameras—along with high ISO settings for DSLRs and the video camera's comparable gain settings—they maintain a strong advantage over small chip video cameras because of the capability to shoot in natural and practical low-light situations. Fewer lights are needed on set.
The quality of light refers to what it looks like and what it feels like. What it looks like is what you see on the surface. The feel, on the other hand, conveys the emotion shaped by lighting. You can craft the look and feel of a film by paying attention to:
| 1. | Light quality |
| 2. | Light direction |
| 3. | Light and shadow placement |
| 4. | Color temperature |
Craft the look and feel of a film by paying attention to:
1. Light quality
2. Light direction
3. Light and shadow placement
4. Color temperature
LIGHT QUALITY 1: SHOULD IT BE HARD OR SOFT?
Hard light is direct, producing harsh shadows, and results in a high level of contrast. This can come from a sunny day or an unshaded light pointed directly at a subject. Hard lights are especially effective as backlight and rimlight sources, such as the example in Figure 2.1.
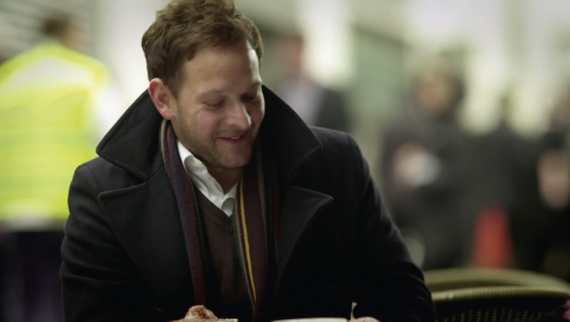
FIGURE 2.1
Steve Lawes utilizes a soft three-quarter frontal key light while utilizing a shallow depth of field using a Sony PMW-F3 Super 35 mm HD video camera in Convergence, directed by Martin Scanlan. In addition a hard light source is utilized as a three-quarter rear “kicker”, the harsh light providing tonal contrast to the shot, due to the stark brightness opposed to the soft quality key coming from the left front. Shot on a Sony PMW-F3. (See Scanlan, M. and Lawes, S. (2011). Convergence. Vimeo.com. <http://vimeo.com/16898584>.)
(©2011 Steve Lawes and Martin Scanlan. Used with permission.)
Soft light is indirect, created by reflecting or diffusing the light—an overcast day or a scrim or sheet dropped between the light source and the subject, or simply bouncing light off a white art board, or even reflecting light off a wall or ceiling. This type of light provides low contrast to the image (see Figure 2.2).
One of the counterintuitive properties of light is the fact that as the lighting instrument is brought closer to the subject, the softer the lighting gets, while farther away, the harder it is because it becomes more of a point source, causing the hard light quality to stand out. A diffused light source from farther away may convey a harder light quality than a low-watt Fresnel lamp up close.
LIGHT QUALITY 2: DIRECTION
The direction of the light will determine the placement of shadows and, consequently, the physical texture of objects and people. There are fewer shadows when the lighting is on-axis of the camera (the front). Shadows increase as the light shifts off-axis of the camera and to the rear of your subject. Light from the side will increase the texture of the scene. When lighting is “motivated,” it refers to a light from a particular source, such as a fireplace, window, lamp, or the sun. In the medium close-up of Evie Bicker in the still from Scanlan's Convergence (see Figure 2.2) shot on a Sony PMW-F3 HD video camera with a Super 35 mm sized sensor, a high three-quarter key highlights the left side of her face, while soft shadows sculpt her cheekbone with soft-quality light, the light motivated by a sunlight. Her dark clothing and well-lit face provides high contrast in the scene, making her expression stand out. (The bright pink scarf also punches the scene with color, again making her stand out in the scene.) This light was likely scrimmed providing a soft look and feel on the woman. If the scene expressed hard light and shadows a totally different feel would shape the scene. As an additional note, the saturation of color is more prominent when the source is from the front, while colors become desaturated when the lights are placed in the rear.
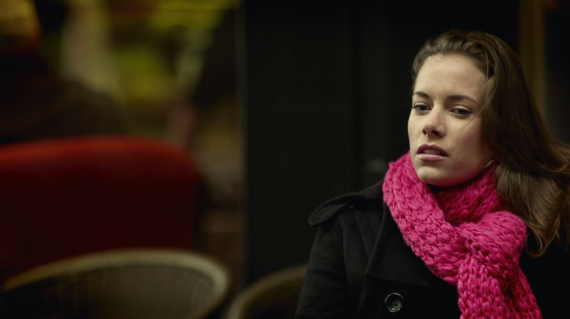
FIGURE 2.2
A woman sitting at an outdoor cafe in Martin Scanlan's short, Convergence, director of photography by Steve Lawes. A high three-quarter key highlights the left side of her face, while soft shadows sculpt her cheekbone with soft-quality light. Shot on a Sony PMW-F3. (See Scanlan, M. and Lawes, S. (2011). Convergence. Vimeo. com. <http://vimeo.com/16898584>.)
(©2011 Steve Lawes and Martin Scanlan. Used with permission.)
Light Placement Terminology
![]() Key: The main light source of the scene (a window, a table lamp, overhead lighting, a fireplace, and so forth). Know where your motivated light source is and add lights, if needed, to reinforce it accordingly. Can be hard or soft quality.
Key: The main light source of the scene (a window, a table lamp, overhead lighting, a fireplace, and so forth). Know where your motivated light source is and add lights, if needed, to reinforce it accordingly. Can be hard or soft quality.
![]() Fill: Lights used to fill in shadows caused by the key light. Usually a soft quality.
Fill: Lights used to fill in shadows caused by the key light. Usually a soft quality.
![]() Back and Rim: Lights placed behind characters to separate them from the background. A rim light specifically is placed high with the light falling on a character's head, her hair lit in such a way as to differentiate her from the background.
Back and Rim: Lights placed behind characters to separate them from the background. A rim light specifically is placed high with the light falling on a character's head, her hair lit in such a way as to differentiate her from the background.
![]() Background: Lighting occurring in the background of the set, designed to separate it from the foreground, giving the scene visual depth. These could be street lights, lights in a store, a hallway light inside, and so forth.
Background: Lighting occurring in the background of the set, designed to separate it from the foreground, giving the scene visual depth. These could be street lights, lights in a store, a hallway light inside, and so forth.
Following are a series of stills from a variety of DSLR and large sensor video shooters’ work, each one illustrating a different light source direction.
Light Source Direction: Side
A side key light on the front of the face brings out the main features of the character, the emotions expressed by the face (see Figure 2.3).

FIGURE 2.3
In Philip Bloom's San Francisco's People, he utilizes practicals from street lamps to light his subject. (See Bloom, P. (2009). San Francisco's People: Canon 5DmkII. <http://philipbloom.co.uk/dslr-films/san-franciscos-people-canon-5dmkii/>.) Shot on a Canon 5D Mark II; 50 mm f/1.2 lens with Zacuto Z-Finder (eyepiece adapter).
(©2009 Philip Bloom. Used with permission.)
Light Source Direction: Side
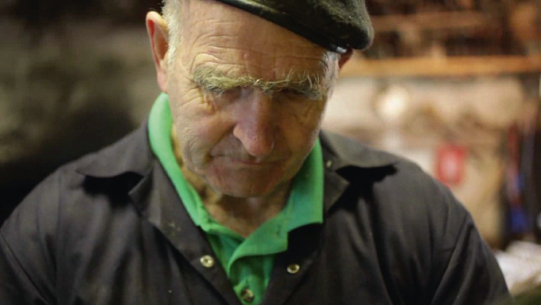
FIGURE 2.4
In this still from Rii Schroer's 16 Teeth: Cumbria's Last Traditional Rakemakers (featured in Chapter 9), we see how Schroer utilizes side lighting to highlight the features of her subject. Side lighting brings out texture because it reinforces shadows, as we can see with the man's wrinkles (on-axis light will lesson shadows). Fill light reflects back onto the man's screen-right face to help ease out the shadows (light from a window). Backlighting provides a sense of depth to the frame. Shot on a Canon 5D Mark II. Canon 24–70 mm/2.8 lens. (See Schroer, R. (2009). 16 Teeth: Cumbria's Last Traditional Rakemakers. Vimeo.com. <http://vimeo.com/4231211>.)
(©2009 Rii Schroer. Used with permission.)
Light Source Direction: Back
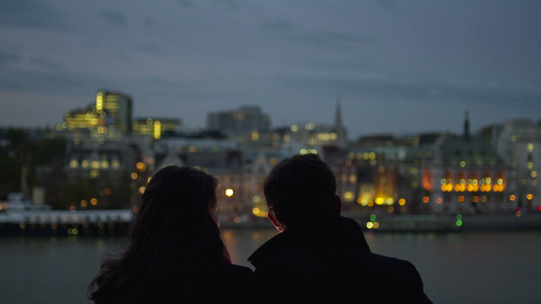
FIGURE 2.5
Steve Lawes utilizes the backlight of street and city lamps (in a shallow depth of field), creating a silhouette of the two leads in Convergence. Backlight from a low angle, rear, provides a colored rim light around his performers shaping a colorful shot with the cityscape in the distance. Shot on a Sony PMW-F3. (See Scanlan, M. and Lawes, S. (2011). Convergence. Vimeo.com. <http://vimeo.com/16898584>.)
(©2011 Steve Lawes and Martin Scanlan. Used with permission.)
Light Source Direction: ¾ Rear

FIGURE 2.6
A three-quarter rear key provides a hard quality light source on the face of Neil Henry sculpting strong shadows on his face. A fill light from the left side removes some of the shadows. Shot on a Sony PMW-F3. (See Scanlan, M. and Lawes, S. (2011). Convergence. Vimeo.com. <http://vimeo.com/16898584>.)
(©2011 Steve Lawes and Martin Scanlan. Used with permission.)
Light Source Direction: Front

FIGURE 2.7
This frontal key light from Scanlan's and Lawe's Convergence brings out the full emotion of loss and longing in the character (performed by Neil Henry), with just the hint of a soft shadow screen right. Notice the eyes contain a glint in them. Frontal lights make characters come alive through eye lights. Some cinematographers will add an eye light to bring liveliness to the shot. Shot on a Sony PMW-F3. (See Scanlan, M. and Lawes, S. (2011). Convergence. Vimeo.com. <http://vimeo.com/16898584>.)
(©2011 Steve Lawes and Martin Scanlan. Used with permission.)
Light Source Direction: ¾ Frontal Key
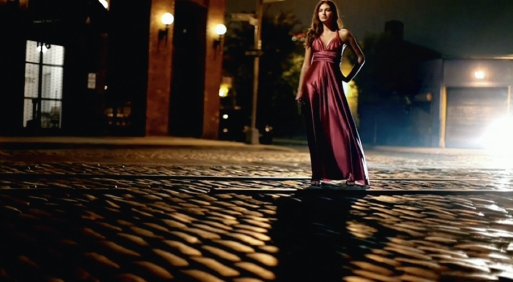
FIGURE 2.8
This still from Vincent Laforet's Reverie utilizes a ¾ frontal key (Profoto 7B head with reflector and modeling lamp with bare head) from a high angle, emphasizing the beauty and dramatic look of the woman. Backlighting is shaped from available (practical) street lamps and also causes shadows to fall into the foreground of the shot. The higher the backlight, the shorter the shadow on the ground (but not the face). Shot on a Canon 5D Mark II, 50 mm lens at f/2. (See Laforet, V. (2008). Reverie. Vimeo.com. <http://vimeo.com/7151244>.)
(©2008 Vincent Laforet. Used with permission.)

FIGURE 2.9
The setup for the shot featured in Figure 2.8. Vincent Laforet, screen right, sits behind the camera, while we can see the break lights on the vehicle casting red light onto the model.
(Photo courtesy of Vincent Laforet.)

FIGURE 2.10
In the opening sequence to Laforet's Reverie, we can see how he crafted a night look for this scene. Soft light (with a blue gel to color the scene) from above left lights the actor's face, while one from the front hits his feet. The light is tightly controlled, minimizing spill, so as to enhance the shadows in the space. The lack of a backlight also helps accent the darkness and provides the night-time feel. Shot on a 5D Mark II. (See Laforet, V. (2008). Reverie. Vimeo.com. <http://vimeo.com/7151244>.)
(©2008 Vincent Laforet. Used with permission.)
Note: If you're shooting in the daytime and need to make it look dark, use blue gel filters with a high hard light (representing the moon) and desaturate the colors.
LIGHT QUALITY 3: LIGHT AND SHADOW
Shadows bring out drama and are essential when creating a night scene (see Figure 2.10). Related to light direction is the placement of shadows. The direction and height of the light determine how shadows fall in the cinematographer's composition. Lights from the front will minimize shadows, whereas lights from the rear will increase the amount of shadows seen on camera. The higher the light source, the shorter the shadow. If you want long shadows, shoot at sunrise or sunset, or place your lights low, instead of high, in the background. Side lighting will increase texture.
LIGHT QUALITY 4: COLOR TEMPERATURE
Digital sensors see lights differently than people do. Computer chips are not as smart as human perception and have a hard time adjusting precise and subtle differences in color caused by different kinds of light sources. Different chemicals burn at different wavelengths, producing different color qualities depending on whether the lamp is halogen, tungsten, fluorescent, sunlight, and so on. Also, sunlight changes its color temperature depending on the time of day and whether or not it's cloudy (see Figure 2.11). Color temperature is measured in degrees Kelvin (K).

FIGURE 2.11
An overview of the color tones during different times of day. Sunset can also refer to sunrise. The warmer and cooler label refers to the quality of the tones, not to actual temperature. (Based on image from http://www.freestylephoto.biz/camerakh.php, accessed 28.02.2010).
Our eyes adjust to these varying color temperatures automatically. Indoor settings for cameras are usually set at 3200 K, whereas outdoor settings are usually at 5600 K; both of these numbers are averages for indoor tungsten lighting and outdoor daylight. Even though cameras have automatic white balance systems, the white balance setting of your camera allows you to adjust the setting manually. You may set your camera to manual mode and adjust it with a white or gray card. The Canon 5D and 7D, as well as the Panasonic Lumix GH series, include adjustable color temperatures you can select with the dial (Philip Bloom refers to this as “dialing in the color temperature”). Balancing correctly is important so that you can control your image. Sometimes you may want to experiment with color temperature as a way to change the look of the scene, but you should always control this important element of lighting (see Figure 2.12).
Cinematographer's Tip
Color Temperature
Shane Hurlbut, ASC
You have to get the in-camera look as close as possible to the final vision for the project. It's an 8-bit color space, 4-2-0. It is compressed and that color space can be limiting. I find it is the compression that makes it look the closest to film, so embrace it. As a cinematographer, you really need to micromanage the color temperature. If you want a day exterior to feel consistent throughout a day from morning till sunset, you need to start with your color temperature so that it is consistent with that of the sun. In the morning it could be around 3400 degrees. To keep the light looking white and not orange, you will need to set your color temp at 3400 Kelvin. By midday it should be around 5200 to 5500 Kelvin. You repeat the same approach at sunset. We had a sequence in Act of Valor on a dry lake bed that posed for a landing strip in the Horn of Africa. We started before the sun came up and were there until it went behind the Sierra Nevada at around 7:45pm. I used this micromanaging approach and the image is so consistent. In the final color correction we hardly had to do any manipulation other than dialing in contrast. (Hurlbut, S. (2009, Nov. 9). Collision Conference. Video. <http://shanehurlbut.smugmug.com/Professional/CollisionConference/10137672_ia4ZS#697099091_Bqx5z-A-LB>, accessed 28.05.2010).
In addition, many of these cameras allow you to create presets for the picture look. Several DSLR shooters have mimicked the look of a variety of film stocks to create different looks as well. (See Chapter 4 for details on adjusting color temperature, as well as steps for shaping your picture style.) In addition, postproduction color grading allows you to further shape the look of your project (Philip Bloom, for example, uses Magic Bullet software to utilize color grading plug-ins to achieve his looks).
There is no one way to determine color balance. Do you balance for tungsten if you're indoors near a window, do you just go with the camera's preset (daylight, indoor, outdoor shade, and so forth), or do you dial it in? You need to look at the image and think about how it relates to the story to best determine what you need. Shane Hurlbut, ASC, dials in his color temperature by eyeballing the monitor or the camera's LCD screen and getting the look as close as he can get it before turning it over to postproduction. Others suggest using the presets for consistency depending on the lighting type you're in, and setting manual white balance only when in a mixed lighting setup (halogens, fluorescents, incandescents in one room, for example). The Canon 7D tends to go a little red when shooting indoors with the incandescent setting.
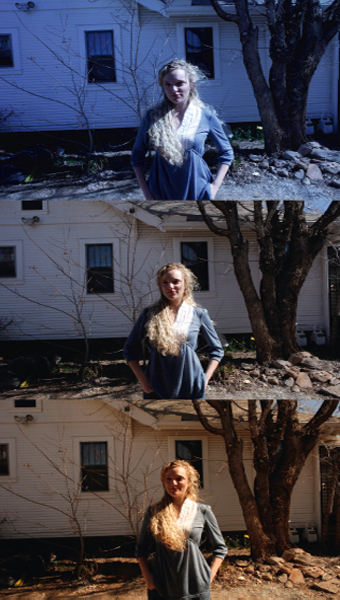
FIGURE 2.12
Three shots of the same model using three different color temperatures. The middle one is “correct.” The first one is too blue, and the third is too warm for the standard look. However, the color temperature is a guide; you may decide the warm image is the color temperature you're looking for to capture the feeling of your story.
(Photos by Kurt Lancaster.)
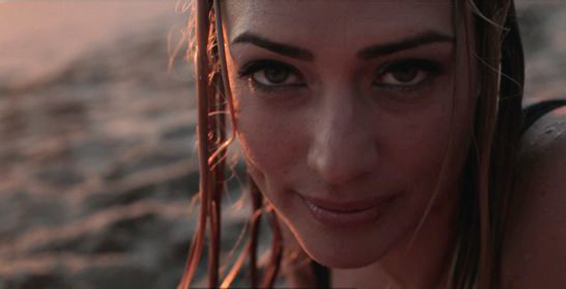
FIGURE 2.13
Shane Hurlbut, ASC, dialed in the color temperature to 4700 degrees Kelvin for the beach scene from The Last 3 Minutes (featured in Ch. 12). Shot on a Canon 5D Mark II. (See Chan, P. and Hurlbut, S. (2010). Lasf 3 Minutes. Vimeo.com. <http://vimeo.com/10570139>.)
(©2010 Hurlbut Visuals. Used with permission.)
White Balance Tip
Do not manually white balance during a sunrise or sunset because you would be adjusting the nice golden flow into white, and you don't want to lose the golden glow! During the sunset scene in The Last 3 Minutes, Shane Hurlbut, ASC, dialed in his color temperature at 4700 degrees K (see Figure 2.13).
SAMPLE LIGHTING SETUPS
The following stills and diagrams with brief explanations show basic setups for shooting outdoor day, outdoor night, indoor day, and indoor night as tied to the idea of composition and light quality.
Outdoor Day (Soft and Hard)—Philip Bloom's Cherry Blossom Girl
When shooting outdoor locations, time of day and weather are the two most important factors to consider; they determine your light source and shadows. Big-budget films may use generators with daylight lamps, but when shooting a documentary or an outdoor wedding, for example, you need to be aware of the sun's location because it will be the primary light source (see Figures 2.14 and 2.15). Mornings and afternoons tend to provide better shooting because the color temperature will provide warmer skin tones; it will also provide long shadows, so you can shape the look around this light and shadow placement. However, when shooting during the “golden hour,” you'll have less time to shoot and a bit more challenge in post to match the color temps from shot to shot (and sometimes within the shot) because the lighting is changing quickly (and thus the color temperature). In addition, to soften the quality of the light, you may want to use a scrim to remove the harshness of the light on a subject's face, or you may want to bounce light off a reflector to provide fill light.
FIGURES 2.14 AND 2.15
In these two stills from Philip Bloom's Cherry Blossom Girl, we see how he utilized the position of the sun to light the same subject in two different ways. In the first, we see the woman lit from the side with soft-quality lighting, reflected sunlight causing fill light on her right side. In the second shot, Bloom places the woman so she's lit by a high key sun from ¾ back, acting as a hard rim light, which causes a glow around her hair and shoulders. The sunlight reflects back onto her face, acting as a soft fill. (See Bloom, P. (2009). Cherry Blossom Girl. Vimeo.com. <http://vimeo.com/5223767>.)
(©2009 Philip Bloom. Used with permission.)
Indoor Day—Philip Bloom's Cherry Blossom Girl
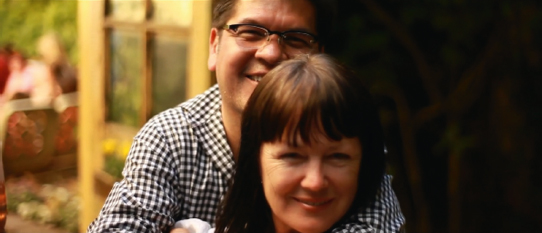
FIGURE 2.16
In this shot, Bloom utilizes an open doorway to provide a key light on his two subjects inside. The rear side lighting lights the screen left side of the couple, while a bit of reflected light on screen right helps add a bit of fill to the scene. Notice the color temperature of warm hues, compared to the cooler tones of the woman in Figures 2.14 and 2.15. Shot on a Canon 5D Mark II. (See Bloom, P. (2009). Cherry Blossom Girl. Vimeo.com. <http://vimeo.com/5223767>.)
(©2009 Philip Bloom. Used with permission.)
Outdoor Night—Martin Scanlan's and Steve Lawes’ Convergence

FIGURE 2.17
In this shot from Scanlan's and Lawes’ Convergence, we see a tight close-up of Evie Bicker and Neil Henry as they are about to kiss. The shot is sculpted with a shallow depth of field, creating bokeh from the out of focus lights in the background. Due to the different colored lights, this effect creates a romantic feel for the scene, with soft red and bluish lighting used faintly on the performers’ faces, the lighting designed to reflect the lighting seen in the background. Shot on a Sony PMW-F3. (See Scanlan, M. and Lawes, S. (2011). Convergence. Vimeo.com. <http://vimeo.com/16898584>.)
(©2011 Steve Lawes and Martin Scanlan. Used with permission.)

FIGURE 2.18
Rii Schroer utilizes sunlight from a window as her key light in 16 Teeth: Cumbria's Last Traditional Rakemakers. The light bounces off the back wall and ceiling, acting as fill light on the characters. A fireplace also adds backlighting screen left. For additional details, see Chapter 10.
(See Schroer, R. (2009). 16 Teeth: Cumbria's Last Traditional Rakemakers. Vimeo.com. <http://vimeo.com/4231211>.)
(©2009 Rii Schroer. Used with permission.)
Indoor Day—Rii Schroer's 16 Teeth: Cumbria's Last Traditional Rakemakers
In shaping the interior during the day, many cinematographers will use windows for short shoots (see Figure 2.18). They may add in a daylight lamp from the direction of the window on longer shoots, so as not to lose light direction when the direction of the light changes over the course of a day.
Indoor Night—Vincent Laforet's Reverie
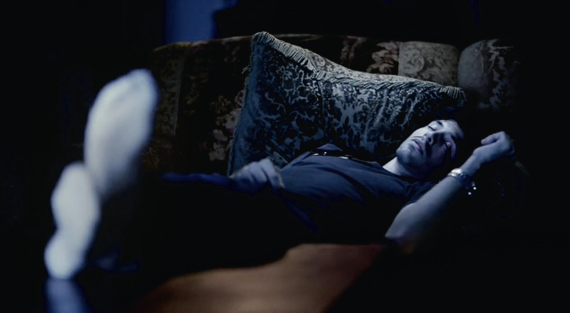
FIGURE 2.19
Beauty dish light from above with grid. TV light in front with blue screen. Rim light with bare bulb from behind couch. Lens: 1.2, 85 mm at f/2. (See Laforet, V. (2008). Reverie. Vimeo.com. <http://vimeo.com/7151244>.)
(©2008 Vincent Laforet. Used with permission.)
1 Fauer, J. (2008). Cinematographer Style: The Complete Interviews, Vol. 1. (p.332). American Society of Cinematographers.