
Chapter 11
Urban Lowbrow Art
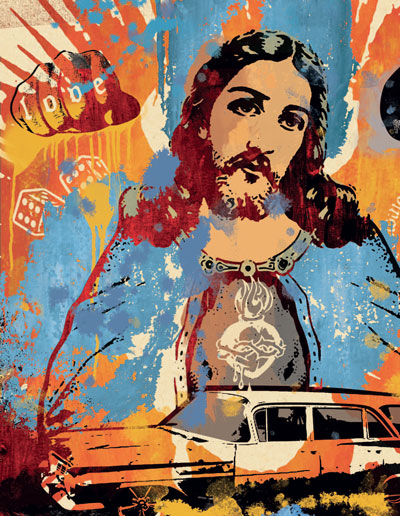
There is evidence of a reckless approach inherent in the majority of urban art. This, along with popculture subject matter, is what some argue sets it apart from the world of mainstream art, giving it the derogatory sounding tag of being “ lowbrow. ” However, with a lack of mainstream acceptance comes a sense of freedom. Not only is no subject too taboo, but the techniques of execution are less limited than within mainstream art. Paint is thrown around with abandon, new elements are added on top of old, and the visual result has an incredibly loose feel to it. This is something that is rarely achieved or even addressed in the world of digital art. Things are often very contrived and the feeling of abandon is rarely even attempted. The recklessness and abandon that the paint slingers take for granted is something that we Photoshop artists must carefully plan and calculate. In order to achieve similar results, it is up to the digital artist to devise a process that mimics the techniques of the real-world approach. This process is outlined step-by-step within this chapter. So lower your chair, lean back, and let’s create an urban lowbrow masterpiece.
![]() The techniques used in this chapter are not overly complicated, but there is a lot going on here. A vast array of tools and features are used. You’ll explore everything from bitmap conversions to layer stacks, alpha channels, type layers, masks, groups, the Pen tool, native fi lters, and more. If anything within this chapter is remotely daunting, it is the quantity of techniques explored.
The techniques used in this chapter are not overly complicated, but there is a lot going on here. A vast array of tools and features are used. You’ll explore everything from bitmap conversions to layer stacks, alpha channels, type layers, masks, groups, the Pen tool, native fi lters, and more. If anything within this chapter is remotely daunting, it is the quantity of techniques explored.
What you’ll learn in this chapter
Creative Techniques and Working Methods
The importance of materials
As you work your way through the following pages, you’ll notice the inclusion of many real-world resources. When a dripping paint effect is required, we’ll opt for an actual photo of just the thing. Rather than a digital simulation, an appropriate paper scan is used to create an authentic unbleached parchment background. All of the primary elements are converted drawings or photos. The results are helped by the fact that no single element is entirely computer generated. By the time you finish this chapter, it will become obvious that if you want the finished result to feel real, it is best to begin with real-world resources.
Visualize puncture effects
Converted and adjusted black-and-white art is an infinitely useful tool when compositing. The usefulness of this as a resource extends beyond the obvious use as an image component on the canvas. By creating selections from the art and hiding regions of groups via masks based on the selections, you’ll learn to puncture holes in artwork that is composed of multiple layers, revealing the background layer beneath.

Intentionally compose within groups
The central primary elements within this image, the car, the figure, etc., are all contained within a single group. By treating the group as a self-contained collage within the greater scheme of the image, you can work on the content as an independent component. Then, after the fact, you’ll learn that the entire group can be integrated into the composition by simply altering the blending mode.

Photoshop Tools, Features, and Functions
Threshold method
Using bitmap mode’s threshold method is very effective. When you choose the threshold method, there are no halftone screens or patterns generated from the shades of gray within the image. The result is a simple, high contrast, black-and-white image.

Native filters
Another method for achieving high contrast is to use a couple of native filters that reside within Photoshop. The stamp and photocopy sketch filters can prove very useful when it comes to converting color and grayscale images and will help preserve a little detail where the bitmap conversion method will not.

Alpha channels
When it comes to incorporating converted components into the composition, we’d be nowhere if it weren’t for alpha channels. They provide unparalleled control and flexibility when it comes to creating custom selections from black-and-white data.

PART ONE: Building the background
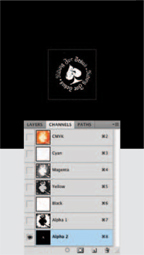
1 To get started, open up the bkd.jpg file from the CD. This will act as the background layer in our new working file. Next, open up the black-and-white heart.jpg file. Type Control(PC)/Command(Mac)-a to select all of the image contents and then type Control(PC)/Command(Mac)-c to copy the contents of the selection. In the bkd.jpg file, click on the Create New Channel button at the bottom of the Channels palette. With your new alpha channel targeted, type Control(PC)/Command(Mac)-v to paste the copied black-and-white image into your alpha channel. Click on the Load Channel as a Selection button at the bottom of the palette.
2 Return to the Layers palette and click on the Create a New Layer button at the bottom of the palette. Target your new layer and click on the Foreground Color swatch in the toolbar to access the picker. Choose a color similar to red brick and click OK. Type Alt(PC)/Option(Mac)-Delete to fill the active selection with the new foreground color. Leave the selection active and open up the redpaint.jpg file. Select the contents of the redpaint.jpg file and copy. Return to the working file with the active selection and choose Edit>Paste Into from the menu.

 Project files
All of the files needed to follow along with this chapter and create the featured image are available for download on the accompanying Web site in the project files section. Visit www.creativephotoshopthebook.com. However, do not feel restricted to using these files only. Feel free to follow along and incorporate background imagery and textures of your own as you work through the chapter. Also, rather than using the supplied outline art files, you can create your own outline art using the methods described earlier in either Chapter 5 or Chapter 6.
3 Use the Move tool to drag the contents of the layer up to the top of the canvas area. Ensure that the layer is targeted in the Layers palette and not the mask. Because the mask isn’t linked, it will remain in position as you move the layer contents. Change the layer blending mode to hard light and then duplicate the layer by dragging it onto the Create a New Layer button. Change the blending mode of your duplicate layer to soft light. With your current layer targeted, Shift-click on the layer directly above the background layer, targeting the top three layers. Type Control(PC)/Command(Mac)-g to add the targeted layers to a new group.
Mask your group
Punch a hole in your paint effects by using the contents of a new channel as the basis for a mask.
1 Open up the ace.jpg file. Select the contents of the file and copy them. Return to your working file and create a new alpha channel in the Channels palette. With your new channel targeted, paste the copied contents from the other file.
2 Click in the column to the left of the CMYK composite channel to enable its visibility. You will now see your alpha channel appear as a red overlay on top of the image. This will aid you in repositioning your pasted art.
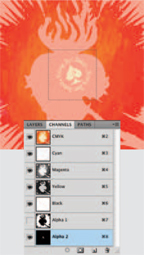
3 Position the pasted art within the paint area to the right. Load the channel as a selection and then target your group in the Layers palette. Choose Layer>Layer Mask>Hide Selection from the menu to mask this area of the entire group.

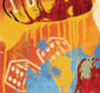
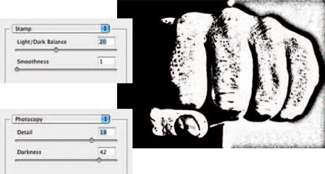
4 Open up the dice.jpg file. We’re going to use the photocopy filter here as it will produce a high-contrast result with a halo around the perimeter of the dice. The photocopy filter uses the current foreground and background colors to produce its results; so in order to create a black-and-white effect, we need to set the foreground and background colors to their default black-and-white state. Press the “ d ” key on the keyboard to set the foreground and background colors to their default state. Choose Filter>Sketch>Photocopy from the menu. Adjust the detail and darkness settings until your dice look something like this. Apply the filter.

Incorporate the dice
Place your converted dice into another channel and use the resulting selection to punch another hole in the paint.
1 Choose Image>Mode>Grayscale from the menu. Then, choose Image>Mode>Bitmap to access the bitmap conversion options. Choose 50% threshold as the method and leave the output set at the current resolution. This will vary depending upon the resolution you’re working at.
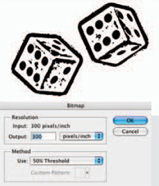
2 Click OK to convert your image. Then select the contents of the image and copy them. Return to your working file, create a new alpha channel, and invert it by typing Control(PC)/Command(Mac)-i. Paste your copied dice into the new, inverted channel.
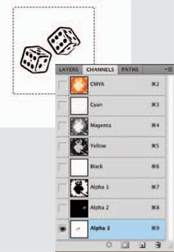
3 Enable the visibility of the composite channel. Position your selection contents to the left and then load the channel as a selection. Invert the selection by typing Control(PC)/Command(Mac)-Shift-i. Target the group’s mask in the Layers palette and fill the selection with black.

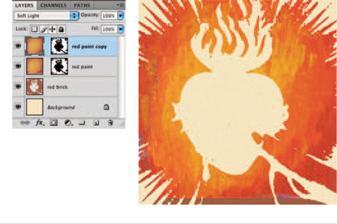
PART TWO: Introducing painted textures
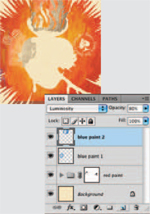
5 Deactivate the dice selection. Open up the bluepaint.jpg file and use the Magic Wand to select a range of blue color from within the image. Hold down the Control(PC)/Command(Mac) key and drag the selected paint into the working file as a new layer. Choose Edit>Free-Transform from the menu. Click and drag within the center of the bounding box to reposition the contents; then Shift-click and drag a corner point to resize the contents of the bounding box proportionately. Press the Enter key to apply the transformation. Reduce the opacity of the layer and change the blending mode to luminosity.

Finish the blue paint effect
Repeat the process of dragging selected regions of blue into the image and then add a solid blue background on an underlying layer.
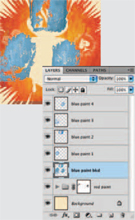
1 Return to the bluepaint.jpg file and use the Magic Wand to select another, different range of color. Again, hold down the Control(PC)/Command(Mac) key and drag it into the working file. Use Free-Transform to resize and position it; change the mode to luminosity and reduce the opacity.
2 Use this method to add a couple more layers from the same bluepaint.jpg file. Control(PC)/Command(Mac)-click on the thumbnail of one of these layers to generate a selection from the contents. Then Control(PC)/Command(Mac)-Shift-click on the remaining blue paint layer thumbnails to add them to the selection.

3 Create a new layer and drag it below all of these new layers in the Layers palette. Choose a light blue foreground color from the picker and use it to fill the active selection on your new layer. Deactivate the selection.
PART THREE: Adding the main components
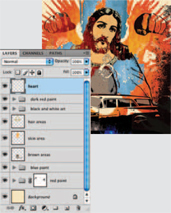
6 Target all of the blue paint layers and group them in the Layers palette. Open up the figure. jpg file. This file, like the original heart.jpg file, has been prepared ahead of time. Both images were converted to grayscale and then converted to bitmap mode, as you did previously to convert the dice after the photocopy filter was applied. Use the Move tool to click anywhere on the image and drag it into the working file as a new layer. Reposition the layer contents toward the upper left of the canvas. Drag the new layer to the top of the stack in the Layers palette.

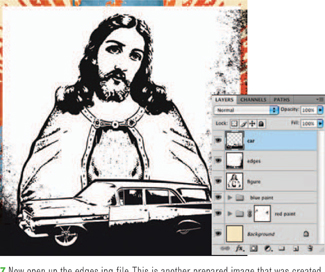
7 Now open up the edges.jpg file. This is another prepared image that was created by converting poor quality scans of photocopied pages to bitmap mode. If you like this sort of look, be sure to read where photocopy effects are explained in greater detail. Use the Move tool to drag the edges.jpg image into the working file as a new layer. Position the layer so that it touches the top of the canvas and change the blending mode to multiply. Open up the car.psd file and drag it into the working file as a new layer. Position the car layer at the bottom of the canvas.
 The conversion process
In order to convert an image to bitmap mode, it must be converted to grayscale first. After you convert your image to grayscale, it is a good idea to examine the overall contrast within the image. Perform any tonal adjustments you think will be necessary for a successful conversion while you’re working in grayscale. Once you’ve got things looking the way you want them, then go ahead and convert the image to bitmap mode. Once the image is in bitmap mode you cannot perform any tonal adjustments, so remember to make any adjustments while you are in grayscale mode.
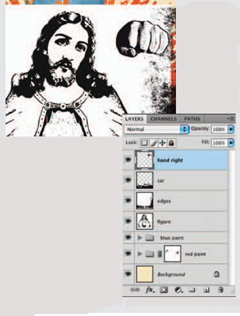
8 Open up the righthand.jpg file. Duplicate the background layer and ensure that the foreground and background colors are set to black and white. Target the bottom layer and then choose Filter>Sketch>Stamp from the menu. Adjust the sliders so that there is a good balance between contrast and detail. Click OK to apply the filter and then target the top layer that is hiding the effect. Now choose Filter>Sketch>Photocopy Apply a fairly dark photocopy effect and then change the blending mode of this layer to multiply. Choose Layer>Flatten from the menu to flatten the image.
Incorporate hands into the design
Add the selected hand to your working file; then repeat the entire process to alter and then add the other hand as well.
1 Select the Pen tool, ensure that it is set to create paths, and that the Add to Path Area option is enabled in the Tool Options bar. Draw a closed path component that surrounds the hand and includes a bit of the perimeter.

2 In the Paths palette, click on the Load Path as a Selection button. Copy the selected contents and return to your working file. Paste the copied art into the file as a new layer and use Free-Transform to adjust size, rotation, and position.
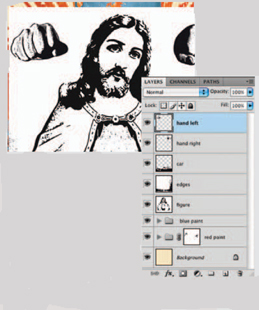
3 Open up the lefthand.jpg file and repeat the process. Apply filters to the original background and duplicate layers. Flatten the file and encircle the hand with a path. Load the path as a selection and copy. Paste the art into the working file and transform the layer contents.
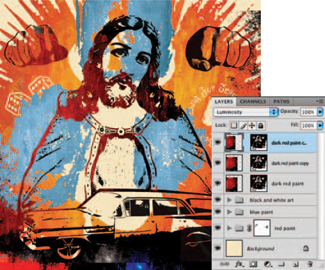
9 Target all of these black-and-white layers and add them to a new group within the Layers palette. Ensure that the new group is targeted in the Layers palette, and set the blending mode of the group itself to multiply. Now that you can see the entire composition clearly, select the Magic Wand tool. Disable the Contiguous option, and then enable the Sample All Layers option in the Tool Options bar. Leave the tolerance set at the default value of 32 and click on a black area of the canvas. This will select all visible areas of the same black color.

10 Open up the darkred.jpg image. Select and copy it. Return to your working file and, with the current Magic Wand selection active, choose Edit>Paste Into from the menu. Use the Move tool to reposition the contents of the layer toward the left of the canvas. Change the blending mode of the layer to hard light. Duplicate the layer. Target your newly duplicated layer and now duplicate it too. Target the second duplicate layer and use the Move tool to move the layer contents upward and to the left a little more. Change the blending mode of the layer to luminosity.
 Gathering resource materials
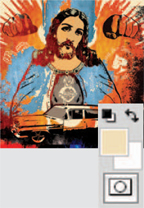
When collecting resource materials to use within your urban art illustrations, primarily main image components, bear in mind the conversion process. The image of Jesus is a photograph I took of a mural painted onto the side of a religious supply store. I knew it was an ideal candidate for conversion because, although the original was in color, there was enough contrast between the outline and fill colors to indicate that conversion to black and white would be successful. And although the low-rider car is a photo of an actual car, I examined the image and found that the same qualities were present. It is important to look for areas of preexisting contrast in your photographs or scans to ensure that the image contains detail and is properly represented when you convert to bitmap mode.
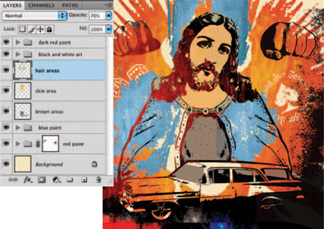
11 Target all of the dark red paint layers in the Layers palette and group them. Use the Pen tool to create path components outlining areas like the car windows and the front of his gown. Generate a selection from the path and fill the active selection with brown on a new layer. Drag the layer down beneath the group that contains the black-and-white artwork in the Layers palette. Reduce the layer opacity slightly, revealing some of the painterly texture beneath. Use this same method again to add color into his skin and hair on other layers beneath the group containing the black-and-white art.
PART FOUR: Bitmaps and type layers
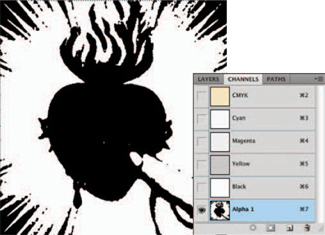
Add the heart
A scanned drawing, converted to bitmap mode, provides the basis for the heart-shaped selection within a new alpha channel.
1 Open up the sacredheart.jpg file. Choose Image>Mode>Bitmap from the menu. Use the 50% threshold method and then invert the image. Copy the inverted bitmap and create a new alpha channel in your working file. Paste the copied art into the channel.

2 Load a selection from the channel and then create a new layer in the Layers palette. Drag your new layer to the top of the stack in the Layers palette. Fill the active selection with a light beige foreground color on the new layer.
3 Deactivate the selection and then use the Move tool to reposition the contents of the layer so that the heart is sitting directly on top of his chest area. Keep the foreground color set to the same beige and select the Horizontal Type tool.
12 Click on the hand at the right to add a text insertion point in that area of the canvas. Type the word “ hate ” and press the Enter key. Try to select an appropriate font from the available fonts in your system that are listed in the Tool Options bar. Also enter a sufficient size to cover the hand as shown here. Choose Edit>Free-Transform from the menu. Click and drag outside of the bounding box to rotate it and then place the type directly over the knuckles. Press Enter to apply the transformation and then use the same method to add the word “ love ” across the knuckles of his other hand on another type layer.

PART FIVE: Additional paint effects
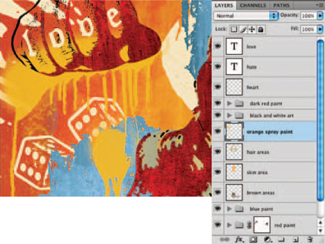
13 Open up the spraypaint.jpg file. Use the Lasso tool to draw a rough selection containing some of the dripping paint and copy it. Create a new alpha channel in the working file and paste the copied paint into it. Generate a selection from the channel and create a new layer in the Layers palette. Fill the active selection with a new, bright orange foreground color. Deactivate the selection and use Free-Transform to resize the contents of the new paint layer. Position it over the hand at the left and drag the layer beneath the group that contains the black-and-white art.
 No fonts, no problem
You may find that you’re lacking an appropriate font on your system for the love and hate knuckle tattoos in your illustration. If this is the case, worry not, there are plenty of appropriate fonts out there on the Web. Simply do a search for gothic free fonts like I did here, and you’ll find numerous hits offering a vast number of appropriate fonts available for free personal use.
14 Use this method to add dripping paint clusters on a variety of layers in different colors. Explore different positions on the canvas as well as within the Layers palette hierarchy. Repeat the entire procedure using the brushy.jpg file and the overspray.jpg file as the resources for new alpha channel – based selections. Load the channels as selections and fill the selected regions with color to produce similar effects in different colors on a variety of layers. Vary the position of your layers but ensure that they remain below the black artwork group in the Layers palette.

 Don’t stop there
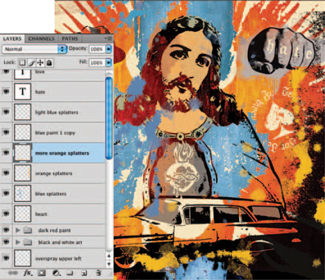
Take a good look at your file. It contains numerous layers and alpha channels. You do not have to limit yourself to stopping because the illustration is complete. There are endless opportunities when you consider the resources available within the file. For instance, I duplicated one of the blue paint layers, changed the blending mode to overlay, and increased the opacity to 100%. After that, I dragged it out of the group and closer to the top of the stack within the Layers palette. Finally, I moved it down to the bottom of the canvas. This is just one very simple example of what can be done. Have some fun and experiment with what else you can do within the file.
15 Now, use the splatters.jpg as the resource for an alpha channel – based selection. Again, fill the selection with a variety of colors on different layers. Move them up or down within the palette, transform and reposition the layer contents as necessary. Feel free to duplicate and perform transform operations on your new layers as well as existing paint layers.
Don’t limit yourself in terms of subject matter
This technique lends itself to any subject, so don’t feel limited to traditional lowbrow subject matter and iconography. Here you can see that the effect is equally as compelling when applied to a more esoteric theme like ancient stone monuments. Feel free to take the methodology explained here and apply it to any subject of your own choice.
