
Chapter 7
Retro Art Effects
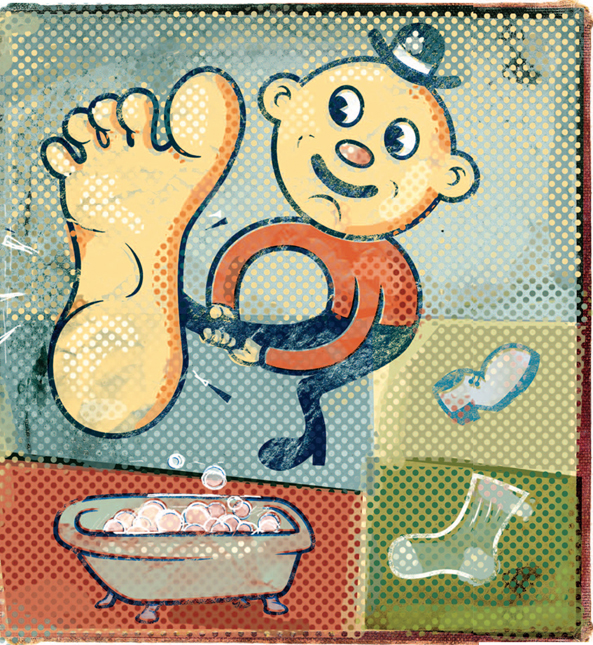
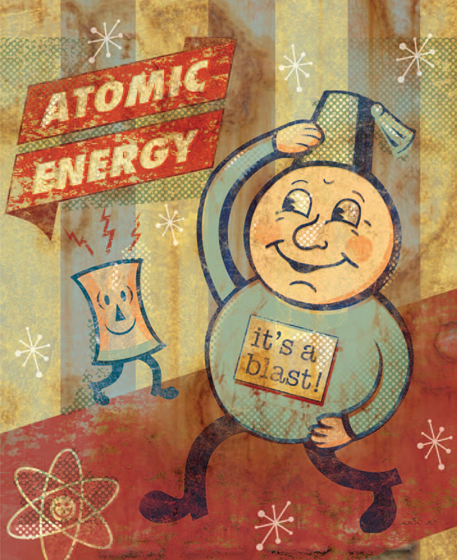
There is a certain quality to vintage pop art that usually makes me smile. I am not sure whether it is the perpetually happy and whimsical figures, the coarse halftone patterns and inferior printing, or the gaudy combinations of color. But there is something about that 1950s drive-in style, “everything-is-wonderful” advertising art that is genuinely unique and strangely optimistic.
From a Photoshop artist’s perspective, perhaps a major part of the appeal is just how different it is than most contemporary digital art. As far as execution goes, printed retro art was generally done on the cheap. Registration didn’t always match up so well, colors overlapped, and halftone screens were overly large. Age is almost certainly another contributing factor to the appeal. Whether the artwork was part of a sign that has spent 40 odd years outdoors or on an old cardboard box that has been sitting in a mothball-ridden attic, the signs of age are always evident. Areas of color become worn, and printed inks will eventually display numerous scrapes and scratches.
Photoshop is a tool that allows us to achieve absolute perfection in almost anything we set out to do. However, in this chapter, I really want to draw your attention to the fact that Photoshop is an extremely useful tool when it comes to methodically reproducing imperfection. Retro art’s simplicity of design, rough and imperfect execution, and whimsical nature is a breath of fresh air for those of us who could use a break from the seriousness and perfection of working digitally day to day.
![]() In addition to working with layers, groups, and layer masks, this chapter will venture into the realm of alpha channels and innovative selection methods. Although everything is clearly explained, some users simply find the concept of alpha channels daunting.
In addition to working with layers, groups, and layer masks, this chapter will venture into the realm of alpha channels and innovative selection methods. Although everything is clearly explained, some users simply find the concept of alpha channels daunting.
What you’ll learn in this chapter
Creative Techniques and Working Methods
Recognizing suitable resources
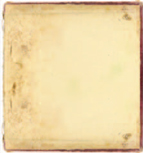
Something as simple as the background you use can be integral in setting the tone for your illustration. Here, a weathered and torn library book succeeds on a number of levels. First, the ragged imperfection of the edges reinforces the feeling of imperfection inherent within retro imagery. Second, the natural and organic color of the paper gives the image a more human feel, grounding it in the natural world as opposed to the digital realm. As you work your way through this chapter it will be hard to ignore the fact that these factors, along with the style of the artwork itself, help to create a convincing effect. You’ll develop a sharp eye for recognizing the potential in what will be useful background elements in future retro compositions.
Analysis of common textures
The primary distress effects applied to the artwork are the result of a couple of desktop scans. An unlikely resource was a common slate tile. It was scanned and then converted to grayscale for inclusion within an alpha channel. After you load the channels as selections and use them to mask groups of layers, simulating wear and tear, the potential within everyday textures becomes quite evident. You’ll begin to look around you and envision common objects as textures, analyzing the light and dark potential within and visualizing the masked results that can be achieved.

Photoshop Tools, Features, and Functions
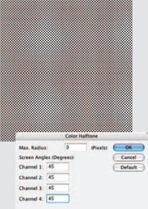
Color halftone filter
You can do a lot more with the color halftone filter than simulate the effect of CMYK printing under a microscope. If you carefully arrange the screen angles so that they line up nicely, you can create a beautiful and smooth dot pattern that acts as a valuable resource.

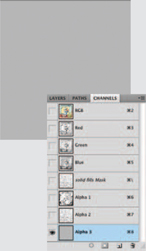
Alpha channel content
When you create a color halftone pattern in an alpha channel, it acts as a convenient and permanent resource to load as a selection border at any point. Learning to create art within channels for the sole purpose of using as selections is something that will benefit you in all manner of projects, not just retro art imagery.
PART ONE: The background and outline art
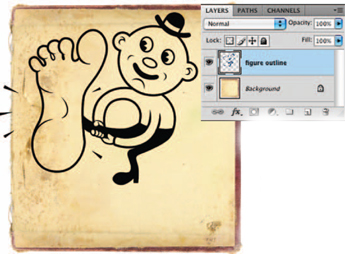
1 Open up the background.jpg file. This is a desktop scan of the inside cover of an old library book. You can substitute this background image with one of your own if you like. If you decide to go this route, try and choose something that conveys a bit of age, distress, and imperfection like this image does. Next, open up the figure.psd file. Use the Move tool to click on your figure and drag it into the background file as a new layer. Drag the contents of the new layer to the upper left of the book cover on the canvas.
 Project files
All of the files needed to follow along with this chapter and create the featured image are available for download on the accompanying Web site in the project files section. Visit www.creativephotoshopthebook.com.
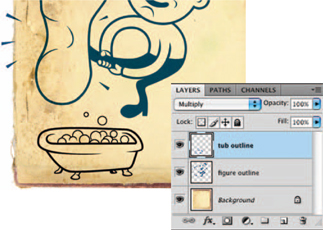
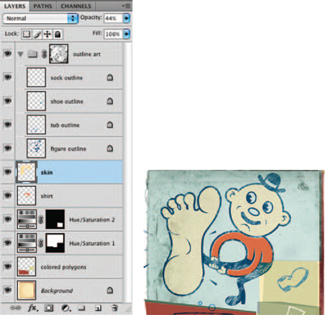
2 Click on the Foreground Color swatch in the toolbar to open the picker. Choose a dark blue color from the picker and click OK. With your newest layer targeted, enable the Lock Transparent Pixels option in the Layers palette. Type Alt(PC)/Option(Mac)-Delete to fill the solid pixels on the current layer with your new foreground color. Change the blending mode of the layer to multiply. Next, open up the tub.psd file. Again, use the Move tool to drag it into your working file as a new layer. Position it beneath the figure on the canvas.
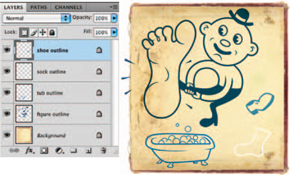
3 Lock the transparency of the tub layer and then fill it with a slightly lighter blue foreground color. Change the blending mode of the layer to multiply and reduce the opacity a little. Open up the shoe.psd file and drag it into your working file as a new layer. Position it to the right of the figure, lock the transparency, and fill the layer with a very light blue foreground color. Repeat this same process one more time to add the sock.psd art to the file as a new layer. Fill the sock with a very light, off-white color.
PART TWO: Distress the outlines
Create a texture channel
Use a desktop scan of an ordinary slate tile to create a new alpha channel that will assist in ageing your outline art.
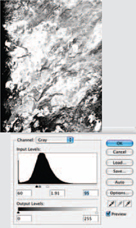
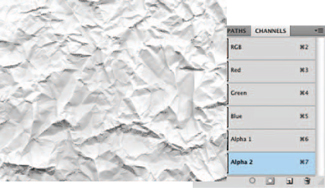
1 Open up the slate.jpg file. Choose Image>Mode>Grayscale from the menu to remove the color information from the file. After converting to grayscale mode, choose Image>Adjustments>Levels and perform a very drastic input levels adjustment, like the one shown here.
2 Choose Select>All and then Edit>Copy from the menu. Return to your working file. In the Channels palette, click on the Create New Channel button. Target the new channel and choose Edit>Paste from the menu. Feel free to use the Move tool to reposition the pasted contents.

3 Click the Load Channel as a Selection button at the bottom of the Channels palette. Target all of your outline art layers and type Control(PC)/Command(Mac)-g to group them. With the current selection active, click on the Add Layer Mask button to mask the group.

PART THREE: Solid regions of color
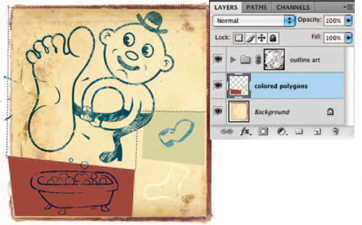
4 Type Control(PC)/Command(Mac)-Shift-n on the keyboard to create a new layer. Drag the layer beneath the group in the Layers palette and select the Polygonal Lasso tool. Use the Polygonal Lasso to draw a shape that surrounds the bathtub on your new layer. Select a deep red foreground color from the picker and fill the selection with it. Repeat the same procedure to create a green polygonal shape on this layer that surrounds the shoe. Now use the Polygonal Lasso tool to draw an irregular shaped selection that surrounds the top portion of the background.
5 With the current selection active, create a new hue/saturation adjustment layer by clicking on the Hue/Saturation button in the Adjustments palette. Adjust the hue to +111 and reduce the saturation by 76. This creates a hue/saturation adjustment layer with a mask based upon your selection border. Now use the Polygonal Lasso tool to draw a selection border around the sock area. Again, create a new hue/saturation adjustment layer. Set the hue to +21 and reduce the lightness to −29.

 Editing masks
You can reintroduce any masked areas by adding white into those areas when your layer mask is targeted in the Layers palette. If too much of your group is masked by your channel-based mask, go ahead and paint white over those areas with a soft paintbrush and a white foreground color to make them visible again. You can also reduce the areas affected by your hue/saturation layer masks by targeting the mask and then filling a selected area with black, hiding the effect in that area.
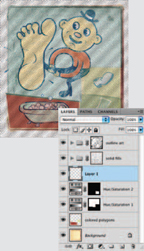
6 Expand your group and target the figure outlines layer in the Layers palette. Select the Magic Wand tool. Ensure that the Contiguous option is enabled and that the Sample All Layers option is disabled in the Tool Options bar. Leave the tolerance set to the default value of 32, and click in the figure’s empty shirt area that is surrounded by outline art. With your new selection active, create a new layer and drag it beneath the expanded group in the Layers palette. Fill the active selection with a lighter red foreground color and deselect.

 Nudging
You can use the Move tool to reposition the contents of any layer on the canvas; however, sometimes you may only want to adjust the positioning of something by a few pixels. When you just want to give the contents of your targeted layer a gentle nudge in a certain direction, first select the Move tool. Then try using the arrow keys on the keyboard instead of clicking and dragging the Move tool. The arrow keys make performing very subtle movements an effortless procedure.
7 Use the Move tool to click and drag a little, offsetting the registration so that the fill color of his shirt doesn’t match up with the outline. Again, target the figure outline layer and this time, click in the face area to select it. Then hold down the Shift key and click inside the other areas of skin like his foot, hands, etc. This will add all of these areas to your selection. Create another new layer beneath your group in the Layers palette. Fill the active selection with a flesh-colored foreground color and deselect. Reduce the opacity of the layer to 44%.
PART FOUR: Distress the solid areas
8 Duplicate the layer by dragging it onto the Create a New Layer button at the bottom of the Layers palette. Increase the opacity of the duplicate layer to 100% and use the Move tool to offset the position slightly on the canvas so that the color appears to be out of register. Repeat this method of selecting areas with the Magic Wand, filling the selections with different colors on new layers, and offsetting the registration, filling all of the outline art. Fill the remaining areas of the figure outline layer and also fill the outlined areas indicated by the other outline art layers.
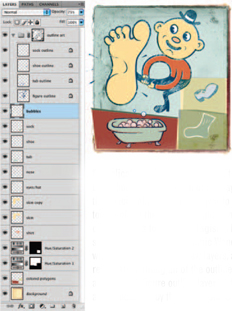
9 Target all of the individual layers that you created, which fill the outlined areas of your artwork, and add them to a new group in the Layers palette. Open up the crumpled.jpg file. Type Control(PC)/Command(Mac)-a to select all and then type Control(PC)/Command(Mac)-c to copy. Once you’ve copied the crumpled paper image, return to your working file. Create a new alpha channel in the Channels palette. Target the channel and then type Control(PC)/Command(Mac)-v to paste the crumpled paper image into the new channel. Load the new channel as a selection.
 Hide a mask
When you mask a layer or group while a selection is active you’ll immediately see the results, as all areas that lie outside of your currently active selection border are masked. Sometimes you may feel that the result is too drastic, and perhaps you want to unmask some currently masked areas to reveal layer contents hidden by the mask. Often, it can be difficult to visualize which areas you want to reveal because they are masked and therefore not visible. However, there are a few ways to remedy this. You can temporarily hide a layer mask by holding down the Shift key and clicking on it in the Layers palette. The mask thumbnail will be covered with a red “ x. ” This will allow you to see your unmasked layer so you can decide which regions need to be revealed. Then, Shift-click on the mask thumbnail to make it visible again and edit the mask’s contents.
In CS4, you can hide the mask by clicking on the visibility icon at the bottom of the Masks palette as well. In addition to simply hiding the mask, the density slider in the Masks palette will allow you to reduce the opacity of it, making it partially visible if you like.
10 Target the new group containing your filled area layers in the Layers palette. With the current, channel-based selection active, click on the Add Layer Mask button at the bottom of the Layers palette to mask the group. Masking this group while the crumpled paper–based selection is active will add a nice, subtle distress effect to all of the filled area layers within the group.
PART FIVE: Halftone effects
Create a halftone screen pattern
Clever use of the Color Halftone filter within a new alpha channel allows us to create and store a dot pattern, which can then be loaded as a selection border.
1 Create a new alpha channel in the Channels palette. With this new channel targeted, click on the Foreground Color swatch in the toolbar and select a light gray foreground color from the picker. Then type Alt(PC)/Option(Mac)-Delete to fill the entire channel with it.
2 Choose Filter>Pixelate>Color Halftone from the menu. Enter a maximum radius of 9 pixels and set the screen angles of all four channels to 45°. This will convert the gray contents of your alpha channel to a black-and-white dot pattern.
3 Load the alpha channel as a selection and return to the Layers palette. With your current selection active, create a new layer and place it beneath both of your groups, yet above the adjustment layers, in the Layers palette.
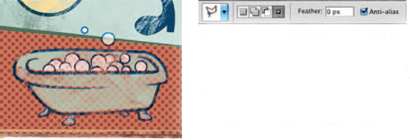
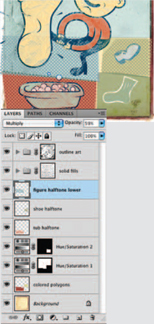
11 With your new layer targeted and the current selection active, select the Polygonal Lasso tool. In the Tool Options bar, click on the Intersect with Selection button. Draw a very rough polygonal selection that overlaps the red background behind the bathtub on the canvas. When you close your polygonal selection, you’ll immediately see the results of using the Intersect option. Only areas where your two selection borders overlap remain selected. Fill the resulting selection with a light red color and deactivate the selection. Reduce the opacity of the layer slightly.
Create halftone backgrounds
Use the halftone channel alongside the Polygonal Lasso’s Intersect function to create and fill a series of dotted backgrounds for your line art.
1 Load the channel as a selection again and use the Polygonal Lasso to create a selection border behind the shoe that intersects with the channel-based selection. Fill the area with green on a new layer. Repeat this process to add a light blue pattern behind the lower portion of the figure.
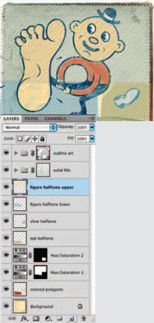
2 Load the halftone channel as a selection again and this time, choose Select>Inverse from the menu. Again, use the Polygonal Lasso to draw a selection border intersecting the area behind the upper portion of the figure. Fill the selection with gold on a new layer.
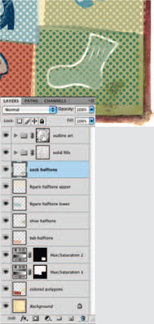
3 Use this same method to load the channel as a selection, invert it, and draw a polygonal selection that intersects the selected area behind the sock. Fill the resulting selection with green on a new layer. Deactivate the selection.
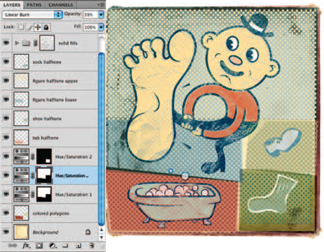
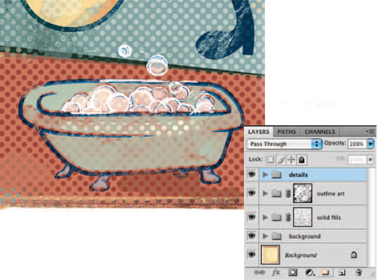
PART SIX: Embellish and organize
12 Now that the composition is beginning to take shape, let’s take a moment and look at things that require a bit of refining to enhance color and contrast overall. Because this file is built as separate layers, performing alterations is easy. First, change the blending mode of the hue/saturation layer that affects the area behind the sock to multiply. Next, change the blending mode of the halftone layer behind the lower portion of the figure to multiply and reduce the opacity. Finally, duplicate the other hue/saturation adjustment layer, change the blending mode to linear burn, and reduce the opacity considerably.
 Halftone density
When creating halftone patterns within channels, screen density depends upon the value of the grayscale shade you’re converting. Here, a light gray converted to a halftone produces a dot pattern in which the dots do not touch and are surrounded by white space. If you were converting a very dark gray, there would be light-colored dots, surrounded by areas of black. Try to envision the density of dot pattern you want to create before you fill your channel with a grayscale value; this will help you choose the right shade of gray and ultimately ensure that you get the selection you want from it.
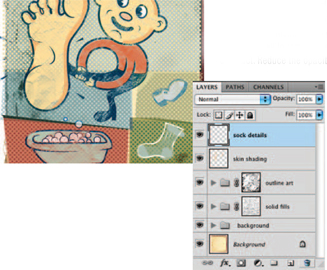
13 Target all of the halftone layers, adjustment layers, and areas that contain solid-colored polygons. Add all of these background-affecting layers to a new group within the Layers palette. After you do this, create a new layer and drag it to the top of the stack within the Layers palette. Select the Brush tool and choose a hard, round Brush preset from the Brush Preset picker in the Tool Options bar. Choose a dark flesh foreground color from the picker and paint some shading onto the figure’s skin on your new layer.

14 Keep this layer targeted in the Layers palette and expand the group that contains your outline art. Control(PC)/Command(Mac)-click on the figure outlines layer thumbnail to generate a selection from its contents. Press the Delete key to remove these areas from your currently targeted layer and deselect. Reduce the opacity of the layer to 61%. Use this same method to paint some details into the sock area on a new layer. Then load the sock outline layer as a selection and delete any painted contents of the selected area on your sock detail layer. Deselect and collapse the expanded group.
15 Return to the Channels palette and load your halftone channel as a selection once again. Invert the selection and create a new layer at the top of the stack in the Layers palette. Choose a darker flesh foreground color than the one you used previously. Paint over shaded areas of his skin within the active selection on the new layer to add darker, halftone shading effects. Next, switch the foreground color to an extremely light flesh color, almost white. Paint within the selection to add highlight areas onto this skin, nose, and hat.

 Viewing layer masks
Although the layer mask thumbnail in the Layers palette provides you with a small preview of the mask’s content, it is very small and you can’t always see the subtle paint effects that reside within your mask. If you hold down the Alt(PC)/Option(Mac) key while you click on your layer mask thumbnail, it will become visible on the canvas, exactly like you’d see it if you made it visible while hiding the composite channel in the Channels palette. This is a quick method to have a look-back at how you’ve edited your masks. Alt(PC)/Option(Mac)-clicking on the mask thumbnail again hides the mask and returns the canvas to normal.
16 Use a variety of colors to paint over various areas of this layer to add shading and highlights within the active selection. Increase and decrease the brush diameter as necessary. Also, try reducing the opacity of your brush and painting over areas of the background to introduce different colors into already existing dot patterns. When you’re finished, invert the selection and continue to paint on the current layer until you’re satisfied with the results. Deselect.

 Inverting keyboard commands
Carefully pay attention to the keyboard commands you use when inverting. You can either invert an image or invert an active selection. Always remember that the keyboard shortcut for inverting an image is Control(PC)/Command(Mac)-I and that for inverting a selection is Control(PC)/Command(Mac)-Shift-I. Remembering when and when not to hold down the Shift key while using these keyboard shortcuts is essential to performing the correct operation each time.
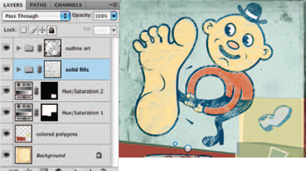
17 Open up the drawing.jpg file. Type Control(PC)/Command(Mac)-I on the keyboard to invert the image, creating negative of the original. Select all and copy. Return to your working file and create a new alpha channel in the Channels palette. Ensure that your new channel is targeted, and paste the copied, inverted image into your alpha channel. Load the channel as a selection.
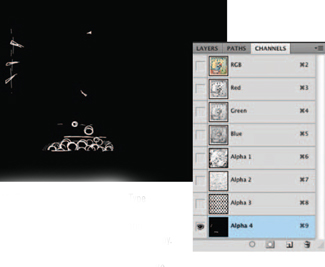
18 Create a new layer at the top of the stack in the Layers palette. Set your foreground color to white and fill the active selection with white on the current layer. Deactivate the selection and use the Move tool to position the contents of the layer so that the drawn bubbles nicely overlap the bubbles on the tub outline layer below. Target the top four layers that provide the painted, drawn, and halftone details, and add them to a new group in the Layers palette.
The secrets of successful retro art
Let’s take a final look at some of the essential techniques required to produce convincing vintage artwork.
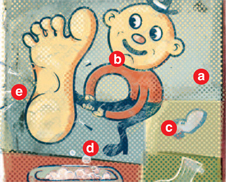
a Starting with an appropriate background image is always helpful. Here an old library book was used, but it can be anything that has a nostalgic feel to it. A background image or texture with an authentic feel will prove much more successful than a flat, solid-colored canvas.
b Using alpha channels as the basis for selections, which are in turn used to mask groups, is an excellent way to create convincing wear and distress. Using appropriate imagery within your channels is very important. Try to choose images containing random patterns and textures, as realistic wear and tear is never orderly.
c Moving layers that contain fill colors offsets the registration between outlines and solid color fills. This poor registration is a telltale sign of quick and dirty printing, resulting in a distinct look that is about as far away from digital technology as you can get.
d The halftone screen effect tends to dominate the overall composition in terms of stylistic methods used. It really adds an authentic feel to the finished art, reminiscent of vintage printing methods.
e Incorporating scanned ballpoint pen art into the composition adds a scratchy, hand-drawn feeling, which contributes to the nondigital overall feel of the illustration.
Incorporating type into your design
Working within the framework described in this chapter allows you to create convincing retro art effects time and time again. However, don’t feel limited to illustration only when using this technique; this is an excellent method for working with typographical elements as well. A little distress and halftone pattern here and there within your letterforms will make them feel right at home in your retro compositions.
Other type-integration methods

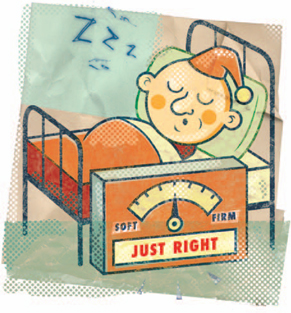
Feel free to get a little creative when adding typographic components to your retro imagery; you aren’t strictly limited to the Type tool. In the top image I used a ballpoint pen to draw the Z’s, giving the image a tactile and whimsical charm. In the bottom image, I actually cut out a series of letters from an old newspaper and placed them in the image after scanning. The yellow paper and naturally distressed ink of the scanned letters add to the convincing retro effect.