Chapter 3
Graffiti Spray Paint Art

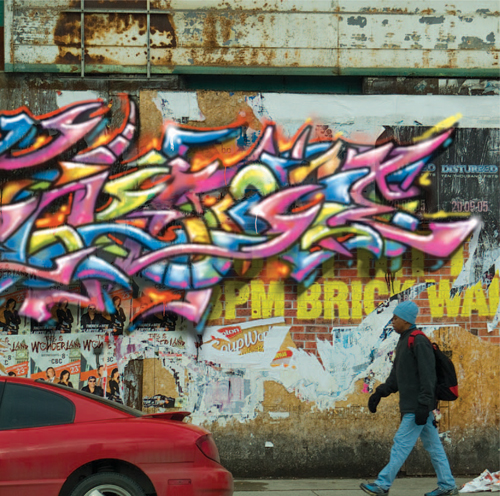
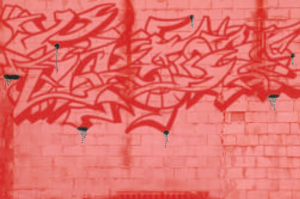
To create realistic graffiti art, you no longer have to hit the streets with a backpack full of spray cans, looking for that secluded area where you won’t get caught. You don’t need to place yourself at the mercy of the elements, and you don’t need to break the law. All that you need these days is a digital photo, a scanned drawing of your plan, and a little Photoshop know-how.
Photoshop offers all of the tools necessary to add innovative digital graffiti to any photographed scene. Brushes, selections, and layer blending modes are essential Photoshop tools to get the job done. In this chapter, the standout features are the Brush tool’s Airbrush option and flow settings. Above all other features, these are key ingredients in producing convincing graffiti art. These two features give the Brush tool its authentic spray paint feel and allow you to produce convincing spray paint results.
However, in order to make things feel real, you’ll also need to incorporate some real-world imperfections. While producing real spray paint art, you get annoying drips littering your masterpiece when you apply too much paint to a single area at once. And although this imperfection is something you’d try to avoid in the real world, here, in the digital realm, this imperfection is required to lend authenticity to your art.
For the authentic spray paint look, you’ll need to incorporate the real thing. In this particular case, I’ve incorporated some basic paint drips, done traditionally, into the digital composition, giving it an authentic feel. And rather than creating a digital backdrop for the graffiti art, it is painted directly on top of a photo of a bare wall, using layer blending modes to make it look as if it really belongs there. So remember, when creating realistic graffiti in Photoshop, it is not just paint techniques that you’ll need to employ but innovative image composition methods as well.
![]() A basic understanding of the Brush tool and Layers palette will make this chapter easier for you. Experience in painting with a mouse will be your greatest asset here, as the most difficult part will be actually producing the strokes that you intend to make. It takes practice. If you’re a pressure-sensitive tablet user, the process will be less cumbersome, as painting with a mouse can feel unintuitive at times.
A basic understanding of the Brush tool and Layers palette will make this chapter easier for you. Experience in painting with a mouse will be your greatest asset here, as the most difficult part will be actually producing the strokes that you intend to make. It takes practice. If you’re a pressure-sensitive tablet user, the process will be less cumbersome, as painting with a mouse can feel unintuitive at times.
What you’ll learn in this chapter
Creative Techniques and Working Methods
Combining digital with tactile
Something as small as the inclusion of actual paint drips can have an immense effect on how authentic the work seems at the end of it all. It is very important to exercise a little forethought when you set out to do something like this. Knowing that I was going to be spraying paint digitally, and knowing that I could get that paint to build up naturally, I knew that I wanted it to drip. Now, there is no gravity in Photoshop, so creating dripping paint would have to be done in the real world or carefully faked digitally. Although this is a common theme that pops up again and again throughout this book, it is very important to mentally prepare yourself for the task at hand.
Pre-Photoshop preparation
Simply put, think about what you’re going to do ahead of time. Get everything together and then launch Photoshop. As you work your way through this chapter and get to the dripping paint part, it will become clear that spraying these drips on paper ahead of time was the best and most efficient method to create a realistic effect. You’ll develop an understanding of the importance of preparation as well as how very small details can be the deciding factor in whether or not your artwork appears genuine.
Photoshop Tools, Features, and Functions
 Airbrush capabilities
This feature does not get enabled often. But for this chapter, we wouldn’t be able to live without it. It allows the brush to deposit paint the way a spray can would. There is an endless stream when you hold the button down and the movement of the mouse directly affects how much paint is deposited in a given area.
 Opacity and flow
Using these two Brush tool options together allows you to customize how paint is deposited by your virtual airbrush. The numbers you enter in these fields will have an immense effect on how natural your sprayed strokes appear.
PART ONE: Preparing the wall
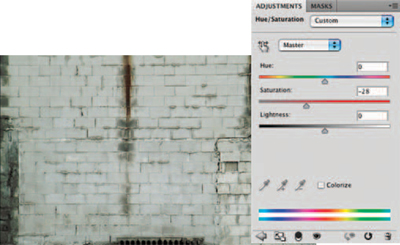
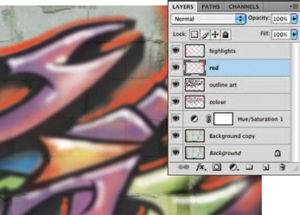
1 Open up the wall.jpg file. This will act as your background for the image and this file will become the bottom layer of our multilayered working file. The first thing you notice about the wall is that the darker details are not pronounced enough. Perhaps the original photograph was a little overexposed. To remedy this, drag the background layer onto the Create a New Layer button at the bottom of the Layers palette to duplicate it. Target the duplicate layer and change the blending mode of the layer to linear burn. Reduce the opacity of the layer to 67% so that the burn effect isn’t overpowering.
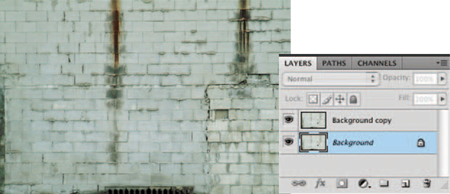
2 In order to make the painting stand out even more, let’s reduce the amount of color in this already very neutral-feeling background. Click on the Create New Fill or Adjustment Layer button at the bottom of the Layers palette to access the pop-up menu of Adjustment and Fill Layer options. Choose Hue/Saturation from the list to create a new hue/saturation adjustment layer. Another method for creating a hue/saturation adjustment layer is to click on the Hue/Saturation button in the Adjustments panel. The method you choose to create the hue/saturation adjustment layer doesn’t matter. In either case, reduce the saturation by around 28 in the Adjustments panel to remove color from the underlying layers. Click OK.
 Project files
All of the files needed to follow along with this chapter and create the featured image are available for download on the accompanying Web site in the project files section. Visit www.creativephotoshopthebook.com.
PART TWO: Black outlines
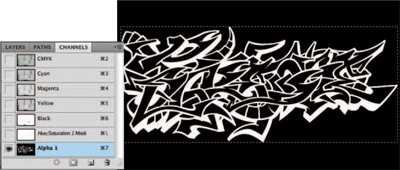
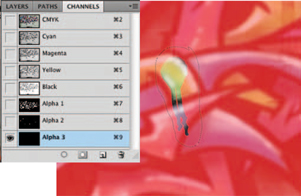
3 Open up the drawing.jpg file. Choose Image>Adjustments>Invert from the menu to convert the artwork to a negative. Type Control(PC)/Command(Mac)-a to select all and then type Control(PC)/Command(Mac)-c to copy the selected image. Return to your working file and navigate to the Channels palette. In the Channels palette, click on the Create New Channel button at the bottom of the Channels palette to create an empty alpha channel. Target your new alpha channel and type Control(PC)/Command(Mac)-v to paste the copied art into your new channel.
 Go your own way
The black-and-white art here is a very sharp and finely tuned piece of artwork. However, what makes every graffiti artist unique is his or her style of drawing. Feel free to carefully draw your own black-and-white artwork and substitute it for the one used here. There is no part of the process more appropriate to expressing your individual style than the black-and-white art stage. You can create any subject you like, but try to make it a nice, sharp piece in solid black and solid white. This will help to keep the channel clean, resulting in a nice, clearly defined selection border.
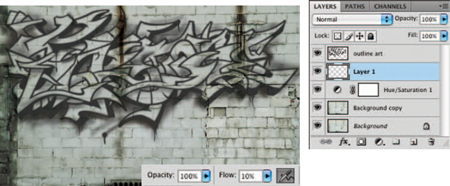
4 Ensure that the new channel remains targeted and then click on the Load Channel as Selection button at the bottom of the Channels palette. Return to the Layers palette and click on the Create a New Layer button to create a layer at the top of the stack within the palette. Press the “ d ” key to set your foreground color to black. Then, ensure that your new layer is targeted and type Alt(PC)/Option(Mac)-Delete on the keyboard to fill the current selection with black on the new layer. Type Control(PC)/Command(Mac)-d to deactivate the selection.
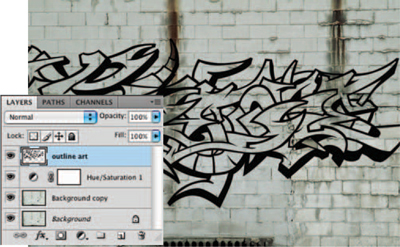
5 Use the Move tool to position the layer contents a little higher on the canvas. Change the layer blending mode to multiply and then reduce the opacity of the layer to 75%, providing a hint of transparency. With your black outline layer targeted, choose Filter>Blur>Gaussian Blur from the menu. Enter a radius setting that softens the edges of your black line work. Softening the edges, combined with the layer blending mode of multiply, is what will give the art on this layer the appearance of being sprayed onto the wall. Be careful not to soften the edges too much, you still want your artwork to look like something.

 Inverting images
Because you are pasting black art on a white background into an alpha channel, it needs to be inverted first, so that the art is white and the background is black. A quick way of inverting your art is to type Control(PC)/Command(Mac)-I on the keyboard. Or, you can leave your art in its positive state and double-click your alpha channel in the Channels palette. Then, from within the Channel options, change things so that color indicates selected areas rather than masked areas before you paste your copied art into it.
PART THREE: Paint drips and buildup
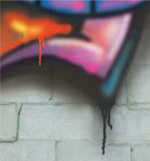
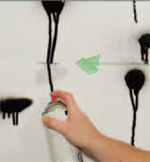
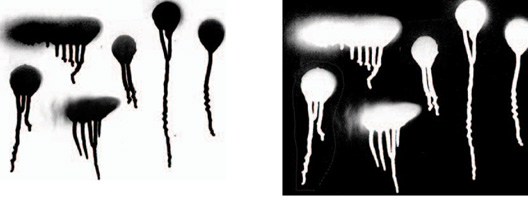
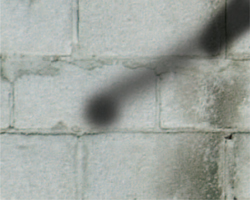
6 Now, as mentioned in the introduction, sometimes you need to resort to the real thing to achieve authenticity in your digital art. Here, a series of black paint drips were painted on a white piece of paper. Holding the can in one place while spraying allows you to build up enough paint in that spot so that it begins to run. Black and white were used because these paint drips, after being scanned, are destined to be used to create custom selections within a series of alpha channels.
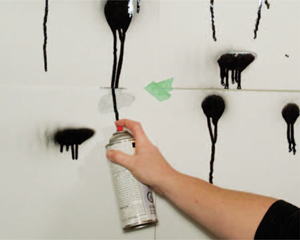
7 Go ahead and paint your own drips if you like. If you’re doing it on your own, be certain that the paint is completely dry before you scan it. Spray paint is difficult to remove from any surface — that’s what makes it so appealing for outdoor art. If you’d rather focus on Photoshop instead of making a mess, the dirty work here has already been done for you. Open up the drips.jpg file. This is a desktop scan of a group of spray paint drips. Invert the file and then use the Lasso tool to draw a rough selection that contains one entire drip.
Adding a paint drip
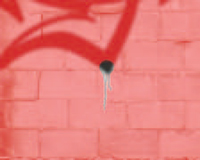
Paste a copied paint drip into your alpha channel using the visible composite channel to aid with proper positioning.
1 Copy the selected drip and return to your working file. Create a new channel, ensuring that color indicates masked areas (the default setting). Target your new channel and enable the visibility of your CMYK composite channel in the Channels palette.
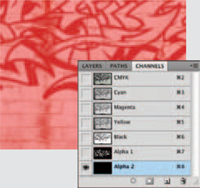
2 Now that you have your new channel targeted and your composite channel visible, paste the copied art into your new channel. Choose Edit>Free-Transform from the menu. Shift-drag a corner of the bounding box inward to reduce the selection contents.
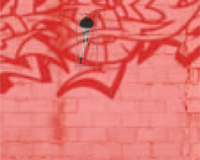
3 Click and drag outside of the bounding box to rotate the contents as necessary. Click and drag within the bounding box to position your drip over a corner area of your black outline art. Press Enter to apply the transformation.
8 Use this method to copy selected drips from the drips.jpg file and paste them into your alpha channel. Keep the visibility of the composite channel enabled to help you position your drips properly and use Free-Transform to adjust size, rotation, and placement. When you have a number of drips in your channel that sit nicely over appropriate areas of the image, load the channel as a selection.
 Placing drips
When placing a drip area within the image, try to think of where it would occur realistically. You know that drips traditionally occur because too much paint is applied in a single area at one time. So try to look at areas of the art where a spray can is likely to spend a lot of time. Corners are a perfect place. Actually, anywhere where two lines meet means that the spray can will deposit more paint in that area. Working along these lines will aid in achieving a realistic result. However, don’t let the rules of the real world deter you from adding a drip where you think it will look good. Although we’re using the laws of nature as our guide here, they certainly don’t bind us.
9 After generating the selection, click on the CMYK composite channel at the top of the Channels palette to target it. Next, click on the eye icon to the left of your alpha channel to disable the visibility of that channel, causing the red overlay to disappear. Return to the Layers palette and ensure that the layer containing your black outline art is targeted. Fill the current selection with black on this layer and deselect. If you haven’t changed your foreground color, it should still be set to black. In this case, all that you need to do to fill the selection is to type Alt(PC)/Option(Mac)-Delete. Then type Control(PC)/Command(Mac)-d to deactivate the selection.

 Saving your tool preset
When you’ve hit upon a combination of brush settings you like, you can save the brush in the current state as a preset, to access it again directly at any point later on. Just open the Tool Preset picker at the far left of the Tool Options bar. Once the picker is open, just click on the Create New Tool Preset button to add your current tool to the list of presets. From that point on, your brush will reside within the preset picker for immediate access.
10 Select the Brush tool. In the Brushes palette, choose one of the soft, round brush tip presets. Disable shape dynamics because we do not want the actual thickness of the stroke to change. Enable the Airbrush option as well as the Smoothing option. Leave the brush opacity set to 100% but reduce the flow to 30% in the Tool Options bar. Try painting a few strokes at various areas on the black layer that surround the outline art. The longer you stay in one place with the mouse button down, the more the paint will build up in that area.
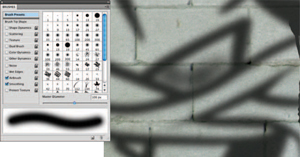
11 Reducing the flow forces the brush to behave like true spray paint because paint is deposited in your stroke at a slower rate. Move the mouse quickly while holding down the button to paint a light stroke or move slowly to paint a darker stroke. The faster you move the mouse, the less paint will be deposited in the stroke because the flow cannot keep up with you — just like real-world spray painting. Try creating a stroke very quickly while holding down the mouse button. Then stay completely still at the end of the stroke while continuing to hold down the mouse button. This will cause paint to build up in the area where you are hovering — just like it would if you were using a real spray can.
12 Use this method to add some primarily lighter strokes around the edges and over top of the black outlines, giving it an authentic look. Also try increasing the brush size and reducing the flow so that it looks as if the spray can was held further away while you were painting on the wall. Continue painting on this layer until you think the black spray paint effect is complete. Also, if you feel that you need some more drips on this layer, use the methods employed previously to add drips. Create a new layer and drag it beneath the black outline layer in the Layers palette.
PART FOUR: Color and highlights
Adding color
1 Click on the Foreground Color swatch in the toolbox and choose a pink color from the picker. Reduce your brush diameter slightly in the Brushes palette. Begin to paint some strokes within areas defined by black outlines on the new layer.
2 Paint like you did previously, using a very low flow setting and numerous strokes of varying speed and thickness. Now select a purple color from the picker and continue to paint some purple strokes within the same regions of the artwork on the current layer

3 Use this method to add a variety of colors into the shape areas on the current layer, defined by the black outline layer. Remember to vary flow settings, brush diameter, and the speed at which you paint your strokes to achieve the authentic spray paint effect.
13 Create a new layer and drag it to the top of the Layers palette. With the new layer targeted, and the Brush tool still selected, press “ d ” on the keyboard to reset the foreground and background colors to their default settings of black and white. Then type “x” to reverse them. Reduce the master diameter of your brush tip considerably in the Brushes palette and if you’ve reduced the flow setting, increase it to 30% once again. Use the current brush settings to paint a series of white strokes on this new layer to create highlights on the shapes inside the black outlines.

 Opacity and flow
Rather than always returning to the Tool Options bar to adjust opacity and flow settings when using the Brush tool, a couple of useful keyboard shortcuts will improve your efficiency while working. Quickly pressing a number key on the keyboard will set your brush opacity, using a multiple of ten. Or, if you want something precision, simply type the two numbers of your desired opacity. Holding down Shift while pressing a number key will allow you to adjust the flow instead of the opacity. If you have the Airbrush option enabled, things are reversed. When the Airbrush is enabled, simply pressing a number key changes the flow and holding down the Shift key while you press a number key changes the opacity.
14 Continue painting until there are deposits of solid white here and there. Also, increase the diameter of the brush and reduce the flow. Then paint some strokes with these brush settings to create a softer, more gradual highlight effect within the shapes. When you’re finished painting, return once again to your inverted drips. jpg file. Use the Lasso to draw a rough selection around a cluster of drips and copy it. Return to the working file, create another alpha channel, and target it in the Channels palette. Enable visibility of the composite channel again and then paste into your new alpha channel.
15 As before, use Free-Transform to rotate, resize, and position the drip. Position it so that it overlaps an area of opaque white and then press Return to apply the transformation. Repeat this process to add a few drips to the alpha channel and then generate a selection from it. Target the composite channel and disable the visibility of your new alpha channel. With the current selection active, return to the Layers palette. Target the layer with the white highlights painted onto it. Specify a white foreground color and fill the active selection with it. Deactivate the selection.
16 Create a new layer and drag it beneath the white highlight layer in the Layers palette. Greatly reduce the size of your brush so the stroke thickness is similar to that of your thin white highlight strokes. Set the flow to 35% and begin to paint some red highlights outside the black outline on the new layer. Be certain to paint over some areas enough times so that there are a few solid red blobs of paint on this layer. Also, increase the brush diameter and reduce the flow setting. With these brush settings, paint some larger, softer strokes here and there on the current layer.
 Varying paint colors
Unlike traditional painting, we can change our minds regarding color after the fact when creating graffiti art in Photoshop. Because different colors exist on different layers you can target any individual layer and alter the color via Image>Adjustments>Hue/Saturation. Also, you can target a layer in the Layers palette, enable the transparency lock, and then fil the targeted layer with any color you choose. This will allow you to instantly change the painted areas of the layer while preserving the transparent areas.
17 And now for what is becoming a familiar operation, again, return to the drips image file. Paste some selected drips into a new alpha channel. Generate a selection from the channel and fill the selected areas with the same red foreground color on the current layer. Deactivate the selection. Feel free at this point to embellish the image by painting some finer strokes of vibrant color on top of the existing layers on a new layer. Use the now familiar methods you’ve employed all along to finesse your graffiti art.
Dissecting your graffiti art
Let’s recap which methods and techniques are vital when it comes to creating convincing acts of virtual vandalism.

a Working with the flow setting allowed us to create brush strokes with a paint density that reacted to the speed of the mouse movement. Moving quickly deposited less paint, allowing us to see the detail of the wall through the paint in a number of areas.
b Although we imported a perfectly sharp black-and-white drawing as our outline art, a simple application of the Gaussian Blur filter produced a soft, convincing spray paint effect here.
c By incorporating paint drips via channel-based selections, we were able to force gravity to take its toll on the artwork, adding to the feeling of authenticity. Even while using the Airbrush option, no matter how long you hold the mouse button down in Photoshop, the paint simply will not drip as it piles up.
d By moving the brush quickly and then holding it in one place with the mouse button pressed, you can simulate what really happens when you do this with a can of actual spray paint. It is light where the motion was quick and heavy where the tool was stagnant.
This graffiti is portable
You can now take what you’ve created here and apply it to any background. First target only the layers that make up the painted graffiti in the image. Group them and then simply drag the group into another image window. After you’ve dragged the paint group into an appropriate scene, simply use Free-Transform to adjust the size and position until it looks authentic.