Chapter 6
Illustrating from Sketches

In the previous chapter, you learned how to create stunning illustrations from existing photography. That is an excellent method to create bold and sharp works of art when you have the appropriate materials to trace from. However, what do you do when you lack photographic resources, and all that you possess is an idea of what you wish to create? The answer to this question can be found at the end of any pencil: start with a sketch. Quickly sketching onto paper is a tried and true method for recording visual ideas, and an integral starting point when it comes to illustrating. However, as much as sketching is an integral part of the illustrating process, it is what you create from that sketch within Photoshop that will transform your basic idea into a professional piece of finished art.
When working with a sketch, always remember that it is merely a starting point. Photoshop provides all of the tools necessary to improve upon and embellish the artwork along the way. Using Photoshop to create artwork from sketches allows you to create finished art that is true to your original idea in terms of concept, but vastly superior when it comes to execution. Also, when working from sketches rather than photography, your subject matter is not limited to your available photographs, you’re only limited by your imagination.
![]() Much like the previous chapter, we’re going to spend a lot of time using the Pen tool here. Obviously a bit of experience and practice will make things easier. However, even if you’re new to using the Pen tool, you can make your way through. Apart from Pen tool usage, we’ll concentrate on building a layered fi le, selecting and fi lling regions, creating shaded gradients, and using vector masks.
Much like the previous chapter, we’re going to spend a lot of time using the Pen tool here. Obviously a bit of experience and practice will make things easier. However, even if you’re new to using the Pen tool, you can make your way through. Apart from Pen tool usage, we’ll concentrate on building a layered fi le, selecting and fi lling regions, creating shaded gradients, and using vector masks.
What you’ll learn in this chapter
Creative Techniques and Working Methods
Refining as you go
As with tracing photography, we’ll be using the Pen tool to create the regions and define the outer edges of our artwork. However, when working from a sketch, it is necessary to refine the artwork as you go. You’ll need to not only trace the art but also create smooth line work of a uniform thickness, add sharp areas of detail, and define regions of varying color. Whereas, when tracing photography, the idea is to simplify, reduce detail, and use what is already there in a stylized manner. The goal here is to build upon what is being expressed in the sketch. A sketch should be viewed as an idea in progress, as opposed to a photograph, which is often a complete idea captured. Rather than replicate, you’re finessing as you proceed when working in this manner.
Constraining graduated areas
The way in which shading is added later in this chapter may seem unorthodox at first. However, as you work your way through, you’ll likely develop an appreciation for how intuitive this method is. You’ll begin by creating loose gradients in approximate regions. This is an uninhibited and efficient way to get the colors you want in desired areas. The next step is to mask the regions with vectors and create defined areas with sharp edges, containing the chaos and getting just the effect you’re after.
Photoshop Tools, Features, and Functions
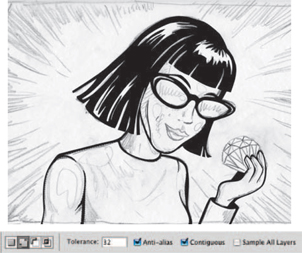
Magic Wand
Used with a default tolerance setting and with the Sample All Layers option disabled, this tool is your best bet for quickly selecting regions of transparency that are isolated from others by your outline art.
![]()
Expand
In order to avoid minor gaps, you’ll need to expand all of those quick Magic Wand–based selections before you fill them with color. This simple command found under the Select>Modify menu is your greatest ally here.

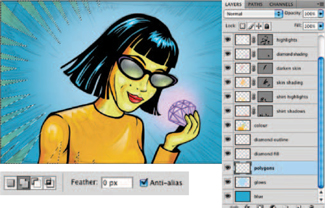
Polygonal Lasso
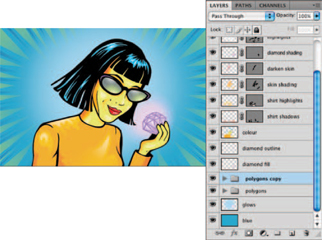
This tool does not often see the light of day. However, in the background of the image, it was the wisest choice for quickly creating a series of random triangular shapes around the edges. It comes in handy from time to time; try not to forget that it exists.
![]()
PART ONE: Creating the outline
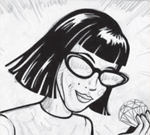
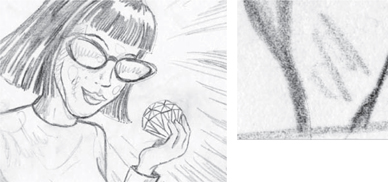
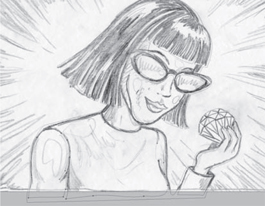
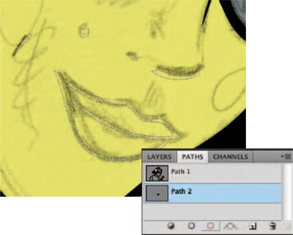
1 Begin by opening up the sketch.psd file. This is the scanned drawing we’re going to use as the basis for creating the illustration on the opposite page. As you can see here, the basic idea exists within the sketch. However, when you look at the finished art on the opposing page, you can see that a lot of refinement and embellishments were made to transform the sketch into a finished piece. The first step in the transformation is to carefully define the outer shape of the figure. Select the Pen tool.
 Project files
All of the files needed to follow along with this chapter and create the featured image are available for download on the accompanying Web site in the project files section. Visit www.creativephotoshopthebook.com.
 Embellish as you go
Your path doesn’t have to follow the sketch exactly, remember the idea here is to improve upon the drawing. Use the sketch as a guide, but create your paths however you think they work best. Don’t worry about tracing the sketch exactly; you’ll get a much better result if you focus on creating clean line work and smooth curves.
2 In the Tool Options bar, set the Pen tool to create paths, not shape layers, and enable the Add to Path Area function. Zoom in closely on the figure and click once on the outer edge of her to create an anchor point, starting a new path component. Start at the left-most corner of her hair; because this is a sharp corner, it is an ideal place for a corner point. Follow the outer perimeter of her hair upward a little, then click and drag to create a smooth point. Keep the mouse button down as you drag, this will move the direction handles, which defines the curvature of the line on either side of the point.

3 Release the mouse button and move upward, further along the outer edge of her hair. Click and drag to create another direction point; when you are happy with the approximate curve of the new line segment, release the mouse button. Use this method to work your way around her hair, creating a curved path component. When you get to a sharp corner, simply click and then move on to the next point, creating a corner point instead of a smooth point. Work your way around the entire perimeter until you get to the place where her chest meets the bottom of the canvas.
4 Hold down the Space bar to temporarily access the Pan tool. Drag upward so that you can see the area below the bottom edge of the canvas. Continue to draw your path so that it dips below the bottom of the canvas and then rises back up to trace the contour of her hand. Do not trace the outer edge of the diamond just yet. When you’ve traced the contour of her hand and find yourself at the bottom edge of the canvas again, create a point below the canvas and then another point below the canvas at the far left.

 Screen modes for panning
In order to work beyond the edge of the canvas, you’ll need to be working with a screen mode that allows you to see the area beyond. Select either Full Screen Mode with Menu Bar or Full Screen Mode from the options available in the Screen Mode menu in the Application bar. An even quicker method for toggling through screen modes is to simply hit the “ f ” key. If you’re using Windows, the default view is already a Full Screen option. However, if you’re using a Mac, you’ll need to choose a different screen mode than the default.
5 Continue to draw your path upward, back onto the canvas, tracing the outer contour until you reach your original point. Click on the first anchor point you created to close the path component. This is the outer perimeter of the woman. If we were to load this path as a selection and fill it with black, like we’re going to do shortly, the result would be a solid black shape like a silhouette. What we really want is an outline; this is achieved by drawing additional path components that will subtract when the selection is eventually loaded. Choose the Subtract from Path Area function in the Tool Options bar.
 Editing paths
Use the Direct Selection tool to select individual points of your path components and edit them. You can move anchor by clicking on them and then dragging. When you click on a s mooth anchor point, the direction lines will appear. Clicking and dragging on a direction handle at the end of a direction line allows you to reshape the curves on either side of the direction point.
 Converting points
You can access the Convert Point tool within the expanded Pen tool button in the toolbar, or by holding down the Alt(PC)/Option(Mac) key when using the Pen tool. To convert a corner point to a smooth point, simply click and drag on it using the Convert Point tool. Direction lines will appear, curving the line segments on either side of the point as you drag. To convert a smooth point to corner point, click on it once with the Convert Point tool and the direction lines will disappear, removing the direction lines and the curvature from the line segments.
6 With the Subtract from Path Area option enabled, carefully trace the inside areas of the woman, creating numerous, closed path components that will subtract from the outer path when we load it as a selection. Use the sketch as your guide to trace all of the white regions that exist inside the black outline of the sketch and within the outer perimeter defined by your first path component. Trace her skin, the fabric of her shirt, hair highlights, the inside of her glasses, etc. And remember, if you accidentally create a path component using the wrong path area operation, simply select it with the Path Selection tool and change the Path Area function in the Tool Options bar.
7 When you close your last path component, there should be no single component selected within your path. If for some reason, you have a single component selected, use the Path Selection tool or the Direct Selection tool to click on an area of the canvas that contains no path. This will deselect any selected path component(s). Ensure that your new path is targeted in the Paths palette; then click on the Load Path as a Selection button at the bottom of the palette. With the selection active, return to the Layers palette and click on the Create a New Layer button at the bottom of the palette.
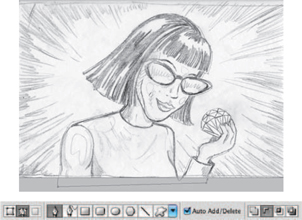
 Auto Add/Delete
When using the Pen tool, by default, the Auto Add/Delete option is enabled. When this option is enabled, points are added to, or removed from, any selected path depending upon where you click. If you click on an existing point, it will be removed. If you click on a line segment, a point will be added.
8 Press the “ d ” key to set the foreground color to black if it isn’t already. Ensure that your new layer is targeted and your current selection is active. Type Alt(PC)/Option(Mac)-Delete to fill the active selection with the current foreground color on the new layer. Type Control(PC)/Command(Mac)-d to deactivate the selection. Select the Magic Wand tool. In the Tool Options bar, ensure that the Contiguous option is enabled, Sample All Layers is disabled, and that the tolerance is left at its default setting of 32. Click on her shirt area contained within the black outlines to load it as a selection.
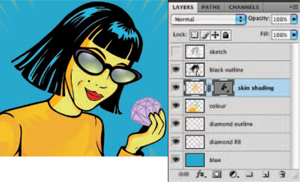
PART TWO: Filling regions with color
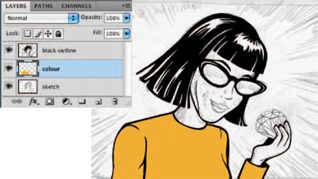
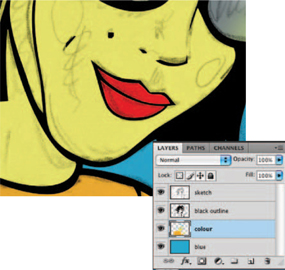
9 Hold down the Shift key and click on her sleeve area as well, adding it to the currently active selection. Click on the Foreground Color swatch in the toolbar to open the picker. Select a bright orange color from the picker and click OK to specify it as the current foreground color. Create a new layer in the Layers palette and drag it beneath the black outline layer. With the selection active, choose Select>Modify>Expand from the menu. Expand the selection by a single pixel or two and then fill the active selection with your new foreground color on the new layer. Deselect.
Fill the remaining areas
Repeat this same method to add a variety of colors to different outlined regions of the artwork.
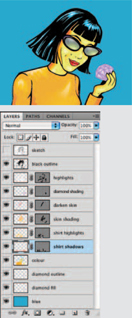
1 Target your outline layer in the Layers palette and use the Magic Wand to select her face, neck, and hand regions that are surrounded by black outlines. Leave the selection active and then target the underlying layer. Expand the selection by one or two pixels.

2 Select a yellow foreground color and fill the active selection with it. Deselect and target the black layer again. Use the Magic Wand to select her hair highlights. Return to the underlying layer and expand the selection. Select a blue foreground color from the picker.

3 Fill the active selection with your new foreground color. Repeat this method to add some purple into the highlight areas of her glasses frames. Finally, repeat the process again to add some gray into the lenses of her glasses. Keep this selection active.
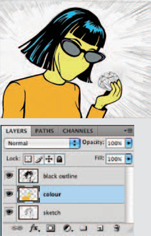
10 Select the Gradient tool. Choose the Foreground to Transparent preset and enable the radial method in the Tool Options bar. Set the foreground color to white and set the opacity of the Gradient tool to 75%. Click and drag once, starting at the top edge of each lens selection border and dragging outward slightly, to create white highlights at the top of each lens. Next, switch the foreground color to green and add larger gradients into each lens near the bottom. Finally, choose a very light yellow foreground color and create two smaller gradients over top of the green ones you just created.

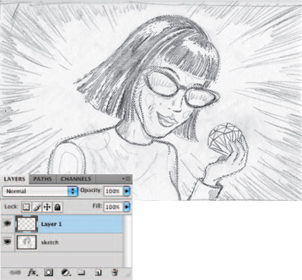
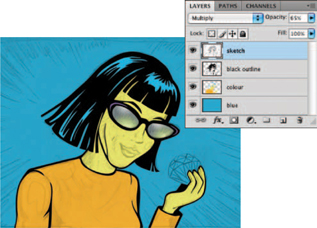
11 Deactivate the selection and create a new layer. Target the new layer and choose a new, light blue foreground color from the picker. Type Alt(PC)/Option(Mac)-Delete to fill the entire new layer with the foreground color. Drag the layer to the bottom of the stack in the Layers palette. Then drag the sketch layer to the top of the stack. From now on, we’ll enable and disable the visibility of the sketch layer as required, making it visible only when it is needed as a guide. Change the blending mode of the sketch layer to multiply and reduce the opacity to 65%.
 Create an action
When repeating the same task over and over again, like expanding a selection, create an action to save your time in the long run. To begin, ensure that you have a selection active. Then, in the Actions palette, click on the Create New Action button. Name your action, assign a function key, and click Record. Expand your selection and then click the Stop Recording button in the Actions palette. The next time you want to expand a selection, all you need to do is click on the assigned function key to play the action, which will automatically expand your selection.
12 Select the Pen tool and ensure that the Add to Path Area option is enabled. Draw a closed path component around the perimeter of her lips, using the same method you used to draw your first path component around the entire woman. Now examine the details of her face that are indicated by the sketch. Create a few thin, closed path components that will add lines of detail to her face. Next, select the Subtract from Path Area option and create two closed path components, surrounding her lips, inside the outer lips path component. Load the entire path as a selection.
 Breaking a curve
When you click and drag on a direction handle with the Direct Selection tool, it moves the direction lines on either side of the direction point, altering the curves of both line segments. However, if you click on a direction handle with the Convert Point tool, it will convert your smooth point to a corner point with independent direction lines. This means that the direction lines do not affect the line segment curve on the other side of the point when moved; only the curve on the same side of the point is affected.
13 Target the layer that contains your black outline art in the Layers palette, and fill the new selection with black on that layer. Deactivate the selection and select the Magic Wand tool. Using the same settings as before, use the Magic Wand to target both empty areas inside the lip outlines. Expand the selection slightly using the Select>Modify>Expand menu option and target the layer that contains your other solid colors in the Layers palette. Fill the active selection with red on this layer and deselect. Select the Pen tool and ensure that the Add to Path Area option is enabled.
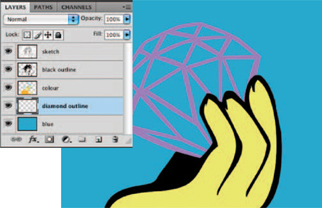
14 Use the Pen tool to draw a closed path component that surrounds the outer perimeter of the diamond shape. Next, enable the Subtract from Path Area function and create a closed path component for each facet on the inside of the diamond shape. Ensure that no single path component is selected and then load the entire path as a selection. Create a new layer and place it above the solid blue layer. Select a purple foreground color from the picker and fill the active selection with it on the new layer. Disable the visibility of the sketch layer to see the illustration clearly.
PART THREE: Shading via gradients and masks
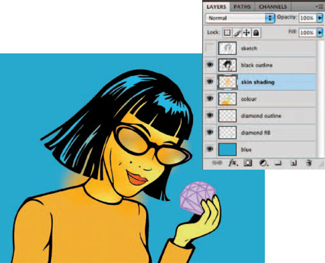
15 Use the Magic Wand tool to select all of the inner facet areas of the diamond. Expand the selection as you’ve been doing previously and create a new layer. Drag the new layer beneath the diamond outline layer and fill it with a very light purple color. Deactivate the selection and create another new layer. Drag this layer up within the Layers palette, until it resides directly below your black outline layer. Choose an orange foreground color. Use the Gradient tool, with the same settings as before, to create a series of gradients over the areas of her face that require shading.
 Refine edge
Photoshop CS3 and CS4 offer another method for expanding selections. It resides amid a plethora of other features in the new Refine Edge option. When you have a selection active, click on the Refine Edge button in the Tool Options bar. Drag the contract/expand slider to the right to enlarge the selection boundary, expanding the selection. Or, instead of dragging the slider, you can enter a numeric value in the field.
16 Worry not, all unwanted areas of gradient will be hidden in a moment. Right now, continue to add orange gradients over areas of her neck and hand that will require shading as well. When finished, select the Pen tool and enable the Add to Path Area option. Draw a series of closed path components around only the regions of her skin where you want the orange gradients to be visible. Ensure that no single path component is selected and then choose Layer>Vector Mask>Current Path. This will constrain the visibility of your gradients to the areas within the vector mask’s path components.
Create a series of masked gradient layers
Use the same method of creating gradients and applying vector masks to add highlights and shadows to different parts of the illustration across multiple layers.
1 Create a new layer beneath the black outline layer. Target it and create some new radial, white to transparent gradients on this layer, in areas where you’d like to add highlights. For a less drastic result, reduce the gradient opacity in places.

2 Select the Pen tool. With the Add to Path Area function enabled, create a series of closed path components to contain your highlight gradients within specific regions on the canvas. Ensure that no single path component is selected and choose Layer>Vector Mask>Current Path from the menu.

3 Use this method to create new, vector-masked layers with different colored gradients on them, indicating the different shades within her shirt and the diamond. Also add some darker shading to her face and neck, using the same procedure.
17 Create a new layer and place it directly above the solid blue layer in the Layers palette. Select the Gradient tool. Leave the options set as they were, except increase the gradient opacity to 100%. Choose a very light blue foreground color from the picker, then click and drag to create a large, light blue to transparent gradient in behind the woman’s head on the new layer. Repeat this process a couple of times to intensify the gradient. Then choose a light purple foreground color and repeat the same process to add a glow behind the diamond.
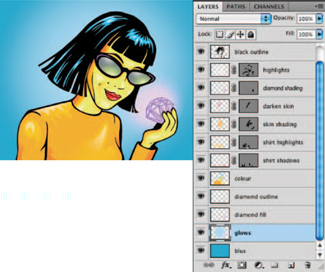
PART FOUR: Polygons in the background
18 Create a new layer and select the Polygonal Lasso tool. Enable the visibility of your sketch layer once again. However, ensure that your new layer is presently targeted in the Layers palette. Enable the Add to Selection option in the Tool Options bar and draw a series of polygons on the left side of the canvas, based on what is indicated by the sketch layer. Select the Gradient tool and choose a green foreground color from the picker. Set the gradient opacity to 50%. Click and drag repeatedly, from the edges of the canvas inward, to create a series of gradients within the polygons around the left edges of the canvas.
 Continuing to edit masked layers
Once you’ve created your gradients and added a vector mask to a layer, it doesn’t mean that your layer contents have to remain that way. Remember, in areas where you added shading within a vector mask, you can edit the layer contents whenever you like. Simply target the layer, not the mask, in the Layers palette and edit the layer using any paint tool. You can paint with a brush or add different colored gradients to alter the colors. Paint anywhere on the layer you like, but bear in mind that only areas that aren’t clipped by the layer mask will be visible.
19 Deactivate the current selection and create a new layer. Disable the visibility of the sketch layer. Target the new layer and again draw a series of polygonal shaped selections. This time, make them thinner than before, and try to create them in-between the larger polygons that you created previously. Use a dark blue foreground color and the Gradient tool to create numerous gradients within this selection on the new layer. Deactivate the selection when you’re finished. In the Layers palette, click on the layer below while holding down the Shift key to target it too. Choose Layer>New>Group From Layers from the menu.

 Zooming
When creating and editing paths, I often find myself zooming in close to edit individual points, and then zooming out to view the results of these edits within the entire path. Rather than always having to switch back and forth between the Zoom tool and any path creation or editing tool, you should familiarize yourself with the keyboard shortcuts for zooming. Type Control(PC)/Command(Mac) “+” to zoom in, or type Control(PC)/Command(Mac) “−” to zoom out.
 Bird’s eye view
Holding down the “ h ” key while you are zoomed in on an image allows you to enter bird’s eye view. Clicking on the canvas zooms out and allows you to move a bounding box around on the image area. The bounding box dictates the region that will be visible when you exit bird’s eye view. When the bounding box surrounds your desired region, release the mouse button and you will automatically zoom back in. The area defined by the bounding box will fill the screen instantly.
20 Click on the group in the Layers palette and hold down the Alt(PC)/Option(Mac) key. Drag upward until you see a very dark horizontal line appear directly above the group in the Layers palette and release the mouse button. This creates a copy of the group directly above the original. Target your newly copied group and then choose Edit>Transform>Flip Horizontal from the menu. Select the Move tool Click and drag to the right, while holding down the Shift key, until the flipped polygons are moved to the right edge of the canvas.
Other things to consider
Don’t feel limited by the content within your sketch. You can add other elements into the composition after the fact. Feel free to incorporate type layers, repeating patterns, or anything else you can think of to add interest and diversity to your illustrated work.

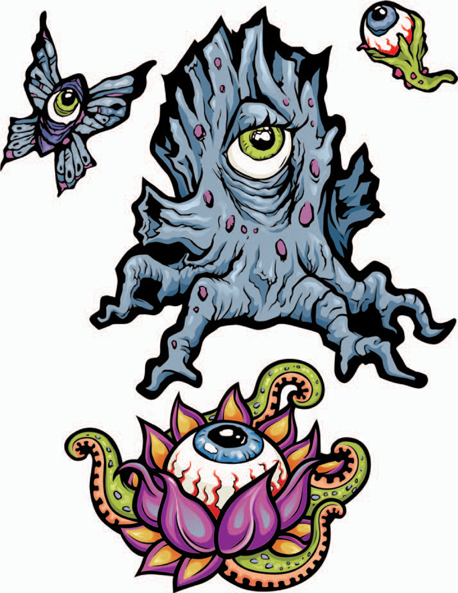
Simple art with extreme color
Your drawing does not have to be overly complicated. You can use a very simple sketch as a starting point, especially if you have a clever color strategy up your sleeve. Here you can see that the illustrated components are very simple, allowing color divisions to create a strong presence within the image. If the illustration and the color usage are both complex, things tend to become overwhelming.
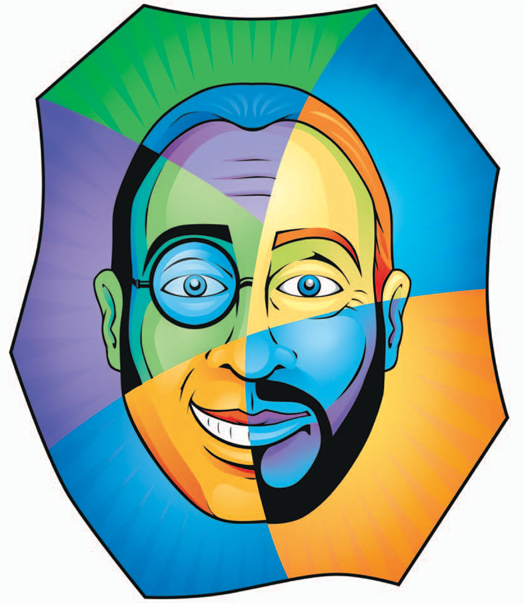
There are no limits
When you choose sketches over photography as your raw resource material, there are no limits when it comes to subject matter. Proven here by the contents of this page, your illustration subjects can be as wild as your imagination.