
Chapter 4. RAM
When people talk about the RAM in their computer, they are almost always referring to the “sticks” of memory that are installed into the motherboard. This is known as DRAM, or main memory, and often comes in capacities of 512MB, 1GB, or 2GB. This type of RAM has its own clock speed and must be compatible with the motherboard’s RAM slots. It’s not the only type of RAM, but it’s the one you should be most concerned with for the exam. For all practical purposes the terms stick, DIMM, and memory module mean the same thing; they refer to the RAM installed into a motherboard’s RAM slots.
The most important concept in this chapter is compatibility. There are a lot of RAM technologies to know, but the bottom line is “will it be compatible with my motherboard?” The best way to find out is to go to the RAM manufacturer’s website and search for your motherboard. They usually list the matching RAM.
This chapter concentrates on SRAM and DRAM; however, there are other types, for example NVRAM that is covered in Chapter 6, “Storage Devices.” In this chapter we discuss SRAM, DRAM, and DRAM types and demonstrate how to install and troubleshoot DRAM memory modules.
RAM Basics and Types of RAM
RAM Basics
Memory is the workspace for the CPU. Random-access memory (RAM) is the main memory that the CPU uses to store or retrieve data, which can be done in any order, regardless of what the CPU last accessed. The beauty of RAM is that the CPU can access any piece of memory it needs from anywhere in RAM, and any of these accesses take an equal amount of time. You often hear people associate RAM with a person’s memory. But a person might take longer to recall certain memories in comparison to others. The CPU has equal access to all contents of RAM. It’s fast and efficient, but the drawback is that RAM is typically cleared when the computer is shut off. To store data permanently, it would need to be written to a hard drive or other device, which is slower and less uniform in its storage and delivery of data. An example of this is when you work on a Word document; as you work, the contents of that file are stored in RAM, but when you save the file, the contents are then stored on a hard drive, or other media of your choice, which is done at a substantially slower rate.
The CPU though, is sort of closed off from memory, and the rest of the computer for that matter. It’s kind of like the wizard behind the curtain. But someone does indeed pay attention to it—the memory controller chip. The memory controller is the go-between; basically, information is stored in and retrieved from RAM with the help of the memory controller. When the CPU wants to store or retrieve data to and from RAM, the memory controller is the chip that is responsible for getting the job done. It does this by moving the data along the address bus, which connects the memory controller to RAM. Figure 4.1 shows the two possible locations for the memory controller.
Figure 4.1 Comparison of the two memory controller designs
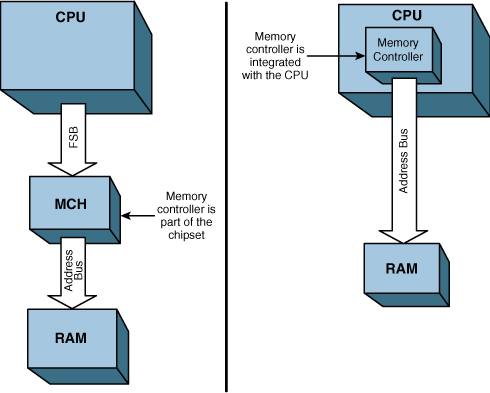
As you can see in the figure, the memory controller can be in one of two places:
• Within the chipset: In many Intel systems the memory controller is called the Memory Controller Hub (MCH). A major component within the chipset of the motherboard, it’s also known as the northbridge. This design is shown on the left side of Figure 4.1.
• Integrated to the CPU: In other systems, the memory controller is part of the CPU (known as “on-die”), as shown on the right side of Figure 4.1. It does the same job regardless, but remember from Chapter 3, “The CPU,” that AMD has been integrating the memory controller on to the CPU for some time now. And Intel’s new Core i7 has an on-die memory controller as well, a major departure from the Core 2 CPU configurations. So this second design would seem to be catching on!
RAM discussed in this chapter is considered volatile (unless otherwise noted). This means that it loses any stored contents if it stops receiving power; for example, if you shut the computer off. However, not all RAM is volatile. We talk about non-volatile types of RAM (for example NVRAM) in Chapter 6.
Today’s RAM is a set of integrated circuits (ICs) that works at high speed. These ICs could be on the motherboard, on adapter cards, within or on the processor, and of course, on those RAM sticks installed into the motherboard.
Types of RAM
Let’s start by discussing the two main categories of RAM. Afterward, we move on to the types of RAM sticks you might install in a computer.
SRAM Versus DRAM
Static random-access memory (SRAM) is RAM that does not need to be periodically refreshed. Memory refreshing is common to other types of RAM and is basically the act of reading information from a specific area of memory and immediately rewriting that information back to the same area without modifying it. Due to SRAM’s architecture, it does not require this refresh. You can find SRAM used as cache memory for CPUs, as buffers on the motherboard or within hard drives, and as temporary storage for LCD screens. Normally, SRAM is soldered directly to a printed circuit board (PCB) or integrated directly to a chip. This means that you probably won’t be replacing SRAM. SRAM is faster than, and is usually found in smaller quantities than its distant cousin DRAM.
Dynamic random-access memory (DRAM) is RAM that does need to be periodically refreshed. This is because every bit of information stored in DRAM is stored in a separate capacitor. These capacitors lose their charge over time, causing the data to fade unless the capacitor is recharged or refreshed. It is slower than SRAM but is of simple design and can reach high capacities. Like SRAM, DRAM is volatile and requires power to retain its data. Sticks of DRAM are installed into the motherboard and are the most common type of DRAM you will be installing and troubleshooting. Many technicians refer to these DRAM sticks simply as memory modules, or just RAM. However, DRAM might also exist on adapter cards or elsewhere that we speak more about later on.
ExamAlert
Know the differences between SRAM and DRAM for the exam.
Note
Another type of memory you should know for the exam is ROM or read-only memory. Unlike the RAM types discussed in this chapter, ROM is nonvolatile, meaning that it retains its contents, even if it is not supplied with power. Historically, ROM chips could be read from but not written to. But now we have ROM chips that can do both, for example EEPROM implemented as a BIOS chip. For more information on EEPROM and the BIOS see Chapter 2, “Motherboards.”
Let’s talk about the different types of DRAM sticks you see in computers and how fast they can go!
SDRAM
Synchronous DRAM (SDRAM) is DRAM that is synchronized to the base clock of the motherboard (also referred to as the system bus speed). If your system bus (and corresponding memory bus) was 100MHz, you would want to install compatible 100MHz SDRAM because that SDRAM receives its clock signal from the system bus on the motherboard.
Typical SDRAM clock rates are 66MHz, 100MHz, and 133MHz; the physical RAM sticks are referred to as PC66, PC100, and PC133, respectively. Although you rarely see this type of RAM anymore, you can still purchase PC100 and PC133 versions. In stick format it is designed as a 168-pin DIMM. (You might also see SDRAM chips integrated directly to a sound or video card). DIMMs (dual in-line memory modules) have been in use for over a decade. They are the successor to the SIMM (single in-line memory module). The main difference between the two is that DIMMs have separate electrical contacts on each side of the module (or stick), whereas SIMMs might have contacts on both sides, but they are redundant.
Data transfer rates vary depending on the speed of the RAM, but SDRAM in general has a bus width of 64 bits (8 bytes). A 100MHz SDRAM bus can, therefore, transfer 8 bytes of data, 100 million times per second, equaling 800MB/s. Keep in mind that this data rate is a theoretical maximum, and actual data throughputs will be less.
An example of the “stick” or DIMM version of SDRAM is shown in Figure 4.2.
Figure 4.2 A 168-Pin PC100 SDRAM 128MB stick
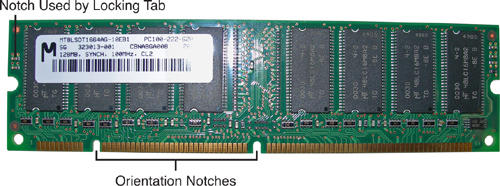
Notice how the stick has two notches located at the bottom, which help to orient the stick during installation. But they have another purpose; they define the functionality of SDRAM. The first notch specifies whether the SDRAM is registered, unbuffered, or reserved for future use, according to its position. Registered (or buffered) RAM has a register between the memory module and the memory controller. The register uses less electricity and requires less of a load from the memory controller, ultimately enabling for more memory modules. Historically, this was used in servers where more than four sticks of RAM were required, but aside from some video cards, you probably won’t see this on today’s PCs. The second notch deals with voltage, and depending on its position, specifies whether the SDRAM stick runs at 5 volts or 3.3 volts. You might also notice that the sticker shows this RAM has a capacity of 128MB, which gives you an idea of the age of this technology; however it is still covered on the A+ exam. Finally, there is a notch on each side of the stick of RAM. These lock it into place when inserting it into the RAM slot of a motherboard. Basically, you press the stick straight down into the slot until the slot’s tabs lock around the side notches.
ExamAlert
Identify SDRAM and its speeds (PC100, PC133) for the exam.
Note
A good place to go to get a “pulse” about current RAM trends is a website called www.pricewatch.com. It shows all the current types of RAM you can purchase and compares prices between vendors. Of course, this website (and others like it) compares lots of other PC equipment as well.
DDR
Let’s talk about today’s RAM—Double Data Rate (or DDR) is by far the most commonly used RAM on the planet. DDR is synchronized to the memory clock just like SDRAM; it’s also called DDR SDRAM. The original DDR (aka DDR1) is actually SDRAM that has been double-pumped, meaning that twice the data is transferred but at the same clock speed. It does this by transferring data on the rising and falling edges of each clock signal (every cycle). So let’s use DDR-200 as an example. Our original 100MHz system bus’s transfers are doubled, so instead of 100 million transfers, it can now do 200 million transfers per second. (That’s where the 200 comes from in DDR-200.) DDR also has a 64-bit wide bus allowing for 8 bytes of data per cycle. A 100MHz DDR bus can, therefore, transfer 8 bytes of data, 100 million times per second, times 2, equaling 1600MB/s. The equation for this data transfer rate (also known as bandwidth) is
Clock speed × bytes × 2 = Data Transfer Rate
Example: 100 MHz × 8 × 2 = 1,600MB/s
Whenever we do these types of equations, we are interested in solving for bytes because that is what these data rates measure.
You notice that people, and even manufacturers, refer to transfers per second as MHz. Although this is not completely accurate, it is common terminology. For example, DDR-200 can do 200 million transfers per second, but it is also referred to as 200MHz.
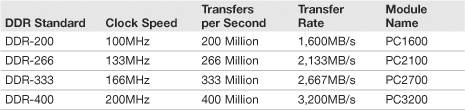
Table 4.1 gives the low-down about DDR1 memory modules including the standard names, clock speeds, how many transfers the RAM can do per second, and the total data transfer rate, also referred to as bandwidth. Finally, it shows the module name that is the name you would go by when ordering or purchasing RAM.
Table 4.1 Comparison of DDR1 Types
Note
The DDR standards shown in this table are just that—standards as specified by JEDEC (a standardization body). However, you might see manufacturers use module names that go beyond these, for example, PC4300, which is actually based off of the DDR-400 PC3200 standard. Manufacturers optimize their RAM using higher tolerance or overvolted chips, but note that motherboard manufacturers might not recommend using anything that is not standardized by JEDEC. This applies to other versions of DDR as well. Use motherboard supported and approved RAM! It can save troubleshooting time in the future.
The DDR DIMM has 184 pins and is not compatible with 168-pin SDRAM DIMMs. DDR DIMMs have one notch instead of two; this notch prevents using the wrong memory module in a RAM slot.
DDR2
DDR2 builds on the original DDR specification by increasing speed. It does this through faster signaling, which requires additional pins. Standard DDR2 DIMMs have 240 pins and cannot be used in DDR1 memory slots. As of early 2009, DDR2 was still the most common DIMM installed in new computers. Table 4.2 gives a comparison of the various types of DDR2, their speeds, and transfer rates.
Table 4.2 Comparison of DDR2 Types

Figure 4.3 shows an example of a DDR2-800 DIMM. You might notice that the notch is in a slightly different location than with DDR DIMMs, again preventing mismatching of memory and RAM slot.
Figure 4.3 A 240-Pin PC2-6400 2 GB DIMM (DDR2-800)

ExamAlert
Know the amount of pins in SDRAM, DDR, and DDR2 memory modules.
DDR3
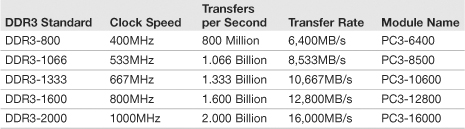
When is enough enough? Never! Actually, DDR3 was designed for lower power consumption, and higher reliability, while enabling higher levels of performance. 240-pin DDR3 DIMMs are similar to DDR2 DIMMs, but are not backward compatible. It is probable that DDR3 will soon be the majority DIMM installed in new PCs, due to its capability to transfer twice as much data, using less voltage, basically working faster and more efficiently. Table 4.3 gives a comparison of the various types of DDR3, their speeds, and transfer rates.
Table 4.3 Comparison of DDR3 Types
Note
Laptops use smaller configurations of SDRAM, DDR, DDR2, and DDR3 with different pin configurations. These are known as SODIMMs. More information about Laptops and SODIMMs can be found in Chapter 11, “Laptops.”
Note
The future of DDR is DDR4, which is currently used in some video cards but not available in DIMM format as of the publishing of this book.
RDRAM (Rambus)
Rambus DRAM is another type of synchronous dynamic RAM designed by the Rambus Corporation and used primarily at the turn of the millennium. Because RDRAM was proprietary and not part of the JEDEC standard, many manufacturers would not support or license it. This and other factors led to the general demise of RDRAM; when it comes to PCs, it’s difficult to find it today, but a few components and gaming consoles use it. The chances of you working with it in a PC, or seeing questions on the exam about it are unlikely; however, it is briefly listed on the CompTIA A+ objectives. A few examples of RDRAM (also known as RIMMs) are PC800 (single channel, 16-bits wide, 1600MB/s bandwidth) and the more advanced RIMM 3200 (dual channel, 32-bits wide, 3200MB/s).
RAM Technologies
When you decide on the type of RAM to use, you must decide on more technical details; for example, whether to use single or dual channel RAM that will be dictated for the most part by the motherboard. Your particular environment might need RAM that doesn’t lag, so memory latency should be another consideration. There are several other lesser considerations such as whether to use single-sided or double-sided RAM, parity, or ECC RAM. For the most part, these additional factors don’t play into the decision much: Your motherboard dictates whether the RAM is single-sided or double-sided, and parity and ECC RAM is more rare nowadays.
Single Channel Versus Dual Channel
Single channel is the original RAM architecture. In modern computers, there is a 64-bit bus (or data channel) between the memory and the memory controller. One or more sticks of RAM can be installed into the motherboard, but they share the same channel.
Dual channel is a newer technology that essentially doubles the data throughput. Two separate 64-bit channels are employed together resulting in a 128-bit bus. To incorporate this, the proper motherboard will have color-coded matching banks. See Figure 4.4 for an example of this.
Figure 4.4 A motherboard’s dual channel memory slots
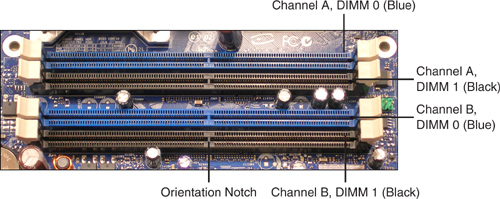
In the figure you can see four RAM slots. The first slot is blue and the second slot is black. Collectively they are known as Channel A. The third slot is also blue and the fourth is black, but these are known as Channel B. To use dual channel architecture, a kit of two RAM sticks would be installed to the matching color (matching bank), for example both blue slots; one in Channel A, and one in Channel B, collectively forming the DIMM 0 bank. It is recommended that both DIMMs be identical for best performance. This means the capacity, speed, and number of chips must be the same on both DIMMs. However, if you access a website such as www.kingston.com, you can find a user-friendly memory database that tells you exactly which kits of RAM will be compatible with your motherboard. This is the easiest way to ensure a harmonious system. As a final note, it is recommended to install to banks sequentially, meaning install two memory sticks to Bank 0, and then (optionally) install two memory sticks to Bank 1.
ExamAlert
Know the difference between single and dual channel for the exam.
Memory Latency
Memory latency or CAS (Column Address Strobe) latency happens when a memory controller tries to access data from a memory module. It is a slight delay (usually measured in nanoseconds) while the memory module responds to the memory controller. It is given a rating of CAS, or more commonly CL. The higher the CL number, the longer the delay. For example, the RAM I purchased from Kingston is CL-6. The general range of DDR2 memory is between CL3 and CL6, so I’m at the slowest end of the spectrum. However, the difference between the ratings is small, so it will usually have an affect only on users that run powerful memory intensive applications, for instance graphics rendering. Video editors, graphic designers, and gamers beware! Otherwise CL6 is fine for the purpose of this computer.
Single sided Versus Double Sided
The terms single-sided and double-sided are not quite literal. Use your motherboard’s documentation or a memory manufacturer’s database to verify whether your motherboard accepts single-sided or double-sided memory modules, and acquire the compatible RAM from a reputable vendor. Single-sided refers to a memory module with a single “bank” of chips. The computer’s memory controller can access all the chips at once. The memory module might have chips on both physical sides, or only on one side, but it is known as single-sided because the computer can address all the chips at once.
Double-sided memory modules have their chips divided into two “sides” known as banks. Only one “side” can be seen by the computer at any time. To use the second half of the storage available, the computer must switch to the second bank and can no longer read or write to the first half until it switches back again.
Note
Don’t confuse double-sided memory and dual channel memory when it comes to banks. An individual stick of RAM that is known as double-sided is broken down into two banks, but this has no bearing on the installation of the RAM. A bank of dual channel RAM is two sticks of RAM that must be installed as a pair to matching color-coded slots. More often you will be concerned with dual channel banks.
Parity Versus Nonparity
There are several types of parity in computing; RAM parity is when memory stores an extra bit (known as a parity bit) used for error detection. This means that the memory module can store 9 bits instead of 8 bits for every byte of data. So, parity RAM includes this extra bit, and the more common nonparity RAM does not. Parity RAM might be required when data integrity is a necessity.
ECC Versus Non-ECC
Error Correction Code (ECC) in RAM can detect and correct errors. Real-time applications might use ECC RAM. Like parity RAM, additional information needs to be stored, and more resources are used in general. This RAM is the slowest and most expensive of RAM types.
Note
Most new PCs do not support parity or ECC RAM due to the possibility of data corruption. If it is supported, but not necessary, these options can be disabled in the BIOS.
One Final Note About RAM
The main thing to “remember” when working with RAM is that it needs to be compatible with the motherboard. Check your motherboard’s documentation regarding capacity per slot (or channel), maximum capacity, speed, and whether it accepts single- or dual-channel RAM. The best thing to do is to run a search on your particular motherboard at the RAM manufacturer’s website to attain a complete list of a compatible RAM.
Cram Quiz
Answer these questions. The answers follow the last question. If you cannot answer these questions correctly, consider reading this section again until you can.
1. Which technology divides the RAM slots into colors?
![]() A. ECC
A. ECC
![]() B. Parity
B. Parity
![]() C. Double-sided
C. Double-sided
![]() D. Dual channel
D. Dual channel
2. Which of these is the delay it takes for a memory module to start sending data to the MCC?
![]() A. DDR
A. DDR
![]() B. Propagation
B. Propagation
![]() C. Latency
C. Latency
![]() D. FSB
D. FSB
3. What is the transfer rate of DDR2-800?
![]() A. 6,400MB/s
A. 6,400MB/s
![]() B. 8,533MB/s
B. 8,533MB/s
![]() C. 5,333MB/s
C. 5,333MB/s
![]() D. 800MHz
D. 800MHz
4. Which of these would you find internal to the CPU?
![]() A. DRAM
A. DRAM
![]() B. DIMM
B. DIMM
![]() C. SDRAM
C. SDRAM
![]() D. SRAM
D. SRAM
5. What does SDRAM synchronize to?
![]() A. FSB
A. FSB
![]() B. CPU
B. CPU
![]() C. System bus
C. System bus
![]() D. PCI bus
D. PCI bus
6. Which chip designates where RAM will be stored?
![]() A. ICH
A. ICH
![]() B. MCH
B. MCH
![]() C. CPU
C. CPU
![]() D. FSB
D. FSB
7. How many pins are on a DDR2 memory module?
![]() A. 168
A. 168
![]() B. 184
B. 184
![]() C. 240
C. 240
![]() D. 200
D. 200
Cram Quiz Answers
1. D. Dual-channel memory configurations have two RAM slots of a particular color, each one of which is placed in a different channel; these are collectively known as DIMM 0. DIMM 1 comprises the other two slots, which are a different color, and again, each of them are placed in a separate channel.
2. C. Latency is the delay between the memory module and the memory controller, usually rated as CL and a number.
3. A. DDR2-800 can transfer 6,400MB/s; 800MHz is the doubled clock rate or speed. It has an original clock speed of 400MHz but doubles that output, so it is often referred to as 800MHz.
4. D. One function of SRAM is to act as CPU cache. L1 cache would be internal to the CPU or in the core. L2 would be on-die.
5. C. SDRAM technologies synchronize to the base clock of the motherboard (also known as the system bus speed) enabling for efficient transfer of data.
6. B. The Memory Controller Hub (MCH) is in charge of storing and retrieving data to and from RAM. Even though some systems use a memory controller that is part of the CPU, it is not the CPU that is in charge of this. The CPU knows what bytes it wants but not the location of those bytes.
7. C. DDR2 is a 240-pin architecture. 168-pin is the original SDRAM, 184-pin is the first version of DDR (DDR1), and 200-pin architectures can be found in laptops; they are known as SODIMMs.
Installing and Troubleshooting DRAM
Installing DRAM
Installing DRAM is fun and easy. Simply stated, it can be broken down into this: Orient the RAM properly, insert the RAM into the slot, and press down with both thumbs until the ears lock. Then, test. Easy! But let’s take it a little further. Remember that some people refer to memory modules as DIMMs, DRAM, RAM sticks, or just plain RAM, and you could get any of these terms on the exam as well. The following describes the steps involved when installing RAM:
1. Select the correct memory module: The memory module must be compatible with the motherboard. Once again, this means it must be of the right size and pin configuration, the right type or standard, the correct speed, the correct size, and within voltage parameters. Don’t forget to use the memory manufacturer’s website. They have search engines that enable you to input the motherboard you have, by make and model, and then the search displays all the different RAM configurations that are compatible with the motherboard. If you have a proprietary computer such as an HP or Dell, the website asks for the make and model of the computer instead of the motherboard. How much simpler could it be? Be wary of websites that don’t have searchable databases like these.
For our computer I used Kingston RAM. I went to its website, plugged in the make (Intel) and the model (DP35DP) of the motherboard, and it came up with a whole slew of different DDR2 RAM stick configurations; from 256MB configs all the way up to 4GB. As you might have guessed, I chose the 4GB configuration, which is actually a kit of two 2GB sticks, running at 800MHz, which work in a dual-channel configuration, as we display in a minute. To be sure, I checked Intel’s website to verify how much RAM I could use per slot and what speeds would run. The documentation shows that I could use up to 8GB maximum of DDR2 RAM, a maximum of 2GB per slot, at a top speed of 800MHz. Well, for now I don’t need more than 4GB, but I can always add an identical kit later if I want; otherwise, everything sounds compatible. When the RAM is added, the BIOS should find it automatically; however, it is wise to check if any BIOS upgrades are available on the motherboard’s website that deal with the latest types of RAM.
When the RAM arrives, we are ready to install. Power down the PC, disconnect the power cable (or turn off the kill switch), open the PC, and get ready!
2. Employ ESD prevention methods: Use an antistatic strap and mat. Before touching any components, place both hands on an unpainted portion of the case chassis. For more information on ESD preventative measures, see Chapter 16, “Safety and Professionalism.” Never touch any of the pins or chips on the memory module, instead grab the module from the side edges. Remove the memory modules (could be one or more) from the package and place them on an antistatic bag.
3. Ready the motherboard: Some technicians prefer to install the RAM into the motherboard and then install the motherboard into the case; this can also depend on whether you build a new computer or upgrading one. If you do choose to install the RAM to the motherboard separately, place the motherboard on the antistatic mat. (The mat should be on a hard, flat surface.) If you install the RAM directly into an already installed motherboard, clear away any cables or other equipment that might get in the way or could possibly damage the RAM during installation.
You see a plastic tab (ear) on each side of the RAM slot in the motherboard; they are usually white. Swing them out from the slot carefully so that they end up at an angle from the slot; this enables room for the memory module to be inserted.
4. Install the RAM: Be careful with the RAM and the RAM slot! They are delicate! Always touch the case chassis before picking up the RAM. Hold it by the edges and do not touch any pins, or other circuitry on the memory module. If you need to put it down, put it down on an antistatic mat.
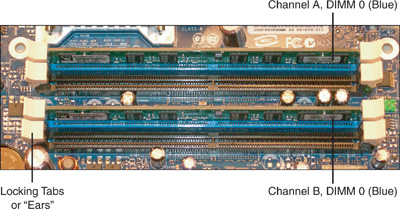
Take a look at the slot, there should be a break in the slot somewhere near the middle (but not the exact middle); this is where the notch in the memory module will go. Gently place the memory module in the slot, pins down. If the notch does not line up with the break in the slot, you might need to turn the module around. When it appears that the RAM is oriented correctly, press down with both thumbs on the top of the memory module. Keep your thumbs as close to the edge as you can so that you can distribute even pressure to the memory module. Press down with both thumbs at the same time until the “ears” on the edge of the RAM slot close and lock on to the memory module. You might hear a click or two when it is done. You might also have to push both of the ears toward the RAM to completely lock them into place. Take a look at the memory module from the side, or compare them to other ears in unused slots; the plastic ears should be standing straight up now. You may need a bit of force to fully insert the RAM, but don’t go overboard! If the motherboard is bending excessively, you are using too much force. If this is the case, make sure that the RAM is oriented correctly; the notches should match up, and the RAM should be straight within the slot. Figure 4.5 shows a bank of DDR2 memory modules installed into the blue DIMM 0 slots.
Figure 4.5 Installed Bank of DDR2 Memory Modules
Install the entire motherboard assembly into the case if that were your method of choice.
5. Test the installation: With the case still open, boot the computer and make sure that the BIOS POST recognizes the new RAM as the right type and speed. Halt the POST, if necessary to read the details, and when done, enter the BIOS. Next, view the details of the RAM within the BIOS. The amount is often on the main page, but you might need to look deeper for the exact configuration, depending on the motherboard. Next, access the operating system (after it is installed) and make sure it boots correctly. Complete several full cycles and warm boots. Also, at some point, you should view the RAM with CPU-Z or in Windows to verify that the operating system is seeing the correct capacity of RAM. You can do this in several places within Windows; here’s a couple:
• System Properties: Click Start; then right-click Computer (My Computer in Windows XP) and select Properties. The total RAM should be listed within this window.
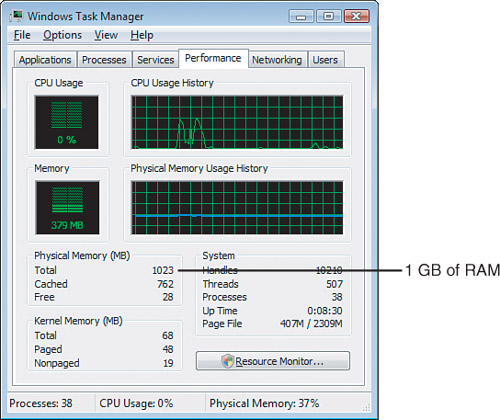
• Task Manager: We mentioned before that you can view the Task Manager by right-clicking the taskbar and selecting Task Manager. There are several other ways to open this; I like this one: Press Windows+R to bring up the Run prompt and type taskmgr. When it is open, go to the Performance tab and view the Physical Memory box. It should show the total physical memory. Keep in mind that 1024MB actually means 1GB. Figure 4.6 shows another computer I have running Windows Vista displaying 1GB of RAM.
Figure 4.6 Windows Vista Task Manager displaying 1GB of RAM
Consider testing the RAM by seeing if you can open several applications at once without any issues or delays.
ExamAlert
Know how to select, install, and verify RAM for the exam.
Finally, if everything looks okay, close up the case, and if all went well, congratulate yourself on another job well done!
Troubleshooting DRAM
It’s not common, but RAM memory modules can cause intermittent issues, or they can fail altogether. Always make sure that the RAM is fully seated within the RAM slot and that the plastic ears are locking the RAM into place. Keep in mind that an unstable system can be caused by several components including RAM. Remember to check the “big four”: video card, CPU, RAM, and motherboard.
A lot of the issues you see are because a user has purchased and installed a memory stick that is not compatible, or is semicompatible, with the motherboard: wrong speed, incorrect capacity, improper configuration, and so on. Be ready for this; check the RAM compatibility against the motherboard, even if the user swears he checked it already. A good technician has her documentation available and has access to the Internet, This can help to ensure that the correct RAM has been installed originally and that it is configured properly. Some RAM manufacturers (www.kingston.com, www.crucial.com) have tools to check compatibility issues.
ExamAlert
Verify compatibility of RAM when troubleshooting!
Perhaps there was some kind of surge inside the computer; maybe the computer is not protected by a surge protector or UPS. Another possibility is that the RAM was damaged by ESD, and this damage manifests itself as intermittent problems. There are expensive hardware-based RAM testers that can tell you if the RAM is electrically sound and if it can process data correctly. If your company owns one, or if you can get your hands on one for a short time, you might narrow the problem down further. However, from personal experience, I have rarely needed to use these.
Here are some possible symptoms of a RAM issue and corresponding troubleshooting techniques:
• Computer will not boot: If there is no RAM in the computer, or the RAM is damaged, or not installed securely, it can prevent the computer from doing anything at all, aside from draining electricity from your AC outlet. For example, the power supply fan turns, but nothing else—no beeps and no displays. Add RAM if none exists. (Sounds silly but I’ve seen it!) If you suspect faulty RAM, or a faulty RAM slot, you can try taking the RAM out, cleaning the RAM and RAM slot if necessary (with compressed air or with Stabilant 22a or like cleaner), and putting the RAM back in, being sure to seat the memory module properly. Next, if the computer has two memory modules, try booting it with just one (if the motherboard allows it), or try moving memory modules to different slots. As mentioned in previous chapters, a POST card tester can be helpful in these situations as well. If necessary, replace the memory module with an identical one (if you have an extra one handy), or at worst, purchase a new one if you have identified the memory module as the source of the problem.
• BIOS indicates a memory error: The BIOS can indicate a memory error through a message on the screen or by beeping. If it beeps, you need to reference your motherboard documentation for the specific beep codes. Sometimes a BIOS setting can be incorrect. For example, maybe the RAM’s latency setting should be configured as CL5 instead of CL6, or some other setting needs to be modified. If the computer has a saved version of the BIOS settings, you can try reverting to them, or you can try loading the BIOS defaults; I can’t tell you how many times this has worked for me! Sometimes the BIOS indicates the wrong amount of RAM. If this is the case, check the RAM as explained in the first bullet. Finally, a BIOS update can be the cure; perhaps the BIOS just doesn’t have the programming necessary to identify the latest type of RAM that was installed.
• Memory errors occur: Several types of memory errors are initiated by the operating system:
• Stop error, aka BSOD or Blue Screen of Death. This is a critical system error that causes the operating system to shut down. Most of the time, these are due to device driver errors (poor code), but they can be associated with a physical fault in memory. One example of this would be an nonmaskable interrupt (NMI). An NMI can interrupt the processor to gain its attention regarding nonrecoverable hardware errors, resulting in a BSOD. The BSOD usually dumps the contents of memory to a file (for later analysis) and restarts the computer. If you don’t encounter another BSOD, it’s probably not much to worry about. But if the BSOD happens repeatedly, you want to write down the information you see on the screen and cross-reference it to the Microsoft Knowledge Base (MSKB) at http://support.microsoft.com. Again, if you suspect faulty RAM, try the troubleshooting methods in the first bullet “Computer will not boot.”
• Page faults (hard faults), Out of memory or low on virtual memory errors. These are usually issues with the operating system or application that was running. However, you see less and less of these with each new Windows version. If a particular application keeps failing, or if you get a particular message listing a specific memory location over and over again, it can indicate a physical problem with RAM. Be sure to document error messages and any error codes or memory locations that display on the screen.
• General protection fault (GPF). This can cause a program to fail, and in older versions of Windows, it would cause the entire OS to shut down and display a black screen. Today, these errors are uncommon and are usually related to the OS, running applications, and CPU. It is also possible that memory errors can cause a GPF, for example writing to a read-only portion of memory, or a conflict in a particular part of memory, but again, these are rare.
We troubleshoot these BSODs, page faults, and other Windows issues in Chapter 10, “Troubleshooting Windows.”
Chances are you won’t need them often, but a few memory testing programs are available online: GoldMemory (http://www.goldmemory.cz/), MemTest86 (http://www.memtest86.com/), PC-Diagnosys (http://www.windsortech.com/pcdiags.html), and the Windows Memory Diagnostic (http://oca.microsoft.com/en/windiag.asp) are a few examples. These can help diagnose whether a memory module needs to be replaced. But in general, trust in your senses, look at and listen to the computer to help diagnose any RAM issues that might occur.
Cram Quiz
Answer these questions. The answers follow the last question. If you cannot answer these questions correctly, consider reading this section again until you can.
1. Where can you view how much RAM you have in the computer? (Select all that apply.)
![]() A. Task Manager
A. Task Manager
![]() B. My Computer
B. My Computer
![]() C. System Properties
C. System Properties
![]() D. BIOS
D. BIOS
2. How should you hold RAM when installing it?
![]() A. By the edges
A. By the edges
![]() B. By the front and back
B. By the front and back
![]() C. With tweezers
C. With tweezers
![]() D. With an Integrated Circuit (IC) puller
D. With an Integrated Circuit (IC) puller
3. You suspect a problem with a memory module, what should you do first?
![]() A. Replace the module with a new one.
A. Replace the module with a new one.
![]() B. Install more RAM.
B. Install more RAM.
![]() C. Clean the RAM slot.
C. Clean the RAM slot.
![]() D. Test the RAM with MemTest86.
D. Test the RAM with MemTest86.
4. If a BSOD occurs, what should you do?
![]() A. Replace all the RAM.
A. Replace all the RAM.
![]() B. Re-install the operating system.
B. Re-install the operating system.
![]() C. Check the RAM settings in the BIOS.
C. Check the RAM settings in the BIOS.
![]() D. Wait for it to happen again.
D. Wait for it to happen again.
Cram Quiz Answers
1. A, C, and D. The BIOS displays what type of RAM you have and the amount. Windows has several locations in which you can discern how much RAM there is, including the Task Manager, System Properties, and System Information.
2. A. Hold RAM by the edges to avoid contact with the pins, chips, and circuitry
3. C. Clean the RAM slot and memory module. Consider using compressed air or the proper spray (like Stabilant 22a).
4. D. A singular BSOD doesn’t necessarily mean that the RAM or any other components have gone bad. Often, a single BSOD occurs, but you never see it again. You want to see two or more of the same error before starting into a lengthy troubleshooting session!
Additional Reading and Resources
Additional A+ resources: http://www.davidlprowse.com/aplus
GoldMemory: http://www.goldmemory.cz/
Memory Advisor Tool: http://www.crucial.com/
MemTest86: http://www.memtest86.com/
Microsoft Help and Support : http://support.microsoft.com
Mueller, Scott. Upgrading and Repairing PCs. Que.
Online memory search and memory tools: http://www.kingston.com
PC-Diagnosys: http://www.windsortech.com/pcdiags.html