
Chapter 3. The CPU
The central processing unit, or CPU, is quite often referred to as the “brain” of the computer. Today’s CPUs are like superbrains! A typical CPU today runs at 3GHz or higher, use two or more cores, and some can easily process 50 billion operations per second. That’s a good deal more than we would have seen just 5 years ago. Some mornings I have trouble processing the thought need coffee! Of course we know that the human brain is much more sophisticated and functional than a CPU, but the CPU wins out when it comes to sheer calculating power.
You might hear the CPU referred to as a microprocessor, which technically it is. It’s a much smaller version of the processors that were used 50 years ago. And although microprocessor might be a more accurate term, it has become more acceptable to refer to it as CPU, which this chapter does. However, you also see CPU manufacturers such as Intel refer to them as processors, so for all intents and purposes, the three terms mean the same thing. Keep in mind that a computer has other processors used by video cards and elsewhere, but know that the CPU is the main processor.
This chapter discusses some CPU technologies and cooling methods and talks about the models of CPUs offered by Intel and AMD. Afterward, the chapter demonstrates how to install and troubleshoot the CPU.
CPU 101
The CPU is often the most-expensive component in the computer; it’s also one of, if not the, most important. The CPU’s main function is to execute instructions or programs. Its speed, or clock rate, is measured in Hertz. For example, at 2.66GHz, a CPU operates at 2.66 billion cycles per second; we speak more to this concept in a moment. But although the speed of the CPU might be important, other factors should also play into your decision when choosing a CPU, including the chipset on the motherboard, CPU technology, and the brand of CPU. Chapter 2, “Motherboards,” covers chipsets, but let’s go ahead and talk about the various CPU technologies and brands of CPUs now.
CPU Technology
CPU technology is a key factor when considering a CPU. It all comes back to the motherboard; the CPU must be compatible with the motherboard in a number of ways. It is important to think about the speed (clock rate) of the CPU you want to use and whether that speed can be supported by the motherboard, and if the CPU fits in the motherboard’s socket. Also, a decision has to be made as to whether to use a 32-bit or 64-bit CPU, and choose either a single-core or multi-core CPU; this will be based off the motherboard and the type of operating system you plan to install. Getting deeper into the technical side of the CPU, you might want to know the amount of cache included with the CPU, and the amount of power it requires.
Clock Rate
The clock rate is the frequency (or speed) of a component. It is rated in cycles per second and measured in Hertz (Hz). For all practical purposes, the term clock rate is the same as the more commonly used term: clock speed.
Components are sold to consumers with a maximum clock rate, but they don’t always run at that maximum number. To explain, let me use a car analogy. The CPU is often called the “engine” of the computer, like a car engine. Well, your car’s speedometer might go up to 120MPH, but you’ll probably never drive at that maximum—for a variety of reasons! When it comes to CPUs, the stated clock rate is the maximum clock rate, and the CPU usually runs at a speed less than that; in fact, it can run at any speed below the maximum.
Now, we’re all familiar with speeds such as 2.4GHz, 3.0GHz, or 3.2GHz. But what is the basis of these speeds? Speed can be broken down into three categories that are interrelated:
• Motherboard clock speed: The base clock speed of the motherboard. Also referred to as the system bus speed, this speed is generated by a quartz oscillating crystal soldered directly to the motherboard. For example, the base clock speed on the motherboard used in Chapter 2 is 333MHz.
• External clock speed: This is the speed of the front side bus (FSB), which connects the CPU to the Memory Controller Hub (northbridge) on the motherboard. This is usually variable and depends on the CPU you install. In addition, it is determined from the base clock speed of the motherboard. For example, our motherboard’s maximum external clock speed (or FSB) is 1333MHz. Simply put, this means that it is transferring 4 times the amount of data per cycle as compared to the original base clock speed. 333 MHz × 4 = 1,333MHz.
• Internal clock speed: This is the internal speed of the CPU. For this book I purchased the Intel Q8400 CPU that is rated at 2.66GHz. The CPU uses an internal multiplier that is also based off the motherboard base clock. The multiplier for this CPU is 8. The math is as follows: base clock speed × multiplier = internal clock speed. In our example, that would be 333MHz × 8 = 2.66GHz. Our motherboard can support faster CPUs also, for example, the Intel Q9650 that has an internal clock speed of 3.00GHz. This means that it has a multiplier of 9 (3.00GHz / 333MHz = 9). Some motherboards allow for overclocking (not ours), which enables the user to increase the multiplier within the BIOS, thereby increasing the internal clock speed of the CPU. This could possibly cause damage to the system, analogous to blowing the engine of a car when attempting to run a 10 second ¼ mile. So approach overclocking with caution.
Note
Quite often motherboard manufacturers state only the internal and external clock speeds (CPU and FSB); you might need to dig for more information concerning the base clock speed. To make matters more confusing, some manufacturers refer to the FSB as the system bus, but you can tell the difference. Just remember that the FSB is calculated from the base clock of the motherboard. Quite often, it’s multiplied by four. Currently, FSBs are between 800MHz and 1600MHz.
However, the external clock speed (FSB) isn’t actually a factor for AMD CPUs or newer Intel Core i7 CPUs because they have essentially done away with the FSB. Intel just recently started using the QuickPath Interconnect (QPI) technology in newer motherboards.
32-Bit Versus 64-Bit
The bulk of today’s CPUs are 64-bit; it’s a type of CPU architecture that incorporates registers that are 64 bits wide. These registers, or temporary storage areas, allow the CPU to work with and process 64-bit data types and provide support for up to one-terabyte of platform address space. 64-bit CPUs have been available for PCs since 2003. Examples of 64-bit CPUs include the AMD Phenom and Intel Duo Core CPUs.
The predecessor to the 64-bit CPU was the 32-bit CPU. Intel started developing well-known 32-bit CPUs as early as 1985 with the 386DX CPU (which ran at a whopping 33MHZ!), and AMD did likewise in 1991 with the Am386. A 32-bit CPU can’t support nearly as much address space as a 64-bit CPU; 32-bit is limited to 4GB. Most editions of Windows are available in both 32-bit and 64-bit versions.
You will probably still see 32-bit technologies (such as the Pentium 4) in the field; however, due to applications’ ever-increasing need for resources, these older CPUs continue to diminish, whereas 64-bit technologies (such as Core 2 Duo) will become more prevalent.
You might hear of the terms x86 and x64. x86 refers to older CPU names that ended in an 86—for example, the 80386 (shortened to just 386), 486, or 586 CPU and so on. Generally, when people use the term x86, they refer to 32-bit CPUs that enable 4GB of address space. x64 (or x86-64) refers to newer 64-bit CPUs that are a superset of the x86 architecture. This technology can run 64-bit software and 32-bit software and can address a maximum of 1TB.
Windows Vista and Windows XP come in 64-bit and 32-bit versions so that users from both generations of computers can run the software efficiently. Windows 2000 Professional was designed for 32-bit CPUs only.
Sockets
The socket is the electrical interface between the CPU and the motherboard. It attaches directly to the motherboard and houses the CPU. It also physically supports the CPU and heat sink and enables for easy replacement of the CPU.
The socket is either made of plastic or metal, with metal contacts for connectivity to each of the pins/lands of the CPU. A metal lever (retaining arm) locks the CPU in place. Figure 3.1 shows an example of an unlocked socket.
Figure 3.1 An unlocked LGA775 socket
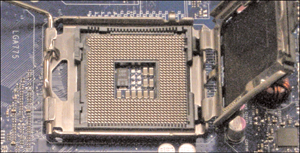
Historically the socket has been considered a ZIF, short for zero insertion force. This means that the CPU should connect easily into the socket, with no pressure or force involved during the installation. Installing the CPU into these ZIF sockets is kind of like moving a planchette over a Ouija board until the CPU falls into place! Today’s newer Land Grid Array (LGA) sockets require you to place the CPU into the socket housing, but it still doesn’t require much force at all. The socket will have many pin inserts, or lands (on newer sockets), for the CPU to connect to. Pin 1 can be found in one of the corners and can be identified by one or more missing pins or pinholes depending on the type of socket. This helps you to orient the CPU, which also has the missing pin(s), or an arrow, in the corresponding corner. Here are two types of sockets you should know for the exam:
• PGA: Pin Grid Array sockets accept CPUs that have pins covering the majority of their underside. The pins on the CPU are placed in the pinholes of the socket, and the CPU is locked into place by a retaining arm. PGA has been in use since the late ‘80s, and is still in use on some motherboards today, but is quickly giving way to LGA.
• LGA: Land Grid Array sockets use lands that protrude out and touch the CPU’s contact points. This newer type of socket (also known as Socket T) offers better power distribution and less chance to damage the CPU compared to PGA. LGA has been used since the later versions of Pentium 4 and is commonly used today.
The CPU and socket must be compatible. For example, the motherboard we use has an LGA775 CPU socket, which is common but not the only socket that Intel uses on its motherboards. The Q8400 CPU we use is designed to fit into the LGA775 socket, and several other CPUs are capable of fitting into this socket as well, but not all. For example some of Intel’s Extreme CPUs are packaged differently and might need a different socket, such as the LGA771, which means a different motherboard must be used. Common sockets used by AMD are the Socket AM2 and AM2+.
ExamAlert
When purchasing a CPU, make sure that it is compatible with the motherboard’s socket.
CPU Cache
Several types of cache are used in computers, but CPU cache is a special high-speed memory that reduces the time the CPU takes to access data. By using high-speed static RAM (SRAM) and because the cache is often located directly on, or even in the CPU, CPU cache can be faster than accessing information from dynamic RAM (DRAM) sticks. However, it will be limited in storage capacity when compared to DRAM. Cache is divided into levels:
• Level 1: L1 cache is built in to the CPU and gives fast access to the most frequently used data. This level cache is the first one accessed by the CPU and is usually found in small amounts. However, it is the fastest cache to be found, offering the lowest latency of any of the types of cache. One of the reasons for this is that it resides within the CPU core. Our Q8400 CPU has 4 × 32KB of L1 cache; 32KB for each core. You can find more information about multi-core technology later in this chapter.
• Level 2: L2 cache can be built in to the CPU or placed on a separate chip on the motherboard. L2 cache is accessed after L1 cache, and it serves the CPU with less frequently used data in comparison to L1 but still more frequently used than DRAM data. L2 cache feeds the L1 cache, which in turn feeds the CPU. L2 is not as fast as L1 cache but is superior to DRAM sticks. Today’s CPUs have the L2 cache directly on-die, and the cache takes up the majority of the CPU’s real estate. The Q8400 CPU we use for our build has a total of 4MB L2 cache.
• Level 3: L3 cache comes in the largest capacities of the three types of cache and has the most latency; therefore, it is the slowest. If the CPU can’t find what it needs in L1, it moves to L2 and finally to L3. Or you could think of it this way: L3 cache feeds L2 cache, which feeds L1 cache, which in turn feeds the CPU with data. If the CPU can’t find the data it is seeking, it moves on to the DRAM sticks. L3 cache could be on-die or on-board, but most of today’s CPUs (if they use it at all) have it on-die. Newer AMD CPUs utilize a large amount of L3 cache, but most Intel CPUs do not use it, although this could obviously change in the future.
Generally, the more cache the better. The less the CPU needs to access DRAM, the faster it can calculate data.
Hyper-Threading
Intel’s Hyper-Threading (HT) enables a single CPU to accept and calculate two independent sets of instructions simultaneously, simulating two CPUs. The technology was designed so that single CPUs can compete better with true multi-CPU systems but without the cost involved. In an HT environment, only one CPU is present, but the operating system sees two virtual CPUs and divides the workload, or threads, between the two.
Hyper-Threading began during the Pentium 4 days, but is not used in Intel’s Core 2 CPUs. However, it has made a return in 2009 with the Core i7 CPU.
Note
Don’t confuse Hyper-Threading with HyperTransport used by AMD. HyperTransport is a high-speed, low latency, point-to-point link that increases communication speeds between various devices; AMD uses it so that CPUs can access system memory more efficiently.
Multi-Core Technologies
Whereas HT technology simulates multiple CPUs, multi-core CPUs physically contain two or more actual processor cores, in one CPU package. These newer CPUs can have 2, 4, or even 8 cores, each acting as a single entity, but in many cases sharing the CPU cache. This enables for more-efficient processing of data. Not only is less heat generated, but also a 1.8GHz dual-core CPU can process more data per second than a 3.6GHz single-core CPU.
Current examples of multi-core CPUs include Intel’s Core 2 Duo, Core 2 Quad, and Core 2 Extreme, and AMD’s X2 and Phenom CPUs. Intel’s new i7 Core CPUs combine multi-core technology with Hyper-Threading enabling for as many as eight simultaneous threads in a single CPU package. It just goes on and on!
ExamAlert
Know the differences between Hyper-Threading and multi-core technologies for the exam. Hyper-Threading enables a single core CPU to calculate two instruction sets simultaneously, whereas multi-core CPUs calculate two or more instruction sets simultaneously, one instruction set per core.
Power Consumption
Power consumption of CPUs is normally rated in watts. For example, the Q8400 is rated as a 95 watt-hour CPU. This rating is known as thermal design point (TDP), and it signifies the maximum power that the computer’s cooling system needs to dissipate heat generated by the CPU. This doesn’t mean that it always uses that much power, but it should play into your decision when planning what power supply to use and what kind of cooling system. For more information on power supplies, see Chapter 5, “Power.” One hundred watts, or thereabouts, is a common amount for multi-core CPUs. They are more efficient than their predecessor single-core CPUs, such as the Pentium D that could use as much as 215 watts.
Because we are talking electricity, another important factor is voltage. CPUs are associated with a voltage range; for example, the Q8400 ranges from 0.86V—1.28V. It is important to monitor the voltage that is received by the CPU; you can do this in the BIOS. If the CPU goes beyond the specified voltage range for any extended length of time, it will damage the CPU. This becomes especially important for overclockers.
Brands of CPUs
For the average user, it doesn’t matter too much which CPU you go with. However, for the developer, gamer, video editor, or musician, it can make or break your computer’s performance. Although the CompTIA A+ objectives cover only Intel and AMD (Advanced Micro Devices), you should be aware that there are others in the market. Intel and AMD dominate the PC and laptop arena, but other companies such as VIA have made great inroads into niche markets and are moving deeper into the laptop/mobile markets as well. CPU manufacturers use the make/model system. For example, the CPU we use is the Intel (make) Core 2 Quad Q8400 Yorkfield (model).
Intel Versus AMD
Intel and AMD are both good companies that make quality products, which leads to great competition. Which is better? In all honestly, it varies and depends on how you use the CPU. You can find advocates for both (albeit subjective advocates), and the scales are constantly tipping back and forth. On any given day, a specific Intel CPU might outperform AMD, and 3 months later, a different AMD CPU will outperform an Intel. It’s been that way for years now. Table 3.1 and Table 3.2 give a synopsis of currently offered CPUs by the two manufacturers, with the latest at the top and the oldest at the bottom. All these are 64-bit CPUs.
Table 3.1 Comparison of Intel CPUs (as of July, 2009)
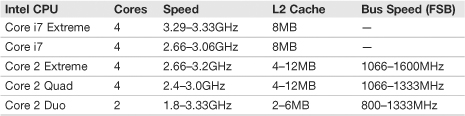
Table 3.2 Comparison of AMD CPUs (as of July, 2009)

Note
The Core i7 does away with the FSB. This is because Intel added an on-die memory controller (memory controller added directly to the CPU). Core i7 setups use a different chipset (for example the X58); within this chipset the QuickPath Interconnect (QPI) makes the connection between the CPU and the northbridge. The northbridge is referred to as the IOH (Input/Output Hub). However, you will probably not see questions concerning Core i7 on the exam because it is a fairly new technology.
Note
All the AMD models listed have an on-die memory controller and use HyperTransport technology instead of a front side bus. AMD CPUs utilize L3 cache whereas Intel CPUs do not; however, AMD CPUs in general use less L2 cache than Intel.
Whatever CPU you choose, make sure that you get a compatible motherboard. A few things to watch for are compatibility with the FSB (if applicable), chipset, socket type, and voltage. However, Intel and AMD have tools on their websites that make it easy for you to find compatible motherboards.
Cooling
Now that we know a CPU can effectively use as much electricity as a light bulb, we can understand why it gets so hot. Hundreds of millions of transistors are hammering away in these powerhouses, so we need to keep it and other devices in the computer cool. This is done in a few ways as outlined in this section.
Heat Sinks
The heat sink is a block of metal made to sit right on top of the CPU, with metal fins stretching away from the CPU. It uses conduction to direct heat away from the CPU and out through the fins. With passive heat sinks, that’s all there is to it. But with active heat sinks, a fan is attached to the top of the heat sink. The fan plugs into the motherboard for power and usually blows air into the heat sink and toward the CPU helping to dissipate heat through the heat sink fins. More powerful aftermarket CPU fans can be installed as well; just make sure that your power supply can handle the increased power requirements. In today’s motherboards the chipset’s northbridge and southbridge have passive heat sinks, but all new CPUs come with active heat sinks. Traditionally heat sinks have been made of aluminum, but now you also see copper heat sinks used due to their superior conductivity.
Thermal Compound
The CPU cap and the bottom of the heat sink have slight imperfections in the metal. The best heat dissipation from CPU to heat sink would occur if the metal faces on each were completely and perfectly straight and flat, but you would find that only in a platinum-iridium alloy. So, to fill the tiny gaps and imperfections, thermal compound (aka thermal interface material or TIM) is used. One example of thermal compound is Arctic Silver, available online and at various electronics stores. Now, if this is a new installation, thermal compound is probably not needed. Most new CPUs’ heat sinks have factory applied thermal compound that spreads and fills the gaps automatically after you install the heat sink and boot the computer. However, if you need to remove the heat sink for any reason, for example to clean it, thermal compound should be applied to the CPU cap before re-installing the heat sink, or installing a new heat sink. To do this, first clean any old thermal compound off of the CPU cap and the heat sink with TIM remover such as Akasa TIM-Clean. Then, clean a credit card with isopropyl alcohol or denatured alcohol. Next, apply a small amount of thermal compound to the center of the CPU cap. (This is the top of the installed CPU. You don’t want to get any thermal compound on the actual CPU or motherboard.) With the credit card, spread the thermal compound carefully so that that you end up with a thin layer. Finally, install the heat sink. Try to do so in one shot without jostling the heat sink excessively.
ExamAlert
Reapply thermal compound whenever removing and re-installing a heat sink.
Fans
Case fans are also needed to get the heat out of the case. The power supply has a built-in fan that is adequate for lesser systems. However, multi-core systems should have at least one extra exhaust fan mounted to the back of the case, and many cases today come with one for this purpose. An additional fan on the front of the case can be used as an intake of cool air. If you aren’t sure which way the fan blows, connect its power cable to the computer but don’t mount it; then hold a piece of paper against the fan. The side that pulls the paper toward it should be the side facing the front of the computer when it is mounted. Some cases come with fans that are mounted to the top, which is also ingenious because heat rises. Another thing to consider is where the heat goes after it leaves the case. If the computer is in an enclosed area, the heat will have a hard time escaping and might end up back in the computer. Make sure there is air flow around the computer case. I have seen some people point the front of their computer toward an AC vent in the summer and even use special exhaust fans (such as bathroom fans) that butt up against the power supply or secondary exhaust fan on the case and lead hot air directly out of the house, but I digress.
Another possibility is a solution Intel developed called the Chassis Air Guide system, which is essentially a hollow tube that leads from the side of the case to the CPU, guiding cool room ambient air toward the CPU. For more information on the Intel Chassis Air Guide and Intel’s Thermally Advantaged Tested Chassis list, see the following link: http://www.intel.com/go/chassis/. Of course, three or four fans can make a decent amount of noise, and they still might not be enough for the most powerful computers, especially the overclocked ones, which leads us to our next option.
Liquid Cooling Systems
Although still uncommon, liquid cooled systems are looked at as more of a viable option than they would have been 5 or 10 years ago. And newer water cooling kits can be used to not only cool the CPU, but also the chipset, hard drives, video cards, and more. A kit usually comes with a CPU water block, pump, radiator/fan, PVC tubing, and of course, coolant. The advantages are improved heat dissipation (if installed properly), higher overclocking rates, and support for the latest, hottest CPUs. The disadvantage as you can guess is the risk of a leak that can damage components. Due to the complexity of the installation, and the fact that most computers do not need this level of heat dissipation, liquid cooling is usually employed only by enthusiasts.
Cram Quiz
Answer these questions. The answers follow the last question. If you cannot answer these questions correctly, consider reading this section again until you can.
1. Which of these is the speed of the CPU?
![]() A. External clock speed
A. External clock speed
![]() B. FSB
B. FSB
![]() C. Internal clock speed
C. Internal clock speed
![]() D. System bus speed
D. System bus speed
2. Which of the following are 64-bit CPUs? (Select all that apply.)
![]() A. Core 2 Duo
A. Core 2 Duo
![]() B. Phenom II
B. Phenom II
![]() C. Pentium III
C. Pentium III
![]() D. Celeron
D. Celeron
3. Which is the fastest cache memory?
![]() A. L2
A. L2
![]() B. L3
B. L3
![]() C. HTTP
C. HTTP
![]() D. L1
D. L1
4. What does Hyper-Threading do?
![]() A. It gives you multiple cores within the CPU.
A. It gives you multiple cores within the CPU.
![]() B. It enables for four simultaneous threads to be processed by one CPU core.
B. It enables for four simultaneous threads to be processed by one CPU core.
![]() C. It enables for two simultaneous threads to be processed by one CPU core.
C. It enables for two simultaneous threads to be processed by one CPU core.
![]() D. It is a high-speed connection from the CPU to RAM.
D. It is a high-speed connection from the CPU to RAM.
5. What seals the tiny gaps between the CPU cap and the heat sink?
![]() A. Thermal jelly
A. Thermal jelly
![]() B. Peanut butter and jelly
B. Peanut butter and jelly
![]() C. 3-in-1 house oil
C. 3-in-1 house oil
![]() D. Thermal compound
D. Thermal compound
6. What is the amount of power required to cool the computer?
![]() A. FSB
A. FSB
![]() B. TDP
B. TDP
![]() C. MMX
C. MMX
![]() D. TDK
D. TDK
7. Which kind of socket incorporates “lands” to ensure connectivity to a CPU?
![]() A. PGA
A. PGA
![]() B. Chipset
B. Chipset
![]() C. LGA
C. LGA
![]() D. Copper
D. Copper
Cram Quiz Answers
1. C. The internal clock speed is the speed of the CPU, for example 2.4GHz. The external clock speed is the speed of the FSB, and the system bus speed (base clock) is what the internal clock speed is based off of. An example of a base clock system bus speed would be 333MHz.
2. A and B. Intel’s Core 2 Duo and AMD’s Phenom II are both 64-bit CPUs. The Pentium III and Celeron are 32-bit CPUs.
3. D. L1 is the fastest cache memory and is located within the CPU’s core.
4. C. Hyper-Threading allows for an operating system to send two simultaneous threads to be processed by a single CPU core. The OS views the CPU core as two virtual processors. Multiple cores would infer multi-core technology that means that there are two physical processing cores within the CPU package. The high-speed connection used by AMD from the CPU to RAM is Hyper-Transport.
5. D. Thermal compound is used to seal the small gaps between the CPU and heat sink. Did I ever tell you about the time I found grape jelly inside of a customer’s computer?
6. B. TDP (Thermal design point) is the amount of power required to cool a computer and is linked directly to the amount of heat a CPU creates.
7. C. LGA (Land Grid Array) is the type of socket that uses “lands” to connect the socket to the CPU? PGA sockets have pinholes that make for connectivity to the CPU’s copper pins.
Installing and Troubleshooting CPUs
This section delves into the hands-on steps involved when installing or troubleshooting a CPU. Installation of CPUs has actually become easier over time, especially with the advent of LGA sockets. However, troubleshooting a CPU can be just as much of a challenge as ever. It’s important to note that proper installation of a CPU can reduce the amount of CPU failures and the ensuing amount of CPU troubleshooting.
Installing CPUs
As with most computer components, installing a CPU is easy. But you must be careful, it can be easily damaged. Take it slow, and employ proper safety measures. We break it down into some simple steps:
1. Select a CPU: If you build a new computer, the CPU needs to be compatible with the motherboard for the type of CPU, speed, socket type, and voltage. If you upgrade a CPU, be sure that it is on the manufacturer’s compatible list (which can be found on its website). This might be the motherboard manufacturer, or it could be a proprietary computer manufacturer (such as HP or Dell).
Power down the PC, disconnect the power cable (or turn off the kill switch), open the PC, and get your boxes of components ready!
2. Employ ESD prevention methods: Use an antistatic strap and mat. Remove the CPU and heat sink from the package and place them on an antistatic bag. (One usually comes with the motherboard, but you should have extra ones handy.) Make sure that the CPU’s lands (or pins) are facing up to avoid damage. Never touch the lands or pins of a CPU. Before touching any components, place both hands on an unpainted portion of the case chassis. For more information on ESD preventative measures, see Chapter 16, “Safety and Professionalism.”
3. Ready the motherboard: Some technicians prefer to install the CPU into the motherboard and then install the motherboard into the case. If so, place the motherboard on the antistatic mat. (The mat should be on a hard flat surface.) If you install the CPU directly into an already installed motherboard, clear away any cables or other equipment that might get in the way or could possibly damage the CPU, heat sink, or fan.
4. Install the CPU: Be careful with the CPU! It is extremely delicate! Always touch the case chassis before picking up the CPU. Hold it by the edges (the way you would properly hold a CD) and do not touch any pins, lands, or other circuitry on the CPU. If you need to put it down, put it down on an antistatic mat with the pins/lands facing up. Most of the time a CPU will be installed to either an LGA socket or a PGA socket. The following two bullets show how to install a CPU into each type of socket.
• If you install to an LGA socket, unlock the socket by releasing the retaining arm and swinging it open as far as it can go. Open the socket hatch, unhook it if necessary, and remove any plastic cover. Next, place the CPU into the socket. One corner of the CPU has an arrow that should be oriented with the socket’s missing pin(s); both of these corresponding corners indicate pin 1, as shown in Figure 3.2. Carefully place the CPU into the socket. The lands on the CPU match up with the lands on the socket if it is oriented correctly. Make sure it is flush and flat within the socket. Close the cap, and secure the retaining arm underneath the tab that is connected to the socket, thus securing the CPU. Next, install the heat sink/fan assembly. On LGA sockets these usually have four plastic snap-in anchors. Carefully press each of these into and through the corresponding motherboard holes. Don’t use too much force! Then turn each of them one quarter turn to lock the heat sink in place. Make sure that the heat sink is installed flush with the CPU by inspecting the assembly from the side. You want to be positive of this before turning on the computer because the thermal compound will begin to expand and fill the imperfections right away. Plug the fan into the appropriate motherboard power connector, as shown in Figure 3.3. (These are usually labeled directly on the motherboard, or see your motherboard documentation for details on where to plug the fan in.)
Figure 3.2 Orientation markings on the Q8400 CPU and LGA775 socket
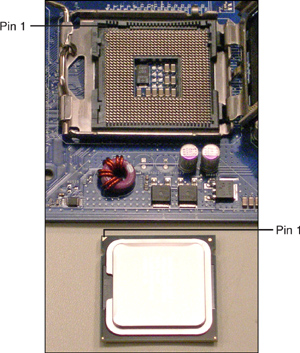
Figure 3.3 An installed multi-core CPU with connected fan

Install the entire motherboard assembly into the case if that were your method of choice.
• If you install to a PGA socket, unlock the socket by moving the retaining arm out and upward until it is at a 90-degree angle to the motherboard. Then gently place the CPU into the ZIF socket. There will be an arrow on one corner of the CPU that should correspond to a missing pin (or arrow) on the socket. Don’t use force; slide the CPU around until it slips into the socket. Look at the CPU from the side and make sure it is flush with the socket. Lock down the retaining arm to keep the CPU in place. Then attach the heat sink/fan assembly to the metal clips that are on the sides of the socket. Make sure that the heat sink is installed flush with the CPU by inspecting the assembly from the side. You want to be positive of this before turning on the computer because the thermal compound will begin to expand and fill the imperfections right away. Attach the power cable for the fan to the motherboard. (See your motherboard documentation for details on where to plug the fan in.)
Note
With some CPUs you might need to lock down the retaining arm after the heat sink/fan is installed. This depends on the CPU. Remember to RTM...read the manual!
Install the entire motherboard assembly into the case if that were your method of choice.
5. Test the installation: With the case still open, boot the computer to make sure that the BIOS POST recognizes the CPU as the right type and speed. Halt the POST if necessary to read the details, and when done, enter the BIOS and view the CPU information there as well. If the BIOS doesn’t recognize the CPU properly, check if a BIOS upgrade is necessary for the motherboard. Also make sure that the CPU fan is functional. Then view the details of the CPU within the BIOS. Be sure that the voltage reported by the BIOS is within tolerance. Then access the operating system (after it is installed) and make sure it boots correctly. Complete several full cycles and warm boots. Finally, view the CPU(s) within Windows and with CPU-Z:
• Within Windows: Check in the Device Manager to make sure that the CPU is identified correctly. Navigate to Start and right-click on Computer (My Computer in XP); then select Manage from the drop-down menu. This brings up the Computer Management window. From here locate the Device Manager in the left window pane and click it. Now, from the list in the right window pane, there should be a category named Processors; click the plus sign to expand it, and the CPU you installed should be listed. In Figure 3.4 you can see a different system I am running that has a Core 2 Duo; the CPU shows up as two separate CPUs running at 2.5GHz. You can view similar information in Windows at the System Information window, which can be accessed by pressing Windows+R to open the Run prompt and typing msinfo32 (in Vista) or winmsd (in XP).
Figure 3.4 A Core 2 Duo CPU as shown in the Device Manager

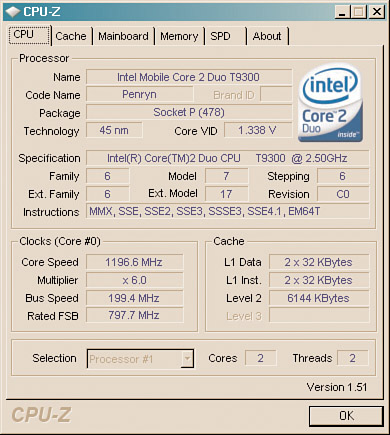
• With CPU-Z: The CPU-Z program can be downloaded from http://www.cpuid.com/cpuz.php; it is freeware that gathers all the information we just saw in the Device Manager and also identifies the voltage, clock speeds, cache memory, and much more. This is the program to use when analyzing and monitoring your CPU, as shown in Figure 3.5. When installed (which is easy), simply run it to analyze your CPU.
Figure 3.5 CPU-Z showing the same Core 2 Duo CPU
Finally, if everything looks okay, close up the case, and consider monitoring the heat during the first few hours of operation. This can usually be done within the BIOS or with third-party applications within Windows. If all went well, congratulate yourself on a job well done!
Troubleshooting CPUs
The most common issue with a CPU is when it isn’t installed properly or securely. This could possibly cause a complete failure when trying to turn the system on. If this happens, always check the power first, just in case. Another possibility is that the system will turn on, and power will be supplied to the system, but nothing else will happen: no POST, no display, no hard drive activity. In either of these situations, after checking power, make sure of the following:
• Check the Big Four: Remember that the CPU is part of the big four including the video card, RAM, and motherboard. Be sure to check these other components for simple connectivity problems, which could be the real culprit and not the CPU at all. In fact, always check connections first before taking the CPU assembly apart.
• Fan is connected and functional: Some motherboards have a safeguard that disables booting if the fan is defective or not plugged in. Or you might get a message on the screen or other type warning depending on the motherboard. Be sure that the fan is plugged into the correct power connector on the motherboard (or elsewhere), and verify that it turns when the computer is on. If the fan has failed, replacement fans can be purchased; just make sure that the new fan is compatible with the heat sink and motherboard.
• Heat sink is connected properly: Make sure that the heat sink is flush with the CPU cap and that it is securely fastened to the motherboard (or socket housing).
• CPU is installed properly: Make sure it was installed flush into the socket and that it was oriented correctly. Of course, this means removing the heat sink. If you do so, you should clean off excess thermal compound and reapply thermal compound to the CPU cap before reinstalling the heat sink.
ExamAlert
When troubleshooting the CPU, be sure to first check all connections, and then make sure the fan, heat sink, and CPU are secure and installed properly.
Note
As always, turn off the computer, unplug it, and employ ESD measures before working on the inside of the computer.
Here are a few more possible symptoms of a failing CPU:
• Unexplained crashes during boot up or during use.
• The computer locks after only a short time of use.
• Voltage is near, at, or above the top end of the allowable range.
Sometimes, the CPU is just plain defective. It could have been received this way, or maybe it overheated. Perhaps there was a surge that damaged it, or maybe someone overclocked it too far, and it was the victim of overvoltage (and subsequent overheating). Regardless of these reasons, the CPU needs to be replaced. Now, by default CPUs come with a heat sink and fan, and if that is the case, install the CPU as you normally would. But in some cases, you can save money by purchasing the CPU only and use the existing heat sink. In this case, remember to clean excess thermal compound and then reapply thermal compound; but reapply to the CPU cap, not to the heat sink. If the CPU was installed properly, users don’t usually have many problems with it (aside from the overclockers). Keep this in mind when troubleshooting the CPU, or when troubleshooting an issue that might appear to be a CPU issue but is actually something else altogether.
Cram Quiz
Answer these questions. The answers follow the last question. If you cannot answer these questions correctly, consider reading this section again until you can.
1. You are troubleshooting a CPU and have already cut power, disconnected the power cable, opened the case, and put on your antistatic strap. What should you do next?
![]() A. Check the BIOS.
A. Check the BIOS.
![]() B. Check connections.
B. Check connections.
![]() C. Remove the CPU.
C. Remove the CPU.
![]() D. Test the motherboard with a multimeter.
D. Test the motherboard with a multimeter.
2. You have installed the CPU and heat sink/fan assembly. What should you do next?
![]() A. Apply thermal compound.
A. Apply thermal compound.
![]() B. Boot the computer.
B. Boot the computer.
![]() C. Plug in the fan.
C. Plug in the fan.
![]() D. Replace the BIOS jumper shunt.
D. Replace the BIOS jumper shunt.
3. What is a possible symptom of a failing CPU?
![]() A. CPU is beyond the recommended voltage range.
A. CPU is beyond the recommended voltage range.
![]() B. Computer won’t boot.
B. Computer won’t boot.
![]() C. BIOS reports low temperatures within the case.
C. BIOS reports low temperatures within the case.
![]() D. Spyware is installed into the browser.
D. Spyware is installed into the browser.
4. When deciding on a CPU for use with a specific motherboard, what does it need to be compatible with?
![]() A. Case
A. Case
![]() B. Socket
B. Socket
![]() C. Wattage range
C. Wattage range
![]() D. PCI slots
D. PCI slots
Cram Quiz Answers
1. B. Check connections first; it is quick, easy, and a common culprit.
2. C. After installing the heat sink/fan assembly, plug in the fan to the appropriate connector on the motherboard.
3. A. If the CPU is running beyond the recommended voltage range for extended periods of time, it can be a sign of a failing CPU. If the computer won’t boot at all, another problem might have occurred, or the CPU might have already failed. Low case temperatures are a good thing (if they aren’t below freezing!) and spyware is unrelated, but we talk about it plenty in Chapter 15, “Security.”
4. B. The CPU needs to be compatible with the socket of the motherboard. The case doesn’t actually make much of a difference when it comes to the CPU. (Just make sure it’s large enough!) There is no wattage range, but you should be concerned with the voltage range of the CPU, and PCI slots don’t actually play into this at all because there is no direct connectivity between the two.
Additional Reading and Resources
Additional A+ resources: http://www.davidlprowse.com/aplus.
AMD official product information: http://www.amd.com/us-en/Processors/ProductInformation.
Computing tips, tricks, and solutions: http:///www.thomshardware.com.
Intel official product information: http://www.intel.com/products/processor/index.htm.
Mueller, Scott. Upgrading and Repairing PCs. Que.