
Chapter 9. Maintaining Windows
Windows maintenance is important as a security precaution and as a way to prevent any strange and unforeseen issues that might occur. Bad guys are always finding ways to exploit Windows code, and as these exploits are discovered, Microsoft releases updates (also known as patches) to fix those issues.
Keeping up maintenance on the hard disk drives is one of the best things you can do for your computer. By maintaining the hard drive, you increase its lifespan and reduce the chance of corrupted files.
This chapter shows how to update Windows and how to configure the Windows Update program. It also shows how to maintain the hard disk with cleanup and defragmenting programs.
Updating Windows
Updating Windows can be done in two ways: first, by updating to the latest service pack, and second by using the Windows Update program. Let’s begin by discussing service packs.
Service Packs
A service pack (SP) is a group of updates, bug fixes, updated drivers, and security fixes that are installed from one downloadable package or from one disc. Service packs are numbered, for example SP1, SP2, and so on. Installing the service pack is relatively easy and only asks a few basic questions. When those questions are answered, it takes several minutes or more to complete the update; then a restart will be required. While the service pack is installed, it rewrites many files and copies new ones to the hard drive as well.
Historically, many service packs have been cumulative, meaning that they also contain previous service packs. For example, SP2 for Windows XP includes all the updates from SP1; a Windows XP installation with no service pack installed can be updated directly to SP2, without having to install SP1 first. However, of late, you see more service packs that are incremental, for example Windows XP SP3. A Windows XP installation with no service pack cannot be updated directly to SP3; it needs to have SP1 or SP2 installed first before the SP3 update. Another example of an incremental service pack is Windows Vista SP2; service pack 1 must be installed first before updating to SP2 in Windows Vista.
To find out which service pack is installed to the operating system, do the following:
• In Windows Vista: Click Start; then right-click Computer and select Properties. This opens the System window. In the “Windows edition” section, you should see system information including the operating system version and the service pack that is installed. If the words “service pack” do not appear, there is no service pack installed.
• In Windows XP: Click Start; then right-click My Computer and select Properties. This opens the System Properties window. Toward the top of the General tab, you should see system information including the operating system version and the service pack that is installed. If the words “service pack” do not appear, there is no service pack installed.
Note
You can also find out which service pack your operating system uses by opening the System Information tool (open the Run prompt and type msinfo32.exe). It will be listed directly in the system summary.
Service packs can be acquired through Windows Update, at www.microsoft.com on CD/DVD and through a Microsoft Developer Network (MSDN) subscription. A service pack might also have been incorporated into the original operating system distribution DVD/CD. This is known as slipstreaming. This method enables the user to install the operating system and the service pack at the same time in a seamless manner. It is also possible for system administrators to create slipstreamed images for simplified over-the-network installations of the OS and SP.
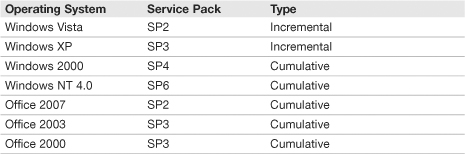
Table 9.1 defines the latest service packs as of August, 2009. You might see older operating systems in the field. (If something works, why replace it, right?) For example, Windows NT and 2000 servers might be happily churning out the data necessary to users. That’s okay; just make sure that they use the latest service pack so that they can interact properly with other computers on the network. Keep in mind that this table is subject to change because new service packs can be released at any time. For example, Windows 7 is on the horizon; when new OSs are released, it usually means a new service pack for older OSs. Note also that other applications such as Microsoft Office, and server based apps like Microsoft Exchange Server, use service packs as well.
Table 9.1 Latest Windows Service Packs as of August 2009
ExamAlert
Memorize the latest service packs for Windows Vista, Windows XP, Windows 2000, Office 2007, and Office 2003.
Note
Some companies choose to stay with SP2 for Windows XP, particularly in audio/video production environments, although this is not recommended, especially if the Windows XP computers will be interacting with other operating systems on the network.
Windows Update
As with any OS, Windows Vista and XP should be updated regularly. Microsoft recognizes deficiencies in the OS, and possible exploits that could occur, and releases patches to increase OS performance and protect the system. After the latest service pack has been installed, the next step is to see if any additional updates are available for download.
To install additional updates for Windows through Windows Update:
1. Click Start > All Programs > Windows Update.
2. Windows Vista opens the Window Update window in which you can click the Install Updates button. Windows XP opens a web page in which you can select Express or Custom installation of updates. Follow the prompts to install the latest version of the Windows Update software if necessary.
Note
Do not select Express or let Microsoft automatically install all updates if you do not want to use newer applications, for example Internet Explorer 8 or XP SP3.
3. The system (or web page) automatically scans for updates. Updates are divided into the following categories:
• Critical Updates and Service Packs: These include the latest service pack and other security and stability updates. Some updates must be installed individually; others can be installed as a group.
• Windows Updates: Recommended updates to fix noncritical problems certain users might encounter; also adds features and updates to features bundled into Windows.
• Driver Updates: Updated device drivers for installed hardware.
If your system is in need of updates, a shield (for the Windows Security Center) appears in the system tray. Double-clicking this brings up the Security Center window in which you can turn on automatic updates. To modify how you are alerted to updates, and how they are downloaded and installed, do the following:
• Windows Vista: Click Start > Windows Update; then click the Change Settings link.
• Windows XP: Click Start > Control Panel; then select Classic view, and double-click Automatic Updates.
From here there will be four options:
• Install updates automatically: This is the recommended option by Microsoft. You can schedule when and how often the updates should be downloaded and installed.
• Download updates but let me choose whether to install them: This automatically download updates when they become available, but Windows prompts you to install them instead of installing them automatically. Each update has a check box, so you can select individual updates to install.
• Check for updates but let me choose whether to download and install them: This lets you know when updates are available, but you are in control as to when they are downloaded and installed.
• Never check for updates: This is not recommended by Microsoft because it can be a security risk but might be necessary in some environments in which updates could cause conflicts over the network. In some networks, the administrator takes care of updates from a server and sets the local computers to this option.
ExamAlert
Know how to install Windows updates and how to modify how they are downloaded and installed.
Note
Another tool that can be used online is Microsoft Update, which is similar to Windows Update, but it can update for other Microsoft applications as well. It can be found at the following link: http://windowsupdate.microsoft.com/.
Cram Quiz
Answer these questions. The answers follow the last question. If you cannot answer these questions correctly, consider reading this section again until you can.
1. Which is the latest service pack for Windows XP, and what type is it?
![]() A. SP2, cumulative
A. SP2, cumulative
![]() B. SP3, incremental
B. SP3, incremental
![]() C. SP1, incremental
C. SP1, incremental
![]() D. SP4, cumulative
D. SP4, cumulative
2. Which Windows Update option is not recommended?
![]() A. Download Updates but Let Me Choose Whether to Install Them
A. Download Updates but Let Me Choose Whether to Install Them
![]() B. Install Updates Automatically
B. Install Updates Automatically
![]() C. Never Check for Updates
C. Never Check for Updates
![]() D. Check for Updates but Let Me Choose Whether to Download and Install Them
D. Check for Updates but Let Me Choose Whether to Download and Install Them
3. Where can you find out the latest service pack that is used by Windows Vista? (Select all that apply.)
![]() A. System window
A. System window
![]() B. System Properties window
B. System Properties window
![]() C. System Information
C. System Information
![]() D. System Tools
D. System Tools
4. In Windows Vista, where would you go to modify how you are alerted to updates?
![]() A. Click Start > Windows Update; then click the Change settings link.
A. Click Start > Windows Update; then click the Change settings link.
![]() B. Click Start > Control Panel; then select Classic view, and double-click Automatic Updates.
B. Click Start > Control Panel; then select Classic view, and double-click Automatic Updates.
![]() C. Click Start; then right-click My Computer and select Properties.
C. Click Start; then right-click My Computer and select Properties.
![]() D. Click Start > Windows Update; then click the Check for updates link.
D. Click Start > Windows Update; then click the Check for updates link.
Cram Quiz Answers
1. B. SP3 is the latest service pack for Windows XP as of August, 2009, and it is an incremental upgrade meaning that you need either SP1 or SP2 installed prior to installing SP3.
2. C. It is not recommended that you set Windows Update to Never Check for Updates because it is a security risk.
3. A and C. You can find out the latest SP in use by Windows Vista within the System window and the System Information tool. The SP for Windows XP can be found in the System Properties window.
4. A. To modify how you are alerted to updates and how they are downloaded and installed in Window Vista, click Start > Windows Update; then click the Change settings link.
Maintaining Hard Disks
In Chapter 6, “Storage Devices,” I made a bold statement: “Hard disks will fail.” But it’s all too true; it’s not a matter of if; it’s a matter of when. By maintaining the hard disk with various hard disk utilities, we attempt to stave off that dark day as long as possible. To further protect out data, we can back it up with programs that Windows provides to us or third-party programs. And to protect operating system files, Windows offers the System Restore utility. Let’s start with some of the hard disk utilities that you will use in the field.
Hard Disk Utilities
Temporary files and older files can clog up a hard disk and cause a decrease in performance. One program used to remove these files is called Disk Cleanup. Within this program users can select which volume they want to cleanup; it then scans the volume and calculates how much space you can save. It can clean away temporary files and downloaded program files, offline web pages, Office setup files, and, older files, and empty the Recycle Bin. This program can be accessed from Start > All Programs > Accessories > Disk Cleanup. It is recommended that all programs are closed prior to running Disk Cleanup.
Note
Another good disk cleanup program available freely on the web is called simply “CleanUp!”
You can also delete temporary files and Internet files manually. To remove temporary files manually, navigate to C:WindowsTemp and remove any temp files and Internet files necessary. There are also various folders within the user profile folder (for example the Recent folder) that have temporary files. However, it is easier to remove these files with one of the programs mentioned previously. Temporary Internet files and cookies can be removed by accessing the Internet Properties window by clicking Start > Control Panel (Classic view) and double-clicking Internet Options. Within the Internet Properties window’s General tab, locate the Browsing History section and click Delete. This offers you the option to remove a variety of information including temporary Internet files, cookies, history, form data, and passwords, or you can select Delete all.
Note
The preceding information about deleting information in Internet Explorer is based on Internet Explorer version 7.
Over time, data is written to the drive, and subsequently erased, over and over again, leaving gaps in the drivespace. New data will sometimes be written to multiple areas of the drive in a broken or fragmented fashion filling in any blank areas it can find. When this happens, the hard drive must work much harder to find the data it needs, spinning more, starting and stopping more; in general, more mechanical movement. The more the drive has to access this fragmented data, the shorter its lifespan becomes due to mechanical wear and tear. Defragmenting the drive can be done with Microsoft’s Disk Defragmenter, with the command-line defrag command, or with other third-party programs. The Disk Defragmenter is located in different places depending on whether Vista or XP is used:
• Windows Vista Disk Defragmenter: Click Start > All Programs > Accessories > Disk Defragmenter. The program automatically analyzes volumes and lets you know if a volume needs to be defragmented.
• Windows XP Disk Defragmenter: Open Computer Management > Storage and click Disk Defragmenter. From here you have the option to analyze or defragment volumes.
If using the Disk Defragmenter program, you need 15 percent free space on the volume you want to defrag. If you have less than that, you need to use the command-line option defrag -f. Figure 9.1 shows Windows XP’s Disk Defragmenter after it has completed defragmenting the D: drive.
Figure 9.1 Windows XP Disk Defragmenter

Before clicking the Defragment button, it’s recommended that the Analyze button be clicked first to find out if the drive needs to be defragmented. In Figure 9.1 there are two rows of colors. The first indicates the estimated disk usage before defragmentation, which is identified from the analysis. If a drive needs to be defragmented, this row has areas of blue and areas of red. Blue means contiguous files, which is good; red means fragmented files; the more red the more the need for defragmenting. The second row indicates estimated disk usage after defragmentation. When defragmentation is complete, the second row should show all blue or all contiguous files.
Backups
Backing up data is critical for a company. It is not enough to rely on a fault tolerant array. Individual files or the entire system can be backed up to another set of hard disks, or to optical discs, or to tape. Windows Vista and Windows XP use two separate programs for backing up data.
Using Windows Vista’s Backup Status and Configuration
Backup Status and Configuration is the successor to Windows XP’s NTBackup. It can back up individual files or an entire image of your system (using Complete PC Backup) to the removable media of your choice, for example DVD. To create a complete backup of your PC with Vista’s Complete PC Backup:
1. Start the Complete PC Backup by going to Start > All Programs > Accessories > System Tools > Backup Status and Configuration.
2. Click the Complete PC Backup button.
3. Select Create a backup now and follow the directions. Have media ready that can hold an image of your operating system, for example DVD-R. Be ready; this will be a sizeable image!
Using Windows XP’s NTBackup
Windows XP Professional offers the built-in program called NTBackup. This is accessible by opening the Run prompt and typing ntbackup. From here you can backup individual files and backup the System State, which includes everything that makes one installation of Windows XP different from another. Unfortunately, Windows XP does not include a Complete PC Backup option; however, the Automated System Recovery (ASR) option in NTBackup does enable you to back up and restore the system state (user accounts, settings, boot files, and so on).
To create an ASR backup with NTBackup:
1. Switch to Advanced Mode (if NTBackup starts in Wizard mode) and click the Automated System Recovery Wizard button. When the wizard’s opening dialog appears, click Next to continue.
2. Specify where to store the backup, and click Next.
3. Click Finish to complete the wizard. You will be asked to provide a floppy disk to store configuration files.
Creating Restore Points
System Restore can fix issues caused by defective hardware or software by reverting back to an earlier time. Registry changes made by hardware or software are reversed in an attempt to force the computer to work the way it did previously. Restore points can be created manually and are also created automatically by the operating system before new applications, or hardware is installed.
To create a restore point in Windows Vista:
1. Right-click Computer and select Properties. This opens the System Properties window, as shown in Figure 9.2. Alternatively, you can go to Start > All Programs > Accessories > System Tools > System Restore and click the link at the bottom of the window that says open System Protection.
Figure 9.2 The System Protection Tab of the System Properties Window

2. Click the System Protection tab.
3. Click the Create button. This opens the System Protection window.
4. Enter a name for the restore point and click Create.
To create a restore point in Windows XP:
1. Navigate to Start > All Programs > Accessories > System Tools > System Restore. This opens the System Restore window.
2. Click Create a Restore Point and then click Next.
3. Enter a name for the restore point and click Create.
If System Restore is not available, it might be turned off. Within Windows Vista you can enable or disable System Restore on any volume from the System Protection tab of the System Properties Window. Simply check or uncheck any volume that you want to enable or disable. Within Windows XP, the state of System Restore affects all drives; you can turn the utility only on and off. This is done from the System Restore tab of the System Properties Window. You can also change the amount of disk space it uses here.
Cram Quiz
Answer these questions. The answers follow the last question. If you cannot answer these questions correctly, consider reading this section again until you can.
1. Which program removes temporary files?
![]() A. Disk Backup
A. Disk Backup
![]() B. Disk Cleanup
B. Disk Cleanup
![]() C. System Restore
C. System Restore
![]() D. Disk Defragmenter
D. Disk Defragmenter
2. If there is less than 15 percent free space within a volume, how would a user defragment it in Windows?
![]() A. With Disk Defragmenter
A. With Disk Defragmenter
![]() B. With the command
B. With the command defragment -f
![]() C. With the command
C. With the command defrag -f
![]() D. With a third-party tool
D. With a third-party tool
3. Which program in Windows Vista creates a Complete PC Backup?
![]() A. Backup Status and Configuration
A. Backup Status and Configuration
![]() B. NTBackup
B. NTBackup
![]() C. ASR
C. ASR
![]() D. System Restore
D. System Restore
4. Where would you go in Windows Vista to enable System Restore? (Select the best answer.)
![]() A. System Properties window
A. System Properties window
![]() B. Advanced Protection tab of the System Properties window
B. Advanced Protection tab of the System Properties window
![]() C. Task Manager
C. Task Manager
![]() D. System Protection tab of the System Properties window
D. System Protection tab of the System Properties window
Cram Quiz Answers
1. B. Disk Cleanup removes temporary files and other types of files and clears the recycle bin.
2. C. defrag –f defragments the drive even if free space is low. However, be prepared to use a lot of system resources to complete the defrag. Close any open windows before starting the process.
3. A. Backup Status and Configuration has an option called Complete PC Backup within Windows Vista. NTBackup is a Windows XP program that can back up individual files and the System State but not the entire PC. ASR is the Automated System Recovery option in Windows XP that backs up the System State and other data. System Restore creates restore points that deals more with settings than it does data.
4. D. To enable (or disable) System Restore in Windows Vista, go to the System Protection tab of the System Properties window.