Chapter 15. Security
The 2009 A+ exams have an increased amount of security objectives. This is understandable because everyone should have some basic knowledge on security. Computers and computer networks are constantly at risk, and new risks are always rearing their ugly head.
This chapter concentrates on demonstrating how to secure an individual computer system. But you must ask yourself some questions: What kind of computer am I trying to secure? What operating system is it using, and what applications are loaded? How will the files be protected? What type of hardware is employed, and what BIOS is in place? And, what are the security policies of my company? We’ll answer all these questions in the hope that you end up with a secure computer.
Note
The CompTIA A+ objectives focus primarily on individual computer security but make a few references to network and wireless security; these few additional points are covered in Chapter 14, “Networking,” in the section titled “Installing & Configuring a SOHO Network.”
Basics of Data Security
Data security is the act of protecting data from threats and possible corruption. You need to be aware of several types of threats:
• Malicious software: Known as malware, this includes computer viruses, worms, trojan horses, spyware, rootkits, adware, and other types of unwanted software. Everyone has heard of a scenario in which a user’s computer was compromised to some extent due to malicious software.
• Unauthorized access: This is access to computer resources and data without consent of the owner. It might include approaching the system, trespassing, communicating, storing and retrieving data, intercepting data, or any other methods that would interfere with a computer’s normal work. Access to data must be controlled to ensure privacy. Improper administrative access would fall into this category as well.
• System failure: This refers to computer crashes, or individual application failure. This could happen due to three reasons: user error, malicious activity, or hardware failure.
• Social engineering: The act of manipulating users into revealing confidential information or performing other actions detrimental to the user. Almost everyone gets emails nowadays from unknown entities making false claims or asking for personal information (or money!); this is one example of social engineering.
ExamAlert
Know the possible threats to a computer system for the exam!
Many data security technologies can protect against, or help recover from, the above threats. Several common ones are listed here:
• Authentication: This is the verification of a person’s identity, and it helps protect against unauthorized access. It is a preventative measure that can be broken down into three categories:
• Something the user knows, for example a password or PIN
• Something the user has, for example a smart card or other security token
• Something the user is, for example the biometric reading of a fingerprint or retina scan
• Anti-malware software: This is software that protects a computer from the various forms of malware, and if necessary, detects and removes them. Types include antivirus and antispyware software. Well-known examples include Norton AntiVirus, McAfee VirusScan, Windows Defender, and Spyware Doctor. Nowadays, a lot of the software named “antivirus” can protect against spyware as well.
• Data backups: This must be the fifth time we’ve mentioned backing up data in this book, but it’s worth the reminder! Backups won’t stop damage to data, but they can enable you to recover data after an attack or other compromise, or system failure. From programs such as NTbackup and Bacula to enterprise-level programs such as Tivoli and Veritas, data backup is an important part of security. Note that fault tolerant methods such as RAID 1 and 5 are good preventative measures against hardware failure but might not offer protection from data corruption or erasure. For more information on RAID, see Chapter 6, “Storage Devices.”
• Encryption: This is the act of changing information using an algorithm known as a cipher to make it unreadable to anyone except users who possess the proper “key” to the data. Examples of this include HTTPS, Kerberos, and PGP. We talk more about encryption later in this chapter.
• Data removal: Proper data removal goes far beyond file deletion or the formatting of digital media. The problem with file deletion/formatting is data remanence, or the residue, that is left behind, from which re-creation of files can be accomplished by some less-than-reputable people with smart tools. Companies typically employ one of three options when met with the prospect of data removal:
• Clearing: This is the removal of data with a certain amount of assurance that it cannot be reconstructed. The data is actually recoverable with special techniques. In this case, the media is recycled and used within the company again. The data wiping technique (also known as shredding) is used to clear data from media by overwriting new data to that media. Several software programs are available to accomplish this.
• Purging: Also known as sanitizing, this is once again the removal of data, but this time, it’s done in such a way so that it cannot be reconstructed by any known technique; in this case the media is released outside the company. Special software (or other means) are employed to completely destroy all data on the media.
• Destruction: This is when the storage media is physically destroyed through pulverizing, incineration, and so on. At this point, the media can be disposed of in accordance with municipal guidelines.
• User awareness: The wiser the user, the less chance of security breaches. Employee training and education, easily accessible and understandable policies, security-awareness emails and online security resources all help to provide user awareness. These methods can help to protect from all the threats mentioned previously.
ExamAlert
Educating the user is an excellent method when attempting to protect against security attacks.
Data Sensitivity and Security Compliance
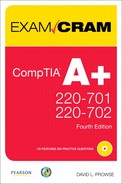
Sensitive data is information that can result in a loss of security, or loss of advantage to a company, if accessed by unauthorized persons. Quite often, information is broken down into two groups: classified (which requires some level of security clearance) and nonclassified. ISO/IEC 17799:2005 (now known as ISO/IEC 27002:2005) is a security standard that among other things, can aid companies in classifying their data. Although you don’t need to know the contents of that document for the exam, you should have a basic idea of how to classify information. For example, classification of data can be broken down as shown in Table 15.1.
Table 15.1 Example of Data Sensitivity Classifications
In this example, loss of public and internal information probably won’t affect the company very much. However, unauthorized access, misuse, modification, or loss of confidential, secret, or top secret data can affect users’ privacy, trade secrets, financials, and the general security of the company. By classifying data and enforcing policies that govern who has access to what information, a company can limit its exposure to security threats.
Many companies need to be in compliance with specific laws when it comes to the disclosure of information. In the United States there are two acts you should know about, as shown in Table 15.2. In addition, there are several bills in process that will probably be passed in the near future regarding data breach notification.
Table 15.2 Acts Passed Concerning the Disclosure of Data

Many computer technicians have to deal with SOX and HIPAA at some point in their careers, and although the acts create a lot of paperwork and protocol, the expected result is that they will help companies protect their data.
Cram Quiz
Answer these questions. The answers follow the last question. If you cannot answer these questions correctly, consider reading this section again until you can.
1. Which method would you use if you were disposing hard drives as part of a company computer sale?
![]() A. Destruction
A. Destruction
![]() B. Purging
B. Purging
![]() C. Clearing
C. Clearing
![]() D. Formatting
D. Formatting
2. Which of these governs the disclosure of financial data?
![]() A. SOX
A. SOX
![]() B. HIPAA
B. HIPAA
![]() C. GLB
C. GLB
![]() D. Top secret
D. Top secret
3. Which of the following is the verification of a person’s identity?
![]() A. Authorization
A. Authorization
![]() B. Accountability
B. Accountability
![]() C. Authentication
C. Authentication
![]() D. Password
D. Password
4. Which of the following is not an example of malicious software?
![]() A. Rootkits
A. Rootkits
![]() B. Spyware
B. Spyware
![]() C. Viruses
C. Viruses
![]() D. Browser
D. Browser
Cram Quiz Answers
1. B. Purging (or sanitizing) removes all the data from a hard drive so that it cannot be reconstructed by any known technique.
2. A. SOX, or Sarbanes-Oxley, governs the disclosure of financial and accounting data.
3. C. Authentication is the verification of a person’s identity. Authorization to specific resources cannot be accomplished without previous authentication of the user.
4. D. A web browser (for example, Internet Explorer) is the only one listed that is not an example of malicious software. Although a browser can be compromised in a variety of ways by malicious software, the application itself is not the malware.
Authentication
As previously mentioned, authentication is the verification of a person’s identity. Its purpose is to help protect against unauthorized access. This preventative measure can be something the user knows, for example a password, something the user has such as a smart card, or something the user is, for example, a user’s fingerprint read by a biometric device. Let’s discuss each of these now.
Usernames and Passwords
The username/password combination is the most common type of authentication when it comes to gaining access to computers. The username is known to all parties involved and can be seen as plain text when typed. In some cases, the user has no control over what the username will be, or it will be the name or email address of the user. However, the password is either set by the user or created automatically for the user. It is common knowledge that a strong password is important for protecting a user account, whether the account is with a bank, at work, or elsewhere. But what is a strong password? Many organizations define a strong password as a password with at least 8 characters, including at least one uppercase letter, one number, and one special character. The best passwords have the same requirements but are 14 characters or more. Many password checker programs are on the web, for example Microsoft’s password checker at http://www.microsoft.com/protect/yourself/password/checker.mspx. Table 15.3 shows a strong password and a “best” password as checked by this program.
Table 15.3 Strong and Stronger Passwords

Notice the first password is using the | pipe symbol instead of the letter L. This is a special character that shares the backslash key on the keyboard. In the second password we have 16 characters, 3 capital letters, 2 numbers, and a partridge in a pear tree, um, I mean one special character ![]() . Just checking if you are still with me! Of course a partridge wouldn’t help your password security, but the other methods make for an extremely strong password that would take a super-computer many years to crack.
. Just checking if you are still with me! Of course a partridge wouldn’t help your password security, but the other methods make for an extremely strong password that would take a super-computer many years to crack.
Changing your password at regular intervals is important as well. The general rule of thumb is to change your password as often as you change your toothbrush. However, because this is a subjective concept (to put it nicely!), many organizations have policies concerning your password. It might need to meet certain requirements, or be changed at regular intervals, and so forth. Figure 15.1 shows an example of the default password policy on a Windows XP Professional computer. This can be accessed by navigating to Start > All Programs > Administrative Tools > Local Security Policy. When in the Local Security Settings window, continue to Security Settings > Account Policies > Password Policy.
Figure 15.1 Default password policy in Windows XP

As you can see in the figure, there are several items that we can configure or could be configured by the network administrator centrally if the computer is part of a domain. The four important ones for the exam include
• Enforce password history: When this is defined, users cannot use any of the passwords that are remembered in the history. If you set the history to 3, then the last three passwords cannot be used again when it is time to change the password.
• Maximum and minimum password age: This defines exactly how long a password can be used. The maximum is initially set to 42 days but does not affect the default Administrator account. To enforce effective password history, the minimum must be higher than zero.
Note
To avoid any chance of overriding the maximum password age policy, create Windows XP user accounts in the Local Users and Groups section of the Computer Management console instead of within the User Accounts applet of the Control Panel.
• Minimum password length: This requires that the password must be at least the specified amount of characters. For a strong password policy, set this to 8 or more.
• Passwords must meet complexity requirements: This means that passwords must meet three of these four criteria: uppercase characters, lowercase characters, digits between 0 and 9, and nonalphabetic characters (special characters).
Note
For more information on password best practices, see the following link: http://technet.microsoft.com/en-us/library/cc784090.aspx.
Now that we have a secure password, and a password policy in place, let’s talk about securing the logon process and user accounts for Windows XP and Vista. There are several things we can do to secure these:
1. Disable the Welcome screen and Fast User Switching: Although these are convenient features, they can be security risks. To disable both of these in Windows XP, navigate to Start > Control Panel > User Accounts (and User Accounts again if you are in Category view); then select Change the way users log on or off”. Deselect both check boxes.
Note
To remove these in Windows Vista, you need to access the Local Group Policy Editor. Although you shouldn’t see this on the exam, you can find out how to do it at my website: http://www.davidlprowse.com/aplus.
This also enables you to open the Windows Security dialog box by pressing Ctrl+Alt+Del, which previously would have brought up the Task Manager. From the Windows Security dialog box, you can see who is logged on to the computer and the name of the computer. You can also lock the computer. The advantage of locking the computer is that you can leave your applications open while you take a break, go to lunch, and such. If you log off of the system, all applications are closed. Of course, from the Windows Security dialog box you can also change your password, run the Task Manager, log off, or shut down the computer.
2. Enable Ctrl+Alt+Del login functionality: Setting up the computer so a user must press Ctrl+Alt+Del before logging on secures the computer in more ways than one. To do this, open the Local Security Settings window previously mentioned.
Note
A quick way to get to the Local Security Settings window is by bringing up the Run prompt and typing secpol.msc.
This time navigate to Security Settings > Local Policies > Security Options and then locate the item listed as Interactive Logon: Do Not Require CTRL+ALT+DEL. Double-click it and select the Disabled radio button (this is a double negative); then log off and log back on. The Ctrl+Alt+Del window should appear.
3. Rename and password protect the Administrator account: It’s nice that Windows XP and Vista have incorporated a separate administrator account: the problem is that by default the account has no password. To configure this account, navigate to Computer Management > System Tools > Local Users and Groups > Users and locate the Administrator account. By right-clicking the account, you see a drop-down menu in which you can rename it and/or give it a password. (Just remember the new username and password!) Now it’s great to have this additional administrator account on the shelf just in case the primary account fails; however Vista disables this account by default. To enable it, right-click the account and select Properties. In the General tab, deselect the Account is disabled check box. Alternatively, open the command line and type net user administrator /active:yes.
Note
Alternatively, you can use the User Accounts applet in the Control Panel to accomplish these tasks for any account in Vista, and for any account except Administrator in XP, but using Computer Management is recommended due to the fact that it is more consistent and thorough.
4. Verify that the Guest account (and other unnecessary accounts) are disabled: This can be done by navigating to Computer Management > System Tools > Local Users and Groups > Users, and right-clicking the account in question, selecting properties and then selecting the check box named “Account Is Disabled. It is also possible to delete accounts (aside from built-in accounts such as the Guest account): however, companies usually opt to have them disabled instead, so that the company can retain information linking to the account.
5. Set the Account lockout threshold: If a user attempts to log on to a system and is unsuccessful, the user will be locked out of the system (after a specified number of attempts). The settings and thresholds for this can be configured in the Local Security Settings window. Navigate to Security Settings > Account Policies > Account Lockout Policy. From here you can set the threshold to a certain amount of invalid logons, set how long the user will be locked out, and how long until the lockout counter is reset. If an account is locked out and you need to unlock it immediately, follow one of the options at the end of step 3.
ExamAlert
Know how to enable/disable accounts, reset passwords, and modify password policy for the exam!
It’s important to note that when logging on to a Microsoft network, the logon process is secured by the Kerberos protocol, which is run by the Domain Controller. This adds a layer of protection for the username and password as they are being authenticated across the network. When a user is going to take a break or go to lunch, they should lock the computer. This can be done by pressing Windows+L. When doing so, the operating system goes into a locked state, and the only way to unlock the computer is to enter the username and password of the person who locked the computer. The difference between this and logging out is that a locked computer keeps all the session’s applications and files open, whereas logging out closes all applications and open files.
User Account Control (UAC)
User Account Control (UAC) is a security component of Windows Vista that keeps every user (besides the actual Administrator account) in standard user mode instead of as an administrator with full administrative rights—even if they are a member of the administrators group. It is meant to prevent unauthorized access and avoid user error in the form of accidental changes. With UAC enabled users perform common tasks as nonadministrators, and when necessary, as administrators, without having to switch users, log off, or use Run As.
Basically, UAC was created with two goals in mind. First, to eliminate unnecessary requests for excessive administrative-level access to Windows resources. And second, to reduce the risk of malicious software using the administrator’s access control to infect operating system files. When a standard end user requires administrator privileges to perform certain tasks such as installing an application, a small pop-up UAC window appears notifying the user that an administrator credential is necessary. If the user has administrative rights and clicks Continue, the task will be carried out, but if they do not have sufficient rights, the attempt fails. Note that these pop-up UAC windows do not appear if the person is logged on with the actual Administrator account.
Turning UAC on and off can be done by going to Start > Control Panel > User Accounts and Family Safety. Then select User Accounts and Turn User Account Control On or Off. From there UAC can be turned on and off by checking or unchecking the box. If a change is made to UAC, the system needs to be restarted. Note that if you use the Classic View in the Control Panel, User Accounts and Family Safety is bypassed.
ExamAlert
Be sure to know how to turn UAC on and off for the exam!
BIOS Security
The BIOS can be the victim of malicious attack as well; for mischievous persons it can also act as the gateway to the rest of the system. Protect it! Or your computer just might not boot. Here are a few ways to do so:
• Use a BIOS password: The password that blocks unwanted persons from gaining access to the BIOS is also known as the supervisor password. Don’t confuse it with the user password (or power-on password) that is employed so that the BIOS can verify a user’s identity before accessing the operating system. Both of these are shown in Figure 15.2.
Figure 15.2 BIOS and drive lock passwords

On a semi-related note, many laptops come equipped with drive lock technology; this might simply be referred to as an HDD password. If enabled, it prompts the user to enter a password for the hard drive when the computer is first booted. If the user of the computer doesn’t know the password for the hard drive, the drive will lock and the OS will not boot. An eight digit or like hard drive ID usually associates the laptop with the hard drive that is installed, as shown in Figure 15.2. On most systems this password is clear by default, but if the password is set and forgotten, it can usually be reset within the BIOS. Some laptops come with documentation clearly stating the BIOS and drive lock passwords.
• Flash the BIOS: Flashing is the term used to describe the updating of the BIOS. By updating the BIOS to the latest version, you can avoid possible exploits and BIOS errors that might occur. All new motherboards issue at least one new BIOS version within the first 6 months of the motherboard’s release. For more information on BIOS updating, see Chapter 2, “Motherboards.”
• Configure the BIOS: Setup the BIOS to reduce the risk of infiltration. For example, change the BIOS boot order (boot device priority) so that it looks for a hard disk first and not any type of removable media. Also, if company policy requires it, disable removable media including the floppy drive and USB ports.
Smart Cards and Biometrics
The smart card falls into the category of “something a person has.” It’s the size of a credit card and has an embedded chip that stores and transacts data for use in secure applications such as hotel guest room access, prepaid phone services, and more. Smart cards have multiple applications, one of which is to authenticate users, by swiping the device against a scanner, thus securing a computer or a computer room. It might also be used as part of a multifactor authentication scheme in which there is a combination of username/password (or PIN) and a smart card. Advanced smart cards have specialized cryptographic hardware that utilizes algorithms such as RSA and 3DES (more on these encryption types later in this chapter). A smart card might incorporate a processor or an RFID chip as well. A smart card security system will usually be composed of the smart card itself, smart card readers, and a back-office database that stores all the smart card access control lists and history.
Biometrics fall into the category of “something a person is.” Examples of bodily characteristics that are measured include fingerprints, retinal patterns, iris patterns, and even bone structure. Biometric readers, for example fingerprint scanners, are becoming more common on laptops or as USB devices; biometric information can also be incorporated into smart card technology. One example of biometrics hardware is the Microsoft Fingerprint Scanner, which is USB-based.
Note
There is a fourth type of authentication based on something a person does. Examples of this include signature and voice recognition; however, this is not covered in the CompTIA A+ objectives.
Cram Quiz
Answer these questions. The answers follow the last question. If you cannot answer these questions correctly, consider reading this section again until you can.
1. Which of the following is the strongest password?
![]() A. |ocrian#
A. |ocrian#
![]() B. Marqu1sD3S0d
B. Marqu1sD3S0d
![]() C. This1sV#ryS3cure
C. This1sV#ryS3cure
![]() D. Thisisverysecure
D. Thisisverysecure
2. Which of the following would fall into the category of “something a person is”?
![]() A. Passwords
A. Passwords
![]() B. Passphrases
B. Passphrases
![]() C. Fingerprints
C. Fingerprints
![]() D. Smart Cards
D. Smart Cards
3. Which of these is a security component of Windows Vista?
![]() A. UAC
A. UAC
![]() B. UPS
B. UPS
![]() C. Gadgets
C. Gadgets
![]() D. Control Panel
D. Control Panel
4. What key combination helps to secure the logon process?
![]() A. Windows+R
A. Windows+R
![]() B. Ctrl+Shift+Esc
B. Ctrl+Shift+Esc
![]() C. Ctrl+Alt+Del
C. Ctrl+Alt+Del
![]() D. Alt+F4
D. Alt+F4
Cram Quiz Answers
1. C. Answer C incorporates case-sensitive letters, numbers, and special characters and is 16-characters long.
2. C. Fingerprints are an example of something a person is. The process of measuring that characteristic is known as biometrics.
3. A. User Account Control (UAC) adds a layer of security to Windows Vista to protect against malware and user error, and conserve resources.
4. C. Ctrl+Alt+Del is the key combination that is used to help secure the logon process. It can be added by configuring the Local Security policy.
Malicious Software
Malicious software, or malware, is software that is designed to infiltrate a computer system and possibly damage it without the user’s knowledge or consent. Malware is a broad term used by computer guys to include viruses, worms, trojan horses, spyware, rootkits, adware, and other types of unwanted software.
Of course, we don’t want malware to infect our computer system, but to defend against it we first need to define it and categorize it. Then we can put preventative measures into place. It’s also important to locate and remove or quarantine malware from a computer system.
Types of Malware
There are several types of malware that you need to know for the exam. For the past several years there has been an emphasis shift from viruses to spyware. Most people know about viruses and have some kind of antivirus software running. However, many people are still confused about exactly what spyware is, how it occurs, and how to protect against it. Because of this, computer professionals spend a lot of time fixing spyware issues and training users on how to protect against them in the future. However, viruses are still a valid foe; let’s start by discussing them.
Viruses
A virus is code that runs on a computer without the user’s knowledge; it infects the computer when the code is accessed and executed. It also has reproductive capability and can spread copies of itself throughout the computer. By infecting files that are accessed by other computers, the virus can spread to those other systems as well.
One well-known example of a virus is the “Love Bug.” Originating in 2000, this virus would arrive by an email titled “I love you” with an attachment named love-letter-for-you.txt.vbs, or one of several other permutations of this fictitious love. Some users would be tricked into thinking this was a text file, but the extension was actually .vbs, short for Visual Basic script. This virus deleted files, sent usernames and passwords to its creator, infected 15 million computers, and supposedly caused $5 billion in damage. Educate your users on how to screen their email!
There are several different types of viruses that you might encounter:
• Boot Sector: Initially loads into the first sector of the hard drive; when the computer boots, the virus then loads into memory.
• Macro: Usually placed in office documents and emailed to users in the hopes that the user will open the document, thus executing the virus.
• Program: This type of virus infects executable files.
• Polymorphic: Can change every time is it executed, in an attempt to avoid antivirus detection.
• Stealth: Uses various techniques to go unnoticed by antivirus programs.
• Multipartite: This is a hybrid of boot and program viruses. It attacks the boot sector or system files first and then attacks the other.
ExamAlert
For viruses to do their dirty work, they first need to be executed by the user in some way.
Worms
Worms are much like viruses except that they self-replicate whereas a virus does not.
ExamAlert
The difference between viruses and worms is that worms self-replicate!
Worms take advantage of backdoors and security holes in operating systems and applications. They look for other systems on the network or through the Internet that are running the same applications and replicate to those other systems. When it comes to worms, there is no need for the user to access and execute the malware. A well-known example of a worm is Nimda (admin backward) which propagated automatically through the Internet in 22 minutes back in 2001, causing widespread damage. It propagated through network shares, mass emailing and operating system vulnerabilities.
Trojan Horses
Trojan Horses, or simply trojans, appear to perform desired functions but are actually performing malicious functions behind the scenes. These are not technically viruses and can easily be downloaded without noticing them. Remote access trojans (RATs) are the most common type of Trojan, for example Back Orifice or NetBus; their capability to allow an attacker higher administration privileges than the owner of the system makes them dangerous as well.
Spyware
Spyware is a type of malicious software that is either downloaded unwittingly from a website or is installed along with some other third-party software. Usually, this malware collects information about the user without the user’s consent. It could be as simple as a piece of code that logs what websites you access, to a program that records your keystrokes. Spyware is also associated with advertising (those pop-ups that just won’t go away!) and could possibly change the computer configuration without any user interaction, for example redirecting a browser to access websites other than those desired. Adware usually falls into the realm of spyware because it pops up advertisements based on what it has learned from spying on the user. Grayware is another general term used to describe applications that are behaving improperly, but without serious consequences. It is associated with spyware, adware, and joke programs. Very funny...not.
Note
Malware can be distributed throughout the Internet by way of a botnet—a collection of compromised computers (known as zombies) running software installed by worms or other malware. It’s a vicious circle!
There are other types of malware such as rootkits and logic bombs, but for the most part the previously mentioned malware are the ones you’ll see on the exam.
Preventing and Troubleshooting Malware
Now that we know the types of malware, let’s talk about how to stop them before they happen, and how to troubleshoot them if they do happen. Unfortunately, given the amount of computers you will work on, they will happen.
If a system is affected by malware, it might be sluggish in its response time, display unwanted pop-ups and incorrect home pages, or applications (and maybe even the whole system) could lock up or shut down unexpectedly. Quite often malware uses CPU and memory resources directly or behind the scenes, causing the system to run slower than usual. In general, a technician should look for erratic behavior from the computer, as if it had a mind of its own! Let’s go over viruses and spyware and show how to prevent them and troubleshoot them if they do occur.
Preventing and Troubleshooting Viruses
There are several things that we can do to protect a computer system from viruses. First, every computer should have antivirus software running on it. McAfee, Norton, and Vipre are examples of manufacturers of AV software, but there are many others. Second, the AV software should be updated, which means that the software will require a current license; this is renewed yearly with most providers. When updating, be sure to update the AV engine and the definitions if you are doing it manually. Otherwise, set the AV software to automatically update at periodic intervals, for example every week. It’s a good idea to schedule regular scans of the system within the AV software.
ExamAlert
Be sure to update antivirus software regularly!
Next, we want to make sure that the computer has the latest service packs and updates available. This goes for the operating system and applications such as Office. Backdoors into operating systems and other applications are not uncommon, and the OS manufacturers often release fixes for these breaches of security. In Windows XP, Automatic Updates can be configured by going to Start > Control Panel > Automatic Updates. From here you have several options:
• Automatic—This automatically downloads and installs updates at specific intervals entered by the user.
• Download updates for me, but let me choose when to install them.
• Notify me but don’t automatically download or install them.
• Turn off Automatic Updates.
Configure Automatic Updates according to your company’s policy. You can also check if your computer is up to date by going to Start > All Programs > Windows Update. It directs you to a website that prompts you to install a Windows Update component and then checks if the computer has the latest security (and other) patches. In Windows Vista, you can check for updates directly within the Automatic Updates program. To access the preceding options, one additional step is required: clicking on the Change settings link.
It’s also important to make sure that a firewall is available, enabled, and updated. A firewall will close all the inbound ports to your computer (or network) in an attempt to block intruders. The Windows Firewall is a built-in feature of Windows XP/Vista, and you might also have a SOHO router with a built-in firewall. By using both, you will have two layers of protection from viruses and other attacks. You can access the Windows Firewall by navigating to Start > Control Panel > Windows Firewall. Keep in mind that you might need to set exceptions for programs that need to access the Internet. This can be done by the program, or the port used by the protocol, and can be configured in the Exceptions tab, enabling specific applications to communicate through the firewall while keeping the rest of the ports closed.
Finally, educate users as to how viruses can infect a system. Instruct them on how to screen their emails and tell them not to open unknown attachments. Show them how to scan removable media before copying files to their computer.
By utilizing these methods, virus infection can be severely reduced. However, if a computer is infected by a virus, you want to know what to look for so that you can “cure” the computer.
Here are some typical symptoms of viruses:
• Computer runs slower than usual.
• Computer locks up frequently or stops responding altogether.
• Computer restarts on its own or crashes frequently.
• Disk drives and/or applications are not accessible or don’t work properly.
• Strange sounds occur.
• You receive unusual error messages.
• Display or print distortion.
• New icons appear or old icons (and applications) disappear.
• There is a double extension on a file attached to an email that was opened, for example: .txt.vbs or .txt.exe.
• Antivirus programs will not run or can’t be installed.
• Files have been corrupted or folders are created automatically.
Before making any changes to the computer, make sure that you back up critical data and verify that the latest updates have been installed to the OS and the AV software. Then, perform a thorough scan of the system using the AV software’s scan utility; if allowed by the software, run the scan in Safe Mode.
ExamAlert
If at all possible, scan in Safe Mode!
Hopefully, the AV software will find and quarantine the virus(s) on the system. In the case that the AV software’s scan does not find the issue, or if the AV software has been infected and won’t run, you can try using an online scanner such as Trend Micro’s HouseCall: http://housecall.trendmicro.com/ or download Microsoft’s Malicious Software Removal Tool: http://www.microsoft.com/security/malwareremove/default.mspx.
In rare cases, you might need to delete individual files and remove Registry entries. This might be the only solution when a new virus has infected a system and there is no antivirus definition released. Instructions on how to remove viruses in this manner can be found on AV software manufacturers’ websites.
When it comes to boot sector viruses, your AV software is still the best bet. The AV software might utilize a boot disk to accomplish this, or it might have boot shielding built in. Some BIOS programs have the capability to scan the boot sector of the hard drive at startup; this might need to be enabled in the BIOS setup first. It is also possible to use the DOS SYS command to restore the first sector or the FDISK/MBR command to repair the master boot record within the boot sector, but a DOS-based boot disk will be necessary to do this; it will need to be created on a DOS based computer or downloaded from the Internet. Windows 2000 and XP offer the FIXMBR command available from the Recovery Console. Windows Vista offers the bootrec /fixmbr command from within the System Recovery Options Command Prompt. Keep in mind that the DOS, Recovery Console, and System Recovery Options Command Prompt methods might not fix the problem; in fact, they might render the hard drive inoperable depending on the type of virus. It is best to use the AV software’s various utilities that you have purchased for the system.
Worms and Trojans can be prevented and troubleshot in the same manner as viruses. There are scanners for trojans as well, for example: http://www.windowsecurity.com/trojanscan/. In some cases, AV software will scan for worms and trojans in addition to viruses.
Preventing and Troubleshooting Spyware
Preventing spyware is much like preventing viruses as far as updating the operating system and using a firewall. Also, because spyware has become much more common, antivirus companies have begun adding antispyware components to their software. Here are a few more things you can do to protect the computer in the hopes of preventing spyware:
• Download and install antispyware protection software. For example, Windows Defender, available at http://www.microsoft.com/windows/products/winfamily/defender/default.mspx. Other options include Spyware Doctor with Antivirus, SpyBot S&D (free), or one of the antivirus programs previously mentioned if it includes spyware protection. Be sure to keep the antispyware software updated.
• Adjust Internet Explorer security settings. This can be done by clicking Tools on the menu bar, selecting Internet Options, and accessing the Security tab. From there the security level can be increased, and trusted and restricted sites can be established. (It’s a good thing.) Internet Explorer 7 and higher also have a phishing filter that can be turned on by going to Tools, Phishing Filter and clicking Turn on Automatic Website Checking. This attempts to filter out fraudulent online requests for usernames, passwords, and credit card information, which is also known as web-page spoofing. Higher security settings can also help to fend off session hijacking; that is the act of taking control of a user session after obtaining or generating an authentication ID.
• Uninstall unnecessary applications and turn off superfluous services (for example, Telnet and FTP if they are not being used).
• Educate users on how to surf the web safely. User education is actually the number one method of preventing malware! Only access sites believed to be safe, and only download programs from reputable websites. Don’t click OK or Agree to close a window; instead press Alt+F4 on the keyboard to close that window. Be wary of file-sharing websites and the content stored on those sites. Be careful of emails with links to downloadable software that could be malicious.
• Consider technologies that discourage spyware. For example, use a browser that is less susceptible to spyware. Consider running a browser within a virtual machine, or take it to the next level and use a thin-client computer!
Here are some common symptoms of spyware:
• The web browser’s default home page has been modified.
• A particular website comes up every time you perform a search.
• Excessive pop-up windows appear.
• The network adapter’s activity LED blinks frequently when the computer shouldn’t be transmitting data.
• The firewall and/or antivirus programs turn off automatically.
• New programs, icons, and favorites appear.
• Odd problems occur within windows (slow system, applications behaving strangely, and such).
• The Java console appears randomly.
To troubleshoot and repair systems infected with spyware, first disconnect the system from the Internet. Then, try uninstalling the program from Add/Remove Programs in Windows XP, or Programs and Features in Windows Vista. Some of the less malicious spyware programs can be fully uninstalled without any residual damage. Be sure to reboot the computer afterward and verify that the spyware was actually uninstalled! Next, scan your system with the AV software to remove any viruses that might have infested the system, which might get in the way of a successful spyware removal. Once again, do this in Safe Mode if the AV software offers that option.
Note
In some cases, Safe Mode is not enough, and you need to boot off of a CD (Knoppix or BartPE, for example) and then rerun the scans.
Next, scan the computer with the antispyware software of your choice in an attempt to quarantine and remove the spyware. Other programs such as HijackThis can be used in an attempt to remove malware, but be careful with these programs as you will probably need to modify the Registry. Only remove that which is part of the infection.
Finally, you need to make sure that the malware will not re-emerge on your system. To do this, check your home page setting in your browser, verify that your hosts file hasn’t been hijacked (located in C:WINDOWSsystem32driversetc), and make sure that unwanted websites haven’t been added to the Trusted Sites within the browser.
On a final and sad note, sometimes computers become so infected with malware that they cannot be saved. In this case, the data should be backed up (if necessary by removing the hard drive and slaving it to another system), and the operating system and applications reinstalled.
Cram Quiz
Answer these questions. The answers follow the last question. If you cannot answer these questions correctly, consider reading this section again until you can.
1. Which of the following is the best mode to use when scanning for viruses?
![]() A. Safe Mode
A. Safe Mode
![]() B. Last Known Good Configuration
B. Last Known Good Configuration
![]() C. Command Prompt only
C. Command Prompt only
![]() D. Boot into Windows normally
D. Boot into Windows normally
2. Which of the following is a common symptom of spyware?
![]() A. Infected files
A. Infected files
![]() B. Computer shuts down
B. Computer shuts down
![]() C. Applications freeze
C. Applications freeze
![]() D. Pop-up windows
D. Pop-up windows
3. Which of the following is one way to prevent spyware?
![]() A. Use firewall exceptions.
A. Use firewall exceptions.
![]() B. Adjust Internet Explorer security settings.
B. Adjust Internet Explorer security settings.
![]() C. Adjust the Internet Explorer home page.
C. Adjust the Internet Explorer home page.
![]() D. Remove the spyware from Add/Remove Programs.
D. Remove the spyware from Add/Remove Programs.
4. What key combination should be used to close a pop-up window?
![]() A. Windows+R
A. Windows+R
![]() B. Ctrl+Shift+Esc
B. Ctrl+Shift+Esc
![]() C. Ctrl+Alt+Del
C. Ctrl+Alt+Del
![]() D. Alt+F4
D. Alt+F4
Exam Cram Answers
1. A. Safe Mode should be used (if your AV software supports it) when scanning for viruses.
2. D. Pop-up windows are common to spyware. The rest of the answers are more common symptoms of viruses.
3. B. Adjust the Internet Explorer security settings so that security is at a higher level, and add trusted and restricted websites.
4. D. Alt+F4 is the key combination that is used to close an active window. Sometimes it is okay to click the X, but malware creators are getting smarter all the time and the X could be a ruse.
File Security
File security is a feature of most operating systems that controls what files and folders a user has access to. To allow access to a folder, that folder must first be shared. Then permissions can be granted or denied to specific users or groups of users. Because files are securable in Windows, access to them is regulated by an Access Control Model. But before we get into sharing and permissions, let’s talk a little more about files and folders.
Working with Files and Folders
Previously we covered the basics of files and folders and how to access and work with them in the GUI and in the command line. To further understand how to secure files, let’s review the available file attributes. They start with the group of attributes known as RASH:
• Read-only: Write-protects the file so that it cannot be modified.
• Archive: Its purpose is to quickly determine if a file requires backing up; it is set when a file is overwritten or modified by the operating system.
• System: Indicates that the file is integral and important to the operating system; it protects the file.
• Hidden: Makes a file invisible when applications attempt to display a list of files.
There are two more attributes: compression, which decreases the size of a file so that it uses less space on a volume, and encryption, which converts the file (using a cipher) so that it cannot be read by others. We’ll talk more about encryption later in this chapter.
It is important to note that the system attribute protects a file. Viruses and other malicious attacks could possibly remove the system attribute (and read-only attribute) in an attempt to make modifications to the file or delete the file. For example, if a virus, worm, or RAT gained access to a system with the correct administrative privileges, removing the file would be as simple as using the following syntax:
attrib –r –a –s –h filename
del filename
When checking if viruses exist or have done damage to a system, use the attrib command in the root directory to verify that the proper attributes are set on system files. Here are some of the important root directory system files to watch out for:
• NTDETECT.COM
• ntldr
• pagefile.sys
By default, all of the preceding files should be set to ASHR except for pagefile.sys that should be set to ASH. If there have been any modifications to them, use the attrib command to reset them—you might also want to verify that they weren’t corrupted, and if you suspect foul play, recover the original files from the installation CD (or service pack CD).
System files and folders are quite often hidden from view to protect the system. In some cases you can simply click on the link Show the Contents of This Folder, but to permanently configure the system to show hidden files and folders navigate to Windows Explorer, Tools menu, and click Folder Options. Then select the View tab and under Hidden Files and Folders select the Show Hidden Files and Folders radio button, as shown in Figure 15.3. Note that in Windows Vista, the menu bar can also be hidden; to view it press Alt+T on the keyboard. To configure the system to show protected system files, deselect the Hide Protected Operating System Files check box, located two lines below Show Hidden Files and Folders. This enables you to view files such as ntldr and boot.ini.
Figure 15.3 The View tab of the Folder Options window

ExamAlert
To view files such as ntldr and boot.ini, deselect the Hide Protected Operating System Files check box.
Sharing Folders
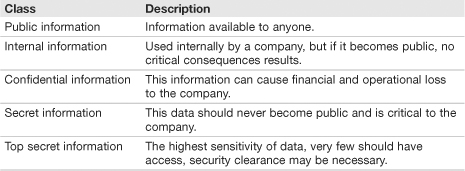
Folders and files need to be shared so that other users on the local computer and on the network can gain access to them. Windows operating systems use an Access Control Model for securable objects like folders. This model takes care of rights and permissions, usually through discretionary access control lists (DACL) that contain individual access control entries (ACEs). All the shared folders can be found by navigating to Computer Management > Shared Folders > Shares, as shown in Figure 15.4.
Here we also see the hidden administrative shares that can be identified by the $ on the end of the share name. These shares cannot be seen by standard users when browsing to the computer over the network; they are meant for administrative use. Note that every volume (C: or D:, for example) has an administrative share. Although it is possible to remove these by editing the Registry, it is not recommended because it might cause other networking issues. You should be aware that only administrators should have access to these shares.
Sharing folders differs slightly in Windows XP and Windows Vista, so let’s briefly discuss each one now.
Sharing Folders in Windows XP
There are two different ways to share folders in Windows XP: By utilizing simple file sharing or by using standard network shares.
Simple file sharing is enabled by default, but if you need to turn it on, you can do so by navigating to the Tools menu in Windows Explorer and selecting Folder Options. From the Folder Options window, click the View tab and scroll to the end of the list. The last option is Use Simple File Sharing; if it is check marked, then it is enabled. To share a file or folder for other local users on the computer, simply drag it to the Shared Documents folder, usually listed directly after Control Panel in the left window pane of Windows Explorer; this is known as a local share. To share a folder for access by remote users on the network, right-click the folder to be shared, and select Sharing & Security. Next, check mark the Share This Folder on the Network check box. At that point, you can give it a share name that by default is the same as the folder name. Now remote users can either browse to your computer or map a network drive to view the folder’s contents. Keep in mind that by sharing the folder in this manner, any user can access the folder, but by default the files will be read-only. For users to modify the files, the option Allow Network Users to Change My Files would have to be selected. Simple file sharing is an example of share-level security, which has slowly been losing ground to the more secure user-level security.
To use standard network shares (also known as user-level security), simple file sharing must be disabled. When this is done, folders are shared by accessing the same Sharing tab of the folder’s properties window, but you can notice that the window has changed. Now, we have the option to set permissions for the folder. There are two levels of permissions: Share permissions and NTFS permissions.
• Share permissions can be accessed from the Sharing tab by clicking the Permissions button. From here you note that the Everyone group has read-only access by default. The other two permissions available to us are Change and Full Control.
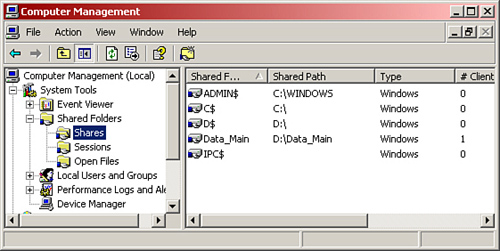
• NTFS permissions are accessed from the Security tab. Here we have six default levels of permissions from Read and Write to Full Control, as shown in Figure 15.5.
Figure 15.5 Security tab of a folder’s Properties window
ExamAlert
NTFS permissions are modified in the Security tab of the folder’s Properties window.
The weakest of these permissions is Read, and the strongest, of course, is Full Control. You also note that we have the option to Allow access or Deny access and that this can be done by the users or by their user group, thus the term user-level security. Generally, if you want users to have access to the folder, you would add them to the list and select Allow for the appropriate permission. If you don’t want to allow them access, normally you simply wouldn’t add them. But in some cases, an explicit Deny is necessary. This could be because the user is part of a larger group that already has access to a parent folder, but you don’t want the specific user to have access to this particular subfolder.
Of course, permissions can get very in-depth; for more information on simple file sharing and the associated permissions see the following link: http://support.microsoft.com/kb/304040/. For more information on NTFS permissions see: http://technet.microsoft.com/en-us/library/bb727008.aspx.
Sharing Folders in Windows Vista
Windows Vista does not enable simple file sharing by default. Access to shared folders in Vista normally requires a username and password. (So share-level security has, for the most part, gone the way of the dodo.) There are once again two different ways of sharing folders; by using a wizard or doing it manually. First however, we need to make sure that file sharing is turned on! To do this, navigate to Control Panel > Network and Internet > Network and Sharing Center. Under Sharing and Discovery you see the File sharing option; make sure it is turned on. Also verify that Network discovery is on so that other computers can “see” the computer that will be hosting the shares, as shown in Figure 15.6.
Figure 15.6 Network and Sharing Center
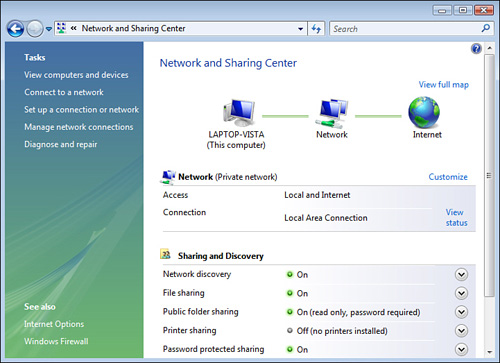
You will note a few other settings. First is Public Folder Sharing. Although you can share any folder you want, the Public folder was created as a default share that any user on the local computer or other computers can access. It takes the place of the Shared Documents folder in Windows XP. The Public folder can be found by navigating to Start > Documents and then selecting Public under Favorite Links. This setting can be configured so that network users can open files in the Public folder, or open and modify them, or the setting can be turned off so that only local users can see the files. Second is Password Protected Sharing. If this is on, a remote user needs to type a username and password to gain access to a share, but if it is off, any user can connect automatically, which is not recommended as it is not secure.
Now, you can enable/disable the wizard previously mentioned by navigating to Windows Explorer, Tools menu, and click Folder Options. Then select the View tab, scroll to the bottom, and either select or deselect the Use Sharing Wizard check box. If you use the wizard and attempt to share a folder by right-clicking it and selecting Share, a window pops up prompting you to select the users that will have access to the folder. The appropriate users are then added to the list and configured as a Reader, Contributor, or Co-author. If you choose not to use the wizard, and want to share a folder, right-click the folder and select Share; then click the Advanced Sharing button. In the Advanced Sharing window, check mark the option for Share This Folder. From there, Share permissions can be added the same way as in Windows XP simply by clicking the Permissions button. To add NTFS security permissions, cancel out of the Advanced Sharing window and select the Security tab; NTFS permissions work the same way as in Windows XP. For more information on File sharing in Windows Vista see the following link: http://technet.microsoft.com/en-us/library/bb727037.aspx.
Permission Inheritance and Propagation
If you create a folder, the default action it takes is to inherit permissions from the parent folder. So any permissions that you set in the parent will be inherited by the subfolder. To view an example of this, locate any folder within an NTFS volume (besides the root folder), right-click it and select properties, access the Security tab, and click the Advanced button. Here you see an enabled check box named Inherit from Parent the Permission Entries (and so on)” toward the bottom of the window, as shown in Figure 15.7. This means that any permissions added or removed in the parent folder will also be added or removed in the current folder. In addition, those permissions that are inherited cannot be modified in the current folder. To make modifications in this case, deselect the Inherit from Parent the Permission Entries (and so on) check box. When you do so, you have the option to copy the permissions from the parent to the current folder or remove them entirely. So by default, the parent is automatically propagating permissions to the subfolder, and the subfolder is inheriting its permissions from the parent. You can also propagate permission changes to subfolders that are not inheriting from the current folder. To do so, select the Replace Permission Entries on All Child Objects (and so on) check box. This might all seem a bit confusing, and you will probably not be asked many questions on the subject. Just remember that folders automatically inherit from the parent unless you turn inheriting off—and you can propagate permission entries to subfolders at any time by selecting the Replace option.
Figure 15.7 Advanced Security Settings window

Moving and Copying Folders and Files
This subject (and the previous one) is actually an MCSE type concept, so we’ll try to keep this simple. Moving and copying folders have different results when it comes to permissions. Basically, it breaks down like this:
• If you copy a folder on the same or to a different volume, the folder inherits the permissions of the parent folder it was copied to (target directory).
• If you move a folder to a different location on the same volume, the folder retains its original permissions.
Note
Keep in mind that when you move data, the data isn’t actually relocated; instead the pointer to the file or folder is modified.
Encryption
Encryption is the process of converting information, with the use of a cipher (algorithm), making it unreadable by other users unless they have the correct “key” to the information. Cryptography is the practice of hiding information. In a cryptosystem, information is protected by disguising it.
Types of Encryption
There are two main types of encryption algorithms:
• Symmetric key: This encryption system uses a common shared key between the sender and the receiver. It is quick and easier to implement than an asymmetric system. One logistical issue with symmetric keys is that the shared key must be communicated between the users securely before file transfer can commence. Examples of symmetric key technology include Encrypting File System (EFS), BitLocker, WEP, WPA, Kerberos, AES, 3DES, and Rivest’s cipher.
• Asymmetric key: This system uses two keys; one is public, the other private. Users encrypt data with the public key of the target computer. Upon receipt of the data, the target uses a private key to decrypt the data. One issue with asymmetric is ensuring that the public key is authentic; to be certain, organizations will use a PKI or public key infrastructure. Examples of asymmetric key technology include RSA and ECC.
ExamAlert
Know the difference between symmetric key and asymmetric key technologies.
Another type of encryption is used for verifying the integrity of files that are downloaded; this is known as hashing. A hash is a mathematically generated number that ensures message integrity. Examples of hash algorithms include Secure Hash Algorithm (SHA) and Message-Digest algorithm 5 (MD5).
Encryption in Windows
There are a few different encryption technologies used in Windows. For example, whenever you log on to a Windows network, that authentication is secured with the Kerberos protocol. Another example is when you want to encrypt one or more files or folders. In this case Windows uses the Encrypting File System (EFS), a component of NTFS. Follow the steps below to encrypt a file in Windows:
1. Locate the file, right-click it, and select Properties. This brings up the General tab within the file’s Properties window.
2. At the bottom of the General tab, click the Advanced button. This brings up the Advanced Attributes window.
3. Check the box labeled Encrypt Contents to Secure Data.
4. Click OK for both windows. (When you do so, the system should ask whether you want to encrypt the parent folder and the file or just the file. It’s recommended that the file’s parent folder be encrypted as well.)
The file should now appear green within Windows Explorer. To unencrypt the file and return it to normal, simply deselect the check box.
Note
Windows XP Home edition doesn’t include EFS.
EFS is considered a symmetric key technology but actually uses symmetric and asymmetric keys. Any individual or program that does not have the correct key cannot read the encrypted file. If a file needs to be decrypted and the original user (owner of the key) isn’t available, an EFS recovery agent will need to be used. In many cases the default recovery agent is the built-in Administrator account. It is important to note a few more items: One is that EFS isn’t designed to protect data while it is transferred from one computer to another; the other is that it is not designed to encrypt an entire disk.
To encrypt an entire disk, you need some kind of full disk encryption software. There are several currently available on the market; one developed by Microsoft is called BitLocker—available only on Vista Ultimate and Vista Enterprise. This software can encrypt the entire disk which, after complete, is transparent to the user. However, there are some requirements for this including
• A Trusted Platform Module (TPM): a chip residing on the motherboard that actually stores the encrypted keys.
or
• An external USB key to store the encrypted keys.
and
• A hard drive with two volumes, preferably created during the installation of Windows. One volume is for the operating system (most likely C:) that will be encrypted; the other is the active volume that remains unencrypted so that the computer can boot. If a second volume needs to be created, the BitLocker Drive Preparation Tool can be of assistance and can be downloaded from Windows Update.
BitLocker software is based on the Advanced Encryption Standard (AES) and uses a 128-bit key. Keep in mind that a drive encrypted with BitLocker usually suffers in performance compared to a nonencrypted drive and could have a lesser shelf life as well.
Note
Windows sessions over the Internet can be encrypted by utilizing Microsoft Challenge-Handshake Authentication Protocol (MS-CHAP) and MS-CHAP Version 2. These authenticate a user or a networked computer to an authenticating entity such as an Internet access provider. This is sometimes used with virtual private network (VPN) connections and can be enabled within the Advanced Security Settings window within the VPN adapter’s Properties page.
Cram Quiz
Answer these questions. The answers follow the last question. If you cannot answer these questions correctly, consider reading this section again until you can.
1. Which operating system offers simple file sharing?
![]() A. Windows XP
A. Windows XP
![]() B. Windows Vista
B. Windows Vista
![]() C. Windows 2000
C. Windows 2000
![]() D. DOS
D. DOS
2. Where would you turn on file sharing in Windows Vista?
![]() A. Control Panel
A. Control Panel
![]() B. Local Area Connection
B. Local Area Connection
![]() C. Network and Sharing Center
C. Network and Sharing Center
![]() D. Firewall properties
D. Firewall properties
3. Which option will enable you to view ntldr?
![]() A. Enable Hide protected operating system files
A. Enable Hide protected operating system files
![]() B. Disable Show hidden files and folders
B. Disable Show hidden files and folders
![]() C. Disable Hide protected operating system files
C. Disable Hide protected operating system files
![]() D. Remove the –R attribute
D. Remove the –R attribute
4. Which type of encryption technology is used with the BitLocker application?
![]() A. Symmetric
A. Symmetric
![]() B. Asymmetric
B. Asymmetric
![]() C. Hashing
C. Hashing
![]() D. WPA2
D. WPA2
Cram Quiz Answers
1. A. Windows XP uses simple file sharing by default. However, most network admins opt to use standard sharing; also, there is no simple file sharing when computers are members of a domain. The approximate equivalent of this in Windows Vista would be known as Disable Password Protected Sharing.
2. C. The Network and Sharing Center is where you would enable file sharing in Windows Vista.
3. C. To view ntldr you need to disable the Hide protected operating system files check box. Keep in mind that you should have already enabled the Show hidden files and folders radio button.
4. A. BitLocker uses symmetric encryption technology based off of AES.
Additional Reading and Resources
Barrett, Diane, et al. CompTIA Security+ Exam Cram, 2nd edition. Que, 2009.
Additional A+ resources: http://www.davidlprowse.com/aplus