
Chapter 11. Laptops
Ah, the laptop. The beauty of laptops is that they are portable, and all the connections are right at your fingertips. However, quite often there is a trade-off in performance and in price. This chapter assumes a basic knowledge of laptops, and jumps straight into how to install, configure, and troubleshoot laptop devices.
Laptops were originally designed for niche markets, but today are used in businesses almost as much as desktop PCs are. Laptops (also known as notebooks or portable computers) have integrated displays, keyboards, and pointing devices making them easy to transport and easy to use in confined spaces. There are plenty of other portable devices on the market today including PDAs, Ultra-Mobile PCs, and more, but the bulk of the portable devices that you will troubleshoot are laptops; it is laptops that are covered on the CompTIA A+ exams. For the exams, it is important to identify the components of a laptop and the ports that surround the machine, how to install and configure hardware, and how to take care of and troubleshoot the laptop. In many respects, laptops work the same way as desktop computers. This chapter focuses on the differences that make a laptop stand out from the desktop PC.
Installing, Configuring, and Troubleshooting Visible Laptop Components
In this section, we discuss the visible components of the laptop such as the keyboard and the display. These two devices are probably the most prone to failure, so we discuss some methods and step by steps on how to repair them. In addition, we talk about a laptop’s audio, power, expansion busses, and optical disc drives.
Laptop 101
For the exam, it is important to identify the main components of a laptop and its ports. Figure 11.1 shows some of the main components of the laptop.
Figure 11.1 A typical laptop’s main components

The main components of the laptop include the liquid crystal display (LCD), keyboard (with special Fn key), touch pad, the power button, and extra buttons. The extra buttons offer additional functionality, for example; enabling and disabling wireless, turning the sound on or off, and opening applications such as Internet Explorer and Outlook.
A laptop manufacturer needs to squeeze in ports wherever they can find space, so quite often you find ports on three of the sides of the laptop. Figures 11.2 through 11.4 identify the various ports around the sides of the laptop.
Figure 11.2 A typical laptop’s ports part A

Figure 11.3 A typical laptop’s ports part B
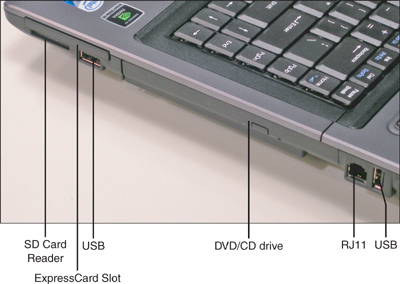
Figure 11.4 A typical laptop’s ports part C

Note
The ports in Figures 11.2 through 11.4 are described in detail in Chapter 12, “Video, Audio, and Peripherals.”
ExamAlert
Be able to identify the main components and ports of a laptop for the exam.
Input Devices
Inputting information to a laptop is just like inputting information to a PC, except all of the devices are miniaturized. Laptops have a few different input devices including keyboards, pointing devices, and the stylus.
Keyboards and Function Keys
Some laptops have keyboards similar to the 101-key keyboard found on a PC including a numeric keypad; these laptops are larger than most and are known as desktop replacements. However, most laptops are designed with a small form factor in mind, and this means a smaller keyboard. For example, the keyboard in Figure 11.5 has 86 keys. But as you note in the figure, a user has the option of using the Fn key. The Fn key (Function key) is a modifier key used on most laptops. This is designed to activate secondary functions of other keys (usually marked in blue). For example, in Figure 11.5 the F8 key has the secondary function “volume up,” but only if you are pressing the Fn key at the same time.
Figure 11.5 A typical laptop keyboard
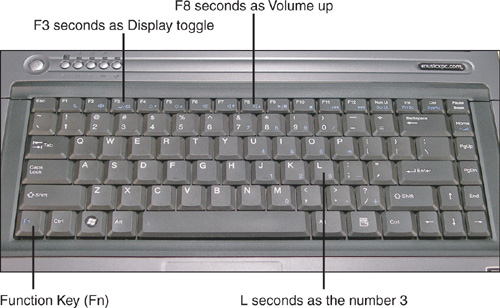
Using this method, much more functionality can be incorporated into the keyboard without the need for additional keys. This idea has since grown to include all kinds of controls; for instance, using media player controls, putting the computer to sleep, and a variety of other functions including enabling an external monitor (as shown in Figure 11.5); on this laptop the F3 key seconds as a display toggle between the built-in LCD and an external monitor. In addition, the entire numeric keypad is added to the keyboard as secondary keys. For example, in Figure 11.5 the L key seconds as the number 3, but this will work only if the Number Lock (Num Lk) key has been enabled. (The Fn key is not necessary for the numeric keypad to work.) Quite often, users forget about the Num Lk key, and when they try to type, strange garbled code comes out! Simply press the Num Lk key once to fix the problem. This is also common if the user works with an external keyboard at the office and disconnects it when they leave the office.
ExamAlert
Press the Num Lk key to enable/disable the numeric keypad on a laptop.
Personally, I have had a dozen people I know approach me telling me that their laptop’s keyboard wasn’t working properly. Over time I’ve noticed several culprits: overuse, loose ribbon cables, spilled coffee, or users simply pounding the tar out of the keyboard! Here are a couple of problems you might encounter:
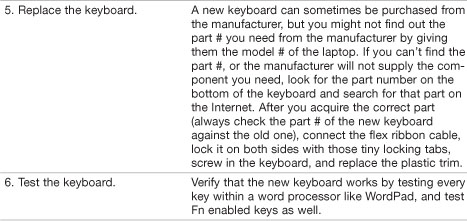
• Stuck keys: Stuck keys could occur because of overuse, damage to the individual key’s switch, or if liquid was spilled on the keyboard. (And if a stuck key is the worst that happens due to a liquid spill, consider yourself lucky!) Stuck keys can be identified by the fact that the key fails to work in Windows, or if the BIOS reports a 3xx error. (It might say something similar to “Keyboard stuck key failure.”) If there is a BIOS error, look for a two-digit hexadecimal code just before the 3xx error. This code identifies which key(s) is stuck. Of course, you have to access your BIOS documentation to find out which key a particular hexadecimal code refers to. (In some cases this will be based off of the standard ASCII printable character code.) By removing the keycap and cleaning the keyswitch underneath, you can usually fix the problem. If not, the entire keyboard will probably have to be replaced. See Table 11.1 for more information.
Table 11.1 Steps Involved in Replacing a Laptop Keyboard
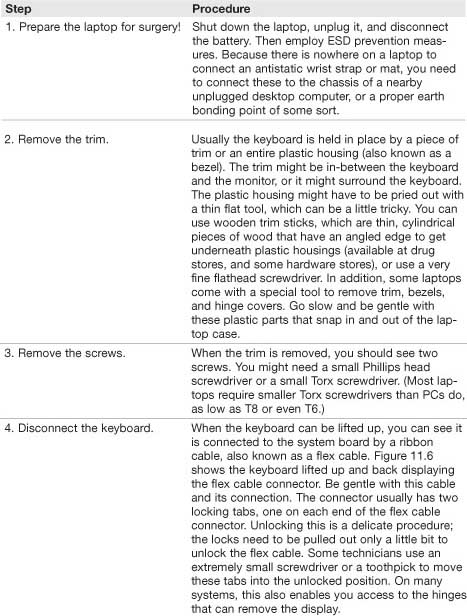
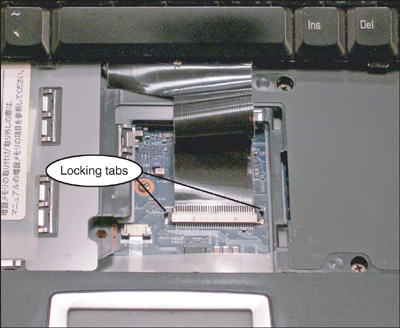
• Loose connection: If the laptop is moved around and jostled a lot, as many laptops are, it could possibly cause loose connections. One of these is the ribbon cable that connects the keyboard to the motherboard. To fix this, the keyboard will have to be lifted away from the laptop and the ribbon cable attached securely. Follow the steps listed in Table 11.1 to accomplish this.
• Damaged keyboard: Users who inadvertently drop heavy items onto the keyboard or operate the keyboard with a heavy hand might cause a warped or bent keyboard. Some brands of laptops suffer from this more than others. This is usually impossible to repair, and the keyboard will need to be replaced, as shown in Table 11.1.
Figure 11.6 Keyboard Flex Cable Connector
Note
Step 1 should be employed whenever you replace parts in the laptop.
ExamAlert
Understand the steps involved when replacing keyboards for the exam.
If a user needs access to a laptop right away before it can be repaired, a temporary solution would be to connect a USB or PS/2 external keyboard. This should be recognized automatically by Windows. There are USB to PS/2 adapters available if the laptop has only USB ports, and the only keyboard accessible is PS/2. Examples of sites where these types of adapters can be acquired include www.cablestogo.com, and www.cyberguys.com.
Note
When repairing a laptop, try to document the process as you go. Write down what you see and how and where cables and screws were attached. Also make note of how devices were oriented before they were removed. Label any parts that you remove for easier identification later on. If available, refer to the manufacturer’s documentation that came with the laptop.
Pointing Devices
Whereas a PC uses a mouse, the laptop uses a pointing device. The bulk of laptops come with a pointing device known as a touch pad. By gliding a finger across the touch pad surface, a user can move the cursor on the screen. Touch pads also comes with two buttons that take the place of a mouse’s buttons. In portable computing lingo, the word “click” is replaced with the word “tap.” In addition to using the buttons, most touch pad surfaces can also be tapped or double-tapped upon, just by tapping with the finger. The buttons are oriented in such a way as to be used with the thumb. Touch pads can be replaced though it is uncommon to do so; they are connected by two cables similar to the flex cable that connects the keyboard. However, you might have to remove other devices first to get at the touch pad. You might also have to work from the bottom and from the top of the laptop; this will depend on the brand of laptop. Some touch pad buttons can be replaced the way keys on the keypads are. Touch pads are sometimes referred to as track pads as well.
Pointing devices can often be turned off within Windows, usually through the laptop manufacturer’s software. Watch out for situations in which the entire device was disabled or perhaps just the pad portion of the touch pad was disabled. It’s also possible to disable tapping ability of the touch pad, while still allowing movement of the cursor.
Another common type of pointing device is the pointing stick, known within IBM/Lenovo laptops as the TrackPoint. This device manifests itself as a smaller rubber cap (that looks like an eraser head) just above the B key, and two buttons that work essentially the same as a touch pad’s buttons. External keyboards are also sold with integrated TrackPoint devices.
Of course external mice can be connected to the laptop or its docking station as well. These would be connected to USB or PS/2 ports or could be wireless devices that connect via Bluetooth.
Stylus/Digitizer
A stylus is a writing tool, usually a thin plastic “pen” looking device used to take the place of a mouse by tapping and “writing” on a touch screen (also known as a digitizer screen). This method is widely used in tablet PCs, PDAs, and handheld computers. Whenever you sign for a package from a package company, you sign with a stylus on a touch screen. This takes the place of pencil and paper.
Video
A laptop’s video subsystem is composed of a liquid crystal display (LCD) and a graphics processor unit (GPU):
• LCD: A flat panel display that consists of two sheets of polarizing material surrounding a layer of liquid crystal solution. It connects to the motherboard by way of a flex ribbon cable and gets its power from an inverter board.
• GPU: The GPU is the processor for video. On a laptop it is usually integrated with the motherboard. In some cases it is part of the chipset and utilizes RAM as shared video memory. In others scenarios, namely more powerful laptops, it is a separate processor that has its own memory and possibly is situated upon its own circuit board.
Most of today’s LCD screens are thin-film transistor (TFT) active-matrix displays, meaning they have three transistors for each pixel, which are contained within a flexible material. These are located directly behind the liquid crystal material. In general, LCDs use low amounts of power, generate a small amount of heat, and cause very little in the way of interference and emissions.
Display Controls
Brightness can be adjusted from the keyboard on most laptops. On the laptop keyboard shown previously in Figure 11.5, pressing the Fn and F4 key will decrease brightness, and pressing the Fn and F5 key will increase brightness. There usually aren’t contrast controls on a laptop’s LCD.
Resolution is the amount of pixels, measured horizontal by vertical, on the display, and is user selectable. The higher the resolution, the more that can be fit on the screen, which is beneficial to a certain point, especially if the laptop’s screen isn’t very big. Table 11.2 shows some of the common resolutions that laptops use currently.
Table 11.2 Common Laptop Resolutions

Note
For more about resolution and the different resolution modes available, see Chapter 12, “Video, Audio, and Peripherals.”
Laptops’ active-matrix screens are usually set to run at one specific resolution. The laptop used during the writing of this book uses a default resolution of 1280x800 pixels. If the resolution is changed to something else, the laptop usually scales the resolution, making the picture unclear and perhaps not even fit on the screen correctly. Because of this you’re really stuck with the default resolution. Sometimes this default resolution can be a bit tough on the eyes, for example if the laptop’s display runs at WXGA 1280x800 but the screen size is only 13.3 inches. If a user plans on using the laptop for long periods of time, they should consider a laptop with a larger display or an external display.
That brings us to the capability to send video signal to an external monitor. Some people refer to this technology as screen switching. Most laptops come with an external connection (either VGA or DVI or both) for a second monitor. When this monitor is plugged in, it can be enabled by pressing the display toggle key, otherwise known as the secondary monitor button. On the laptop used in this chapter, this can be done by pressing the Fn key and the F3 key simultaneously; however, it can be a different key than F3 on other brands of laptops. The icon on the key usually looks like an open laptop viewed from the side with a monitor to its right. Normally, you have the option to display the desktop to the laptop, to the external display, or a copy of the desktop to both. Many laptops offer a greater resolution to external displays than they can provide internally, but only when the external display is being used exclusively. For example, the laptop used in this chapter can run a resolution of 1280x800 on the integrated display but can run at 1920x1200 on the external monitor (again, exclusively). If the external monitor won’t display anything, make sure that the cable is firmly connected to the external port, verify that the external monitor is plugged in and on, and then try cycling through the various video options by pressing the button several times, waiting a few seconds each time. Make sure you are holding down the Fn key while doing so. Finally, restart the computer if necessary. This can get a little trickier if using a projector as the second display. Sometimes, the projector might need time to warm up or might need to be configured via it’s on-screen display (OSD). Locate the projector’s documentation for more details.
Well, displaying the same desktop on two monitors is great, but what if you want to take it to the next level and stretch out the Windows desktop across two monitors? That would be known as DualView.
Note
For more about video settings, see Chapter 12 “Video, Audio, and Peripherals.”
DualView
DualView is a Windows feature that extends the desktop across to a second display; it enables you to spread applications over two monitors that effectively work together as one. This works well for applications that are very wide; for instance, a wide spreadsheet that requires some heavy left-to-right scrolling, an audio/video application with many tracks of information, or in the case that more than one window needs to be open and visible at the same time. The secondary screen used in DualView does not have a taskbar; it just has the wallpaper that you normally use. When DualView is used on a laptop, the laptop is always the primary monitor, and the other monitor cannot be selected as primary, meaning it cannot have the taskbar, Start button, and so on. To enable DualView, follow these steps:
1. Connect a secondary monitor to the DVI or VGA port on the laptop. Newer laptops have a DVI port. But you can still connect older SVGA monitors, just use a DVI to VGA adapter. (These come with many of today’s video cards.)
2. Turn on the secondary monitor.
3. Open the Display Settings window in Vista, or the Display Properties window in XP.
• In Vista: Right-click the desktop and select Personalize. Then select Display Settings. This opens the Display Settings window.
• In XP: Right-click the desktop and select Properties. This opens the Display Properties window. Select the Settings tab.
4. Click on the Display drop down menu. Multiple Monitors should be listed. If it is not listed, the laptop might not support DualView.
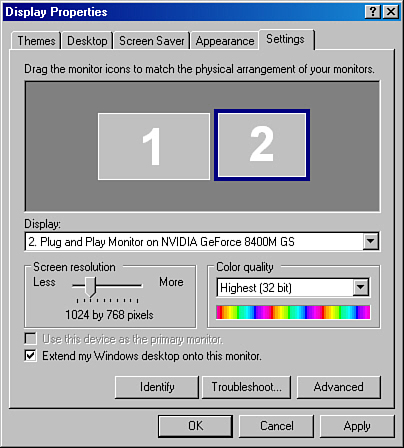
5. Select the monitor with the number 2, either in the display, or in the drop-down menu and check mark Extend My Windows Desktop on to this Monitor, as shown in Figure 11.7. By using the Identify button, and dragging the monitors around in the display window, you can arrange your monitors so that they match their physical position.
Figure 11.7 Windows XP DualView configuration
6. Click Apply. The mouse should extend all the way across both monitors now. Verify that the secondary monitor is functional by dragging a window to that display. If all is good, click OK to close the Display Settings/Display Properties window.
When DualView is implemented, screen switching will not function; to use screen switching, DualView first has to be disabled. Some laptops video adapters do not support DualView, or they might need a software upgrade to support it.
Note
Windows’ Multiple Monitor technology builds off of DualView but cannot currently be used on laptops. It works with desktop PCs and can drive up to ten monitors, any one of which can be the primary monitor. In Windows XP, different video adapters with different drivers can be used, but in Windows Vista, the same driver must be used for all adapters. Many video adapters today come with two DVI outputs standard for just this sort of scenario. Other video adapters don’t support Multiple Monitor or need a software upgrade to do so.
Troubleshooting Video Issues
The video display in laptops is integrated, which while being a main feature of the portability of laptops can be a point of failure as well. Display failures can be broken down into a few categories:
• Damaged inverter: The LCD is lit by a Cold Cathode Fluorescent Lamp (basically a bulb). The lamp is driven by a high-voltage inverter circuit. Because the inverter runs at high voltage, and possibly at high temperatures, it is prone to failure. If the inverter fails, the display will go dark; however, an external monitor should work properly. Another possibility is that the lamp has failed. You can verify if it is an inverter/lamp issue by shining a flashlight directly at the screen. When you do this you should be able to make out Windows! This means that the display is getting the video signal from the motherboard, and the problem, most likely, is indeed the inverter or the lamp. If the display’s flex cable that connects the LCD to the motherboard was loose or disconnected, nothing would show up on the screen at all. The inverter circuit is usually situated on its own circuit board. To replace this circuit board follow the steps in Table 11.3.
Table 11.3 Steps to Replace a Damaged Inverter Board

• Damaged LCD screen: An LCD could be damaged in a variety of ways. For example you might see a crack in the screen, or a portion of the screen doesn’t display properly. If this is the case, the LCD will have to be replaced, follow steps 1–3 in Table 11.3 to open the display assembly.
• Worn out lamp: A laptop’s lamp will usually last a long time. However, at some point the lamp will start to wear out. You might notice a dimmer screen than before, or a reddish/pinkish hue to the screen, or maybe a loss of color. All these things indicate the possibility of a worn out lamp. To replace the lamp, follow the steps in Table 11.3 but during steps 4 and 5, instead of replacing the inverter, replace the lamp.
ExamAlert
Warning! The inverter should not be handled if the laptop is on! Be sure to turn off and unplug the laptop and remove the battery before removing an inverter.
Audio
Almost all laptops have an integrated sound card (often a Mini-PCI card) and speakers. These work in the same manner as a PC’s sound card and speakers, just on a smaller scale. Quite often, a laptop comes equipped with a speaker out/headphone out connector, line in connector, microphone connector, and perhaps an IEEE 1394 (FireWire) connector. For more information on audio see the section titled “The Audio Subsystem” in Chapter 12.
A laptop’s volume can be adjusted in one of two ways:
• Volume knob/button: Older laptops have a knob, which can sometimes be a little hard to find. This can be the culprit when a user informs you that they cannot hear anything from their speakers. Newer laptops use a button, usually one that is activated with the Fn key (refer to Figure 11.5). Most new laptops have an on-screen display that shows the volume level as you adjust it.
• Software adjustment: Volume can be adjusted within Windows Vista by navigating to Start > Control Panel > Sound and then accessing the Speakers Properties window and adjusting the volume slider. Volume can be adjusted in Windows XP by navigating to Start > Control Panel > Sounds and Audio Devices, and then adjusting the volume slider. From here you can also place a volume icon on the taskbar (within the System Tray) for easy access to the volume control and to the Sounds and Audio Devices window. Vista places an icon within the System Tray automatically. Most sound cards come with their own software as well in which a user can adjust volume, the equalizer, and more. This software might place an icon within the System Tray as well.
Optical Discs
Due to the amount of abuse a typical laptop receives, it is not uncommon to see a DVD or CD drive fail. However, optical disc drives are usually easy to replace on a laptop, easier than on a desktop PC in fact. Most of the time there will be two screws on the bottom of the laptop that hold the DVD or CD drive in place. When removed, the drive can be slid out of the side of the laptop. Drives that can be installed simply by sliding them into a slot are becoming more and more commonplace; most laptops incorporate them. Check your laptop’s documentation for a compatible replacement (or upgrade), or check the bottom of the drive itself for part numbers that you can use to find a replacement drive online.
Power
Laptops are designed to run on battery power, but laptops can run only between 2 and 5 hours on these batteries. So, the laptop comes with an AC power adapter to plug into an AC outlet; these adapters should always be carried with the laptop. How many times have I heard from a user that they forgot their power brick! Recommend to users that they always put the AC adapter back in the laptop case.
The worst is when a laptop won’t turn on! Without power a user can’t do anything. When troubleshooting power problems, envision the entire chain of power in your mind (or write it on paper), from the AC outlet, to the AC adapter, all the way to the power button on the laptop. There are a few things you can check if it appears that the laptop is not getting any power.
• Check the power LED: Most laptops have a power LED just above the keyboard. If this lights up, then maybe it isn’t a power problem at all. For example, the user might start the laptop, see nothing on the display, and determine that the laptop has no power, when in reality, it is a display issue. Many laptops also have hard drive and wireless LEDs, which can tell you more about the status of the laptop, without being able to see anything on the screen.
• Check connections: Verify that the laptop is firmly connected to the AC adapter and that the AC Adapter is firmly connected to the AC outlet.
• Make sure the user uses the right power adapter: Swapping power adapters between two different laptops is not recommended, but users try to do it all the time. Two different laptop models made by the same manufacturer might use what appear to be similar power adapters, with only one or two volts separating them; however, the laptop usually won’t power on with that “slightly” different power adapter. Laptop AC adapters are known as fixed input power supplies, meaning they work at a specific voltage. The adapter is not meant to be used on another model laptop. Unfortunately, a user might have plugged in the incorrect power adapter, and the laptop worked fine for 4 or 5 hours, because it was actually running on battery power, but the user might not have noticed, even though the system should have notified the user when the battery was low (and critical). If you do suspect that an AC power adapter is faulty, consider testing your theory by swapping it out with an identical power adapter. Chances are a company will have extra power adapters or will have several laptops of the same make and model. Another power adapter-related issue could be that the user is trying to work in another country. To do this, the user needs an auto-switching AC adapter, meaning that it can switch from 120 to 240 VAC automatically. Some laptops do not come with auto-switching AC adapters, but after market versions can be purchased for many models of laptops. Remember that an additional adapter might be necessary to make the actual connection to the AC outlet in foreign countries.
• Check the battery and voltage: It might sound silly, but check if the battery hasn’t been removed for some odd reason. Also, check if the battery is fully inserted into the battery compartment. There is usually a locking mechanism that should hold the battery in place. Finally, test the battery’s voltage. Batteries last a finite amount of time. They can be recharged (known as cycles) by the laptop just so many times before failure. After a few to several years, the battery won’t hold a charge any longer or will lose charge quickly. In some cases you can try discharging and recharging the battery a few times to “stimulate” it, but in most scenarios the battery will have to be replaced. In general, lithium-ion batteries last longer if the laptop is operated and stored at the right temperature ranges. Acceptable operating range for laptops is from 50—95°F (10—35°C), and acceptable storage ranges are from −4—140°F (−20—60°C).
Note
For more information on how to prolong lithium-ion batteries (the most common laptop battery), see the following link: http://batteryuniversity.com/parttwo-34.htm.
• Check if standby or hibernate mode has failed: If the user regularly puts the laptop into standby or hibernate mode, they could encounter issues once in a while. In some cases, the power button needs to be held down for several seconds to reboot the machine out of a failed power down state. This might have to be done with the battery removed. If either of these modes failed, check the Event Viewer for any relative information, and possibly turn off hibernation and or standby mode until the situation has been rectified.
• Reconnect the power button: In rare cases the power button might have been disconnected from the system board. To fix this the laptop will have to be opened up; usually removing the keyboard and laptop housing gives access to the buttons.
• Check the AC outlet: Make sure the AC outlet that the user has plugged the laptop into is supplying power. A simple test would be to plug a lamp, clock, or other device into the outlet, but a more discerning and safe test would be to use a receptacle tester. For more information on testing AC outlets see Chapter 5, “Power.”
There are a few different types of batteries that a laptop might use including Lithium-ion (Li-ion), Nickel-metal hydride (NiMH), and Nickel-cadmium (NiCd), but Li-ion is by far the most common. They have the best energy to weight ratio and don’t suffer from “memory effect” like NiCd batteries. They also discharge slowly when they are not used.
However, you can’t run on batteries forever! So Windows includes alarms that can be set to notify the user when the battery is getting low, and real low, known as critical. These alarms are set in Power Options.
To modify battery alarms in Windows XP click Start > Control Panel, and in Classic mode double-click the Power Options icon. Select the Alarms tab; from here the low battery and critical battery alarm thresholds can be modified. Additional settings like the power scheme used, what to do when the lid of the laptop is closed, and enabling hibernation can also be modified in the Power Options window. To conserve battery power, consider setting the display and hard disk to turn off after the computer has been idle for 5 minutes; this can be done from the Power Schemes tab.
Power options on portable systems running Windows Vista can be modified by going to the Control Panel, selecting Classic view, and double-clicking the Power Options applet. By default in Vista, there are three Preferred plans: Balanced, Power saver, and High performance; however, users can create their own power plans as well. Each of these plans can be modified by clicking on the Change plan settings link. There are a lot of settings in this window; let’s show one example. In Balanced, click Change plan settings. The Display is set to turn off in 20 minutes by default; it can be set from 1 minute to 5 hours, or set to never. If you click on the Change advanced power settings link, the Power Options button appears. From here you can specify how long before the hard disk turns off, and set power savings for devices such as the processor, wireless, USB, and PCI Express. To configure alarms in Vista, go to the Battery area and Low battery notification. Take a few minutes looking through these options, and the options for the other power plans. Almost all of today’s laptops use the Advanced Configuration and Power Interface (ACPI), which enables Windows to control the device power management instead of the BIOS.
ExamAlert
Know where to modify battery alarms in Windows XP and Vista.
Expansion Devices
There are several ways to expand upon your laptop, including external and internal expansion slots and docking stations. Let’s talk about each of these briefly.
• External expansion busses: The most common types of external expansion busses are called PC Card (also known as PCMCIA), CardBus, and ExpressCard; I’m talking about those 2-inch-wide slots on the side of the laptop. These expansion busses accept credit card-size devices that can be added to a laptop to increase memory, or add functionality in the form of networking, hard disks, and more. They are hot swappable, meaning they support hot plugging into the expansion slot while the computer is powered on.
PC Cards must be supported by the computer on two levels: the card level (Card Services) and the socket level (Socket Services). Card Services deal with the installation of compatible drivers to the operating system and enable the allocation of system resources automatically. Socket Services is the BIOS level software interface that provides access to the sockets (slots) in the computer.
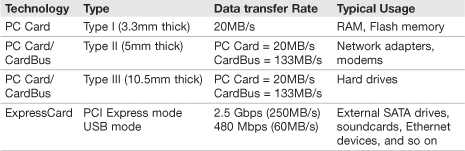
PC Cards have a 16-bit bus width and can be used in PC Card slots and CardBus slots. However, CardBus cards have a 32-bit bus width (essentially they are PCI); they look similar to PC Cards but cannot be used in a PC Card slot. ExpressCard (also known as PCI ExpressCard) is a separate technology altogether and not compatible with either of the other two (without an adapter). It looks similar to the others, but you can identify it by a cutout in one corner of the card. Also, PC Cards and CardBus cards have a 68-pin connector, whereas ExpressCard has a 26-pin connector. PC Card and CardBus were the most-used expansion cards in laptops for many years, but since 2006 have been losing ground to ExpressCard, especially in higher-end laptops. This is yet another example of a technology that is moving from parallel to serial data transfer. A manufacturer of ExpressCard devices can select to design them using the PCI Express technology or USB 2.0 technology depending on what type of card they make. For example, an ExpressCard soundcard wouldn’t need the speed of PCI Express, so it would probably be designed from a USB 2.0 standpoint. Table 11.4 breaks down the characteristics of PC Card, CardBus, and ExpressCard expansion busses.
Table 11.4 PC Card, CardBus, and ExpressCard Details
ExamAlert
Memorize the differences between the PC Card, CardBus, and ExpressCard expansion busses for the exam.
Note
Many owners of high-end laptops complain about the quality of the integrated soundcards and look for alternatives. To meet this need, some manufacturers such as Creative Labs make high-quality ExpressCard soundcards that rival the latest soundcard technology in desktop computers.
• Internal expansion busses: As far as internal expansion busses go, laptops use Mini-PCI and Mini-PCI Express. These are about a quarter the size of their desktop computer counterparts and work essentially the same, although there might be less performance in the laptop versions. For example Mini-PCI has a maximum data transfer rate of 133MB/s, which is one-half of some PCI cards in desktops. They might be used as video cards or as wireless cards. Replacing them can be a bit of a chore on some laptops. You’ need to remove the keyboard first, then disconnect a cable or two from the Mini-PCI card, and remove two screws that hold the card in place. (The card is often flat against the system board.) By the way, when replacing components like this, be sure to put the keyboard upside down on an antistatic bag, and put Mini-PCI cards in an antistatic bag as well until you are ready for them.
• Docking Stations: The docking station expands the laptop so that it can behave more like a desktop computer. By connecting the laptop to the docking station, and adding a full-size keyboard, mouse, and monitor, the user doesn’t actually touch the laptop anymore except perhaps to turn it on. Most laptops can hot dock, meaning they can connect to the docking station while powered on. The docking station recharges the laptop’s battery, and possibly a second battery, and has connections for video, audio, networking, and expansion cards. Docking stations might even have an optical disk drive or additional hard disk; it all depends on the brand and model. If all these extras aren’t necessary, a user might require only a port replicator, which is a similar device but it has only ports; for example, video, sound, network, and so on.
Note
Of course, you can also expand your laptop by using integrated USB and IEEE 1394 ports and built-in memory card readers. For more information on USB and IEEE 1394, see Chapter 12, “Video, Audio, and Peripherals.” For more information on memory cards, see Chapter 6, “Storage Devices.”
Communications
Communicating quickly and efficiently is key in business environments. To do so, laptops use a variety of different devices including the following:
• Ethernet: Most laptops today come equipped with wired and wireless Ethernet adapters to connect to a local area network (LAN) or a wireless local area network (WLAN). The wired connection presents itself as an RJ45 port and can typically transfer data at 1000, 100, and 10Mbps, auto-negotiating its speed to the network it is connected to. Wireless connections are made with an internal Mini-PCI card that can connect to 802.11n, g, and b networks (a maximum of 300, 54, and 11Mbps, respectively). It is also possible to connect wired or wireless network adapters to USB ports or to ExpressCard or PC Card slots. Otherwise, these technologies work the same on a laptop as they do on a desktop computer. For more information on wired and wireless LAN technologies, see Chapter 14, “Networking.” There is usually a WLAN button (located near the power button) that can enable/disable the wireless adapter. Keep this in mind when troubleshooting. If this is disabled, the laptop cannot connect wirelessly, even if the device is enabled in the Device Manager. Many laptops use proprietary software for the configuration of wireless network connections, instead of using the built-in Windows Wireless Zero Configuration program. In some cases, it might be easier to disable the proprietary application and use Wireless Zero Configuration instead.
• Bluetooth: Bluetooth adapters enable a laptop to connect to other Bluetooth devices over short distances, thus joining or creating a personal area network (PAN). A Bluetooth adapter might be included inside the laptop as an individual Mini-PCI card or as a combo Bluetooth/WLAN Mini-PCI card. External USB and ExpressCard Bluetooth adapters and remote controls are also available. For more information on Bluetooth, see Chapter 14, “Networking.” Many laptops come with WLAN and Bluetooth capabilities; however, the two technologies compete over frequencies. It is recommended that a user make use of only one at a time if possible. Buttons are usually available on the laptop (near the power button) for enabling/disabling WLAN and Bluetooth.
• Infrared: Infrared or IrDA wireless ports can be used to transfer data between the laptop and another computer, PDA, or other mobile device over short distance. Unlike Bluetooth, IrDA connections must be line-of-sight. Built-in IrDA ports are not seen as often on laptops as Bluetooth but can be purchased in USB format if necessary.
• Cellular WAN: Connecting to the Internet through 3G cellular WAN cards has become more popular over the past few years. Telecommunications providers like Verizon, Sprint, and AT&T offer cellular WAN ExpressCards (also known as wireless WAN cards) and USB-based travel routers. Some laptops are designed with built in Mini-PCI cellular devices (sometimes called modems).
• Modem: The standard dial-up modem can still be found on many laptops. This circuitry is often built into the motherboard but can also be a Mini-PCI card or a separate card altogether. If the modem fails and it is integrated into the motherboard, the entire motherboard would have to be replaced (which would be costly) or a PC Card, ExpressCard, or USB version could be purchased.
ExamAlert
Know the various ways that a laptop could communicate with other computers for the exam including wired and wireless Ethernet, Bluetooth, IrDA, Cellular WAN, and dial-up modems.
Cram Quiz
Answer these questions. The answers follow the last question. If you cannot answer these questions correctly, consider reading this section again until you can.
1. Which kinds of ports can typically be found on a laptop? (Select all that apply.)
![]() A. RJ45
A. RJ45
![]() B. USB
B. USB
![]() C. IEEE 1284
C. IEEE 1284
![]() D. DVI
D. DVI
2. When a user types, a laptop’s screen displays letters and numbers instead of only letters. What should you check first?
![]() A. Fn key
A. Fn key
![]() B. LCD cutoff switch
B. LCD cutoff switch
![]() C. Num Lk key
C. Num Lk key
![]() D. Scroll Lock key
D. Scroll Lock key
3. Which of the following are possible reasons that a laptop’s keyboard might fail completely? (Select the best two answers.)
![]() A. A stuck key.
A. A stuck key.
![]() B. A disconnected ribbon cable.
B. A disconnected ribbon cable.
![]() C. The user spilled coffee on the laptop.
C. The user spilled coffee on the laptop.
![]() D. The keyboard was disabled in the Device Manager.
D. The keyboard was disabled in the Device Manager.
4. What kind of video technology do most laptops incorporate currently?
![]() A. TFT Active Matrix
A. TFT Active Matrix
![]() B. Passive Matrix
B. Passive Matrix
![]() C. CRT
C. CRT
![]() D. TFT Passive Matrix
D. TFT Passive Matrix
5. What is a common resolution on today’s laptops?
![]() A. 640x480
A. 640x480
![]() B. 800x600
B. 800x600
![]() C. 1280x800
C. 1280x800
![]() D. 2048x1536
D. 2048x1536
6. If a user wanted to stretch their desktop across two monitors, what Windows technology would they look for?
![]() A. Multiple monitor
A. Multiple monitor
![]() B. Video replication
B. Video replication
![]() C. SideCar
C. SideCar
![]() D. DualView
D. DualView
7. What are two possible reasons why a laptop’s display suddenly went blank?
![]() A. Damaged inverter
A. Damaged inverter
![]() B. Damaged LCD
B. Damaged LCD
![]() C. Burned out lamp
C. Burned out lamp
![]() D. Incorrect resolution setting
D. Incorrect resolution setting
8. What is the most common battery used by today’s laptops?
![]() A. Double AA batteries
A. Double AA batteries
![]() B. Lithium-ion (Li-ion)
B. Lithium-ion (Li-ion)
![]() C. Nickel-metal hydride (NiMH)
C. Nickel-metal hydride (NiMH)
![]() D. Nickel-cadmium (NiCd)
D. Nickel-cadmium (NiCd)
9. Where would a user go to modify the battery alarms in Windows?
![]() A. Display Properties window
A. Display Properties window
![]() B. Power Properties window
B. Power Properties window
![]() C. BIOS
C. BIOS
![]() D. Power Options window
D. Power Options window
10. A user doesn’t see anything on his laptop’s screen. He tries to use AC power and thinks that the laptop is not receiving any. What are two possible reasons for this?
![]() A. Incorrect AC adapter.
A. Incorrect AC adapter.
![]() B. The AC adapter is not connected to the laptop.
B. The AC adapter is not connected to the laptop.
![]() C. Windows won’t boot.
C. Windows won’t boot.
![]() D. The battery is dead.
D. The battery is dead.
11. Which of the following has the fastest data transfer rate?
![]() A. CardBus
A. CardBus
![]() B. ExpressCard PCIe
B. ExpressCard PCIe
![]() C. PC Card
C. PC Card
![]() D. ExpressCard USB
D. ExpressCard USB
12. Which of the following are ways that a laptop can communicate with other computers? (Select all that apply)
![]() A. Bluetooth
A. Bluetooth
![]() B. WLAN
B. WLAN
![]() C. Ultraviolet
C. Ultraviolet
![]() D. Cellular WAN
D. Cellular WAN
Cram Quiz Answers
1. A, B, and D. RJ45, USB, and DVI ports are all common on a laptop. However, IEEE 1284 printer ports are not common.
2. C. The number lock key (Num Lk) can enable or disable the numeric keypad. This might be necessary if the user inadvertently turned it on or disconnected an external keyboard from the laptop. Pressing the Function (Fn) key is not necessary when pressing the Num Lk key. The LCD cutoff switch is used to turn off the bulb that lights the LCD. The scroll lock key is used very little but is meant to lock any scrolling done with the arrow keys.
3. B and C. A laptop’s keyboard could fail due to a disconnected or loose keyboard ribbon cable. It could also fail if a user spilled coffee on the laptop, or through general abuse, or by being dropped on the ground, and so on. One stuck key will not cause the entire keyboard to fail, and on most laptops, the keyboard cannot be disabled in the Device Manager.
4. A. TFT active matrix LCDs are the most common in laptops today. Passive matrix screens have been discontinued, although you might see an older laptop that utilizes this technology. There is no TFT passive matrix, and cathode ray tubes (CRTs) were used only on the first laptops many years ago. Due to a CRT’s weight and heavy power usage, it is not a good solution for laptops.
5. C. 1280x800 (WXGA) is a common resolution used by today’s laptops. 640x480 and 800x600 are older VGA modes that can’t fit much on the screen. 2048x1536 (QXGA) is a higher resolution than most laptops’ video adapters can display. For more information on resolutions see Chapter 12, “Video, Audio, and Peripherals.”
6. D. DualView enables a laptop running Windows XP or Vista to stretch the desktop across two monitors. It is a basic version of Multiple Monitor that is only available on desktop PCs. SideCar is a third-party hardware/software solution that enables a desktop PC or laptop to stretch the desktop over multiple monitors but is not included in Windows.
7. A and C. A damaged inverter or burned out bulb could cause a laptop’s display to go blank. You can verify if the LCD is still getting a signal by shining a flashlight at the screen. A damaged LCD usually works to a certain extent and will either be cracked, have areas of Windows missing, or show other signs of damage. An incorrect resolution settings usually makes Windows look garbled on the screen.
8. B. There are a few different types of batteries that a laptop might use including Lithium-ion (Li-ion), Nickel-metal hydride (NiMH), and Nickel-cadmium (NiCd), but lithium-ion is by far the most common. Believe it or not, some laptops (namely children’s) can run on 4 AA batteries, but it is not common or feasible in today’s business environments.
9. D. To change the thresholds for battery alarms, a user would access the Power Options window.
10. A and B. An incorrect adapter will usually not power a laptop. The laptop used must be exact. And of course, if the laptop is not plugged in properly to the adapter, it won’t get power. Windows doesn’t play into this scenario. And if the battery was dead, it could cause the laptop to not power up, but only if the AC adapter was also disconnected; the scenario states that the user is trying to use AC power.
11. B. ExpressCard in PCI Express mode (PCIe) has the highest data transfer rate at 250MB/s. The next fastest would be CardBus, followed by ExpressCard in USB mode, with PC Card bringing up the rear.
12. A, B, and D. Laptops can communicate with other computers through Bluetooth, WLAN, IrDA, and Cellular WAN wireless connections, plus wired connections like Ethernet (RJ45) and dial-up (RJ11).
Installing, Configuring, and Troubleshooting Internal Laptop Components
Now that you know how to troubleshoot the visible components of a laptop, let’s discuss the internal components a little bit. Because they are not exposed, these devices won’t fail as often as components such as the keyboard and the display, but sometimes failures still occur. At times you might need to replace a hard drive (and possibly recover the drive’s data), add or swap out memory, and possibly switch out a CPU, motherboard, or both. Dealing with hard drive trouble and working with RAM is more common, so let’s begin with those.
Hard Drives
So far, we mentioned a few times that hard drives will fail; it’s just a matter of when. And laptop hard drives are more susceptible to failure than desktop computers due to their mobility and the bumps and bruises that laptops regularly sustain. Laptops are available with PATA (IDE) or SATA hard disks, though more and more are coming standard with SATA. The bulk of the hard drives in laptops are 2.5-inches wide, as opposed to a desktop computer’s 3.5-inch hard drive. Obviously, the smaller form factor is necessary in today’s laptops. Ultra-small laptops and other small portable devices might use a hard disk as small as 1.8 inches.
2.5-inch SATA hard drives use the same connectors as their 3.5-inch counterparts, another benefit of using SATA. Because of this, no adapters are needed when transferring information from a laptop drive to a desktop drive (which is common when attempting to recover data). However, 2.5-inch PATA drives use a different connector than their 3.5-inch counterparts. Remember from Chapter 6 that a 3.5-inch PATA desktop hard drive has a 40-pin IDE connector for data and a 4-pin Molex connector for power. The problem is that a 2.5-inch PATA hard drive just doesn’t have the space for these types of connectors. So a different 44-pin IDE connector was developed, which is much smaller and contains both the data and the power pins in one 44-pin package. However, this means that an adapter is necessary if you want to transfer data from the 2.5-inch PATA drive to a 3.5-inch PATA drive. An example of this adapter is shown in Figure 11.8.
Figure 11.8 44-pin to 40-pin IDE adapter

44-pin 2.5-inch PATA hard drives have four additional pins to the right of the IDE connector; these are used for master/slave configurations, which might be necessary to configure when rescuing data from a laptop drive. Of course, to rescue data from a hard drive, you first have to remove it. Laptop hard drives can be accessed from one of three places. The first, and maybe the most common, is from an access panel on the bottom of the laptop. The second is from underneath the keyboard. And the third would be from the side of the laptop. In this last scenario, the hard drive is inside of a caddy that has a handle for easy removal; it should slide right out of the side of the laptop. In the third scenario, the hard drive would have to be removed from the caddy, and in any scenario there will usually be some kind of bracket that has to be unscrewed from the drive when replacing it. Hold on to this bracket for the new hard drive.
Memory
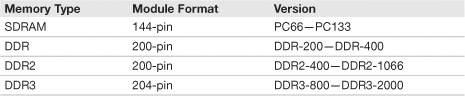
Most of today’s laptops use DDR SDRAM like desktop computers do. But once again, we are dealing with a much smaller device, so the memory is also smaller; it is known as a SO-DIMM or small outline dual in-line memory module. Table 11.5 shows the four types of SO-DIMMs and their pin formats. As with desktop RAM, different versions of memory in laptops are not compatible; for example, you can’t put a DDR2 SO-DIMM into a DDR SO-DIMM slot.
RAM has a center notch that helps to orient the RAM during installation. This notch will usually be in a different location for DDR, DDR2, and DDR3.
Installing RAM to a laptop is usually quite simple. Often it is located on the bottom of the laptop underneath an access cover. In other laptops it might be underneath the keyboard, or there could be one stick of RAM under the keyboard and a second (usually for add-ons) under an access cover underneath the laptop. Consult your laptop’s documentation for the exact location of the RAM compartment. Sometimes the compartment has a small icon identifying it as the location for memory. Table 11.6 shows the steps involved in adding RAM to a laptop. Keep in mind that SO-DIMMs, and their corresponding memory board, are much more delicate that their counterparts in a desktop computer.
Table 11.6 Installing a SO-DIMM to a Laptop

System Board and CPU
I mentioned before that the worst thing that could happen to a laptop is if it doesn’t start. Let me rephrase; that would be the worst thing that could happen to a user. The worst thing for a tech would be if the system board failed. This is because it would require almost a complete disassembly of the unit to repair, which is very time-consuming and requires heavy documentation to get all the parts back together properly when done. However, CPU replacement (and upgrading) is not quite as difficult but still requires removing at least the keyboard, and more than likely, a few other components that will be in the way; documentation is still very important when replacing a CPU.

Sometimes a system board’s lithium battery needs replacement. This is done in the same manner as it is within a desktop computer; however, you need to remove the keyboard, and perhaps other devices and connections, to get access to the battery. Most laptops come with the same CR2032 battery that desktop models use; however, a few laptops (and other handheld devices) come with a rechargeable system board lithium battery that has a shelf life of up to 10 years, but this is a fairly new technology.
Before you do decide to take this type of plunge into a laptop, one thing to keep in mind is that a lot of companies will purchase 1- to 3-year warranties for the laptops they use. Even though there is a cost involved in doing this, it is usually the wise choice. If the laptop did fail, the alternative would be to have a technician spend several hours (at least) disassembling, testing, replacing, and reassembling the laptop; all of which could cost the company more money in man hours than it would have to just get the warranty. Warranties are a type of insurance, and this type is usually acceptable to a company. So check your company’s policies and procedures first before doing these types of repairs.
Before removing a CPU or other internal components, employ ESD prevention measures. If the CPU is surface-mounted, you cannot remove it; if it has failed the entire system board would have to be removed. But if it is socketed (which is more likely on newer laptops), with either a pin grid array (PGA) or ball grid array (BGA), it can be removed. Usually there is some kind of locking arm mechanism that must be unlocked to remove the CPU from the socket. Common sockets for mobile Intel CPUs include the Socket M (for several CPUs including the Core 2 Duo) and Socket P (for Core 2). Keep in mind that upgrade ranges for laptop CPUs are usually quite narrow. If a CPU fails, it is usually best to install an identical CPU. If you do plan to upgrade a CPU, check the documentation carefully to make sure that the exact model laptop (and it’s motherboard) can support the faster CPU. After removing the CPU, be sure to place it on top of an antistatic bag with the pins facing up. When installing CPUs, employ the same delicate procedure as you would with a desktop PC. These CPUs require no force to insert them into the socket.
Note
For more information on installing motherboards and CPUs into desktops, see Chapter 2, “Motherboards,” and Chapter 3, “The CPU.”
Note
The Internet has plenty of sites that can offer some free repair tips, for example: http://repair4laptop.org and http://www.laptoprepair101.com. Another good resource for laptop repair is the book Upgrading and Repairing Laptops by Scott Mueller.
Cram Quiz
Answer these questions. The answers follow the last question. If you cannot answer these questions correctly, consider reading this section again until you can.
1. What is the pinout for a stick of SO-DIMM DDR RAM?
![]() A. 200
A. 200
![]() B. 168
B. 168
![]() C. 144
C. 144
![]() D. 204
D. 204
2. How many pins are in a laptop’s PATA hard drive?
![]() A. 40
A. 40
![]() B. 200
B. 200
![]() C. 68
C. 68
![]() D. 44
D. 44
3. How are SODIMMs installed to a laptop?
![]() A. By pressing straight down
A. By pressing straight down
![]() B. Into a ZIF socket
B. Into a ZIF socket
![]() C. On a 45-degree angle
C. On a 45-degree angle
![]() D. On a 90-degree angle
D. On a 90-degree angle
4. What should you do when upgrading a CPU in a laptop? (Select all that apply.)
![]() A. Check documentation to see if the CPU is supported.
A. Check documentation to see if the CPU is supported.
![]() B. Install more RAM.
B. Install more RAM.
![]() C. Employ antistatic measures.
C. Employ antistatic measures.
![]() D. Remove the system board.
D. Remove the system board.
Cram Exam Answers
1. A. DDR SODIMM modules have 200 pins. Desktop SDRAM has 168 pins. SODIMM SDRAM has 144 pins, and DDR3 SODIMMs have 204 pins.
2. D. A laptop’s PATA hard drive has a 44-pin IDE connection that includes the four power pins.
3. C. SODIMMs are installed to a laptop at a 45-degree angle unlike a desktop’s DDR memory that is installed by pressing straight down. ZIF sockets refer to CPUs.
4. A and C. When upgrading a CPU in a laptop, check for laptop documentation to see if the faster CPU is supported; then employ ESD prevention measures. More RAM is not necessary when upgrading a CPU, but it could help the laptop get the best out of the CPU if an open memory slot is available. Usually the system board does not have to be removed to replace or upgrade a CPU.
Additional Reading and Resources
Battery University. http://batteryuniversity.com.
Mueller, Scott. Upgrading and Repairing Laptops. Que.