C H A P T E R 4
![]()
Installing Ubuntu
It's now time to install Ubuntu. In the dim and distant past, installation was sometimes difficult, but the developers now have it down to a fine art, so it should take only 30 minutes or so on a modern PC. It's also relatively simple, with very few decisions to make throughout, and lots of hand-holding.
However, you should examine all the options you're offered to make sure they're correct. Installing an operating system involves a couple of serious processes that have the potential for data loss. Read and consider every warning message you see, and be sure to keep your wits about you. Above all, make a backup of your data beforehand, as described in the previous chapter.
An Overview of the Installation Process
The DVD-ROM disc supplied with this book is double-sided. This means it's like a vinyl LP record. To play Side A, simply insert the disc with the Side A label topmost. To play Side B, insert the disc with the Side B label topmost.
Side A contains the current Long term support (LTS) release version of Ubuntu, 10.04, code-named Lucid Lynx. This is the most recent version of Ubuntu at the time of writing. Side B contains the following:
- ISO image files of the 32-bit and 64-bit versions of Ubuntu 10.04, which you can burn to a blank CD-R/RW disc by following the instructions in Appendix D. This is included in case you want to give copies of Ubuntu to your friends, or if you want to try the Wubi Windows installer (see the “Installing Ubuntu Inside Windows” sidebar), which isn't included with the DVD version of Ubuntu 10.04 for technical reasons.
 Note You can also freely duplicate the DVD supplied with this book and give copies to friends if you want. In fact, this is encouraged.
 - The 32-bit “Alternate Install” version of Ubuntu 10.04, which can be useful for setting up automated deployments, upgrading from older installations without network access, LVM and/or RAID partitioning, and installing on systems with less than about 256MB of RAM.
- The 10.04 (Lucid Lynx) releases of Kubuntu and Xubuntu, which provide alternative Desktop environments if Ubuntu's default Desktop environment, GNOME, does not suit your taste, and Edubuntu, which provides a layer of educational content on top of the standard Ubuntu installation. For more details on these versions of Ubuntu, see Appendix D.
- An image of the Ubuntu Netbook Edition, which presents a simplified interface which its developers feel is more suited to the smaller screens found on Netbooks.
If you want to try one of the installers on Side B of the DVD, you will first need to burn it onto a CD (or DVD, in the case of the Edubuntu image). This procedure is discussed in Appendix D.
However, most readers will want to install the default version of Ubuntu. So to start things rolling, insert Side A into the DVD-ROM drive and boot your computer. You might have to set your BIOS to boot from DVD, as explained in stage 2 of the installation guide in this chapter.
If you've ever installed Windows from scratch on a computer, you might be used to working with the Windows installation program. This appears when you boot from a Windows CD or DVD or run the setup.exe program from the Desktop, and it guides you through installing Windows onto your hard disk.
Ubuntu is a little different. After you've booted from the DVD-ROM, a menu will appear. You can choose the Install Ubuntu option, and the DVD will continue booting to a graphical installer. Alternatively, you can choose the Try Ubuntu option. This allows you to run Ubuntu from the DVD-ROM, effectively trying it out without making any changes to your computer.
Using Ubuntu without installing it to the hard disk is referred to as running in live distro mode. Although this is a great way to take a sneak peak at what Ubuntu offers, there are a few things to be aware of, as discussed in the sidebar titled “Running in Live Distro Mode.”
To install Ubuntu on your computer, simply select the Install Ubuntu option from the Welcome window. This will run the dedicated installation program, which will work through a few stages to get Linux on your computer's hard disk. During the installation stages, you'll be asked a handful of essential questions and will be taken through the process of creating space on your computer for the new OS. After this, Ubuntu is installed onto your hard disk.
At the end of the procedure, your PC will boot straight into the Ubuntu login screen, and you're set to go. There's no need to mess around configuring hardware, because for almost everything, that's done automatically. Neat, eh?
In most cases, the installation process will run smoothly without a hitch. But if you do run into problems, head over to Chapter 5, which addresses many of the most common issues and provides solutions.
RUNNING IN LIVE DISTRO MODE
A Stage-by-Stage Installation Guide
As outlined in Chapter 3, you shouldn't start the installation process until you've made sure there is enough space for Ubuntu on your hard disk and you have backed up all your data. With those preparations complete, you're ready to install Ubuntu. The remainder of this chapter guides you through the process.
Stage 1: Prepare the Windows Partition for Resizing
If you're installing Ubuntu on a computer that already contains Windows, it's a good idea to perform three additional steps before actually installing Ubuntu. These steps will ensure that Ubuntu will be able to resize the Windows partition successfully.
If your computer doesn't contain Windows, or if you're installing Ubuntu onto a second hard disk, you can skip straight to stage 2.
The following are the steps for preparing the Windows partition for resizing:
- Scan the disk for errors.
- Defragment the hard disk.
- Ensure that Windows is shut down correctly.
To scan the disk, open My Computer (or Computer if you're running Windows Vista or 7), right-click your Windows drive (usually C:) and select Properties. In the window that appears, click the Tools tab and then click the Check Now button under the Error Checking heading. Ensure that there's a check alongside Automatically Fix File System Errors, and click the Start button. You will then be prompted to schedule the disk check the next time your computer restarts. Select to do so and reboot your computer, so the disk check can take place.
When the computer has rebooted, it's time to defragment your disk. Windows can be untidy with how it stores data on the disk. Over time files get broken into pieces and scattered all over your Windows partition. Defragmenting the partition will not only make Windows run more quickly, but will also consolidate your files at the beginning of the partition, enabling you to shrink it further and create a larger partition for Ubuntu in the freed space. Repeat the previous steps to view the Tools tab of the drive's Properties dialog box, and click the Defragment Now button. Then work through the defragmentation program's options in order to defragment the Windows disk (shown in Figure 4-1); usually this involves simply clicking the Defragment button (labeled Defragment Now under Windows Vista or Defragment Disk under Windows 7).
After that has completed—it may take several hours if your computer has not been defragmented before—shut down the computer as usual and proceed to stage 2 of the installation process.
It's vital that the computer shuts itself down properly. If the computer doesn't cleanly shut down, Ubuntu's installation program might stop with an error message about not being able to resize the partition.

Figure 4-1. Before installing Ubuntu, it's essential to scan the Windows partition for errors and to defragment it.
INSTALLING UBUNTU INSIDE WINDOWS
Stage 2: Boot from the DVD-ROM
With your computer booted up, insert the Ubuntu disc into the DVD-ROM drive, with Side A topmost. Close the tray and reboot your computer. The disc might automatically run under Windows, opening a menu where you can click to find out more about Ubuntu, but you can ignore this.
Because you need to boot from the DVD-ROM disc in order to run the Ubuntu installer, the first step is to make sure your computer's BIOS is set correctly.
Many modern computers let you press a particular key during the initial boot phase of your computer, during the memory testing and drive identification period, to make a boot menu appear. Often this is F8, Delete, or Esc, but you should keep an eye on the boot messages to identify the correct key. On the boot menu, you can choose to boot from the CD or DVD drive from the list.
If you do not have an option to boot from the CD/DVD drive, you'll need to enter the BIOS setup program and change the boot priority of your computer. To do this, press the Delete key just after the computer is first activated. Again, some computers use another key or key combination, and your boot screen should indicate which key to press.
When the BIOS menu appears, look for a menu option such as Boot and select it (you can usually navigate around the screen of the BIOS menu using the cursor keys, and select options by pressing Enter). On the new menu, look for a separate entry such as Boot Device Priority or perhaps Boot Sequence. Make sure that the entry for the CD/DVD-ROM is at the top of the list. Arrange the list so that CD/ DVD-ROM is followed by the floppy drive and then your main hard disk. You can usually press the F1 key for help on how the menu selection system works.
After you've made the changes, be sure to select the Save and Exit option. Your PC will then reset and boot from the Ubuntu DVD-ROM, and you'll be greeted by the Ubuntu DVD boot menu.
![]() Note After Ubuntu has been installed on your computer, you might choose to repeat this step and rearrange the boot order once more to make the hard disk appear at the top of the list. Then your computer won't waste time checking the DVD-ROM drive for a boot disc every time it starts.
Note After Ubuntu has been installed on your computer, you might choose to repeat this step and rearrange the boot order once more to make the hard disk appear at the top of the list. Then your computer won't waste time checking the DVD-ROM drive for a boot disc every time it starts.
Stage 3: Try or Install
When the DVD-ROM boots, for a few seconds you'll see a purple background with two small icons—a keyboard and an accessibility symbol—at the bottom of the screen, hinting that accessibility features such as a screen reader can be reached by pressing any key on the keyboard. Most people can just leave the boot sequence to continue.
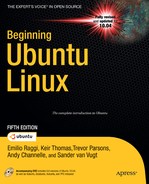
You will then be entertained by a progress indicator for a minute or so, depending on the speed of your machine, after which the installer window will appear (Figure 4-2).
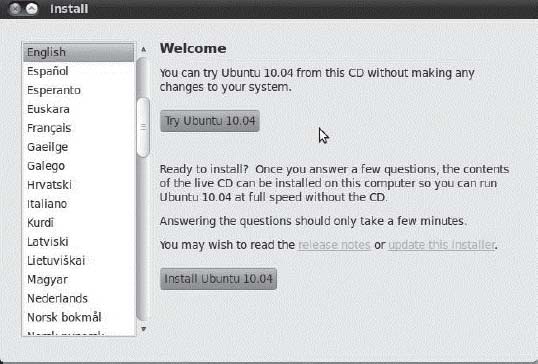
Figure 4-2. The Welcome screen of the installer: choose to test the system out, or install it.
English is the default language for the installer, but a selection list on the left of the window offers the choice of more than 60 other languages, reminding us what an amazingly international project Ubuntu is.
The two main options offered by the Welcome window are as follows:
Try Ubuntu 10.04: This option lets you run Ubuntu “live” from the DVD-ROM disc, so you can try out its features, albeit in a slightly limited state (see the “Running in Live Distro Mode” sidebar). If you've never seen Ubuntu up and running, choose this option and play around. You can always click the install icon on the Desktop when you're ready to take the plunge.
Install Ubuntu 10.04: This will start Ubuntu's installation routine. Choose this if you want to get straight on with installing Ubuntu on your PC now.
Text links on this window also offer you the opportunity to read the release notes for Ubuntu 10.04 and to update the installer itself. It's not essential to do either of these.
![]() Note Pressing a key when the purple background first appears on booting the DVD-ROM will bring up an alternative boot menu. This allows you to activate accessibility features, test your computer's memory, or start a text-mode installer, in case the standard graphical installer has problems displaying on your hardware. Chances are you won't need any of these options.
Note Pressing a key when the purple background first appears on booting the DVD-ROM will bring up an alternative boot menu. This allows you to activate accessibility features, test your computer's memory, or start a text-mode installer, in case the standard graphical installer has problems displaying on your hardware. Chances are you won't need any of these options.
Stage 4: Select Your Location and Time Zone
Ubuntu will next ask you to choose your time zone. If your PC is already connected to the Internet, Ubuntu may already have detected your location correctly. You can select your time zone manually by clicking your location on the world map that's displayed or by selecting the nearest city from the drop-down lists at the base of the page.
When you click the map, you'll see that the time zone is highlighted in green, and you can click near your location within this band. You'll also see a live clock showing the time in that location. See Figure 4-3 for an example.
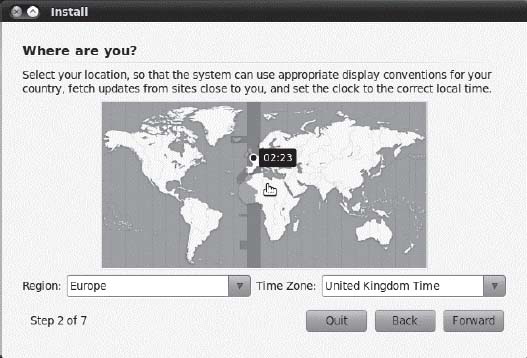
Figure 4-3. Select the time zone from the map and then you can refine your options by using the drop-down lists at the bottom of the page.
The city you choose doesn't matter a great deal—the purpose of this step is to ensure that Ubuntu selects the correct time zone for your location, which it does by looking up the city in a database of time zones.
After you've made your selection, click the Forward button.
Stage 5: Confirm Your Keyboard Layout
Next you'll be asked to confirm the keyboard layout you'll be using, as shown in Figure 4-4. This should correspond to your language and locale settings, and will be automatically selected, so you can just click the Forward button. If you're unsure whether Ubuntu has guessed the correct keyboard layout, you can click the test text field and type in some characters before continuing. You can also manually set your preferred keyboard layout by clicking the Choose Your Own radio button and selecting as appropriate from the country and layout lists.
![]() Note Keyboard layouts can differ from country to country even if they speak the same language. This is to allow for local necessities. The UK keyboard layout has the pound sterling symbol (£) above the number 3, for example, and swaps around the locations of a handful of other symbols, too.
Note Keyboard layouts can differ from country to country even if they speak the same language. This is to allow for local necessities. The UK keyboard layout has the pound sterling symbol (£) above the number 3, for example, and swaps around the locations of a handful of other symbols, too.
Figure 4-4. Ubuntu will guess your keyboard layout, but you can test it to make sure by typing in the test text field at the bottom of the dialog box.
Stage 6: Repartition Your Hard Disk
Partitioning the disk is one of the most important steps during installation, but, unfortunately, it's one that can be couched in difficult terminology. Partitioning is the process of dividing up a hard disk into sections so that different operating systems or one operating system and some data can exist on the same computer and convince the computer that more than one disk exists. Though it's a complex subject, Ubuntu does its best to make partitioning easy.
The Ubuntu installation routine offers several options for disk partitioning:
- Resize the existing partition on the hard disk and install Ubuntu alongside it in the newly created free space. (This option is not offered if the disk has no existing partitions.)
- Use the entire disk, whether it already has some contents or not (that is, if the computer or hard disk is new or if you want to overwrite your Windows installation).
- Use the largest free space that might already exist on the hard disk, for example if you've already manually repartitioned the disk. (This option is not offered if the disk has no existing partitions.)
- Manually edit the partition table—that is, resize/delete any existing partitions by hand and create the Ubuntu partitions. This is suitable only for expert users.
Most people who are installing Ubuntu on a computer that already has Windows on it will want to resize the main partition, as described next.
If you're installing Ubuntu on a computer that has no operating system installed or one that you would like to completely erase from the computer, follow the instructions under the upcoming “Use Entire Disk” section. However, be aware that this will completely wipe any data from that disk.
Resize the Main Partition
This is the default partitioning option if your computer already has Windows installed on it. Ubuntu will detect the main Windows partition and suggest the amount of resizing.
![]() Caution If there's not enough free space within the Windows partition, you won't be able to resize it to make space for Ubuntu. If this is the case, the Ubuntu installer will tell you. See Chapter 3 for suggestions for freeing up space.
Caution If there's not enough free space within the Windows partition, you won't be able to resize it to make space for Ubuntu. If this is the case, the Ubuntu installer will tell you. See Chapter 3 for suggestions for freeing up space.
By default, Ubuntu attempts to grab as much space for itself as possible, without shrinking the existing partition too much. In our example in Figure 4-5, the installation program has decided to split the disk roughly 50/50, giving both operating systems a decent amount of space. This is shown in the bar display: the right part of the bar represents Windows, and the left part represents the new Ubuntu partition.
Ubuntu's default choice is normally fine, but you can also click and drag the grab bar in the middle of the partitioning display bar to increase or decrease the sizes of the Windows and Ubuntu partitions. You may want to give Windows a little more space if you plan to divide your time between Windows and Ubuntu. Bear in mind that, while Ubuntu can read files on the Windows partition, Windows refuses to do vice versa, so if you want to access your files locally from both operating systems, those files should be stored in the Windows (NTFS or FAT) partition.
The Ubuntu installer is intelligent enough not to let you set an impossible value for shrinking the existing partition. The Ubuntu installer is also clever enough to know that Windows needs some free space within its partition to operate effectively—to write temporary and system files and user-created files such as Word documents, for example. So you shouldn't be able to make changes that are too extreme. On a test system, we couldn't set a size for the existing partition lower than 10 percent of the entire disk, because the existing data on the partition occupied about 10 percent of the space. You can override this protection by manually partitioning, as described in the “Manually Edit the Partition Table” section of this chapter. Similarly, the installer shouldn't let you create an inadequate amount of free space for Ubuntu when dragging the slider to the right.
The next time you start Windows, having resized your Windows partition, it's very likely that Microsoft's disk checking program will run. This is quite normal. Typically it will complete without finding any errors.

Figure 4-5. The installer will take as much space as Ubuntu needs, without shrinking the existing partition too much.
After you've made your selection, click the Forward button. After a warning message asks whether you really want to take this irreversible step, the installer will resize the partition. This might take a few moments.
![]() Caution If you're resizing a partition on a laptop or notebook computer, ensure that you have the main power connected. If the power goes off during the resizing procedure because of a failing battery, there's a very good chance your Windows partition will be destroyed.
Caution If you're resizing a partition on a laptop or notebook computer, ensure that you have the main power connected. If the power goes off during the resizing procedure because of a failing battery, there's a very good chance your Windows partition will be destroyed.
Use Entire Disk
If the hard disk is empty, or if you've decided to eradicate Windows and use only Ubuntu on your computer, you can choose the “Erase and use the entire disk” option, as shown in Figure 4-6.
If the disk does have contents, this option will remove them and then use the entire disk to install Ubuntu. As mentioned in Chapter 3, before undertaking this move, you should back up essential data from the Windows partition (or any others on the hard disk). There is no easy way of undoing the partition erasure, so you should proceed with caution.
After you've made the choice, click the Forward button. The deletion should take place quickly, after which you can proceed straight to the next stage in this guide.
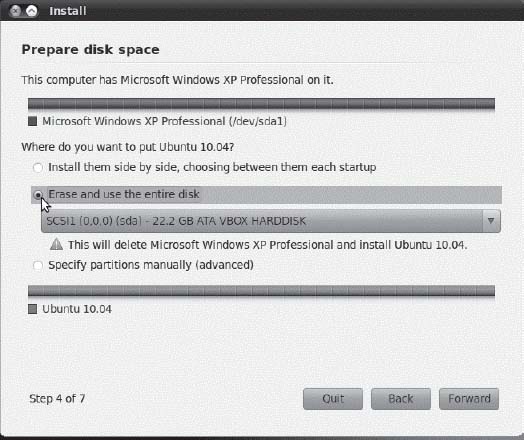
Figure 4-6. If you have an unused disk or are getting rid of Windows entirely, choose the “Erase and use the entire disk” option.
Use the Largest Continuous Free Space
If you've already repartitioned your hard disk by using a third-party utility, or if you deliberately created a smaller Windows partition in order to leave free space for another operating system, you can select the “Use the largest continuous free space” option (note that this option won't appear unless there is free space on the hard disk). Then the Ubuntu installation program will use the largest amount of free space for the Ubuntu partitions. This is an important point: if you have more than one area of free space, the largest will be used.
If you do have more than one amount of free space, the Ubuntu installation routine is unable to automatically use any smaller amounts of free space. If you want this to be the case, the only option is to manually partition, as described in the section “Manually Edit the Partition Table.” However, only advanced users will need to do this.
After you've made your choice, click the Forward button and proceed to the next stage in this guide.
Use a Second Hard Disk
If your computer has more than one hard disk—a new hard disk you've added for Ubuntu, as described in Chapter 3, or a second hard disk already installed in your computer—you should select it under the Use the Entire Disk option. The way Ubuntu identifies your hard disks might seem a little complicated at first, but is actually straightforward.
If your computer is relatively new, chances are it has a SATA-based hard disk. If so, the first hard disk will be identified as sda, the second as sdb, the third as sdc. All that changes in each case is the last letter: a, b, c, and so on.
If your computer uses IDE-based hard disks, the drives will also be identified as sda, sdb, and so on. The primary master drive in the system is identified as hda, the primary slave as hdb, the secondary master as hdc, and so on. The drive will also be identified by make and model, which may help you identify it.
Assuming the second IDE hard disk is installed as a slave on the primary channel, as is the standard configuration for an additional hard disk, it will be identified as hdb, so make that selection. If the disk is installed as the slave on the secondary channel (that is, the same channel as the DVD-ROM drive), it will be identified as hdd.
After you've selected the disk, click the Forward button.
Manually Edit the Partition Table
If, for any reason, you find that Ubuntu's default partitioning choices are not for you, you can opt to manually edit the partition table. For example, you may want to separate the operating system installation from your /home folder. This separation makes doing a fresh installation of Ubuntu or another Linux easy, because the data is left untouched. There are essentially two stages to work through if you choose this option:
- You're given the chance to repartition the disk manually. You can resize or delete any existing partitions and create the partitions Ubuntu needs.
- While creating/editing the partitions, you'll be asked to assign mount points. You'll be prompted to tell Ubuntu which of the partitions on the disk it should use for the root file system (that is, the main partition for Ubuntu's use) and which should be used for the swap partition.
Manually partitioning offers ultimate flexibility but requires a relatively high level of knowledge of how Ubuntu works. Therefore, we recommend that only experts undertake this step, unless you have no other choice because the default Ubuntu partitioning choices do not offer what you need or do not work properly for you.
In the following steps, we explain how to resize an existing partition, create the new partitions that Ubuntu needs, and assign mount points so that Ubuntu is able to use them.
![]() Tip GParted is a graphical partition tool that you can use to add, edit, and delete partitions easily. GParted looks similar to the third-party commercial partition tools you may have already used. You can run this utility by starting Ubuntu in live distro mode and choosing System
Tip GParted is a graphical partition tool that you can use to add, edit, and delete partitions easily. GParted looks similar to the third-party commercial partition tools you may have already used. You can run this utility by starting Ubuntu in live distro mode and choosing System ![]() Administration
Administration ![]() GParted from the menu. After you have made the desired changes with this partition editor, you can reboot and start the Ubuntu installer again. Then when you manually edit the partitions in the installer, you need to set mount points only on the partitions that you created in GParted.
GParted from the menu. After you have made the desired changes with this partition editor, you can reboot and start the Ubuntu installer again. Then when you manually edit the partitions in the installer, you need to set mount points only on the partitions that you created in GParted.
Prepare Partitions
When the disk partitioning choices appear, click the “Specify partitions manually (advanced)” radio button and click Forward. The Prepare Partitions window will appear, as shown in Figure 4-7. This window lists the hard disks detected by Ubuntu and their corresponding partitions. Each item has the following properties:
- Device: This is the logical representation of the hardware device in Ubuntu. See the previous section for an explanation of the drive identification, but note that here the drive references are preceded with
/dev. You can ignore this. The numbers at the end refer to the order of partitions. For example,sda1refers to the first partition of the first hard disk, andsda2refers to the second partition of the first hard disk. - Type: This specifies the file system type of the partition. For example, NTFS and VFAT are Windows file systems, ext4 indicates the Ubuntu partition, and swap indicates a swap file partition.
- Mount Point: A mount point is a location within Ubuntu's file system where Ubuntu will “see” a partition. At least one partition needs to be mounted as root, denoted with a single
/. Mounting is discussed further in Chapter 10. - Format?: This indicates whether the partition will be formatted during installation. Formatting will destroy any data on a partition, so ensure that you have backups of important data and that you really do want to format.
- Size: This determines the disk space of the partition, in megabytes. Note that the strict definition of the word megabyte is used, meaning 1,000,000 bytes, rather than the more widely used 1,024,000 bytes (1,024KB). To confuse matters, the 1,024KB definition is used in the rest of the installation program. (From its next release, Ubuntu is due to switch entirely to the SI standard, that is, 1MB (megabyte) = 1,000 KB).
- Used: This determines how much disk space has been consumed, in megabytes.
At the bottom of the window are buttons to manipulate the hard disk as a whole or each individual partition. For the hard disk, you can opt to create a new partition table. This effectively returns the disk to as-new status, with no partition information, so creating a new partition table is tantamount to erasing the whole hard disk. Be sure you know what you're doing! For unallocated free space, you have an option to add a new partition. For an existing partition, you have an option to change its properties (this option lets you resize the disk and assign a mount point) or delete the partition to accumulate free disk space. You also have a revert option to undo all hard disk changes, which applies to all desired changes except resizing a partition, because resizing is carried out as soon as you select to do so, unlike the other changes, which are carried out after working through all the installation stages.

Figure 4-7. Creating a new partition table has the same effect as completely wiping the contents of a disk. Use with extreme care.
So you want to resize the main NTFS (Windows) partition. Search for that partition in the partition type list; it will be shown as ntfs.
Determine Windows Partition Size
After you have found the NTFS partition, you should determine how much space should be retained in your Windows partition so that Windows will still function properly while providing a sufficient amount of space for Ubuntu. The bare minimum disk space required for a Windows partition varies between 2GB for Windows XP and 16GB for Windows 7, though these minimums will give you very little space for documents or other data.
You should free up as much space as possible for Ubuntu. But if disk space is a concern, you will need to determine the minimum of disk space that should be put aside for the main and swap partitions of Ubuntu.
The main partition will contain the Ubuntu operating system itself. This partition should have at the very least 3GB of disk space (2GB for the base installation, and the rest for new applications, software upgrades, and your data).
The swap partition is similar to the swap file under Windows (sometimes referred to as virtual memory or the paging file), except that it resides on its own partition. The traditional purpose of a swap partition is to act as additional memory should the main memory become full. Accessing the hard disk takes longer than accessing the RAM, so using the swap partition for this purpose is a last resort. The swap file is also used by Linux for storing “anonymous pages,” that is, data that exists in memory only and not on disk. Without swap, there would be nowhere for anonymous pages to go when Linux wants to use the memory space they're taking up. Additionally, the swap file is used to store the contents of the physical memory when the computer enters Hibernate (Suspend to Disk) power-saving mode.
The ideal size for the swap partition is a subject of endless debate. Recommendations usually depend on the size of your physical RAM. If you want to use the Hibernate feature on your computer, your swap partition size must be at least equal to the size of the physical RAM, or hibernation will fail. See Table 4-1 for some suggestions.
Table 4-1. Suggested Swap Partition Sizes for a Desktop Ubuntu System
| Physical RAM Size | Swap Partition Sizea |
| 512MB | 1,024MB |
| 1,024MB (1GB) | 1,024MB |
| 2,048MB (2GB) | 2,048MB |
| 3,072MB (3GB) | 3,072MB |
| 4,096MB (4GB) | 4,096MB |
a Swap partition sizes have been adjusted to take into account the strict definition that 1 megabyte = 1,000,000 bytes, as stated in the Create Partition dialog box.
After you have determined the size of your main and swap partitions, total their sizes. This is how much free space you need to allocate for Ubuntu.
Edit Partition Properties
In the Prepare Partitions window, select the NTFS partition and click Change to edit its properties. Figure 4-8 shows how to edit a partition. In the Edit Partition dialog box, you can edit three partition properties:
- New Partition Size in Megabytes: This allows you to adjust the size of the selected partition. If you reduce the size of the selected partition, the remaining space will be allocated for free space. For example, if you have an NTFS partition with a size of 104,847MB and you would like to allocate 8,192MB for Ubuntu, you would need to reduce the size of the NTFS partition to 96,655MB. Adjust the size of the NTFS partition as you determined in the previous step.
- Use As: This either changes or displays the file system of the selected partition. The current file system is NTFS, because you are editing a Windows partition, so select
ntfsfrom the list if it isn't already displayed. Be careful not to select any of the other entries from the list, because this could damage your Windows setup irreversibly. - Mount Point: Ubuntu makes non-Linux file systems (such as Windows) available by mounting them. You can either select one of the default suggestions (on our test system, these were
/dosand/windows) or type your own path (but only if you know what you're doing).
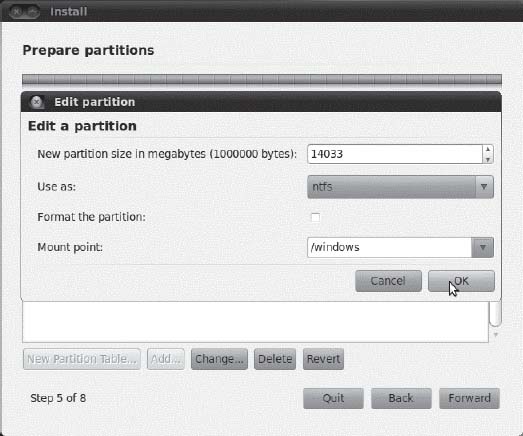
Figure 4-8. With manual partition editing you can shrink a Windows (NTFS) partition and choose a mount point where it can be accessed from your new Ubuntu system.
After you're satisfied with your choices, click the OK button. At this point, you are prompted to confirm that your desired changes will be made to the disk. It's a good idea to read through the summary carefully, because after you click Continue, there's no going back. Any data on the disk will be lost. Click Continue when you're ready to start the resizing process. After the process is finished, you will have free space to allocate for Ubuntu.
If you see an error message while trying to resize the partition, it's likely that Windows was not shut down correctly. To fix this situation, exit the Ubuntu installer, reboot Windows, and opt to check the disk. Then reboot so the check can take place. After that, reboot again, ensuring that Windows is properly shut down. Then you can return to the Ubuntu installer.
Create Main and Swap Partitions
The next step is to create partitions with the free space. Select the new free space you have created and click the Add… button. The Create Partition dialog box will appear, as shown in Figure 4-9. This dialog box has five options:
- Type for the New Partition: This option allows you to set the partition as primary or logical. Unless the hard disk has more than one operating system installed, you should select the Primary option. With primary partitions, you can divide your hard disk up to only four partitions. If you need more than four partitions, or if there are already three partitions on the disk, select the Logical option, and create the further partitions you need within the new logical partition.
- New Partition Size in Megabytes: This option sets the number of megabytes that will be allocated to the new partition. The default value takes all of the free space, but since you are going to make both a main partition and a swap partition, you should adjust the size accordingly.
- Location for the New Partition: This option specifies whether the new partition will be created on the beginning or end area of the free space. It's recommended that you use the beginning. This way, the free space can be seen easily, because it always appears just below all of the partitions.
- Use As: This option specifies the file system of the new partition. The default option of Ext4 Journaling File System is fine when you are creating the main partition.
- Mount Point: The mount point is a directory that will act as a location where you can make a disk accessible. The main partition you create for Ubuntu must be mounted as root. This is always represented as a single forward slash (
/).

Figure 4-9. You can create a new partition as long as there is free/unallocated space available.
To create the main partition, where the operating system and data will all be stored, reduce the new partition size to leave enough space for swap, choose Ext4 as the format from the Use As drop-down menu, and then set the Mount Point to the forward slash (/) to specify that this partition is the main partition or root file system. Your dialog box should look similar to the one shown in Figure 4-9. Click the OK button to continue.
Next we'll create the swap partition. If you calculated the main partition size correctly, you can just accept the remaining space for use as swap. Change the Use As option to Swap Area. Leave the rest of the options untouched (note that the swap partition doesn't need a mount point). For example, if the size of the physical RAM is 1GB, the partition size for the swap partition should be set to 1,024MB, as shown in Figure 4-10. Click OK to continue.
You should now have partitions ready to go, as shown in Figure 4-11. Note that you may also have an NTFS partition visible if you're dual-booting with Windows. Click Forward to continue.
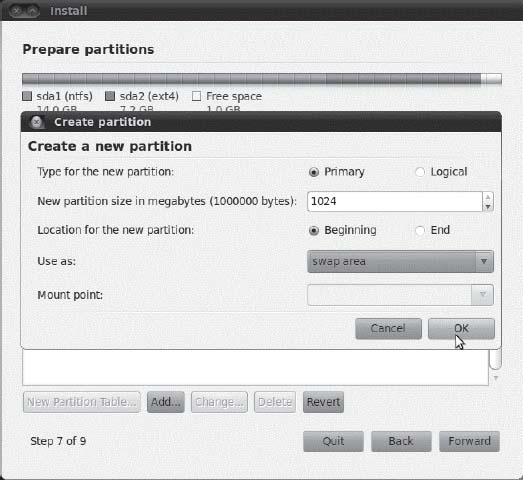
Figure 4-10. If you've done your sums right, the remaining space on the disk should be what you calculated that you wanted for swap.
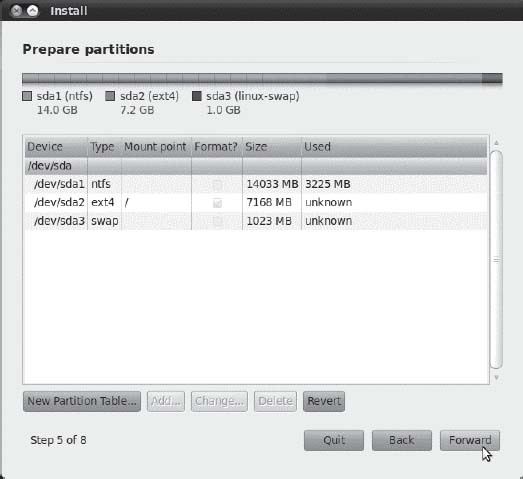
Figure 4-11. With your partitions configured, you're ready to move on.
Stage 7: Set Up a User
Next you'll be prompted to say who you are and choose the name you want to use to log in. In answer to the question What Is Your Name? you can enter the name by which you'll be formally identified on the system to anyone who uses it. The standard practice is to use your first and last names, separated by a space.
Next, you'll be asked for the name you want to use to log in. This username needs to be unique; two users on the same computer cannot have the same username. Also, it must follow these rules:
- The username should be one word without any spaces in it.
- You can choose any username consisting of uppercase and lowercase letters and numbers, but not symbols or punctuation.
- The username cannot begin with an uppercase letter, although you can use uppercase in the rest of the name.
The simplest procedure for choosing a username is to use your own first name, typed entirely in lowercase letters. For example, in Figure 4-12, we've set the full name to Trevor Parsons and the login name to trevor. Helpfully, Ubuntu will add the first part of the full name to the username space automatically.
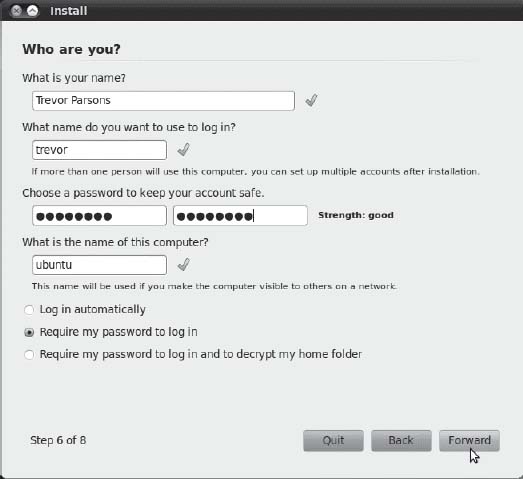
Figure 4-12. You should enter an ordinary name, a login name, a password, and, if you want, a name to give your computer.
Following the username, enter a password. Here, the rules are the inverse of those for your username. A good password contains numbers, uppercase and lowercase letters, punctuation marks, and anything else you can get in there! This helps make your password almost impossible for someone else to guess, and thus makes your system more secure. (If you want to be really secure, create a password that's ten or more characters long.) You'll need to enter the password twice; the second time confirms that you didn't make a typo the first time around.
The What Is the Name of This Computer? text box contains the hostname for the computer. This is how the computer is identified on certain types of networks, if you choose to share files or resources with other computers. Ubuntu will fill in this field automatically based on your username, but you can replace that with something else more personal. The rules for the hostname are broadly similar to those for the username; it cannot contain spaces or symbols. For example, if your computer is a Dell PC, you might type Office_Dell (note that you can use an underscore character in place of a space character).
After you're finished, click the Forward button.
Stage 8: Import Documents and Settings
The next step is to migrate accounts by importing documents and settings of existing user accounts from your Windows partition to Ubuntu. (You won't be prompted to do this if you're installing Ubuntu on a fresh hard disk or have chosen to overwrite your Windows partition.) Just select the items you would like to import to your account, as shown in Figure 4-13. Then click the Forward button to continue.
This is certainly a handy feature to be offered by the installer, but think twice about whether to use it. If you have a large amount of data, such as music and video, stored on your Windows partition, there is little point in using the migration tool to copy it over onto your new Ubuntu partition. You would be merely duplicating large amounts of data on the same disk, which makes little sense given that your Windows partition will in any case be accessible from your new Ubuntu system.
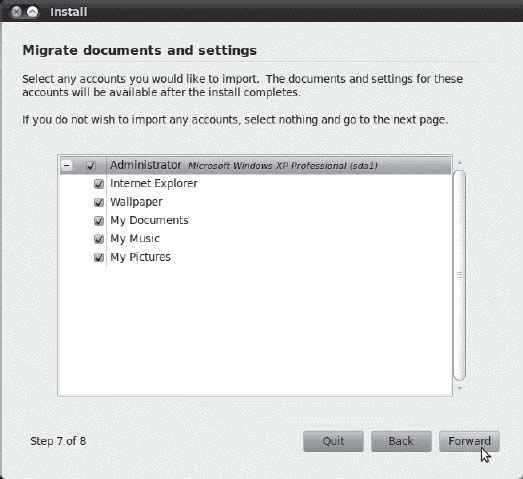
Figure 4-13. Select the items you would like to migrate from Windows to your account.
Stage 9: Confirm Installation Choices
At this point, you'll see the Ready to Install window, which lists the choices you've made, as shown in Figure 4-14. It's a good idea to check to make sure everything is correct before clicking the Install button.
When you're ready to install Ubuntu, click the Install button. This will start the installation procedure. The new partitions you created will be formatted, and the Ubuntu files will be copied.

Figure 4-14. Confirm the installation choices, and click the Install button to format the new partitions and copy the Ubuntu files.
If you click the Advanced button (which isn't required), you will be prompted to customize the boot loader and set a network proxy if you have one. For the boot loader settings, you have the option not to write the boot loader to the disk. The option makes sense if you already have an existing boot loader, perhaps from another Linux installation, and you would prefer to use it as the primary boot loader for all the operating systems installed on your computer.
Stage 10: Perform Installation
Now all you have to do is wait! The Ubuntu installation routine will copy the necessary files and install Ubuntu, as shown in Figure 4-15. It won't require any further input from you, unless something goes wrong. For example, if you've created partitions that are too small in the previous section, this is the point at which you'll be told. If you do encounter an error, the installation program will quit, and you will need to start it again by clicking the icon on the Desktop, this time altering your choices accordingly.
Installation should take no more than 30 minutes. It completed in half that time on most of our test systems.

Figure 4-15. While the Ubuntu files are copied, you can read about its nifty features and applications.
Stage 11: Reboot and Enjoy Ubuntu!
When installation has finished, a dialog box will appear telling you to restart the computer (see Figure 4-16). After you click the Restart Now button, the DVD will be ejected automatically. It's important that you remove it so that you don't accidentally boot Ubuntu's installer again when the machine restarts. In fact, Ubuntu will prompt you to remove the disk and press Enter to confirm the removal.
Following this, the system will restart. If you've installed Ubuntu on a computer that contains Windows, you'll first see the Grub boot menu. This offers a number of choices, including the chance to boot Ubuntu into recovery mode, which can help fix your computer (discussed in Chapter 5). You can also choose to boot into Windows. You can switch between the menu choices by using the arrow keys; press Enter to make your selection.

Figure 4-16. You're almost ready to get started with Ubuntu.
You can also run Memtest86 to test your system's memory. However, most users can simply press Enter when the menu appears, which will select the topmost entry, thereby booting Ubuntu in normal mode. Alternatively, after 10 seconds, the default choice will be automatically selected.
If you installed Ubuntu onto a computer or hard disk without any other OS, the system will start up directly, without displaying a boot menu (although this can be accessed if desired by holding down Shift during startup).
After a few seconds have passed while Ubuntu loads, you'll see the Ubuntu login screen, as shown in Figure 4-17 (unless you set up Ubuntu to log you in automatically). From here, you can progress to Chapter 6 to learn how to get started. Alternatively, if you've run into any problems, see Chapter 5.
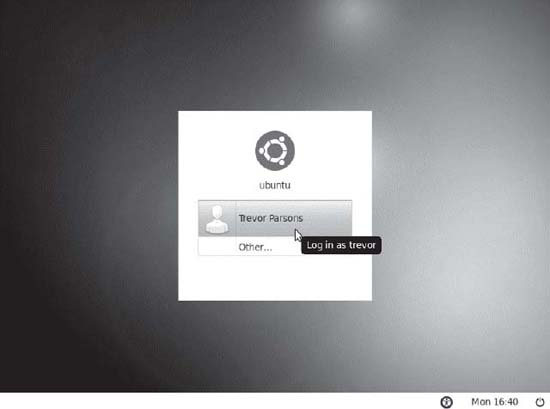
Figure 4-17. When the computer has rebooted after installation, the standard Ubuntu login screen will appear.
INSTALLING UBUNTU ON AN APPLE MAC
Ubuntu can also run on Apple Macintosh computers, as well as PCs. However, the instructions vary depending on the processor installed in your Macintosh. To find out which type of processor your Mac uses, click the Apple menu and select About This Mac. In the summary dialog box, look for the Processor heading. If your computer is more than four years old, the line will probably read “PowerPC,” and you should refer to the instructions under that heading. If yours is a more recent Mac, and the line contains “Intel” in combination with any other words, such as “Intel Core i5,” continue with the following instructions.
Intel
If your Mac contains an Intel processor, you might be able to boot from the DVD-ROM supplied with this book and use it to install Ubuntu. However, some extra steps are necessary. If you're using Mac OS X 10.5 “Leopard” or 10.6 “Snow Leopard,” you can use Apple's Boot Camp utility (located in Applications ![]() Utilities) to resize the existing Mac OS X partition. Boot Camp is also used to provide a boot menu to let you switch between Mac OS X and Ubuntu. However, Boot Camp is designed to allow Windows to be installed alongside Mac OS X, so some additional steps are necessary to make it work with Ubuntu. A full guide is provided at the official Ubuntu wiki:
Utilities) to resize the existing Mac OS X partition. Boot Camp is also used to provide a boot menu to let you switch between Mac OS X and Ubuntu. However, Boot Camp is designed to allow Windows to be installed alongside Mac OS X, so some additional steps are necessary to make it work with Ubuntu. A full guide is provided at the official Ubuntu wiki: https://help.ubuntu.com/community/MacBook.
If you're running Mac OS X Tiger (10.4), you may want to look into using third-party boot menu software called rEFlt (http://refit.sourceforge.net). This utility can also be used in Leopard and Snow Leopard in place of Boot Camp.
After the computer has been correctly configured by following the guide, you can boot from the DVD-ROM and follow the instructions in the rest of this chapter. Hold down the C key (or Cmd+Shift+Option+Delete on older systems) when the Apple symbol appears during booting to boot from the DVD-ROM disc.
PowerPC
Ubuntu also works on a Mac based on a PowerPC processor, although a special version must be used. Note that Canonical, the company that sponsors Ubuntu, no longer provides official releases of Ubuntu on this architecture. Current versions are supported solely by the community. The PowerPC version of Ubuntu 10.04 can be downloaded from http://cdimage.ubuntu.com/ports/releases/lucid/release/. Choose the link entitled Mac (PowerPC) and IBM-PPC (POWER5) desktop CD. Once you've saved this ISO image to disk, you'll need to manually burn it to a blank CD-R or CD-RW, and then boot from it to install Ubuntu. However, first you must create some free space on the hard disk, so you can install Ubuntu alongside your existing OS (assuming you want to dual-boot Mac OS X and Ubuntu; if you want to let Ubuntu use the entire hard disk, the Ubuntu installer will be able to wipe the existing partitions, and no further action is necessary). Boot from the Mac OS X installation DVD-ROM and quit the installer. Then use Disk Utility from the menus to resize the hard disk in order to make space.
To create the Ubuntu installation CD in Mac OS X, insert a blank CD-R or CD-RW, and then start Disk Utility. Choose Images ![]() Burn, navigate to the
Burn, navigate to the ubuntu-10.04-desktop-powerpc.iso file you downloaded and then click the Burn button. When the burn has finished, use the disc to boot from and install Ubuntu, following the instructions provided in this chapter. Hold down the C key (or Cmd+Shift+Option+Delete on older systems) when the Apple symbol appears during booting to boot from the CD.
The Virtual Option
Many owners of Apple computers choose to run Ubuntu in a virtual machine running on OS X, rather than install and run it natively. As discussed in the “Virtualization” sidebar in Chapter 3 (where we list the main virtualization software options for Mac OS X), this can be a convenient and risk-free choice, whether you're an ordinary user who wants to experiment with Ubuntu or a software developer who wants access to OS X, Linux, and Windows on a single machine. Virtualizing is a compromise, though, both in performance—because Ubuntu has to compete for hardware resources with the host operating system—and in the heavy dependence you will still have on proprietary software. The choice is very much yours!
Summary
By following the steps outlined in this chapter, you should now have Ubuntu installed on your computer. We've tried to provide you with enough information to get around certain problems, and explain each step of the installation.
Alas, it's still possible that you encountered hurdles that weren't addressed here. In the next chapter, you'll find solutions to common problems associated with Ubuntu installation.