
P A R T 2
![]()
Installing Ubuntu
C H A P T E R 3
![]()
Pre-installation Steps
Now that you know a bit about where Ubuntu Linux came from, how it's different, and why you might want to use it, it's time to get Ubuntu running on your own desktop or laptop, using the DVD that's included with this book. Most computers in the world run Windows, but very few people install Windows themselves. They have no need to, because almost every computer you can buy comes with Windows pre-installed. By contrast, it's rare to find companies selling new computers with Ubuntu or any other flavor of Linux on them. There are exceptions—for example, a company called System 76 supplies excellent hardware to customers in the United States and Canada with Ubuntu pre-installed. And even Dell has been known to offer Ubuntu on a limited range of its computers, notably the inexpensive Inspiron Mini 10 netbook.
But for most of us, getting Ubuntu means installing it for ourselves. This can seem a daunting prospect if you haven't done it before. However, Ubuntu makes this job as easy as it's possible to be. Its installation routines are very advanced compared to previous versions of Linux and even compared to other current distributions.
What does saying that you're going to install Ubuntu actually mean? It involves three things:
- Somehow, all the files necessary to run Ubuntu are going to be put onto your hard disk.
- The PC will be configured so that it knows where to find these files when it first boots up.
- The Ubuntu operating system will be set up so that you can use it.
However, in order to do all this and get Ubuntu onto your PC, you must undertake some preparatory work, which is the focus of this chapter.
Understanding Partitioning
Chances are your PC already has Windows installed on it. This won't present a problem. In most cases, Ubuntu can live happily alongside Windows in what's called a dual-boot setup, which enables you to choose which operating system to run at your computer's startup. However, installing Ubuntu means that Windows must make certain compromises. Windows is forced to cohabit on your hard disk with another OS—something it isn't designed to do.
![]() Note Even if you intend to install Ubuntu on a completely blank hard disk, it's still important that you understand partitioning.
Note Even if you intend to install Ubuntu on a completely blank hard disk, it's still important that you understand partitioning.
The main issue with such a situation is that Windows needs to shrink and make some space available for Ubuntu (unless you install a second hard disk, which is discussed later in this chapter). In an ideal world, Ubuntu needs its own separately defined part of the disk, which is referred to as a partition. All of this can be handled automatically by the Ubuntu installation routine, but it's important that you know what happens so that you know what to do in the unlikely event of anything going wrong.
![]() Note It's possible to install Ubuntu within the Windows file system too, as an alternative to dual-booting. That's explained in Chapter 4.
Note It's possible to install Ubuntu within the Windows file system too, as an alternative to dual-booting. That's explained in Chapter 4.
All hard disks are split into partitions, which are large chunks of the disk created to hold operating systems and data (just as a large farm is partitioned into separate fields). A partition is usually multiple gigabytes in size, although it can be smaller.
![]() Note If you use a Macintosh, don't feel left out! The next chapter includes a sidebar explaining the options for installing Ubuntu on your Mac.
Note If you use a Macintosh, don't feel left out! The next chapter includes a sidebar explaining the options for installing Ubuntu on your Mac.
You can view your disk's partitions by using the Disk Management tool in Windows XP, 2000, Vista, and 7, as shown in Figure 3-1. You can access this tool by right-clicking Computer in the Windows Start menu and selecting Manage. This brings up the Computer Management window, where you will find Disk Management under Storage.
Most desktop PC systems have just one partition, unless the user has specifically created additional partitions. As mentioned, Ubuntu needs a partition of its own. During installation, Ubuntu needs to shrink the main Windows partition and create two new partitions: one for the operating system itself, and an extra one to hold the swap file.
In addition, the Ubuntu installation routine writes a new boot sector (also known as a boot loader). The boot sector is located at the very beginning of the disk and contains a small program that then runs another program that lets you choose between operating systems (and therefore partitions) when you first boot up.
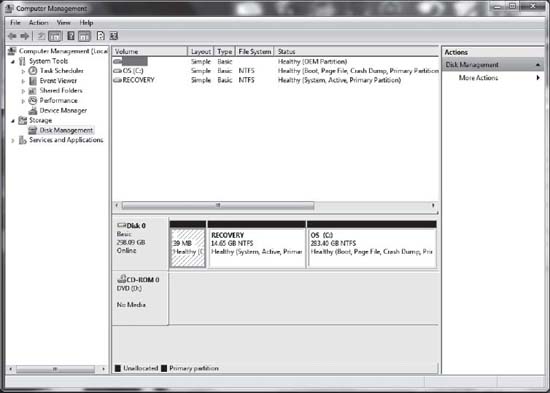
Figure 3-1. You can view your disk's partitions by using Windows' Disk Management tool.
![]() Note Partitioning a laptop for dual-booting can present some tricky decisions. Manufacturers often create multi-partition setups including a recovery partition to make it very easy to reset Windows to factory defaults. It's tempting to delete this recovery partition and devote the space to Linux. If you decide to do this, make sure you have a full set of Windows recovery disks before you start!
Note Partitioning a laptop for dual-booting can present some tricky decisions. Manufacturers often create multi-partition setups including a recovery partition to make it very easy to reset Windows to factory defaults. It's tempting to delete this recovery partition and devote the space to Linux. If you decide to do this, make sure you have a full set of Windows recovery disks before you start!
Of course, Ubuntu cannot shrink a Windows partition that is packed full of data, because no space is available for it to reclaim. Therefore, one of the first preparatory steps is to ensure that enough space is free.
Freeing Up Space
The first step before installing Ubuntu alongside Windows is to check how much free space you have in your Windows partition. To see the amount of free space you have under Windows Vista or 7, click the Start button, click Computer, and look at the bar graph next to your hard disk drive, as shown in Figure 3-2. With older versions of Windows, you should double-click My Computer, right-click your boot drive, and select Properties. The free space is usually indicated in purple on a pie chart.
In both cases, look for how much free space you have. In Windows Vista and 7, this is the first figure underneath the bar graph.
You need to have at least 3GB of free space in your Windows partition for Ubuntu to use, but 3GB is a bare minimum and should be considered only if you have no other choice (that is, your computer lacks free disk space). You'll need more space than that if you wish to install a lot of programs. If you don't have enough free space, you have several options: reclaim space, remove Windows, or use a second hard disk.
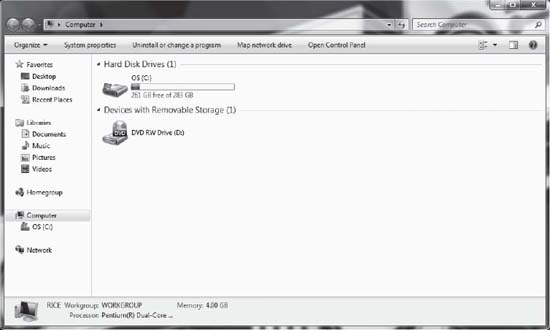
Figure 3-2. Ubuntu needs free disk space in which to install, so you might need to clean up your Windows partition.
Reclaiming Space
In Windows 7, Vista, and XP, you can run the Disk Cleanup tool to free some space on your hard disk. Under Windows 7 and Vista, click Start ![]() Computer and right-click the icon representing your hard disk. Select Properties from the menu that appears and then click the Disk Cleanup button. On Windows XP, click the Disk Cleanup button beneath the pie chart showing the free disk space. Disk Cleanup is also accessible by clicking Start
Computer and right-click the icon representing your hard disk. Select Properties from the menu that appears and then click the Disk Cleanup button. On Windows XP, click the Disk Cleanup button beneath the pie chart showing the free disk space. Disk Cleanup is also accessible by clicking Start ![]() All Programs
All Programs ![]() Accessories
Accessories ![]() System Tools
System Tools ![]() Disk Cleanup.
Disk Cleanup.
You might also consider turning off System Restore. This consumes a lot of disk space, which you can reclaim. However, deactivating System Restore means you lose the possibility of returning your system to a previous state should anything go wrong (although you can always manually back up your data, of course). To access System Restore under Windows 7 and Vista, click the Start button and then right-click Computer in the menu. Select Properties and click the System Protection link on the left of the window that appears. In Windows 7, select the drive (usually C:) for which you want to deactivate System Restore and click Configure. Select Turn Off System Protection in the window which appears, and confirm your change by clicking OK here and in the underlying System Protection window. In Windows Vista, remove the check alongside the drives under the Available Disk list, confirm that you want to turn off System Restore, and click the OK button on the System Properties dialog box. Under Windows XP, right-click My Computer, click Properties, and then click the System Restore tab. Next, put a check alongside Turn Off System Restore on All Drives, and click OK.
If you still cannot free up enough disk space, consider uninstalling unused software via the Add/Remove Programs applet within Control Panel. If you have any large games installed, consider removing them first, because they usually take up substantial amounts of hard disk space. You might also consider deleting movie and MP3 music files, which are renowned for eating up hard disk space. The average MP3 is around 4MB, for example, and one minute of video typically takes up 10MB of disk space!
Removing Windows
Some users might prefer a second, more radical option: getting rid of Windows completely and letting Ubuntu take over the entire hard disk. If you feel confident that Ubuntu will fulfill your needs, this is undoubtedly the most straightforward solution. You'll be able to do this during installation. However, this will also mean that any personal data you have will be lost, so you should first back up your data (as described shortly).
![]() Caution You should be aware that installing Windows back onto a hard disk that has Ubuntu on it is troublesome. Windows has a Darwinian desire to wipe out the competition. If you attempt to install Windows on an Ubuntu hard disk, it will overwrite Linux.
Caution You should be aware that installing Windows back onto a hard disk that has Ubuntu on it is troublesome. Windows has a Darwinian desire to wipe out the competition. If you attempt to install Windows on an Ubuntu hard disk, it will overwrite Linux.
Using Another Hard Disk
A third option for making room for Ubuntu is attractive and somewhat safer in terms of avoiding the potential for data loss: fitting a second hard disk to your PC. You can then install Ubuntu on this other hard disk, letting it take up the entire disk. Unlike some versions of Windows, Ubuntu doesn't need to be installed on the primary hard disk and is happy on a secondary drive.
A second hard disk is perhaps the best solution if you're low on disk space and want to retain Windows on your system. However, you'll need to know how to install the new drive or find someone to do it for you (although step-by-step guides can be found on the Web—just search using Google or another search engine). In addition, if your PC is less than 12 months old, you could invalidate your warranty by opening up your PC.
If you have an old PC lying around, you might also consider installing Ubuntu on it, at least until you're sure that you want to run it on your main PC.
VIRTUALIZATION
Backing Up Your Data
Whichever route you decide to take when installing Ubuntu, you should back up the data currently on your computer beforehand. Possibly the easiest way of doing this is to burn the data to recordable CD or DVD discs by using a program such as Nero or Infrarecorder and a CD-R/RW or DVD-R/RW drive.
If you take the coexistence route, installing Ubuntu alongside Windows, you should back up your data anyway for insurance purposes. Although the people behind Ubuntu test all their software thoroughly and rely on community reporting of bugs, there's always the chance that something out of your control will go wrong. Repartitioning a hard disk is a major operation and carries with it the potential for data loss.
If you intend to erase the hard disk when installing Ubuntu (thereby removing Windows), you can back up your data and then import it into Ubuntu.
Table 3-1 shows a list of common personal data file types, their file extensions, where they can be typically found on a Windows system, and notes on importing the data into Ubuntu. Note that earlier versions of Windows (95, 98, and Me) may differ when it comes to data storage locations.
Table 3-1. Data That Should Be Backed Up
Backing Up E-Mail Files
Microsoft e-mail cannot be easily imported into Ubuntu. Most e-mail programs use the MBOX format, and this is true of Ubuntu as well as programs created by the Mozilla Foundation (the organization behind the Firefox web browser). However, Microsoft uses its own DBX file format for Outlook Express and PST format for Outlook.
As a workaround, you can download and install the free Mozilla Thunderbird e-mail client (available from www.getthunderbird.com) on your Windows system. In Thunderbird, choose Tools ![]() Import to import your messages and contacts from Outlook, Outlook Express, or even the popular Eudora mail client. You will then be able to back up Thunderbird's mail files and import them into Evolution under Ubuntu, as described in Chapter 14.
Import to import your messages and contacts from Outlook, Outlook Express, or even the popular Eudora mail client. You will then be able to back up Thunderbird's mail files and import them into Evolution under Ubuntu, as described in Chapter 14.
To find where the mail files are stored, in Thunderbird choose Tools ![]() Account Settings, and then look in the Local Directory box. Back up each file that corresponds to a folder within your mail program (for example, Inbox, Sent, and so on). Note that you need to back up only the files without file extensions. You can ignore the
Account Settings, and then look in the Local Directory box. Back up each file that corresponds to a folder within your mail program (for example, Inbox, Sent, and so on). Note that you need to back up only the files without file extensions. You can ignore the .sdb folders as well as the .msf files.
![]() Tip To quickly go to the location of the Thunderbird e-mail files under Windows, copy the address in the Local Directory text box. Then, under Windows XP, click Start
Tip To quickly go to the location of the Thunderbird e-mail files under Windows, copy the address in the Local Directory text box. Then, under Windows XP, click Start ![]() Run, paste the address straight into the Open box, and click OK. Under Windows Vista or 7, paste the address into the Start Search text box and press Enter. Bear in mind that some of the folders are classified as system folders and are therefore hidden. You will need to activate the View Hidden Files option within My Computer.
Run, paste the address straight into the Open box, and click OK. Under Windows Vista or 7, paste the address into the Start Search text box and press Enter. Bear in mind that some of the folders are classified as system folders and are therefore hidden. You will need to activate the View Hidden Files option within My Computer.
Making Notes
When you're backing up data, a pencil and paper come in handy too. You should write down any important usernames and passwords, such as those for your e-mail account and other online services.
In addition, don't forget to jot down essential technical details, such as your IP address if you are part of a network of computers using static addresses (this will usually be relevant only if you work in an office environment).
![]() Tip If you've forgotten any passwords, several freeware/shareware applications are able to “decode” the asterisks that obscure Windows passwords and show what's beneath them. A good example is Asterisk Password Reveal, which you can download from
Tip If you've forgotten any passwords, several freeware/shareware applications are able to “decode” the asterisks that obscure Windows passwords and show what's beneath them. A good example is Asterisk Password Reveal, which you can download from www.paqtool.com/product/pass/pass_001.htm. Shareware sites like www.download.com offer similar applications.
Note that you don't need to write down information such as hardware interrupt (IRQ) or memory addresses, because hardware is configured automatically by Ubuntu. However, it might be worth making a note of the make and model of some items of internal hardware, such as your graphics card and sound card. This will help if Ubuntu is unable to automatically detect your hardware, although such a situation is fairly unlikely to arise. Under Windows Vista and 7, you can find out this information by clicking the Start button and right-clicking Computer. Click Properties in the menu that appears, and click the Device Manager link on the left of the window that appears. Under Windows XP, right-click My Computer on the Desktop (or on your Start menu), select Properties, and click the Hardware tab. Then click the Device Manager button.
Instead of writing everything down, you might consider taking a screenshot by pressing the Print Screen key and using your favorite image editor to print it.
![]() Tip Ubuntu works with a wide variety of hardware, and in most cases, it will automatically detect your system components. If you're in any doubt, you can consult the forums at
Tip Ubuntu works with a wide variety of hardware, and in most cases, it will automatically detect your system components. If you're in any doubt, you can consult the forums at http://ubuntuforums.org—in particular, the Hardware Help forums under the Main Support Categories heading. You might also consider subscribing to one or more of the Ubuntu mailing lists at https://lists.ubuntu.com. Remember that an important element of Ubuntu is its community of users, many of whom will be very willing to answer any questions you might have!
When you're certain that all your data is backed up, you can move on to the next chapter, which provides a step-by-step guide to installing the operating system.
Summary
The aim of this chapter has been to prepare both you and your computer for the installation of Ubuntu. You've looked at how your hard disk will be partitioned prior to installation and the preparations you should make to ensure that your hard disk has sufficient free space. You also learned about the types of files you might choose to back up, in addition to vital details you should record, such as usernames and passwords for your online accounts.
In the next chapter, we move on to a full description of the Ubuntu installation procedure. The chapter guides you through getting Ubuntu onto your computer.