Appendix A
Answers to Exercises
This appendix covers the answers to each of the exercises at the end of each chapter.
Chapter 1
Exercise 1
Mark up the following list, with inserted and deleted content:
Ricotta pancake ingredients:
- 1 1/2 3/4 cups ricotta
- 3/4 cup milk
- 4 eggs
- 1 cup plain white flour
- 1 teaspoon baking powder
- 75g 50g butter
- Pinch of salt
Answer
Here is the bulleted list with elements that show which content has been inserted and deleted:
<h1>Ricotta pancake ingredients:</h1>
<ul>
  <li>1 <del>1/2</del><ins>3/4</ins> cups ricotta</li>
  <li>3/4 cup milk</li>
  <li>4 eggs</li>
  <li>1 cup plain <ins>white</ins> flour</li>
  <li>1 teaspoon baking powder</li>
  <li><del>75g</del><ins>50g</ins> butter</li>
  <li>Pinch of salt</li>
</ul>
Chapter 2
Exercise 1
Mark up the following sentence with the relevant presentational elements.
The 1st time the bold man wrote in italics, he emphasized several key words.Answer
The sentence uses superscript, bold, italic, and emphasized elements.
<p>The 1<sup>st</sup> time the <b>bold</b> man wrote in
 <i>italics</i>, he <em>emphasized</em> several key words.</p>
Exercise 2
You have already created the homepage for the Example Café site that you will build throughout the book. You also created a recipes page. Now you need to create three more pages so that you can continue to build the site in upcoming chapters. Each page should start like the homepage, with a level 1 heading titled Example Café, followed by this paragraph: Welcome to Example Café. We will be developing this site throughout the book. After this
Answer
The markup for menu.html should look like this:
<!DOCTYPE html>
<html>
<head>
  <meta charset="utf-8">
    <title>Example Cafe - Menu</title>
  </head>
  <body>
    <h1>Example Café</h1>
    <p>Welcome to Example Café. We will be developing this site
    throughout the book.</p>
    <h2>Menu</h2>
    <p>The menu will go here.</p>
  </body>
</html>
The markup for opening.html should look like this:
<!DOCTYPE html>
<html>
<head>
  <meta charset="utf-8">
    <title>Example Cafe - Menu</title>
  </head>
  <body>
    <h1>Example Café</h1>
    <p>Welcome to Example Café. We will be developing this site
    throughout the book.</p>
    <h2>Opening Hours</h2>
    <p>Details of opening hours and how to find us will go here. </p>
  </body>
</html>
The markup for contact.html should look like this:
<!DOCTYPE html>
<html>
<head>
  <meta charset="utf-8">
    <title>Example Cafe - Menu</title>
  </head>
  <body>
    <h1>Example Café</h1>
    <p>Welcome to Example Café. We will be developing this site
    throughout the book.</p>
    <h2>Contact</h2>
    <p>12 Sea View, Newquay, Cornwall, UK</p>
  </body>
</html>
Chapter 3
Exercise 1
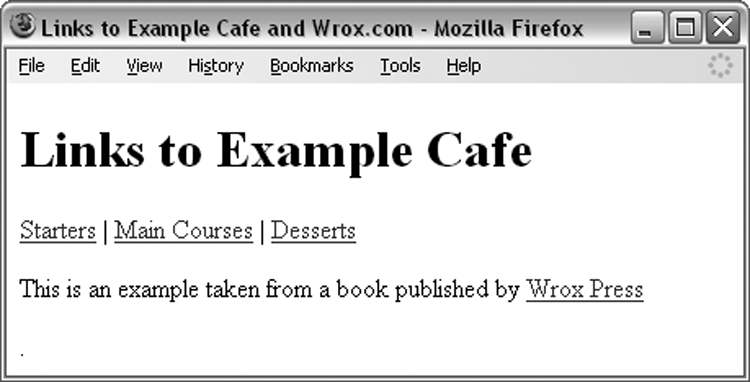
Look back at the Try It Out example where you created a menu, and create a new page that links directly to each course on the menu. Then add a link to the main Wrox website (www.wrox.com). The page should look something like Figure A-1.
Answer
Here is the page with links to the menu first and then a link to the Wrox Press website:
<!DOCTYPE html>
<html>
<head>
  <meta charset="utf-8">
  <title>Links to Example Cafe and Wrox.com</title>
</head>
<body>
  <h1>Links to Example Cafe</h1>
  <p>
    <a href="http://www.examplecafe.com/menu.html#starters">Starters</a> |
    <a href="http://www.examplecafe.com/menu.html#mains">Main Courses</a> |
    <a href="http://www.examplecafe.com/menu.html#desserts">Desserts</a>
  </p>
  <p>This is an example taken from a book published by
    <a href="http://www.wrox.com">Wrox Press</a>
  </p>.
</body>
</html>
Exercise 2
Go back to the pages in the sample application and make sure that you have updated the navigation for each page.
Answer
Navigation for the homepage:
<nav>
  HOME
  <a href="menu.html">MENU</a>
  <a href="recipes.html">RECIPES</a>
  <a href="contact.html">CONTACT</a>
</nav>
Navigation for the menu page:
<nav>
  <a href="index.html">HOME</a>
  MENU
  <a href="recipes.html">RECIPES</a>
  <a href="contact.html">CONTACT</a>
</nav>
Navigation for the recipes page:
<nav>
  <a href="index.html">HOME</a>
  <a href="menu.html">MENU</a>
  RECIPES
  <a href="contact.html">CONTACT</a>
</nav>
Navigation for the contact page:
<nav>
  <a href="index.html">HOME</a>
  <a href="menu.html">MENU</a>
  <a href="recipes.html">RECIPES</a>
  CONTACT
</nav>
Chapter 4
Exercise 1
Add the images of icons that represent a diary, a camera, and a newspaper to the following example. All the images are provided in the images folder in the download code for Chapter 4.
<h1>Icons</h1>
<p>Here is an icon used to represent a diary.</p>
<img src="images/diary.gif" alt="Diary" width="150" height="120" >

<p>Here is an icon used to represent a picture.</p>
Camera image goes here

<p>Here is an icon used to represent a news item.</p>
Newspaper image goes here
Your finished page should resemble Figure A-2.

Answer
Here is the code for this page:
<!DOCTYPE html>
<html>
<head>
  <meta charset="utf-8">
  <title>Exercise 1</title>
</head>
<body>
  <h1>Icons</h1>
  <p>Here is an icon used to represent a diary.</p>
  <img src="images/diary.gif" alt="Diary" width="150" height="120" >
  <p>Here is an icon used to represent a picture.</p>
  <img src="images/picture.gif" alt="Picture" width="150" height="120" >
  <p>Here is an icon used to represent a news item.</p>
  <img src="images/news.gif" alt="news" width="150" height="120" >
</body>
</html>
Exercise 2
Look at the images shown in Figures A-3 and A-4 and decide whether you are more likely to get smaller file sizes and better quality images if you save them as PNGs or JPEGs.


Answer
As discussed in Chapter 3, “Links and Navigation,” images with large, flat areas of color, such as Image 1 where you see only the silhouette of the people, compress better as GIFs or PNGs than JPEGs, whereas JPEGs are better for saving photographic images where there is greater variety of colors and more difference in the shades of different colors.
- Image 1 (Figure A-3): GIF or PNG
- Image 2 (Figure A-4): JPEG
Exercise 3
Go through the files for the sample application and replace the main heading with the logo on each page. On every page except for the homepage, make sure that the image links back to the index.html page.
Answer
The new heading should look like this:
<a href="index.html" id="top">
  <img src="images/logo.gif" alt="example cafe logo" width="194"
height="80" >
</a>
Chapter 5
Exercise 1
Where should the <caption> element for a table be placed in the document and, by default, where is it displayed?
Answer
The <caption> element should appear after the opening <table> element but before the first <tr> element.
Exercise 2
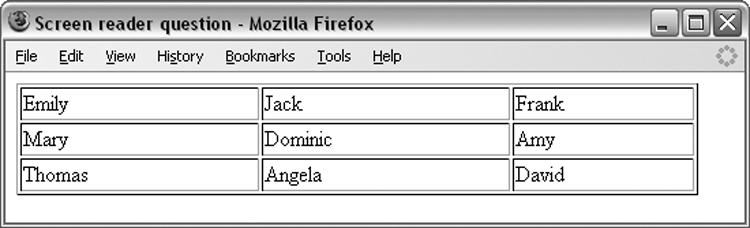
In what order would the cells in Figure A-5 be read out by a screen reader?
Answer
The names would be read in the following order: Emily, Jack, Frank, Mary, Dominic, Amy, Thomas, Angela, and David.
Chapter 6
Exercise 1
Create an e-mail feedback form that looks like the one shown in Figure A-6.
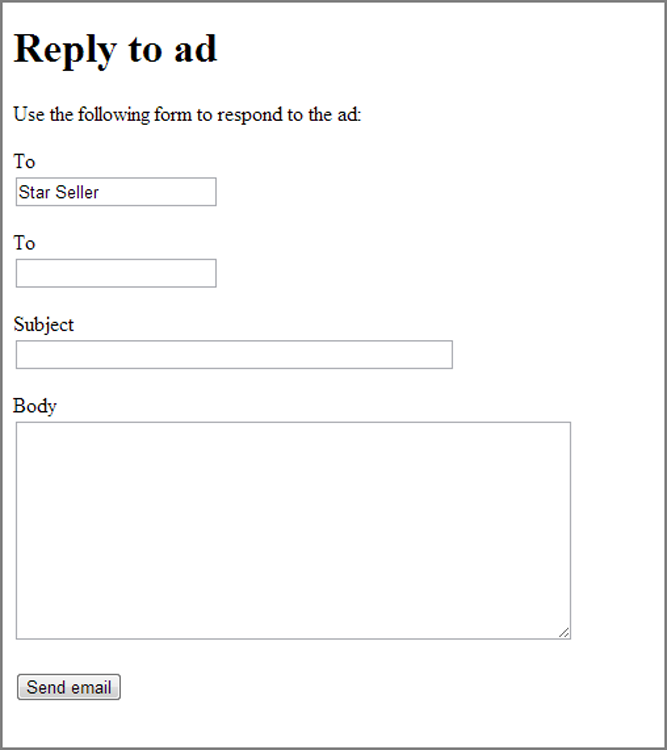
The first textbox is a readonly textbox so that the user cannot alter the name of the person the e-mail is sent to.
Answer
Here is the code for the feedback form:
<!DOCTYPE html>
<html>
<head>
  <meta charset="utf-8">
  <title>Reply to ad</title>
</head>
<body>
<h1>Reply to ad</h1>
<p>Use the following form to respond to the ad:</p>
<form action="http://www.example.com/ads/respond.aspx" method="post"
      name="frmRespondToAd">
<table>
  <tr>
    <td><label for="emailTo">To</label></td>
    <td><input type="text" name="txtTo" readonly="readonly" id="emailTo"
         size="20" value="Star Seller" /></td>
  </tr>
  <tr>
    <td><label for="emailFrom">To</label></td>
    <td><input type="text" name="txtFrom" id="emailFrom" size="20" /></td>
  </tr>
  <tr>
    <td><label for="emailSubject">Subject</label></td>
    <td><input type="text" name="txtSubject" id="emailSubject"
        size="50" /></td>
  </tr>
  <tr>
    <td><label for="emailBody">Body</label></td>
    <td><textarea name="txtBody" id="emailBody" cols="50" rows="10">
        </textarea></td>
  </tr>
</table>
  <input type="submit" value="Send email" >
</form>
</body>
</html>
Exercise 2
Create a voting or ranking form that looks like the one shown in Figure A-7.

The following <style> element was added to the <head> of the document to make each column of the table the same fixed width, with text aligned in the center.
<head>
  <title>Voting</title>
  <style type="text/css">td {width:100px; text-align:center;}</style>
</head>
Answer
Here is the code for the voting form. The checked attribute is used on the middle value for this form so that it loads with an average score (in case the form is submitted without a value selected):
<!DOCTYPE html>
<html>
<head>
  <meta charset="utf-8">
  <title>Voting</title>
  <style type="text/css">td {width:100px; text-align:center;}</style>
</head>
<body>
<h2>Register your opinion</h2>
<p>How well do you rate the information on this site (where 1 is
    very poor and 5 is very good)?</p>
<form action="http://www.example.com/ads/respond.aspx" method="get"
       name="frmRespondToAd">
  <table>
    <tr>
      <td><input type="radio" name="radVote" value="1" id="vpoor" /></td>
      <td><input type="radio" name="radVote" value="2" id="poor" /></td>
      <td><input type="radio" name="radVote" value="3" id="average"
         checked="checked" /></td>
      <td><input type="radio" name="radVote" value="4" id="good" /></td>
      <td><input type="radio" name="radVote" value="5" id="vgood" /></td>
    </tr>
    <tr>
      <td><label for="vpoor">1 <br />Very Poor</label></td>
      <td><label for="poor">2 <br />Poor</label></td>
      <td><label for="average">3 <br />Average</label></td>
      <td><label for="good">4 <br />Good</label></td>
      <td><label for="vgood">5 <br />Very Good</label></td>
    </tr>
  </table>
  <input type="submit" value="Vote now" />
</form>
</body>
</html>
Chapter 7
Exercise 1
In this exercise (and the next), you continue to work on the Example Café website. Open the index.html page, and add a <div> element just inside the opening <body> tag and the closing </body> tag. Give the element an id attribute whose value is page. Repeat this for each page of the site.

Answer
Here is the HTML for the homepage; you can see the new <div> element has been highlighted:
<!DOCTYPE html>
<html>
<head>
  <meta charset="utf-8">
  <title>Example Cafe - community cafe in Newquay, Cornwall, UK</title>
  <link rel="stylesheet" href="css/interface.css">
</head>
<body>
  <div id="page">
    <header>
      <a id="top"><img src="images/logo.gif" alt="example cafe logo"
         width="194" height="80" >
      <nav id="navigation">
        HOME
        <a href="menu.html">MENU</a>
        <a href="recipes.html">RECIPES</a>
        <a href="contact.html">CONTACT</a>
      </nav>
    </header>
    <article>
      <h1>Home</h1>
      <img src="images/scrambled_eggs.jpg" width="622" height="370"
       alt="Photo of scrambled eggs on an English muffin" align="left" >
      <h2>A community cafe serving home cooked, locally sourced, organic food</h2>
      <p>With stunning views of the ocean, Example Cafe offers the
 perfect environment to unwind and recharge the batteries.</p>
      <p>Our menu offers a wide range of breakfasts, brunches and lunches,
 including a range of vegetarian options.</p>
      <p>Whether you sip on a fresh, hot coffee or a cooling smoothie, you
 never need to feel rushed. Relax with friends or just watch the world go
 by.</p>
      <h2>This weekend's special brunch</h2>
      <p>This weekend, our season of special brunches continues with scrambled
 egg on an English muffin. Not for the faint-hearted, the secret to these eggs
 is that they are made with half cream and cooked in butter, with no more
than four eggs in the pan at a time.</p>    </article>
  </div>
</body>
</html>
Now here is the CSS rule that creates the blue border:
#page {
  width:960px;
  border:10px solid #3399cc;
  padding:40px;
  margin:20px;
}Answer
The first three changes (for points a, b, and c) can be handled using one CSS rule. The rule must control four properties:
- The border-top and border-bottom properties add a single-pixel gray line above and below the navigation.
- The padding property adds space between the lines and the items in the navigation.
- The margin property adds a bit of space above and below the gray lines.
- The margin-right property can be used to add space to the right of each individual link.
#navigation {
  border-top:1px solid #d6d6d6;
  border-bottom:1px solid #d6d6d6;
  padding:10px 0px 10px 0px;
  margin:20px 0px 20px 0px;
}
#navigation a {
  color:#3399cc;
  text-decoration:none;
  margin-right:20px;
}
Answer
Here is the new CSS rule that controls the appearance of the image:
.main_image {
  border:1px solid #000000;
margin:0px 10px 10px 0px;}Answer
You can add the line-height property to the rule that controls the <p> elements to change the gap between the text, which typesetters refer to as leading.
p {
  color:#333333;
  font-size:90%;
  line-height:1.3em;
}
Exercise 2
Take a look at the following HTML:
<!DOCTYPE html>
<html>
<head>
  <title>Font test</title>
  <link rel="stylesheet" href="tableStyles.css" />
</head>
<body>
<table>
  <tr>
    <th>Quantity</th>
    <th>Ingredient</th>
  </tr>
  <tr class="odd">
    <td>3</td>
    <td>Eggs</td>
  </tr>
  <tr>
    <td>100ml</td>
    <td>Milk</td>
  </tr>
  <tr class="odd">
    <td>200g</td>
    <td>Spinach</td>
   </tr>
   <tr>
     <td>1 pinch</td>
     <td>Cinnamon</td>
   </tr>
 </table>
</body>
</html>
Now create the tableStyles.css style sheet, which makes this example look like Figure A-9.
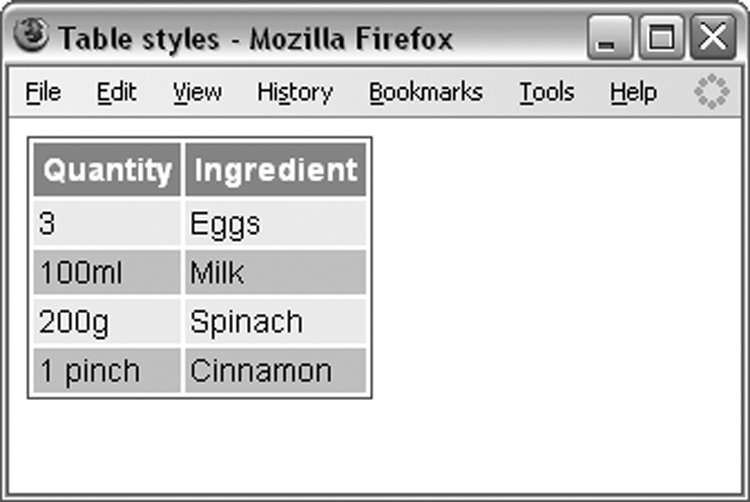
Don’t worry about getting the sizes exactly the same as the screen shot, but do make sure you have padding in the cells and a border around the outside. The white border is created by default in IE; you find out how to remove this in Chapter 8.
Answer
First, you need to add a style rule for either the <body> element or all elements using the universal selector *, which indicates that the rule applies to all elements. As mentioned in the chapter, set the background-color property of the <body> element on a site in case the user has set it to another value. You can also set the font-family and font-size properties to control how the text appears.
body {
  background-color:#ffffff;
  font-family:arial, verdana, sans-serif;
  font-size:14px;
}
To give the entire table a single-pixel, dark gray border, you can use the following style rules, or you could just use the border property shorthand:
table {
  border-style:solid;
  border-width:1px;
  border-color:#666666;
}
The table headings have a dark background with light writing; the font is also bold. In addition, there is no border to the headings. Note how the shorthand border property is used this time and the cells have padding:
th {
  color:#ffffff;
  background-color:#999999;
  font-weight:bold;
  border:0;
  padding:4px;
}
By default, the table rows will have a light background color:
tr {background-color:#cccccc;}To alternate the colors of the rows, the <tr> elements that have a class attribute whose value is odd will have a different background color:
tr.odd {background-color:#efefef;}Finally, you should give two pixels of padding to each table cell, and ensure that the color of the text in the cells is black.
td {
  color:#000000;
  padding:2px;
}
Chapter 8
Exercise 1
In this exercise, you create a linked table of contents that sits at the top of a long document in an ordered list and links to the headings in the main part of the document.
The HTML file exercise1.html is provided with the download code for this book, ready for you to create the style sheet. Your style sheet should do the following:
- Set the styles of all links including active and visited links.
- Make the contents of the list bold.
- Make the background of the list light gray and use padding to ensure the bullet points show.
- Make the width of the links box 250 pixels wide.
- Change the style of heading bullet points to empty circles.
- Change the style of link bullet points to squares.
Your page should look something like Figure A-10.

Answer
You can create a rule that applies to the <body> element to control the background color of the page and the font used.
body {
  background-color:#ffffff;
  font-family:arial, verdana, sans-serif;
  font-size:12px;}
There were several tasks that related to the list of bullet points that make up the contents. If you look at the following rule, you can see it starts by setting the background color of the list to a light gray. This is followed by a property that sets the default style of bullet points to empty circles. Then all the text is made bold. The fourth property sets the padding to the left of the list. Finally, the width of the lists is set to 250 pixels wide.
ul {
  background-color:#d6d6d6;
  list-style:circle;
  font-weight:bold;
  padding-left:30px;
  width:250px;}
The links to the sections are in nested unordered lists, and there are a couple of properties you need to set for these lists. First, you must set the bullet points to squares. Second, because all unordered lists have a gray background and are 250 pixels wide, the nested lists would poke out to the right side if you did not make them less wide.
ul ul {
  list-style:square;
  width:220px;}
The final item on the list was to set the styles of all links including active and visited links, which requires another four rules:
a:link {
  color:#0033ff;;
  text-decoration:none;}
a:visited {
  color:#0066ff;
  text-decoration:none;}
a:active {
  text-decoration:underline;}
a:link:hover {
  color:#003399;
  background-color:#e9e9e9;
  text-decoration:underline;}
Exercise 2
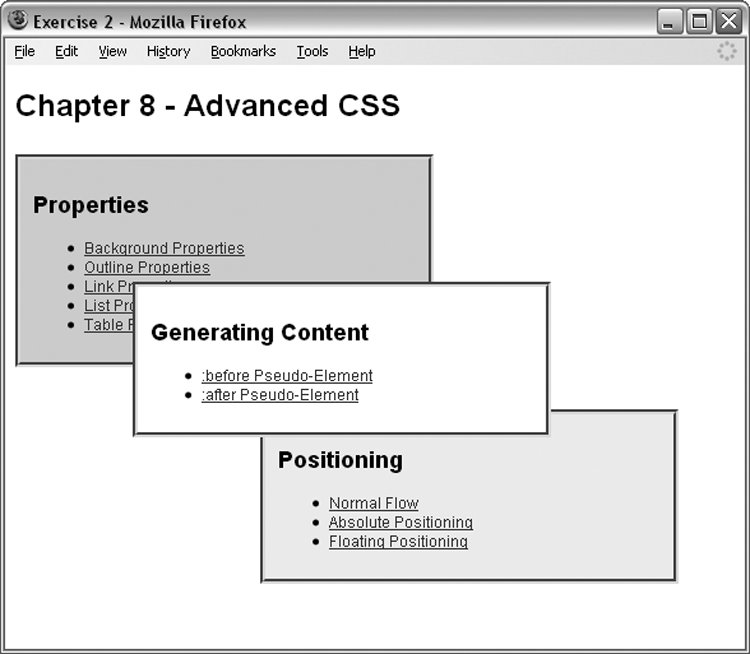
In this exercise, you test your CSS positioning skills. You should create a page that represents the links to the different sections of the chapter in a different way. Each of the sections must be shown in a different block, and each block must be absolutely positioned in a diagonal top-left to bottom-right direction. The middle box should appear on top, as shown in the Figure A-11.
You can find the source HTML file (exercise2.html) with the download code for this chapter.
Answer
To begin, set the background color for the entire page and default font in a rule that applies to the <body> element.
body {
  background-color:#ffffff;
  font-family:arial, verdana, sans-serif;
  font-size:12px;}
Next, set a rule that applies to all the <div> elements. Even though you will change the background color of two of the boxes, whenever boxes are taken out of normal flow, there is a risk that they will overlap, so you should give them a background color (because by default boxes have no background).
You can also set some common properties, adding padding to each box, as well as a border and the width of the boxes.
div {
  background-color:#ffffff;
  padding:10px;
  border-style:groove; border-width:4px; border-color:#999999;
  width:300px;}
Finally, you simply position each of the boxes. Because the containing element is the <body> element, you position each box from the top-left corner of the browser window.
div.page1 {
  position:absolute;
  top:70px;
  z-index:2;
  background-color:#d6d6d6;}

div.page2 {
  position:absolute;
  top:170px; left:100px;
  z-index:3;}

div.page3 {
  position:absolute;
  top:270px; left:200px;
  z-index:1;
  background-color:#efefef;}
Chapter 9
Exercise 1
In this exercise, you create a linked table of contents that sits at the top of a long document in an ordered list and links to the headings in the main part of the document.
The HTML file exercise1.html is provided with the download code for this book, ready for you to create the style sheet. Your style sheet should do the following:
- Round the corners of the #contents <div> element with a 12-pixel corner radius.
- Make the background color of the #contents element 70 percent opaque, leaving the text black.
- Change the font to be Inconsolata using http://www.fontsquirrel.com/fonts/Inconsolata.
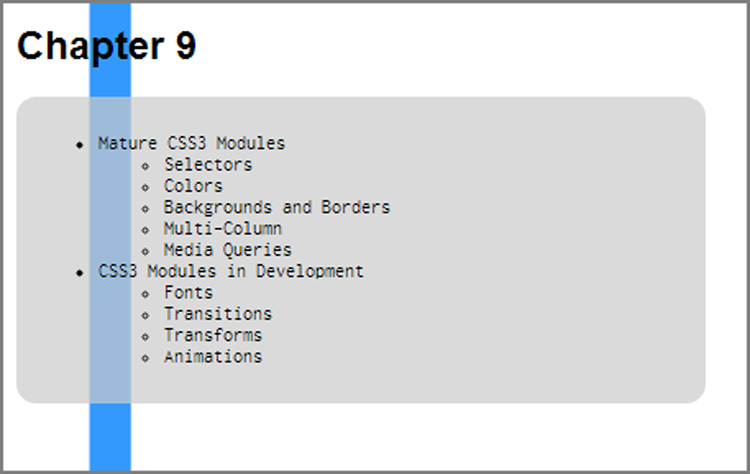
Your page should look something like Figure A-12.
Answer
Your CSS should look something like the following:
@font-face {
    font-family: 'InconsolataMedium';
    src: url('fonts/Inconsolata-webfont.eot'),
    src: url('fonts/Inconsolata-webfont.eot?#iefix')
    format('embedded-opentype'),
         url('fonts/Inconsolata-webfont.woff') format('woff'),
         url('fonts/Inconsolata-webfont.ttf') format('truetype'),
         url('fonts/Inconsolata-webfont.svg#InconsolataMedium')
         format('svg'),
    font-weight: normal;
    font-style: normal;

}
#contents {
  padding : 10px;
  font-family : InconsolataMedium;
  background-color : hsla( 0,0%,80%,.7 );
  width : 400px;
  -webkit-border-radius: 12px;
  border-radius: 12px;
}
Exercise 2
In this exercise, you test your understanding of border-radius and the Transitions module to make a neat hover effect. Your style sheet should do the following:
- Set 1 second transitions for both the :hover and standard state. Transition the border-radius and background-color properties.
- In the #hover:hover definition, change the background color to #00ccff and change the border-radius to 100 pixels, which makes the box a circle.
The hover state of your page should look like Figure A-13.
You can find the source HTML file (exercise2.html) with the download code for this chapter.

Answer
Your style sheet should look like the following. It may look different depending on the number of prefixed browser variations you use:
#hover {
  width : 200px;
  height : 200px;
  background-color : #ffcc00;
  -webkit-transition-property : background-color,
    -webkit-border-radius;
  -moz-transition-property : background-color,
    -moz-border-radius;
  -o-transition-property :  background-color,
    -o-border-radius;
  transition-property :  background-color,
     border-radius;
  -webkit-transition-duration: 1s;
  -moz-transition-duration: 1s;
  -o-transition-duration: background-color 1s;
  transition-duration: background-color 1s;
  text-align: center;
  line-height:200px;
}
#hover:hover {
  width : 200px;
  background-color : #00ccff;
  -webkit-transition-property : background-color,
    -webkit-border-radius;
  -moz-transition-property : background-color,
    -moz-border-radius;
  -o-transition-property :  background-color,
    -o-border-radius;
  transition-property :  background-color,
    border-radius;
 -webkit-transition-duration: 1s;
  -moz-transition-duration: 1s;
  -o-transition-duration: background-color 1s;
  transition-duration: background-color 1s;
 -webkit-border-radius : 100px;
  border-radius : 100px;
}
Chapter 10
Exercise 1
Create a script to write out the multiplication table for the number 5 from 1 to 20 using a while loop.
Answer
The exercise is based around a counter (to work out where you are in your tables); each time the code is run, the counter increments by 1. So, you need to make sure the counter can go up to 20, rather than 10. This goes in the condition of the while loop:
while (i < 21) {Then you need to change the multiplier, which is both written out and used in the calculation:
document.body.innerHTML+= "<p>" + i + " x 5 = " + (i * 5) + "</p>";Depending on how you write out the results, your answer should look something like this:
var i = 1;
while ( i < 21 ) {
  document.body.innerHTML+= "<p>" + i + " x 5 = " + (i * 5) + "</p>";
  i++;
}
Exercise 2
Modify ch10_eg05.js so that it can say one of three things:
- “Good Morning” to visitors coming to the page before 12 p.m. (using an if statement).
- “Good Afternoon” to visitors coming to the page between 12 p.m. and 6 p.m. (again using an if statement). (Hint: You might need to use a logical operator.)
- “Good Evening” to visitors coming to the page after 6 p.m. up until midnight (again using an if statement).
Answer
This script needs to use the getHours() method of the date object to determine the time and then uses if statements to check the appropriate time for each statement presented to the user.
The afternoon uses a logical operator to check that it is after 12 p.m. but before 6 p.m.
var date = new Date();
var time = date.getHours();

if ( time < 12 ) {
  document.body.innerHTML += '<h1>Good Morning</h1>';
}
if ( time >= 12 && time < 18 ) {
  document.body.innerHTML += '<h1>Good Afternoon</h1>';
}
if ( time >= 18 ) {
    document.body.innerHTML += '<h1>Good Evening</h1>';
}
Chapter 11
Exercise 1
Rewrite the code from the files ch10_eg03.html and ch10_eg03.js to use jQuery. Instead of a console.log, add a <p> element to display the results as a child of the <body> element. Use the jQuery method $().val() to get the value of the form fields.
Answer
First, you need to add jQuery and add the <p> element to hold the results.
<!DOCTYPE html>
<html>
<head>
<title>Area calculator</title>
</head>
<body>
<form name="frmArea">
Enter the width and height of your rectangle to calculate the size:<br>
Width: <input type="text" name="txtWidth" size="5" id="width"><br>
Height: <input type="text" name="txtHeight" size="5" id="height"><br>
<input type="button" value="Calculate area" id="calc">
</form>
<p id="results">
</p>
<script src="js/jquery-1.8.2.min.js"></script>
<script src="exercise1.js"></script>
</body>
</html>
Then you need to adjust the script. Most of it is similar to the core JavaScript example; you just use the jQuery convenience methods. The biggest difference is getting a reference to the #results <p> element and using $().html() to write out the results of the calculation:
function calculateArea( width, height ) {
  var area = width * height;
  return area
}

$( "#calc" ).on( "click" , function(){
  $( "#results" ).html( calculateArea(
    $( "#width" ).val(),
    $( "#height" ).val()
  ));
});
Exercise 2
Modify main.js in the Example Café site to test the hash of the URL. You can access the hash with the BOM property window.location.hash. Use a conditional statement and jQuery to satisfy the following three conditions:
- If the hash equals “starters,” hide the menu items for mains and desserts.
- If the hash equals “mains,” hide the menu items for starters and desserts.
- If the hash equals “desserts,” hide the menu items for starters and mains.
Test it by appending each hash to the file URL (for example, menu.html”#starters”).
Note that the window.location.hash property includes the # character.
Answer
All the pieces for this script, with the exception of testing window.location.hash, are already in place from the earlier Try It Out. The differences are as follows:
- You need to hide all the menu items instead of just the desserts and mains.
- You need to test the window.location.hash against the options and then show the correct menu using a conditional statement.
- If there’s not a hash set at all or the hash doesn’t match any of the predefined options, you need to show the default.
$( document ).ready(function(){
  if ( $( "body" ).hasClass( "menu" ) ) {
    $( "#starters + div, #mains + div, #desserts + div").hide();
    if ( document.location.hash === "#starters" ) {
      $( "#starters" ).addClass( "expanded" ).next().show();
    } else if ( document.location.hash === "#mains" ) {
      $( "#mains" ).addClass( "expanded" ).next().show();
    } else if ( document.location.hash === "#desserts" ) {
      $( "#desserts" ).addClass( "expanded" ).next().show();
    } else {
      $( "#starters" ).addClass( "expanded" ).next().show();
    }
    $( "h2" ).on( "click", function(){
      if( !$( this ).hasClass( "expanded" )) {
        $( ".expanded" ).removeClass( "expanded" ).next().slideUp( "fast" );
        $( this ).addClass( "expanded" ).next().slideDown( "slow" );
      }
    });
  }
});
Chapter 12
Exercise 1
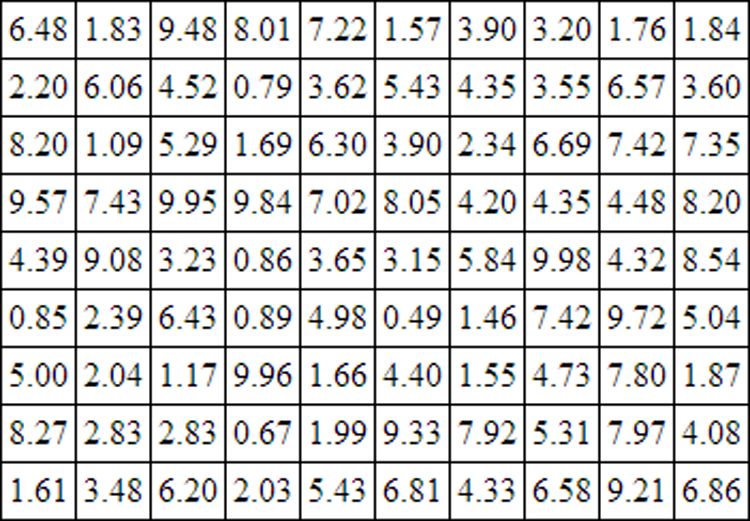
Use a jQuery GET request to get the file data/example1.json. The file contains an array. Every element in the array is another array full of numbers. Loop through each element in the array and write every number into the cell of a table with jQuery’s DOM manipulation tools. Style the table so that it has 1-pixel black borders, 3 pixels of padding on all sides, and no space between the cells.
When you finish, the table should look something like Figure A-14.
Answer
Using the $.get() convenience method, you need to get a reference to the cells from the data.cells array. Then you build up a string of HTML in a for loop, using simple concatenation. There are different ways to build up HTML. This example simply uses a string that will eventually be passed into $().html() to insert it into the DOM.
$( document ).ready( function(){
  $.get( 'data/example1.json' , function( data ){
    var cells = data.cells,
        html = "<table>";
    for (var i = 0, len = cells.length; i < len; i++ ) {
      html += "<tr>";
      for (var j = 0; j < cells[i].length; j++){
        html += "<td>" + cells[i][j] +"</td.>";
      }
      html += "<tr>";
    }
    html+="</table>";
    $( "#container" ).html( html );
  });
});
Exercise 2
Start with the following markup:
<div id="container">
  <h1>This book is about <span id="subject"></span></h1>
  <ul id="subjects">
    <li>HTML</li>
    <li>CSS</li>
    <li>JavaScript</li>
    <li>Ajax</li>
    <li>HTML5</li>
    <li>CSS3</li>
    <li>Video</li>
    <li>Audio</li>
  </ul>
  <div id="target">
    <p>Drop subjects here!</p>
  </div>
</div>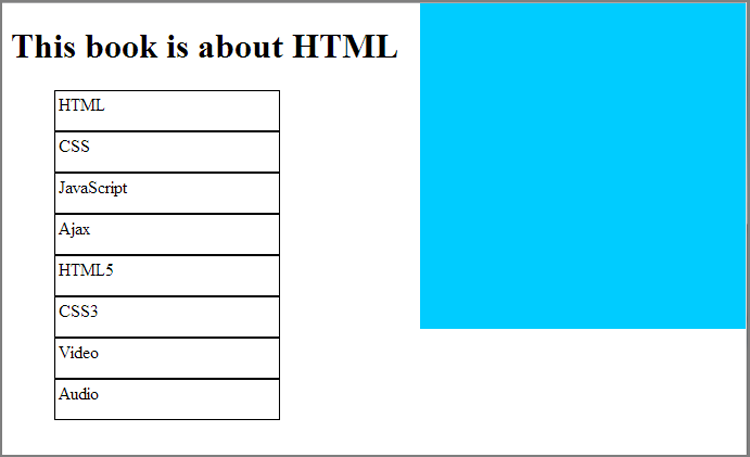
Answer
This is another example of how powerful jQuery UI can be after you get the hang of it.
First, you instantiate the Draggable behavior on the <li> elements, setting the revert property to true so that the elements return to their original place after being dropped:
$( document ).ready( function(){
  $( "#subjects li" ).draggable({
      "revert" : true
  });
Then you need to set up the Droppable behavior with a callback function that reads the text of the dropped <li> and writes it into the subject element.
  $( "#target" ).droppable({
      "drop" : function( e, ui ){
        $( "#subject" ).text( $( ui.draggable ).text() );
    }
  });
});
Chapter 13
There are no exercises in Chapter 13.