Figure 8-10: The upload page.
Uploading Your Application to the Google Play Store
You’ve finally reached the apex of Android application development: You’re ready to publish the application. To publish your app, you’ll need to collect the following information:
![]() The signed application APK
The signed application APK
![]() Your application screenshots
Your application screenshots
![]() A description and promotional text for your application
A description and promotional text for your application
![]() An optional promotional image used to advertise your app if it’s featured in the Google Play Store
An optional promotional image used to advertise your app if it’s featured in the Google Play Store
Publishing an application is easy — follow these steps:
1. On the Android developer’s home page (refer to Figure 8-8), click the Upload Application button.
The Upload an Application page opens, as shown in Figure 8-10.
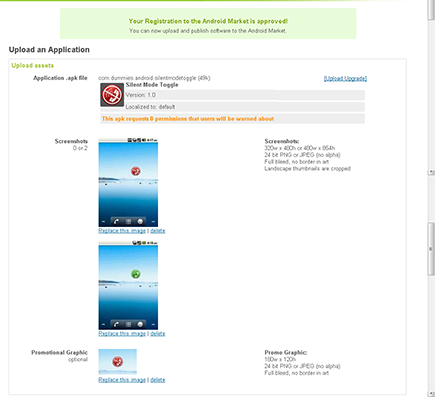
2. For the Application APK file, choose the .apk file that you create earlier in this chapter, and then click Upload.
 No two applications can have the same package name in the Google Play Store. (Google uses the Java package name as the identifier.) Therefore, if you try to upload the Silent Mode Toggle application at this point, you see this error message:
The package name of your apk (com.dummies.android.silentmodetoggle) is the same as the package name of another developer’s application. Choose a new package name.
When you upload an application that you’ve created, you don’t see this message.
3. In the Screenshots section, add two screen shots from your application.
Apps with screen shots have higher install rates than apps without them. These screen shots allow users to preview your application in a running state without having to install your application.
4. Add a promotional shot.
The promo shot is not a screen shot but rather is an advertisement used for random promotions that Android chooses to showcase. A promo shot isn’t required to publish the app.
5. Set the title of your application.
Choose a title that fits your application. This text is indexed for the Google Play Store search engine.
6. Set the description for your application.
Users see this description when they inspect your application to determine whether to install it. All this text is indexed for the Google Play Store search engine.
7. Set the promotional text of your application.
Promotional text is used when your application is featured or promoted in the Google Play Store. Getting your application featured is likely based on the popularity of your application. If it’s chosen to be featured in the promotional area of the Google Play Store (usually in the upper area of the screen of each category), the promo text shows up as the promotional component for it.
8. Set the application type.
This app falls into the Applications type; if you have a game app, choose the Games type.
9. Set the category for the app.
The category is based on your application type.
10. Turn off copy protection.
 Copy protection prevents your application from being illegally copied to other devices. To avoid that, use the Google Play Licensing service instead at
 http://d.android.com/guide/google/play/licensing/index.html
.
11. Select the list of locations where the application should be visible.
For example, if your application is meant for an Italian audience, deselect All Locations and select Italy as the destination location, to ensure that only devices in the Italy region can see it in the store. If you leave All Locations enabled, all locations can (you guessed it) see your app in the store.
12. Fill out the Web Site and E-Mail fields (and Phone, if you want).
These fields are used to contact you for various reasons, including app feature requests and bug reports. If you fill in the Phone field, remember that users can call to speak with you. If you’re writing an app for one company and publishing it under your developer account, you can change the Web Site, E-Mail, and Phone fields so that users can’t contact you.
13. Verify that your application meets the Android content guidelines and that you have complied with applicable laws by selecting the pertinent check boxes.
14. Choose one of these options:
• Publish: Saves and publishes the app to the store in real time. The Upload an Application page opens. (Refer to Figure 8-10.)
• Save: Saves changes, but doesn’t publish the app. Your app is shown as saved on the Android developer’s home page, as shown in Figure 8-11. When you’re ready to publish your app, select the title and click the Upload Application button.
You can also choose Delete at this time, but you probably don’t want to. You’ll delete all your work.
Figure 8-11: The saved app on your Android developer’s Home screen.

15. Scroll to the bottom of the page and click the Publish button.
Your application is published to the Google Play Store.
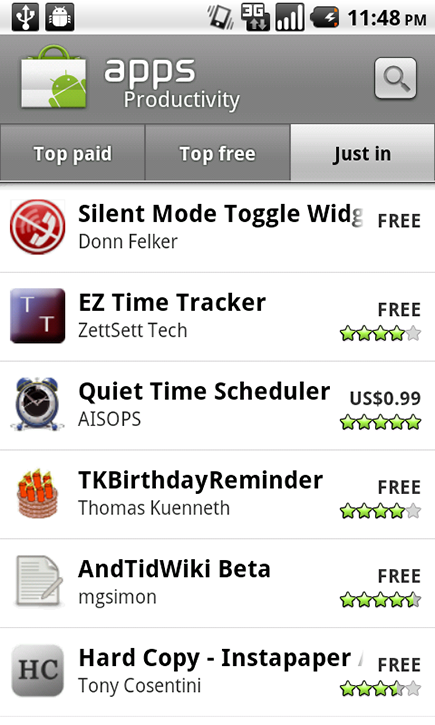
Figure 8-12 shows an application in the Google Play Store on a Nexus One device.
Figure 8-12: The application is released in the Google Play Store.
You’ve probably noticed a certain highlight in this process: It has no app-approval process (like a certain other platform does). You can create an app now and publish it, and users can install it right away. You can then complete a quick release cycle and get new features out the door as quickly as you finish them — very cool.
If you ever need to remove your application from the Google Play Store, select the app title from the Android developer’s home screen, scroll to the bottom, and clicked the Unpublish button.
..................Content has been hidden....................
You can't read the all page of ebook, please click here login for view all page.