
Figure 8-1: The Export Android Application Wizard.
Creating a Distributable File
So you have a great idea, and it has led you to develop the next hit application or game for the Android platform. Now you’re ready to put the application into the hands of users. The first thing you need to do is package your application so that it can be placed on their devices. To do so, you create an Android package file, or APK file.
In the following sections, you create an APK file.
Revisiting the manifest file
Before you jump in and create the distributable APK file, you should take great care to ensure that your application is available to as many users as possible, by familiarizing yourself with the uses-sdk element in the AndroidManifest.xml file. Your AndroidManifest.xml file now has a uses-sdk entry (see Chapter 4):
<uses-sdk android:minSdkVersion=”4” />
The minSdkVersion property identifies which versions of the Android platform can install this application — in this instance, level 4. The Silent Mode Toggle application was developed by setting the target software development kit (SDK) to version 15.
The Android platform is, for the most part, backward compatible. Most features from version 3 are also in version 4. Small changes and sometimes new, large components are released in each new version, but everything else in the platform remains basically backward compatible. Therefore, stating that this application needs a minimum of SDK version 4 signifies that any Android operating system of version 4 or later can run the application.
Using the minSdkVersion information, the Google Play Store can determine which applications to show the user of a specific device. If you were to release the application now with the minSdkVersion value set to 4 and you open the Google Play Store on an Android device running version 3 (Android 1.5) or earlier, you wouldn’t find your application — Google Play Store filters it out because you, the developer, have specified that this app can run only on devices of API Level 4 or greater. If you were to open the Google Play Store on a device running API Level 4 or higher, you could find and install your application.
 If you don’t provide a
 minSdkVersion value in the uses-sdk element of the application’s manifest, the Google Play Store defaults the minSdkVersion to 1, which means that this application is compatible with all versions of Android. If your application happens to use a component that’s unavailable in older versions of the platform (such as the Account Manager introduced in Android 2.0) and a user installs your application, the app will crash.
 Always set the
 minSdkVersion to the lowest version of the SDK on which you tested your application, and set the targetSdkVersion to the highest tested version.
Choosing your tools
You can build an Android APK file in numerous ways:
![]() Android Development Tools (ADT) inside Eclipse
Android Development Tools (ADT) inside Eclipse
![]() Automated build process, such as a continuous integration server
Automated build process, such as a continuous integration server
![]() Command line with Ant
Command line with Ant
![]() Maven or Gradle build systems
Maven or Gradle build systems
You use the ADT within Eclipse to create an APK file. The ADT provides an array of tools that compiles, digitally signs, and packages your Android application into an APK file. Here, the digital signature process takes place, as discussed in the next section.
Other options, such as Ant and continuous integration, are possible but are used in more advanced scenarios. You can find more information about setting up an Ant build process in the Android documentation at http://d.android.com/tools/publishing/app-signing.html
.
Digitally signing your application
The Android system requires all installed applications to be digitally signed with a certificate that contains a public/private key pair. The private key is held by the developer. The certificate that’s used to digitally sign the application identifies developer and establishes the trust relationships between applications.
You need to know some key information about signing Android applications:
![]() All Android applications must be signed. The system won’t install applications that aren’t signed.
All Android applications must be signed. The system won’t install applications that aren’t signed.
![]() You can use self-signed certificates to sign your applications; a certificate authority isn’t needed.
You can use self-signed certificates to sign your applications; a certificate authority isn’t needed.
![]() When you’re ready to release your application to the store, you must sign it with a private key. You cannot publish the application with the debug key that signs the APK file when debugging the application during development.
When you’re ready to release your application to the store, you must sign it with a private key. You cannot publish the application with the debug key that signs the APK file when debugging the application during development.
![]() The certificate has an expiration date, and it’s verified only at install time. If the certificate expires after the application has been installed, the application continues to operate normally.
The certificate has an expiration date, and it’s verified only at install time. If the certificate expires after the application has been installed, the application continues to operate normally.
![]() If you don’t want to use the ADT tools to generate the certificate, you can use standard tools such as Keytool or Jarsigner to generate and sign your APK files.
If you don’t want to use the ADT tools to generate the certificate, you can use standard tools such as Keytool or Jarsigner to generate and sign your APK files.
You can create modular applications that can communicate with each other if the applications were signed with the same certificate. This arrangement allows applications to run within the same process, and the system can, if requested, treat them as a single application. Using this methodology, you can create your application in modules, and users can update each module as they see fit — for example, to create a game and then release update packs to upgrade it. Users can decide to purchase only the updates they want.
The certificate process is outlined in detail in the Android documentation at http://d.android.com/tools/publishing/app-signing.html
.
Creating a keystore
A keystore in Android (and in Java) is a container in which your personal certificates reside. You can use a couple of tools in Android to create a keystore file:
![]() ADT Export Wizard: Installed with the ADT, it lets you export a self-signed APK file that can digitally sign the application as well as create the certificate and keystore (if needed) in a wizard-like process. You create a keystore when you create your APK file in the upcoming section.
ADT Export Wizard: Installed with the ADT, it lets you export a self-signed APK file that can digitally sign the application as well as create the certificate and keystore (if needed) in a wizard-like process. You create a keystore when you create your APK file in the upcoming section.
![]() Keytool application: It lets you create a self-signed keystore via the command line. Keytool, located in the Java bin directory, provides many options via the command line.
Keytool application: It lets you create a self-signed keystore via the command line. Keytool, located in the Java bin directory, provides many options via the command line.
Safeguarding your keystore
The keystore file contains your private certificate, which Android uses to identify your application in the Google Play Store. Back up your keystore in a safe location because if you happen to lose it, you cannot sign the application with the same private key. Neither can you upgrade your application because the Google Play Store platform recognizes that the application isn’t signed by the same key and restricts you from upgrading it — the store sees the file as a new Android application. This also happens if you change the package name of the app; Android doesn’t recognize it as a valid update because the package and/or certificate are not the same.
Creating the APK file
To create your first APK file, follow these steps:
1. Open Eclipse, if it isn’t already open.
2. Right-click the Silent Mode Toggle app, choose Android Tools, and then choose Export Signed Application Package.
The Export Android Application Wizard, shown in Figure 8-1, opens with the current project name filled in.

3. Click the Next button.
The Keystore Selection screen opens, as shown in Figure 8-2.
4. Select the Create New Keystore radio button.
If you already have a keystore, choose the Use Existing Keystore option instead.
5. Choose the location of your keystore.
In the c:android path, choose a location for the keystore, which should end with the .keystore extension. For example
c:androiddummies.keystore
Figure 8-2: The Keystore Selection screen.
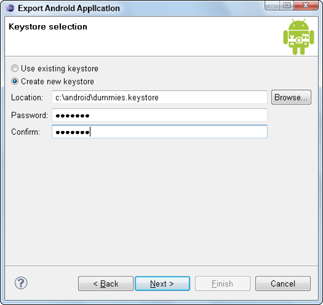
6. Enter a password that you’ll remember, and reenter it in the Confirm field.
If using an existing keystore, you won’t need to confirm your password.
Your keystore file has been created, but now you need to create a key.
7. Click the Next button.
The Key Creation screen appears, as shown in Figure 8-3.
Figure 8-3: The Key Creation screen.
8. Fill out the following fields:
• Alias: The alias that you use to identify the key.
• Password and Confirm: The password that will be used for the key.
• Validity: Indicates how long this key will be valid. Your key must expire after October 22, 2033.
9. Complete the certificate issuer section, filling out at least one of these fields:
• First and Last Name
• Organization Unit
• Organization
• City or Locality
• State or Province
• Country Code (XX)
10. Click the Next button.
The final screen is the Destination and Key/Certificate Checks screen, shown in Figure 8-4.
Figure 8-4: Choosing a name and destination for your first APK file.
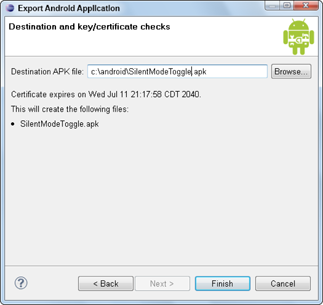
11. Enter the location for where you want to save the APK file containing your signed application.
12. Click the Finish button.
The .apk file is created in your chosen location as well as a keystore in the location you chose in Step 5. Open these locations, and you can see a .keystore file as well as an .apk file, as shown in Figure 8-5.
Figure 8-5: Providing a destination for the APK file.
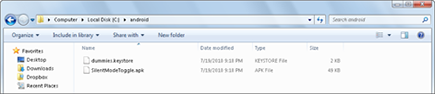
You have created a distributable APK file and a reusable keystore for future updates.
..................Content has been hidden....................
You can't read the all page of ebook, please click here login for view all page.