
8
Understanding the Scope of Access
In the previous chapter, we discussed the levels of cyber anonymity, as well as how to develop a mindset and best practices to maintain cyber anonymity. This chapter provides information on how to set up cyber anonymity and requirements to maintain cyber anonymity under the following topics:
- Understanding the scope of access
- Planning for connectivity
- Understanding the level of access
- Preparing the device
- Preparing applications for anonymity
Understanding the scope of access
In the cyber world, the most used way of providing access to services is through an identity system. We discussed different types of identity systems in previous chapters. There are centralized and decentralized identity systems. Some identity systems are application based and some identity systems are web based. However, all identity systems keep a bunch of attributes that relate to identity. There are many web-based identity providers today that support Single Sign-On (SSO) – when configured, authentication will take place on the identity provider’s identity system, which provides access to other services, such as service providers. Facebook, Google, and Microsoft are popular identity providers that can be integrated into other applications for authentication purposes.
When the authentication is completed, the next step is authorization. Authorization is maintaining a level of access. For example, if you take a company with a large number of employees, all the employees may have a username and password. That doesn’t mean that everyone can access everything once they have access to the company systems. The level of access is defined by authorization, meaning different users will have different levels of access based on their job roles. Some users will be given more access and some users will be given less access to the system. For example, senior managers will be given more access and junior executives will be given less access to resources. This mechanism is often known as a Least-Permission Policy (LPP). According to LPP, a user or the subject must be given the lowest possible permission to perform their job – no more than that. To provide LPP-based access, first systems administrators need to analyze the requirements.
Providing the required level of access is often complex. Most companies practice a principle known as Separation of Duties (SoD) to achieve this goal. The meaning of SoD is: no user should be given enough privileges to misuse the system on their own. LPP and SoD sound the same but their objectives are different. The objective of SoD is to distribute and divide important duties among different members of the team, so one person will not be able to commit any fraudulent activities that can cause damage to the system on their own. The objective of LLP is, even if duties and tasks were assigned, permissions are only given to perform the duty, no more than that. This prevents misusing permissions given to users.
When accessing any application as a user, the two concepts that are important to understand are how the application maintains LPP and SoD. Basically, these concepts are used by administrators to provide access and effectively maintain access. Sometimes we use built-in identity systems to authenticate, meaning the system will be creating login credentials for us. This typically goes through a registration process. Once registered, we receive an activation link to the registered email address. Once we click on the activation link, we will be given access to the system. Typically, this will be user-level access to the application. In order to get user-level access, we have to go through a lengthy registration process.
But we can use another option that most applications today provide, of using a readily available identity from another popular identity provider, such as one of the ones we discussed before. This option will redirect us to authenticate on their web application; then, once authenticated by their web application, we will be redirected to the service provider’s application. Both mechanisms used identity to authenticate users to services. As we discussed before, access control is not a simple thing. It’s very complex based on the requirements. Whenever we access any type of application, remember the way it provides access is based on identity. To create or use an identity, applications collect information from the user.
From a cyber anonymity perspective, we need to concentrate on the level of access that we need to maintain. If we need more access to the application or system, the authentication provider would be collecting more information from us. Authentication and authorization are based on the identity that we need to create in order to access the resources. In other words, when we must authenticate, we need to create an identity by providing our information. Then, the system will keep our information, which we do not need in this case. Systems that do not need to authenticate will not collect information directly. These systems will collect information using indirect methods, such as third-party cookies, which we discussed in the previous chapter.
The next question would be that even if the systems or resources we access need an identity for authentication purposes, do we need to use authentic or original information to create an account? For example, can we use a disposable email address with a pseudonym to create identities to access resources? That depends on the requirements. For example, a banking app, or any other app that requires authenticating real users, requires you to provide authentic information; otherwise, it will not serve its purpose. But if you need to access certain services, let’s say a resource that provides e-books or a news feed, you can use a pseudonym or temporary email address to create an account to gain access and access the resource without sharing your personal and sensitive information.
Planning for connectivity
When you are surfing the internet or accessing any service over the internet, connectivity plays a major role. First, your device should be connected to the internet in order to access any service. When the device is connected, you will get access to the desired service. But the real concern is, your internet provider collects and shares your information with different service providers. Previously, we discussed the importance of not connecting a device to open and public networks. When you connect a device to an untrusted network, you have no idea who has access to the network and how much data they have access to. Unencrypted network protocols are especially prone to this kind of attack and information disclosure. If you need to maintain cyber anonymity, it is better to use a trustworthy internet connection. There are different types of internet connections available today.
Types of connections
Even though there are a lot of connections that provide internet access, there are differences and some concerns. Not only individuals but also many businesses and companies use different types of connections.
Dial-up connections
This was the only option before introducing broadband connections, but now this type of connectivity is very rare. But still, some service providers offer this connection type in rural areas where other connections are not available. This is the slowest connection type; technically, the connection is established by the modem connected or built into a user’s computer dialing the service provider’s network and establishing the connection. When the connection is established, users can surf the internet very slowly, provided through Public Switching Telephone Network (PSTN) – the network used for regular telephone lines. Most Internet Service Providers (ISPs) have stopped providing this connectivity.
When it comes to security, it’s hard for someone to intercept traffic generated from your system to the ISP. Mostly, a dial-up connection establishes the connection from an individual device to the ISP network. Typically, your device is not connecting to a local network, but you will get assigned a dynamic IP once the connection is established. Once you have disconnected from the ISP and established the connection again, you will be assigned a different IP address. Typically, a dial-up connection is safer as interceptors have comparatively lower opportunities when using dial-up connections.
Broadband connections
This term refers to any internet connection that provides a wide-bandwidth data transmission and supports multiple signals and ranges of frequencies. Typically, broadband connections don’t charge customers for the connection time. There is a range of broadband connection types available today in many countries and service providers.
Cable connections
Mainly, cable connections are used by companies and apartments using television cables, also known as coaxial cables. Through cable connections, users are connected to the internet with higher speeds with stable connectivity. Cable connections have low physical security and can be easily intercepted without interrupting the transmission and without being detected.
Leased lines
Typically, companies use leased lines with faster and more reliable connections over dedicated links. Generally, this provides a connection between the ISP and the company. The main advantage of a leased line is the speed is not shared with anyone. The total bandwidth for the company is determined by the ISP. This provides very fast and reliable links for the company’s operations. When it comes to security, a leased line provides a high level of security as the connection is dedicated and no one else is using the same link.
DSL connections
Digital Subscriber Line (DSL) connections are used by small and medium organizations and provide high-speed internet over telephone networks. Depending on the area and the service provider, the connectivity speed can differ. Providing a DSL connection is easy as it uses typical telephone networks and usually most small and medium organizations already have a telephony connection. DSL uses shared bandwidth; hence, the speed can be different depending on the service provider or the time of the day. When more users are connected to the DSL service provider, the speed can go down. DSL connectivity provides different levels of security risks as computers and devices are connected all the time, so bad guys can try to compromise systems whenever they want.
Fiber connections
Fiber connections are very popular among domestic users as well as businesses due to their speed and reliability. Fiber connections use light as the medium of data transfer. Even if the ISPs use fiber to provide a reliable connection, they still use DSL or cable to deliver the connection to customers. Even for domestic use, fiber provides very fast connectivity and the connection can easily be intercepted as it uses light as the transmission medium.
Ethernet
Once the internet connection is provided, if you have multiple devices to be connected to the network, this is the preferred method in many companies. Typically, a Local Area Network (LAN) is built using Ethernet. Ethernet cables are used to connect devices. When it comes to security, an Ethernet network provides a higher level of security when compared to Wi-Fi. To access an Ethernet network, your device must have physical access to the Ethernet network, whereas a Wi-Fi network can be connected to without physical access to the network.
Wi-Fi connection
Wireless fidelity, commonly known as wireless networks, is commonly used in houses, restaurants, hotels, and even companies as Wi-Fi connectivity provides mobility and flexibility. Users are given the flexibility to connect from anywhere within the signal range. The medium of connectivity is air – radio frequency to be specific. Mostly, Wi-Fi is the preferred method of connectivity for faster and more reliable connections, such as cable, DSL, leased lines, and fiber links, to the endpoints. Even though Wi-Fi provides flexibility and mobility, it introduces a range of newer security risks. Since Wi-Fi networks provide connectivity through the air, the possibility of interception is high. Unlike Ethernet networks, physical connectivity is not required for attackers to launch attacks on Wi-Fi networks.
Mobile broadband
Many mobile ISPs offer high-speed broadband internet over Third-Generation (3G) wireless and Fourth-Generation (4G) wireless networks. Using mobile networks, ISPs provide internet using 3G and 4G technology. 4G technology provides faster internet connectivity than 3G networks. Recently, some service providers have started offering Fifth-Generation (5G) wireless. Mobile broadband is typically more secure than other network types we discussed before as when you use 4G or 5G networks, the data being shared is encrypted. When you use a Wi-Fi network, the connection is typically encrypted using symmetric encryption. But users who are connected to the same network can still see others’ communication. When you use 4G connectivity, you are using a secure connection and the communication is encrypted. In other words, a 4G connection is much safer than a public Wi-Fi network. On the other hand, 4G networks are much harder to crack than Wi-Fi networks. If you want to ensure secure communication, it is better to use 4G mobile data than an untrusted Wi-Fi network as 4G communication is encrypted by a cellular network using a 128-bit key.
Considering the different connectivity types we discussed, some connectivity types provide more security than others, such as 4G mobile broadband connections. Some connectivity types offer faster access to the networks, such as fiber and leased lines. The newly introduced 5G is more secure than 4G.
Also, we discussed security considerations in different types of connections. As we discussed before, connectivity should be trustworthy if we need to maintain ethical cyber anonymity as attackers can sniff the network and compromise confidentiality otherwise. When the appropriate connection is selected, we need to ensure the connection is secure. We can’t implement any security for some connections as the security is entirely controlled by the service provider. However, when the connectivity is decided and connected to the local network, we need to ensure the local connectivity is secure and safe. Let’s see how we can make the network safe and secure to ensure confidentiality.
How to secure a home network
Most of our home networks today are powered by Wi-Fi routers. The router is connected to the internet using different kinds of connections, as we discussed previously, including fiber, cable, 4G, or DSL. Mostly, the whole household uses the same Wi-Fi to connect different types of devices to the internet. Sometimes, visitors or guests can even ask for the Wi-Fi password to connect to the internet. This means many people have your Wi-Fi password saved in their devices, maybe when they passed by, so they can connect to your Wi-Fi router without even your knowledge. As we discussed before, unlike Ethernet connections, Wi-Fi does not need physical connectivity or cable. If they are in the signal proximity, they can connect to it. There will probably be buildings, such as apartments or restaurants, around your house that receive the signals from your Wi-Fi router.
Sometimes, I’ve seen people going around with mobile devices to check what the maximum distance to receive signals from their Wi-Fi network is. But this is not a very accurate method as attackers can receive Wi-Fi signals from a longer distance than you think using high-gain antennas.
In 2015, at the DEFCON security conference, security researchers planned to introduce a hardware device known as ProxyHam, which could connect to public Wi-Fi networks from 2.5 miles away. While it was not introduced as anticipated at the 2015 conference, the idea and technology was made available to the public. ProxyHam is a dictionary-sized device that uses 900-megahertz radio signals to connect to a device with a Wi-Fi antenna or a public Wi-Fi network from 2.5 miles away. In other words, if someone plants a Wi-Fi dongle on a public device, it can be used as an entry point to connect to the network from 2.5 miles away to maintain anonymity. This proves that attackers can receive signals from much longer distances than we think as usually, we think Wi-Fi signals are only accessible within around a 100-foot diameter.
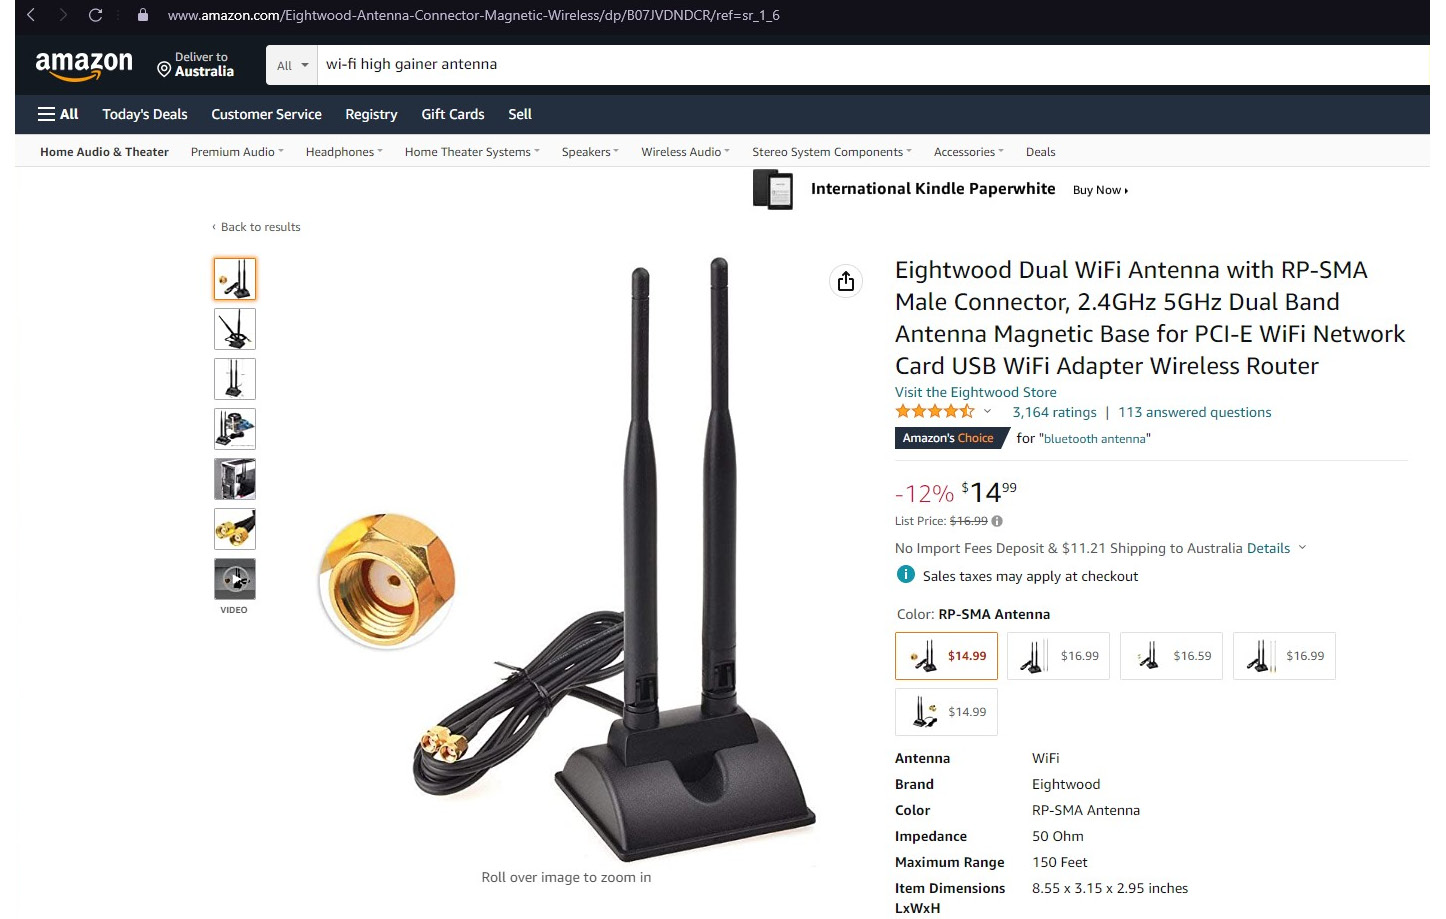
Figure 8.1: High-gain antennas to receive signals from longer distances
This Wi-Fi high-gain antenna can be used to boost signals or receive signals for long distances. Attackers can employ these types of high-gain antennas to compromise your networks. Since Wi-Fi communication is based on transmitter and receiver communication via radio frequency, we cannot be certain that only the people close to the network will be receiving signals.
As we discussed, unlike Ethernet networks, your Wi-Fi signal goes beyond your premises and your walls. Sometimes, some areas in your house might not receive signals but attackers can still connect to your Wi-Fi from a greater distance if they use high-gain antennas. When we share our Wi-Fi passwords with many visitors and guests, we will never know how many people or devices are connecting to our Wi-Fi network. Considering these facts, one of the main things to do is restrict access to your Wi-Fi network and control who can access and use your Wi-Fi signals. The next issue is that of the signal footprint; as we discussed in Chapter 6, Artifacts that Attackers Can Collect from You, anyone who receives the signals can capture data on your network. They will not be able to access data as the communication is encrypted, but if the Wi-Fi password is not complex, they can even crack the key and access the content of communications, including your personal and sensitive information. Let’s see how we can secure a Wi-Fi network.
Configuring a strong Wi-Fi password
Configuring a strong password is a must. Typically, this must be over 12 characters as attackers can try to crack the password using readily available word lists. We can also use passphrase generators, as we discussed in the previous chapter, to generate a passphrase for the Wi-Fi router. This can be done by accessing your Wi-Fi router control panel. Typically, when you connect the router for the first time, you can use the router’s default password printed on the router to connect to the router. Once connected, the router will assign IP addresses to your device. Modern routers are plug-and-play devices; users can just plug in the router and it starts working without additional configuration. But typically, routers use very basic Wi-Fi passwords that can be cracked by attackers even before you connect.
Once the device is connected to the Wi-Fi network using the default password, you can access the device’s IP configuration. You can open the terminal and enter ipconfig, if the device is Windows, or enter ifconfig if the device is Linux. This will display the IP configuration for the device, obtained from the Wi-Fi router.

Figure 8.2: ipconfig /all command shows the IP configuration of the device
Once you retrieve the IP configuration, typically, the default gateway shows the IP address of the Wi-Fi router. Generally, all Wi-Fi routers today have a built-in web server that hosts a web application that can be used to configure the device. The best way to access it is to enter this IP in the browser. For this example, we need to enter http://192.168.0.1. When you enter this in the browser, it will take you to the authentication window. Typically, the credentials are printed on the Wi-Fi device or user manuals. Alternatively, you can Google default passwords to access the device.
Then, you need to navigate to the Wi-Fi security options and change the Wi-Fi password on the devices. We need to configure WPA2 as the security mode. If your device supports WPA3, that’s the best mode now, but it may not be available on your device as WPA3 was introduced recently.
Then, you can change the password to a stronger passphrase to protect it from password-based attacks. This includes changing both the security mode and the password. Previous WEP encryption is easy to break.
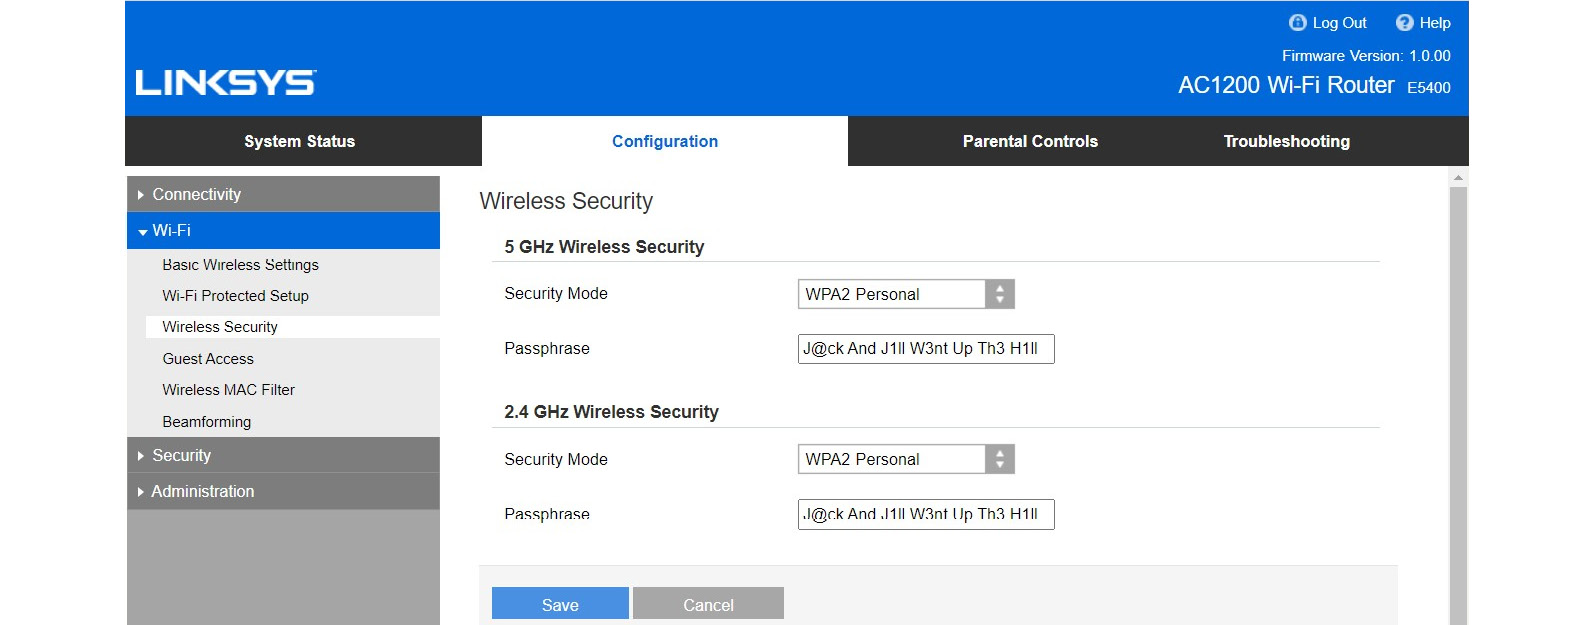
Figure 8.3: Configuring a complex passphrase to a Wi-Fi password
Once the proper passphrase and security mode are configured, we must change the device password. This is essential as any person who has access to the network can easily access this and even view the Wi-Fi password in plain text, as you can see in the preceding screenshot. Protecting the router password is equally important.
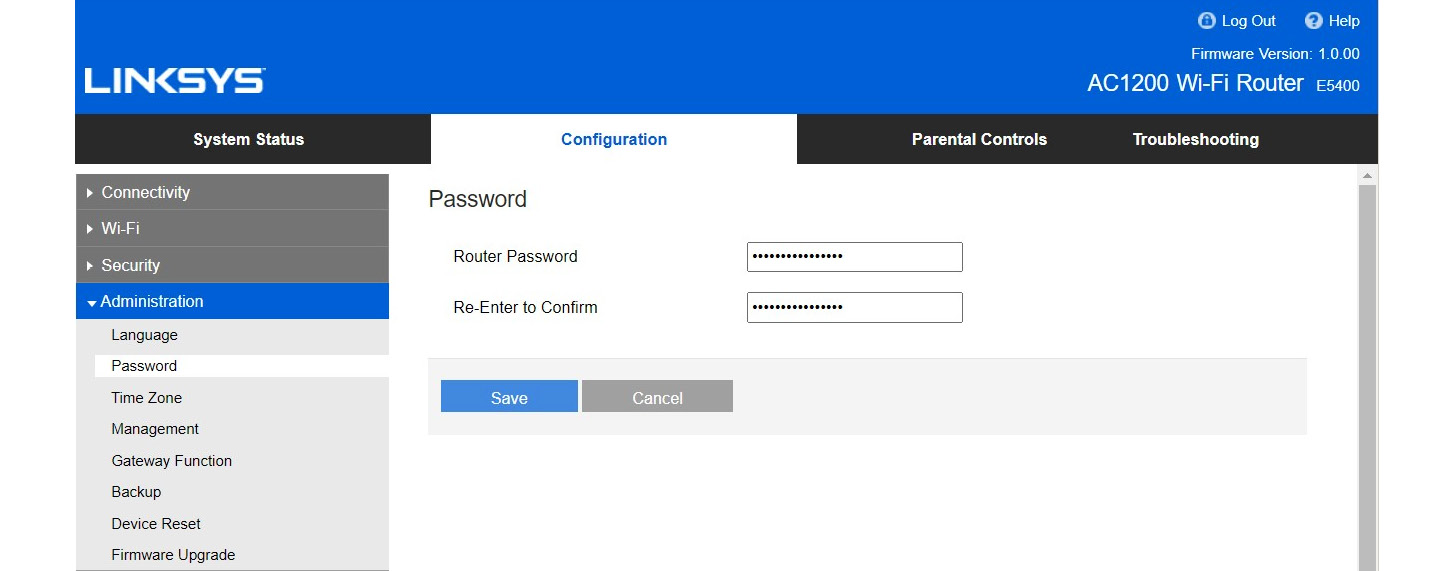
Figure 8.4: Changing the device password
You can configure the device password to protect the device. Also, upgrading the device’s firmware is important as older firmware might have vulnerabilities that could lead attackers to compromise the Wi-Fi device. Some devices may even lead to downloading Read-Only Memory (ROM) and accessing all configuration settings on the device, including configuration data and credentials to the device. When upgrading the firmware, make sure to download new firmware from the original website of the vendor as attackers can distribute malicious firmware, which can lead to attackers planting a backdoor to the device or bricking the device. (Bricking refers to making a device permanently unusable.)
Some Wi-Fi routers provide a feature known as guest access, which provides access to the network temporarily without using the Wi-Fi password. If a device supports this function, you can create the guest network on the same device, and it will allow guests to access the internet but with limited accessibility to the network. You can later change the guest password.

Figure 8.5: Enabling guest access to provide temporary access to the Wi-Fi network
Guest access allows you to provide access to the internet for temporary users or visitors without exposing your real network credentials.
We also need to make sure we limit access to who we share the password to our private Wi-Fi network with; if we share it with everyone, it may as well be public. Sometimes, friends or guests visiting your house might also request the Wi-Fi password; unless it is extremely urgent, we shouldn’t share our Wi-Fi password with anyone. If the password is shared, we need to make sure it is changed later. Passwords must be changed frequently to prevent different types of attacks. Some attackers will collect data packets to break the password later. Depending on the complexity of the password, it can take some time to break the password. If you have a practice of frequently changing the password, even when attackers have compromised the password, they will not be able to access the resources as the password is changed when they break the old password.
Another approach to improving the security of a Wi-Fi network is disabling the SSID broadcast. SSID stands for service set identifier, which is commonly known as the network name. As you can see in Figure 8.5, there is an option to enable or disable the SSID broadcast. When you enable the SSID broadcast, devices will be able to see that there is a Wi-Fi network. When you disable the SSID broadcast, strangers will not be able to see that there is a Wi-Fi network. This can increase security by not showing the Wi-Fi network when attackers try to scan the network. Even if you disable SSID broadcasting, there are tools that attackers can use to view these networks, but still, you can be protected against general scanning.
Device configurations to make it secure
There are various other settings that can make your device secure. These settings are entirely device specific; some devices have these settings and some may not offer them:
- Wi-Fi Protected Setup (WPS) configuration: WPS is a feature available in many Wi-Fi routers that allows users to easily connect the device to the network. Typically, WPS offers two methods of connectivity. The first method is using the WPS button on the Wi-Fi device. Users can press the button while selecting the SSID on their device, which will connect the device to the Wi-Fi network without having to provide a password. If you configure this method, the router must be physically secured as anyone who can access the Wi-Fi device physically can connect to the network.
The second method is using an eight-digit numeric code generated by the device or configured by the user. With today’s computation power, the eight-digit numeric code can be cracked very easily. If the device has a WPS feature, turning off this feature can increase security.
If the device supports MAC filtering, it’s a great idea to configure this. This will restrict only devices with permitted MAC addresses to access the internet. When it comes to user-friendliness, MAC filtering is not preferred, but if the consideration is security, enable MAC filtering to provide safer access to the internet as only devices with permitted MAC addresses will be allowed.
- Enabling firewalls: If the device has built-in firewalls, you can enable them. This will prevent unwanted traffic from coming in, including anonymous internet requests. A built-in web filter can help us to prevent information collection using Java, ActiveX, and cookies.
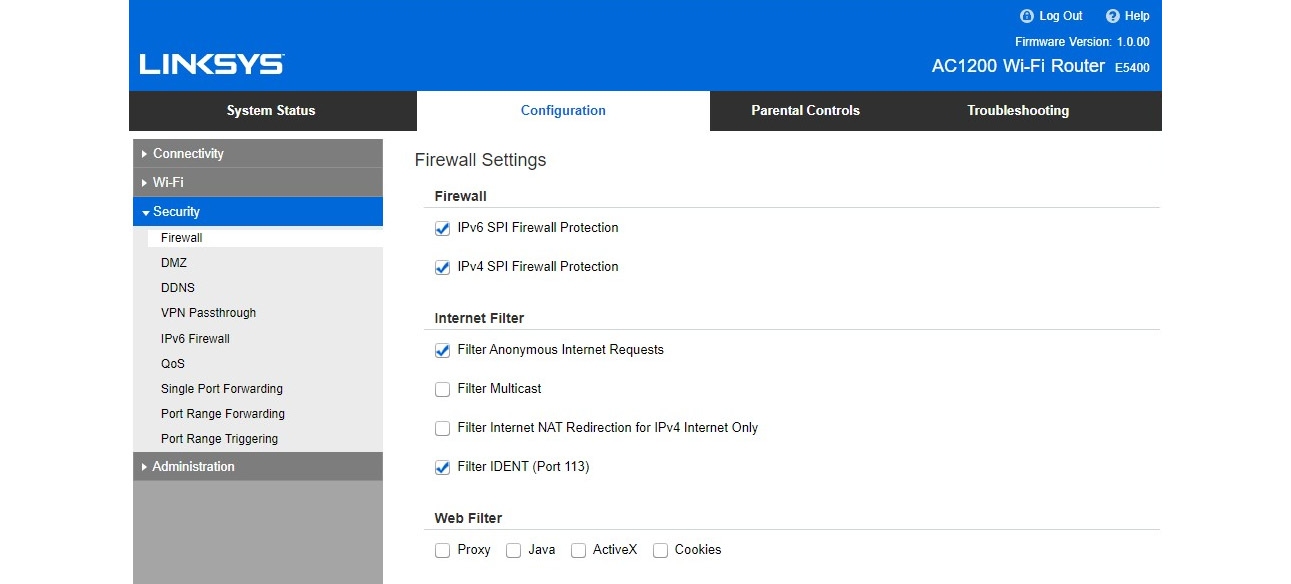
Figure 8.6: Enabling a firewall on a Wi-Fi device
Understanding the level of access
Level of access is typically defined as authorization, which we discussed in the first section of this chapter. When it comes to cyber anonymity, we need to understand the level of access required based on our requirements. If you need a higher level of access, typically, you need to go through an authentication process. If you need a lower level of access to the resources, you might not need any type of authentication. In the first section of this chapter, we discussed what authentication and authorization are. Also, we discussed applications such as banking applications, which need to verify the user’s authenticity before providing access. Some services, such as news websites, wouldn’t require any authentication. Some applications require authenticating but not all applications would not need to authenticate you.
It’s important to understand what level of access we need from the application or the services. Then, we can decide whether we need to create an identity. Some applications and resources might collect information from you even if it is not required. In these scenarios, we can refrain from sharing our sensitive information or personal information. Let’s try to understand the different levels of access defined in various scenarios:
- Administrators of superuser access level: This is the highest level of access given to any device, application, or resource. Anyone who has this level of access can do pretty much anything they want, including making modifications and reconfigurations. Every permission, including read permission, is applied to these users. Typically, users are not given this level of permission. You will be given this permission if you are the owner or administrator of the resource. Hackers and attackers are dying to get this level of access to any resource.
- Protected items access level: This level of access is given for items or specific resources. Previously, we discussed SoD. In this case, separate permission will be given to different subjects. In this case, specific permission will be given to specific items or resources. Users with this permission will not have modify permissions but they can perform every other operation. For example, a user with this permission will be able to perform anything within the scope specified, but they will not be able to assign another user to have this level of permission. This means Permission for modification is not allowed.
- Registered users: Any user who has credentials or a valid username and password combination is categorized into this category. They can just access the resource, modify only specific settings, and mostly make changes within their own account. Some resources allow registered users to maintain their profile within the resource, so they can update their user information, including name, address, contact information, and even credit or debit card information within the profile.
- Unregistered or anonymous users: This type of user will always have limited access. Usually, only low-sensitivity information will be available to these users. Organizations use other techniques to collect information from these users, including cookies.
Once we understand the level of access, we know what we can do within the resource. Mostly, we will be given access as registered users or unregistered users. Depending on the requirements, we can decide whether we want to register with the resource. If registration is not required for our requirements, maintaining an unregistered status is best as it does not need our information. If registration is required, we need to maintain a minimum set of information as in today’s world, even web applications can do a lot. If you access https://whatwebcando.today, you will be amazed by the features of web applications.

Figure 8.7: Some of the capabilities of a web application
Even when you access as an unregistered user, a web application can collect information about you. We discussed how a browser can collect information using cookies. Similarly, web applications accessed over the browser can collect information about your geolocation, operating system, input touch gestures, device battery status, device memory, recording media, advanced camera control, audio and video capturing, Bluetooth support, USB support, and Near-Field Communication (NFC) support.
With all these capabilities today, it’s not easy to stay anonymous while surfing or interacting with the internet. As we discussed before, when you access the internet using browsers or applications, you will be tracked. All the layers that we discussed are watching and collecting information about you. Even operating systems collect information about you. Especially, if you are using the Windows operating system, you will be traced using telemetry data. Venders specify that they use telemetry data to improve the software and improve the user experience. However, if your motive is to stay anonymous, this is something you don’t want to happen and there are better options for this. The Linux operating system, in particular, offers a range of distributions that support being anonymous online.
It’s common for attackers, hackers, and cyber terrorists to maintain anonymity as they don’t want to be traced and prosecuted. They use multiple technologies to prevent being traced. To achieve this, they maintain anonymity in various layers. But hackers are not the only people who wanted to become anonymous. There are many ethical reasons to be anonymous in today’s world. As an example, some people want to share their thoughts without being victimized on various forums. They want to maintain anonymity so no one will identify and discriminate against them due to their ideas and thoughts.
In some countries, people may want to voice their opposition to the government but are scared of the government’s retaliation; thus, if they express their thoughts, they would want to be anonymous.
Also, for privacy and security concerns, users might want to maintain anonymity as they don’t want to be exposed to hackers or to the public.
Whatever the objective for being anonymous, you need to know who you should be anonymous in front of, or should you retain anonymity in front of everyone? As we discussed previously, anonymity protects your identity, not your actions. There are many advantages to being anonymous as your actions are visible but others won’t know your identity. Let’s see what other main advantages of being anonymous are:
- Ensuring freedom of speech: Once anonymity is guaranteed, you can share your real thoughts without being judged or discriminated against.
- Minimizing tracking: Trackers will have limited chances to trace and monitor your behavior patterns on the internet.
- Information security: Once you maintain anonymity on the internet, it will make attackers harder to identify and launch attacks on you as your identity is not visible. This will make it much harder for attackers to compromise your systems and steal your information.
- Personal security: Since your identity isn’t visible, no one knows who you are. This will increase your security.
Preparing the device
Sometimes, people think the internet was built on anonymity as no one is regulating the internet or no one can regulate the internet due to its architecture. But when you analyze the components that are part of communication, you will realize that the privacy of the internet is hardly assured. While it might not be governments or employers that are spying, larger players on the internet, such as Google, Facebook, Amazon, and Microsoft, collect heaps of information for different purposes. Even though we use our own devices, private internet connections, and selected web browsers, these companies collect information and use it for product improvements, introducing new products, understanding new trends, and studying your behavioral patterns on the internet.
Some time ago, almost all the devices on the market had proprietary operating systems, such as Windows, iOS (the proprietary operating system used on Apple mobile devices), Symbian (the operating system used on personal digital assistance devices), Research in Motion (RIM, the proprietary operating system on BlackBerry devices), and Danger OS (also known as Hiptop or Sidekick, a Java-based proprietary operating system used by T-Mobile). At this time, there were many hardware vendors worldwide that didn’t have a proper operating system to run on their devices, especially for touchscreen devices. The Android operating system became a solution for this.
The Android operating system was developed for mobile devices by a consortium of developers, commonly known as Open Handset Alliance, which was commercially sponsored by Google. Android was developed based on a modified version of the Linux kernel and open source software. Even though most versions of Android are proprietary, Android has kept the source model open source. That has given the option to develop variants of the Android operating system on different types of electronic devices, including TVs, game consoles, audio systems, digital cameras, and wearables. This has made Android one of the most popular operating systems among many vendors and achieve higher market share. This means for many users, the first devices they used ran on the Android operating system. Most Android devices come with a bunch of additional proprietary software pre-installed. This proprietary software includes Google mobile services, Google Play, and core Google services.
This has given Google the opportunity to collect information about users on a range of electronic devices. Not only Android but other mobile operating systems and desktop operating systems also collect information from users. What these vendors say is, they want to provide you with a better experience while using the device. They also say that they collect information to improve the software, fix bugs, and introduce newer and better features. This is true; they use the collected information to provide a better user experience. However, they cannot deny the fact that they also use this information for their product improvement, to provide custom features and functions to end users. Some information they collect can be sensitive.
Other large companies aside from Google, such as Microsoft, Apple, and Amazon, do the same; they also collect user information for various requirements, as we discuss in this book. How to prepare a device to be anonymous is another useful area to look at. Under this topic, we will look at how we can prepare various devices to maintain anonymity by doing the following:
- Reducing the footprint on the operating system
- Reducing the temporary and permanent files created on the operating system
- Removing temporary and permanently created files after interacting with the internet
- Minimizing the device footprint on various resources we interact with on the web
Various operating systems act in different ways in the context of anonymity. Depending on the device you use, preparation can be varied. We will be discussing some of the secure operating systems that can be used to interact with the internet without creating a considerable footprint. Also, we will see how to configure commonly used operating systems for the previously mentioned requirements. If you are using an operating system such as Windows, it collects information via telemetry. Because of this, it is better to use the Linux operating system as there are plenty of Linux distros that offer features that enhance cyber anonymity. But in today’s world, most apps and services we use for personal and professional requirements may run on the Windows operating system, so we cannot just stop using Windows due to privacy concerns. Virtual machines and live boot systems can be a lifesaver in this regard. Let’s look at the benefits of using virtual machines and live booting systems.
Virtual machines
Virtual machines are the machines that run on top of your physical machines, typically on a virtualization layer. These machines can work like normal physical machines. A virtual machine utilizes the hardware resources of the physical machine. Ideally, you can run multiple virtual machines on a single physical machine if the physical machine has sufficient hardware. Typically, the physical machine is referred to as the host machine and the operating system of the physical machine is known as the host operating system. The operating system on the virtual machine is known as the “guest operating system.” Depending on the host operating system, there is a range of options available for virtualization.
If you are using Windows as the host operating system, it has built-in virtualization technology for Windows known as Hyper-V. Hyper-V is available in client operating systems such as Windows 10 and server operating systems such as Windows Server 2012, Windows Server 2012 R2, Windows Server 2016, Windows Server 2019, and Windows Server 2022. You can build guest machines on Hyper-V. This gives us the option to install Linux distributions on the Windows 10 operating system. Once you use a virtual operating system, typically, it reduces the footprint, and if you want to you can even revert it to a previous snapshot, which removes every activity you performed on the virtual machine. Including Windows Hyper-V, there are many virtualization options available, as follows:
- Hyper-V: Hyper-V is a feature that comes with Windows operating systems without additional payment that supports a range of guest operating systems, including many versions of the Windows client and server operating systems (Windows XP, Vista, Windows 7, Windows 8, Windows 8.1, Windows 10, Windows Server 2003, and all other Windows server versions), Linux, and FreeBSD.
- VirtualBox: VirtualBox is an open source virtualization technology that can be used to build enterprise virtualization, which supports the creation and management of virtual machines. VirtualBox runs on various host operating systems, including Windows, Linux, and FreeBSD. VirtualBox supports transferring guest machines from one host to another. The best thing about VirtualBox is it’s free!
- VMware Workstation and VMware Workstation Player: VMware Workstation is a reliable virtualization technology for professionals. VMware Workstation Player is a basic version and is free to use, whereas VMware Workstation Pro is a commercial and feature-rich version. Both the VMware Player and VMware Pro versions support similar host operating systems and hardware. VMware is an enterprise-level virtualization technology that is compatible with most 64-bit Windows and Linux host operating systems, including Windows 8, Windows 10, Windows Server 2012, and later server operating systems, Ubuntu, Red Hat Enterprise Linux, Oracle Linux, and CentOS.
- VMware Fusion: VMware Fusion is an offering from VMware that supports Mac operating systems that is ideal for application development and testing. VMware Fusion allows developers to run multiple applications on multiple operating systems simultaneously and integrate with many development tools. It is mostly used by cloud application developers.
- QEMU: QEMU, also known as B, is an open source tool written in the C language that supports a range of host operating systems, including Windows, Linux, and FreeBSD. This is a lightweight virtualization and emulation platform that supports full system emulation.
- Citrix Hypervisor: Citrix Hypervisor offers desktop virtualization that supports a range of host operating systems, including Windows 10. It provides simple management for testing intensive workloads, which allow users to enjoy enhanced graphic workloads. Citrix supports centralized virtualization management.
- Red Hat Virtualization: Red Hat Virtualization is an open source platform that offers virtualization for Linux and Windows operating systems. Red Hat Virtualization offers a range of features, including a single management and provisioning feature for new virtual machines, the ability to clone existing machines easily, and easy setup and management.
- Kernel Virtual Machine (KVM): KVM is virtualization software for Linux that offers a virtualization infrastructure module. This is free software that supports Windows, Solaris, and Linux.
- Mobile emulators: If you would like to run the Android operating system virtually on your Windows 10 machine, you can consider a range of Android emulators, including BlueStacks, MEmu, Nox, GameLoop, Bliss OS, Xamarin, Phoenix OS, and Android Studio.
Depending on your expectations of being anonymous, you can use virtual machines as an option when interacting with the internet as it provides a secure and hassle-free method to maintain a very low footprint and anonymity. All the virtualization techniques that we discussed previously provide similar functionality for our requirements. I will explain how we can use VMware Workstation to create virtual machines to maintain anonymity. First, you can download and install VMware Workstation. Once you have installed it, it’s important to configure the virtual network in a different network range and enable Dynamic Host Control Protocol (DHCP), which can assign IP addresses automatically for our virtual guest operating systems. Then, you need to access Virtual Network Editor to configure the required configurations.
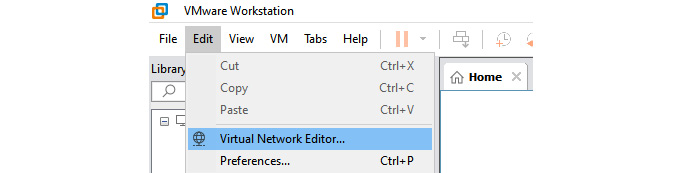
Figure 8.8: Select Virtual Network Editor… in VMware Workstation
When the Virtual Network Editor option appears, you need to select the Change Settings option to configure the required settings. Then, it will open the Virtual Network Editor configuration window.

Figure 8.9: Selecting the NAT interface on the network
You need to configure the subnet IP and the subnet mask. As shown in the preceding figure, I used the 10.10.10.0 subnet IP and the 255.255.255.0 subnet mask for this demonstration. The meaning of this is, all the virtual guest operating systems will have IPs from this IP range. Once you have configured the subnet IP and the subnet mask, you need to configure DHCP. Click on DHCP Settings… to do that.

Figure 8.10: DHCP configuration for virtual machines
In the DHCP settings, you can configure the range of IPs that you want to assign to virtual machines. I configured 10.10.10.5 to 10.10.10.25 as I can assign 21 IPs to my virtual machines. You can configure any range you want, and then virtual machines will obtain IPs from this range. When you save the settings, it will be ready to assign IP addresses. Then, you need to configure the gateway address. You can do that by configuring the NAT settings.

Figure 8.11: Configuring the default gateway in the NAT settings for virtual machines
Now, your virtual network is ready to host virtual machines. Let’s see how to create a virtual machine and configure it to access the internet. You can create a virtual machine by clicking on the New Virtual Machine option under the File menu on VMware Workstation. You can select the Typical installation when building a virtual machine. On the guest operating system installation window, select the I will install operating system later option and continue. Then, you will need to select the guest operating system that you are going to install.

Figure 8.12: Selecting the operating system you need to install
Select Linux as the operating system and Ubuntu as the version. When you click Next, it will ask for a name for the virtual machine and the location to store data. Then, it will prompt you for the virtual hard disk size that you need to configure. Depending on the operating system, the disk size required can be different. Configure 40 GB for this example and select store virtual disk as a single file as it’s easy to manage. When you click Next, it will give you a summary of the configuration and you can customize the hardware if needed. This configuration can vary depending on the hardware resources of the host machine as the host machine also requires hardware resources. Then, you can click on Finish to complete the creation of the virtual machine.
This method can be used to install any supported operating system on the virtual machine. We will discuss a few Linux operating systems that support anonymity. Once you have decided on the operating system to install on the virtual machine, you can simply download the ISO file of the operating system and install it on the virtual machine that you created.
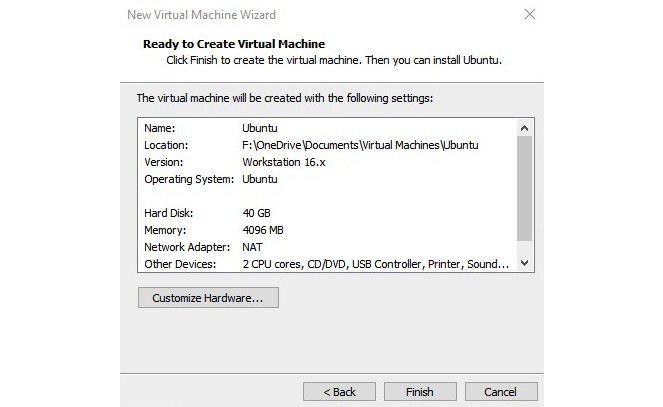
Figure 8.13: Customizing the hardware if you require
Now you are ready to install the operating system on the virtual machine created. Since we have configured the virtual network, whatever operating system we installed will obtain the IP address automatically.
Using live boot versions
Using live boot versions is another way to keep our footprint to a minimum. In the past many operating systems supported live boot CDs and DVDs. Today, the usage of CDs and DVDs has become very limited. The idea of live boot versions is to run the operating system without installing it onto the device. You can run the operating system from the storage media and start using it without installing it. Since CDs and DVDs are read-only storage media, once the operating system is shut down, all temporary files and traces created will be removed from the system automatically. Nowadays, we can use USB live boot systems. Many Linux-based operating systems support USB live boot. The main advantage of USB live boot is it does not install anything on the system. You can plug the USB drive into the computer and start using it straight away. Kali Linux and Parrot Security are examples of live boot versions. These operating systems support live boot on virtual machines. For example, you can download a Kali Linux ISO file and run a live system on the virtual machine we created. The only configuration you need to do is download the ISO file and configure it on the installation media on the virtual machine settings.
Another option is to convert ISO to a USB bootable disk and use the USB bootable disk to boot the system. Not all operating systems support live boot. But you can convert ISO to a USB bootable disk by using isotousb.exe, which can be downloaded from http://www.isotousb.com/.

Figure 8.14: Booting a virtual machine using ISO
As the preceding figure shows, you need to go to the virtual machine settings, configure a connection to the ISO image file, and select the downloaded ISO file. Then, you need to save the settings and power on the virtual machine. The virtual machine will then start up with the operating system on the ISO file. If the operating system supports live boot, you can select live boot to boot the operating system. There is a range of Linux operating systems that support live USB boot:
- Linux Lite: This is a Ubuntu-based operating system that supports live boot with a range of pre-installed applications.
- Peppermint OS: Peppermint OS is a lightweight Linux distribution that supports live boot functionality with pre-installed applications.
- Puppy Linux: This is an all-time favorite of the community. Puppy Linux comes with some programs that are not even included in full distributions.
- Kali Linux: Penetration testers and security professionals use Kali Linux for various security testing activities, as it comes with a range of security tools, including supporting live boot.
- Parrot Security: This is another operating system, like Kali, that comes with a range of security tools and supports live boot.
Other than live boot-supported distros, there are operating systems that enhance anonymity and are considered secure. As we already discussed virtual machines, you can consider building a virtual machine with a secure operating system:
- Tails: Tails is a Debian-based Linux distribution that is designed to provide privacy and anonymity. Connections made outside of it will go through the Tor proxy chain. The Tor Project sponsored Tails. We will discuss the Tor Project and the Tails operating system in Chapter 10, Proxy Chains and Anonymizers.
- Kodachi: This is another Debian-based distribution designed to provide anonymity and security. Kodachi connects to the outside over secure VPN connections. All network traffic is encrypted, and a free VPN is preconfigured in Kodachi. Also, Kodachi is famous for its anti-forensic operating system, which makes it very hard for memory-related forensic investigations to be carried out. Kodachi supports the DNSCrypt protocol, which encrypts requests sent to OpenDNS to eliminate DNS-level information leakage.
- Whonix: Whonix, commonly known as TorBox in the security community, is another Debian-based Linux distribution, designed to ensure privacy and anonymity. Whonix is designed to provide the security of both virtual technology and the Tor chain proxy. Whonix is preconfigured with maximum security settings to be anonymous, and all traffic is redirected through Tor.
- Subgraph OS: Subgraph OS is another privacy- and anonymity-oriented operating system that uses the concept of sandboxing. Sandboxing is a technology that uses virtualized or isolated space to execute programs. Custom applications running on Subgraph will be executed in isolated sandboxes to provide security.
- Qubes OS: Qubes OS uses separate virtual machines to run each application to provide maximum security. For example, if the user opens a browser, it will be running on a separate virtual machine.
We will discuss these secure operating systems further in Chapter 10, Proxy Chains and Anonymizers, where we will be going through the installation, advantages, and disadvantages of each operating system and how we can incorporate secure operating systems with the virtualization and other technologies we discussed. Once we have deployed virtualization and live boot operating systems, that will reduce the footprint while interacting with the internet. Let’s look at some commonly used operating systems and how we can improve privacy and anonymity.
How you can improve privacy and anonymity on Windows 10
Windows 10 is one of the most used operating systems. But when it comes to privacy, Windows 10 has a bad reputation. There are ways that we can improve privacy and anonymity:
- Configure the privacy settings in Windows 10 so as not to share information with Microsoft.

Figure 8.15: Configure the privacy settings so as not to share information with Microsoft

Figure 8.16: Disable storing activity history on the device

Figure 8.17: Disable Getting to know you
- Enable setting a random hardware address on new networks.

Figure 8.18: Enable random hardware addresses for new networks

Figure 8.19: Prevent apps from accessing your location
- Switch to a local account from a Microsoft account to stop synchronizing your settings and information with Microsoft.

Figure 8.20: Switch to a local account by clicking on the Sign in with a local account instead option
- Disable Tailored experiences. Microsoft will use your data to offer personalized tips, ads, and recommendations if not disabled.
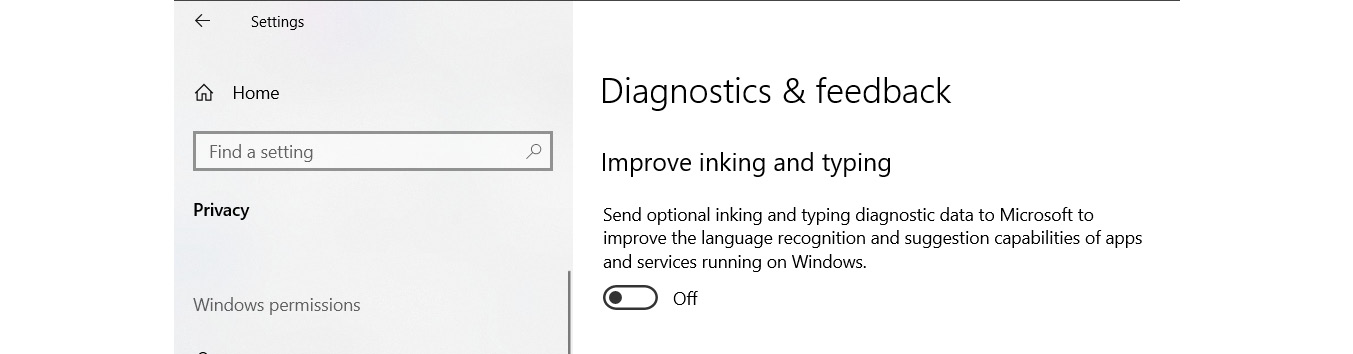
Figure 8.21: Disable personalized experiences
These configurations can provide you with more control over your data on Windows 10 and improve your privacy and anonymity.
How you can improve privacy and anonymity on your Android or iPhone
When you are using mobile devices, you can use similar techniques to what we discussed in Chapter 7, Introduction to Cyber Anonymity, to improve security and privacy, including the following:
- Ensure physical security all the time.
- Enable a secure key or password to access the device.
- Encrypt the storage.
- Use a VPN.
- Use secure browsers.
- Use encrypted messaging apps, such as Signal.
- Use secure email services, such as ProtonMail.
- Use secure email clients – ProtonMail also provides a secure email client.
- Use temporary or disposable email addresses when necessary.
- Use temporary or disposable mobile numbers when necessary.
- Configure proper application permissions. For example, don’t allow accessing location data for apps that don’t require it.
- Disable unwanted connections. If you are not using Bluetooth, turn it off.
- Disable cookies on browsers.
- Disable voice assistance services as if they are kept on, they are listening to you all the time. You can turn off Siri on your iPhone by accessing the settings and tapping on the Siri and Search settings. If you are using an Android device, you can go to Google Assistant under Account Services and turn it off.
- Stay away from social media. If you use social media, don’t configure social media client apps to auto-upload photos taken from your device. But the best way to ensure privacy is to stay off social media.
- Update your device’s operating system regularly.
- Use a mobile security solution such as antimalware and antivirus solutions. Many vendors provide free mobile device security solutions, such as Avira, Avast, AVG, and Bitdefender.
When using mobile devices, you need to be mindful of scammers. Some mobile apps, such as Truecaller, can be useful to find out who a caller is when you are receiving a call from an unknown number. Truecaller also offers scam protection on SMS messages and calls. But the catch is, even Truecaller collects information about users. You can use Truecaller in a passive mode, where you will only be using Truecaller to verify unknown numbers.
If you are using an iPhone, you can disable your caller ID when calling someone you don’t want to expose your number to. Once you disable caller ID, the receiver will not see your number, which will maintain privacy.
Preparing applications for anonymity
Once the devices are suitably set up to provide privacy and anonymity, we need to prepare applications as applications also collect information about users and create privacy challenges. The method for preparing applications for anonymity depends on the type of application. Some applications provide full functionality of the application without the user having to provide their true identity or even any identity. This mechanism is known as anonymity and pseudonymity. Both anonymity and pseudonymity are important concepts in privacy. Applications that support anonymity do not require any identity information or personally identifiable information to provide functionality. In general, these applications do not require users to register before using the app. Apps that support pseudonymity provide functionality once users produce any username, term, or descriptor that’s different from the actual name of the user. In other words, users can use apps that support anonymity without any authentication or verification, whereas apps that support pseudonymity would require a username, screen name, tag name, or something that the user can decide that doesn’t expose the user’s real personal information. Some apps, such as banking apps, require real identity information to be entered to access the app.
Mainly, we only need to install the required apps on our devices as having more apps increases the chances that our privacy will be compromised. Once you get rid of unwanted apps from your devices, the next step is to disable app tracking on your devices to stop the apps from tracking your activity. Let’s look at a few commonly used platforms and apps as examples of how we can block tracking.
How to block app tracking on Android devices
Since smartphones have access to location data and a lot of other information on your device, they often utilize this information for personalized advertising. Android devices are famous for this. You can turn off location tracking to stop unwanted apps from accessing your location data. Some apps, such as store locators, need this access to show you, for example, the nearest store location, but most apps just use it for advertising purposes. You can disable this by accessing the settings on the Android device, then going to Apps | Apps permissions. Under app permissions, you can access the location option and disable access to your device location for unwanted apps. Using the same option, you can review other applications and how other applications access the features of the device. You can disable these functions accessed by unwanted apps.
If not, these applications will have access to your calendar, location, call log, storage, and many other functions of the device.

Figure 8.22: Disabling app permissions to device functions
You can disable access to your Android device’s features by apps and increase your privacy.
How to block app tracking by iOS devices
Devices with iOS, including iPhones and iPads, track your location and activities. Disabling access to these functions by unwanted apps can increase the privacy of the device. To configure app privacy on an iOS device, you need to access the settings of the iOS device and access the Privacy option. When you access the Privacy option, you will see how apps have access to many functions on the device.

Figure 8.23: App permissions on an iOS device
Once you access the Privacy option of the iOS device, you need to access Location Services to turn off location services for unwanted apps.
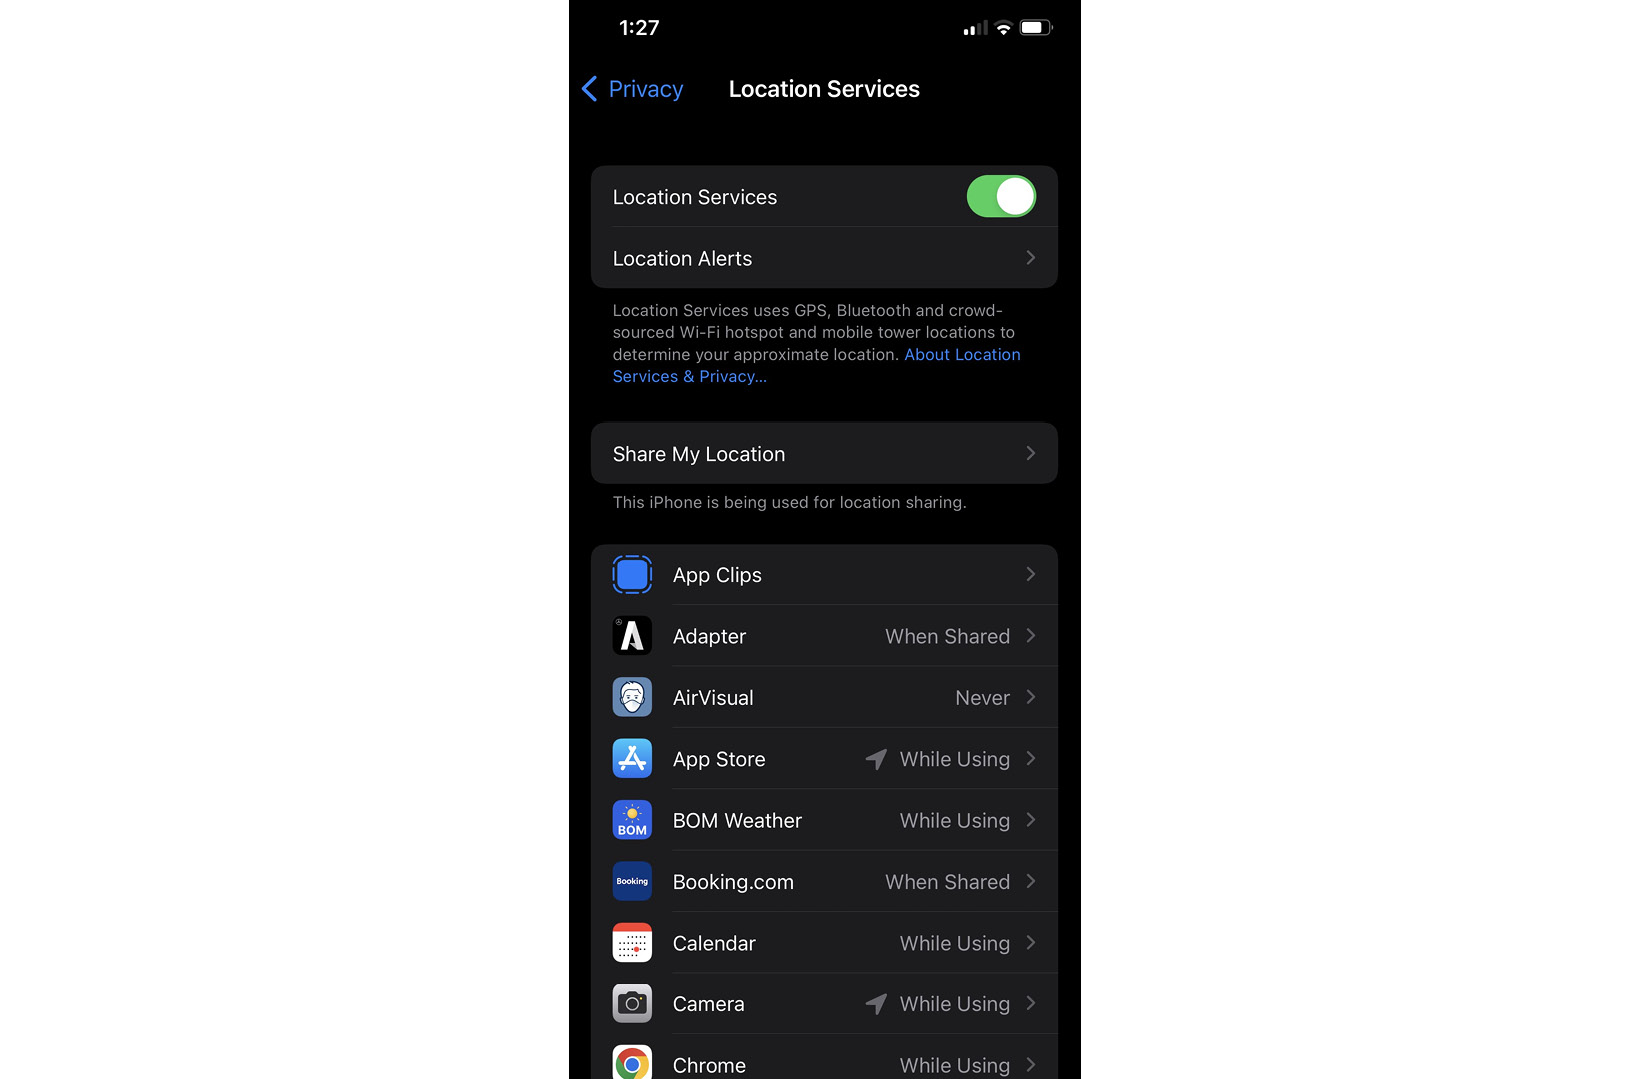
Figure 8.24: Location permissions of an iOS device
You can completely switch off location services for all the apps or you can configure it for each application as required. For example, in the preceding figure, some apps are configured to Never for location access and some apps are configured to While Using for location access. This will improve the privacy on your device as you are no longer sharing location with all the apps.

Figure 8.25: Tracking permissions
You can also completely disable tracking on your device for apps, or you can configure it so only trustworthy apps track you. If privacy is a concern, then disabling tracking for all apps is the best option.
You can disable location and tracking access for individual apps on a device. But cloud services use a different approach, where they keep all their tracking data on the cloud. Then, you need to access the cloud account and configure the required settings on the cloud account or cloud profile the way you want. For example, if you use Facebook or Google, you need to access your account on the cloud service and disable tracking your actions. If you want to disable this on Facebook, you need to log in to your Facebook account on the Facebook website, go to the Your Facebook Information tab under General account settings, and select the Off-Facebook activity option. Then, you can clear the history and configure the Off-Facebook Activity for future option. If you want to configure this on Google, you need to access the Manage your Google Account option and access Data and Personalization to turn off tracking.
As we discussed in this section, we need to reduce the number of apps installed on our system, as well as configuring app behavior on a local device. If the app is connected to the cloud, often you need to configure tracking from the account section.
Summary
In this chapter, we went through making our presence online anonymous. We learned how to set up cyber anonymity and what is required to maintain cyber anonymity. We also discussed how to become anonymous online under five main topics, as follows:
- Understanding the scope of access
- Planning for connectivity
- Understanding the level of access
- Preparing the device
- Preparing applications for anonymity
First, we tried to understand the scope of access for various apps and services, and then we discussed how to plan connectivity with the objective of maintaining anonymity. We also discussed various levels of access for different resources we use in today’s world. Then, we discussed how to prepare a device to be anonymous, including secure operating systems, virtual machines, and live boot systems, which support anonymity. The last topic we discussed was how we can prepare apps to support anonymity.
In the next chapter, we will be looking at another set of interesting topics to discuss how to maintain cyber anonymity and areas and techniques to maintain cyber anonymity.