ANIMATING FOR FILM: DIGITAL TO ANALOG
RACHEL MAX
Creating a high-resolution cut-out animation in After Effects for output to 35mm film
HOW THE PROJECT ORIGINATED :: In 2000 I screened a short animation at the Slamdance Film Festival and began my love affair with the film festival circuit, Slamdance, and animating quirky, low-fi shorts. :: Slamdance is the notorious “other” film festival in Park City, Utah which runs concurrently to Sundance. Started in 1996 by Independent filmmakers who didn’t get into Sundance, Slamdance (“by filmmakers, for filmmakers!”) supports first-time directors with films funded by the generosity of friends, family, and high-interest-rate credit cards. Every year the Slamdancers face the challenge of putting together another amazing festival and delicately choose a small percentage of their submissions to be screened.
One of the many things to be done in preparation for the festival is creating the official trailer that runs before each screening. The trailer showcases the festival sponsors and brands the look of the festival. The festival directors have taken a creative approach to the trailer design by handing it off to a different alumnus each year. In 2003 they called me. :: In this chapter, I’ll discuss aspects of how I made the trailer. I’ll also address film aspect ratios and how to do cut-out style animation in After Effects.
WHAT’S ON THE DVD
The DVD contains the 2003 Slamdance Film Festival trailer, as well as an After Effects project and the artwork used to create the trailer. These sources are copyright Slamdance, Eighteenth Street Lounge, and Rachel Max, and are not to be reused in any form.
 AUDIO EDITING TIPS
A little bit of audio editing goes a long way. Read tips from the pros. I find DV Magazine to be an excellent resource. Trish and Chris Meyer have their outstanding column on broadcast design, and Jay Rose has great articles on working with audio. Also check out these sites:
Concept
I was told the theme that year was innocence and getting back to basics. The festival was moving from a large abandoned silver mine it had used for two years back to the Treasure Mountain Inn on the top of Main Street where the festival started. (SEE FIGURE 01.)
A graphic artist from Los Angeles had been chosen to design the programs, and the director thought my style of animation would work well for the trailer. It was the beginning of what Indiewire later described as “a wonderful, crudely animated festival trailer.” Sweet!
I was living next door to some cute kids at the time, and I thought it would be great to get them involved. I came up with the idea of involving children in a classroom, somehow mistaking the Slamdance logo for a shape. It would be animated with voice-over from a video shoot with the children.
I asked a friend to help me, and we arranged to shoot at the neighbor’s house. There was no budget for the trailer, so I borrowed a GL1 and shot using just the mic on the camera. Lighting wasn’t an issue since we only needed the audio. The hardest part of the shoot was getting performances from the children. It took about three hours, but we got enough for the short trailer.
At the time I started this project I was working with After Effects 5.5 on a dual-processor 800 MHz G4 running Mac OS 10.2. I was still transitioning to OS X and was running some software in OS 9. I edited the footage with Apple Final Cut Pro 3 and narrowed down the audio clips I wanted. I output stereo 44.1kHz, 16-bit AIFF files from Final Cut Pro and edited them in Macromedia SoundEdit 16. I normalized the levels and edited out digital pops.

01 » SLAMDANCE HEADQUARTERS AT THE TREASURE MOUNTAIN INN

02 & 03 » COMPARE THE AUDIO WAVEFORM BEFORE AND AFTER NORMALIZATION.
Recording audio with a GL1 meant there was a lot of over-modulation. I saved the edited AIFF files as .mov files and assembled the audio in After Effects. (SEE FIGURE 02 & 03.)
For corporate work I would usually opt to use music from a music stock library (see Chris and Trish Meyer’s chapter for more information on stock music), but I was on a mission to use a song called “Margaret Evening Fashion” by a German group called Le Hammond Inferno. I first heard the song on a CD called All Systems Are Go Go put out by the DJ Ursula 1000 and Eighteenth Street Lounge Music. I love the upbeat-retro-electronic sound of the album. My search led me to Le Hammond Inferno record label Bungalow in Berlin. I was told that there were some unresolved issues with the song which prevented its use but that they would gladly put me in touch with Ursula 1000.
You never know what people are willing to give you until you ask. A week later, after a lovely phone call with Alex Gimeno of Ursula, I licensed the song “Beatbox Cha Cha” from his album Kinda Kinky. Slamdance is a non-profit and couldn’t offer monetary compensation for the use of the song, but the festival has a large worldwide audience so it was good exposure for the artist. (SEE FIGURE 04.)
Delivery Specs
To begin a project you have to understand where it’s going. I needed to know the delivery specs before I could begin to draw. Slamdance was being sponsored in part by The Digital Film Group from Vancouver, which specializes in converting video and digital files to 35mm film. They use only true film resolution film recorders and are known for their beautiful crisp transfers of films like The Corporation and Atanarjuat: the Fast Runner.

04 » THE KINDA KINKY ALBUM COVER COURTESY OF ESL MUSIC AND URSULA 1000
The default 2K composition size in After Effects is 2048x1536, which is 4x3, or a 1.33:1 ratio, and known in the film world as Academy Standard. (SEE FIGURE 05.)
The 1.33:1 ratio was the standard for films made up until the early 1950s. It was also the ratio the National Television Standards Committee (NTSC) chose during the advent of TV because it permitted the most efficient use of motion picture film. During the late 1950s Hollywood changed film sizes to draw the TV audience back to the cinemas. The two most common newer ratios are 1.85:1, known as Academy Flat and 2.35:1, known as Anamorphic Scope. Less-used film ratios are 1.66:1 and 2.20:1 (70mm). The ratio of 1.78:1, otherwise known as 16x9, was one of these less-used ratios, but we will see more of it as it is the proposed standard for HDTV. (SEE FIGURE 06.)
The lab informed me that the ratio was going to be 1.85:1 or a composition size of 2048x1107 pixels. The delivery specs for the project were to be:
• an uncompressed TARGA sequence
• Universal Leader at the head of the trailer
• a frame of 1000Hz tone at the 2 during the leader (creates what’s known as the 2 pop)
• a tail pop five seconds after last frame of action (LFOA)
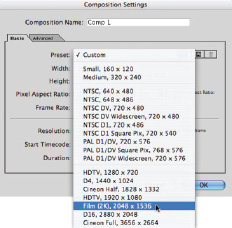
05 » THE DEFAULT 2K RESOLUTION IN AFTER EFFECTS
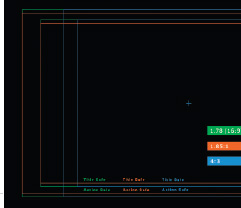
06 » SOME RATIOS COMPARED COURTESY OF THE DIGITAL FILM GROUP

07 » THE PROJECT SETTINGS
The project settings were 24fps, 35mm, in 8-bit color space. I had previously exported the audio files from Final Cut Pro as 44.1kHz, so I decided to stick with that. Keeping the audio at the original 48kHz would have been slightly better, but I didn’t have the time to re-export and re-optimize the audio. (SEE FIGURE 07.)
The Universal Leader, also known as the Academy Leader, is usually used to provide projectionists with information like the name of the work and to cue when sound and picture actually start. It also protects the film from being handled and allows the projector to get up to full speed before the film begins. In this case, the Digital Film Group also needed the leader with 1000kHz pops to sync the sound to the picture. The sound and picture go through several stages before they are married in a composite film print and are synced at the 2 during the leader to the one frame of 1000kHz tone in the audio track. Including the tail pop is a step usually done for feature films, but it helps a projectionist using a platter system to know when a film has ended. (SEE FIGURE 08.)

09 »

10 » THE SPARKY AWARD COURTESY OF KARIN HAYES
Asset Management
One reason I love animation is that you can create your own assets at any point in the production. Production and postproduction get meshed together, which solves many problems and of course creates others. I didn’t have a tremendous amount of time at this point, and ironically I don’t draw very well. The first thing I set about drawing was the Slamdance mascot Sparky. (SEE FIGURE 09.)
When in doubt, trace. I brought a low-resolution JPEG into an arbitrarily high-resolution Photoshop image that was 2036X1719 pixels. I scaled the JPEG to fit and then used the Brush tool to outline Sparky. I painted dabs of color on his face and went back and forth between Photoshop 7 and Corel Painter 7 to blend the colors. Open the file Sparky.psd from this chapter’s footage folder on the DVD enclosed with this book. (SEE FIGURE 10.)
You’ll notice that I have four layers. (SEE FIGURE 11.)
I have a layer for Sparky’s face, a layer of extra lines (I wasn’t sure if I wanted that effect or not), and individual layers for his left and right eyelids so I could make him blink and wink when I got to the animation stage. When working with cut-outs I put everything that can be animated on separate layers. We’ll look at more detailed files and talk about animating them later in the chapter.
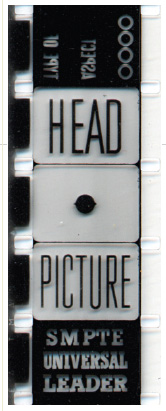
08 » PICTURE START ON UNIVERSAL LEADER

11 »
PREVIEW A SEGMENT
To preview a segment of the final movie, press a number such as 1 (on the standard keyboard, not the numeric keypad) to jump to that marker, press B to set the start of the work area to that point, press a later number such as 2 to jump to that marker, press N to end the work area, and then press 0 on the numeric keypad to RAM Preview that segment. You can also use Page Up and Page Down to step through the piece frame by frame.

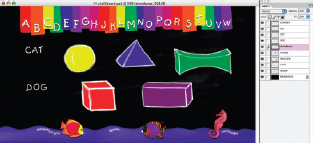
Next I drew a chalkboard for the classroom setting and a few shapes that the kids were going to confuse with the Slamdance logo. I started in Photoshop and made a new image that would match the 2048x1107 size of the final animation. Open Chalk-board.psd to see the results. (SEE FIGURE 12.)
It’s a good thing I’m not a primary school teacher because as you’ll notice my alphabet ends at W. I got to W and realized that although film doesn’t have title-safe and action-safe areas, video does, and this trailer was going on the annual Slamdance DVD. It looks a bit weird to me now but at the time I probably had a good reason for not resizing the alphabet banner and adding XYZ.
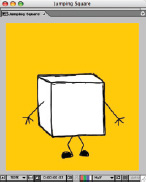
Open other files from the Artwork folder. You’ll notice that the shape files have many layers as all their legs are on separate layers. Let discuss why I set up my files like this and how to animate a jumping square.
Tutorial: Animating the Jumping Square
Open Slamdance Trailer 2003.aep. In the Project window, open the Renders folder and double-click on Jumping Square.mov to play the file. At the top of the Project window, you should see information about the file such as its size, the fact that it has an alpha channel and that it is used twice. (SEE FIGURE 13.)
Now go to the Precomps folder in the Comps folder and open Jumping Square. (SEE FIGURE 14.)
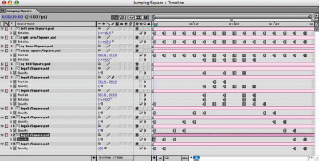
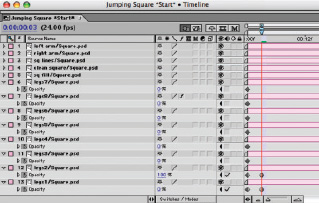
Select all the layers in the Timeline by pressing Cmd-A (Ctrl-A) and press U to view all the keyframes in the composition. (SEE FIGURE 15.)
12 »

13 »
14 »
15 »
LINKS TO GREAT MUSIC
Ursula 1000:www.ursula1000.com
Eighteenth Street Lounge: www.eslmusic.com
Bungalow Records: www.bungalow.de
MUSIC LICENSING
Music licensing can be tricky because you need to obtain both the performance rights and the publishing rights. For this reason I choose to approach an independent label. If you can’t afford a lawyer to draft a contract, there are books that come with examples of various production forms. I recommend The Complete Film Production Handbook by Eve Light Honthaner. It is designed for feature film production, but much of it can be applied to commercials, promos, and most any creative work.
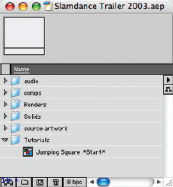
These are Hold Keyframes meaning that there is no interpolation between the action, so the animation is sudden. It makes for jumpy but cute and disarming animations. In the Project window, open the Tutorials folder and double-click the Jumping Square *Start* composition. (SEE FIGURE 16.)
Looking at the layers, you’ll notice I switched the position of legs7 and legs8 because the new order looked better. Make sure your Parent column is visible. If it’s not, Ctrl-click (right-click) on the top of any column and select it. (SEE FIGURE 17.)
Hold down the Cmd (Ctrl) key and select layers 1, 2, 3, and 5. In the Parent column use the pickwhip or click on the bar and parent the layers to layer 4, “clean square.” (SEE FIGURE 18.)

17 »

18 »
KEEPING THE FILL SEPARATE
You’ll notice in many of the comps and in the original Photoshop artwork that I kept the fill colors separate from the outline of the shapes. I did this so I could change the color of any of the layers with the Fill effect keeping my options open for background colors. In the Project window, go to the Precomps folder in the Comps folder and open the Heart composition. Select the line layer and press E to show all applied effects. The Fill effect is filling the original black outline of the heart with white.

Select layers 6 through 13, press T to show Opacity and set keyframes on these layers by clicking and dragging the mouse over each stopwatch. SEE FIGURE 19.)
Move forward three frames and set a keyframe for legs1 at 0% opacity and legs2 at 100% opacity. The premise here is that only one leg layer is visible at a time. Continue to set opacity keyframes for each of the leg layers every three frames until all the layers have been animated coming on and off. As you set the leg keyframe, position layer 4 correctly to match the leg position. To move three frames at a time you can scrub in the Timeline or click on the timecode bar in the Timeline window, press the + sign on your numeric keypad, enter the number 3, and press return to move ahead three keyframes. This also works in reverse by entering + -3 (or however many keyframes). (SEE FIGURES 20, 21 & 22.)
When you get to frame 15 and have set opacity keyframes for layers 8 through 13 and position keyframes for layer 4, scrub back through your animation. Your keyframes are linear, so the opacity changes are interpolated. It should look a bit like the bionic man in slow motion. We’ll change this in a minute. (SEE FIGURE 23.)

19 »

20 » YOU CAN TYPE A FRAME NUMBER
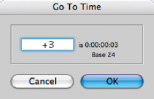
21 » YOU CAN MOVE A SPECIFIC NUMBER OF FRAMES.
22 » BEGINNING TO SET OPACITY KEYFRAMES EVERY THREE FRAMES.

23 »
24 »

25 » SETTING ROTATION KEYFRAMES FOR THE ARMS AT 0:00
Let’s continue setting the keyframes. Go back to frame 15. Select layer 4, hold the Shift key and press R to bring up Rotation. Click the stopwatch to set a keyframe at 0° rotation. (SEE FIGURE 24.)
Move to frame 18, set opacity keyframes for layers 7 and 8 and set another position keyframe for layer 4. This time also set a rotation keyframe of 8°. Move forward to frame 21 and set opacity keyframes for layers 6 and 7 and this time set your rotation for layer 4 to 19°. This is the top of the jump. From here on you’ll be setting keyframes for the descent of the square. When you get to 1:18 make sure the position and rotation values for layer 4 match the values at the beginning of the composition. The easy way to do this is select the position keyframe at 0:00, press Cmd-C (Ctrl-C) to copy it, make sure you’re at 1:18, select layer 4, and paste the keyframe by pressing Cmd-V (Ctrl-V). Now you have a complete loop.
Next you need to keyframe the rotation on the arms. Press the Home key to go to the beginning of the composition. Select layers 1 and 2 and bring up Rotation (press R). (SEE FIGURE 25.)

26 »
Make sure the anchor points are at the bottom of the arms where they connect with the body. Use the Pan Behind tool to move them to the correct position if not. (SEE FIGURE 26.)
When people jump, their arms start out by their sides and then rotate up until they are above their heads at the highest point of the jump. We’ll use that same principle here. At 0:00 set a keyframe at layer 1 at –76 degrees and layer 2 at 92 degrees (or whatever you think best). Continue through the Timeline setting keyframes, remembering that the highest point is at frame 21 where the arms should be the most extended. When you get to 1:18 copy and paste the initial rotation keyframes to the end rotation keyframes to sustain your loop.

27 »

28 »

29 »
Select all your keyframes by clicking and dragging over them all. Select Animation>Toggle Hold Keyframe or press Cmd-Opt-H (Ctrl-Alt-H). (SEE FIGURE 27.)
Your keyframes will go from linear interpolation to no interpolation. (SEE FIGURE 28 & 29.)
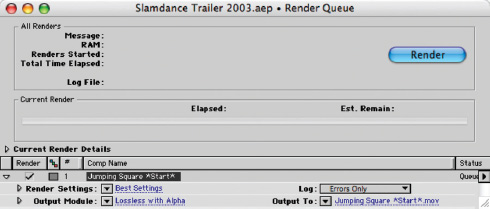
At 1:18 press N to end your work. Press the Home key to return to the beginning, and press B to begin the work area here. Choose Composition>Make Movie or press Cmd-M (Ctrl-M) to make a movie. (SEE FIGURE 30.)
For Render Settings choose Best Settings and for the Output Module select Lossless with Alpha. (SEE FIGURE 31.)

30 »
31 »

32 »

33 »
Click on Lossless with Alpha and change Post-Render Action to Import so After Effects will import the rendered file. Render your file. (SEE FIGURE 32.)
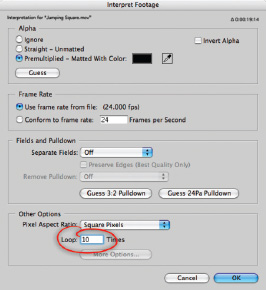
Once the file is rendered and has been imported, Ctrl-click (right-click) on the file in the Project window and select Interpret Footage. You could have also selected the file and pressed Cmd-F (Ctrl-F). (SEE FIGURE 33.)
In the Loop field change enter 10. (SEE FIGURE 34.)
You can now use this file in any composition without having to set all those keyframes. There are other ways we could have achieved the same result. We could have used expressions to loop the cycle, but I find that rendering QuickTime files improves overall speed. I am working with a 1GHz PowerBook now and need to cut as many corners as I can.
Open the “background for squares” composition in the Precomps folder to see the looped Jumping Square.mov in action. (SEE FIGURE 35.)
34 »
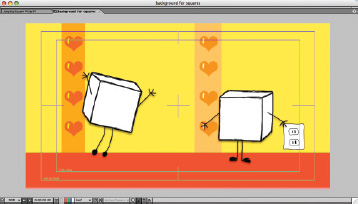
35 »
From the Computer to the Silver Screen
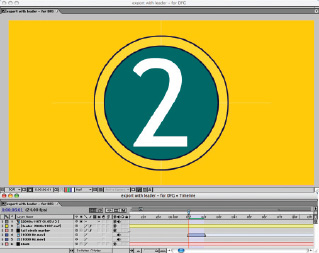
I assembled the compositions in a main composition called 2048x1107 and then placed that comp in a final export comp called Export With Leader, where I added the Universal Leader and the 1000Hz tones. (SEE FIGURE 36.)
I had to be careful to have the 1000Hz tone on only one frame. If the tone extended more than one frame the lab wouldn’t have been able to find the sync mark. It was also imperative to have the first frame of action 48 frames after the 2 Pop. (SEE FIGURE 37.)
I rendered a smaller 720x540 version of the trailer starting at the 2 Pop so the lab could compare their sync to my version. The deliverables were a complete TARGA sequence, an AIFF file, and a smaller rendered QuickTime of the trailer. I sent these on a small FireWire drive which Digital Film Group would send back after they were done. They recorded the TARGA sequence to film and had the audio converted at a sound house. The converted audio was married back to the picture later in a composite print. The optical audio track on a 35mm print is always 21 frames in advance of the picture due to light traveling faster than sound. They made several prints from that composite print and sent them to Slamdance.
The festival was a great success, and the trailer went over well. I strongly recommend going out to Park City, Utah during the festivals and watching as many films as you can—especially the short films.
For a list of film festivals near you go to:

36 »
37 »
ABOUT THE AUTHOR

Rachel Max has been writing and animating short films for seven years and has been showing them in film festivals internationally since 1999. Her work has been broadcast on HBO, IFC, the Sundance Channel, and most recently on the show “Jump Cuts” on Comedy Central. Her clients include GEICO, Apple Computer, Bright Eyes, Slamdance, and MTV. She lives in New York City where she works as a freelance broadcast designer, producer, and teacher.
SOFTWARE AND HARDWARE USED
Shot with a Canon GL1
Digitized and edited with Final Cut Pro 3
Audio edited in SoundEdit 16 and Peak
Drawings done in Painter 7 and Photoshop 7
Input device was a Wacom Intuos 2 Graphics Tablet 6×8
Resolution was 2048×1107
Composited in After Effects 5.5
Output as a TARGA sequence
