KEN LOCSMANDI, FILMWORKS/FX
We’ll be attacking this lesson from a do-it-yourself mindset. The video I will be showing is for a band named Key to Arson, for the song “One Last Night.” I co-directed the video with David Alexander. The concept behind this video was to shoot a majority of it on greenscreen using a virtual environment. Shooting this way is usually more expensive than shooting it practically. “Practically” means without visual effects, where everything is done in camera. Proficiency in a 3D software package allows virtual environments to be created modestly, and good preparation greatly increases the chances of success. Some key things to consider when making virtual environments are:
• What is your deadline? If you have only a few days or a week you better pull back your ambitions. Good work takes time. Even though the software is good, there is not a magic button that does the work for you. Most directors who use visual effects have a limited understanding of what it takes to create them. The good directors listen to the visual effects team in preproduction and do what is asked of them while shooting.
• Are the rendering times going to kill you? In the “One Last Night” video we created computer-generated (CG) water. Since we had already done water on such projects as Smashmouth’s Pacific Coast Party, JAG, and The Pirates of the Caribbean trailer, we knew what was in store for us. We had already learned how to optimize our files for faster render times.
• Limit your moving camera shots. The more moving cameras you have the less assets you can reuse for compositing. Camera moves need to be tracked, and each render is unique to that shot. Later in the lesson you will see how to quickly use the same assets for multiple shots if you have a locked camera. The more you can share assets, the quicker you can get things done and the more time you’ll have to be creative.
WHAT’S ON THE DVD
Included on the DVD are all the source files for the project and a completed rendered sequence.
Preproduction
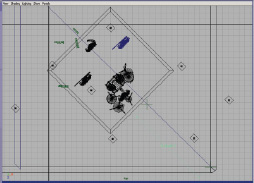
Almost all projects have problems due to lack of preproduction. When you have a tight budget, preproduction is essential. Having an animatic (moving story board) of the video saves time in production. Instead of using traditional hand-drawn storyboards, a 3D application is used for the animatic. 3D applications like Poser work well. SOFTIMAGE XSI, a high-end 3D application, is $495. It could easily be used for animatics and to make photorealistic digital backgrounds. The advantage of using a 3D application is that real-world data can be incorporated. In this video, the real-world data were the dimensions of the insert stage at Panavision, where the shooting occurred. Measurements were taken, and the stage was built to scale in Alias’s Maya. (SEE FIGURE 01.)
By having the real-world measurements set up in Maya, we knew where we could shoot, in what direction, and how low or high. In some instances we knew our lens limitations as well. If you know where you are going to shoot, go into your 3D application and make a scene that looks like your shooting area. You don’t need to be a great modeler. Just put primitive shapes, but make them the correct size. For example, if you have a person standing on a tree stump that is two feet high, build a cylinder that is two feet high in your 3D application. It’s just for reference. We created a simple stand-in model for each band member, and we and color-coded them. We also added the lens that we wanted, along with bits of shot information describing the angle. (SEE FIGURES 02 AND 03.)
We cut the whole thing together with a nonlinear editor with time-code. Now we had a pretty good roadmap. Projects with large budgets typically run through all of the shooting before editing. They may film the entire song dozens and dozens of times. We went through the entire song only twice, once as a wide-angle performance with a locked camera. The second was a pass with a moving camera. These two setups were backups for editing so the editor would always have something to cut to for artistic preference.
01 »

02 »
Production
If your budget allows and you know someone who has experience lighting and shooting green, you should see if they can help. If you have to be your own director of photography (DP) then you should know a few things before shooting greenscreen.
• If possible, shoot in a full frame rate. Film and 24p cameras shoot a full frame. Traditional video cameras shoot fields. These fields are partial information of a full frame. This chapter is not meant to be super technical, so I don’t want to get into exact field and frame rate conversions. I will touch the subject briefly once you get into keying the greenscreen.
• Make sure you use the same type of screens on the set. It doesn’t mater what type you shoot, whether digital green, chroma green, or bluescreen. Just make sure you are not mixing different types of material.
• Make sure the lighting on the screen is flat. Flat refers to a screen that has consistent lighting across all its areas.
• Keep your subject as far from the screen as possible to limit spill. Spill is greenscreen light reflected onto the subject from the greenscreen. Keying software is very advanced these days, and spill is much easier to correct than in the past.
• Keep objects out of the greenscreen. Remove all objects such as C-stands and ladders. Sometimes it is unavoidable, but many people get lazy shooting and decide to fix it in postproduction. Don’t start that habit.

03 »
• The subject should be a different color than your screen. If you are shooting a green car, don’t use a greenscreen. It seems obvious, but I have been on many so-called professional sets where things like this happen.
One of the key things that speed up production was having the animatic on set. We took our NLE to the set. Since we had the entire edit with shot information and timecode we could quickly figure out where we were and what we needed to shoot. We hooked the video tape up to a composite input and captured low-resolution images off the film camera. (SEE FIGURE 04.)

04 »
We would cut in the takes as they were being shot into the appropriate timecode position. You could do this same technique with any editing system on a laptop. Avid Xpress Pro, Adobe Premiere Pro, or Apple Final Cut Pro would work fine. Most laptop computers don’t have standard video composite signals, but most have FireWire ports. There are many secondary converters that convert composite video signals to FireWire. We’ve also used Avid Mojo to bring in footage.
In some cases we would even do rough composites with After Effects. Your greenscreens will never look great coming off a film video tap. If you are using a video camera, you can capture shots and do really good test composites right on set. I’ve done this while capturing HD footage. The composites almost look like finals.
Postproduction Tutorial
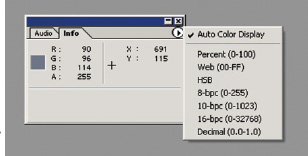
Before you start this lesson you should have a basic understanding of After Effects. Make sure that in the Info window, you have Auto Display selected. If you have something else selected such as percent, the values given in this tutorial may seem incorrect. One of the main subjects of this lesson is assigning effects. If you leave the Effects window open you can simply start typing the name of the effect in the blank field that has the word contains next to it. As you start to type the effect’s name, it will be listed. (SEE FIGURES 05 AND 06.)

05 »
06 »
You are going to do ten tasks. A few of these tasks have subtasks. Here is what will be covered:
1. Import, interpret, and create a composite
2. Clean up and paint out markers
3. Precompose to make a foreground plate
4. Import background elements and compose a composite
4a. Add more TVs
4b. Add volume light
5. Bring the foreground and background together.
5a. Pull a key
5b. Get rid of spill
6. Isolate and color the tattoo
7. Add atmosphere and depth
8. Finish final coloring
9. Apply all you have done to another shot 9a. Interpret the fields
9b. Make the correct frame length
9c. Add variation
10. Output

SHOT 23 »
Copy the Key to Arson directory from the DVD to your computer.
The first shot I will cover is Shot 23. Shot 23 is the name given to the shot during editing. We had one layer in our NLE that consisted only of shot numbers over the top of our shot image. This gave us a numbering system and a visual guide. Shot 23 was shot from the same angle as Shot 27. All the shots with the same angle can share some assets. These assets can include background images rendered from a 3D application.
Shot 23 and all the shots that have the same angle are locked, which means there are no moving cameras. Later I will show how you can replace footage to finish additional shots quickly. The reason this is possible is because the camera is locked.
![]() 1. IMPORT, INTERPRET, AND CREATE A COMPOSITE
1. IMPORT, INTERPRET, AND CREATE A COMPOSITE
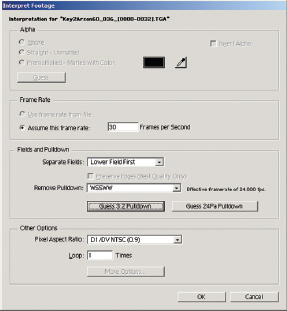
Import the footage into After Effects by choosing File>Import>Import File. Choose Local_key_to_arsonRAWKeytoArsonKey2Arson60_036. Click the first frame of the footage, then check the TGA sequence box at the bottom of the Import window. If you don’t check this box, you will get only one frame of the footage. Once the file is imported, we need to convert the footage so that we are working with full frames and not fields. This is known as a 2:3 pulldown. Go to File>Interpret Footage>Main. Assume this frame rate should read 30. Click the Guess 3:2 pull down menu. (SEE FIGURE 07.)
After Effects will convert the separate fields into whole frames. All the information for the footage will be displayed in the Project window. The footage is now 24 frames per second (fps). Create a composite using the footage. I like to just drag the footage over the composite icon at the bottom of the Project window (See Figure 22). This will build a composite with the correct length and frame rate. By default After Effects names the composite the same as the footage. Click the Composite name in the Project window. Press Enter and rename the composite Paint_fix. Save the project as Shot_23.aep. (SEE FIGURE 08.)
07 »

08 »
![]() 2. CLEAN UP AND PAINT OUT MARKERS
2. CLEAN UP AND PAINT OUT MARKERS
On set, we put up tracking marks. In this shot they look like little red blobs, but they are actually two pieces of gaffer’s tape in the shape of a plus sign or cross. We placed these over the entire greenscreen every three feet before shooting. All the tracking marks have to be removed. (SEE FIGURE 09.)

09 »
We could draw masks around the marks to remove them, but with this shot we decided that we were just going to paint them out. This is easily done in After Effects. Double-clicking the footage in the Timeline will open it in the Composite window. Select the clone brush. Make sure Mode is set to Normal and Channels are set to RGB. Since this is a locked shot we are going to set the Paint Duration to Constant. (SEE FIGURES 10 AND 11.)

10 »

11 »
The Constant setting will paint all the way through the duration of the shot. Make sure you start painting on the first frame. If you start on frame five then you will see the tracking marks on frames one through four. Pick a brush tip that will cover the entire tracking mark in the image. I used a brush of size 65.
Sample an area of the greenscreen near the marker that you will be painting over. This is done by holding down the Option (Alt) key. Repeat this step for the other unpainted makers. A smaller brush of about 13 could be used for the marker that is under the symbol. Don’t paint over the symbol, just the marker. When finished, you will have five clone/paint functions in your Timeline. Expand the attributes on the footage layer in the Timeline by clicking the small arrow next to the name. Add a Remove Grain effect by choosing Effect >Noise & Grain >Remove Grain. The default settings are fine. This will make the shot less noisy, and it will key better. Make sure the viewing mode is changed from Preview to Final Output in the Remove Grain palette. With all the markers gone, we now have clean footage to key. (SEE FIGURE 12.)

12 »
![]() 3. PRECOMPOSE TO MAKE A FOREGROUND PLATE
3. PRECOMPOSE TO MAKE A FOREGROUND PLATE
I’m now going to create a new composite by precompositing my shot Paint_fix. Select the raw painted footage layer in the Timeline. Choose Layer>Precompose and name the new composite Pre_color. Make sure “Move All Attributes into the new composite”, is selected. (SEE FIGURE 13)

13 »
Now there is a composite inside of a composite. The reason this is done is so that we can key on the cleaned composite. Also, this isolates the footage so that later we can easily replace the footage in the composite to complete other shots that are similar.
![]() 4. IMPORT BACKGROUND ELEMENTS AND COMPOSE A COMPOSITE.
4. IMPORT BACKGROUND ELEMENTS AND COMPOSE A COMPOSITE.
Next we’ll bring in the CG background plates. They can be found inLocal_key_to_arsonWIPKeytoArsonAssetsBG_plates.
There are two directories, one called “water” and one called “TV.” Import the files from each of the directories. These elements were rendered out of a 3D package and are whole frames at 24fps. There is no reason to worry about pulldown since these files were never video files. The TVs have an alpha channel on them. (SEE FIGURES 14 AND 15.)
14 » 15 »

16 »
After Effects will ask how you want to interpret the alpha channel. Check the Premultiply Matte with Color when importing the TVs. When importing the water check Ignore on the alpha. Interpret both the water and the TV footage as 24fps. (SEE FIGURE 16.)
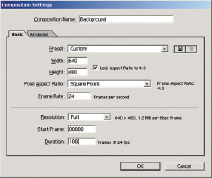
Make a composite using the water. Name the composite Background. Then drag the TV screen element into the Background composite. Name the TV footage in the Timeline TV_01, and name the water footage Water. You may notice that your composite size is 640X480. We used a square-pixel aspect ratio out of our 3D application. Video has a .9 aspect ratio. Don’t worry about this. Everything will size up correctly. (SEE FIGURE 17.)

17 »
It may be good to double-check all your composites at this point and make sure they are 24fps.
4a. Add more TVs
Make the Background composite 100 frames long instead of 200. Select the composite and choose Composition>Composition Settings. Change the duration to 100. By making the composite 100 frames long you’re able to slide the footage down the Timeline without running out of frames. If your settings are reading in something else instead of frames, go to File>Project Settings and change your preferences to Frame. (SEE FIGURES 18 AND 19.)
18 »

19 »
We want to add more TVs to the scene. With the two elements together the number of TVs seems a bit sparse. Duplicate the TV_01 layer adding more monitors. Since the TV layer is named TV_01, the layer numbers itself automatically to TV_02. Put the new TV layer under the original in the Timeline. (SEE FIGURE 20.) The pixel resolution is 800X600 on the TVs. This was done so that it could be easily scaled and moved if necessary. Scale and reposition the new monitor layers to fill in the scene. I scaled the scene 69% and positioned X as 279 and Y as 232. Your composite should look something like Figure 20. To add a brightness contrast, choose Effects>Brightness Contrast with a brightness setting of 30 on the TV_02 layer. Also, blur them slightly with a fast blur. Choose Effects>Blur & Sharpen>Fast Blur, with a blur- riness of 3. Offset the layer in the Timeline to the left about –70 frames so that the images playing on the TVs in TV_02 look different from those in TV_01. You could go back to the 3D application and fill in more monitors there, but it would require additional 3D rendering times. The beauty of compositing is that you can add things with more layers. So now we have many more monitors, but it looks a little shabby because you can see the edge where the chains stop. Don’t worry; the shot is going to have a shallow depth of field, and the background is going to be out of focus. But it still needs more.

20 »
4b. Add volume light
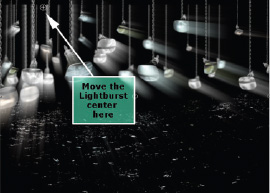
We want to give it more volume in the form of light. We’re going to build another composite using the background we made. Do this by dragging the background composite onto the Create New Composite icon (SEE FIGURE 21.), in the Project window. This new composite will be named BG_with_light. We need to duplicate the layer BG_with_light, because we’re going to add the Cycore Lightburst effect. Choose Effects>Render>CC Lightburst. Applying CC Lightburst to the top layer and changing its blending mode to Screen makes it look as if volumetric light is coming off the TV screens. If you can’t find the modes you may have to click the Switches/Modes button (SEE FIGURE 22.) at the bottom of the Timeline. Move the center of the Lightburst to the upper left of the screen. This makes it look like the rays are point down from the TVs. (SEE FIGURE 23.)
21 »
22 »
23 »
On the right side of the composite, the rays look off. Draw a square mask over the left side of the screen so that only the monitors on the left are visible. The light is now shining only from the monitors on the left. (SEE FIGURE 24.)

24 »
Duplicate the layer containing the newly drawn mask. Make sure you duplicate the layer and not just the effects. Change the Mask attribute of the new layer from Add to Subtract. Now the rays on the screen’s left side are back, but they are still in the wrong direction. Move this layer’s Lightburst center to the upper right. Now the volume light looks as if it is shining correctly. (SEE FIGURE 25.)
25 »
The light doesn’t have to be perfect because the background is going to be blurry. Now there is a base background that has extra monitors and volume light.
![]() 5. BRING THE FOREGROUND AND BACKGROUND TOGETHER
5. BRING THE FOREGROUND AND BACKGROUND TOGETHER
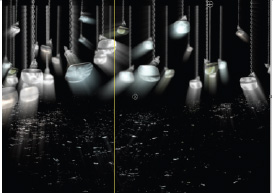
We’ll now bring our BG_with_light composite into our main composite named Pre_color. With the two layers together we can start keying and combining the elements. Rename the top layer FG. Rename the bottom layer BG. There will be other foreground elements added later. (SEE FIGURE 26.)

26 »
5a. Pull a key.

27 »

28 »
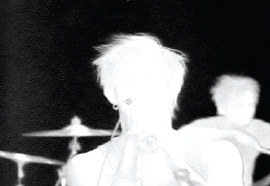
Add a key light to the FG layer. Choose Effect>Keying>Keylight. Sample some of the greenscreen using the Eyedropper tool (SEE FIGURE 27.) in Keylight palette. A good area to sample is next to the singer’s head. Hair is often difficult to make look good, so sampling a green in the general area is an adequate place to start. Keylight does an excellent job very quickly. (SEE FIGURE 28.)
In Keylight, set the View to Screen Matte. (SEE FIGURE 29.) This shows how well the key worked. Changing the Screen Matte clip black to 12 and clip white to 71 will help fix some of the bad areas of the matte. Most beginners try to make the matte completely white and black. This will cause loss of detail in the image. The matte can be slightly dirty, containing gray values. Once you start adding all the additional elements of the composite, you’ll find that it is not necessary to make the matte really tight (all black and white). (SEE FIGURES 30 AND 31.)
29 »
30 »
31 »

32 »
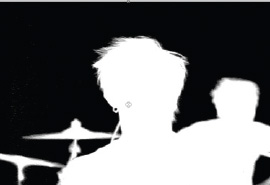
Once you have a fairly good matte, turn the View back to Final Result. The image will start to look a bit grainy. Turn down the screen balance setting in Keylight to about 33. It’s less grainy, but some of the green spill made it back into the image. (SEE FIGURE 32.)
5b. Get rid of spill
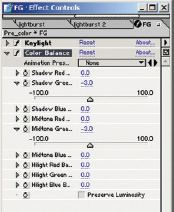
The foreground image still has bounced light from the green-screen on it. This is known as spill. An additional color balance effect will remove more green from the shadows and midtones. Choose Effects >Adjust>Color Balance. The adjustment is very minor, only –3.0 to the green shadows and green midtones. (SEE FIGURE 33.)
»33
![]() 6. ISOLATE AND COLOR THE TATTOO
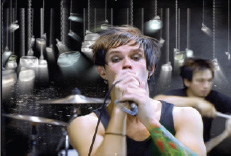
6. ISOLATE AND COLOR THE TATTOO
The key has made the color of the tattoo look bland. Most of the green is now gone. We’ll create another layer by duplicating the Paint_fix layer to compensate for the color shift. Remember, the Paint_fix layer was renamed FG in the Timeline.
Name the new layer “Tattoo” and delete all its effects. Just select the effects in the layer and press Delete on the keyboard. Drawing a rough mask around the tattoo with a feather of about 16 pixels will be sufficient to color it appropriately. A large feather radius allows the mask to be less accurate. Roughly animate the mask so that it follows the tattoo. Click the animation stopwatch on the mask shape (See Figure 32). You don’t need to animate every frame of the mask. Start with the first frame, then move to the last, then the middle. Add keyframes in between the ones that seem off. (SEE FIGURE 34.)

» 34
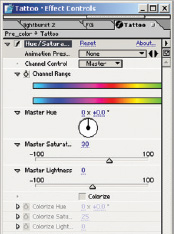
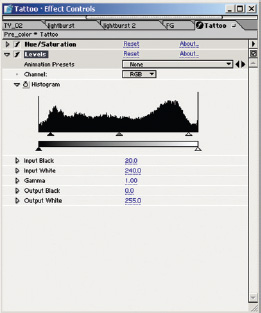
It doesn’t have to be exact because you have a large feather. Add a hue saturation. Choose Effect>Adjust>Hue/Saturation, with an increased master saturation value of about 30. Next, crush the image a bit with a level effect. Choose Effects>Adjust>Levels. The input black level should be around 20, and the input white level should be about 240. Now it looks like fresh ink! (SEE FIGURES 35 AND 36.)
» 35
» 36
![]() 7. ADD ATMOSPHERE AND DEPTH
7. ADD ATMOSPHERE AND DEPTH
We need to add some atmosphere and depth cueing. A smoke element shot on a black background will be used to do this. You can shoot your own elements by having smoke in front of duvetyne, a black non-reflective fabric. You can get stock footage as I have done many times through Artbeats.

37 »
Import the smoke fromLocal_key_to_arsonWIPKeytoArsonAssetsSmoke. (SEE FIGURE 37.)
Make sure the frame rate is 24fps. If you have ever looked at a mountain range, you may have noticed that the mountains that are further away have more of a grayish tint to them than the ones closer. Traditional painters studied such phenomena and used them in their work. The more you begin to composite the more you need to learn these traditional art skills. We will add a layer of smoke just above the BG layer. Changing the blending mode to Screen will add only the lighter values to the composite. The blackest parts of the smoke layer will become transparent. (SEE FIGURE 38.)
38 »
An opacity value of 50 on the layer will blend it in, making the background not so dark. This gives it the feeling that it has atmosphere and depth. The drummer still seems a little dark. (SEE FIGURE 39.)

39 »
Duplicate the smoke layer and make it the top layer. Since we have the blending mode and the transparency levels already set, we don’t need to make any adjustments. Put a fast blur with a blurriness value of 6 on the BG layer. This makes the background depth of field balance out with the depth of the drummer. The new layer blends in and adds more of the needed depth. This composite is almost complete.
We’re going to add more of a cool (temperature) look to it. Make an entirely new composite out of the Pre_color composite. Drag the Pre_color comp onto the Make New Composition icon (SEE FIGURE 40). Name the new composite FIN.
After Effects has something called an Adjustment Layer. This is a non-destructive layer that can hold effects. All the effects applied to the Adjustment Layer will be applied to all the layers under it within the Timeline. Create an adjustment layer. Choose Layer>New>Adjustment Layer. Put a CC Toner on the Adjustment Layer. Choose Effects>Image Control>CC Toner. Manipulate the midtones in the Toner menu from gray to medium blue, and make blend with original 70. Now the color temperature of the light in the composite looks cooler. (SEE FIGURE 41.)
The people now look like they are frozen. The surrounding color is desirable, but the skin needs to be warmer. With the adjustment layer selected, draw some quick junk masks around the people. (SEE FIGURE 42.). Set the Mask Properties to Subtract so that the Adjustment Layer affects the background and not the people. It is not necessary to animate the masks. Adjust the mask feather to 30. Now the people don’t look like they are frozen, and the shot is finally finished. (SEE FIGURE 43.)
40 »

41 »

42 »
43 »
![]() 9. APPLY ALL YOU HAVE DONE TO ANOTHER SHOT.
9. APPLY ALL YOU HAVE DONE TO ANOTHER SHOT.
We can now quickly finish a few more shots, by just replacing footage and changing the time duration. In the Project window, Ctrl-click (right-click) the RAW greenscreen footage of Shot 23, named KeytoArson60_36 and replace it with the Shot 27 RAW footage, which is named KeytoArson61_37. (SEE FIGURE 44.)
9a. Interpret the fields.
Interpret the footage by guessing the 3:2 pulldown for this new Shot 27 footage. The pulldown should be different between the two pieces of footage. (SEE FIGURE 45.)
9b. Make the correct frame length.
Shot 23 is 27 frames long. Shot 27 is 44 frames long. The composite frame lengths have to be adjusted in order to make them equal to the shot lengths of the new composites. Right away, rename this project Shot 27. This will make sure that you don’t loose Shot 23. It will also help clear up any confusion. Now we will correct all the lengths of the composites starting with the Paint_fix composite.
Choose Composition>Composition Settings and make the Duration 44 frames. (SEE FIGURE 46.)
The strokes in this composite will also have to be stretched to the correct frame length. (SEE FIGURE 47.)
This can be done by grabbing the end of the Clone Paint Timeline bar and pulling it to the end of the frame length, which is now 44. Adjust all the other composites so that the footage is extended all the way to the end of the 44 frames. Leave the background composites’ frame lengths alone. (SEE FIGURE 48.)

» 44

» 45
» 46

» 47

» 48
9c. Add variation.
The background is longer than 44 frames. Having the length of the composite longer allows variation to the animation on the consecutive shots. In the Pre_color composite we’ll move the BG layer in the Timeline to the left a few frames; 10 or so should be fine. This offsets the background making it different than Shot 23. (SEE FIGURE 49.)

» 49
You may find that some things such as masks need to be corrected. The tattoo layer in Pre_color needs to have its masks adjusted to follow the new footage. (SEE FIGURE 50.)

50 »
By replacing the footage and adjusting frame lengths, we have another complete shot in just a few minutes. This same procedure can be applied to all the shots that have a similar angle.
![]() 10. OUTPUT THE FINAL PRODUCT.
10. OUTPUT THE FINAL PRODUCT.
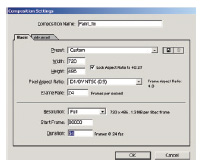
The fields need to be put back into the render in the same order as they were imported. Selecting the raw footage in the project displays all attributes of the footage, including the 3:2 removal information. In order to render the FIN composite you have to add it to the render queue. Choose Composition>Add to Render Queue. With the render queue open, click Best settings to open the render settings. Make sure the quality is set to best and the resolution is set to full. Under time sampling, make sure your 3:2 settings are the same as those in your raw greenscreen footage. In this case the field rendering should be set to Lower Field First, and the 3:2 pulldown should be set to SSWWW. (SEE FIGURE 51.)
Click OK. Then choose the output module by clicking on the word Lossless. Select the parameters you need to get the footage back into your NLE. I’ve set it up to render a TGA sequence. Pick a render directory by selecting Output to Name. Name your files Shot27_[#####].tga. Each # symbol represents the number padding of the frame rendered. Frame one will be, shot27_00001. tga. Frame 44 will be shot27_00044.tga and so on. The shot is finished. (SEE FIGURE 52.)

51 »
Conclusion
Digital compositing is one the most amazing visual effects tools to date. Desktop tools are affordable, accessible, and fairly intuitive. The possibilities are endless. But new tools and faster computers don’t make up for an artistic eye. Study traditional art skills. These can be applied to any artistic discipline and are timeless. Don’t get frustrated. The challenges of visual effects work enhance the rewards. Most of all, keep having fun. If it’s not fun, it’s not worth doing.

52 »
 SHOT MANAGEMENT
When working on large projects, it’s easy to lose track of your shots. A typical video may have 50 to 100 visual effects shots. Most individuals can’t afford to have someone program an asset-management system. Here are a few tips on organizing so you don’t get overwhelmed.
// USE AN NLE AS A SHOT ORGANIZER.
Any NLE will work as long as it has the option of superimposing text over clips in a layer. We use an NLE called the Leitch Velocity.
In Velocity, the shots clips are on one layer. Another layer is created with shot numbers that we assign. If the numbers are made large they are fairly easy to see. (SEE FIGURE 53.)
// COPY YOUR SHOTS TO A CENTRAL LOCATION.
Our server is set up with the following directory structure.
![]() R (RAW) drives contain the raw unfettered source footage. This would include the greenscreen clips as they were shot and background plates. Since the background footage was CG we wouldn’t have background plates.
R (RAW) drives contain the raw unfettered source footage. This would include the greenscreen clips as they were shot and background plates. Since the background footage was CG we wouldn’t have background plates.
![]() The W (WIP) drive is where all the data and asset work is stored. WIP is an abbreviation for “work in progress.” This directory is backed up nightly.
The W (WIP) drive is where all the data and asset work is stored. WIP is an abbreviation for “work in progress.” This directory is backed up nightly.
![]() The final drive in our system is the T drive. Temp is short for “temporary.” Anything at any time can be deleted from this drive. We have a directory within our temp directory called Deliver. Final composites are rendered to Deliver before they are imported into the NLE.
The final drive in our system is the T drive. Temp is short for “temporary.” Anything at any time can be deleted from this drive. We have a directory within our temp directory called Deliver. Final composites are rendered to Deliver before they are imported into the NLE.
// MAKE DIRECTORY STRUCTURES THAT KEEP YOU ORGANIZED.
You should formulate a directory structure that works for you. As deadlines approach things begin to get sloppy. If you just randomly start putting your files everywhere, eventually you will lose track and mess something up. My biggest pet peeve is saving files to the desktop. Saving to the desktop usually shows that there is no understanding of file structure at all. Get into a routine of saving your work in the same place and rendering to specific directories. Make a generic directory structure and call it “Template.” In that directory make subdirectories that correspond with the shot you are doing and the applications you use. A good way to organize is to duplicate the Template directory and rename it using the shot number from the NLE. Our template contains subdirectories named Maya, Max, After Effects, Zbrush, and Photoshop.

53 »
ABOUT THE AUTHOR

Ken Locsmandi has worked on several projects including The Matrix, The Cell, and Terminal, as well as many other commercial, television, DVD, and film projects. Ken is co-founder and CFO of Filmworks/FX a full-service post-production facility. The company has film-processing, telecine, editing, and visual effects.
As an animator for the film Rusty: A Dog’s Tale, for Calico Creations Ken developed techniques for live-action animal scenes that the studio used in its animation pipeline. From 1998 to 2000 Ken’s own company Filmworks/FX was contracted on such projects as The Matrix, The Cell, Backstreet Boys, and Janet Jackson music videos, as well as many other commercial, television, DVD, and film projects.
Ken has supervised such projects as .Smashmouth’s Pacific Coast Party, Lil BowWow’s “Basketball,” “Slum Village,” and “Tainted.” Ken won the Omni Award for best visual effects on television for the 2001 season finale of JAG. Ken also won the Slamdunk 2003 film writing competition for his short film script The Piñata.
54 & 55 »
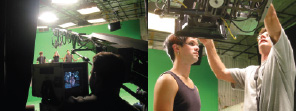
The total budget of this video was $10,000 dollars. It was shot on 35mm film, mostly on a greenscreen stage using Panavision cameras and a techno crane. I happen to own a laboratory and telecine, so shooting on film wasn’t an issue. My producers have also been in the film business for years, so they were able to pull in favors on equipment and film stock. (SEE FIGURES 54 AND 55)
You don’t need to shoot on film. Don’t get discouraged because you don’t have all these gadgets. You don’t need them. You just need to be creative with what you do have. You can do something very similar using inexpensive tools. A 24p video camera and tripod with a movable head would work great. Even handheld is fine, but tracking a background in is much more difficult. You will still need tracking marks if you’re going to move the camera on a tripod or by hand. The following are a list of fairly inexpensive tools.
![]() 24p camera or miniDV camera
24p camera or miniDV camera
![]() Tripod
Tripod
![]() Red gaffers tape
Red gaffers tape
![]() Greenscreen (paint)
Greenscreen (paint)
![]() Lighting kit
Lighting kit
![]() Good strong back
Good strong back
![]() Optional jib arm
Optional jib arm
![]() 3D application (Alias Maya, Avid SOFTIMAGE XSI, Autodesk 3ds max)
3D application (Alias Maya, Avid SOFTIMAGE XSI, Autodesk 3ds max)
![]() Compositing package (After Effects)
Compositing package (After Effects)
![]() Non-linear editor (Adobe Premiere Pro, Avid Xpress Pro DV, Apple Final Cut Pro)
Non-linear editor (Adobe Premiere Pro, Avid Xpress Pro DV, Apple Final Cut Pro)
![]() A crew that will work for pizza
A crew that will work for pizza