
MARK COLERAN
The core of my work involves the design and creation of computer graphics and heads-up displays for film. Wherever possible, I attempt to break down these screens into components and toolkits, with their own set of controls so they can be quickly and easily adapted for changes, to alternate scenes and other projects. Remember, it’s good to recycle!
The following outline is a breakdown of the creation of one of those elements. It involves a few little tricks and some basic techniques that can save you a great deal of time. It also touches on basic expressions that anybody who knows how to copy and paste can understand and use.
WHAT’S ON THE DVD
The DVD contains the project files used within this tutorial. As well as artwork and the beginning and end projects there are saved versions from the various stages. If needed you can open these up for clarification of steps and process.
׃׃ Artwork / Gyro_art.ai
PROJECT FILES ׃׃
׃׃ Stage 1_imported.aep
׃׃ Stage 2_organized.aep
׃׃ Stage 3_shape.aep
׃׃ Stage 4_shape.aep
׃׃ Stage 5_control.aep
׃׃ Stage 6_control.aep
׃׃ Stage 7_control.aep
The Artwork
The artwork for this project has been created in Adobe Illustrator CS. Although we will not go into a discussion on how to create artwork in Illustrator for animation in After Effects, there is one thing that needs to be stated clearly. When creating artwork, think about how it is going to be animated and what you need to create to achieve that end. It is easy to just create artwork, throw it into After Effects and then realize that not all the elements are on their own layers. I know I’ve done it a thousand times. It is much harder to change this after the event, and sometimes it requires you to restart the After Effects work from the beginning after making major changes to the artwork. Forward planning is always the key.
The other major thing that you can do to make your life far easier is to logically name all the artwork layers in Illustrator. This can pay dividends during work, when it comes to looking at your project and being able to tell rapidly which element is which. It is far easier to read Line work layer 1 and Text Layer 2 over Untitled 1 and Untitled 2.
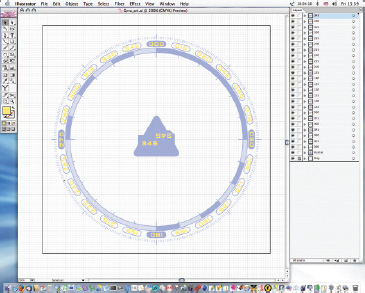
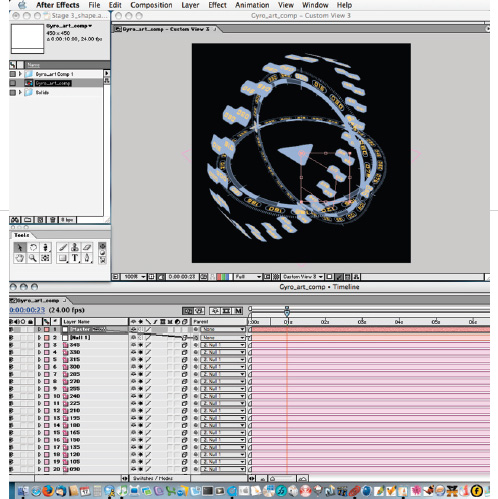
For this project we are using an element created in Adobe Illustrator consisting of 26 layers. From this we intend to make a 3D gyro-type device. The numbered layers from 000 to 345 are to create a ring around the main ring and the pointer. (SEE FIGURE 01.)
01 »
Tutorial
![]() THE PROJECT
THE PROJECT
First thing for us to do is import the artwork into After Effects.
Start a new project and either double-click in the project bin window or choose File>Import>File.
Select Gyro_art.ai. Before you import it though, be sure to make sure that Import As is set to Composition - Cropped Layers. (SEE FIGURE 02.)
Why? We want After Effects to import our artwork exactly as it is laid out in our original artwork. Importing as composition will create a new After Effects project and bring in the same layered structure as the artwork.
Save your file.

02 »
![]() SAVED PROJECT - STAGE 1 IMPORT
SAVED PROJECT - STAGE 1 IMPORT
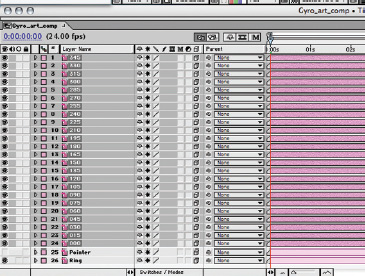
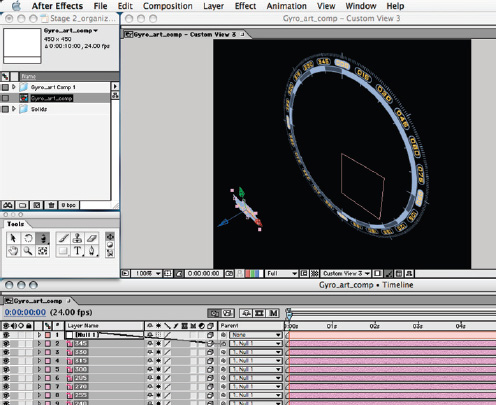
Open the composition Gyro_art Comp 1. You will see the same layer structure from the Illustrator file and all with nice names that tell you what they are.
Now we need to get organized. First we need to flick some switches. Switch all the layers to continuous rasterization.
Then toggle the 3D mode switch so that all the layers will work in 3D space. (SEE FIGURE 03.)

03 »
It will also be easier to to work with this artwork if the project is slightly larger. Press Cmd-K (Ctrl-K) to open the Composition Settings dialog box and type a value of 450x450 for width and height. While you are here you can also double-check that the frame rate and the duration are correct. For this piece we will use a duration of 10 seconds and a frame rate of 24fps.
Why? When you import artwork into After Effects, from either Illustrator or Photoshop as a composition, After Effects creates the new project settings for frame rate and duration based on the last project you created.
This is also a good time to make any changes to the composition name, as it will be difficult later. (SEE FIGURE 04.)

04 »
![]() PROJECT STAGE 2: ORGANIZE
PROJECT STAGE 2: ORGANIZE
We can now go about setting up our 3D device.
It will be easier to see what you are doing if you change your current artwork view in the main comp window. Change the view from Active Camera to Custom View 2 so that it looks like you are looking down on your artwork. (SEE FIGURE 05 & 06.)

05 »
06 »
For the sake of clarity we will also turn off the visibility of the layer Pointer. (SEE FIGURE 07.)

07 »
The first thing we are going to tackle are the small blocks that make up the majority of the layers. We want to use these to create a ring around the gyro. It is, however, pretty hard just to move these into a circular position by hand.
When the artwork was created, I knew how large this ring, constructed from the numbered block layers was going to have be in order to go around the outer edge of the ring layer. We can now use this value to rapidly set up this block ring.
Select all the block layers (the layers named 000 through to 345) and press P once to see the positions values for all these layers. We can now change the position to the known artwork size value, which in this case is 200. Insert into the Z value –200 and press return. All the layers have now jumped forwards by 200.
Create a new null object from Layer>New>Null Object. Null objects are handy objects that allow you to organize and structure objects in 3D space but that do not show up when you render them. Change to Null to 3D object by switching the 3D toggle in the timeline window. (SEE FIGURE 08 & 09)

08 »

09 »
Now reselect all the number blocks and parent them to this null. (SEE FIGURE 10.)
10 »
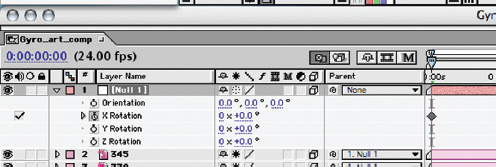
Select the null layer and press R to reveal the rotation values for the layer. (SEE FIGURE 11.)

11 »
What we are going to do here is use animation to set up our artwork rather than just use animation for the final output.
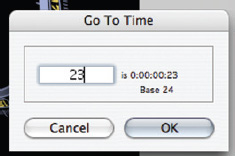
Click on the stopwatch to set a keyframe on the X Rotation at 0 frames. Click on the time display on the Timeline to bring up the Go To Time dialog box and type a value of 23. When the Timeline is at this time, click on the angle value for X rotation and set it to –345. (SEE FIGURE 12-14.)
12 »
13 »

14 »
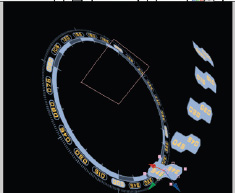
[Go back to the beginning of the Timeline and un-parent the first number 000. Move one frame using the Page Down key or your time control panel and then un-parent the next number 015. Repeat for all other blocks. By un-parenting the block we are dumping the blocks where they were at that point in time of parent. It just so happens that the amount of frames used to rotate the null are the same number of pieces that we wish to distribute. (SEE FIGURE 15.)

15 »
It is good to consider the possibilities offered by using animation to set up artwork. (SEE FIGURE 16.)
16 »
Once you have distributed all block layers, (SEE FIGURE 17.) you will want to parent them once again to the null layer. But before you do, set the time at 0 and click on the stopwatch on the null layer’s X rotation to remove the keyframes and animation. (SEE FIGURE 18-20.)

17 »

18 »

19 »

20 »
It can be a good idea just to scrub an angle value for your null layer just to make sure you got all the artwork elements you wanted to parent in place.
Next up we want to set up the two rings for the other two axes. Instead of going through the hassle of creating two rings in the artwork we can just duplicate the single ring we have.
Select the Ring layer in the Timeline and just press Cmd-D (Ctrl-D) or Edit>Duplicate. This will create a new layer. Press R to see the rotation values of this new layer. Set the X rotation value to –90. We can also turn on the visibility of the Pointer layer and repeat this process. Press R and set the X rotation to –90. (SEE FIGURE 21 & 22.)

21 »
22 »
![]() PROJECT STAGE 3: SHAPE
PROJECT STAGE 3: SHAPE
Right now our image looks complete. but for the sake of easily animating this, we need to make some final organizing touches.
We are just going to create a single null object to link all the other elements to so we can animate it as a single object.
Create a new null from Layer>New>Null Object. Press Cmd-Shift-Y (Ctrl-Shift-Y) to edit the null object’s name and rename it Master Null (SEE FIGURE 23 & 24.)

23 »
24 »
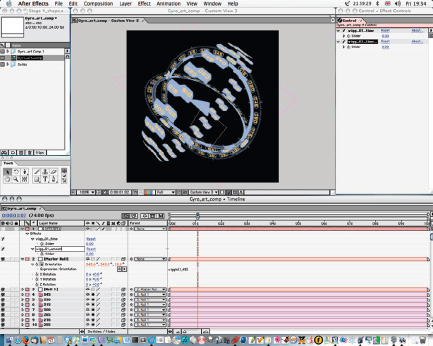
Select Null 1 and pickwhip it to the Master Null. Select Pointer, Ring, and Ring 2 and parent them to Master Null. You can now use this null object to control and move the gyro. Select Master Null and press R to reveal its rotation properties. If you want to you can resize the outer block ring so that it sits within the rings by altering the scale of Null 1. (SEE FIGURE 25 & 26.)
![]() PROJECT STAGE 4: SHAPE
PROJECT STAGE 4: SHAPE
Now, we could just leave it at that. The artwork is set up and ready to rock. But wait, there’s more. If we can get After Effects to help set up out artwork for us, why not get After Effects to do the animation for us?
This is where we get into basic expressions. Expressions are not something to be scared of. When you go to a foreign country is unnecessary to be able to speak the language fluently, but it can make life so much easier and more rewarding if you have a basic grasp of the local lingo. The same can be said for expressions.
25 »

26 »
Most people don’t want or don’t have the ability to think about any type of coding, but here we will use just one simple expression that has over the years saved me countless hours of painful keyframing and will essentially do your animation for you.

WHAT’S NEXT?
Click on Master Null and press R to reveal the Rotation properties. Select the orientation property to highlight it and select Animation>Add Expression. (SEE FIGURE 27 & 28.)

27 »

28 »
The equals sign next to the stopwatch mean that there is an active expression applied to that property. In the bar that has appeared in the Timeline we want to type, replacing the current contents “wiggle [1,45]”. Either click away from the type or press Enter to commit the expression.

29 »
If you now do a RAM Preview, you will see that the gyro is animated. Work done! But not quite yet.
Let’s have a look at the expression. Wiggle is a random-number generator that make a smooth move between the numbers it generates. The values we put into the brackets [1,45] tell the Wiggle how to make the random numbers. In our case it will generate a random number between 45 and –45 once a second. Values of [2,45] would do the math twice a second, and values of [0.5,45] would do the math every two seconds. With a little craft you can get the speed you need that fits perfectly with your desired animation.
The problem with this is that we rarely require an animation just to randomly move. We need some degree of control so it can perhaps start from a very gentle move and speed up. As it stands we cannot keyframe the expression amount, but there is a workaround that introduces you to a concept that I use extensively in my work: the control layer.
This is a layer that I use to animate and control every element and property in a project. Instead of hunting about in all the layers I only go to one place.
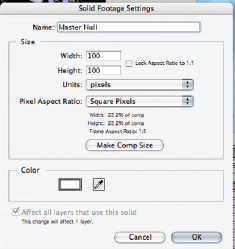
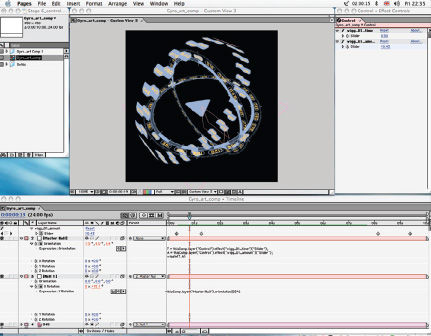
Let’s start with our own control layer. Create a new layer by pressing Cmd-Y (Ctrl-Y) or choosing Layer>New>Solid. Give the layer a logical name, Control. It doesn’t matter how big it is. Turn off the visibility of this solid. (SEE FIGURE 29.)

While the layer is still selected, choose Effect>Expression Controls and select Slider Control. This has added what appears to be an effect called Slider Control. Expression controls are ways of generating a value based on the properties you are already familiar with, such as sliders and angles. Although on their own they do nothing, combined with expressions they become extremely powerful. If you press E while the control layer is selected, it will reveal this property. Press Return to rename this layer to wigg_01_time. While this effect is still selected press Cmd-D (Ctrl-D) to duplicate it. Rename this one to wigg_01_amount. (SEE FIGURE 30.)
30 »
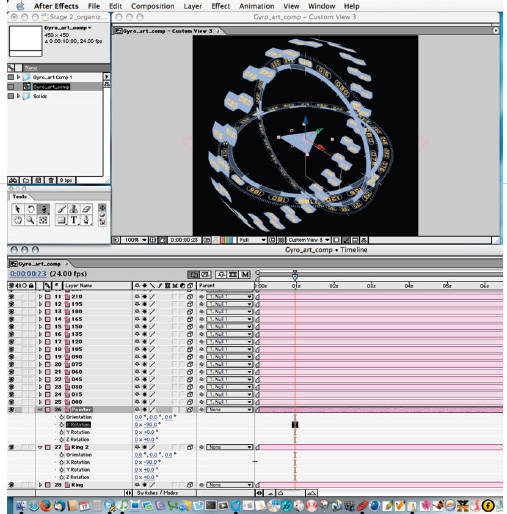
If you look at the layer below Control, the Master Null, we are going to modify the expression here to give us greater control over the animation. Selecting the text of the expression and holding the mouse over the bottom edge, we can enlarge the expression text area to see the whole expression. Place the cursor on the bottom edge and it will change to a vertical arrow. Pull down the bottom edge so you can see at least three lines of text. (SEE FIGURE 31.)

31 »
We will now edit this expression to work with the Slider Controls effect we added to our control layer.

The first thing we need to do is create a variable. A variable is a way of defining a value that is changeable so that we can still use it even though it might be changing. If we have a small equation like 2+2, if it changed to 2+3, we would have to rewrite the equation. If we said, however, that A is the first number and B is the second number then we could just write A+B and would never have to change the equation. It would just be the variables of A and B that would change. Lost you yet?
Placing the cursor at the beginning of the wiggle text, insert two lines above it. Type “T =” and then grab the pickwhip and drag it across to the wigg_01_time Slider value. After Effects will automatically write in the linking code for you. Although it looks complex the expression merely says; in this composition, on this layer, in this effect, using the value of this slider. Using the pickwhip is soooo much easier.

Just remember to add a semicolon after this text to tell After Effects that this is the end of a line.
Repeat this for the next line, typing “A = “then pickwhipping the second effect slider value from wigg_01_amount. Add the semicolon to the end of this line.
Your expression should look like this:
T = thisComp.layer[“Control”].effect[“wigg_01_time”][“Slider”];
A = thisComp.layer[“Control”].effect[“wigg_01_amount”][“Slider”];
wiggle[1,45]
All we need to do to this to finish it is change the wiggle values to match the variables we created. Replace the “1” with “T” and the “45” with “A”.
wiggle[T,A]
Now if you run a RAM Preview, you will see … nothing.
That is because the sliders by default have a value of 0. Let’s change these sliders so they have some effect. Type in or scrub a value of 2 into wigg_01_time. Type in or scrub a value of approximately 30 into wigg_01_amount.
Now run a RAM Preview and you will see the results. The Gyro now looks like it has come from a very badly flown aircraft!
Why bother to go through all this effort to create and expression and set of controls that appear to do exactly the same as one simple expression, applied to a single parameter of the object? Well, for a start we can now keyframe the animation. Drag your Timeline near the start of the comp but not exactly on the start. Click on the stopwatch to make a keyframe for the “wigg_01_amount”. Set this keyframe value to 0. Move your Timeline along slightly and set a value of 30. Set another keyframe slightly further along with another value, let’s say 60, and then another at 0 before the end of your composition. As you can now see, we have managed to wrangle the randomness and gained control over it. This can be extremely useful. (SEE FIGURE 32-37.)

32 »

33 »

34 »

35 »

36 »

37 »
Let’s just reset our keyframe values to something a bit more sedate. Set a value of 0.5 for the wigg_01_time and change the value keyframes for wigg_01_amount to 20.
GOTCHA…. Never set keyframe values for any parameter that involves time. In this case “wigg_01_time”. Time is calculated anew each time it changes and would cause the image to randomly jump each and every time it moves to a new frame.
We can now also expand our control and re-use the expression we made to control the object.
Select Null 1 and press R to reveal the Rotation properties if they are not already revealed. Opt-click (Alt-click) on the stopwatch to add an expression. Use the pick-whip to link this value to that of the Master Null, but be careful just to select the first parameter. (SEE FIGURE 38.)

38 »
What this will do is copy that value into this property, so our Null 1 is rotating on X to the same value as Master Null.
We might, however, want to add a little variety to its motion. All we have to do is go the end of the expression in Null 1 and type *2. This will effectively double the value that we are feeding off. (SEE FIGURE 39 & 40.)

39 »
40 »

41 »
If we want to keep this consistent with the way that we have been setting things up here, then instead of putting in an arbitrary value of 2 we should use a variable and give it its own control.
First add another Slider Control. Rename this wigg_extra. Edit the expression to look like this:
E = thisComp.layer[“Control”]. effect[“wigg_extra”][“Slider”];
thisComp.layer[“Master Null”]. orientation[0]*E
We are adding the variable line, pickwhipping after the equals sign to the wigg_extra parameter and adding the semicolon. On the next line we just change the *2 to *E. You can now set values for this using your control layer. (SEE FIGURE 38-42.)
42 »
![]() PROJECT STAGE 7: CONTROL
PROJECT STAGE 7: CONTROL
We have basically finished putting our Gyro together. It is possible for us to keep adding layers of detail and continually adding to our control layer. It is possible for to even manipulate a large number of our elements at once.
Let add some additional controls to this comp.
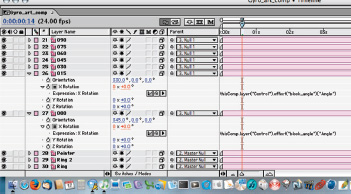
Add a new expression control to the layer Control. This time though, add an Angle Control. Rename this block_angle.
NOTE: Naming expression controls is very important. They should always have unique names. This is the reason we used wigg_01_amount earlier. If you wished to create additional wiggle controls then you just count up.
Select Layer 000 and press R to reveal the Rotation properties. (SEE FIGURE 42.)

42 »
Opt-click (Alt-click) on the stopwatch to create an expression on the X Rotation parameter and pickwhip this to the block_angle control.
This control will now turn the 000 layer. Not much good on its own! Copy the expression from Layer 000, go to the next layer up, press R and Opt-click (Alt-click) on the stopwatch for the X rotation. Paste the expression into the box. Repeat this for each layer all the way up to 345. (SEE FIGURE 43.)

43 »
You now have control of 24 elements from a single point with the bonus that you can also keyframe them from a single point.
There is however one last trick here. It is possible for you to create multiple versions of a composition with only one composition. This can allow you to quickly make huge changes to artwork non-destructively and test different animation options.
Select the layer Control. Press the * key on the numeric keypad to create a marker, double-click on the marker and add a comment, something like version 1. (SEE FIGURE 44.)
44 »
Now duplicate the “Control layer”. Make sure that it has exactly the same name as the previous control layer. Double-click on the layer marker to change the comment to version 2. (SEE FIGURE 45.)

45 »
Press Cmd-Shift-T (Ctrl-Shift-T) to open up the effects for this layer. You will see the same controls as for the version 1 layer.
You can now alter the settings and control here as much as you wish. Here is the payoff, though. Whichever version “Control Layer” is at the top of the Timeline is the version that will get used. (SEE FIGURE 46.)

46 »
Finishing
As a finishing point the final project has had some additional controls added and a few lights to create a more finished and less flat look. Motion blur switches have been toggled to on.
ABOUT THE AUTHOR
Mark Coleran is a motion graphics and visual effects designer for film and television. His clients have been as diverse as the BBC and The Cartoon Network through to the creation of computer interface graphics for feature films such as The World Is Not Enough, The Bourne Identity, Blade 2, and Aliens versus Predator. He is also the founder of the online, commercial motion graphics resource Layerlab. For more information and to see a portfolio, go to www.coleran.com.

