BY MASON DIXON, DESIGN AFTER NEXT
From Kansas City to Chicago to Detroit, the Midwest has been blossoming with creative video works: slick animations, seductive commercials, beautiful shorts, dancing-head music videos, 2D cutouts and illegal cutups. The vast majority are going unnoticed, unscreened, or scattered among festivals stubbornly clinging to genre barriers: animation vs. film, art vs. advertising. So in 2003 the Chicago Motion Graphics Festival was founded to collect and celebrate the best video works emerging in between 3D animation and traditional editing.
The opening for the 2003 festival had a special challenge: to intrigue a room of motion graphics artists while setting itself apart from the rest of the commercials, music videos, films, and artworks shown that night.
One of the first things motion graphics designers will criticize about other people’s work is the use of effects. There is a sense that effects are shortcuts for more complicated tricks created by artists who were being more innovative. Of course, not all effects and plug-ins produce cheap imitations of masterworks, but it seemed like pure animation would be more striking than an effects-based approach.
WHAT’S ON THE DVD
Included on the DVD are all of the source files for the project and a completed rendered sequence.
Tools:
Adobe After Effects, Photoshop, and Illustrator; Curious Labs’ Poser; and Digidesign’s Pro Tools
Budget:
Daily Planet, Creamy Orange, and Design After Next donated the time of their motion designers. The effort totaled over 200 hours and would have billed at over $18,000.
Main Concepts:
• Using the Rotate Camera tool
• Enhancing perspective distortion with depth
• Using Anchor Point to quickly make 3D models
• Mixing 2D and 3D objects in a convincing composition
• Storyboarding for quality and speed
• Using flowcharts to structure 3D compositions
 HALF OF MOTION IS SOUND
The final piece has a soundtrack that is tightly integrated with the visuals. This is one of the aspects that makes the piece so effective. In most projects an audio track is selected and visuals are composed to match. For this piece, the animation was created first and the audio track was composed later in Pro Tools.
Poser was used to make still images of people. Several images were combined in sequences to create walk cycles and other movements
Exploring the Project
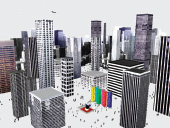
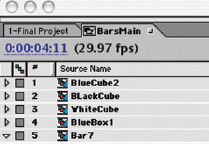
Open ChicagoMotionGraphics.aep, locate CMGF.mov, and double-click its icon in the Project window. Play the movie and pause every few seconds. Look at each individual element used to make a scene. This study will focus on the first sequence in which color bars fall away to reveal the city of Chicago. Open 1-Final Project by double-clicking on it in the Project window. Referring to the comp markers, here are a few of the highlights:
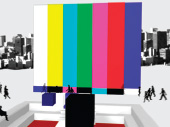
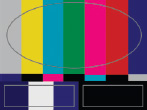
(1) Color Bars: This image, familiar to most video professionals, becomes the image that is matched at the beginning of the camera move.
(2) People: Image sequences were imported to create a group of people outlines that could walk through the streets of our constructed city. They are the first and one of the most important details used to make this animation convincing.
(3) Buildings: A first set of buildings draws on with a set of animated masks, while more buildings appear in the background.
(4) City: By the end of the camera move a full city is revealed with hundreds of buildings shown. While the city appears to be fully three-dimensional, the majority of the buildings are flat, two-dimensional photos. These photos are placed to reinforce the illusion of the city. The majority of these photos were prepared in either Photoshop or Illustrator and were imported as multilayer documents.

01 » THE COLOR BARS
02 » PEOPLE
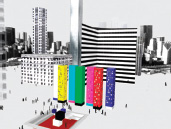
03 » BUILDINGS
04 » FULL CITY
05 » SOURCE FILES

06 » SOURCE FILES
When creating Illustrator files for import as a multilayer document, be sure to put each object on a separate layer, and each layer at the top of the layer order. Layers within layers are not yet supported for Illustrator import.]
Many plug-ins such as those by Zaxwerks, Digital Anarchy, and Trap-code provide ways to overcome some of After Effect’s out-of-the-box limitations by curving object surfaces, creating smoke, and arranging large 3D structures with many unique parts.
Tutorial 1 : Building a Building
After Effects provides a simplified 3D toolset that is designed to lend itself to the type of work that motion designers typically need. In larger 3D programs such as Alias’ Maya or Discreet’s 3ds max, a lot of authoring time is spent deciding how objects will be textured, and a lot of render time is spent on how surfaces reflect each other. After Effects instead makes every surface a video file. This can be a faster and more intuitive approach to 3D for those with a video background.
Most 3D animation packages also have a 3D modeling program. In After Effects, modeling objects to use in your 3D composites is done in normal compositions. However, a few special steps are needed to incorporate them into the final animation, and any lights or cameras used in the model compositions are lost when the model comp is incorporated into an animation composition. (SEE FIGURE 07.)

07 » SHOWING THE CONNECTION BETWEEN PRECOMPS USED AS 3D MODELS AND THE ANIMATIONS COMPS THEY ARE USED INSIDE OF.
Start by opening the project 2-Building *start.
Eventually this building will be used as a 3D model in our 3D city. Each building will need to look different. Each face of the building will be a duplicate copy of the building facade texture that we select for that building. In After Effects, it is the camera that is going to move around the buildings. The perspective of the camera to the building is what will angle and distort the building faces to make it look three-dimensional. So we do not want our texture to look three-dimensional. The best texture is a flat texture or a straight-on view of the building.
COLLAPSE TRANSFORMATION
1. 3D model compositions are dragged into a main composition. This has the effect of collapsing all of the model parts (layers) into one 3D object in the main comp.
2. The Collapse Transformation switch must be turned on for the 3D model’s layer in the main comp. Without it you will see only a picture of the 3D model in the main comp, rather than the actual model.
3. All lights and camera in the model’s precomposition are disregarded. The only lights and cameras that affect the final render are the ones in the main composition.
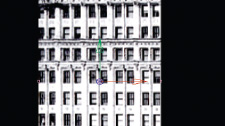
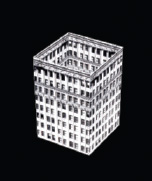
These images were taken from stock photographs of buildings in Chicago. They were brought into Photoshop, trimmed down to rectangles, and desaturated to take out any color. Also, while in Photoshop it is sometimes helpful to note the size of the layers. Those numbers can come in handy later. This one is 134 pixels wide by 233 pixels high.
Next we want to duplicate the layer four times around a center point to make our rectangle into a 3D box. There are several ways to accomplish this, but I prefer to rotate around a layer’s anchor point. If the edges of these building faces are to match up, and each is 134 pixels wide, then the center point of our box will be 67 pixels (134 divided by 2) behind the center of the current layer.
ESSENTIAL KEYBOARD SHORTCUTS
S = Scale
P = Position
R = Rotation (and Orientation if the layer is 3D)
A = Anchor Point
T = Opacity
[ = move layer’s in-point to the time marker
] = move layer’s out-point to the time marker
Cmd-D (Ctrl-D) = duplicate a layer
Cmd-G (Ctrl-G) = open the Go To Time box
Home and End = move time marker to beginning or end of the Timeline
J and K = move the time marker to next or previous visible keyframe
The main tools needed to effectively master 3D in After Effects are the Constrain Arrows and the 3D Views.
Using the Orbit Camera tool in a Custom View does not affect a composition. The position of layers and the way that the comp renders remain exactly the same. Orbiting the camera is simply a way to help you better understand where layers are positioned in 3D space.
For more detail on animating the building’s entrance, go into the Project window, open the x-precomps folder, open the BLDGS folder, and double-click the Bldg 14 composition. This composition shows how masks were animated in the building precomps to add some movement to their entrance in the main comp.
1. Select the layer. Notice the Constrain Arrows at the anchor point. (SEE FIGURE 08.)
2. Set the third number of the anchor point (the Z-axis) to 67. This moves the anchor point of the layer 67 pixels (half the layer width) behind the layer.
3. Set your View to Custom View 1. (SEE FIGURE 09.)
4. Select the Orbit Camera tool. (SEE FIGURE 10.)
5. Click in the middle of the Display window and drag the cursor to the right. This will orbit the building face around to show the anchor point behind it.
6. Duplicate the Building Face layer. Select the Building Face 2 layer and set its Y-Rotation to 0x90.
7. Duplicate the layer again and set the new layer’s Y-Rotation to 0x180.
8. Duplicate the layer again and set the new layer’s Y-Rotation to 0x270. You should now have a building! (SEE FIGURE 11.)
9. Use the Orbit Camera tool to swoop around it and get a sense of how it will look from different camera angles.
08 » CONSTRAIN ARROWS USED IN 3D
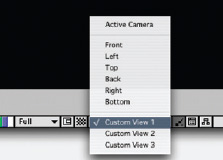
09 » 3D VIEWS

10 » ORBIT TOOL
11 » A SIMPLE 3D MODEL.
TYPING TIMECODE
When using the Go To Time box or setting the composition’s duration, timecode does not need to be treated sensitively. Quickly typing a 300 will give you 3 seconds. Typing 1015 will give you 10 seconds and 15 frames. There is no need to take extra time to type in colons or semicolons.]
Tutorial 2 : Building the Skyline
“Smoke and mirrors” is my term for a type of trick that is constantly useful in After Effects. Many of the techniques used in the special effects field were invented by Alfred Hitchcock for films such as Vertigo. Hitchcock used smoke, mirrors, painted panes of glass, and projections to create the groundbreaking effects of his time. These days we have lots of fancy computers, yet often we use them to do the same things that Hitchcock did with his smoke and mirrors.
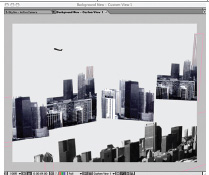
In this project, our smoke and mirrors refers to how we built the skyline. Rather than creating an entire city of buildings, we will create the illusion of an entire city of buildings. Once a few buildings have come into the scene, the audience has registered that they are looking at a city. They are sold on the effect, and from that point forward it is only a matter of maintaining that perception. Rather than trying to create hundreds of buildings for our city, we only create the first 10 and use a backdrop to give the illusion that these buildings continue into the distance.
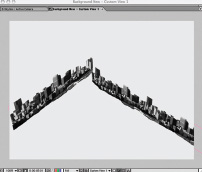
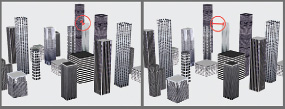
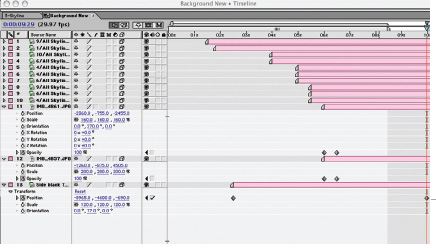
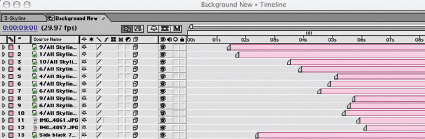
1. Open the 3-Skyline *start composition. This is a duplicate of the final composition with the background layers turned off. Notice that even though there are 15 buildings in our city it still looks pretty sparse. (SEE FIGURE 12 & 13.)
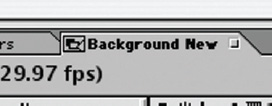
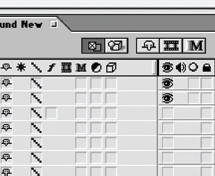
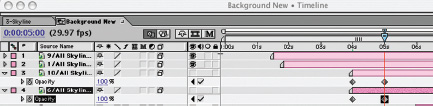
2. Hold down the Option (Alt) key and double-click the Background New layer. This will take you into the Background New composition. (SEE FIGURE 14.)
12 » CITY WITH BACKDROP
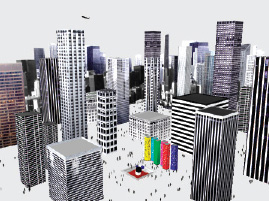
13 » CITY WITHOUT BACKDROP

14 » BACKGROUND TAB
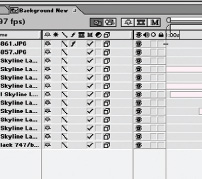
3. Turn on the 3D Switch for all the layers. (SEE FIGURE 15.) You can click on the first one, then while still holding the mouse button depressed, drag straight down to activate all layers.
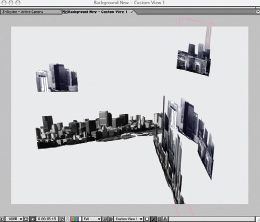
4. Change the View menu in the Display window to Custom View 2. This allows us to select and use the Orbit Camera tool [009 Orbit Tool.tiff] to look around the composition in three dimensions, without altering the active camera or object layers’ positions. (SEE FIGURE 16.)
5. At first, the Eyeball Switch on each layer is turned off. I like to start by assembling the source materials, then turning on the Eyeball Switch for a few layers at a time in order to assign them Positions and start times. Turn on the eyeball switch for the first two layers. (SEE FIGURE 17.)
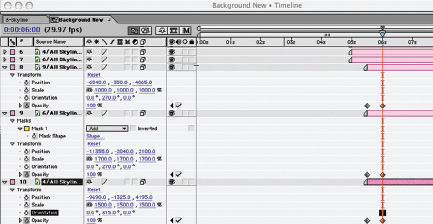
6. These first two layers are base plates. They are designed to take up the majority of the city skyline area that the audience will see. Select the first layer and set its Scale to 1000.
7. Set the first layer’s Position to – 5522, –600, 2375, and its Orientation to 0, 270, 0.
Selecting a layer and pressing the ˜ key will collapse it back to a single line in the Timeline. This helps to hide properties when you are done with them to keep the Timeline view concise.
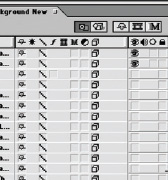
15 » TURN ON THE 3D SWITCH
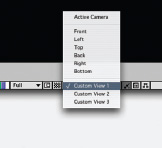
16 » USE CUSTOM VIEW 1
17 » TURN ON THE LAYERS A FEW AT A TIME
8. Go To Time 116 and move the first layer’s in-point to the time marker (use the [key). This layer is now posed to fill the left-hand view of the camera. (SEE FIGURE 18.)
9. Select the second layer and set its Position to 765, –415, 5515 and its Scale to 1750.
10. Go To Time 125 (the first time this layer will possibly be seen) and move the layers in-point to the time marker. (SEE FIGURES 19 & 20.)
11. Use the Orbit Camera tool to orbit around these two layers. Notice how their angle helps them to better fill the area.
12. Turn on the eyeball switch for Layers 3 and 4. These two layers have taller buildings which will sit behind the main backdrop layers to enhance the sense of depth in our skyline.
13. Select Layer 3 and set its Scale to 1100 and its Position to –2615, –990, –6070.
14. Select Layer 4 and set its Scale to 1700 and its Position to –1750, 1950, 7815.

18 »

19 »
20 » DEPENDING ON HOW YOU USE THE ORBIT TOOL, YOU MAY HAVE A DIFFERENT VIEW THAN THIS.
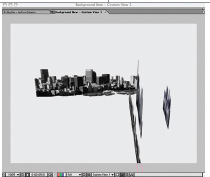
PERSPECTIVE DISTORTION
As a 3D camera moves around a set of 3D layers, those at different depths will appear to move in relation to each other. Rotating a 2D photo in 3D space does not produce the same appearance. This effect is called perspective distortion, and it is how our eyes see depth in the physical world.
15. Use the Orbit Camera tool to orbit around the layers and get a sense of where they are positioned in relation to the first two backdrop layers. Layer 3 sits only slightly behind, while Layer 4 is positioned more than twice as far back. Layer 3 will have only a slight amount of perspective distortion compared to Layer 4. (SEE FIGURES 21, 22 & 23.)
16. When designing a composite of many objects, as is typically done in After Effects, you should be constantly concerned with how each object enters and exits the stage. When our camera pulls away from the color bars, the first two layers will be revealed on either sides of the color bar buildings. Go back to the 3-Skyline composition and Go To Time 3 seconds. (SEE FIGURE 24.)
17. Now Go To Time 400. At this point in our composition the town center is filled in with buildings. The backdrop is to a large extent visible between the main buildings, and thus this is a good time to start bringing in new buildings behind our main backdrop. Since these new elements are not the focus, a simple entrance is better than an attention-grabbing, effects-laden one. A simple fade-in will be more effective than anything else.
18. Hold down the Option (Alt) key and double-click the Background New layer. This will take you into the Background New composition and position the time marker at exactly the same point (4 seconds).
21 »
22 » TRUE 3D ROTATION WITH PERSPECTIVE DISTORTION REQUIRES THE COLLAPSE TRANSFORMATION SWITCH TO BE TURNED ON.

23 » ROTATING A FLAT 2D LAYER IN 3D SPACE. THERE IS NO PERSPECTIVE DISTORTION, AND COLLAPSE TRANSFORMATION IS TURNED OFF.ON.

24 »
19. Select both Layers 3 and 4 and move their in-points to the time marker. Turn on the stopwatch for both of these layers’ Opacity and set their Opacity to 0.
20. Go To Time 500 and set the Opacity of both layers to 100. (SEE FIGURE 25.)
21. Next we will add several more layers in different positions and at different depths to add more sophistication to the perspective distortion of the backdrop. Turn on the eyeball switch for Layers 5, 6 and 7.
22. Set Layer 5’s Scale to 1900, its Position to –4570, –1300, 7350, and its Orientation to 0, 333, 0.
23. Set Layer 6’s Scale to 1800, its Position to –13340, –20, –40, and its Orientation to 0, 280, 0.
24. Set Layer 7’s Scale to 1700, its Position to –13300, –1690, 10425, and its Orientation to 0, 310, 0.
25. Set all three layers’ in-points to 500, turn on the stopwatch for Opacity, and set each layer’s Opacity to 0. Go To Time 515 and set the Opacity of all three layers up to 100. [024 layers567. tiff]
26. Use the Orbit Camera tool to orbit around the layers and get a sense of where they were positioned. Consider how the variation in depth and position will help to make the backdrop look more complex and convincing. (SEE FIGURES 26 & 27.)
27. Turn on the eyeball switch for Layers 8, 9, and 10.
25 »

26 »
27 » PRACTICE WITH THE ORBIT TOOL BY TRYING TO MATCH THE ANGLE OF VIEW HERE.
28. Set Layer 8’s Scale to 1000, its Position to –6540, –350, –4865, and its Orientation to 0, 270, 0.
29. Set Layer 9’s Scale to 1700, its Position to –11355, –2040, 2100, and its Orientation to 0, 270, 0.
30. Set Layer 10’s Scale to 1500, its Position to –9690, –1325, 4195, and its Orientation to 0, 315, 0.
31. Set the in-point of Layers 8, 9, and 10 to time 515 and turn on their stopwatches for Opacity.
32. Set all three layers’ Opacity to 0, Go To Time 600 and set it to 100. (SEE FIGURE 28.)
33. Use the Orbit Camera tool to orbit around the growing city backdrop. Layer 8 serves a slightly different purpose here than some of the previous layers. It extends the reach of the left side of our backdrop. When the camera move in the previous composition completes, the very left-hand edge of our skyline was showing. We want to keep the illusion that the skyline continues on in both directions, so a duplicate skyline piece has been placed just beyond the left edge to help this illusion. (SEE FIGURE 29.)
34. Each layer so far has been a group of buildings. Layers 11, 12, and 13 are single objects, which add just a few final touches of variation and believability. Select Layers 11 and 12 and turn on their eyeball switches.
28 »

29 »
35. Set Layer 11’s Scale to 160, Position to –2360, –755, –2455, and Orientation to 0, 270, 0.
36. Set Layer 12’s Scale to 200, Position to –1260, –875, 4505, and leave Orientation at 0.
37. With the time marker at 600, set both layer’s in-points to the current time, turn on the stopwatch for Opacity, and set Opacity to 0.
38. Go To Time 615 and set the Opacity of both layers to 100. (SEE FIGURE 30.)
39. Orbit around the objects in the Display window to see where their placement is. They were placed in front of the main backdrop to help bridge the viewer’s eye from the 3D buildings to the flat photos of the backdrop. (SEE FIGURE 31.)
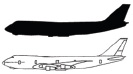
40. The final layer is a small airplane which flies across the sky.
41. Select Layer 13 and turn on its eyeball switch.
42. Go To Time 215 and set the layer’s inpoint to the current time.
43. Set the layer’s Scale to 120 and its Orientation to 0, 77, 0.
44. Set its Position to –2840, –2280, 5410 and turn on the position stopwatch.

30 »

31 »
45. Press the End key to go to the end of the Timeline, and set the layer’s Position to – 8965, –4600, –690. Scrub along the Timeline to watch the airplane’s movement. (SEE FIGURE 32 & 33.)
46. One small way to add a bit of professionalism to this composite is to stagger the in-points of the layers. When groups of two or three layers are starting at the same time, pulling each of them forward or backward a few frames will help to make their entrance less synchronized and more spontaneous. (SEE FIGURE 34.)
47. Finally, turn on the Motion Blur switch for all the layers. Since 3D models use the Collapse Transformation switch, they rely on the Motion Blur of layers below. These layers in particular are not moving, but we want the camera movement around them to contribute to the motion blur. (SEE FIGURE 35.)
48. Use the tabs across the top of the Timeline to return to the 3-Skyline composition, and press the 0 key on the numeric keypad to do a RAM Preview. If you are not able to load the entire sequence into RAM, then reduce the composition’s resolution down to Half and do another RAM Preview. (SEE FIGURE 36.)
32 »
33 »
34 » STAGGER THE IN POINTS OF THE LAYERS

35 » TURN ON THE MOTION BLUR SWITCHES
36 »
Tutorial 3: Composition Timing
When the time for action comes, the time for preparation has passed. If you study how to operate a camera and shoot footage, the first and possibly most important lesson you would learn is that there is very little you can do once you get on location. The majority of hard work is done before you ever pick up a camera. This is called preproduction.
The importance of preproduction is just as true for video producers who use computers instead cameras. Every minute spent with a pen and paper saves 10 minutes of time in the program. Even the most adept After Effects user cannot create rough images in the program as fast as the imagination creates them in your mind.

37 »

38 »

39 »

40 »
The best movies were labored over on paper, in Photoshop or in Illustrator. The individual scenes and transitions were visualized, considered, erased and redrawn, before the artist ever picked up a light pen or mouse. Begin with an idea and then figure out how to make the tools instantiate the vision; otherwise, the technology will entirely determine the tone and body of your message. (SEE FIGURES 40-45.)
With this project we began with the idea of a camera move which pulls away from color bars to reveal a 3D version of the city of Chicago. We knew that parts of the color bars needed to be comprised of actual 3D objects. (SEE FIGURE 46.)
So we conceived a series of buildings made of flat colors which would be the long stripes of color at the top of the color bar. We then considered a small park area which would have a tower and some benches that would form the bottom portion of the color bars.
Each of the color buildings and benches were constructed exactly as described in the previous tutorial. The buildings were positioned right next to each other, and that composition was placed in the scene in front of the camera’s starting position.

41 »

42 »

43 »
44 »

45 »
46 » THE COLOR RECTANGLES ACROSS THE TOP AND MIDDLE COME FROM THE COLORED BUILDINGS, THE SQUARES IN THE LOWER LEFT FROM THE PARK BENCHES, AND THE
1. Open 1-Final Project.aep and go to Time Marker 2. Notice that even a full second after the camera move has begun, the color bars are still fully together.
2. Select the BarsMain layer. It is right at this point that we want the buildings to start moving apart. Press the U key to reveal any keyframed parameters, and nothing happens. The building movement has been animated in the BarsMain precomp. But we need to see the camera move in this comp in order to know where to put the keyframes in the precomp.
3. Hold down the Option (Alt) key and double-click the BarsMain layer. The BarsMain precomp opens in your Display window, but the time marker is set at exactly the time corresponding to where the it was in the 1-FinalProject comp. Notice that each bar begins to move at this time.
4. Press the K key to move the time marker to the next keyframe at time 411. Click on the “1-Final Project” tab at the top of the Timeline window. (SEE FIGURE 47.)
5. Notice that the time marker is now at 411 and the Display window shows the color buildings after they have been moved apart.
Compositions and precompositions are two names for the same thing. The prefix indicates that the composition occurs before other compositions in the project flowchart. Not only does Option (Alt)+double-clicking a layer take you into the previous composition for that layer, but it also synchronizes the time between the two compositions. This allows you to place keyframes in previous compositions at exactly the right times for their action to correspond to the action in the main composition.
Also, the tabs across the top of the Timeline also become like a series of bread crumbs as you drill down through a chain of pre-compositions. Closing them as you move back up to the main composition helps to keep the Tab Well across the top of the Timeline window concise and understandable. (SEE FIGURES 48 & 49.)
![]()
Holding down Option (Alt) and double-clicking a layer takes you into the pre-composition at exactly the equivalent point in the Timeline.
47 » TIMING IS SYNCHRONIZED BETWEEN COMPOSITIONS SHOWN IN TABS.
Comp Flowchart View is provided within After Effects because flowcharts are a simpler way of depicting the variety of compositional structures that can be created inside the program. After Effects compositions can be combined in a more complex way than layers or sequences used in other programs like Photoshop or Final Cut Pro.
6. Open the 1-Final Project composition from the Project window and click the Comp Flowchart Button at the bottom-right side of the Display window. (SEE FIGURE 50.)
This launches the Comp Flowchart View. This is not an authoring part of the program; you cannot change the compositions from this window. The user interface is a bit hard to use, but with a little practice the Comp Flowchart View can become an essential part of both preproduction and project management. Holding down the spacebar gives you the Hand tool, which can be used to quickly navigate around a large flowchart. (SEE FIGURE 51.)
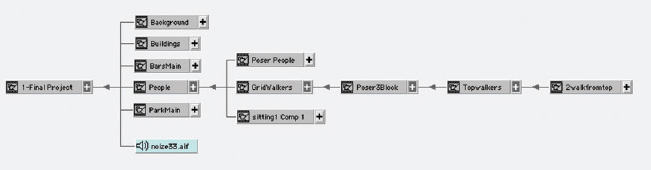
48 » FLOWCHART VIEW CAN BE A USEFUL TOOL TO UNDERSTAND COMPOSITION STRUCTURES.
49 » THE TAB WELL CAN BE YOUR FRIEND.
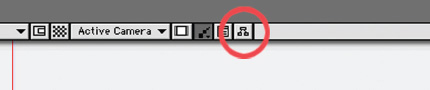
50 » THE FLOWCHART BUTTON TAKES YOU INTO FLOWCHART VIEW.]
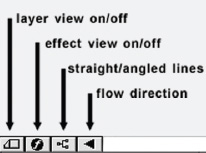
51 » FLOWCHART VIEW OPTIONS IN THE LOWER LEFT CORNER
ABOUT THE ANIMATORS
Jason White, Daily Planet ![]() www.DailyPlanetLtd.com
www.DailyPlanetLtd.com
Jason White began his art career drawing, painting, and studying the fine arts. An interest in digital art and animation led him to study 3D animation and motion graphics at the Illinois Institute of Art in Chicago. White currently works as Director of Motion Graphics at Daily Planet on a range of projects, including television shows, movie intros, commercials, and music videos. Daily Planet is a 25-year-old full-service editorial and motion graphics company located on the 29th floor of the NBC Tower in downtown Chicago. Clients include major advertising agencies, Dell, History Channel, and SC Johnson. Daily Planet Ltd. is an integral component to the thriving local post-production industry.

Nick Campbell, Creamy Orange ![]() www.CreamyOrange.com
www.CreamyOrange.com
Creamy Orange is the personal portfolio of Nick Campbell. The site has become a venue for his contemporary design techniques and multi-layered motion work. A self-proclaimed “Keyframe Scientist,” Nick strives to become the first Motion Graphics Physicist, fusing intricate, subatomic details with strong nuclear ideas and gravitational design. Outside of the laboratory, you can usually find him with a camera in one hand and a cup of coffee in the other.
AUTHOR
Mason Dixon, Design After Next ![]() www.DesignAfterNext.com
www.DesignAfterNext.com
Mason currently works as Chief Technology Officer of Design After Next, a thriving identity design firm. He is certified in video design and web media software by Apple, Adobe, and Macromedia. He studied at the Advanced Communications Technologies Laboratory in Austin Texas, and is a Nettime.org moderator. Current and past clients include the Navy Interactive Courseware Department, American Analog Set, Yahoo Chat, Mayo Clinic and DJ Spooky.
CHICAGO MOTION

The Chicago Motion Graphics Festival (CMGF) was founded out of a need to give the motion graphics artists and producers of the Midwest a forum for their cutting-edge creations. We are looking though a wide-angle lens at the motion graphics landscape, searching for the most innovative designs. We seek to promote those who are creating pioneering visuals, actively build an audience for Motion Graphics in the general public, and hope to Hinspire everyone else in the process.