
Chapter Two. Working in the Document Window
The Document window is the basic workspace in Dreamweaver. The Document window is where you design Web pages; you can create or paste text, embed images, define links, or place and sometimes create page elements like style sheets (that control the look of a page), input forms, embed animation, and create interactive objects (that react to actions by a visitor). In short, the Document window is where you will spend the bulk of your time in Dreamweaver. Even if you have some familiarity with creating pages in Dreamweaver, there are many features rooted within the various elements of the Document window, so it is worthwhile to explore them in some detail.
It is important to be aware of the fact that many features in the Document window, such as defining links, do not work properly unless you have already defined a Dreamweaver site. The whole process of defining a site in Dreamweaver is covered in Chapter 1, “Creating a Web Site,” and you should make sure you have a properly defined site before creating and editing pages in the Document window.
#10. Exploring the Document Window
You work in the Document window when you open an existing Web page or when you create a new one. Use the File menu to open an existing Web page (File > Open, or File > Open Recent to access a list of recently opened pages) or to create a new Web page (File > New).
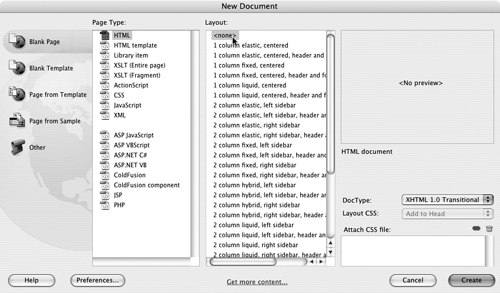
When you choose File > New, the New Document dialog opens. Throughout this book we will explore some of the more useful categories of new documents, but the first and main type of new document you’ll create in the New Document dialog is a basic page, and the basic and main type of Web page you’ll create is an HTML page (Figure 10a).
Figure 10a. New Document dialog, with a new HTML Web page selected.

Clicking the Create button in the New Document dialog generates a new page, and opens that page in the Document window. The Document window is crammed with features. The objects floating around in the Document window are mainly panels, menus, and toolbars, which we’ll explore in the following How-Tos in this chapter. But there are plenty of useful (and sometimes unintuitive) features in just the Document window that should be part of your design arsenal.
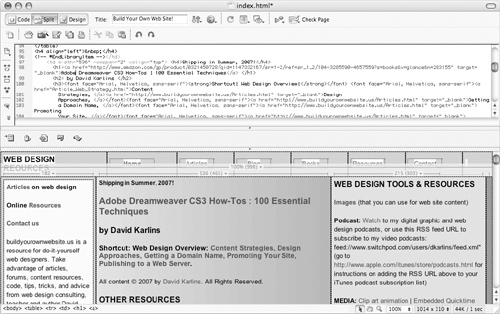
The Document window can display with three views: Code, Split, and Design. Code view displays only code, and is used by designers who wish to bypass Dreamweaver’s ability to generate code. Design view hides most code, providing a graphical design interface. Split view displays code on the top of the Document window and a graphical design environment on the bottom (Figure 10b).
Figure 10b. Split view in the Document window displays code on top and a graphical design interface on the bottom.

There are a number of advantages to working in Split view, both for designers who know how to write code, as well as for designers who are not comfortable or proficient in writing their own code. Split view is a way for proficient coders to see a graphical representation of the code they are writing. And Split view is a good way for designers who are not conversant in coding to become familiar with coding, since generated code appears as you create elements in the graphical design window. And, even though Dreamweaver is the best existing program for generating HTML and other page layout code, there are times when the only way to troubleshoot a design problem is to edit the code directly. If you edit code in Split view, you can see the effect by clicking in the lower (graphical) window.
Stripped of menus and panels, the main features available in the Document window are rulers, the tag selector, and the status bar. Horizontal and vertical rulers provide a quick way to judge the size of your page and objects on it. Hide or change ruler attributes by choosing View > Rulers from the menu. The View > Rulers submenu lets you show or hide rulers and change the unit of measurement from the default pixels to centimeters or inches.
The tag selector, on the left side of the status bar on the bottom of the Document window, allows you to select specific tags for editing in the Property inspector (the Property inspector is examined in #11, “Viewing Panels and the Property Inspector”). The tag selector is especially handy when you’re working with objects like tables or embedded CSS (page design objects), and simply clicking an object in the Document window itself can be difficult (Figure 10c).
Figure 10c. Selecting the Body tag in the tag selector section of the status bar.
![]()
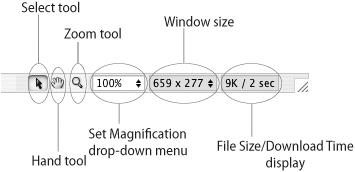
The right side of the status bar has some handy and exciting tools that were introduced in Dreamweaver 8 and retained in CS3.
• The Select and Hand tools provide two ways to navigate around your document. The Select tool is the default mode; it allows you to click on objects, or click and drag to select text. The Hand tool works like similar tools in Adobe Photoshop or Illustrator—allowing you to grab a section of the page and drag it in or out of view.
• The Zoom tool is a way to draw a marquee and enlarge a section of a page.
• To exit either the Zoom or Hand tool mode and return to the default cursor, click the Select tool.
• The Set Magnification drop-down menu is another way to define magnification.
• The Window size display tells you the size of your design window—normally in pixels.
• The File Size/Download Time display estimates download time for the page parameters (Figure 10d).
Figure 10d. Tools in the status bar.
You can adjust the units displayed for window size, or the connection speed used to estimate download time in the Status Bar category of the Preferences dialog. On the Mac, choose Dreamweaver > Preferences, and in Windows choose Edit > Preferences, and then select the Status Bar category to edit these parameters.
#11. Viewing Panels and the Property Inspector
Many of the features explored in other chapters and How-Tos in this book are available in panels—rectangular boxes that are normally aligned to the right of the Document window. While each panel obviously controls different features of your Web site or Web pages, panels have some features in common.
Dreamweaver panels all provide access to very different features. But there are display elements common to all panels (Figure 11a).
Figure 11a. Elements of Dreamweaver panels.
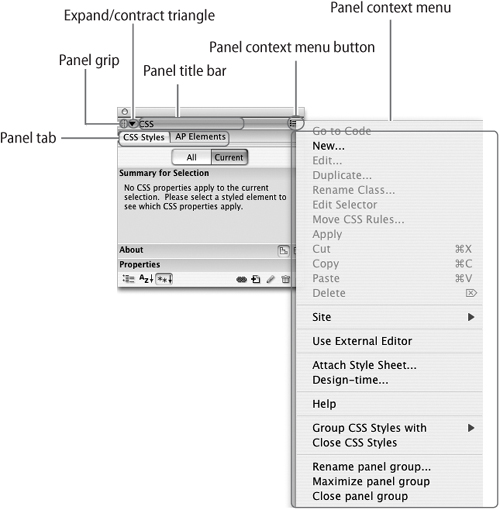
You can drag panels from their default position on the right side of the Document window by dragging on the Panel grip.
You can separate tabbed panels by choosing Group [the name of the selected panel] with from the Panel context menu, and then choosing New panel group (Figure 11b).
Figure 11b. Separating a panel from a tabbed group.

Similarly, you can group panels with other panels as tabbed groups by choosing Group [the name of the selected panel] with from the Panel context menu and selecting another panel to which the selected panel will be grouped.
You can expand or contract panels using the Expand/contract triangle. To hide (or unhide) all open panels, press the F4 function key.
Display panels by selecting them from the Window menu. Active panels display with check marks next to them in the Window menu.
The Properties panel—usually called the Property inspector—is a unique and special type of panel. It is adaptive in that it allows you to edit properties of a selected object, somewhat similar to the Object bar in many Adobe applications. For example, if you select text, the Property inspector makes available options for formatting type, including type size, type font, type style, and link attributes (Figure 11c).
Figure 11c. With text selected, the Property inspector allows you to define type attributes.

Or, if you select an image, the Property inspector makes available image-formatting attributes, like image size, ALT text (alternate text to make your image accessible to visitors or browsers who cannot view images), or hotspots (clickable linked areas within an image).
#12. Editing Page Content in Three Views
There are three ways to edit the content of a Web page in Dreamweaver’s Document window: Code view, Split view, or Design view. Even if you never plan to enter a line of code, it is helpful to understand how these three views work and how to take advantage of them.
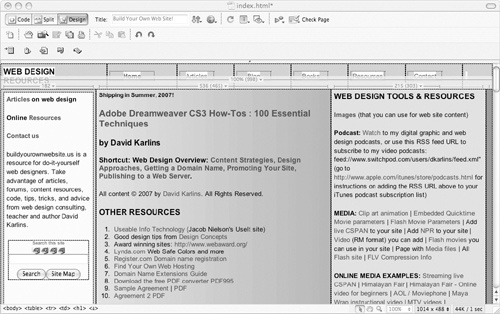
Most page designers do most of their work in Design view. Design view allows you to apply page design formatting and add content to your page in an environment that looks like a word processor. As you enter text, embed images, or apply formatting—using graphical design tools—Dreamweaver generates the necessary code (Figure 12a).
Figure 12a. Working in Design view.
The easiest way to see how this works is in Split view. In Split view, the top of the screen displays generated code, and the bottom of the screen displays the graphical design interface (Figure 12b).
Figure 12b. Working in Split view.
At the bottom of the screen in Split view (or on the entire screen in Design view), Dreamweaver displays a representation of how that code will be interpreted in a browser. This can only be an approximation, as different browsers and different versions of browsers display code differently. Dreamweaver CS3 provides two approaches to seeing more accurate previews of your page in different browsing environments; you can use the tools in the Style Rendering toolbar, or click the Preview/Debug in Browser button in the Document toolbar.
When you define page elements in Design view, your work is translated into code that is interpreted by browsers. When you enter code into Code view, that code is translated into a graphical display in Design view. If you enter code into the Code view of the Document window, the Design view updates when you switch to Design view. Or, if you are in Split view, changes to code update in the Design window when you click in the window.
#13. Examining Dreamweaver Toolbars
Many of Dreamweaver’s page design tools are most easily accessed through toolbars. The Standard toolbar has some basic tools that are common to almost any application. The Document toolbar, on the other hand, provides access to an underappreciated set of rather powerful page design and management tools. The toolbars reside at the top of the Document window, and are displayed (if they are hidden) by choosing them from the View > Toolbars menu.
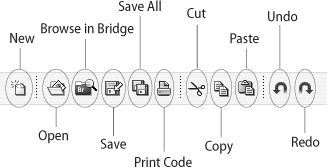
The tools in the Standard toolbar allow you to create new files, open existing files, print code, copy, cut, paste, and undo or redo an action. All these features are accessible from either the File or Edit menus (Figure 13a).
Figure 13a. The Standard toolbar.
The Document toolbar collects some of the most frequently used tools for page design and management. The three buttons on the left allow you to toggle between Code, Split, and Design view (these views are discussed for both Mac and Windows users in #10, “Exploring the Document Window”).
The Document toolbar also provides a convenient way to define a page title—the page “name” that displays in the title bar of a visitor’s browser. You define a page title by typing the text to be displayed in the Title box in the Document toolbar.
The rest of the Document toolbar tools are used for managing documents, document display, and file management (Figure 13b).
Figure 13b. Entering a page title in the Document window.

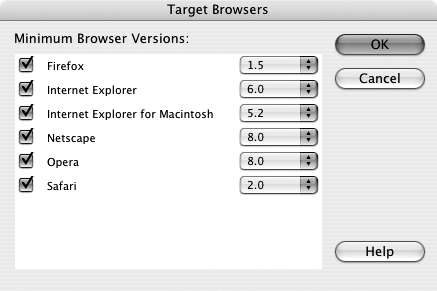
The browser-compatibility check icon allows you choose from a variety of Web standards, and then choose actions (validating the open document, selected files, or all of the files in your site). Choose Settings from the pop-up menu associated with this icon to define the browsers, and versions of browsers, that your page will be tested for compatibility with (Figure 13c).
Figure 13c. Choosing browsers and browser versions that your page will be tested for compatibility with.
The Preview in Browser tool allows you to see how your page will look in a browser window. View options include displaying (or hiding) rulers, guides, and grids. Visual aids include displaying borders of tables, frames, and CSS objects—borders that are not displayed in browsers, but are handy for design purposes.
#14. Using the Insert Toolbar
The Insert toolbar, also referred to as the “Insert bar” for short, is the ubiquitous blue-collar power tool of Dreamweaver. As this toolbar provides access to the bulk of Dreamweaver’s features, many developers keep it displayed at all times for quick access to features that can also be found, less conveniently, in Menu options or panels. Since a large percentage of Dreamweaver features, ranging from everyday (inserting images) to esoteric (detailed database management), are accessible from the seven basic tabs in the Insert toolbar, they will be invoked throughout this book. Here, the point is to get comfortable with how the Insert toolbar works.
The Insert toolbar is a set of toolbars. You get the whole package: Common, Layout, Forms, Data, Spry, Text, and Favorites.
To display the Insert toolbar, choose View > Toolbars > Insert. By default, the Insert toolbar displays in Menu form—you use a drop-down menu to switch between the seven different iterations of the toolbar (Figure 14a).
Figure 14a. Choosing from the set of Insert toolbar display options.

To view all Insert toolbar tabs at once, choose Show as Tabs from the Insert pop-up menu in the Insert toolbar. In Tab view, you can easily switch between the seven different toolbars by clicking a tab (Figure 14b).
Figure 14b. The Insert toolbar, displayed as tabs.
![]()
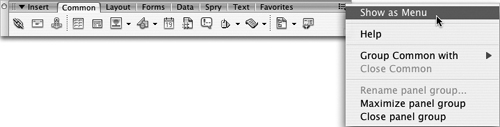
To get back to untabbed menu view, choose Show as Menu from the Insert bar context menu (Figure 14c).
Figure 14c. Toggling from Tab view to Menu view.
While a full survey of the options in the Insert toolbar would amount to a documentation of most of the features available in Dreamweaver, I’ll point you to some of the easy-to-access features:
• Common: Used to define links, e-mail links, page links (anchors), tables, and media
• Layout: Used to create the three main modes for page design in Dreamweaver—tables, Div tags, and Layers
• Forms: Used to define input forms, form fields, and form-handling buttons
• Data: Used to insert live data regions in Web sites linked to server-based databases. This method of building Web sites is beyond the scope of this book, but covered in Macromedia Dreamweaver 8 Advanced for Windows and Macintosh, by Lucinda Dykes (Peachpit Press).
• Spry: Used to place Spry widgets—JavaScript objects (some with CSS formatting attached) that can be inserted into Web pages to provide interactivity or animation
• Text: Used to apply HTML styles to text and insert special characters
• Favorites: A customizable bar; Ctrl-click adds features
#15. Using the Insert Menu Bar
The Insert menu in the main Dreamweaver CS3 menu bar provides an alternative to using the Insert bar. The Insert bar, explained in #14, “Using the Insert Toolbar,” allows you to insert frequently used (and even some rarely used) elements like images or tables by clicking on icons. The Insert menu provides access to essentially the same set of options, but in a menu format. Which is better? It’s a matter of taste.
Because the Insert menu accesses a wide range of often-used features in Dreamweaver, a quick survey of that menu will be useful. Many of the features in the Insert menu are, as noted, replicated in other forms (like the Insert toolbar). But some are not. Frequently used (or frequently looked-for) features like inserting links, e-mail links, and special characters (like the copyright symbol) are easily accessible from the Insert menu, but hard to find elsewhere.
Here, then, is a quick overview of frequently used page design elements accessible from the Insert menu:
• Image: Use this menu option to insert images. See Chapter 5, “Working with Text and Images,” for a full discussion of working with images in Dreamweaver.
• Image Objects: Image objects include two frequently used design features: rollovers and navigation bars. These objects can be generated from this menu, but are better created, edited, and managed using the Behaviors panel. See Chapter 11, “Adding Interactivity with Behaviors,” for an explanation of how this works.
• Media: Use this menu option to add Flash, Flash Video, or other media files. See Chapter 9, “Embedding Media,” for directions.
• Table: Tables remain a useful tool for page layout or for displaying data. See Chapter 3, “Designing Pages with Tables and Frames,” for instructions on page design with tables.
• Table Objects: This menu option has features for editing tables, but also a useful tool for importing tabular data. Your spreadsheet program will export files to tabbed data for import into Dreamweaver.
• Layout Objects: Dreamweaver CS3 incorporates new Advanced Placement (AP) page design elements based on CSS. See Chapter 4, “Designing Pages with Absolute Placement Objects,” for instructions on how to use these design elements.
• Form: The Form submenu includes tools for creating input forms and for placing a wide variety of form fields and objects (like buttons). Designing and implementing forms is explained in Chapter 8, “Collecting Data in Forms.”
• Hyperlink: Use this menu option to place links on your page.
• Email Link: This menu option makes it easy to create links to e-mail addresses.
• Named Anchor: Named anchors are links within a page that can be linked to.
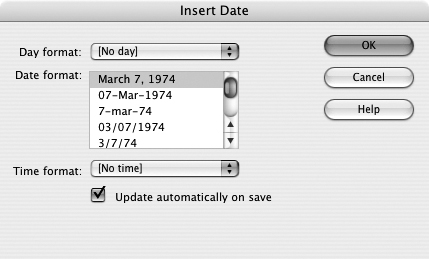
• Date: Use this menu option to insert today’s date in a variety of formats. You can insert the date as text, or as an updatable field that will display the current date whenever the page is opened in a browser menu (Figure 15a).
Figure 15a. Inserting an updatable date field.
• Server Side Include: This menu option inserts content from your Web server. Your Web-hosting server administrator can explain what content is available from your server, if any, and how to embed it into a page.
• Comment: You can insert comments that are read by you and other developers working in Dreamweaver, but are not visible in a browser window.
• HTML: This rather massive submenu allows you to insert a variety of objects accessible through other menus, but also has hidden within it a couple of unique and highly useful features. One is the Horizontal Rule, a design element going out of style but not yet obsolete that places a horizontal line on the page. The other is the Special Characters submenu that allows you to insert a set of often-used non-alphanumeric characters, including a line break, a non-breaking space, the copyright symbol, the em-dash symbol, and a whole set of symbols accessed by choosing Other in the Insert > Special Characters submenu (Figure 15b).
Figure 15b. Viewing a set of insertable symbols.

• Template Objects: Dreamweaver templates allow you to create a container page with universal elements, and then customize parts of that page. See Chapter 6, “Planning and Embedding Site Elements,” for an explanation of how to create and update templates.
• Recent Snippets: Designers who code by hand can create snippets of code in the Snippets panel, and then insert these snippets with this menu option.
• Spry: Adobe has introduced a set of JavaScripts into Dreamweaver, organized under the umbrella of Spry. Chapter 8, “Collecting Data in Forms,” explains how to invoke Spry objects to verify form data, and Chapter 10, “Adding Effects and Interactivity with Spry,” surveys many available Spry tools.
You can also customize the Insert menu or get more objects to add to it. The Add More Objects menu option in the Insert menu launches Adobe’s Dreamweaver Exchange site in your default browser. Here, you can download extensions—code that adds additional third-party designed elements to Dreamweaver.
The set of Dreamweaver extensions at Adobe’s Dreamweaver Exchange site ranges from carefully tested, highly useful tools, to more esoteric and untested features. These features are explained at the Dreamweaver Exchange site (www.adobe.com/cfusion/exchange/index.cfm?view=sn120).
The Exchange site includes ratings for the reliability of each feature, as well as descriptions of the feature, notes on compatibility with different versions of Dreamweaver, and statistics on how many times an extension has been downloaded. Some extensions cost money. Some work only for the Windows or only for the Mac version of Dreamweaver. After you choose and download an extension, you install it using the Extension Manager, available—oddly enough—from the Help menu. Choose Help > Manage Extensions to open the Extension Manager dialog. You’ll see a list of all the extensions you downloaded. You can enable an extension by clicking the On check box in the Extension Manager.
#16. Creating a New Page from Scratch
You can create a new Web page in Dreamweaver from either the Files panel or the Document window. Creating a new file in the Files panel simply generates an HTML page, while creating a new page in the Document window allows you to define the file type and automatically opens the file in the Document window for editing.
To create a new file from the Files panel, go to the Files panel menu and choose File > New File (Figure 16a).
Figure 16a. Generating a new file from the Files panel.

Files created from the Files panel menu are named untitled.html (or untitled2.htm, and so on). You can rename the file in the Files panel by choosing File > Rename from the Files panel menu, or by selecting the file in the Files panel and pressing the F2 function key. The Files panel is a good place to work in if you’re generating lots of new Web pages and plan to open and edit them later.
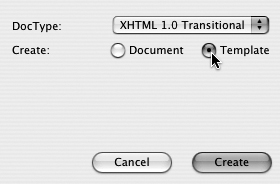
Most often, you’ll create new files from the Document window. From the Document window menu, choose File > New. The New Document dialog opens. When you create files from scratch, that is, without using predefined templates, you’ll need to select the General tab of the New Document dialog.
From the far-left column in the New Document dialog, choose Blank Page. From the Page Type list, choose HTML. In the Layout column, select <none>. In the DocType (Document Type; DTD) field, choose the default document type, XHTML 1.0 Transitional. Then click Create to generate a new Web page (Figure 16b).
Figure 16b. Defining a new file in the New Document dialog.
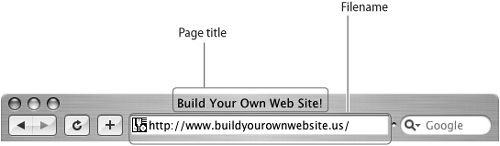
Once you create a new page, you need to save it with a filename, and you need to assign a page title to that page. Every Web page needs a filename and a title. The filename is mainly an internal element. It is used to locate the file in a Web site and to link the file to other files. As such, filenames don’t have to be very creative, but they should avoid special characters like commas, ampersands (&), percent signs (%), spaces, and so on. You’ll be safe if you stick to lowercase alphanumeric characters, plus the helpful dash (-) and underscore (_) characters.
There is a special requirement for filenames assigned to a site home page. A site home page is the page that opens when visitors enter your URL in the address bar of their browser. This URL does not specify a file, only a server location. Once the server location is open in a browser, browsers detect the home page by looking for a file named index.htm or index.html. Never create files named both index.htm and index.html; this will confuse your server, the browsers, and you. Instead, choose one or the other, and create a file called index.html (or index.htm). This will be your home page.
Note
Every Web site generally needs one index file. This file is named “index” and has a filename extension of either .htm or .html. You can create files with the same name but with different filename extensions (like index.htm and index.html, for example). But don’t! Web browsers will recognize either .htm or .html as a Web page filename extension, but they will get confused if you have Web pages with the same name and different versions of the extension.
Pages titles are different from page filenames. Titles have nothing to do with how files are saved, linked to, or managed at a server. Therefore, they can contain any characters, including special characters like commas and other punctuation marks.
As noted, every page has a page title, but unless you assign a page title, the default “Untitled Page” page title appears in browser title bars.
Page titles display in a browser title bar. Therefore, you should make them helpful and descriptive (Figure 16c).
Figure 16c. A filename and page title displayed in a browser.
When you save a page for the first time, you name the page by entering a filename. With a file open in the Save As dialog of the Document window, choose File > Save, and enter a filename in the Save As field (Figure 16d).
Figure 16d. Saving and naming a Web page.

You can enter (or change) page title information in the Title field in the Document toolbar. If the Document toolbar is not visible in the Document window, choose View > Toolbars > Document (Figure 16e).
Figure 16e. Entering a page title.

#17. Defining Links
Links are one of the most basic and dynamic elements of a Web page. In fact, hypertext, the “H” in HTML, refers to text that could have link properties (at least at the time the name was coined). Links can be associated with text or images.
Note
In this technique, we’ll focus on assigning links to text. In Chapter 5, “Working with Text and Images,” you’ll learn about some additional link features that apply only to images, like image maps, which are clickable parts of a picture.
Links have three basic states: unvisited, visited, and active. Unvisited links display by default as underlined blue type. Visited links—links that have been visited in a browser (before the browser cache was cleared)—display by default as underlined and purple. And active links—links to pages that are currently open—display in red.
Note
You do not have to use the default colors or attributes (like underlining) for links. Also, you can define an additional link state (hovered) that displays when a link is rolled over by a mouse cursor. These changes to default link display are made with style sheets and are explained in Chapter 7, “Formatting Page Elements with CSS.”
You will not see link status in the Dreamweaver Document window. All links display in unvisited mode. This is because you haven’t actually followed these links in Dreamweaver. You can only view links in visited or active states if you preview your page in a browser (choose File > Preview in Browser).
Generally speaking, link targets can be one of two types: relative (internal to your site) or absolute (outside your site). Both are defined in the Property inspector for selected text (or a selected image).
To define an absolute link, start by selecting the text you want to link from. With the text selected, you can type an absolute link in the Link box in the Property inspector (Figure 17a).
Figure 17a. Entering an absolute-link target for selected text.

With relative links, you don’t define where the link is found on the Internet; you define where the link is located relative to the current page—and at your Web site.
To define a relative link, with the link text selected, click the blue Browse for File icon next to the link box in the Property inspector. The Select File dialog opens. Navigate to the linked file, and click Choose to generate a link to that file. The relative link appears in the Link box in the Property inspector (Figure 17b).
Figure 17b. Defining a relative link.

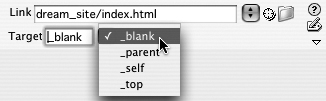
The other attribute that is important to define for a link is the Target window. By default, links open in the same browser window as the linking page, causing the linking page to disappear. A visitor can click the Back button on his or her browser to return to the original, linking page.
If you want a page to open in a new browser window, go to the Property inspector and choose the _blank attribute in the Target pop-up menu (Figure 17c).
Figure 17c. Defining the _blank link target that will open the link in a new browser window.
#18. Creating Pages from Blank Templates
Dreamweaver CS3’s collection of blank templates provides more than 30 page designs. Blank templates use scripting code and Cascading Style Sheet (CSS) coding to define the look of a page.
Note
Blank templates do not provide template content. They just provide page designs, and you supply all the content. If you want help coming up with Web page content for a restaurant, a spa, a hotel, and so on, you can use a starter page. See #19, “Creating Pages from Sample Starter Pages,” for instructions on how to use a starter page.
To select one of the blank templates, choose File > New, and choose Blank Template from the list of categories on the left side of the New Document dialog. In the Template Type column, choose ASP JavaScript template. The ASP and JavaScript templates are the most widely compatible with different hosting and browsing environments.
You can preview each of the page design (“blank”) templates by choosing one in the Layout column of the New Document dialog, and inspecting the layout in the preview area in the upper-right corner of the dialog (Figure 18a).
Figure 18a. Previewing a blank template.

Once you select a blank template to use as a framework for your page design, you can accept the rest of the default settings in the New Document dialog, and click Create to generate a new page. That page still needs to be saved with a filename after you add your own content to it (Figure 18b).
Figure 18b. A page generated from the “2 column elastic, left sidebar” blank template.

When you generate a new page from a blank template, the default document type setting is XHTML 1.0 Transitional. This is a highly flexible, supported page format and generally you will not want to change this setting unless your Web administrator has mandated a different document type standard.
You also have options for how to handle the Layout CSS used to define your page layout. The CSS code for generated pages from blank layouts is, by default, added to the top of the Web page itself. Of course, this code is not visible in browsers, but it defines the page layout. You can, alternatively, elect to generate a new CSS page with the layout coding that is linked to your generated HTML page. This is more complex, but allows the CSS content to be attached to multiple pages. For a full discussion of embedding CSS in pages, or linking it via an external style sheet file, see Chapter 7, “Formatting Page Elements with CSS.”
You can choose the default option of adding CSS to the HTML page by choosing Add to Head from the Layout CSS pop-up menu in the New Document dialog. Or, you can elect to generate a separate, linked CSS page by choosing Create New File from the Layout CSS pop-up. The third option in that pop-up, Link to Existing File, is used if you already have a CSS file you wish to use to format the page (Figure 18c).
Figure 18c. Saving blank page CSS as a separate, linked CSS file.

#19. Creating Pages from Sample Starter Pages
One of the reasons to use Dreamweaver to design your Web site, as opposed to using a cookie-cutter template supplied by a Web hosting service, is that you can create a unique style for your site. That doesn’t mean, however, that you can’t get some hints, inspiration, head starts, and expert design suggestions from Dreamweaver. Starter Pages (Basic) provide an option of bare-bones page designs for specific applications, ranging from journal entries to image slideshows to product catalog layouts. Starter Pages (Theme) provide fully formatted page layouts with selected color schemes and even template text that you can modify for your business, organization, or content theme.
To generate a page from a starter page, choose File > New, and choose Page from Sample from the category list on the left side of the New Document dialog. In the Sample Folder column, choose Starter Page (Theme) to see a list of fully finished sample pages, or Starter Page (Basic) to see page designs without color schemes or starter text and image content. When you select a page design from the Sample Page column, a thumbnail preview of the page appears in the upper-right corner of the New Document dialog (Figure 19a).
Figure 19a. Previewing a themed starter page.

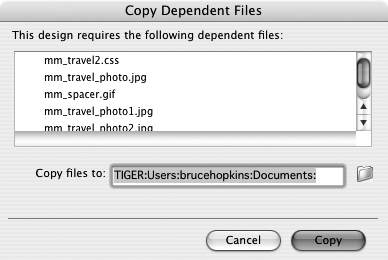
After you select a Starter Page (Theme), simply click Create to generate a new page. The page will open in the Document window, and you can edit and save it. When you save the page generated by a Starter Page (Theme), you will be prompted to save the image and to copy the associated CSS (formatting) files used in that page into the folder on your computer for your Web site (Figure 19b).
Figure 19b. Saving a page generated by a themed starter page, and copying image and CSS files with it into your Web site folder.
If you create a page from a Starter Page (Basic), you have the option of generating either a normal page or a page template. The terminology is confusing here; you are not being given the option of generating a blank template, but a template that can have both editable and non-editable regions. If you choose the Template option in the Create area of the New Document dialog, you will generate a standard Dreamweaver template (Figure 19c).
Figure 19c. Saving a page generated by a basic starter page as a template.
Note
For an explanation of the difference between templates and blank templates, see the sidebar “Templates . . . and Blank Templates,” in #18, “Creating Pages from Blank Templates.”
Once you generate a page from a starter page, you edit and save it just as you would any other page.
#20. Creating Pages from Sample Style Sheets and Framesets
Dreamweaver CS3 provides a set of sample style sheets that define elements like text font, text color, link attributes, and heading styles. To be clear, these are not generated HTML pages—these are predesigned style sheets. The files that are generated from these sample style sheets have to be attached—either by linking or by importing—to an HTML page.
Note
A fuller discussion of linked and imported style sheets can be found throughout Chapter 7, “Formatting Page Elements with CSS.” Here, you will learn to import a generated style sheet into an existing HTML page.
To generate a CSS file from a sample CSS style, follow these steps:
- Choose File > New, and choose Page from Sample from the category list on the left side of the New Document dialog.
- In the Sample Folder column, choose CSS Style Sheet.
- Explore the available style sheets in the Sample Page column. Note that what you see in the preview area in the upper right of the New Document dialog is only the formatting that will be applied. The content in these previews will not be generated as part of the CSS file (Figure 20a).
Figure 20a. Previewing a style sheet.

- When you find a style you want to save as a CSS page, click Create. A CSS file will open in the document window. This file is not “previewable” as it only includes formatting code, not page content (Figure 20b).
Figure 20b. A generated CSS page in the Document window.

- Save the CSS file by choosing File > Save. By default, the file will have a .css (not .htm or .html) filename extension.
- Once you have saved the sample CSS page, you can import that formatting into any open HTML page. Create, or open an existing HTML page, and view the CSS panel. Click the Attach Style Sheet icon at the bottom of the CSS panel (it looks like a link icon) (Figure 20c).
Figure 20c. Clicking the Attach Style Sheet icon in the CSS panel.

- The Attach External Style Sheet dialog opens. Use the Browse icon to locate the CSS file you saved in Step 5, and click Choose in the Select Style Sheet File dialog (Figure 20d).
Figure 20d. Selecting a style sheet file.

- Back in the Attach External Style Sheet dialog, choose Import in the Add As options area, and click OK.
You can also generate framesets from set of sample pages. Framesets appear to be a single Web page in a browser, but are actually a set of “framed” pages that work together within a single browser window. Framesets, or “frames” for short, are explained in detail in Chapter 3, “Designing Pages with Tables and Frames.” You’ll want to reference that chapter if you want to create pages from the set of sample frames.
To see the set of sample frames, choose File > New and choose Page from Sample in the category list on the left side of the New Document dialog. In the Sample Folder column, choose Frameset. You can preview predesigned framesets in the preview area in the upper right of the dialog (Figure 20e).
Figure 20e. Previewing a frameset sample.

Caution
Saving the various files involved in framesets and naming frames within framesets (two different processes) can be confusing. Before generating a frameset from the samples, review the discussions of frames in Chapter 4, “Designing Pages with Absolute Placement Objects,” particularly #27, which explains in much more detail how to generate a frameset from a sample.