Chapter Five. Working with Text and Images
Text and images are the basic building blocks of Web sites. Text is easy to add to a Web site; you can create text right in Dreamweaver or easily copy and paste any text from a document or Web page into a Dreamweaver document.
Pictures are more of a challenge. You can’t create images in Dreamweaver or copy and paste images into a Dreamweaver document.
Now for the good news. There is a wide array of image-editing programs—ranging from the one that came with your digital camera or computer operating system to Adobe Photoshop (or Photoshop Elements). Almost all of them can be used to prepare images for the Web.
Dreamweaver CS3 includes some rudimentary image-editing tools. But in general, you’ll prepare images in advance (in another program) before you place them on a Web page. For that reason, #38, “Preparing Images for the Web,” will explore a range of techniques available in programs other than Dreamweaver.
Once you have an image ready for your Web page, Dreamweaver makes it easy to place the image, align text to flow around the image, and assign links to either the entire image or part of the image (an image map).
Finally, one of the most underrated and valuable new features of Dreamweaver CS3 is the ability to import Photoshop (PSD) files directly into Dreamweaver. I’ll explain how this works in #44, “Placing Photoshop Files in Web Pages.”
#35. Formatting Text with HTML Attributes
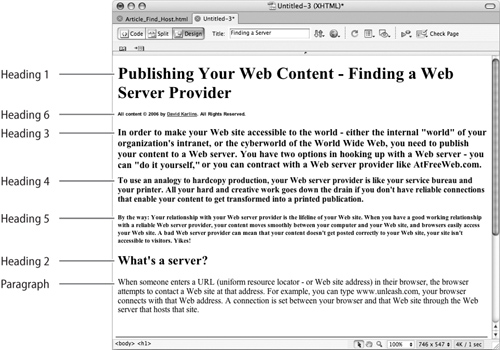
There are two kinds of text formatting in Web pages. The most basic method is assigning HTML tags to text, and then adjusting or enhancing the formatting by modifying those tags with attributes. HTML includes tags that define a document’s structural elements, including six levels of headings (with 1 usually being the largest, and 6 usually the smallest), and the Paragraph tag. With HTML tags and attributes, you can also control text’s appearance, including font color, font size, boldface, italics, and underlining.
To format text with an HTML tag as a paragraph in Dreamweaver, you don’t have to select all the text in the paragraph. The tags available for this purpose are all block-level tags, which means they apply to entire paragraphs. This is true even if you used a line break (Shift-Enter) to create a new line within a paragraph.
With your cursor in a paragraph, choose a tag from the Format pop-up menu in the Property inspector (Figure 35a).
Figure 35a. Assigning a Heading 1 tag to selected text.

Normal text uses the Paragraph style. There are six heading styles (Heading 1 to Heading 6).
Note
The HTML tags for headings are h1, h2, h3, h4, h5, and h6. Dreamweaver displays more intuitive options: Heading 1, Heading 2, and so on in the Property inspector.
Heading 1 is typically used for a page title. Heading 6 is often used for footnotes, legal notices, and other very small text. Other styles fit somewhere in between these extremes (Figure 35b).
Figure 35b. All six HTML heading styles applied to paragraphs.
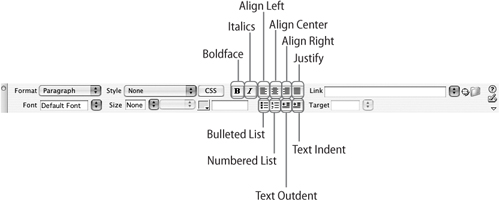
In addition to the six heading tags and Paragraph tag, you’ll use a few other basic HTML elements to format text. They are all applied via buttons in the Property inspector and include the following:
• Bulleted List: Automatically applies bullet icons to paragraphs
• Numbered List: Automatically numbers paragraphs
• Boldface: Formats text with boldface
• Italics: Formats text with italics
• Text Indent: Moves a paragraph away from the left margin
• Text Outdent: Moves a paragraph toward the left margin
• Align Left, Align Center, Align Right, and Justify: Define paragraph alignment
Caution
Using the Text Indent and Text Outdent buttons inserts a blockquote HTML tag. That tag can interfere with the ability of visitors who rely on reader software to read the site content to them out loud.
Boldface and italics are applied only to selected text. The other attributes are applied to entire paragraphs (Figure 35c).
Figure 35c. HTML formatting tags and attributes in the Property inspector.
#36. Applying Colors to Fonts
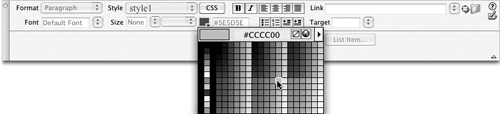
Font color can be assigned to selected text. With text selected in the Document window, click the Text Color icon in the Property inspector to open the Text Color palette. You can choose from the array of “Web-safe” (widely supported) colors, or use the Eyedropper tool to pick up a color on your screen (Figure 36a).
Figure 36a. Assigning a color to selected text in the Property inspector.
Tip
Web-safe colors are especially relevant if you are primarily designing for handheld browsing devices or other browsing environments that do not support the thousands or millions of colors supported by modern computer monitors.
To choose from color schemes (sets of selected colors) or to choose from the full range of colors supported by monitors, click the Color Wheel icon that appears at the top of the Text Color palette (this is the palette that appears when you click the Text Color icon in the Property inspector). When you click the Color Wheel icon, the Colors dialog opens. The Colors dialog has five tabs: Color Wheel, Color Slider, Color Palettes, Image Palettes, and Crayons. The tab on the left is the Color Wheel. Here, you can click any color in the spectrum of monitor-supported colors. The second tab from the left is the Color Slider tab, which is the most widely used tab in the dialog. Here you can easily define RGB colors interactively, or by entering R, G, and B values from 0 to 255 (Figure 36b).
Figure 36b. HTML formatting tags and attributes in the Color Slider tab of the Colors dialog.
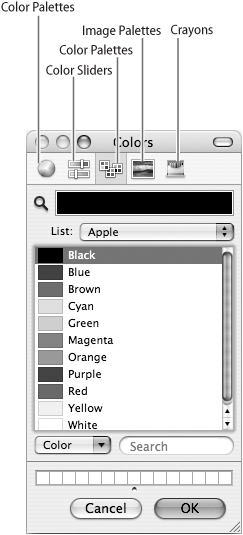
There are other options in the Colors dialog as well. The Color Palettes tab allows you to access preset color schemes. The Image Palettes tab allows you to generate a set of colors from a Web image file (a GIF or JPEG file). The Crayons tab allows you to access a small set of colors represented as a box of crayons.
#37. Defining Inline Text Attributes with CSS
Building on a foundation of very few HTML formatting styles, CSS styles open the door to a range of typography that comes close to what is available in print—close, but not quite. The most important difference between Web and print typography is that when you apply fonts to Web pages, the fonts will only display correctly if they are installed on a visitor’s browser. This means that when you use unusual fonts, most visitors will see a default font like Times Roman or Arial instead. However, with CSS you can define line spacing, word spacing, font size, font color, and other attributes.
To create a CSS formatting rule (style), click the CSS button in the Property inspector; the CSS panel appears. Here, you will create a CSS style that holds all the attributes you apply to the selected text. This style can be applied to other selections of text on the page as well. (I’ll explain how to do this after I show you how to define a CSS style.)
Tip
You are defining a style with a set of formatting attributes. Later—after you define the style—you can apply that style to any text. It is not necessary to have text selected when you define the style.
If there is no CSS style already associated with the selected text, the CSS Styles panel appears with the Attach Style Sheet and New CSS Rule icons active, and the Edit Style and Delete CSS Property icons grayed out. You can now create a CSS Rule (style), and later you can edit it (Figure 37a).
Figure 37a. Defining a new style in the CSS Styles panel.

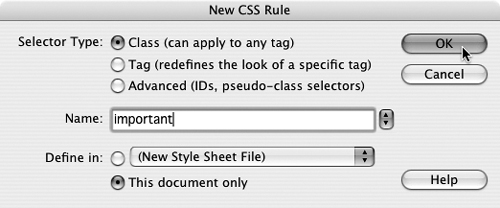
To create a new CSS style, click the New CSS Rule icon in the CSS Styles panel. The New CSS Rule dialog appears. In the Name field, enter a name for the style. In the Selector Type area, choose the Class (can apply to any tag) radio button; this defines a style that can be applied to any selected text. In the Define in area, choose the This document only radio button (Figure 37b).
Figure 37b. Creating a new style in the New CSS Rule dialog.
After you click OK in the New CSS Rule dialog, the CSS Rule definition dialog opens (Figure 37c).
Figure 37c. The CSS Rule definition dialog for a new style.
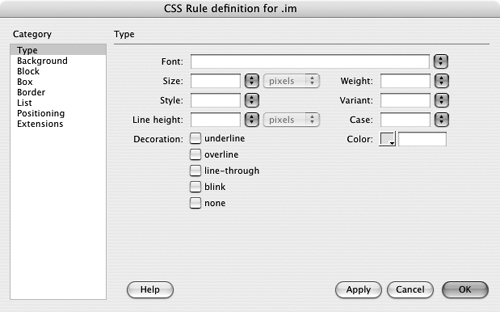
The formatting options here are somewhat like those you are familiar with in your word processor:
• The Type category allows you to define font, size, weight (boldface or lightface), style (italic or roman), and line height (line spacing). Line spacing can be defined as an absolute value or as a percent, so that 150% is one and a half lines of spacing between lines.
• The Background category allows you to define a background color or image behind the selected text.
• The Block category allows you to define features such as word spacing, letter spacing, vertical and horizontal alignment, and indentation.
• The Box category allows you to define width, height, float, clear, padding, and margin for CSS layout elements. See Chapter 7, “Formatting Page Elements with CSS,” for an explanation of laying out pages with CSS.
• The Border category allows you to define the style (including solid or dashed lines), thickness, and color of borders around selected text.
• The List category allows you to define the style of bullets (circle or square), and numbering (roman or arabic).
• The Positioning category allows you to define positioning of CSS layout elements. The Z-index box defines front-to-back positioning of the style. Styles with higher Z-index values appear on top of styles with lower Z-index values if the styles overlap.
• The Extensions category allows you to define page breaks, cursor display (when a cursor is moved over selected text), and special effects like blur and inversion. Page breaks apply to printed pages. Cursor display changes a visitor’s cursor to a crosshair or other icon when he or she hovers over text. Blur and inversion effects are some of the less well-supported features of CSS formatting, and they require more knowledge of CSS than is possible to explore in this concise overview.
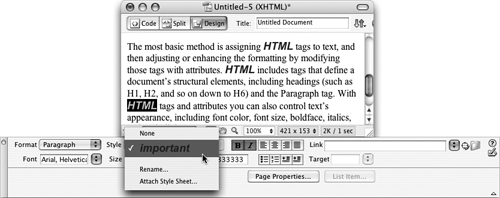
After you define a CSS style, you can apply it to selected text from the Property inspector. This is the easy part: Simply select text, and then choose a CSS style from the Style pop-up menu in the Property inspector (Figure 37d).
Figure 37d. Applying a CSS style to selected text.
#38. Preparing Images for the Web
Web browsers recognize three types of image formats: JPEG, GIF, and PNG. The first step in preparing images for the Web is to save or export them to one of these formats.
With Dreamweaver CS3, you can now directly open or paste a Photoshop file into the Dreamweaver Document window. This process launches Dreamweaver’s new Image Preview window, where you can convert the opened or pasted Photoshop file to a JPEG, GIF, or PNG.
In general, the JPEG format is much better for photos; it supports a more complex set of colors than GIF or PNG. The advantage to using GIF and PNG formats is the ability to have a transparent, or invisible, background that allows the Web page background to show through. This creates the impression that the image is sitting directly on the page. The ability to make a color (usually the background color) invisible makes GIF or PNG the preferred format for icons and other graphics that show the page background “through” the image (Figure 38a).
Figure 38a. A GIF image with a transparent color allows the page background to show through.
Can you get away with simply using a JPEG image file straight from your digital camera in a Web site? Maybe, but the file probably won’t work well, even though the JPEG format available as an option in your digital camera is Web-compatible. The file is likely to be too large, both in dimensions and file size. And it is likely formatted for print, not Web display.
To prepare a file for the Web, you’ll want to choose appropriate color, size, and resolution settings. Web images are generally saved at 72 dpi (dots per inch). This is much lower than print resolution (which is normally set to at least 300 dpi) because monitor resolution is 72 dpi on Macs and 96 dpi in Windows.
When you create images for a Web page, you generally try to keep file size small. File size is not much of an issue for print documents; nobody has to sit and stare at a printed book or newspaper waiting for an illustration to download. On the other hand, several 5 MB images on a Web page will take quite some time to download over a dial-up connection.
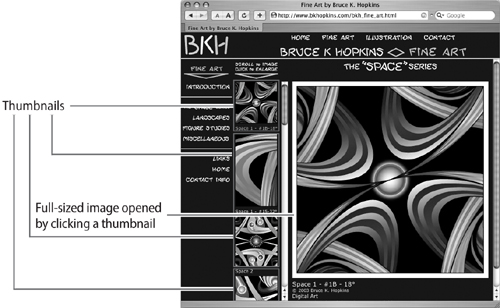
There are two ways to reduce file size: You can make the image smaller, or you can use compression. Smaller images are also smaller files, and they download quickly. Many Web sites use thumbnail images—small preview versions of a full-sized image. Visitors who want to see a full-sized version of the image, either on the same Web page or on a separate page, can click the thumbnail.
Thumbnail images address two challenges in Web design. They reduce the time it takes to download a page (compared to downloading full-sized images), and they help solve the problem of limited space on the page. It’s generally a bad idea to place images on a page that won’t fit in a standard-size browser window—roughly 800 pixels (8 inches) wide and 600 pixels (6 inches) high. Providing a set of clickable thumbnails that open full-sized images is a universally applicable technique for presenting images on Web pages (Figure 38b).
Figure 38b. Visitors at Bruce Hopkins’s Web site can click a thumbnail of an image to display the full-sized version.
Compression is a technique that reduces the number of pixels that need to be “kept track of” in an image file. This is done by defining only necessary pixels. So, for example, instead of “remembering” that there are 50 contiguous white dots in a photo, a compressed image file will define just one of these pixels and compress the file by simply noting that the other 49 pixels are identical to the defined one.
Compression can drastically reduce file size, speeding up download time. But compression also reduces quality by eliminating nuance in an image. The Save for Web window, available in Adobe products such as Photoshop, Photoshop Elements, and Illustrator, allows you to preview images with different levels of compression and compare them. The compression techniques in Adobe’s Save for Web window are not crude; they offer often very high levels of compression that drastically reduce file size without significantly affecting online quality (Figure 38c).
Figure 38c. Comparing an uncompressed image with a highly compressed version of the same image. The photo on the right is about one-twentieth the file size of the original photo (on the left) and will download in 3 seconds over a slow dial-up modem.

Tip
There are many good books on how to prepare images for the Web in Photoshop and Illustrator. If you like the approach and format of this book, check out Adobe Illustrator CS3 How-Tos: 100 Essential Techniques, by David Karlins and Bruce K. Hopkins (Adobe Press).
The final step in the process of preparing an image for the Web is to save the image file to the folder on your computer that you use for your Dreamweaver Web site. When you do this, it will be easy to find the image as you use it on your Web page.
#39. Embedding Images in a Web Page
Once an image is ready for the Web, you can embed it in a page in Dreamweaver. Why do I say embed? Because the image file remains a distinct file. To visitors to your Web site, it appears that the image is “part of the page.” But in reality, a separate image file is displayed on your Web page using parameters you define in Dreamweaver that govern the location, size, and other elements of the image.
Start the process of embedding an image by clicking at the beginning of the paragraph of text with which the image will be associated, or in a table cell or CSS positioning element that you defined to hold the image.
Note
Defining page layout with tables is covered in Chapter 3, “Designing Pages with Tables and Frames.” Creating positioning elements with CSS is explained in Chapter 4, “Designing Pages with Absolute Placement Objects.”
With your cursor at the insertion point, choose Insert > Image. The Select Image Source dialog opens. Navigate to the image you want to place on the page, and click Choose (Figure 39a).
Figure 39a. Choosing an image to embed in a Web page.

If the image file you selected is not in the folder you defined as your Dreamweaver site folder, Dreamweaver helpfully offers to save a copy of the image in your site folder. Click Yes in the dialog that appears to avail yourself of this service (Figure 39b).
Figure 39b. Saving a copy of an image file in your Dreamweaver site folder.

#40. Making Images Accessible with Alt Tags
There are many reasons why visitors won’t be able to or won’t want to see images in their browser. Visitors who rely on screen reader software to read your Web site content aloud will not see your image, nor will visitors using browsers on devices that do not display images. Other visitors to your site might have low-bandwidth connections and elect not to display images.
An Alt tag is code that is displayed if its associated image does not display in a browser window. In addition, with Microsoft Internet Explorer and some other browsers, Alt tag text displays when you roll over an image with the cursor.
Well-designed Web pages provide Alt tags that display when, for any reason, an image does not display (Figure 40a).
Figure 40a. An Alt tag displays to identify a nondisplaying image.
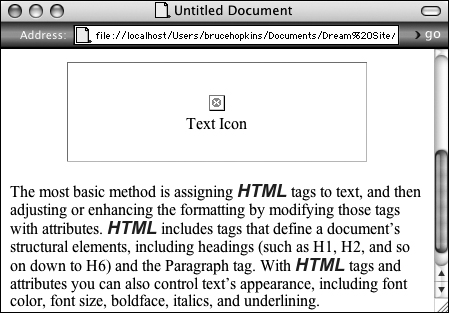
Poorly designed Web pages that do not provide Alt tags simply display a tacky-looking X, question mark, or some other icon or symbol as an image placeholder when an image does not display. These sites are less accessible to visitors who are sight-impaired (Figure 40b).
Figure 40b. The image on this page doesn’t have an Alt tag to identify its content.

You can define an Alt tag in the Property inspector by entering text for a selected image in the Alt field. Enter a brief description that will serve as an alternative for visitors who will not see the image (Figure 40c).

Alt tags are more useful if they are not too long; thus, the recommended maximum length is 50 characters. Sometimes that’s not enough. For example, if you need to convey information depicted in a graph, map, or detailed photo, you might want to provide more information to visitors than fits in an Alt tag.
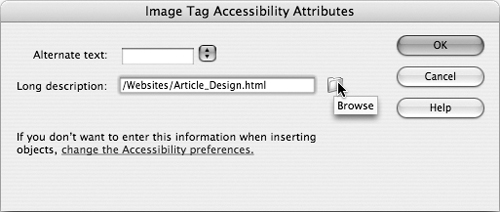
The solution is to provide a separate file that contains unlimited text. This file is accessed by the long description (longdesc) attribute. The content of a longdesc attribute is not text; it is the name of a Web page that contains a text description. The first step in providing a long description for an image is to create a separate all-text HTML file that describes the image.
Once you have created an HTML page with a long description for an image, access the longdesc attribute for a selected image by choosing the Tag inspector (choose Window > Tag Inspector). Expand the CSS/Accessibility category in the Tag panel, and use the Browse icon to navigate to the file you created with the long description (Figure 40d).
Figure 40d. Attaching a long description file to a selected image in the Tag panel.
#41. Editing Images in Dreamweaver
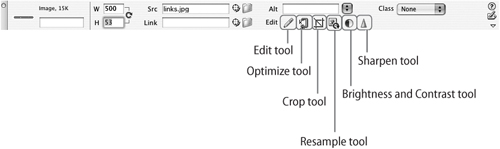
Dreamweaver’s limited set of image-editing tools allows you to crop, resample, change brightness and contrast, apply sharpening, and resize an image. When you select an image, Dreamweaver‘s image-editing tools will display in the Property inspector.
You can resize a selected image by clicking and dragging either the horizontal or vertical sizing handles on the image, or by clicking and dragging the corner handle. Holding down the Shift key as you resize using the corner handle maintains the original height-to-width ratio of the image. The new width and height are indicated in the W and H fields in the Property inspector. You can also enter width and height dimensions in the W and H fields. When you resize an image in Dreamweaver, the width and height display in boldface type in the Property inspector, and you can use the Reset Image to Original Size icon to revert to the original size (Figure 41a).
Figure 41a. Size indicated in the Property inspector.

Caution
There are significant drawbacks to both enlarging and shrinking image dimensions in Dreamweaver. If you make an image larger, you will significantly degrade the quality of the image because there is not enough data saved in the image file to display more pixels. As a result, the image will appear grainy, blurry, or raggedy. You will not lose quality in the same way if you make an image smaller. The image file will have enough data to display a smaller version of the image. However, the image quality will often still degrade because Dreamweaver’s resizing tools are not sophisticated enough to figure out how to properly eliminate some of the image data. Programs like Photoshop and Photoshop Elements have resampling features that intelligently add or remove pixels as you resize an image. In short, it’s best if you can size your image before you bring it into Dreamweaver.
The first two tools in the set, the Edit tool and the Optimize tool, launch a specified image editor, or launch Fireworks—an image editor that was part of the old Macromedia suite and was packaged with Dreamweaver before the Adobe acquisition.
Note
If you placed a Photoshop (PSD) file in Dreamweaver, that image will be converted into a Web-accessible format for display. However, if you edit that image using the Edit tool in the Property inspector, the Photoshop file will reopen for editing in Photoshop. For more exploration of placing Photoshop files in Dreamweaver, see #44, “Placing Photoshop Files in Web Pages.”
The Crop tool, which works like a crop tool in programs like Photoshop, can be used to trim an image. The Resample tool reduces file size after you make an image smaller in Dreamweaver. Until you resample, the image displays in smaller dimensions on the Web page, but the file is not smaller. This means that the resized image will take the same amount of time to download that it did before it was resized. You can reduce file size and eliminate unnecessary pixels by clicking the Resample icon in the Property inspector. The Brightness and Contrast tool and the Sharpen tool will open dialogs with very simple sliders that adjust how an image looks (Figure 41b).
Figure 41b. Image-editing tools in the Property inspector.
To open the Brightness/Contrast dialog for a selected image, click the Brightness and Contrast icon in the Property inspector. Select the Preview Edit check box to see the effect of the changes you made to the brightness and/or contrast (Figure 41c).
Figure 41c. Previewing changes in brightness and contrast.

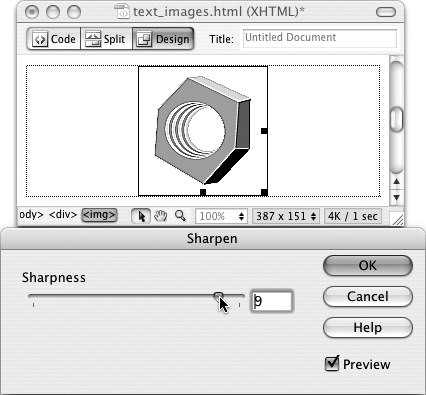
Similarly, the Sharpen dialog has a Preview check box so you can see the effect of the changes you made to the sharpness (Figure 41d).
Figure 41d. Previewing changes in sharpness.
#42. Aligning Text and Images
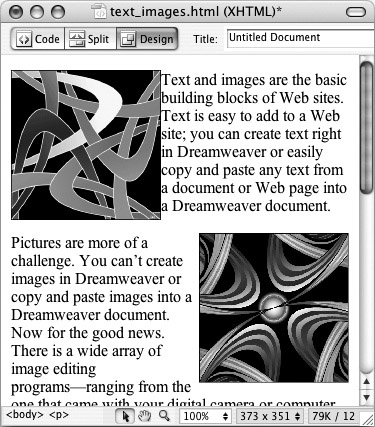
A flexible, reliable technique for combining images and text is to align an image either right or left. Aligning an image will flow text to the right (for a left-aligned image) or to the left (for a right-aligned image) of the image (Figure 42a).
Figure 42a. Left-aligned (top) and right-aligned (bottom) images.
You can also define a horizontal and vertical buffer space between images and the text that flows around them.
Aligned images are associated with a paragraph of text. They are not locked in place on the page, but instead move up or down on the page with the paragraph, depending on the size of the visitor’s browser window.
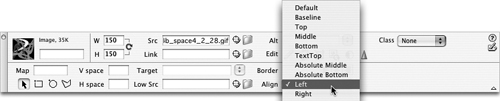
To align a selected image, click the Align field in the Property inspector and choose Left or Right from the pop-up menu (Figure 42b).
Figure 42b. Left-aligning an image in the Property inspector.
When you align images in relation to paragraph text, you almost always want to define horizontal and vertical spacing to separate the edge of the image from the text. If you don’t define horizontal and vertical spacing around the image, the image will bump into the text characters (Figure 42c).
Figure 42c. An image with no horizontal spacing bumps into the paragraph text.

You can assign vertical spacing to a selected image in the Property inspector by entering a value (in pixels) in the V space field. Assign horizontal spacing by entering a value (in pixels) in the H space field (Figure 42d).
Figure 42d. Assigning 2 pixels of vertical spacing and 5 pixels of horizontal spacing around an image.

Tip
A good standard setting for keeping images from bumping into text is 2 or 3 pixels of vertical spacing and 5 pixels of horizontal spacing.
Spacing around selected images appears as a blue line in the Document window. The blue line will disappear when you deselect the image.
#43. Defining Image Maps
In Chapter 2, “Working in the Document Window,” you will find instructions on how to define links. Links can be launched from either text or images. A single image, however, can contain more than one link. Breaking an image into sections, each with its own link definition, is called creating an image map. Image maps are used in a variety of Web graphics. One obvious example is an actual map, where a visitor can click a location (such as a state, city, or restaurant) and launch a link that opens a new page to display the area of the map where he or she clicked.
Image maps are often used to create navigation bars from a single image. A wide, thin graphic that stretches across the width of a page, for instance, can be divided into many links by creating multiple image maps on the same graphic.
Image map sections can be rectangles (including squares), ovals (including circles), or polygons (multisided shapes).
To create an image map from an image already embedded in your page, follow these steps:
- Select the image to which the image map will be applied.
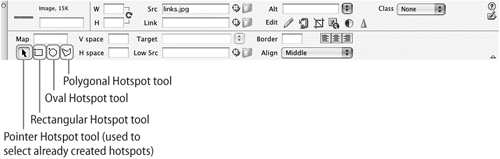
- Click the Rectangular, Oval, or Polygonal Hotspot tool in the lower-left corner of the Property inspector (Figure 43a).
Figure 43a. Hotspot tools in the Property inspector.
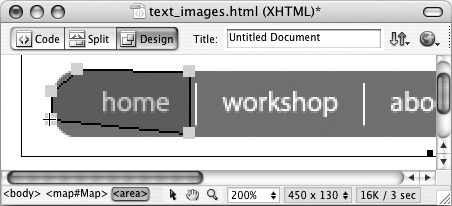
- Draw a rectangle or oval by simply clicking and dragging the image with the appropriate hotspot tool selected. Polygonal hotspots are a bit trickier. To define a polygonal hotspot, choose the Polygonal Hotspot tool, and click (do not click and drag) spots on the image. The hotspot is defined as you create additional points (Figure 43b).
Figure 43b. Defining a polygonal hotspot.
- You can move a defined hotspot by selecting it with the Pointer Hotspot tool and dragging the whole hotspot. To delete a hotspot, select it with the Pointer Hotspot tool and press the Delete key. To resize a hotspot, select a single handle and drag it (Figure 43c).
Figure 43c. Editing the shape of a polygonal hotspot.

- As soon as you finish drawing a hotspot, or if you select a hotspot with the Pointer Hotspot tool, the Property inspector adapts and displays properties just for the selected hotspot, not for the entire selected image (Figure 43d). In the Map field, you can name your map (or just accept the default name). In the Link field, click the blue Browse for File (folder) icon to navigate to a file in your Web site, or enter a URL in the field. In the Target field, choose _blank if you want the link to open in a new browser window. If you don’t want to open the link in a new browser window, don’t enter anything in the Target field. You can define a separate Alt tag for the hotspot by selecting a tag from the Alt menu. Or, you can enter alternate text in the Alt field in the Property inspector. (For an explanation of Alt tags, see #40, “Making Images Accessible with Alt Tags.”)
Figure 43d. Defining a hotspot.

Hotspots are widely supported in browsers, but they appear differently in different browsers. Like everything involved in your Web pages, you should try to test your hotspots in several viewing environments.
#44. Placing Photoshop Files in Web Pages
Web browsers do not support the native Photoshop (PSD) format. Until the advent of Dreamweaver CS3, this meant that Web designers had to convert those Photoshop files into Web-compatible JPEG, GIF, or PNG formats in Photoshop before placing them in Dreamweaver Web pages. Saving Photoshop files to JPEG, GIF, or PNG format is easily done in Photoshop itself, which shares with Adobe Illustrator the Save for Web utility—a powerful, interactive environment for fine-tuning the conversion of non-Web-compatible formats to Web-compatible formats. One obvious limitation to this system is that Web designers without access to Photoshop can’t handle Photoshop files. Or, for those designers with access to Photoshop, this required launching a separate program to convert the Photoshop file to a JPEG, GIF or PNG format.
Dreamweaver CS3 uses a different module to convert Photoshop files to Web graphics. The new Image Preview dialog in Dreamweaver is pulled out of Fireworks. Designers who are familiar with the Save to Web features in Illustrator and Photoshop will find the interface familiar, and Web designers who are used to Fireworks will find the Image Preview dialog very similar to that in Fireworks. With the Image Preview dialog now part of Dreamweaver, you can place a Photoshop file directly in a Web page in Dreamweaver. Or, you can copy and paste selected content directly from Photoshop to Dreamweaver.
Note
Unfortunately, the ability to copy and paste from Adobe Photoshop is not yet (in CS3) implemented for Adobe Illustrator vector images.
Dreamweaver converts that file to a JPEG, GIF, or PNG format, and retains the original Photoshop file. Dreamweaver’s Image Preview window is similar to the Save for Web window in Photoshop and Illustrator, and provides a comprehensive set of options for converting Photoshop files to Web-compatible formats.
Tip
For a discussion of the pros and cons of different Web-compatible image formats, see #38, “Preparing Images for the Web.”
GIF images allow you to make one color transparent. This feature is usually used to make the image background transparent, and can be applied by choosing Index Transparency from the Transparency pop-up menu (Figure 44a).
Figure 44a. A GIF image with transparency applied to the background.

Progressive downloading (for JPEG images) and interlacing downloading (for GIFs) allows images to “fade in” when they download into a browser, instead of appearing line by line. These options are available in the preview window for selected GIF or JPEG conversions, and are generally a more pleasant way to display large images as they download into a viewing environment.
Photoshop files that are converted to Web-compatible file formats in Dreamweaver display a small PS (Photoshop) icon in the Edit area of the Property inspector when the image is selected. Click the Photoshop icon to edit the Photoshop source file.
To place a Photoshop file in a Dreamweaver Web page, follow these steps:
- Click in the Web page at the point at which the image will be inserted.
- Select Insert > Image. The Select Image Source dialog appears. Navigate to a Photoshop (PSD) file, and click the Choose button. Or, you can copy an image from Photoshop into your operating system clipboard, and then paste that image into the Dreamweaver document window.
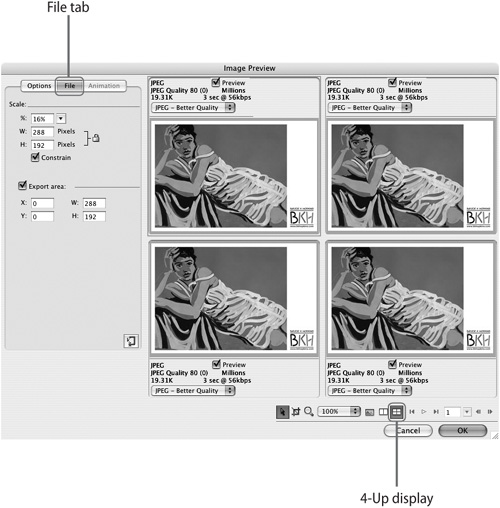
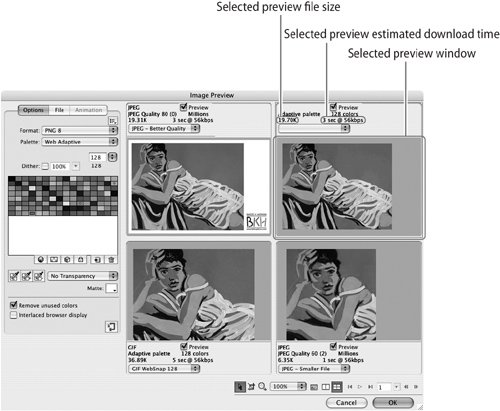
- After you place a Photoshop (PSD) file, or copy and paste selected content from Photoshop into Dreamweaver, the Photoshop image appears in the Image Preview dialog. An easy way to compare file formats and settings is to switch to the “4-Up” view, where you can see and compare different options. To view four options at once, click the 4-Up icon to display four different preview windows (Figure 44b).
Figure 44b. Displaying four preview windows.
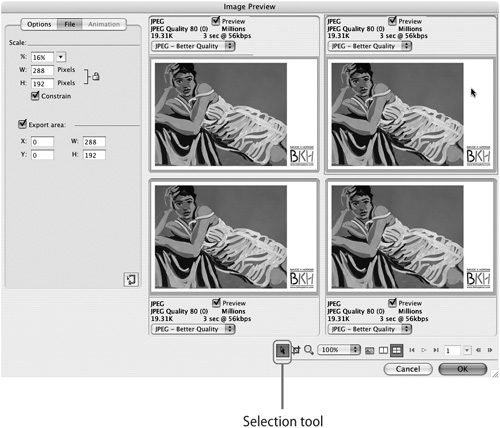
- Select one of the four preview windows using the Pointer tool. With a preview window selected, you can experiment with cropping or with different settings (Figure 44c).
Figure 44c. Selecting a preview window.
- You can use the Crop tool to crop an image in a selected preview window. To crop an image, click the Crop tool, and click and drag on any of the corner or side anchors to crop the image before conversion (Figure 44d).
Figure 44d. Cropping a Photoshop image before converting it to a Web-compatible format.

Note
The Export area check box must be selected in the File tab before you can convert.
- In the Options tab, select one of your four preview windows, and experiment with different formats, palettes (for GIF and PNG formats), and settings. As you adjust image quality, color palettes, and other options, you’ll see a preview of the generated image in the selected preview window. Each preview window has a pop-up menu from which you can select from seven presets. These presets provide a good range of options, and are a good way to experiment with image conversion if you are not fluent in image file format features. Each window also displays the file size and estimated download time for the conversion. Figure 44e).
Figure 44e. Previewing four different image conversion options for high-quality JPEG, smaller-file JPEG, 8-color PNG, and GIF.
- After you define the image format and settings for the converted image, click OK. The Save Web Image dialog opens. Assign a filename in the Save As box, and click Save. If the Image Tag Accessibility Attributes dialog opens, enter a short description of the image in the Alternate text box and click OK.