Chapter Nine. Embedding Media
Media—audio and video files—has always been a dynamic, entertaining, attention-grabbing, and fun element of Web content. Media content has also, historically, been some of the least accessible Web content due to long download times and uneven implementation of the plug-ins (software) required to see and hear online media.
As Bob Dylan has said, “the times, they are a-changin’.” The steady increase in the availability of high-speed Internet connections (along with improvements in streaming techniques that allow media to begin playing more quickly) means more and more people browsing the Web will enjoy video clips without having to endure an inordinate wait. Surveys and estimates indicate that the vast majority of visitors have appropriate software to watch and hear media in the most widely used formats—Windows Media, Flash, QuickTime, and RealMedia.
Another factor in the widespread acceptance of online video is the increasing number of people who have high-quality sound systems and larger screens and/or screens that display millions of colors.
You can add digital media to your site quickly and easily. This book cannot explore the whole fascinating and wide-ranging scope of software tools and techniques involved in generating video or audio files. But almost every computer shipped these days comes with at least a basic program for editing and producing digital audio and video files you create with your digital video camera, audio recording device, or whatever level of media production tools is available to you.
#73. Creating Flash Text in Dreamweaver
Flash Text looks like type, but technically it is media in the sense that it is a graphical media file that requires a media player (the Flash Player).
You generate Flash Text right in Dreamweaver, and the object you create is saved as a Flash movie in the Flash SWF file format. Since Flash Text is, essentially, an embedded Flash movie, Dreamweaver has to generate HTML code that embeds a Flash file. In order for the link to work and not get corrupted, Dreamweaver has to know the filename of the HTML document you are working on. Therefore (and here’s the point), save your page before generating and embedding a Flash Text object.
Once you’ve saved the page into which the Flash Text will be embedded, follow these steps to generate and embed Flash Text:
- With your cursor at the point where you want to insert the Flash Text, choose Insert > Media > Flash Text. The Insert Flash Text dialog will open. Select the Show font check box to activate the preview feature that displays the actual font you select in the Text field of the dialog.
- In the Text field, enter the text you want to appear on your page as Flash Text (Figure 73a).
Figure 73a. Previewing Flash Text as you generate it in the Insert Flash Text dialog.

- From the Font pop-up menu, choose a font. In the Size field, enter text size in points.
- Use the Bold, Italic, and the Left-, Center-, or Right-align icons under the Font pop-up menu to assign style and alignment to the text.
- From the Color pop-up menu, choose a color or enter a hexadecimal color value in the Color field. If you want the text color to change when a visitor rolls his or her cursor over it, enter a rollover color by using the Rollover color pop-up menu or entering a hexadecimal color value in the Rollover color field.
- If your Flash Text is linked to another page or file, enter the link in the Link field. With the Target pop-up menu, you can change the target browser window for the link from the default (opens in the same browser window) to _blank (opens in a new browser window).
- Choose an optional background color from the Bg color pop-up menu, or enter a hexadecimal color value in the Bg color field.
- In the Save as field, Dreamweaver automatically generates a filename with a SWF file extension. You can accept that filename, or enter a new one.
Tip
The filename you assign must be unique—that is, there must not be any other file with that name.
- After you have defined your Flash Text, you can click the Apply button to see how it looks on the page. When the text looks the way you want it to, click OK.
You can edit the appearance of Flash Text objects by selecting them and choosing formatting features from the Property inspector, or you can edit the content of Flash Text objects by clicking the Edit button in the Property inspector.
The Property inspector has a couple formatting options that are not available in the Insert Flash Text dialog. Use the V Space field to define vertical spacing between the Flash Text and objects above or below it. Use the H Space field to set horizontal spacing. The Quality pop-up menu allows you to convert the Flash file to a lower-quality, faster-loading file.
#74. Creating Flash Buttons in Dreamweaver
Each Flash button is a unique Flash (SWF) file (Figure 74a). In order for Dreamweaver to generate a file in the correct folder, with appropriate links to appear in the page, you have to first save the Dreamweaver Web page before inserting Flash buttons. Once you do this, follow these steps to generate and embed Flash buttons:
Figure 74a. A set of Flash buttons on a Web page.

- With your cursor at the point where you want to insert the Flash button, choose Insert > Media > Flash Button. The Insert Flash Button dialog will open. As you design the button, a preview of it will appear in the Sample field at the top of the dialog (Figure 74b).
Figure 74b. Previewing Flash button text as you generate it in the Insert Flash Button dialog.
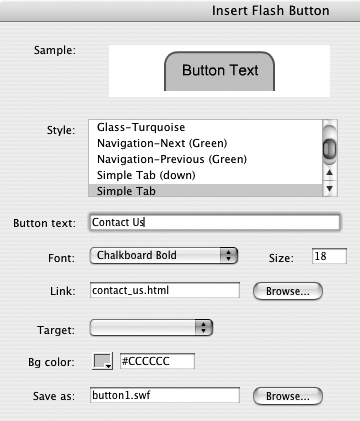
- In the Style field, choose a design for your button from the list.
- In the Button text field, type the text you want to appear in your Flash button.
- From the Font pop-up menu, choose a font. In the Size field, type the text size in points.
- Normally Flash buttons function as navigation buttons. Use the Link field or the Browse button to define a link.
- Use the Target pop-up menu if you want to change the target browser window for the defined link from the default (opens in the same browser window) to _blank (opens in a new browser window).
- Choose an optional background color from the Bg color pop-up menu, or enter a hexadecimal color value in the Bg color field.
- In the Save as field, Dreamweaver automatically generates a filename with a SWF file extension. You can accept that filename or enter a new one. There’s no good reason to change the default button filename.
- After you have defined your Flash button, click the Apply button to see how it looks on the page. When the text looks the way you want it to, click OK.
#75. Embedding Flash and Flash Video Files
When you embed a Flash file or a Flash Video file in a Web page in Dreamweaver, you can adjust the size of the movie, define the size and color of a background behind the movie, and even adjust features like whether or not the movie plays automatically when the page in which it is inserted opens, or if a visitor has to click a Play button to watch the movie.
Despite the similar-sounding names, Flash movies (SWF files) and Flash Video (FLV files) are different things. Flash movies, often referred to as SWFs (often pronounced “swiffs”), present animated and interactive content online, created with Adobe’s Flash authoring tool. The SWF format is also sometimes used to display digital artwork online.
Flash Video is a format for sharing movies online, similar to QuickTime, Windows Media, or RealMedia movies. The Flash movie format (SWF files) is a long-established format for presenting animation and interactivity online. Flash movies are often used for animated ads or interactive forms. The SWF format is the only Web-friendly format that supports vector graphics—graphics that can be enlarged in a browser without distorting the artwork. Complex Flash files can be as engaging and sophisticated as video games. The SWF format is actually the file formatted for the Flash Player, while editable Flash files are saved to FLA format.
Flash Video (FLV) files are different. Adobe is promoting the FLV format as a kind of “universal” video format that transcends other competing media formats. Flash CS3 includes a utility that converts files from Windows Media, QuickTime, and other formats to Flash Video (FLV). The Flash Video (FLV) format is used, for example, as the video format central to the popularity of YouTube (www.youtube.com).In this How-To, I’ll show you how to embed both SWF files (Flash movies) and Flash Video in a Web page.
When you embed a Flash movie (a SWF file) in a Web page, the movie appears as a gray box. When selected, the Property inspector for the movie is active (Figure 75a).
Figure 75a. The Property inspector for a Flash movie.

Use the Loop and AutoPlay check boxes to enable (or disable) looping (repeating) or autoplay (the animation plays when a page is loaded).
The V Space and H Space fields allow you to define vertical (V) or horizontal (H) spacing between the Flash movie and other objects on the page.
The Quality pop-up menu allows you to compress the Flash file (choose Low) for faster downloading and lower quality.
In the Scale pop-up menu, the Default setting maintains the original height-to-width ratio of the original animation (that is, it prevents the animation from being distorted) when the Flash object is resized. The Exact Fit option in the Scale pop-up menu, on the other hand, allows you to stretch the animation horizontally or vertically if you change the original height and/or width.
The Align pop-up menu can be used to align the Flash object left or right, so text flows around the animation.
The Bg pop-up menu can be used to define a background color. The background color is active if you resize the Flash object and maintain the height-to-width aspect ratio by choosing the Default setting in the Scale field.
The Reset size button restores the Flash object to its original size. The Edit button opens Flash (if you have it installed) to edit the Flash object.
The Play button displays the Flash object in the Document window. Toggling to Stop displays the editable gray box.
Dreamweaver CS3 allows you to embed movies that have been saved to the Flash Video format (FLV), and then choose from a nice little set of player controls that display in a browser window to make it easy for visitors to control the movie.
To embed a Flash Video file, follow these steps:
- Choose Insert > Media > Flash Video. The Insert Flash Video dialog will open (Figure 75b). Use the Browse button to navigate to a Flash Video (FLV) file (or enter the URL of a file on the Internet) in the URL field. Unless you are working with a special streaming server (and your server administrator will know this information), choose Progressive Download Video from the Video type pop-up menu.
Figure 75b. Embedding a Flash Video file.

- Click the Detect Size button in the dialog to detect the size of the video. Keep the Constrain check box selected since it is unlikely that you will want to distort the height-to-width ratio of the video. You can enter a new value in either the Width or Height field to resize the video (if you selected the Constrain check box, the nonedited dimension will automatically adjust to keep the height-to-width ratio of the video the same as the original).
- After detecting the video size, you can use the Skin pop-up menu to select a player control set. Note that player controls require various sizes of videos (that’s why you detected the video size in Step 2 first).
- You can enable the Auto play, Auto rewind, or Prompt users to download Flash Player features if necessary using the check boxes in the dialog. If you elect to prompt users to download the Flash Player, you can accept or edit the text message that displays.
Many Flash Video parameters you set when you embed the video can be edited in the Property inspector.
#76. Embedding QuickTime Media
QuickTime movies can be easily embedded in Dreamweaver pages. And you can easily reset the size at which QuickTime movies will display. However, Dreamweaver does not provide easy-to-use sets of controllers for QuickTime movies like it does for Flash Video. Features like background color, autoplay, and scale (enlargement of a video by displaying it at a lower resolution) are all defined with parameters that have to be entered manually.
To embed a QuickTime movie, choose Insert > Media > Plugin. The all-purpose Select File dialog (that is used for all types of plug-ins, not just QuickTime files) will open. Navigate to the QuickTime (MOV) file you wish to insert, and click Choose (Mac) or OK (Windows).
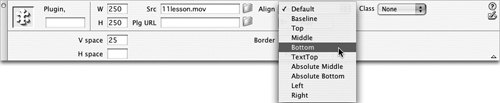
The embedded QuickTime movie appears as a very minimalist 32-pixel square box, regardless of the size of the actual movie. To display the movie at an appropriate size, enter a height and width in the Property inspector. You can also enter vertical (V) or horizontal (H) spacing in the Property inspector. The Align pop-up menu can be used to align the movie on the left or right side of the page (Figure 76a).
Figure 76a. Defining dimension parameters for an embedded QuickTime movie.
You have to manually enter display parameters into the Parameters section of the Property inspector. Click the Parameters button in the Property inspector to display the Parameters dialog. You can add parameters by clicking the “+” symbol in the dialog. Enter a parameter by entering it in the left column, and enter a value in the right column.
After you set parameters, click OK to close the Parameters dialog (Figure 76b).
Figure 76b. Defining background color, scale, autoplay, and volume preset for a QuickTime movie.

You can preview your QuickTime movie in the Dreamweaver Document window by clicking the Play button in the Property inspector, but you’ll have more reliable preview results if you preview the page with the movie in a Web browser (choose File > Preview in Browser, and select a browser from the available list if you have more than one).
#77. Embedding Windows Media
Like QuickTime movies, Windows Media files (which can be WMV, AVI, and other file types) can be easily embedded in Dreamweaver. And you can easily reset the size at which Windows Media movies will display. As with QuickTime movies, Dreamweaver does not provide easy-to-use sets of controllers for Windows Media movies. And, as with QuickTime movies, you need to manually define parameters to control features like autoplay, initial volume, and whether or not a player control displays in the browser with the video.
To embed a Windows Media movie, choose Insert > Media > Plugin. The Select File dialog (used for all types of plug-ins) opens. Navigate to the Windows Media file you wish to insert, and click Choose (Mac) or OK (Windows).
The embedded Windows Media movie is placed on the page in a 32-pixel square box, regardless of the size of the actual movie. To display the movie at an appropriate size, enter a width and height in the Property inspector. You can also enter vertical (V) or horizontal (H) spacing in the Property inspector. The Align pop-up menu can be used to align the movie on the left or right side of the page (Figure 77a).
Figure 77a. Embedding a Windows Media file.

The best way to see how your Windows Media file will look in a browser is to preview the movie in a browser (choose File > Preview in Browser, and select a browser from the available list if you have more than one).
To define how the Windows Media file displays and plays in a browser, you enter parameters into the Parameters area of the Property inspector. Click the Parameters button in the Property inspector to display the Parameters dialog. You can add parameters by clicking the “+” symbol in the dialog. Enter a parameter in the left column, and enter a value in the right column.
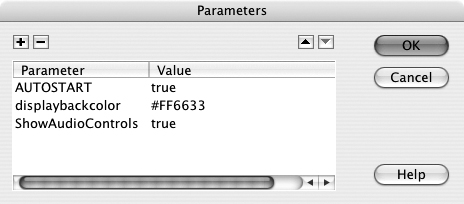
Following are a few useful parameters for controlling the display of Windows Media movies:
• The AUTOSTART parameter with the Value set to true plays a movie automatically when the page opens. When the value is set to false, it does not, and requires the visitor to start the movie using a control.
• The displaybackcolor parameter can have the Value set to false (no background color) or a color (like red, blue, green, or black) or a hexadecimal value.
• The ShowAudioControls can have the Value set to true (a volume control displays) or false (no control).
After you set parameters, click OK to close the Parameters dialog (Figure 77b).
Figure 77b. Parameters for a Windows Media movie.