
Chapter 3. Active Directory Management Tools
Out of the box, Windows is equipped with a multitude of tools for managing Active Directory. Unfortunately, unless you know which tool is suited to your task, it can be challenging to figure out how to get something done without digging through various consoles. Even worse, sometimes there is no GUI for performing a task—leaving you to figure out the appropriate command-line utility or PowerShell command.
This chapter aims to give you a tour of the various management tools that come with Active Directory so that you have a general idea of how to accomplish a task. Throughout this book, you will find references to management tools—both GUI and command-line—and descriptions of how to perform specific tasks with those tools. We won’t cover tools that get proper coverage elsewhere in the book in this chapter but will instead direct you to the proper chapter to get the information you need.
3.1. Management Tools
The original release of Active Directory in Windows 2000 came with a series of Microsoft Management Console (MMC) snap-ins that enabled GUI-based management of most of the directory. Over time, these snap-ins were improved, but there has not been any major evolution of the Active Directory GUIs that came with Windows 2000. Windows Server 2008 R2 introduced the first version of a new GUI tool for managing Active Directory: the Active Directory Administrative Center (ADAC). ADAC was then further improved upon in Windows Server 2012 to add additional functionality and improve performance.
As we know that not everyone will be running Windows Server 2012 in the near future, this chapter covers both the legacy MMC snap-ins (such as Active Directory Users and Computers) and the new ADAC console. Chances are that you’ll find yourself using both toolsets over the long run until ADAC is able to completely replace all of the legacy snap-ins.
Active Directory Administrative Center
The Active Directory Administrative Center is Microsoft’s new GUI tool for managing Active Directory. The first version of ADAC came with Windows Server 2008 R2 and the Windows 7 Remote Server Administration Tools (RSAT). There were a number of shortcomings in the initial version of ADAC, and Microsoft corrected many of these with Windows Server 2012 and the Windows 8 RSAT tools.
ADAC is unique when compared to the legacy GUIs in that it is built on top of Windows PowerShell. Any time you do something in ADAC, ADAC calls a PowerShell cmdlet in the Active Directory module for Windows PowerShell. The Windows PowerShell cmdlets in turn connect to the Active Directory Web Service (ADWS) that was introduced in Windows Server 2008 R2. If you want to use ADAC with a domain that does not have any Windows Server 2008 R2 or newer domain controllers, you’ll need to download and install ADWS for Windows Server 2003 or Windows Server 2008. We’ll discuss ADWS in more detail in Chapter 9, including details on how to add it to older domain controllers.
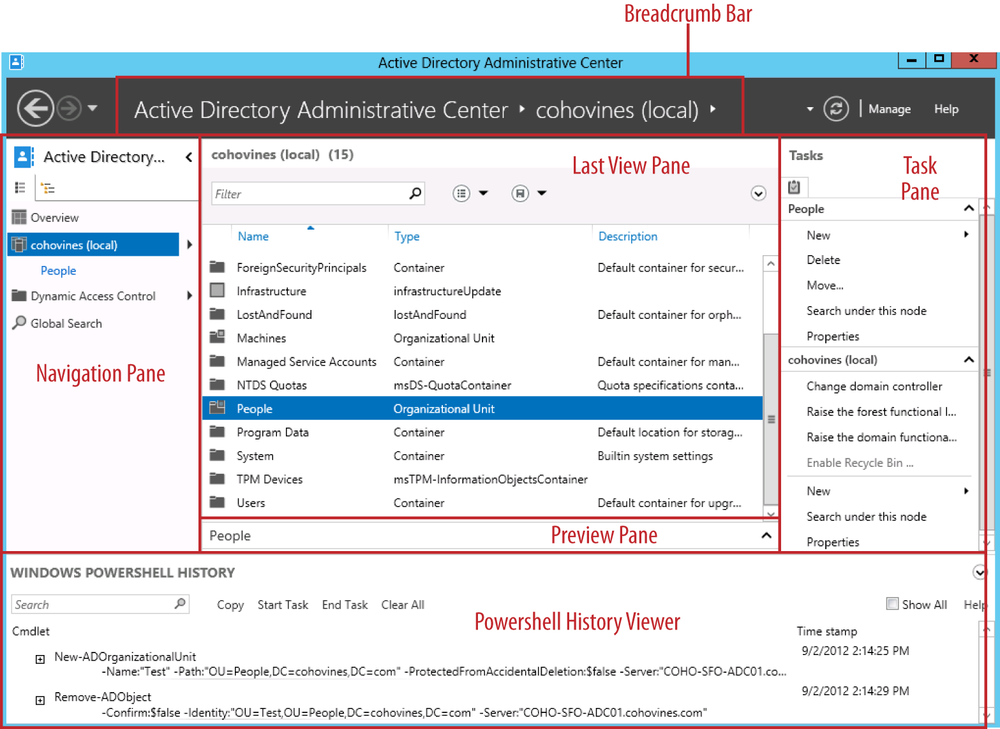
Figure 3-1 shows a labeled diagram of the ADAC interface, which will acquaint you with the terms used throughout this section (e.g., navigation pane, task pane, etc.). The intuitive right-click menus and contextual options in the task pane will make it easy for you to quickly get up to speed with the interface, so we won’t spend much time on the basics of using ADAC for managing objects. Instead, we’ll focus on some of the features in ADAC that might not be immediately apparent.
PowerShell History
New to ADAC in Windows Server 2012 is the ability to review the Windows PowerShell commands ADAC executes as you use the console. This is incredibly useful for learning PowerShell, as you can perform a task once graphically and then walk away with the foundation to efficiently script it.

The Windows PowerShell History pane in Figure 3-2 reflects creating a new organizational unit (OU) called North America, and then moving a user object into the North America OU. You can use the plus/minus buttons on the left to expand or collapse a given cmdlet for ease of reading. The Copy button on the toolbar will copy the command to the clipboard so you can reuse it in a script later.
If you want to review all of the read-only PowerShell calls made by ADAC, check Show All (as shown in the upper-right corner of Figure 3-2). This will show you commands executed for searching, for example. This is disabled by default, as the amount of data that will be presented is substantial.
Global Search
The search functionality in ADAC provides a handy way for you to search Active Directory and learn the LDAP search syntax while you’re at it. Accessible from the navigation pane under the Global Search node, you can either build a query graphically or enter an LDAP filter directly.
In order to add criteria graphically, you’ll need to expand the search area by clicking the down arrow to the far right of the search text box, as shown in Figure 3-3. The “Add criteria” button has a number of common queries that you can choose from, as well as common AD attributes if you scroll further down the list.

Once you have constructed your search, you can view the traditional LDAP syntax making up the query by clicking the “Convert to LDAP” radio button (seen in the upper-left corner of Figure 3-3). In Figure 3-4, ADAC is searching for the list of user accounts that are enabled but also locked out. You can copy the filter to the clipboard and either modify it or use it in another LDAP search program.

Also of interest in the Global Search view, and specifically in Figure 3-3, are a couple of additional options. The first option is the Scope drop-down in the upper-righthand corner. With the Scope drop-down, you can select the domain to search, or target the Global Catalog to search the entire forest. Using the button with the icon of a floppy disk, you can save queries. The queries will be available for later use in ADAC so you don’t need to reconstruct them.
Note
If you enter a custom LDAP filter in the “Convert to LDAP” view, you cannot save this query for later use. Only queries built with the criteria builder can be saved for later use.
Multiple-domain support
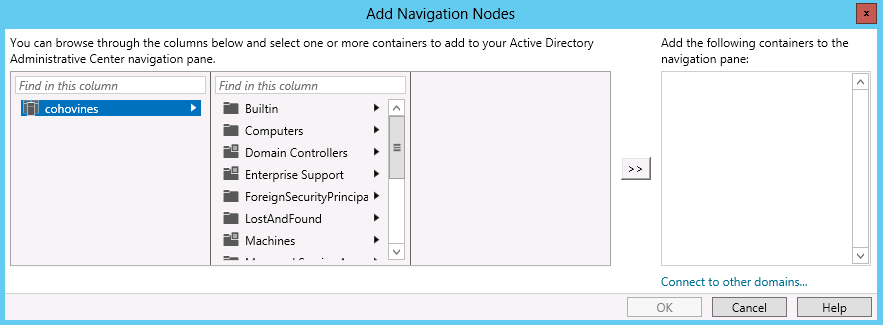
One of the advantages of ADAC over Active Directory Users and Computers is that it supports simultaneously working with multiple domains in the forest. It may not be immediately apparent how to add domains to ADAC. To add a domain, right-click in the whitespace of the navigation pane, and then click Add Navigation Nodes.
In the lower-righthand corner of the Add Navigation Nodes screen, as shown in Figure 3-5, is a link to “Connect to other domains.” Click this link and enter the fully qualified domain name (FQDN) of the domain you want to manage.
Note
You can also use the Add Navigation Nodes screen to pin organizational units (OUs) to the navigation pane.
Extensibility
If you’ve worked with Active Directory Users and Computers (ADUC) before, you may be aware that ADUC can be extended to include additional columns and tabs. Unfortunately, ADAC doesn’t expose corresponding functionality. Any additional tabs registered for use with ADUC are somewhat awkwardly shown in the Extensions section of an object’s property pages, as shown in Figure 3-6. Of particular interest here are the Security and Attribute Editor tabs, which aren’t replicated elsewhere in ADAC.

Active Directory Users and Computers
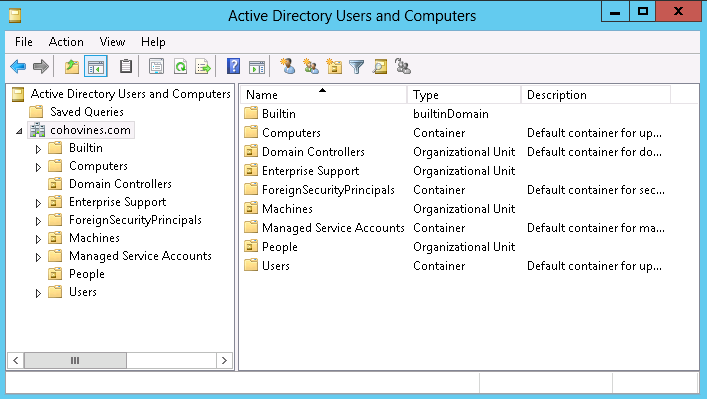
ADUC has been around since Windows 2000. Figure 3-7 shows the Windows Server 2012 version. If you’re a veteran Active Directory administrator, you’ve probably noticed that not much has changed in ADUC over the course of more than a decade. That said, ADUC remains the go-to tool for most administrators, despite the introduction of ADAC. You can launch ADUC from the Administrative Tools section of the Control Panel or Start menu, or, for speed, just run dsa.msc.
As a directory management tool, ADUC excels at providing a frontend for managing users and groups, as well as searching and browsing the directory and managing the hierarchy (organizational unit structure). Although ADUC has some other useful features, it generally isn’t the best tool for the job for tasks beyond this scope. We won’t spend too much time explaining how to go about creating or editing an object in this section, but we’ll point out some tips and tricks to help you take advantage of all of the functionality in ADUC.
In general, the best place to find the features available in any given part of the directory with ADUC is via the right-click menu. ADUC will dynamically filter the options for object creation and management based on where in the directory you are, as well as the permissions you have in that location. ADUC is also smart enough to make text boxes and other controls read-only when you are viewing the properties of an object if your permissions don’t allow you to edit a given attribute. For example, in Figure 3-8, the administrator does not have enough access to modify the email attribute of the user account, so ADUC has marked the field as read-only.

Advanced Features
By default, ADUC doesn’t show all of the functionality it has to offer. In order to see all of the functionality, you need to make sure that View→Advanced Features is checked. Once you enable this option, you’ll see a number of additional containers in the domain as well as numerous additional tabs in the properties of objects. If you compare Figure 3-8 and Figure 3-9, you’ll see how many additional tabs are visible on a user account with Advanced Features enabled.

Of particular interest are the Security and Attribute Editor tabs. The Security tab, shown in Figure 3-10, allows you to edit the permissions on a given object using a friendly interface (similar to managing the permissions on the filesystem, for example). We’ll discuss managing permissions in Active Directory in depth in Chapter 16. The Attribute Editor tab lets you see all of the attributes of an object, regardless of whether or not ADUC natively exposes them in one of the property pages. We’ll look into the Attribute Editor in more detail in the ADSI Edit section of this chapter.

Saved Queries
If you work with specific sets of objects across the directory, or you are often searching for the same thing, you may find the Saved Queries feature to be handy. With Saved Queries, you can create custom “views” of the directory that ADUC remembers across sessions. To create a query, right-click the Saved Queries node (as seen in the upper-left corner of Figure 3-7) and click New→Query.

In the New Query window (Figure 3-11), you can provide a name, a query root, and the actual LDAP filter that will find the objects you’re looking for. The query root simply allows you to define where in the directory your search should begin. By default, the query will search the entire domain, but you can use the Browse button to scope your query to a specific OU, for example.
To construct your search, click Define Query. As you can see in Figure 3-12, ADUC provides a convenient filter builder to graphically define your search so that you won’t need to be comfortable with building LDAP filters by hand. If one of the canned templates doesn’t work for you, you can switch to the object type you’re looking for from the Find drop-down at the top of the screen, or you can use the Custom Search option in the drop-down to enter an LDAP filter directly. We’ll discuss building LDAP filters in depth in Chapter 7.

The definitions for Saved Queries are stored locally, so if you open ADUC on another machine, you won’t see your queries. Fortunately, you can right-click any Saved Query and use the Export Query Definition option to save the query to an XML file. You can then import the XML file on another machine or share it with a colleague.
Controlling drag-and-drop moves
Another handy feature in ADUC is the ability to drag and drop an object or an entire object hierarchy to a new location in the directory. Under the covers, ADUC takes care of the necessary LDAP commands to actually move the object or tree. Unfortunately, the downside of this feature is that it’s incredibly easy for an administrator to accidentally move objects. To combat this problem, Microsoft made a couple of changes in later versions of ADUC.
The first change is a warning message that asks the administrator to confirm the move and advises of some of the potential pitfalls of moving objects (Figure 3-13). Unfortunately, reading dialog boxes before clicking OK is not something that many administrators are especially diligent about. To solve this, a setting in Active Directory can be set to disable drag-and-drop moves in ADUC altogether.

To learn to disable drag-and-drop moves, take a look at Microsoft Knowledge Base article 827687. You’ll need to use ADSI Edit to make the change; if you’re not familiar with this tool yet, take a look at our discussion of ADSI Edit in the next section.
Taskpads
One of the features that ADUC inherits from its roots as an MMC snap-in is the ability to create Taskpads. Taskpads let you create custom views of ADUC with custom subsets of tasks. This can be a great way to create an ADUC console for helpdesk technicians or delegated OU administrators.
To create a Taskpad, you’ll need to launch a new MMC console
(Start→Run→mmc.exe), and then add the ADUC
snap-in. To add the snap-in, go to File→Add/Remove Snap-in. Find
Active Directory Users and Computers on the left side and click Add
>. Once you have a new MMC setup, right-click where you want to
start the Taskpad and click New Taskpad View, as shown in Figure 3-14.

Once you’re done customizing with the wizard, be sure to save the console via the File→Save menu. If you’re looking for a simple console that starts at a given OU and is otherwise identical to ADUC, use the “New Window from Here” option shown in Figure 3-14. Save the resultant MMC, and each time it’s opened ADUC will launch from the location you specified. This latter option is especially useful for a quick solution to providing filtered consoles to junior administrators and technicians.
ADSI Edit
ADSI Edit is a management tool that dates to the early Resource Kit tools for Active Directory. Like many of the Resource Kit tools, ADSI Edit is now included with the RSAT tools for Active Directory; it is accessible via the Administrative Tools section of the Control Panel or by launching adsiedit.msc.
The main benefit of ADSI Edit is that it allows you to browse all of the attributes of an object in a friendly (and sometimes decoded) way and to find objects by browsing to them much like you would with ADUC or ADAC. ADSI Edit also lets you view and edit data in the Configuration naming context with a simple GUI interface.
If you’re launching ADSI Edit for the first time, the first thing you’ll need to do is go to Action→Connect To. From the Connection Settings dialog shown in Figure 3-15, you can pick a naming context from the “Select a well known Naming Context” drop-down, or if you’re connecting to an AD LDS instance, enter the distinguished name (DN) of the naming context instead. Likewise, you can specify a specific domain controller or AD LDS server, or you can opt to let ADSI Edit pick one for you. The Advanced button lets you connect to a Global Catalog or specify alternate credentials for binding with.

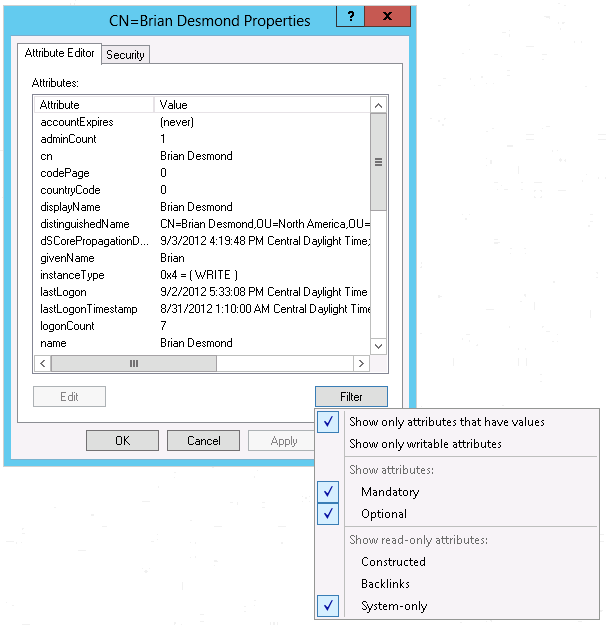
Once you have connected, you can browse the structure much as you would with any other tool. To review the attributes of an object, right-click on it and then click Properties. You’ll get a dialog similar to Figure 3-16.
Note
Technically you should be able to connect to and manage a third-party LDAP server with ADSI Edit, but in our experience this typically does not work well.
Take note of the Filter button’s menu, which is also shown in Figure 3-16. You can use this menu to limit the attributes that are shown and make the output from ADSI Edit more useful. Here are the options in the Filter menu:
- Show only attributes that have values
Filters the list to only show attributes that have been populated with data.
- Show only writable attributes
Filters the list to only show attributes that Active Directory reports are writable by the current user.
- Show attributes: Mandatory
Shows attributes that are marked as mandatory (must be populated) for the object class (e.g., user) in the schema.
- Show attributes: Optional
Shows attributes that are marked as optional (do not need to be populated) for the object class (e.g., user) in the schema.
- Show read-only attributes: Constructed
Displays attributes that have a value computed internally by Active Directory on the fly.
- Show read-only attributes: Backlinks
Displays the backlink component of a linked attribute relationship. Backlink attributes are constructed and not changeable. For example, in a group membership, the
memberattribute on the group is changeable, while the backlink attribute—thememberOfattribute on the user—is not.
You can also edit the ACL on an object by clicking the Security tab. The ACL editor in ADSI Edit is the same interface as in ADUC and ADAC. If you right-click on a user, there is a contextual interface to reset the user’s password, which is particularly useful when managing an AD LDS instance. You can also right-click and delete objects, move objects (there is no drag-and-drop in ADSI Edit), or create an object.
Creating an object with ADSI Edit may be easier than using other raw LDAP editing tools, but it is not especially straightforward. When you click Create, ADSI Edit will first present you with a list of all the object classes in the schema that can be created in the location you selected. Next, ADSI Edit will present you with a page to specify the value for each mandatory attribute defined on the selected object class in the schema. Finally, you will have the option of specifying optional attributes with the More Attributes button on the last page.
ADSI Edit also includes an LDAP query function accessible by right-clicking and going to New→Query. You can either enter a raw LDAP query or use the Windows LDAP query builder to graphically construct your search.
LDP
Sometimes the easiest way to dig into a problem is to look at the supporting data in a raw format, without any of the abstractions that GUI tools typically provide. Microsoft has included a tool called LDP with Active Directory since Windows 2000. Originally LDP was included in the Windows Resource Kit Tools, and then it eventually morphed into a tool that’s installed when you install the Active Directory RSAT tools. You can use LDP to connect to any LDAP server (even non-Microsoft platforms), perform searches, view data, and make modifications.
You won’t find LDP on the Start menu, but you can launch it from a
command prompt or the Run dialog by simply typing ldp. Once LDP starts, you will need to
connect to a domain controller (or an AD Lightweight Directory Services
instance or another LDAP server). You can do this by clicking
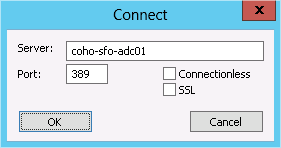
Connection→Connect to open the Connect dialog, shown in Figure 3-17. If you want to encrypt your session
with SSL, check the SSL checkbox and change the port to 636.
Once you’ve connected, you’ll be presented with some anonymously accessible data about the directory known as the RootDSE. If you want to view any of the data stored in the directory, you’ll likely need to authenticate your connection. To do this, click Connection→Bind to open the Bind dialog, shown in Figure 3-18.

There are a number of options you can choose from in the Bind dialog. Specifically, the bind types are:
- Bind as currently logged on user
This passes your current credentials through. If you are signed in with a domain account with sufficient permissions on the target server/directory, you can generally choose this default option.
- Bind with credentials
This allows you to specify a set of domain credentials to bind to the server as. This option is useful if you are signed in with an account that does not have enough permissions and you need to elevate your connection.
- Simple bind
Simple binds are what many applications use, and this is the choice you will likely make if you are connecting to a third-party LDAP server. Keep in mind that simple binds have no mechanism to protect your credentials—unless you are using LDAP over SSL, the credentials you specify in a simple bind will be passed in clear text over the network.
For the purposes of this discussion, we recommend that you use the default option, “Bind as currently logged on user.” Once you bind to the directory, LDP will display the results of the bind attempt in the information pane at the bottom right. A successful bind attempt might generate output similar to the following:
0 = ldap_set_option(ld, LDAP_OPT_ENCRYPT, 1)
res = ldap_bind_s(ld, NULL, &NtAuthIdentity, NEGOTIATE (1158)); // v.3
    {NtAuthIdentity: User='NULL'; Pwd=<unavailable>; domain = 'NULL'}
Authenticated as: 'COHOVINESriandesmond'.
-----------
An unsuccessful bind attempt may generate a number of different types of errors, depending on the failure. In the case of bad credentials, you might get an error similar to this:
res = ldap_simple_bind_s(ld, 'BadUsername', <unavailable>); // v.3
Error <49>: ldap_simple_bind_s() failed: Invalid Credentials
Server error: 80090308: LdapErr: DSID-0C0903C5, comment: AcceptSecurityContext
  error, data 52e, v23f0
Error 0x80090308 The token supplied to the function is invalid
-----------
Once you’ve bound to the directory, you’re ready to start taking advantage of LDP’s features. If you simply want to browse the directory and find the object you’re looking for, go to View→Tree and enter or select the root from which you want to browse LDP will build a tree on the left side of the screen that you can browse through.
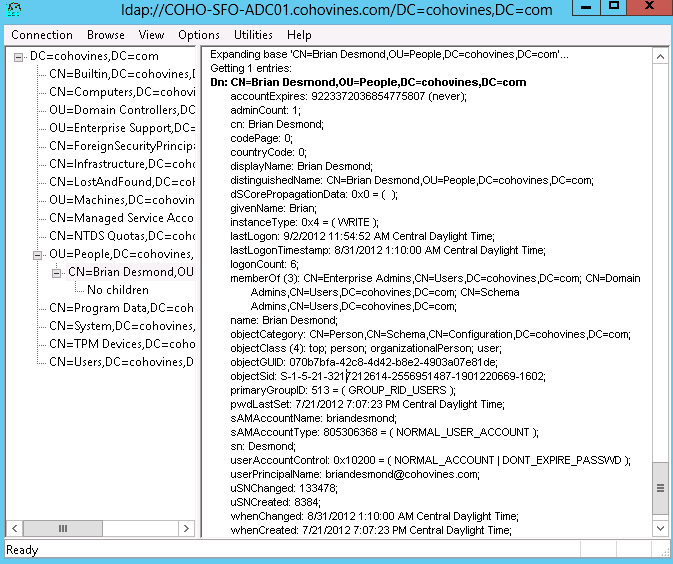
To view the attributes of an object, double-click the object.
Figure 3-19 shows the output after double-clicking
a user object. You can see that LDP shows all of the attributes of the
object in a raw format. LDP will also provide useful hints next to some
attributes. For example, the userAccountControl attribute is a bit mask
that controls multiple settings for a given object. In Figure 3-19, LDP decodes the value (0x10200) and tells you that the object is a
normal (enabled) account that is configured to never have its password
expire.
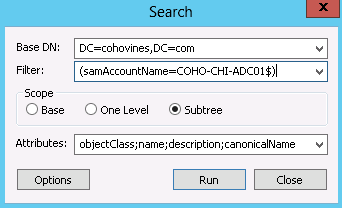
If you have a large directory or you know exactly what you’re looking for, you can issue an LDAP query to the directory by clicking Browse→Search. Figure 3-20 shows a search being constructed for a computer called COHO-CHI-ADC01. You’ll need to specify the attributes you want to have returned with the search, or you can enter an asterisk (*) to return all attributes. You can also control numerous advanced options for the search, such as sorting, timeouts, and the use of special LDAP controls via the Options button. We’ll discuss many of these options in Chapter 7 when we discuss Active Directory searches in depth.
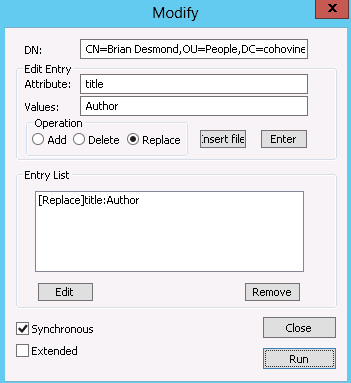
To make changes to an object, right-click the object in the tree
on the left of LDP and click Modify. You can modify one or more
attributes at once by entering the attribute name and value and then
clicking the Enter button, as shown in Figure 3-21. In Figure 3-21, we change the title attribute on a user account to
Author.
The choice of operation type is important and can be a little confusing. If you are updating a normal attribute, use the Replace operation. If you want to append a value to a multivalued attribute, use the Add operation. Finally, if you want to clear an attribute or remove a specific value from a multivalued attribute, use the Delete operation. Once you’re ready to submit your change, click Run.
If the modification succeeds, LDP will report success with output similar to the following:
***Call Modify...
ldap_modify_s(ld, 'CN=Brian Desmond,OU=People,DC=cohovines,DC=com',[1] attrs);
Modified "CN=Brian Desmond,OU=People,DC=cohovines,DC=com".
-----------
If the modification fails, LDP will provide an error code and you can resubmit your request.
There are a number of other useful features in the LDP tool, including the ability to delete an object or tree (Browse→Delete), rename an object (Browse→Modify DN), create objects (Browse→Add Child), view replication metadata (Browse→Replication→Replication Metadata Descriptor, or right-click the object and click Advanced→Replication Metadata), and view the ACL (security descriptor) of an object (Browse→Security→Security Descriptor, or right-click the object and click Advanced→Security Descriptor). We’ll cover the security descriptor functionality in LDP in more depth in Chapter 21.
LDP is a powerful tool that you can use to perform nearly any task in an LDAP directory. Taking advantage of LDP’s power requires a sometimes deep understanding of the LDAP protocol, but when you need to look at raw data or perform an operation directly on the directory without any abstraction, LDP is an excellent tool to have in your tool belt.
3.2. Customizing the Active Directory Administrative Snap-ins
Unfortunately, the Active Directory Administrative Center is not
customizable in terms of the data that’s available in the console. The
legacy snap-ins such as Active Directory Users and Computers are highly
extensible, however. One of the most common examples of extending ADUC is
to display additional attributes, perhaps even ones you’ve created. Let’s
say that you decide to add an attribute called myCorp-LanguagesSpoken to the Active Directory
schema. In turn, you want myCorp-LanguagesSpoken to be displayed in ADUC
so others can view the languages a user speaks. Fortunately, the legacy
Active Directory snap-ins (e.g., ADUC and AD Sites and Services) are
customizable by modifying one or more attributes in Active Directory. You
can also extend the functionality of a snap-in using Windows Scripting
Host (WSH), Visual Basic (VB), or any other COM-based language.
This section is devoted to reviewing the components behind the Active Directory administrative snap-ins and how you can modify them to meet your needs. These components include:
- Display specifiers
Objects in Active Directory that contain localized user interface information
- Property pages
Tabbed dialog boxes that display information
- Context menus
Menus displayed after right-clicking an object (e.g., a user)
- Icons
Images displayed when viewing a particular class
- Display names
User-friendly names displayed for attributes and classes (e.g., Last Name)
- Creation wizard
A wizard interface used to create an object
Display Specifiers
Display specifiers are objects stored in Active Directory that contain information on how to display and manage objects for a specific object class through the Active Directory snap-ins. These display specifiers are held in the Configuration naming context under the DisplaySpecifiers container. Within the DisplaySpecifiers container, there is a container for each supported locale, in a path similar to this:
LDAP://cn=409,cn=DisplaySpecifiers,cn=Configuration,dc=mycorp,dc=com
The preceding container contains the display specifiers for the
US/English locale of 409. If you wanted to create or manage display
specifiers for a different locale, you would just create a new container
with the relevant hexadecimal code for the locale and populate it with
the relevant display specifier objects. For example, 409 in hex
represents 1,033 in decimal, and 1,033 is the US/English locale. If we
created 809 (2,057 in decimal), we would get the UK/English locale, and
if we created 40C (1,036 in decimal), we would get the French locale.
The currently installed locale values can be found in the registry at
HKLMSYSTEMCurrentControlSetControlContentIndexLanguage.
Having display specifiers per locale enables you to support a wide
variety of languages for a geographically dispersed client base.
Each of the locale-specific containers has a series of objects of
the displaySpecifier class. The
object names are in the form of ObjectClass-Display.
The user class has one called
User-Display, the computer class
has one called Computer-Display, and so on. To extend
the interface for a specific object class for a particular language, you
just need to modify the appropriate attributes on the displaySpecifier object that represents the
class in that container.
Here’s a simple example. The classDisplayName attribute exists on all
displaySpecifier objects. Let’s say
we use the ADSI Edit tool from the Support Tools to open up the
Group-Display object and change this attribute from
Group to Moose. If we right-click
on any container in the ADUC tool, a context menu normally appears,
allowing us to create a new user, group, or organizational unit (among
other things). After making the edit and reopening ADUC, it allows us to
create a new user, moose, or organizational unit.
The way that the group class was
displayed in the interface has been changed. If we wanted to change the
display specifier for the French locale as well as or instead of the
US/English locale, we would go to (or create) the 40C container and
apply the change to the Group-Display
object.
Let’s now review some of the other customizations you can make.
Property Pages
You can see the array of property pages that exist by opening the
properties of any object in ADUC. You can add property pages to these
and display your own here. For this to work, though, the property page
has to exist as a Component Object Model (COM) object that supports the
IShellExitInit and IShellPropSheetExt interfaces. This means that
the property page has to be created first in Visual Basic, Visual C++,
or something similar.
Creating the object is the hardest part. Actually telling the
system to use it is easy. Once the property page COM object exists, it
will have a globally unique identifier (GUID). You then use ADSI Edit to
go to the display specifier object representing the class that you wish
to modify and alter the adminPropertyPages or shellPropertyPages attributes. These
attributes are multivalued and store data in the following form:
2, {AB4909C2-6BEA-11D2-B1B6-00C04F9914BD}
1, {AB123CDE-ABCD-1124-ABAB-00CC4DD11223}
The first item represents the order number in which the sheets should appear. The second represents the UUID. A third optional parameter can be used to store extended information, such as data passed to the property page as it is displayed.
To add your own property page to a class, you edit either the
Shell or the Admin property page attribute, depending on
whether you want the default (shell) or administrator UI to be modified,
and add in a line in the form of the preceding ones. It really is that
simple. You can even modify the existing pages, if any, and resequence
them to your liking.
Context Menus
When you right-click an object in ADUC, a context menu pops up.
You can add your own entries to this context menu. Context menu items
are held in the shellContextMenu
attribute for the default UI and the adminContextMenu attribute for the admin UI in
each displaySpecifier object. Items
that should appear in both go into the contextMenu attribute.
The items that you add to the context menus can launch an application or create an instance of a COM object. The data takes the following form in the relevant attributes:
1,Extra &Data..., E:MYPROG.EXE
2,&Extended Attributes...,C:MYSCRIPT.VBS
3,{DB4909C2-6BEA-11D2-B1B6-00C04F9914BD}
Notice that the last item is a COM object. It is denoted by its
GUID. The COM object must have been created to support the IShellExtInit and IContextMenu interfaces. Extra data can be
passed to the COM object by including it as a third parameter on the
line. The former two items are much more important to administrators.
Here you can see that we added two extra items to the menu. These items
are an executable program and a VBScript script. Any type of application
is valid. The second parameter is the string you want to appear on the
context menu. Use of an ampersand (&) character before a letter
denotes that letter as the accelerator. Thus, when the menu is being
displayed using the previous code example, typing “d” selects the first
option, and “e” selects the second.
Being able to add scripts and programs to a context menu is a very
powerful capability. Couple these scripts and programs with ADSI, and
you have a way of extending the snap-ins Microsoft provides to deliver
completely customized functionality based on your business or
organizational needs. For example, let’s say that you want to extend the
schema and include a new, optional myCorp-LanguagesSpoken attribute for the
user class. You can go to the
User-Display object for the appropriate locale and
modify the contextMenu attribute (so
it is available to both users and administrators) to include an ADSI
script that displays that attribute in a message box. The following code
is all that is needed:
OptionExplicitDimwshArgs,objUserSetwshArgs=WScript.ArgumentsSetobjUser=GetObject(wshArgs(0))MsgBoxobjUser.Get("myCorp-LanguagesSpoken"),,"Languages Spoken"
The script does nothing more than bind to the object’s
distinguished name that is passed in as an argument to the program, and
print out the attribute in a MsgBox
with an appropriate title, as shown in Figure 3-22.

In this figure, the guest user object was
right-clicked, which popped up a context menu that includes Languages
Spoken. You can see that it is actually the string “&Languages
Spoken...” being displayed if you look at the text in the lower-left
corner of the window. When we click the item or press the L key, a
dialog box generated by the script is displayed on the screen. Normally
the dialog box and the context menu would not be displayed together, but
we have done so in this screen to show you the process.
You could also write a script or program that allowed you to
modify the mycorp-LanguagesSpoken
attribute and have it appear only on the administrator’s context menus.
Then you can use the ADUC tool to manage your users and this extra
attribute, without ever needing to actually develop an entirely new
interface if you don’t want to.
Icons
When you look at a container of objects in ADUC, it shows you an icon for each object that is appropriate to the specific object class for that object. The icons for organizational units look different than those for containers, users, and printers, for example. The icon can actually be used to represent different states of that object. For example, if you disable a user or computer object, the icon is changed to indicate that the object is disabled. All in all, 16 different state icons can be defined for any object class. The first three represent the states closed (the default state), open, and disabled; the last 13 are currently undefined and left for your own use.
To modify the icon for an object class, simply use the iconPath attribute to store multivalued data
of the following form:
0, c:windowssystem32myicon.ico
1, c:windowssystem32myicons.dll, 0
2, c:windowssystem32myicons.dll, 2
3, c:windowssystem32myicons.dll, 7
This sets the first four icon values. Remember that 0 is closed, 1 is open, and 2 is disabled; 3 through 15 are undefined. The first line uses a proper icon file with an ICO extension and so doesn’t need a third parameter. The last three use the first (0), third (2), and eighth (7) icons from myicons.dll, using an index for the set of icons held in the DLL, starting at 0. The icon path has to exist on the local machine for any client to properly display the icon. Remember to take that into account, since you may need to deploy the icon files to all clients in an enterprise if they are to display the icons properly.
Display Names
As shown earlier, you can alter the way that both class and
attribute names appear within a GUI. If you want to change the class
name, change the text in the classDisplayName property of the relevant
displaySpecifier object. If you want
to change what attribute names appear as, you need to modify the
multivalued attribute attributeDisplayNames. Attribute values take
the form of a comma-delimited string, as follows:
mobile,Mobile Number
physicalDeliveryOfficeName,Office Location
extensionAttribute1,My First Extended Attribute
The first value is the LDAP name corresponding to the attribute in the schema, and the second is the name that it is to be displayed as. Note that you shouldn’t insert a space between the comma and the second value unless you want the name to be preceded by a space.
Object Creation Wizard
When you create a user, group, or organizational unit, ADUC
presents a simple wizard to allow you to specify the relevant data for
that object. It is possible for administrators to modify the default
behavior in one of two ways: they can replace the existing wizard
entirely, if one exists, or just add extra pages to the wizard. Only one
wizard can ever exist, so you either create a new one or modify the
existing one. Let’s say that you want to have the wizard ask for the
value for the myCorp-LanguagesSpoken
attribute for the user class. As the
existing user-creation wizard does not allow data to be input for this
attribute, you can replace the entire wizard with a new one of your own,
or you can place a new page into the wizard to receive data on this
attribute. With property pages, we need to create new wizards or
creation wizard extensions (extra pages for existing wizards) as COM
objects that support the IDsAdminNewObjExt interface. New wizards that
replace the default wizards in use by the system are known as
primary extensions, and they replace the core set
of pages that would be used to create the object. Primary extensions
support creation wizard extensions; you can define a primary extension
for all users, for example, and later add a couple of extra pages using
a creation wizard extension if you require.
If you are replacing the wizard entirely with a primary extension,
modify the creationWizard attribute
of the relevant displaySpecifier
object to hold the GUID of the COM object. If you are just providing
creation wizard extensions, you specify the order in which the pages
should appear, followed by the UUID in the createWizardExt multivalued attribute. The
format is the same as for property pages.
3.3. Active Directory PowerShell Module
The Active Directory PowerShell module first appeared in Windows Server 2008 R2 and was enhanced in Windows Server 2012. While the module is currently in its second iteration, there are still some tasks that you cannot accomplish with it. ADAC uses the AD PowerShell module for all of its tasks, so, if you can do something in ADAC, that task can also be accomplished with the AD PowerShell module. In addition, as we discuss in Chapter 6, Windows Server 2012 introduces an extensive set of cmdlets for managing replication.
Throughout this book you’ll find small examples of using the AD PowerShell module to accomplish various tasks, and we encourage you to read them and build on the benefits of using a scripting language such as PowerShell to be more efficient in your day-to-day Active Directory tasks. Microsoft has made a massive investment in PowerShell, especially in Windows Server 2012, and it is clearly the way of the future.
Even if you have never made a foray into scripting, we strongly encourage you to try it. The PowerShell History pane in ADAC makes discovering AD PowerShell cmdlets extremely easy, and PowerShell has matured substantially over the past several years and is now well documented on the Internet.
If you’re looking for some resources related to learning PowerShell, we highly recommend Windows PowerShell Cookbook, Second Edition by Lee Holmes (O’Reilly).
3.4. Best Practices Analyzer
Keeping Active Directory healthy is a concern of any administrator, and the definition of a healthy domain controller or forest is a topic of much debate on the Internet. Historically, Microsoft has included a tool called dcdiag with Windows: the multitude of tests dcdiag supports can help an administrator proactively check the health of a domain controller, domain, or forest as well as troubleshoot problems when they arise.
The downfall of dcdiag is that the output is difficult to read, the list of switches required to test the intended targets is long, and there is typically no actionable guidance when a problem is identified. Starting with Windows Server 2008 R2, Microsoft set out to solve these problems by creating a Best Practices Analyzer (BPA) for Active Directory that is included as part of the operating system. Windows Server 2012 includes 41 tests that analyze many of the most common issues and misconfigurations that administrators typically run into.
To access the BPA, find Server Manager under the AD DS node on the left and scroll down to Best Practices Analyzer. To run a BPA scan, click Tasks→Start BPA Scan on the right. You can select one or more domain controllers to run the BPA scan on, as shown in Figure 3-23.

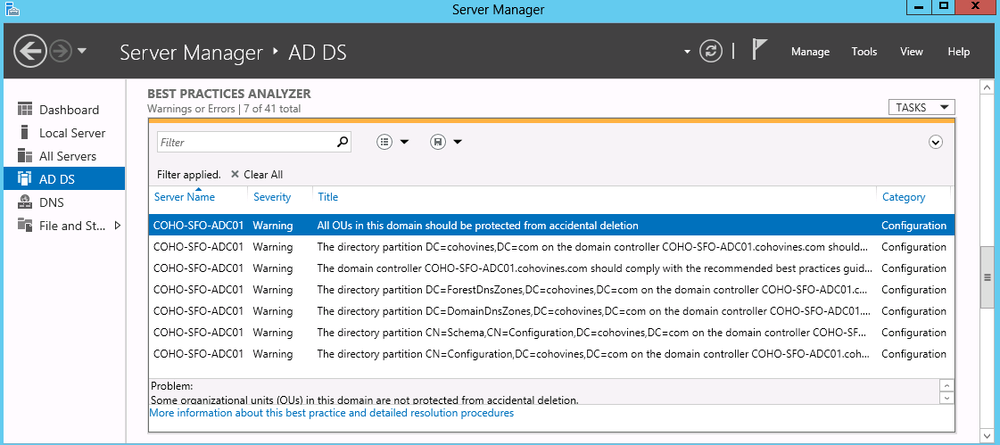
Once the scan completes, you’ll see the results (Figure 3-24). Each result gives you the server exhibiting the issue, a severity level, the name of the issue and an overall category. If you refer to Figure 3-24, you’ll see that when you select an issue, a description of the issue is shown below it along with a link to more information and remediation steps. For example, the issue selected in Figure 3-24 has the following guidance in Server Manager:
Problem:
Some organizational units (OUs) in this domain are not protected from accidental deletion.
Impact:
If all OUs in your Active Directory domains are not protected from accidental deletion, your Active Directory environment can experience disruptions that might be caused by accidental bulk deletion of objects.
Resolution:
Make sure that all OUs in this domain are protected from accidental deletion.
While the BPA can be run on demand in Server Manager, you can also invoke the BPA via Windows PowerShell. This could be useful for checking numerous servers at once, or for scheduling a regular BPA scan of a forest. To invoke the Active Directory BPA with Windows PowerShell, use the Invoke-BpaModel cmdlet:
Invoke-BpaModel"Microsoft/Windows/DirectoryServices"
Once the scan completes, use Get-BpaResult to view the results of the scan:
Get-BpaResult"Microsoft/Windows/DirectoryServices"
Using the BPA PowerShell cmdlets, you could schedule a task that checks for any warnings or errors in the results and sends an email alert if issues are found. In addition to Active Directory, many other components of Windows Server include a BPA. You can get a complete list of the available BPAs with the Get-BpaModel cmdlet:
Get-BpaModel|ftId,Name
3.5. Active Directory-Based Machine Activation
When Microsoft released Windows Vista and Windows Server 2008, it changed the paradigm for installing licensed copies of Windows in corporate environments. Prior to this change, enterprises received special “volume license” installation media and keys that did not require online activation. This changed with the introduction of the key management server (KMS) that was activated with a special license key. Subsequently, machines on the network were directed to the KMS to activate.
Some of the challenges with the KMS model included the lack of authentication or security—any machine with network access could activate itself against the KMS. Additionally, enterprises were now forced to maintain additional servers and infrastructure just for licensing of Windows and Microsoft Office.
Windows 8 and Windows Server 2012 clients support activation from data stored in Active Directory. Since the activation data is stored in Active Directory, there is no longer any dependency on dedicated infrastructure and clients must also be joined to the domain (and thus implicitly authenticated) in order to activate their Windows installations.
You can publish activation information to the forest by using the Volume Activation Management Tool 3.0 (VAMT). The VAMT is included as part of the Windows Automated Deployment Kit (ADK) that is available for download from this link.
3.6. Summary
The goal of this chapter was to introduce the various management tools available to you as an Active Directory administrator, and some of the benefits and limitations of those tools. If you’ve been working with Active Directory for a while, chances are you’ve used Active Directory Users and Computers, but you might not have looked at the new Active Directory Administrative Center (ADAC). If you found ADAC in Windows Server 2008 R2 disappointing, check out the Windows Server 2012 version—it’s been improved substantially.
In addition to the basic user, group, and computer management tools (ADUC and ADAC), we looked at LDP and ADSI Edit, two deeper tools that let you work with the directory on a much less abstract level. There’s no GUI tool that can give you a more raw view into the directory than LDP. We also talked about the importance of harnessing a scripting language (such as Windows PowerShell) and the level of investment Microsoft has made in PowerShell capabilities for Active Directory.
Finally, we looked at a couple of important peripheral manageability investments in the form of the Best Practices Analyzer (BPA) that can analyze the health of your Active Directory environment, and AD-based machine activation that lets you keep domain-joined machines activated without a KMS server.