
Chapter 18. Backup, Recovery, and Maintenance
A very important though often overlooked aspect of maintaining Active Directory is having a solid disaster recovery plan in place. While the reported incidents of corruption of Active Directory have been minimal, it has happened and is something you should be prepared for, regardless of how unlikely it is to occur. You’re much more likely to need to restore accidentally deleted objects than to have to deal with complete corruption, and thus you should be prepared for this as well. Do you have a plan in place for what to do if a domain controller that has a FSMO role suddenly goes offline, and you are unable to bring it back? These are all stressful scenarios: clients are complaining or an application is no longer working correctly, and people aren’t happy. It is during times like these that you don’t want to have to scramble to find a solution. Having well-documented and tested procedures to handle these issues is critical.
In this chapter, we will look at how to prepare for failures by backing up Active Directory. We will then describe how you can recover all or portions of Active Directory from a backup, as well as how to recover deleted objects from the Active Directory Recycle Bin. We will then cover how to recover from FSMO failures. Finally, we will look at other preventive maintenance operations you can do to ensure the health of Active Directory.
18.1. Backing Up Active Directory
Backing up Active Directory is a straightforward operation. It can be done using the NT Backup utility provided with Windows 2000 and 2003, the Windows Server Backup utility provided with Windows Server 2008 and newer, or a third-party backup package. Fortunately, you can back up Active Directory while it is online, so you do not have to worry about creating outages just to perform backups like you do with some other systems.
To back up Active Directory, you have to back up the system state of one or more domain controllers within each domain in the forest. If you want to be able to restore any domain controller in the forest, you’ll need to back up every domain controller. On a Windows 2000 or Windows Server 2003 domain controller, the system state contains the following:
- Active Directory
This includes the files in the NTDS folder, which contains the Active Directory database (ntds.dit), the checkpoint file (edb.chk), transaction log files (edb*.log), and reserved transaction logs (res1.log and res2.log).
- Boot files
The files necessary for the machine to boot up.
- COM+ class registration database
The database for registered COM components.
- Registry
The contents of the registry.
- SYSVOL
This is the SYSVOL share that contains all of the file-based GPO information as well as the NETLOGON share, which typically contains user logon and logoff scripts.
- Certificate Services
This applies only to DCs that are running Certificate Services.
Note
Although most backup packages allow you to perform incremental or differential backups, with Active Directory you can only perform full backups of the system state.
Windows Server 2008 and newer domain controller system state backups include practically every operating system file in addition to the components listed previously. Consequently, you will notice a substantial increase in the size of system state backups on Windows Server 2008 and newer DCs.
The user that performs the backup must be a member of the Backup Operators group or have Domain Admins–equivalent privileges.
Due to the way Active Directory handles deleted objects, your
backups are only good for a certain period of time. When objects are
deleted in Active Directory, initially they are not removed completely. If
the Active Directory Recycle Bin is enabled, a deleted object will
continue to reside in Active Directory for the duration of the deleted
object lifetime followed by the tombstone lifetime. The deleted object
lifetime dictates how long Active Directory keeps objects in the Recycle
Bin for recovery. The tombstone lifetime value dictates how long Active
Directory keeps deleted objects after they have exceeded the deleted
object lifetime before completely removing them. Both lifetimes are
configurable. The deleted object lifetime is defined in the attribute
msDS-DeletedObjectLifetime, while the
tombstone lifetime is defined in the tombStoneLifetime attribute on the following
object:
cn=Directory Services, cn=Windows NT, cn=Services, cn=Configuration, <ForestDN>
The default values for tombStoneLifetime for new forests in the
different OS versions are documented in Table 18-1. By default the msDS-DeletedObjectLifetime attribute is not
populated, so by default it will use the same value as your tombstoneLifetime. Both of these values can be
modified, so you should check to see what the values are for your forest.
As far as backups go, you should not restore a backup that is older than
the lesser of the deleted object lifetime and the tombstone lifetime,
because deleted objects will be reintroduced. If, for whatever reason, you
are not able to get successful backups within the lesser of these two
values, consider increasing them.
Operating system | Tombstone lifetime |
Windows 2000 | 60 days |
Windows Server 2003 | 180 days |
Windows Server 2003 R2 | 60 days (this was a regression bug in R2) |
Windows Server 2003 SP2 | 180 days |
Windows Server 2008 | 180 days |
Windows Server 2008 R2 | 180 days |
Windows Server 2012 | 180 days |
Another issue to be mindful of in regard to how long you keep copies of your backups has to do with passwords. Computer accounts (and managed service accounts) change their passwords every 30 days by default. Domain Controllers will accept the current password as well as one previous password, so if you restore computer objects from a backup that is older than 60 days, those computers will more than likely have to have their passwords reset. Trust relationships can also be affected. As with computer accounts, the current and previous passwords are stored with the trust objects, but unlike computer account passwords, trust passwords are changed every seven days. That means if you authoritatively restore trust objects from a backup that is older than 14 days, you may need to reset the trusts.
Warning
Disk imaging is specifically not supported for domain controller backups. This covers all instances of imaging, from backup of virtual hardware disks to using disk image software like Ghost to special imaging available in various attached storage products. Active Directory is a distributed system running across multiple domain controllers, where each domain controller maintains state for other domain controllers. Imaging various pieces of the distributed system and recovering them separately can have catastrophic results on the consistency of the directory as a whole. Some of the possible issues are USN rollback, lingering objects, and SID rollback.
The only safe way to use disk imaging is to shut down every domain controller in the forest and then image the disks. When you need to restore, you again shut down every domain controller and roll each domain controller back to the same point in time. Even though this is a safe way to do it, it still isn’t supported by Microsoft and should only be used in a test environment.
See MS Knowledge Base article 875495 for more details.
Using the NT Backup Utility
The NT Backup utility is installed on all Windows 2000 and Windows
Server 2003 machines. It is available by going to Start→All
Programs→Accessories→System Tools→Backup. You can also start it up by
going to Start→Run, entering ntbackup, and clicking OK. Figure 18-1 shows the first screen of the NT Backup
utility under Windows Server 2003.

The NT Backup utility can be used to back up the system and also to perform a restore. We will cover restores later in this chapter. If you click on the Advanced Mode link on the first screen, you’ll then see a screen such as that in Figure 18-2.
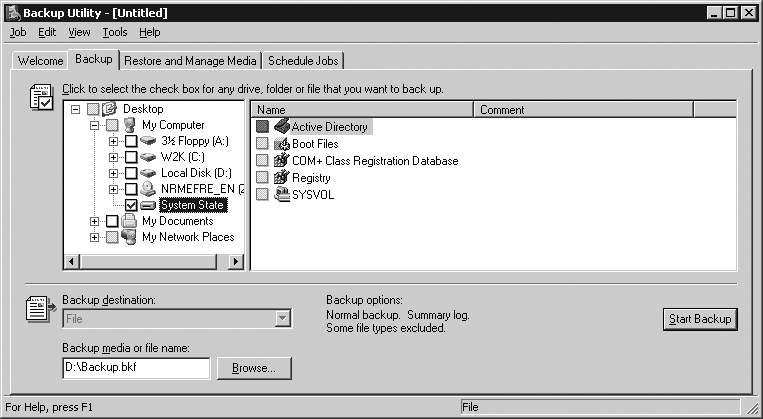
In this case, we clicked on the Backup tab and then selected the box beside System State. We could also back up any of the other drives if we wanted, but the system state is all that is required when doing a basic restore of Active Directory.
By clicking the Start Backup button, we can kick off the backup. In Figure 18-2, we have configured the D: drive to be the location where the backup file gets stored. This could have been a remote file server or other backup media if we wanted.
We can also schedule a backup to run at an interval of our choosing by clicking the Start Backup button and then the Schedule button. After that, we click the Properties button and the screen shown in Figure 18-3 pops up.
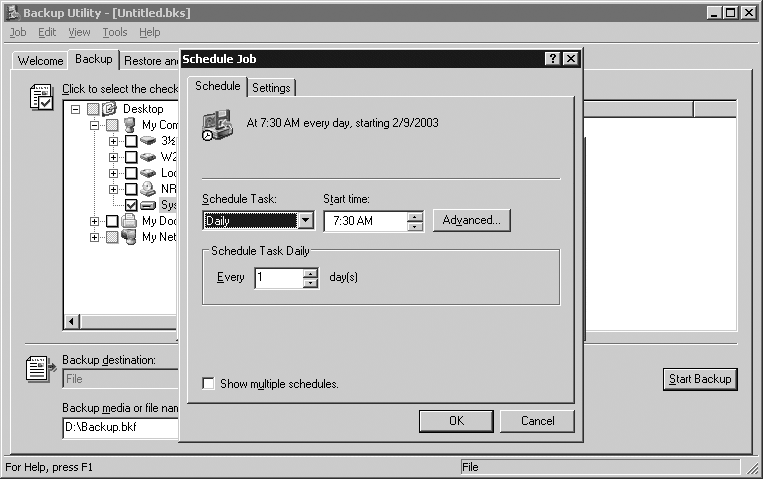
In this case, we’ve configured the backup to run once a day at 7:30 A.M. The screen in Figure 18-3 is actually part of Scheduled Tasks, which is the job scheduling system available in Windows 2000 and Windows Server 2003.
Using Windows Server Backup
Windows Server 2008 introduced a completely revamped backup and restore utility. If you’re used to NT Backup, you’ll have some adjusting to do as the tool has been completely redesigned and has some significant new limitations. In the interest of space, we’ll only discuss the functionality specific to backing up and restoring Active Directory in this book. For a full introduction to Windows Server Backup (WSB), visit this website.
Note
Windows Server Backup is not installed by default. In order to use it, you must install the feature using Server Manager.
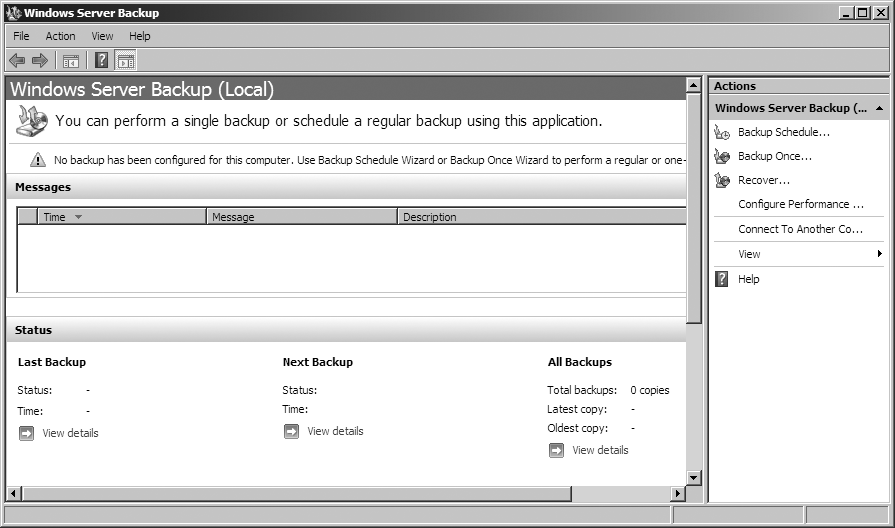
To launch WSB, go to Start → Administrative Tools → Windows Server Backup. The tool has been converted to an MMC snap-in as shown in Figure 18-4.
Note
You can launch WSB directly by going to Start→Run→wbadmin.msc instead of browsing for it on
the Start menu.
Windows Server Backup must back up to a volume that does not contain any components of the system state backup. This means that you cannot select a volume that contains the system files, the Active Directory database (ntds.dit), Sysvol, Active Directory transaction logs, and so forth. The backup will be created in a directory structure on the drive specified under <Drive>:WindowsImageBackup<HostName>Backup <time stamp>. For information about working around this limitation, see the upcoming sidebar Allowing System State Backups to Any Volume. If you do not have this setting enabled and you specify a volume that is not in scope for the backup, you will receive an error similar to Figure 18-5. You can alternatively specify a network path to back up to.

To create a system state backup, select the Custom backup configuration in the backup wizard. Next, click Add Items and select “System state.” You may also wish to select files, such as non-AD-integrated DNS zones or any other data that is specific to the domain controller. On the next page, select a destination, such as a network share or another local drive, and then complete the wizard. On our test systems, with a freshly created Active Directory forest on Windows Server 2008 R2 Enterprise, the total system state backup size was about 10 GB.
What if you want to create a system state backup from the command line? The command to create a backup stored on the E: drive is wbadmin start systemstatebackup -backuptarget:E: -quiet. If you don’t specify -quiet, you will be prompted to continue before the backup completes.
Note
For more information on Windows Server Backup and Active Directory, see the “AD DS Backup and Recovery Step-by-Step Guide” at this link.
18.2. Restoring a Domain Controller
One of the benefits of Active Directory is built-in redundancy. When you lose a single domain controller, the impact can and generally should be insignificant. But with many services, such as DHCP, the architecture dictates a dependency on a specific server. When that server becomes unavailable, clients are impacted. Over the years, failover or redundancy has been built into most of these services, including DHCP. With Active Directory, the architecture is built around redundancy. Clients are not dependent on a single DC; they can fail over to another DC seamlessly if a failure occurs.
When a failure does occur, you should ask yourself several questions to assess the impact:
- Is the domain controller the only one for the domain?
This is the worst-case scenario. The redundancy in Active Directory applies only if you have more than one domain controller in a domain. If there is only one, you have a single point of failure. You could irrevocably lose the domain unless you can get that domain controller back online or restore it from a backup.
- Does the domain controller own a FSMO role?
The five FSMO roles outlined in Chapter 2 play an important part in Active Directory. FSMO roles are not redundant, so if a FSMO role owner becomes unavailable, you may need to seize that role on another domain controller. Check out the Recipe 18.6 for more information.
- Is the domain controller a Global Catalog server?
The Global Catalog function can be added to any domain controller. But if you have only one Global Catalog server in a site and it becomes unavailable, it can impact users’ ability to log in. As long as clients can access a Global Catalog, even if it isn’t in the most optimal location, they will be able to log in. If a site without a Global Catalog for some reason loses connectivity with the rest of the network, this will impact users’ ability to log in. With Windows Server 2003 and newer, you can enable universal group caching on a per-site basis to limit this potential issue, but only if the user is not using a
userPrincipalNamefor authentication.- Is the domain controller necessary from a capacity perspective?
If your domain controllers are running near capacity and one fails, it could overwhelm the remaining servers. At this point, clients could start to experience login failures or extreme slowness when authenticating.
- Are any other services, such as Exchange, relying on that specific domain controller?
Exchange is a heavy consumer of Active Directory, especially the Global Catalog. Failure of a domain controller that Exchange is using can cause considerable issues in the mail environment, depending on the versions of Outlook and Exchange being used. More recent versions of Exchange and Outlook (2003 and newer) handle outages better than older versions. During the outage period, mail delivery could be impacted along with client lookups. Exchange is just one example, but it illustrates an issue you have to be aware of when introducing Active Directory–enabled services into your environment.
These questions can help you assess the urgency of restoring the domain controller. If you answered “no” to all of the questions, the domain controller can stay down for some period without significant impact.
When you’ve identified that you need to restore a domain controller, there are two options to choose from: restoring from replication or restoring from a backup.
Restore from Replication
One option for restoring a domain controller is to bring up a freshly installed or repaired machine and promote it into Active Directory. You would use this option if you had a single domain controller failure due to hardware and either did not have a recent backup of the machine or didn’t want to go through the process of restoring the DC from a backup. This method allows you to replace the server in AD by promoting a newly installed machine and allowing replication to copy all of the data to the DC. Here are the steps to perform this type of restore:
Remove the failed DC from AD. The remnants of the old domain controller must be removed from Active Directory before you promote the freshly installed server. We describe the exact steps to do this shortly.
Rebuild the OS. Reinstall the operating system and any other applications you support on your domain controllers.
Promote the server. After you’ve allowed time for the DC removal process to replicate throughout the forest, you can then promote the new server into AD.
Configure any necessary roles. If the failed server had any FSMO roles or was a global catalog or a DNS server, you can configure the new server to have these roles.
Note
One possible best practice is to keep a spare server that already has the OS and any other software installed ready to ship or onsite at all locations. That way, if you have a major failure with one of your domain controllers, you can use the spare server without needing to stress over getting the hardware replaced immediately in the failed machine. Alternatively, just have additional domain controller capacity in the primary sites where failures would be most painful, especially for Exchange. This alternative strategy is generally much more common than keeping spare hardware in every location.
The biggest potential drawback with this method is the restore time. Depending on the size of your DIT file and how fast your network connections are between the new DC and the server it will replicate with, the restore time could be several hours or even days. Restore time can be dramatically reduced with the Install from Media option, which allows you to take files from a system state backup from one domain controller and use them to quickly promote another domain controller. It may be faster to compress these backup files and then copy them to the remote site over the network, or ship them to the site on some other media, rather than trying to replicate the entire DIT over the WAN. For more information on this approach see the section Install from Media, later in this chapter.
Manually removing a domain controller from Active Directory
One of the key steps in the restore-from-replication method is removing the objects that are associated with the domain controller before it gets added to AD again. Windows Server 2008 allows you to remove a failed domain controller using the Active Directory Users and Computers MMC snap-in. Select the computer object representing the failed domain controller and delete it. You will receive a prompt similar to Figure 18-6 asking you to confirm that the domain controller is, in fact, permanently offline. Once you confirm this, the metadata cleanup steps will be performed automatically.

Under Windows Server 2003, this is a three-step process. The first step is to remove the associated metadata with the ntdsutil utility. The following example shows the commands necessary to remove the DC3 domain controller, which is in the RTP site, from the emea.mycorp.com domain:
C:> ntdsutil
ntdsutil: metadata cleanup
metadata cleanup: connections
Next, we need to connect to an existing domain controller in the domain that contains the DC we want to remove. In this case, we connect to DC2:
server connections: connect to server dc2
Binding to dc2 ...
Connected to dc2 using credentials of locally logged on user.
server connections: quit
metadata cleanup: select operation target
Now we need to select the domain the domain controller is in. In this case, it is emea.mycorp.com:
select operation target: list domains
Found 2 domain(s)
0 - DC=mycorp,DC=com
1 - DC=emea,DC=mycorp,DC=com
select operation target: select domain 1
No current site
Domain - DC=emea,DC=mycorp,DC=com
No current server
No current Naming Context
Next we must select the site the domain controller is in. In this case, it is the RTP site:
select operation target: list sites
Found 4 site(s)
0 - CN=Default-First-Site-Name,CN=Sites,CN=Configuration,DC=mycorp,DC=com
1 - CN=RTP,CN=Sites,CN=Configuration,DC=mycorp,DC=com
2 - CN=SJC,CN=Sites,CN=Configuration,DC=mycorp,DC=com
3 - CN=NYC,CN=Sites,CN=Configuration,DC=mycorp,DC=com
select operation target: select site 1
Site - CN=RTP,CN=Sites,CN=Configuration,DC=mycorp,DC=com
Domain - DC=emea,DC=mycorp,DC=com
No current server
No current Naming Context
After listing the servers in the site, we must select the server we want to remove. In this case, it is DC3:
select operation target: list servers in site
Found 3 server(s)
0 - CN=DC1,CN=Servers,CN=RTP,CN=Sites,CN=Configuration,DC=mycorp,DC=com
1 - CN=DC2,CN=Servers,CN=RTP,CN=Sites,CN=Configuration,DC=mycorp,DC=com
2 - CN=DC3,CN=Servers,CN=RTP,CN=Sites,CN=Configuration,DC=mycorp,DC=com
select operation target: select server 2
Site - CN=RTP,CN=Sites,CN=Configuration, DC=mycorp,DC=com
Domain - DC=emea,DC=mycorp,DC=com
Server - CN=DC3,CN=Servers,CN=RTP,CN=Sites,CN=Configuration,DC=mycorp,DC=com
   DSA object - CN=NTDS Settings,CN=DC3,CN=Servers,CN=RTP,CN=Sites,
                CN=Configuration,DC=mycorp,DC=com
   Computer object - CN=DC3,OU=Domain Controllers,DC=emea,DC=mycorp,DC=com
No current Naming Context
select operation target: quit
Note
This process has been considerably simplified in Windows
Server 2003 Service Pack 1; however, you need to know the distinguishedName of the Domain
Controller’s server object in the
Configuration container. It is recommended that you simply follow
the preceding directions for removing dead domain controllers, as
there is less possibility of a mistake.
The last step removes the metadata for the selected domain controller:
metadata cleanup: remove selected serverAt this point, you should receive confirmation that the DC was removed successfully. If you receive an error stating that the object could not be found, it might have already been removed if you tried to demote the server with dcpromo.
If you are performing this procedure on a domain controller that is running a version of Windows prior to Windows Server 2003 SP1, you will then need to manually remove a few more objects from Active Directory. See MS Knowledge Base article 216498 for details on this. You will need to manually remove the server object under the site in the configuration partition regardless of which version of Windows you are running .
Restore from Backup
Another option to reestablish a failed domain controller is to restore the machine using a backup. This approach, known as a nonauthoritative restore, does not require you to remove any objects from Active Directory. When you restore a DC from a backup, the latest changes will replicate to make it current. If time is of the essence and the backup file is immediately available, this will be the quicker approach because only the latest changes (those made since the last backup), instead of the whole directory tree, will be replicated over the network.
Here are the steps to restore from a backup:
Rebuild the OS. Reinstall the operating system and any other applications you support on your domain controllers. Leave the server as a standalone or member server.
Restore from the backup. Use your backup package to restore at least the system state onto the machine. In the next section Recipe 18.3, we will walk through the NT Backup and Windows Server Backup utilities to show how this is done.
Reboot the server and allow replication to complete. If the failed server had any FSMO roles or was a GC, you can configure the new server to have these roles.
It is also possible to restore the backup of a machine onto a machine that has different hardware. Here are some issues to be aware of when doing so:
The number of drives and drive letters should be the same.
The disk drive controller and configuration should be the same.
The attached cards, such as network cards, video adapters, and processors, should be the same. After the restore, you can install the new cards, which should be recognized by Plug and Play.
The boot.ini from the failed machine will be restored, but it may not be compatible with the new hardware, so you’ll need to make any necessary changes.
If the hardware abstraction layer (HAL) is different between machines, you can run into problems. For example, if the failed machine was single-processor and the new machine is multiprocessor, you will have a compatibility problem. The only workaround is to copy the Hal.dll, which is not included as part of system state, from the old machine and put it on the new machine. The obvious drawback to this is it that will make the new multiprocessor machine act like a single-processor machine.
Because there are numerous things that can go wrong with restoring to different hardware, we highly suggest you test and document the process thoroughly; refer to MS Knowledge Base article 263532. The last thing you want to have to do is troubleshoot hardware compatibility issues when you are trying to restore a crucial domain controller.
Install from Media
One of the challenges of working with Active Directory in a highly distributed environment is often the impact of replicating the initial copy of the database when a new domain controller is promoted. Over a slow WAN link with a large database, this operation can easily take days or weeks. While this is running it can also put an unmanageable load on WAN links that may already be fully utilized without the burden of replicating a full Active Directory database.
Windows Server 2003 introduced a new feature called Install from Media (IFM) that allows domain controllers to be promoted from a backup of another domain controller in the domain. The only replication that will take place in order for the promotion to complete is the changes that have occurred since the backup was taken. The backup image can be either copied to the domain controller via SMB or another protocol, or shipped out of band using a commercial courier. Shipping the backup this way substantially lessens the burden on the WAN for promotion of the domain controller and in some scenarios can substantially speed up the promotion process.
The process for promoting a domain controller from IFM media varies substantially between Windows Server 2003 and Windows Server 2008 domain controllers. On Windows Server 2008 you must create the IFM media using ntdsutil and then point the dcpromo wizard at the folder ntdsutil creates. Windows Server 2003 domain controllers require that you restore a system state backup taken with NT Backup to an “alternate location” and then point the dcpromo wizard at this folder.
Creating and using IFM media on Windows Server 2003
Working with IFM on Windows Server 2003 is very similar to doing so on newer versions of Windows, but there are a few key differences:
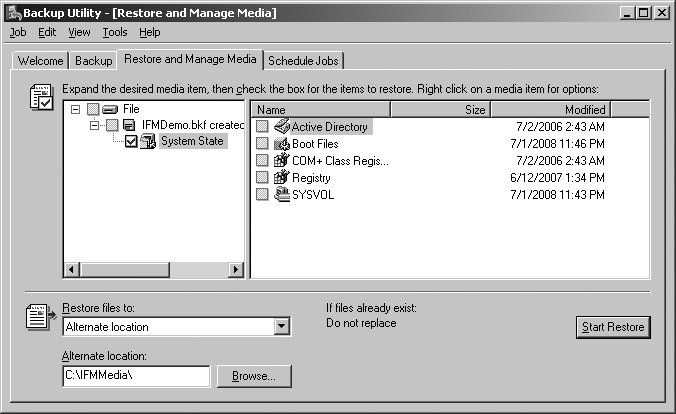
You must create the IFM media using a system state backup from NT Backup.
To use the backup, you must restore it on the target system using the “Restore files to: Alternate location” option shown in Figure 18-7.
dcpromo must be started directly in advanced mode by running dcpromo /adv.
Creating and using IFM media on Windows Server 2008 and newer
Creating the IFM media is a straightforward process, as shown in the following example. You will be given the choice of which type of media you’d like to create:
Full writable domain controller (without Sysvol)
Full writable domain controller (with Sysvol)
Read-only domain controller (without Sysvol)
Read-only domain controller (with Sysvol)
The difference between full domain controller and read-only domain controller media is that the latter do not contain any passwords or other secrets. While you can include the contents of Sysvol, the dcpromo wizard will not use them during promotion to seed the local Sysvol share:
ntdsutil: activate instance ntds
Active instance set to "ntds".
ifm: create full c:ifmmedia
Creating snapshot...
Snapshot set {f15b79ab-9b0b-4845-9583-eb6c7a49bee9} generated successfully.
Snapshot {b1681552-114b-44b9-b547-9a1b15104907} mounted as C:$SNAP_200807012230
_VOLUMEC$
Snapshot {b1681552-114b-44b9-b547-9a1b15104907} is already mounted.
Initiating DEFRAGMENTATION mode...
     Source Database: C:$SNAP_200807012230_VOLUMEC$WindowsNTDS
tds.dit
     Target Database: c:ifmmediaActive Directory
tds.dit

                  Defragmentation  Status (% complete)

          0    10   20   30   40   50   60   70   80   90  100
          |----|----|----|----|----|----|----|----|----|----|
          ...................................................

Copying registry files...
Copying c:ifmmedia
egistrySYSTEM
Copying c:ifmmedia
egistrySECURITY
Snapshot {b1681552-114b-44b9-b547-9a1b15104907} unmounted.
IFM media created successfully in c:ifmmedia
Note
You can also create IFM media from a system state backup using the Windows Server 2008 R2 and newer versions of Windows Server Backup with the “Alternate location” option shown in Figure 18-16.
In the preceding example, we’ve created IFM media for promoting a full writable domain controller excluding the contents of the Sysvol. Figure 18-8 shows the contents of c:ifmmedia.
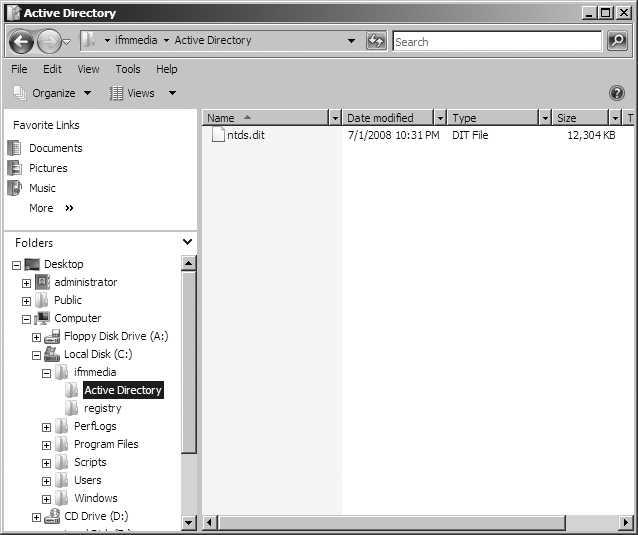
Note
You can use IFM media created on a 32-bit domain controller, to promote a 64-bit domain controller, and vice versa. You cannot, however, use RODC media to promote a full domain controller.
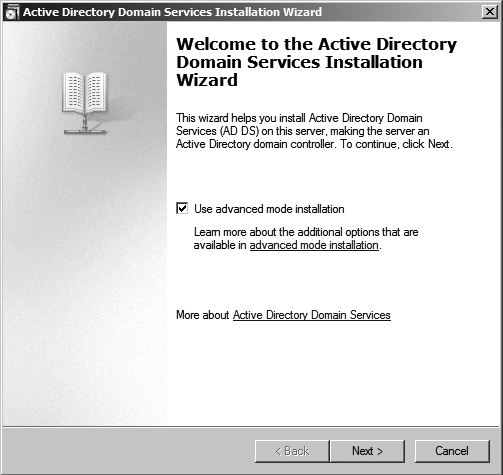
Once you have created the IFM media, you can copy it to the new/target domain controller using whatever means are most convenient. In order to utilize the media, you will need to start dcpromo in advanced mode. Advanced mode is accessible by checking the “Use advanced mode installation” checkbox on the first page of the wizard, as shown in Figure 18-9. You can also run dcpromo /adv.
As you proceed through the wizard, you will be shown a page similar to Figure 18-10 that gives you the option to use the IFM media.

When the wizard completes, it will modify the backup of the ntds.dit database from the source domain controller and then replicate any changes made since the backup of the database was created.
18.3. Restoring Active Directory
No one ever wants to be in a position where they have to restore Active Directory, but nevertheless you should prepare for the possibility. Good planning and preparation helps to ensure that you will have a minimal number of surprises in the event of a disaster scenario that requires you to perform a restore. Active Directory restores come in a few different flavors, which we’ll cover now.
Nonauthoritative Restore
A nonauthoritative restore is a restore where you simply bring a domain controller back to a known good state using a backup. You then let replication resync the contents to account for the latest changes in Active Directory since the backup. The restore-from-backup method we described earlier to handle DC failures is an example of a nonauthoritative restore. The only difference between that scenario and the one we’ll describe here is that this process is for machines that are currently functioning properly as domain controllers; there is no need to rebuild from the ground up. There may be some circumstances when you want to perform a similar restore, but the server is already configured as a domain controller. One example might be if some changes were made on a particular domain controller that you wanted to take back. If you were able to disconnect the domain controller from the network in time before it replicated, you could perform a nonauthoritative restore to get it back to a known state before the changes were made. This would effectively nullify the changes, as long as they hadn’t replicated to another server.
A nonauthoritative restore simply restores Active Directory without marking any of the data as authoritative. This means that any changes that have happened since the backup will replicate to the restored server. Also, any changes that were made on the server that had not replicated will be lost.
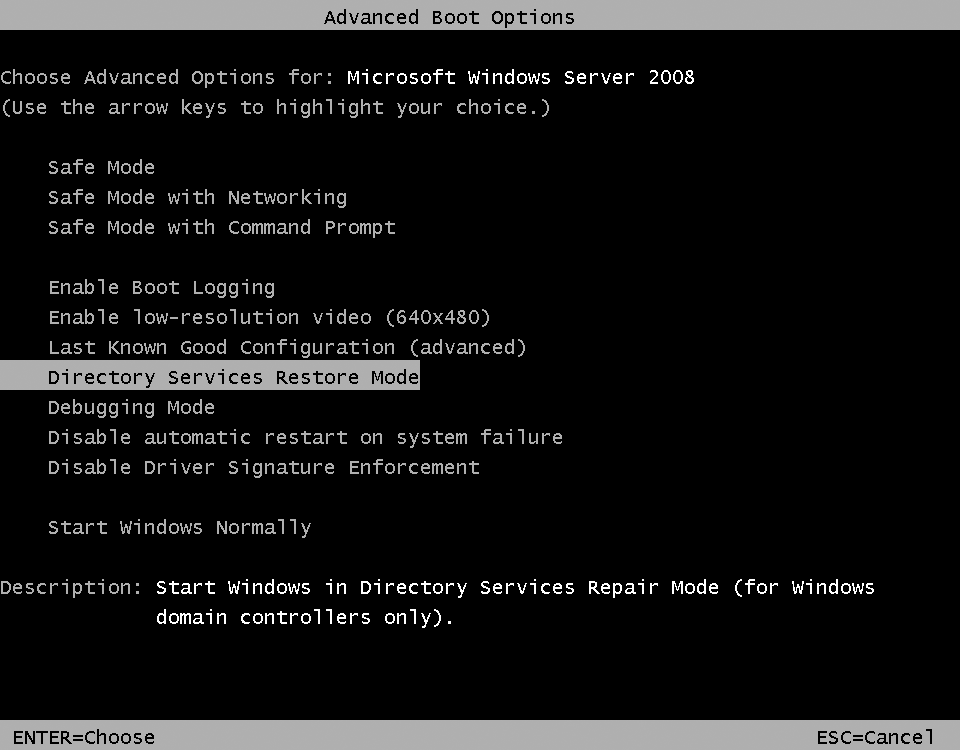
To perform a nonauthoritative restore of a domain controller, you need to boot the DC into Directory Services Restore Mode (DSRM). The reason you have to do this is that when a domain controller is live, it locks the Active Directory database (ntds.dit) in exclusive mode. That means that no other processes can modify its contents. To restore over the ntds.dit file, you must boot into DS Restore Mode, which is a version of Safe Mode for domain controllers. If you try to restore a live domain controller, you’ll get an error and be unable to continue.
You can get into DS Restore Mode by hitting the F8 key during the initial system startup. After doing so, you’ll see the screen shown in Figure 18-11.
Once you receive a logon prompt, you have to log in with the DS Restore Mode administrator account and password. You set the password for this account when you initially dcpromo the machine into Active Directory. Since Active Directory is offline in DS Restore Mode, you have to log in with the local administrator account that is stored in the local SAM and that can only be used in this mode. If you do not know the DSRM password, refer to Microsoft Knowledge Base article 322672 for steps to reset the password.
Restoring with NT Backup
After logging into the system, you’ll need to bring up the NT Backup utility or other backup software. We will walk through how to do the restore using NT Backup. After clicking Next at the initial wizard screen, you’ll see the screen shown in Figure 18-12.

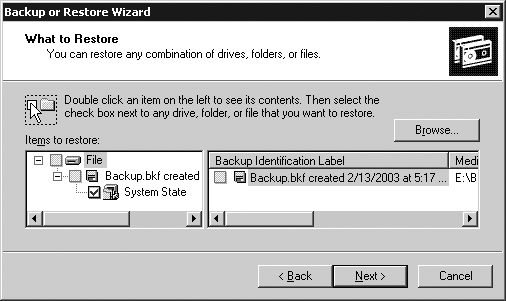
Select “Restore files and settings” and click Next. You’ll now be brought to a screen where you can select what to restore. You should restore at least the system state, but you can also restore the system drive and other drives if necessary. Figure 18-13 shows the selection screen.
After you’ve made your selection and clicked Next, the summary screen will be displayed, showing what will be restored. Before finishing, you need to click the Advanced button and walk through the advanced screens to ensure that junction points will be restored, as shown in Figure 18-14.

Click Finish to kick off the restore. After the restore is complete, you’ll need to reboot into normal mode. At this point, the domain controller will replicate the latest changes with its replication partners. Give time for the replication to complete and then monitor the server and check the event logs to make sure it is functioning correctly.
Restoring with Windows Server Backup
Restoring from a system state backup can be performed using the Recover option in the task pane. First, in the Recovery Wizard, locate the drive or network share containing the backup you will be restoring from. Next, select the date the backup was taken on from the calendar and the time from the drop-down on the right, as shown in Figure 18-15.

If you need to authoritatively restore Sysvol, select the “Perform an authoritative restore of Active Directory files” option. This will only perform an authoritative restore of Sysvol, contrary to the text on the screen, as shown in Figure 18-16.

Once you have completed the wizard, you’ll need to reboot into normal mode. At this point, the domain controller will replicate the latest changes with its replication partners. Give time for the replication to complete and then monitor the server and check the event logs to make sure it is functioning correctly. If you need to perform an authoritative restore, continue reading this chapter before rebooting.
Partial Authoritative Restore
In some situations, you may need to restore data in Active Directory. In the examples we’ve shown so far of restoring a domain controller and performing a nonauthoritative restore, we simply wanted to get the domain controller back up and running. There are certain situations, though, in which you may need to do an authoritative restore. Here are a few examples:
Accidental deletion of important objects
Accidental deletion of an entire subtree
Corruption of objects or the entire directory
Reversing certain object additions or modifications
In all of these scenarios, you can do a partial authoritative restore to reverse the changes. If the entire directory gets corrupted, you’ll need to do a complete authoritative restore, which we will touch on shortly.
Warning
You cannot authoritatively restore the Schema naming context. In order to roll back the schema, you must rebuild the entire forest either from scratch or from a set of system state backups that predate the schema modification. The feasibility of this option is likely small in almost any environment.
You have two options for doing an authoritative restore. You can either find a domain controller that has the data it is supposed to, perhaps because the changes haven’t replicated to it yet, or you can restore the data from a backup. In either case, you need to boot into DS Restore Mode, as described in the section Nonauthoritative Restore. Again, this is necessary due to the fact that the Active Directory database is locked when the DC is live, and no modifications can be made. Once you are in DS Restore Mode, you can restore from a backup if necessary, as described earlier.
At this point you need to mark the data you want restored as
authoritative in your offline Active Directory database. This is done
with the ntdsutil utility. There
are several options to choose from under the authoritative restore menu shown
here:
ntdsutil: authoritative restore
authoritative restore: ?
 ?                             - Show this help information
 Create ldif file(s) from %s   - Creates ldif file(s) using specified
                                 authoritatively restored objects list
                                 to recreate back-links of those objects.
 Help                          - Show this help information
 List NC CRs                   - Lists Partitions and cross-refs.  You need
                                 the cross-ref of a Application Directory
                                 Partition to restore it.
 Quit                          - Return to the prior menu
 Restore database              - Authoritatively restore entire database
 Restore database verinc %d    - ... and override version increase
 Restore object %s             - Authoritatively restore an object
 Restore object %s verinc %d   - ... and override version increase
 Restore subtree %s            - Authoritatively restore a subtree
 Restore subtree %s verinc %d  - ... and override version increase
 authoritative restore:
When doing a partial restore, you can use either the restore object %s subcommand to restore a single object or the restore subtree %s subcommand to restore an entire subtree of objects. In the following example, we will restore the jsmith user object:
authoritative restore: restore object cn=jsmith,ou=sales,dc=mycorp,dc=com
Opening DIT database... Done.
 The current time is 08-10-05 00:15.25.
Most recent database update occured at 08-09-05 21:48.51.
Increasing attribute version numbers by 100000.
 Counting records that need updating...
Records found: 0000000001
Done.
  Found 1 records to update.
 Updating records...
Records remaining: 0000000000
Done.
Successfully updated 1 records.
 The following text file with a list of authoritatively restored
objects has been created in the current working directory:
        ar_20050810-001525_objects.txt
 One or mofre specified objects have back-links in this domain.
The following LDIF files with link restore operations have
 been created in the current working directory:
        ar_20050810-001525_links_ad.loc.ldf
 Authoritative Restore completed successfully.
authoritative restore: quit
As you can see, ntdsutil increases the object’s version number by 100,000. This is how it is marked as authoritative in the database. After you reboot into normal mode, the domain controller will check with its replication partners and determine that the jsmith user object has a higher version than its partners have. It will then replicate this out to them, and likewise, all other objects that have been updated on the partner will be replicated to this server.
Note
If, for whatever reason, the auto increment of 100,000 is not enough for the object(s), you can use the alternate subcommand restoreobject %s verinc %d, where %d, is the amount to increment the version by (this figure is multiplied by the number of days since the backup).
Depending on the version of ntdsutil, you might see different results than what you see here. The utility had some major changes incorporated in the Windows Server 2003 SP1 version; for example, it now creates an LDF file that will contain any linked attribute values attached to the object in the same domain, which allows for recovery of group membership and other linked attributes.
Complete Authoritative Restore
Restoring the entire Active Directory database is similar in concept to restoring individual objects or subtrees, except you are restoring all of the objects, with the exception of the schema. This should be done with caution and only in the most extreme situations. We highly recommend that you test this out in a lab environment to ensure you have the process correctly documented and you actually have experience with performing restores.
Again, to run the restore command, you have to be in DS Restore Mode, and you need to have restored the system from a backup, as described previously in this chapter. The following is example output from the restore database subcommand:
authoritative restore: restore database
Opening DIT database... Done.
  The current time is 08-10-05 00:39.46.
Most recent database update occured at 08-09-05 21:48.51.
Increasing attribute version numbers by 100000.
 Counting records that need updating...
Records found: 0000001725
Done.
  Found 1725 records to update.
 Updating records...
Records remaining: 0000000000
Done.
  Successfully updated 1725 records.
 The following text file with a list of authoritatively
restored objects has been created in the current working directory:
        ar_20050810-003946_objects.txt
 One or more specified objects have back-links in this domain.
The following LDIF files with link restore operations have
 been created in the current working directory:
        ar_20050810-003946_links_ad.loc-Configuration.ldf
        ar_20050810-003946_links_ad.loc.ldf
 Authoritative Restore completed successfully.
 authoritative restore: quit
If you have to perform a complete authoritative restore, the assumption is that something catastrophic has happened on a domain controller that caused some form of global, irreparable Active Directory corruption. The safest thing may in fact be to restore one domain controller per domain and rebuild the rest. You would need to manually remove each of the rebuilt domain controllers from Active Directory and then re-promote each. Again, this is only a suggestion, and each situation must be thoroughly thought out before taking such drastic measures. If you have a thorough understanding of the processes and procedures involved and practice them, you will certainly be better prepared to tackle such an eventuality. For the Microsoft documentation on Active Directory forest recovery best practices, see this website.
18.4. Working with Snapshots
An Active Directory feature introduced in Windows Server 2008 was the notion of snapshots. With snapshots, you can make a point-in-time copy of the Active Directory database. This feature uses the Volume Shadow Copy (VSS) service to create the snapshot. Once you have created a snapshot, you can mount it using the dsamain command-line utility and browse it like the live Active Directory database using ldp, Active Directory Users and Computers (ADUC), or any other tool that supports the LDAP protocol.
The benefits of this new capability are endless, but some ideas include:
Looking at permissions or other settings prior to modification in case you need to roll back
Exporting objects or values that were inadvertently modified and then importing them back into your production directory
Determining which backup to perform a restore from
Restoring a complete object with a third-party tool
Creating the snapshot is a straightforward process using the ntdsutil command-line utility:
C:> ntdsutil
ntdsutil: snapshot
snapshot: activate instance ntds
Active instance set to "ntds".
snapshot: create
Creating snapshot...
Snapshot set {e73b71cd-7e2b-40ee-8871-69575f4b1e66} generated successfully.
Once you have created a snapshot, you can mount it and make it available to LDAP clients. Mounting the snapshot consists of either specifying the GUID generated in the previous step or selecting the snapshot from a list. In this example, we select the snapshot from a list:
snapshot: list all
 1: 2008/06/30:22:44 {e73b71cd-7e2b-40ee-8871-69575f4b1e66}
 2:   C: {c8bc59c0-f20b-4bac-a12a-ab6eab737f0c}

snapshot: mount 1
Snapshot {c8bc59c0-f20b-4bac-a12a-ab6eab737f0c} mounted as
C:$SNAP_200806302244_VOLUMEC$
Once the snapshot has been mounted in the filesystem, you can use the dsamain utility to mount the snapshot version of the Active Directory database and make it accessible via LDAP. dsamain requires that you provide the path to the database to mount as well as a port number to listen on. If you only specify the LDAP port, dsamain will automatically use the subsequent three ports for LDAP over SSL (LDAPS), Global Catalog, and Global Catalog SSL connections. Thus, if you specify port 10389 for LDAP, ports 10390, 10391, and 10392 will also be used. The command to mount the database in this scenario is:
 dsamain -dbpath C:$SNAP_200806302244_VOLUMEC$WindowsNTDS
tds.dit
 -ldapport 10389
You can then use LDP or any LDAP client to connect to port 10389, as shown in Figure 18-17.

You can also connect to mounted snapshots using Active Directory Users and Computers:
Launch ADUC.
Right-click the domain and select Change Domain Controller
Select “This Domain Controller or AD LDS instance.”
Click “<Type a Directory Server name[:port] here>.”
Enter the name of a domain controller or the localhost, as shown in Figure 18-18, and click OK.

Once you’re done with a snapshot, you need to stop the dsamain instance and unmount the snapshot. To stop the dsamain instance, simply press Ctrl-C in the command window and it will exit. Unmounting the snapshot is similar to mounting it:
C:> ntdsutil
ntdsutil: snapshot
snapshot: list all
 1: 2008/06/30:22:44 {e73b71cd-7e2b-40ee-8871-69575f4b1e66}
 2:   C: {c8bc59c0-f20b-4bac-a12a-ab6eab737f0c} C:$SNAP_200806302244_VOLUMEC$

snapshot: unmount 1
Snapshot {c8bc59c0-f20b-4bac-a12a-ab6eab737f0c} unmounted.
In summary, Active Directory snapshots allow you to take a point-in-time copy of the Active Directory database on a domain controller and mount it for parallel access via LDAP. For more information on this functionality, check out the guide at this website.
18.5. Active Directory Recycle Bin
One of the most common Active Directory disasters that administrators face is the accidentally deleted object, or more commonly, accidentally deleted objects. While this type of disaster is entirely preventable, it comes up time and time again. Various third parties have long made tools available for purchase that enable you to restore objects or attribute values to the directory without recovering from a conventional system state backup. Windows Server 2008 R2 introduced the Active Directory Recycle Bin, which is Microsoft’s solution to recovering deleted objects.
Prior to the advent of the Active Directory Recycle Bin, one of the side effects of deleting an object was that the majority of its attributes were removed, so an undelete or reanimation of the tombstone object would be missing most attributes that were set when the object was deleted. Only those attributes that were marked in the schema to be preserved on a tombstone were retained. While most attribute values can be retained, linked attributes (such as group membership) cannot be retained on a tombstone.
Deleted Object Lifecycle
When you delete an object from Active Directory, a number of things happen. Chiefly, the object isn’t actually purged from the Active Directory database for quite some time, in order to ensure that replication of the deletion occurs across the forest. Objects in this state are known as tombstones. If the Active Directory Recycle Bin is not enabled, the time that objects are retained in the database after deletion is called the tombstone lifetime. Once the tombstone lifetime passes, the garbage collection process on each domain controller removes the records from the database. Figure 18-19 shows the lifecycle of an object that is deleted from Active Directory when the Recycle Bin is not enabled.

When you enable the Active Directory Recycle Bin, before a deleted
object becomes a tombstone it first enters the deleted object
state, as shown in Figure 18-20. When an object is
in the deleted state, all of its attributes are retained, as well as any
links to the object. Similar to how an object was deleted prior to the
Recycle Bin being enabled, the isDeleted attribute is set to TRUE, and the object is moved to the Deleted
Objects container.
Note
By default, garbage collection runs on each domain controller every 12 hours. During garbage collection, tombstones are checked to see if the time at which they were deleted exceeds the tombstone lifetime. If so, the records are removed.
You can trigger garbage collection to run on demand by setting
the doGarbageCollection operational
attribute to 1 on a given domain
controller using a tool such as ldp or
admod. For example, you can use the following
admod command to run garbage collection on server
DC01:
admod -h dc01 -sc gc
After the deleted object lifetime passes, garbage collection
converts the object to a recycled object, strips all of the attributes
that are not marked for preservation on tombstones, and sets the
isRecycled attribute to TRUE. The recycled object state is what was
previously called a tombstone. Finally, once the recycled object
lifetime (previously called the tombstone lifetime) passes, garbage
collection physically removes the record from the database.
Enabling the Recycle Bin
The Active Directory Recycle Bin requires the Windows Server 2008 R2 forest functional level (level 4) or better. Once the forest functional level requirement is met, the Recycle Bin optional feature can be enabled. Enabling the Active Directory Recycle Bin is most easily done with PowerShell.
Warning
Once you have enabled the Active Directory Recycle Bin, it cannot be disabled. Be sure that you have tested the effects of enabling the Recycle Bin in a test environment including tools that integrate with Active Directory. Tools generally affected by enabling the Recycle Bin include those that use LDAP DirSync to synchronize changes in AD with a local database.
The Microsoft Identity Lifecycle Manager (ILM) and some versions of Office365 DirSync are two examples of applications that are affected by the Recycle Bin.
On a machine with the Active Directory module for Windows PowerShell installed, run the following two commands:
Enable-ADOptionalFeature-Identity'CN=Recycle Bin Feature,CN=Optional Features,CN=Directory Service,CN=Windows NT,CN=Services,CN=Configuration,'<ForestRootDN>'-Scope ForestOrConfigurationSet-Target '<ForestDNSName>' `'CN=RecycleBinFeature,`CN=OptionalFeatures,`CN=DirectoryService,CN=WindowsNT,CN=Services,CN=Configuration,<ForestRootDN>' -Scope ForestOrConfigurationSet -Target '<ForestDNSName>'
WARNING: Enabling 'Recycle Bin Feature' on 'CN=Partitions,CN=Configuration,
<Forest Root DN>' is anirreversible action! You will not be able to disable
'Recycle Bin Feature' on 'CN=Partitions,CN=Configuration,<Forest Root DN>'
if you proceed.
If you were enabling the Recycle Bin for the
contoso.com forest, you would replace the
<Forest Root DN> in the sample with DC=contoso,DC=com, and you would replace the
<Forest DNS Name> with contoso.com.
Note
You can also enable the Active Directory Recycle Bin using the Windows Server 2012 version of the Active Directory Administrative Center. Simply right-click the forest root domain and click Enable Recycle Bin.
Once the Recycle Bin is enabled, you may see some additional
replication traffic in your environment as the isRecycled attribute is updated for each
object in the forest. Additionally, objects that were previously
tombstoned will enter the recycled state and will no longer be available
for reanimation. Finally, once the Recycle Bin is enabled, the
infrastructure master FSMO role no longer has any work to perform, so
its placement is no longer important. For more information on FSMO
roles, refer to Chapter 2.
Undeleting Objects
Recovering objects from the Recycle Bin, or undeleting them, can be a tricky process. If you are recovering an entire tree of objects, such as in the case that an OU has been deleted, you need to undelete the objects in the correct order. That is, it’s not possible to recover an object before its parent has been recovered.
Fortunately, Microsoft provides a number of tools to make this easier. If you’re using the Windows 8 Remote Server Administration Tools (RSAT), you can use the Active Directory Administrative Center (ADAC) to recover. With the Windows Server 2008 R2 RSAT tools, or if you need more granularity, you can use PowerShell.
Using ADAC
Recovering individual objects from the recycle bin with ADAC is a very straight-forward process. Once the recycle bin is enabled, you will see a Deleted Objects container in ADAC under the root of the domain. Find the object you want to recover and right-click it. You can either choose Restore to restore the object to its original location, or, if you want to restore the object to a different OU, choose “Restore to.” The downside to using ADAC is that it does not support the notion of tree recovery. If you need to recover an OU hierarchy, you’ll need to resort to PowerShell and a special tree recovery script discussed in the next section.
Using PowerShell
The cmdlet you’ll need to become most familiar with when recovering objects from the Recycle Bin with PowerShell is Restore-ADObject. In order to recover an object or series of objects, you’ll first need to identify them and provide them to the Restore-ADObject cmdlet. You can either provide the DN (or GUID) of a specific object to restore, or pipe the results of the Get-ADObject cmdlet to Restore-ADObject.
The easiest way to become familiar with these options is with a
few examples. In the first example, we will recover the account for
user gwashington. We are able to locate this user
based on the previous relative distinguished name (RDN). In the case
of a user (or computer), the RDN is the CN= component of the object’s DN. In the
case of an organizational unit, the RDN is the OU= component of the object’s DN. We recover
the user object as follows:
Get-ADObject-IncludeDeletedObjects-LdapFilter`"(&(objectClass=user)(msDS-lastKnownRDN=gwashington))"|Restore-ADObject
Consider another example where you accidentally delete an OU containing a number of objects. In this case, you’ll first need to recover the OU and then recover the objects that were inside of it. In this example we’ll recover an OU called Presidents, as shown in Figure 18-21, and then recover all of the objects that were in the OU.
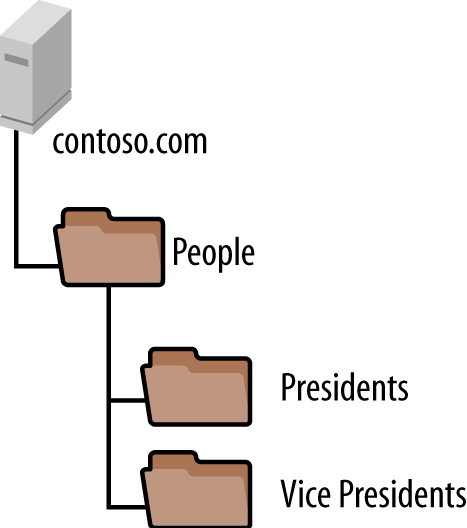
In order to recover the deleted Presidents OU and all of the objects in it, we use the following PowerShell commands (each on one line):
Get-ADObject-IncludeDeletedObjects-LdapFilter`"(&(objectClass=organizationalUnit)(msDS-lastKnownRDN=Presidents))"`|Restore-ADObjectGet-ADObject-IncludeDeletedObjects-LdapFilter`"(&(objectClass=user)(lastKnownParent=OU=Presidents,OU=People,DC=contoso,DC=com))"|Restore-ADObject
If you were to try to restore an object before restoring the object’s parent, you would receive an error similar to the following:
Restore-ADObject : The operation could not be performed because the object's
parent is either uninstantiated or deleted
Fortunately, the Restore-ADObject cmdlet has a number of parameters, as shown in Table 18-2, that enable you to modify the cmdlet’s default behavior.
Parameter | Description |
Identity | Specifies the object to restore. You can provide the DN of the deleted object (in the Deleted Objects container), or the object’s GUID. |
NewName | Specifies a new RDN for
the object to use when it is restored. If this is not
provided, the You may find this parameter useful if, for example, you are recovering a deleted OU after someone has manually recreated the OU with the same name. |
TargetPath | Specifies where in the directory to recover the object to. If the object’s parent no longer exists or you want to recover the object to a new location, you should provide the DN of that location here. If a value is not provided, the recovered
object’s |
The examples we’ve looked at so far are trivial in comparison to possible accidental deletion scenarios where a complex hierarchy of OUs and objects may have been deleted. Such a hierarchy will have to be restored from the top down. Doing this manually would be complex and time-consuming at best. Fortunately, Microsoft has provided a script, Restore-ADTree.ps1, that can be used to recover a hierarchy of objects. This script is available at this link.
If, for example, the People OU shown in Figure 18-21 were accidentally deleted, you could use Restore-ADTree.ps1 to recover the hierarchy like this:
Restore-ADTree.ps1-lastKnownRDN"People"-lastKnownParent"dc=contoso,dc=com"
Note
If you receive an error similar to the following when you run the script, you need to modify your PowerShell Execution Policy.
File C:Restore-ADTree.ps1 cannot be loaded because the execution of
scripts is disabled on this system. Please see
"get-help about_signing" for more details.
To set your execution policy to RemoteSigned, run this command:
Set-ExecutionPolicy-ExecutionPolicy:RemoteSigned
For more information about execution policies, refer to this website.
18.6. FSMO Recovery
The FSMO roles were described in Chapter 2. These roles are considered special in Active Directory because they are hosted on a single domain controller within a forest or domain. The architecture of Active Directory is highly redundant, except for FSMO roles. It is for this reason that you need to have a plan regarding how to handle FSMO failures.
While it would be a really nice feature if domain controllers could detect that they were being shut down and gracefully transfer any FSMO roles they held other domain controllers, this isn’t how it works in reality. In the absence of graceful FSMO role transfer, you have to perform manual transfers. To manually transfer a FSMO role, you bring up the appropriate Active Directory snap-in, bring up the FSMO property page, select a new role owner, and perform the transfer. Here is a list of the FSMO roles and the corresponding snap-ins that can be used to transfer each to another domain controller:
Schema master: Active Directory Schema
Domain naming master: Active Directory Domains and Trusts
RID master: Active Directory Users and Computers
PDC emulator: Active Directory Users and Computers
Infrastructure master: Active Directory Users and Computers
Note
You can use the command-line tool netdom to query all FSMOs for a given domain with a single command:
netdom query fsmo /domain:domainname
When a FSMO role owner goes down and cannot be brought back online, you can no longer transfer the role; you instead have to “seize” it. Windows Server 2008 and newer domain controllers will automatically seize any FSMO roles held by a domain controller when you perform a metadata cleanup. If you wish to specify exactly where the roles are seized to you must still perform this task by hand, though. Unfortunately, you cannot seize FSMO roles using the Active Directory snap-ins, as you can to transfer them. To seize a FSMO role, you will need to use the ntdsutil utility. We will now walk through the ntdsutil commands that are used to seize a FSMO role. Note that due to the width of the output, some of the text wraps to the following line.
We start off by getting into the ntdsutil interactive mode and looking at the options for the roles command:
C:> ntdsutil
ntdsutil: roles
fsmo maintenance: ?
 ?                             - Show this help information
 Connections                   - Connect to a specific domain controller
 Help                          - Show this help information
 Quit                          - Return to the prior menu
 Seize domain naming master    - Overwrite domain role on connected server
 Seize infrastructure master   - Overwrite infrastructure role on connected
                                 server
 Seize PDC                     - Overwrite PDC role on connected server
 Seize RID master              - Overwrite RID role on connected server
 Seize schema master           - Overwrite schema role on connected server
 Select operation target       - Select sites, servers, domains, roles and
                                 naming contexts
 Transfer domain naming master - Make connected server the domain naming master
 Transfer infrastructure master - Make connected server the infrastructure master
 Transfer PDC                  - Make connected server the PDC
 Transfer RID master           - Make connected server the RID master
 Transfer schema master        - Make connected server the schema master
We must now connect to the domain controller to which we want to seize the role. In this case, we will connect to DC1:
fsmo maintenance: connections
server connections: connect to server dc1
Binding to dc1 ...
Connected to dc1 using credentials of locally logged on user.
server connections: quit
At this point, we can transfer and seize any available FSMO role to the DC1 domain controller. In the next example, we will attempt to seize the schema master role. The current schema master is DC2. If we tried to perform a seizure and DC2 was operational, we would effectively do a graceful transfer of the role to DC1. If DC2 was not operational, a seizure would take place, as shown in the following output (note that some lines may wrap due to their length):
fsmo maintenance: seize schema master
Attempting safe transfer of schema FSMO before seizure.
ldap_modify_sW error 0x34(52 (Unavailable).
Ldap extended error message is 000020AF: SvcErr: DSID-03210300, problem 5002
(UNAVAILABLE), data 1753
 Win32 error returned is 0x20af(The requested FSMO operation failed. The current
FSMO holder could not be contacted.)

Depending on the error code this may indicate a connection,
ldap, or role transfer error.
Transfer of schema FSMO failed, proceeding with seizure ...
Server "dc1" knows about 5 roles
Schema - CN=NTDS Settings,
CN=DC1,CN=Servers,CN=RTP,CN=Sites,
CN=Configuration,
DC=mycorp,DC=com
Domain - CN=NTDS Settings,CN=DC1,CN=Servers,CN=RTP,CN=Configuration,
DC=mycorp,DC=com
PDC - CN=NTDS Settings,CN=DC1,CN=Servers,CN=RTP,CN=Sites,CN=Configuration,
DC=mycorp,DC=com
RID - CN=NTDS Settings,CN=DC1,CN=Servers,CN=RTP,CN=Sites,CN=Configuration,
DC=mycorp,DC=com
Infrastructure - CN=NTDS Settings,CN=DC1,CN=Servers,CN=RTP,CN=Sites,
CN=Configuration,DC=mycorp,DC=com
Note that a connection is first attempted to the current role owner, and if it cannot be reached, ntdsutil does the seizure.
One of the nice features of the quirky ntdsutil command is that it can be run in interactive mode, as we just showed, or it can be run from a single command line. To accomplish the same seizure using a single command line, we could use:
C:> ntdsutil roles conn "connect to server dc1" q "seize schema master" q qDepending on your needs, you could write a batch script to prompt for the role you want to seize and the DC to transfer or seize the role to. This could help when it gets down to crunch time and you need to seize the role quickly, and you do not want to have to thumb through this book trying to find all of the commands.
18.7. Restartable Directory Service
Windows Server 2008 introduced the ability to start and stop Active Directory like a normal Windows service. This allows you to perform most offline operations without restarting the domain controller. While Active Directory is stopped, it will not respond to logon requests. If the domain controller is hosting Active Directory–integrated DNS zones, it will also not respond to queries for these zones. While the Active Directory service is stopped, you can perform all of the offline tasks outlined in this chapter with the exception of restoring from a backup. Restoring still requires that you boot into Directory Services Restore Mode.
Once you have stopped the Active Directory service, you can log into the domain controller with domain credentials if another domain controller is available to service the request. If another domain controller is not available to service the request, you will not be able to log in. If you want to have the option of using the Directory Services Restore Mode password, you must modify the registry. This configuration change is outlined in the sidebar “Modify the DSRM Logon Behavior,” next.
Note
If you are trying to log into a Windows Server 2008 domain controller where the directory service is stopped, and login is failing when you try to use the DSRM credentials, make sure that you are not attempting to log into the domain. If you need to explicitly specify the local administrator account, click Switch User on the logon screen and specify a username of .administrator.
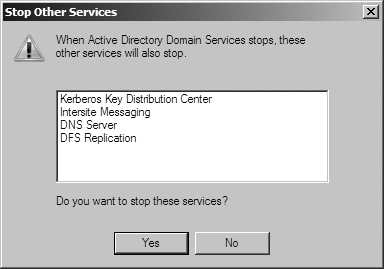
To stop the Active Directory service, open the Services MMC snap-in
by going to Start→Run→services.msc,
right-clicking Active Directory Domain Services, and selecting Stop. You
will be prompted to also stop dependent services, as shown in Figure 18-22. You can also stop Active Directory from
the command prompt by running net stop ntds.
Once you have restarted the Active Directory Domain Services service, you will need to manually start each of these dependent services.
18.8. DIT Maintenance
Using the ntdsutil utility, you can check the integrity and semantics of the Active Directory database and reclaim whitespace, which can dramatically reduce the size of the directory information tree. Also, just as you should rotate the password for the administrator accounts in the forest, you should also change the DS Restore Mode administrator password periodically. You may even need to do this more frequently, depending on whether you have people who leave your team and should no longer know the password.
Unfortunately, to accomplish all these tasks (with the exception of changing the DS Restore Mode administrator password) on Windows Server 2003 and earlier domain controllers, you have to boot the domain controller into DS Restore Mode. That means you will have to schedule downtime for the machine. Also, to use DS Restore Mode, you need console access, either through being physically at the machine or with out-of-band access, such as with an HP Integrated Lights-Out (iLO) connection.
If you cannot access the machine’s physical console, you can also connect via Remote Desktop if you modify the DC’s boot configuration. If you need to configure a Windows Server 2008 or newer domain controller to automatically boot into DS Restore Mode, you’ll need to use the bcdedit command-line utility to reconfigure the domain controller’s boot settings. This is a three-step process. First, issue this command:
bcdedit /copy {current} /d “DC-DS Restore Mode”
The tool will output a GUID response similar to this:
The entry was successfully copied to {49fa7976-5065-11dd-ae21-000c291a8e6c}bcdedit /set
{49fa7976-5065-11dd-ae21-000c291a8e6c} safeboot
dsrepair
bcdedit /default
{49fa7976-5065-11dd-ae21-000c291a8e6c}
When you restart the domain controller, it will boot into DS Restore Mode. You will then need change the domain controller’s default boot option back to the original setting. This is a two-step process. First, issue this command:
bcdedit /enum
This will output a list of all the boot manager options. Find the GUID of the normal Windows instance, and issue the following command:
bcdedit /default
<guid of normal Windows instance>
Checking the Integrity of the DIT
There are several checks you can perform against the DIT file to determine whether it is healthy. The first we’ll show checks the integrity of the DIT file. The integrity check inspects the database at a low level to determine whether there is any binary corruption. It scans the entire file, so depending on the size of your DIT file, it can take a while to complete. While the speed varies greatly based on a number of factors, we’ve seen some estimates that state it can check around 2 gigabytes per hour, so allocate your change notification accordingly.
To start the integrity check, run the ntdsutil command from within DS Restore Mode.
The integrity subcommand can be found within the
files menu:
C:> ntdsutil
ntdsutil: files
file maintenance: integrity
Opening database [Current].

Executing Command: C:WINDOWSsystem32esentutl.exe /g"C:WINDOWSNTDS
tds.dit"
                   /o
Initiating INTEGRITY mode...
        Database: C:WINDOWSNTDS
tds.dit
  Temp. Database: TEMPINTEG1752.EDB
Checking database integrity.
                     Scanning Status (% complete)
          0    10   20   30   40   50   60   70   80   90  100
          |----|----|----|----|----|----|----|----|----|----|
          ...................................................
Integrity check successful.
Operation completed successfully in 11.766 seconds.
Spawned Process Exit code 0x0(0)
If integrity was successful, it is recommended
 you run semantic database analysis to ensure
 semantic database consistency as well.
file maintenance: quit
The integrity check looks at the database headers to make sure they are correct and also checks all database tables to make sure they are working correctly. If the database integrity check fails or encounters errors, you must restore the database from a backup.
If the integrity check succeeds, you should then run a semantics check. Whereas the integrity check examines the database as a whole, the semantics check will examine the database to determine whether it is healthy as it pertains to Active Directory semantics. Some of the things the semantics check looks at include security descriptors, reference counts, distinguished name tag (DNT) consistency, and deleted objects.
To start a semantics check, run the go
subcommand from the semantic database
analysis menu:
ntdsutil: semantic database analysis
semantic checker: ?
  ?                            - Show this help information
 Check Quota                   - Integrity-check quota-tracking table
 Get %d                        - Get record info with given DNT
 Go                            - Start Semantic Checker with No Fixup
 Go Fixup                      - Start Semantic Checker with Fixup
 Help                          - Show this help information
 Quit                          - Return to the prior menu
 Rebuild Quota                 - Force asynchronous rebuild of quota-tracking
 Verbose %s                    - Turn verbose mode on/off
 semantic checker: go
Fixup mode is turned off
Opening database [Current].......Done.
 Getting record count...3115 records
Getting security descriptor count...82 security descriptors
 Writing summary into log file dsdit.dmp.0
SDs scanned:             82
Records scanned:       3115
Processing records..Done.
 semantic checker: quit
If any errors are reported, you can then run go fixup, which will attempt to repair any problems.
If you have to run the repair or go fixup commands, after you boot back into normal mode you should perform a backup as soon as possible and be sure to indicate on the backup that a repair was performed. If, for some reason, you need to restore the domain controller at a later point, and if you restore from a backup prior to the repair, you’ll need to perform the same commands to fix the database again. Alternatively, if you start experiencing problems immediately after the repair, you’ll want to be able to tell where the last backup was before the repair occurred and restore that copy.
Reclaiming Space
If your domain controllers are running low on disk space or if you have deleted a lot of objects since you promoted your domain controllers, you may want to perform an offline defragmentation of the DIT file. You’ve probably seen the online defragmentation events that get logged to the Directory Services event log. These include event 700, which states that an online defrag is about to begin, and event 701, which states that the online defrag has completed. The online defrag process runs twice a day by default and consolidates free space within the DIT file. It does not reclaim any disk space used by the DIT file, though. To do that, you must perform an offline defragmentation. For information on determining how much free space is available in the DIT, see the upcoming sidebar Configuring Logging of Available Database Space.
Note
If you perform an in-place upgrade of Windows 2000 domain controllers to Windows Server 2003, your ntds.dit may develop a substantial amount of free space in it. This is because of an improvement in Windows Server 2003 that stores unique security descriptors once in the entire database rather than each time they are used. Some Active Directory administrators have seen as much as a 40% reduction in the size of their Active Directory database files following this upgrade. If you want to reclaim this space on disk, you will need to perform an offline defragmentation of the ntds.dit file.
An offline defragmentation must be done while the domain controller is in Directory Services Restore Mode. You can then use the ntdsutil command to compact—that is, defrag—the ntds.dit file. This process actually creates a copy of the ntds.dit file in an alternate location. You can then overwrite the existing DIT file with the new compacted version.

The following shows how to perform an offline defragmentation
using ntdsutil. After you enter the
files menu, you’ll need to issue the
compact to
<directorypath> command. The <directorypath> should be the directory
in which the new compacted ntds.dit
file will be created. If the directory does not exist, it will be
created automatically. You perform the defragmentation as
follows:
ntdsutil: files
file maintenance: compact to c:windows
tdscompact
Opening database [Current].
Creating dir: c:windows
tdscompact
Executing Command: C:WINDOWSsystem32esentutl.exe /d"C:WINDOWSNTDS
tds.dit"
 /t"c:windows
tdscompact
tds.dit" /p /o
Initiating DEFRAGMENTATION mode...
            Database: C:WINDOWSNTDS
tds.dit
      Temp. Database: c:windows
tdscompact
tds.dit
                  Defragmentation Status (% complete)
          0    10   20   30   40   50   60   70   80   90  100
          |----|----|----|----|----|----|----|----|----|----|
          ...................................................
Note:
  It is recommended that you immediately perform a full backup
  of this database. If you restore a backup made before the
  defragmentation, the database will be rolled back to the state
  it was in at the time of that backup.
Operation completed successfully in 20.961 seconds.
Spawned Process Exit code 0x0(0)
If compaction was successful you need to:
   copy "c:windows
tdscompact
tds.dit" "C:WINDOWSNTDS
tds.dit"
and delete the old log files:
   del C:WINDOWSNTDS*.log
file maintenance: quit
After you’ve completed the compaction, you can then decide whether you want to overwrite your current ntds.dit file.
Performing an offline defrag of a domain controller affects only that DC. To reclaim space on your other domain controllers, you’ll need to follow the same procedures for all other servers.
After you do an offline defrag, you should make sure a backup is taken soon after. If for some reason you have to do a restore, and you have not done a backup since you did the offline defrag, the ntds.dit file on the domain controller will go right back to the size it was prior to the defrag.
Changing the DS Restore Mode Admin Password
It is a good practice to periodically change the password for your domain administrator accounts. This should be done so that the password does not find its way to more people than it should, and so that you don’t have former administrators trying to perform tasks they shouldn’t if they are no longer in that AD group.
The domain administrator accounts should not be the only ones you are concerned about, though. The DS Restore Mode administrator account is just as important and can be used to do very damaging things, such as directly modifying the contents of the Active Directory database. For this reason, you should also periodically rotate the DS Restore Mode administrator password.
You can use the ntdsutil command to change
the DSRM password while the DC is online. The reset password
on server %s subcommand can be used from the set dsrm password menu, where
%s is the name of the server to target. Leave
%s blank if you want to change the password on the
local machine. In the following example, we set the password for the
DC1 domain controller:
ntdsutil: set dsrm password
Reset DSRM Administrator Password: reset password on server dc1
Please type password for DS Restore Mode Administrator Account: **********
Please confirm new password: **********
Password has been set successfully.
Reset DSRM Administrator Password: quit
Warning
You cannot use ntdsutil to set the DS Restore Mode administrator password if the target machine is currently in DS Restore Mode.
A feature introduced in Windows Server 2008 R2 enables you to copy the password of a domain account to the DSRM password on a domain controller using ntdsutil. This makes maintenance of the DSRM password across an entire domain much easier, since you can schedule a task on each DC to copy the password of the domain account on a regular basis.
Note
This feature was also made available as a hotfix for Windows Server 2008 domain controllers. You can obtain this hotfix from MS Knowledge Base article 961320.
To take advantage of this feature, first create a disabled user account in AD in which you will maintain the DSRM password. Next, run the following ntdsutil commands. Be sure to substitute the username of the account you are using:
ntdsutil: set dsrm password
Reset DSRM Administrator Password: sync from domain account dsrm-sync-userNote
If you have multiple domains in your forest, you will need to create and maintain a user account to synchronize the DSRM password with in each domain.
One of the easiest ways to regularly rotate the DSRM password is to schedule a task using Group Policy Preferences. To do this, first create and link to the Domain Controllers OU a group policy called DSRM Password Sync Policy. Edit the group policy and navigate to Computer ConfigurationPreferencesScheduled Tasks. Create a new scheduled task, as shown in Figure 18-24. Use the following inputs to populate the task properties:
Name: DSRM Password Sync
Run: %windir%System32 tdsutil.exe
Arguments: “set dsrm password” “sync from domain account dsrm-sync-user” q q
Comments: Synchronizes the DSRM Password with the dsrm-sync-user domain account.
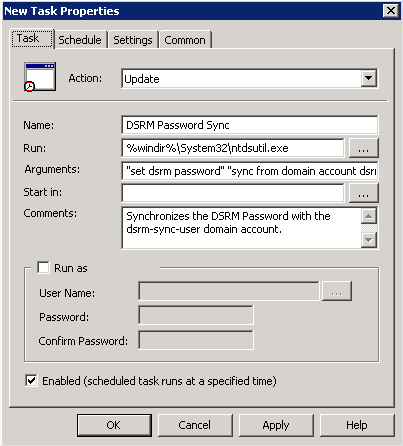
Schedule the task to run periodically (for example, once a day at 9 A.M.) on the Schedule tab. Once you have created the policy and allowed it time to apply, verify that it was created successfully by checking the DC’s Task Scheduler as shown in Figure 18-25. Allow the scheduled time to pass and then reboot the DC into DS Restore Mode to ensure that the password was actually synchronized as expected.

18.9. Summary
In this chapter, we reviewed all the elements necessary to develop a disaster recovery plan. We covered how to back up Active Directory and some of the gotchas related to the tombstone lifetime and password-change cycles. We then discussed the various options for restoring Active Directory, including restoring by replication, authoritative restores, nonauthoritative restores, and the Active Directory Recycle Bin. We discussed the FSMO transfer process and what is needed to seize FSMO roles. Finally, we delved into some of the maintenance tasks that can be done with the Active Directory DIT files.