
2
Managing PowerShell 7 in the Enterprise
This chapter covers the following recipes:
- Utilizing Windows PowerShell Compatibility
- Installing RSAT
- Exploring Package Management
- Exploring PowerShellGet and the PS Gallery
- Creating and Using a Local PowerShell Repository
- Establishing a Script Signing Environment
- Working With Shortcuts and the PSShortCut Module
- Working With Archive Files
- Searching for Files Using the Everything Search Tool
Introduction
For an IT professional in an enterprise environment (and even in smaller ones), PowerShell 7 provides a platform to manage your environment. Many of the commands you need to carry out typical operations come with PowerShell 7, augmented by the commands provided with Windows Server feature tools. In addition, you can obtain third-party modules to extend your capabilities.
Automation, today, means using commands that come from many sources. Some are built-in, but there are gaps. Those gaps can be filled by modules you can obtain from the community and via the PowerShell Gallery. In many cases, you can make use of .NET and WMI classes.
When all else fails, there is often a command-line tool.
As you blend these tools into your workflow, you need to be aware of how a given set of commands work as well as the objects returned. You also need to deal with the mismatch. The Get-ADComputer command, for example, returns the name of the computer in AD in the Name property. Most commands that interact with a given computer use the parameter ComputerName.
In building Windows Server 2022, Microsoft did not update most of the role/feature management tools to support PowerShell 7. These tools work natively in Windows PowerShell but many do not work directly in PowerShell 7. The reason for this is that Microsoft based Windows PowerShell on Microsoft’s .NET Framework, whereas PowerShell 7 is based on the open source .NET. The .NET team did not port all the APIs from the .NET Framework into .NET. Thus many of the role/feature commands that you can run in Windows PowerShell do not run natively since .NET did not implement a certain .NET Framework.
To get around this, PowerShell 7 comes with a Windows PowerShell compatibility solution. When you attempt to use some of the older commands (i.e., those that live in the System32 Windows directory), PowerShell 7 creates a PowerShell remoting session on the current host based on a Windows PowerShell 5.1 endpoint. Then, using implicit remoting, PowerShell creates and imports a script module of proxy functions that invoke the underlying commands in the remoting session. This enables you to use commands, such as Add-WindowsFeature, more or less seamlessly. You will examine the Windows PowerShell compatibility feature in Utilizing Windows PowerShell Compatibility.
Most of Windows Server 2022’s features and roles provide management tools you can use to manage the role or feature. You can also install and use these feature tools on any host allowing you to manage features across your network, as you can see in Installing RSAT.
You can also find and utilize third-party modules that can improve your PowerShell experience. PowerShell implements a set of built-in package management commands, as you can see in Exploring Package Management.
Some organizations create their own private package repositories. These enable their organizations to share corporate modules inside the corporate network. You will create a new package repository in the Creating and Using a Local PowerShell Repository recipe.
PowerShell 7, like Windows PowerShell, supports the use of digitally signed scripts. You can configure PowerShell to run only properly signed scripts as a way of improving the organization’s security. It is straightforward to establish a code-signing environment, using self-signed certificates, as you investigate in the Establishing a code-signing environment recipe.
To simplify the use of commands in an interactive environment, you may find it convenient to create shortcuts you can place on the desktop or in a folder of shortcuts. In Working With Shortcuts and the PSShortCut Module, you will manage shortcuts.
A common problem you can face when automating your environment is the management of archive files. As you saw in Installing Cascadia Code font, you can often get components delivered as a ZIP file. In Working With Archive Files, you examine commands for managing these files.
Windows, Windows Server, and Windows applications have grown significantly both in scope and the files that support them. Sometimes, finding key files you need can be challenging, especially on larger file servers.
The system used in the chapter
This chapter is all about using PowerShell 7 in an enterprise environment and configuring your environment to make the most out of PowerShell 7. In this chapter, you use a single host, SRV1, as follows:

Figure 2.1: Host in use for this chapter
In later chapters, you will use additional servers and will promote SRV1 to be a domain-based server rather than being in a workgroup.
Utilizing Windows PowerShell Compatibility
The PowerShell 7 Windows Compatibility solution allows you to use older Windows PowerShell commands whose developers have not (yet) ported the commands to work natively in PowerShell 7. PowerShell 7 creates a special remoting session into a Windows PowerShell 5.1 endpoint, loads the modules into the remote session, then uses implicit remoting to expose proxy functions inside the PowerShell 7 session. This remoting session has a unique session name, WinPSCompatSession. Should you use multiple Windows PowerShell modules, PowerShell 7 loads them all into a single remoting session. Also, this session uses the “process” transport mechanism versus Windows Remote Management (WinRM). WinRM is the core transport protocol used with PowerShell remoting. The process transport is the transport used to run background jobs; it has less overhead than using WinRM, so is more efficient.
An example of the compatibility mechanism is using Get-WindowsFeature, a cmdlet inside the ServerManager module. You use the command to get details of features that are installed, or not, inside Windows Server. You use other commands in the ServerManager module to install and remove features. Unfortunately, the Windows Server team has not yet updated this module to work within PowerShell 7. Via the compatibility solution, the commands in the ServerManager module enable you to add, remove, and view features. The Windows PowerShell compatibility mechanism allows you to use existing Windows PowerShell scripts in PowerShell 7, although with some very minor caveats.
When you invoke commands in PowerShell 7, PowerShell uses its command discovery mechanism to determine which module contains your desired command. In this case, that module is the ServerManager Windows PowerShell module. PowerShell 7 then creates the remoting session and, using implicit remoting, imports the commands in the module as proxy functions. You then invoke the proxy functions to accomplish your goal. For the most part, this is totally transparent. You use the module’s commands, and they return the object(s) you request. A minor caveat is that the compatibility mechanism does not import Format-XML for the Windows PowerShell module. The result is that the default output of some objects is not the same. There is a workaround for this, which is to manually install Format-XML.
With implicit remoting, PowerShell creates a function inside a PowerShell 7 session with the same name and parameters as the actual command (in the remote session). Once you import the module into the compatibility session, you can view the function definition in the Function drive (Get-Item Function:Get-WindowsFeature | Format-List -Property *). The output shows the proxy function definition that PowerShell 7 creates when it imports the remote module.
When you invoke the command by name, e.g., Get-WindowsFeature, PowerShell runs the function. The function then invokes the remote cmdlet using the steppable pipeline. Implicit remoting is a complex feature that is virtually transparent in operation. You can read more about implicit remoting at https://www.techtutsonline.com/implicit-remoting-windows-powershell/.
And for more information on Windows PowerShell compatibility, see: https://learn.microsoft.com/powershell/module/microsoft.powershell.core/about/about_windows_powershell_compatibility.
Getting ready
You run this recipe on SRV1 after you have installed PowerShell 7.
How to do it...
- Importing the
ServerManagermoduleImport-Module -Name ServerManager - Viewing module details
Get-Module -Name ServerManager | Format-List - Displaying a Windows feature
Get-WindowsFeature -Name 'TFTP-Client' - Running the same command in a remoting session
$Session = Get-PSSession -Name WinPSCompatSession Invoke-Command -Session $Session -ScriptBlock { Get-WindowsFeature -Name 'TFTP-Client' | Format-Table } - Getting the path to Windows PowerShell modules
$Paths = $env:PSModulePath -split ';' $S32Path = $Paths | Where-Object {$_.ToString() -match 'system32'} "System32 path: [$S32Path]" - Displaying path to the format XML for the Server Manager module
$FXML = "$S32path/ServerManager" $FF = Get-ChildItem -Path $FXML*.format.ps1xml "Format XML files:" " $($FF.Name)" - Updating format XML in PowerShell 7
Foreach ($fF in $FFFf) { Update-FormatData -PrependPath $fF.FullName} - Using the command with improved output
Get-WindowsFeature -Name TFTP-Client
How it works...
In step 1, you import the Server Manager module, with output like this:

Figure 2.2: Importing the Server Manager module
In step 2, you use the Get-Module command to examine the Server Manager module’s properties. The output of this step looks like this:

Figure 2.3: Importing the Server Manager module
Now that you have loaded the Server Manager module, in step 3, you utilize one of the commands Get-WindowsFeature to view the details of a feature, with output like this:

Figure 2.4: Displaying the TFTP-Client feature
In step 4, by comparison, you run the same command inside the Windows PowerShell remoting session with slightly different results – like this:

Figure 2.5: Displaying the TFTP-Client feature inside the remoting session
With step 5, you determine and display the folder where Windows PowerShell modules can be found, with output like this:
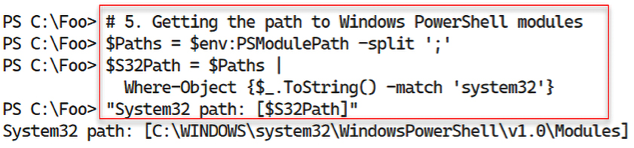
Figure 2.6: Displaying the TFTP-Client feature inside the remoting session
In step 6, you find and display the Server Manager’s display formatting XML file, with output like this:

Figure 2.7: Displaying the TFTP-Client feature inside the remoting session
In step 7, you import the display XML files – which produces no output. Finally, in step 8, you re-run the Get-WindowsFeature command. Since you have now imported the necessary display XML, you see output like this:

Figure 2.8: Displaying the TFTP-Client feature inside PowerShell 7 session
There’s more...
In step 3, you used the Get-WindowsFeature to view one feature. When you run this command, PowerShell runs the command in the compatibility session and returns the object(s) for display in PowerShell 7. However, as you may notice, the output is not the same as you would see normally in Windows PowerShell. This is because the Windows PowerShell compatibility does not, by default, add Format-XML to the current PowerShell session.
Once you have loaded the Server Manager’s display XML, as you can see in step 8, running the Get-WindowsFeature command now produces the same nicely formatted output you can see in Windows PowerShell.
Installing RSAT
The Remote Server Admin Tools (RSAT) is a set of management tools you use to manage individual Windows Features. The RSAT are fundamental to administering the roles and features you can install on Windows Server. The Windows Server DNS Server feature, for example, comes with both an MMC and a module that you use to manage the DNS Server on a given host.
A nice thing about the commands in the ServerManager module – everything is a feature, meaning you do not know whether the tools manage a Windows feature or a Windows role.
Each feature in Windows Server can optionally have management tools, and most do. These tools include PowerShell cmdlets, functions, aliases, GUI Microsoft Management Console (MMC) files, and Win32 console applications. The DNS Server’s RSAT tools include a PowerShell module, an MMC , as well as the command-line tool dnscmd.exe. While you probably do not need the console applications since you can use the cmdlets, that is not always the case. And you may have some older batch scripts that use those console applications.
You can also install the RSAT tools independently of a Windows Server feature on Windows Server. This recipe covers RSAT tool installation on Windows Server 2022.
As mentioned, PowerShell 7 is not installed in Windows by default, at least not at the time of writing. The PowerShell team made PowerShell 7.1 available from the Microsoft Store, which is useful to install PowerShell 7.1 or later on Windows 10/11 systems. Windows Server does not support the Microsoft store.
You have other methods of installing PowerShell 7 on your systems. The first option is to use Install-PowerShell.ps1, which you can download from GitHub, as shown in this recipe. You can also use this recipe on Windows 10 hosts. This approach has the advantage of being the most up-to-date source of the latest versions of PowerShell.
Getting ready
This recipe uses SRV1, a Windows Server workgroup host. There are no Windows features or server applications loaded on this server.
How to do it...
- Displaying counts of available PowerShell commands
$CommandsBeforeRSAT = Get-Command $CmdletsBeforeRSAT = $CommandsBeforeRSAT | Where-Object CommandType -eq 'Cmdlet' $CommandCountBeforeRSAT = $CommandsBeforeRSAT.Count $CmdletCountBeforeRSAT = $CmdletsBeforeRSAT.Count "On Host: [$(hostname)]" "Commands available before RSAT installed [$CommandCountBeforeRSAT]" "Cmdlets available before RSAT installed [$CmdletCountBeforeRSAT]". - Getting command types returned by
Get-Command$CommandsBeforeRSAT | Group-Object -Property CommandType - Checking the object type details
$CommandsBeforeRSAT | Get-Member | Select-Object -ExpandProperty TypeName -Unique - Getting the collection of PowerShell modules and a count of modules before adding the RSAT tools
$ModulesBefore = Get-Module -ListAvailable - Displaying a count of modules available before adding the RSAT tools
$CountOfModulesBeforeRSAT = $ModulesBefore.Count "$CountOfModulesBeforeRSAT modules available" - Getting a count of features actually available on
SRV1Import-Module -Name ServerManager -WarningAction SilentlyContinue $Features = Get-WindowsFeature $FeaturesInstalled = $Features | Where-Object Installed $RsatFeatures = $Features | Where-Object Name -Match 'RSAT' $RsatFeaturesInstalled = $Rsatfeatures | Where-Object Installed - Displaying counts of features installed
"On Host [$(hostname)]" "Total features available [{0}]" -f $Features.Count "Total features installed [{0}]" -f $FeaturesInstalled.Count "Total RSAT features available [{0}]" -f $RsatFeatures.Count "Total RSAT features installed [{0}]" -f $RsatFeaturesInstalled.Count - Adding all RSAT tools to
SRV1Get-WindowsFeature -Name *RSAT* | Install-WindowsFeature - Getting details of RSAT tools now installed on
SRV1:$FeaturesSRV1 = Get-WindowsFeature $InstalledOnSRV1 = $FeaturesSRV1 | Where-Object Installed $RsatInstalledOnSRV1 = $InstalledOnSRV1 | Where-Object Installed | Where-Object Name -Match 'RSAT' - Displaying counts of commands after installing the RSAT tools
"After Installation of RSAT tools on SRV1" $INS = 'Features installed on SRV1' "$($InstalledOnSRV1.Count) $INS" "$($RsatInstalledOnSRV1.Count) $INS" - Displaying RSAT tools on
SRV1$Modules = "$env:windirsystem32windowspowerShellv1.0modules" $ServerManagerModules = "$ModulesServerManager" Update-FormatData -PrependPath "$ServerManagerModules*.format.ps1xml" Get-WindowsFeature | Where-Object Name -Match 'RSAT' - Rebooting
SRV1and then logging on as the local administratorRestart-Computer -Force
How it works...
In step 1, you use Get-Command to obtain all the existing commands available on SRV1. Then you create a count of the commands available as well as a count of the PowerShell cmdlets available to you, with output like this:

Figure 2.9: Counting the available commands and cmdlets on SRV1
In step 2, you discover the different kinds of commands returned by Get-Command. The output looks like this:

Figure 2.10: Viewing command types returned by Get-Command
In PowerShell, the Get-Command cmdlet returns occurrences of different object types to describe the available commands. As you saw in the previous step, there are three command types returned by default by Get-Command. There is a fourth command type, Application, which Get-Command does not return by default.
You can see the class names for those three command types in the output from step 3, which looks like this:
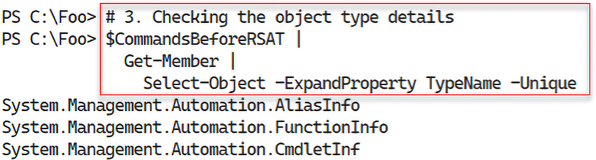
Figure 2.11: Determining full object type names
In step 4, you get the modules available on SRV1, which returns no console output. In step 5, you display a count of the modules discovered, with output like this:
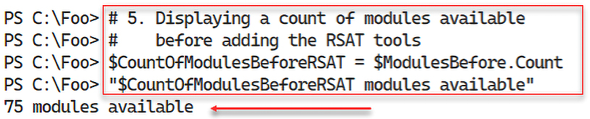
Figure 2.12: Displaying the number of modules available
In step 6, you obtain a count of the features available on SRV1, which produces no output. In the following step, step 7, you display counts of the total features available and the number of RSAT tool sets available. The output from this step looks like this:

Figure 2.13: Displaying the number of features and RSAT features available
In step 8, you install all the available features onto SRV1, with output like this:

Figure 2.14: Adding all RSAT tools to SRV1
In step 9, you get details of all the features now available on SRV1, producing no output. In step 10, you obtain and display a count of the features, including RSAT features, on SRV1, with output like this:

Figure 2.15: Counting features and RSAT features
In step 11, you use Get-WindowsFeature to display all the RSAT tools and their installation status, with output like this:

Figure 2.16: Displaying RSAT features on SRV1
In the final step in this recipe, step 12, you reboot the host creating no console output.
There’s more...
The output from step 1 shows there are 1,809 total commands and 597 cmdlets available on SRV1, before adding the RSAT tools. The actual number may vary, depending on what additional tools, features, or applications you might have added to SRV1 or the specific Windows Server version.
In step 2 and step 3, you find the kinds of commands available and the object type name PowerShell uses to describe these different command types. When you have the class names, you can use your search engine to discover more details about each of these command types. There are two further types of command (ExternalScript and Application) but these are not returned by default.
In step 8, you install all RSAT tools and as you can see, Windows requires a reboot to complete the installation of the tools. Later, in step 12, you reboot SRV1 to complete the installation of these tools.
In step 10, you create the $INS variable, which you later use in the display of the results. This technique enables you to see the code without worrying about line breaks in the book!
In step 11, you display all the RSAT tools using Get-WindowsFeature. Strictly speaking, this step displays the Windows features that have “RSAT” somewhere in the feature name. As you can see, there is no standard for actual feature names. The output shows the individual tools as either Feature Administration tools or Role Administration tools, although that difference is not relevant in your using the Server Manager cmdlets.
Exploring Package Management
The PackageManagement PowerShell module provides tools that enable you to download and install software packages from a variety of sources. The module, in effect, implements a provider interface that software package management systems use to manage software packages.
You can use the cmdlets in the PackageManagement module to work with a variety of package management systems. This module, in effect, provides an API to package management providers such as PowerShellGet, discussed in the Exploring PowerShellGet and PS Gallery recipe.
The primary function of the PackageManagement module is to manage the set of software repositories in which package management tools can search, obtain, install, and remove packages. The module enables you to discover and utilize software packages from a variety of sources, including the PowerShell Gallery.
The modules in the various internet repositories, including the PowerShell Gallery, vary in quality. Some are excellent and are heavily used by the community, while others are less useful or of lower quality. Some are written by the PowerShell product team. Ensure you look carefully at any third-party module you put into production.
This recipe explores the PackageManagement module from SRV1.
Getting ready
You run this recipe on SRV1 after you have installed PowerShell 7.
How to do it...
- Reviewing the cmdlets in the
PackageManagementmoduleGet-Command -Module PackageManagement - Reviewing installed providers with
Get-PackageProviderGet-PackageProvider | Format-Table -Property Name, Version, SupportedFileExtensions, FromTrustedSource - Examining available package providers
$PROVIDERS = Find-PackageProvider $PROVIDERS | Select-Object -Property Name,Summary | Format-Table -AutoSize -Wrap - Discovering and counting available packages
$PACKAGES = Find-Package "Discovered {0:N0} packages" -f $PACKAGES.Count - Showing the first 5 packages discovered
$PACKAGES | Select-Object -First 5 | Format-Table -AutoSize -Wrap - Installing the
ChocolateyGetproviderInstall-PackageProvider -Name ChocolateyGet -Force | Out-Null - Verifying
ChocolateyGetis in the list of installed providersImport-PackageProvider -Name ChocolateyGet Get-PackageProvider -ListAvailable | Select-Object -Property Name,Version - Discovering packages using the
ChocolateyGetprovider$CPackages = Find-Package -ProviderName ChocolateyGet -Name * "$($CPackages.Count) packages available via ChocolateyGet"
How it works...
In step 1, you use Get-Command to discover the cmdlets in the PackageManagement module, with output like this:

Figure 2.17: The PowerShell 7 console
In step 2, you use the Get-PackageProvider cmdlet to view the package providers that you have loaded and imported, with output like this:

Figure 2.18: Reviewing installed package providers
In step 3, you use the Find-PackageProviders cmdlet to find additional package providers. The output looks like this:

Figure 2.19: Discovering additional package providers
You can use the Find-Package cmdlet to discover packages that you can download, install, and use. In step 4, you discover packages available with output that resembles this:

Figure 2.20: Counting available packages
In step 5, you view the details of five (the first five) packages you discovered in the prior step. The output looks like this:

Figure 2.21: Viewing package summaries
In step 6, you install a new package provider – the ChocolateyGet provider. This step produces no output. In step 7, you view the currently imported package providers, with output like this:

Figure 2.22: Viewing package summaries
In the final step in this recipe, step 8, you discover all the currently available packages you can download using the ChocolatelyGet package provider – the output looks like this:

Figure 2.23: Counting packages available via the ChocolateyGet provider
There’s more...
In step 4, you display a count of the packages available in the PS Gallery. By the time you read this, the number of packages is certain to rise. Package authors in the community are constantly adding new and improved packages to the PS Gallery. At the same time, since some users may have developed some automation on top of older providers, these too remain in the PS Gallery.
In step 7, you install the ChocolateyGet packaged provider. With this provider, you can discover and install packages from the Chocolatey repository in addition to the PowerShell Gallery. In Chapter 1, you used the Chocolatey command-line tool while in step 8, you find packages using the Find-Package cmdlet. The ChocolateyGet package provider is a wrapper around the command-line tool – and probably a lot easier to use for a simple case. The PowerShell Gallery and Chocolatey have many packages in common so you can probably find whatever packages you might need in either or both.
Exploring PowerShellGet and the PS Gallery
In a perfect world, PowerShell would come with a command that performed every single action any IT professional should ever need or want. But, as Jeffrey Snover (the inventor of PowerShell) says: To Ship is To Choose. And that means PowerShell itself, as well as Windows Server features, may not have every command you need. At a practical level, the various Windows feature teams, as well as the PowerShell team, do not have infinite resources to implement every good idea. And that is where the PowerShell community and the PowerShell Gallery (PS Gallery) come in.
The PS Gallery provides a huge range of PowerShell artifacts for you to leverage. To some degree, if you can conceive of a use for PowerShell, there are likely to be things in the Gallery to delight you. If you are a Grateful Dead fan, for example, there are some scripts to manage your live concert collection (https://www.powershellgallery.com/packages/gdscripts/1.0.4). If you need to generate nice-looking HTML reports, then you can use the PSWriteHTML module (https://www.powershellgallery.com/packages/PSWriteHTML/0.0.173).
PowerShellGet is a module that enables you to discover, install, update, and publish key PowerShell artifacts found in the PowerShell Gallery. The artifacts you can leverage include modules, scripts, and more. You can think of this module as an abstraction on top of the Package Management tools. You can read more about the module at: https://learn.microsoft.com/powershell/module/powershellget.
Getting ready
You run this recipe on SRV1 after you have installed PowerShell 7.
How to do it...
- Reviewing the commands available in the PowerShellGet module
Get-Command -Module PowerShellGet - Discovering Find-
*cmdlets in PowerShellGet moduleGet-Command -Module PowerShellGet -Verb Find - Getting all commands, modules, DSC resources, and scripts
$Commands = Find-Command $Modules = Find-Module $DSCResources = Find-DscResource $Scripts = Find-Script - Reporting on results
"On Host [$(hostname)]" "Commands found: [{0:N0}]" -f $Commands.Count "Modules found: [{0:N0}]" -f $Modules.Count "DSC Resources found: [{0:N0}]" -f $DSCResources.Count "Scripts found: [{0:N0}]" -f $Scripts.Count - Discovering NTFS-related modules
$Modules | Where-Object Name -match NTFS - Installing the
NTFSSecuritymoduleInstall-Module -Name NTFSSecurity -Force - Reviewing module contents
Get-Command -Module NTFSSecurity - Testing the
Get-NTFSAccesscmdlet:Get-NTFSAccess -Path C:Foo - Creating a download folder
$DLFLDR = 'C:FooDownloadedModules' $NIHT = @{ ItemType = 'Directory' Path = $DLFLDR ErrorAction = 'SilentlyContinue' } New-Item @NIHT | Out-Null - Downloading the
PSLoggingmoduleSave-Module -Name PSLogging -Path $DLFLDR - Viewing the contents of the download folder
Get-ChildItem -Path $DownloadFolder -Recurse -Depth 2 | Format-Table -Property FullName - Importing the
PSLoggingmodule$ModuleFolder = Join-Path -Path $DownloadFolder -ChildPath 'PSLogging' Get-ChildItem -Path $ModuleFolder -Filter *.psm1 -Recurse | Select-Object -ExpandProperty FullName -First 1 | Import-Module -Verbose - Checking commands in the module
Get-Command -Module PSLogging
How it works...
In step 1, you use the Get-Command cmdlet to investigate the commands in the PowerShellGet module, with output that should look like this:

Figure 2.24: The PowerShell 7 console
In step 2, you discover the cmdlets in the PowerShellGet module that have the Find verb, with output like this:

Figure 2.25: Discovering the Find-* cmdlets in the PowerShellGet module
In step 3, which generates no output, you find all the commands, modules, DSC resources, and scripts in the PowerShell Gallery. In step 4, you report on the number of objects found in the PS Gallery, with output like this:

Figure 2.26: Discovering the Find-* cmdlets in the PowerShellGet module
In step 5, you examine the modules returned (in step 3) to see if any of them have “NTFS” in the module name. The output looks like this:

Figure 2.27: Discovering NTFS-related modules in the PowerShell Gallery
Having discovered an NTFS-related module, in step 6, you install the module. This step creates no output. In step 7, you use Get-Command to discover the commands in the NTFSSecurity module, with output like this:

Figure 2.28: Discovering commands in the NTFSSecurity module
In step 8, you use a command from the NTFSSecurity module, Get-NTFSAccess, to view the access control list on the C:Foo folder, which looks like this:

Figure 2.29: Using Get-NTFSAccess
As an alternative to installing fully a PS Gallery module, you might find it useful to download a module into a new folder. From there, you can investigate (and possibly improve it) before installing it in your environment. To do that, in step 9, you create a new download folder, creating no output. In step 10, you download the PSLogging module, which also produces no output.
In step 11, you discover the files contained in the PSLogging module with output like this:

Figure 2.30: Discovering files contained in the PSLogging module
Finally, in step 12, you check the commands contained in this module with output like this:

Figure 2.31: Discovering files contained in the PSLogging module
There’s more...
In step 2, you discover the commands within the PowerShellGet module that enable you to find resources in the PS Gallery. There are 5 types of resources you can search for in the Gallery:
- Command – these are individual commands contained within the gallery. You can use
Find-Commandto help you discover the name of a module that might contain a command. - Module – these are PowerShell modules. Some of which may not work in PowerShell 7 and some that may not work at all.
- DSC Resource – these are Windows PowerShell DSC resources. PowerShell 7 does not provide the rich DSC functions and features available with Windows PowerShell at this time.
- Script – these are complete PowerShell scripts. You can use them as-is or adapt them to your needs.
- Role Capability – this resource was meant for packages that enhance Windows roles but is little used in practice.
In steps 3 and step 4, you discover the number of commands, modules, DSC Resources, and PowerShell scripts available in the gallery. Since there is constant activity, the numbers of PowerShell resources you discover are likely different from what you see in this book. Note that step 3 may take several minutes. If you plan to search for multiple modules, then downloading the details of all the modules makes subsequent searching quicker.
In step 5, you search the PS Gallery for modules whose name includes the string “NTFS”. The modules returned may or may not be helpful for you. As you can see, the search returns the NTFSSecurity module that, in steps 6 through step 8, you install and use.
Before you start using a PS Gallery module, it is a great idea to first download it and test it. In step 9, you create a new folder, and then in step 10, you download the module into this new folder. In step 11, you observe the contents of the module.
Since you have downloaded the module to a folder, not on the PSModulePath environment variable, PowerShell cannot find it automatically. Therefore, in step 12, you import the module manually. You then look at the commands available within the module.
The two modules you examined in this recipe are a tiny part of the PowerShell Gallery. As you discovered, there are thousands of modules, commands, and scripts. Some of those objects are not of the highest quality or may be of no use to you. But others are excellent additions to your module collection, as many recipes in this book demonstrate.
For most IT pros, the PowerShell Gallery is the go-to location for obtaining useful modules that avoid you having to reinvent the wheel. In some cases, you may develop a particularly useful module and then publish it to the PS Gallery to share with others. See https://learn.microsoft.com/powershell/scripting/gallery/concepts/publishing-guidelines for guidelines regarding publishing to the PS Gallery. And, while you are looking at that page, consider implementing the best practices suggested in any production script you develop.
Creating and Using a Local Package Repository
In the Exploring PowerShellGet and PS Gallery recipe, you saw how you could download PowerShell modules and more from the PS Gallery. You can install them, or save them for investigation. One nice feature is that after you install a module using Install-Module, you can later update the module using Update-Module.
As an alternative to using a public repository, you can create your own private repository. You can then use the commands in the PowerShellGet module to find, install, and manage your modules. A private repository allows you to create your modules and put them into a local repository for your IT professionals, developers, or other users to access.
There are several methods you can use to set up your internal package repository. One approach would be to use, a third-party tool such as ProGet from Inedo (see https://inedo.com/ for details on ProGet).
A simple way to create a repository is to set up an SMB file share. Then, you use the command Register-PSRepository to enable you to use the PowerShellGet commands to view this share as a PowerShell repository. You must register this repository for every host from which you access your repository. After you create the share and register the repository, you can publish your modules to the new repository using the Publish-Module command.
Once you set up a repository, you just need to ensure you use Register-PSRepository on any system that wishes to use this new repository, as you can see in this recipe.
Getting ready
Run this recipe on SRV1 after you have loaded PowerShell 7.
How to do it...
- Creating a new repository folder
$PATH = 'C:RKRepo' New-Item -Path $PATH -ItemType Directory | Out-Null - Sharing the folder
$SMBHT = @{ Name = 'RKRepo' Path = LPATH Description = 'Reskit Repository' FullAccess = 'Everyone' } New-SmbShare @SMBHT - Registering the repository as trusted (on
SRV1)$Path = '\SRV1RKRepo' $REPOHT = @{ Name = 'RKRepo' SourceLocation = $Path PublishLocation = $Path InstallationPolicy = 'Trusted' } Register-PSRepository @REPOHT - Viewing configured repositories
Get-PSRepository - Creating a Hello World module folder
$HWDIR = 'C:HW' New-Item -Path $HWDIR -ItemType Directory | Out-Null - Creating a very simple module
$HS = @" Function Get-HelloWorld {'Hello World'} Set-Alias –[Name GHW -=Value Get-HelloWorld "@ $HS | Out-File $HWDIRHW.psm1 - Testing the module locally
Import-Module -Name $HWDIRHW.PSM1 -Verbose GHW - Creating a PowerShell module manifest for the new module
$NMHT = @{ Path = "$HWDIRHW.psd1" RootModule = 'HW.psm1' Description = 'Hello World module' Author = '[email protected]' FunctionsToExport = 'Get-HelloWorld' ModuleVersion = '1.0.1' } New-ModuleManifest @NMHT - Publishing the module
Publish-Module -Path $HWDIR -Repository RKRepo -Force - Viewing the results of publishing
Find-Module -Repository RKRepo - Checking the repository’s home folder
Get-ChildItem -Path $LPATH
How it works...
In step 1, you create a new folder on SRV1 to hold your new PowerShell repository, producing no output. In step 2, you use the New-SmbShare cmdlet to create a new share, with output like this:

Figure 2.32: The PowerShell 7 console
In step 3, you register this new SMB share as a new PowerShell repository, which creates no console output. In step 4, you view the configured PowerShell repositories, with output like this:

Figure 2.33: Viewing configured repositories
To demonstrate using this new repository, in step 5, you first create a folder, and then in step 6, you create a simple module in this folder. These two steps produce no console output.
In step 7, you import and use the module, with output like this:
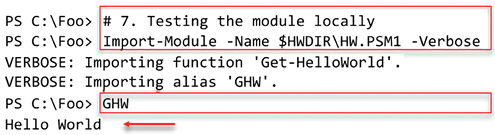
Figure 2.34: Testing HW module
In step 8, you create a module manifest, and in step 9, you publish the module to your repository. These two steps produce no output. In step 10, you use Find-Module to find the modules in your repository, with output like this:

Figure 2.35: Viewing the modules in the new repository
In step 11, you view the repository’s home folder, with output like this:

Figure 2.36: Testing HW module
There’s more...
In step 1, you create a folder on the C: drive to act as a repository that you then share. In production, you should probably put this share in a highly-available system with redundant disk drives.
In step 3, you set up an SMB share to act as a PowerShell repository on SRV1. You may need to adjust the value of the $Path variable in this step if you are testing this recipe on a host with a different name. Also, if you plan to use this repository on other systems, you need to explicitly register this repository on each host since registering a repository works on a system-by-system basis.
In step 11, you can see the NuGet package, which is your module. When you published the module, the cmdlet created and stored the NuGet package in the shared folder.
Establishing a Script Signing Environment
You can often find that it is essential to know if an application, or a PowerShell script, has been modified since it was released. You can use Windows Authenticode Digital Signatures for this purpose.
Authenticode is a Microsoft code-signing technology that identifies the publisher of Authenticode-signed software. Authenticode also verifies that the software has not been tampered with since it was signed and published.
You can also use Authenticode to digitally sign your script using a PowerShell command. You can then ensure PowerShell only runs digitally-signed scripts by setting an execution policy of AllSigned or RemoteSigned.
After you sign a PowerShell script, you can set PowerShell’s execution policy to force PowerShell to test the script to ensure the digital signature is still valid and only run scripts that succeed. You can set PowerShell to do this either for all scripts (you set the execution policy to AllSigned) or only for scripts you downloaded from a remote site (by setting the execution policy to RemoteSigned). Setting the execution policy to AllSigned also means that your Profile files must be signed, or they do not run.
This sounds a beautiful thing, but it is worth remembering that even if you have the execution policy set to AllSigned, it’s trivial to run any non-signed script. Simply bring your script into VS Code (or the Windows PowerShell ISE), select all the text in the script, then run that selected text. If an Execution policy of RemoteSigned is blocking a particular script you downloaded from the internet or from the PS Gallery, you can use the Unblock-File cmdlet to, in effect, turn a remote script into a local one. Script signing just makes it a bit harder, but not impossible, to run a script that has no signature or whose signature fails.
Signing a script is simple once you have a digital certificate issued by a Certificate Authority (CA). You have three options for getting an appropriate code-signing certificate:
- Use a well-known public Certificate Authority such as Digicert (see https://www.digicert.com/code-signing for details of their code-signing certificates).
- Deploy an internal CA and obtain the certificate from your organization’s CA.
- Use a self-signed certificate.
Public certificates are useful but generally not free. You can easily set up your own CA or use self-signed certificates. Self-signed certificates are great for testing out signing scripts and then using them, but possibly inappropriate for production use. All three of these methods can give you a certificate that you can use to sign PowerShell scripts.
This recipe shows how to sign and use digitally-signed scripts. The mechanisms in this recipe work on any of the three sources of signing key listed above. For simplicity, you use a self-signed certificate for this recipe.
Getting ready
You run this recipe on SRV1 after you have installed PowerShell 7.
How to do it...
- Creating a script-signing self-signed certificate
$CHT = @{ Subject = 'Reskit Code Signing' Type = 'CodeSigning' CertStoreLocation = 'Cert:CurrentUserMy' } New-SelfSignedCertificate @CHT | Out-Null - Displaying the newly created certificate
$Cert = Get-ChildItem -Path Cert:CurrentUsermy -CodeSigningCert $Cert | Where-Object {$_.SubjectName.Name -match $CHT.Subject} - Creating and viewing a simple script
$Script = @" # Sample Script 'Hello World from PowerShell 7!' "Running on [$(Hostname)]" "@ $Script | Out-File -FilePath C:FooSigned.ps1 Get-ChildItem -Path C:FooSigned.ps1 - Signing your new script
$SHT = @{ Certificate = $cert FilePath = 'C:FooSigned.ps1' } Set-AuthenticodeSignature @SHT - Checking the script after signing
Get-ChildItem -Path C:FooSigned.ps1 - Viewing the signed script
Get-Content -Path C:FooSigned.ps1 - Testing the signature
Get-AuthenticodeSignature -FilePath C:FooSigned.ps1 | Format-List - Running the signed script
C:FooSigned.ps1 - Setting the execution policy to all signed for this process
Set-ExecutionPolicy -ExecutionPolicy AllSigned -Scope Process - Running the signed script
C:FooSigned.ps1 - Copying certificate to the Current User Trusted Root store
$DestStoreName = 'Root' $DestStoreScope = 'CurrentUser' $Type = 'System.Security.Cryptography.X509Certificates.X509Store' $MHT = @{ TypeName = $Type ArgumentList = ($DestStoreName, $DestStoreScope) } $DestStore = New-Object @MHT $DestStore.Open( [System.Security.Cryptography.X509Certificates.OpenFlags]::ReadWrite) $DestStore.Add($Cert) $DestStore.Close() - Checking the signature
Get-AuthenticodeSignature -FilePath C:FooSigned.ps1 | Format-List - Running the signed script
C:FooSigned.ps1 - Copying certificate to the Trusted Publisher store
$DestStoreName = 'TrustedPublisher' $DestStoreScope = 'CurrentUser' $Type = 'System.Security.Cryptography.X509Certificates.X509Store' $MHT = @{ TypeName = $Type ArgumentList = ($DestStoreName, $DestStoreScope) } $DestStore = New-Object @MHT $DestStore.Open( [System.Security.Cryptography.X509Certificates.OpenFlags]::ReadWrite) $DestStore.Add($Cert) $DestStore.Close() - Running the signed script
C:FooSigned.ps1 - Resetting the Execution policy for this process
Set-ExecutionPolicy -ExecutionPolicy Unrestricted -Scope Process
How it works...
In step 1, you create a new self-signed certificate for code signing. This step creates no output. In step 2, you display the newly created certificate, with output like this:

Figure 2.37: Displaying the certificate
In step 3, you create a very simple script and view the script file’s details, with the following output:

Figure 2.38: Displaying the certificate
With step 4, you sign the script using your newly created code-signing certificate. The output is as follows:

Figure 2.39: Signing your script
In step 5, you view the file details for your newly signed script, with output like this:

Figure 2.40: Signing your script
Next, in step 6, you view the contents of the script file, with output like this:

Figure 2.41: Viewing the signed script
In step 7, you use the Get-AuthenticodeSignature to get the details of the file signature and view the results, as you can see here:

Figure 2.42: Viewing details of the script’s digital signature
In step 8, you run the script with output like this:

Figure 2.43: Running the script
In step 9, you change the current process’s Execution policy to AllSigned, which generates no console output. In step 10 you run the script again with the output like this:

Figure 2.44: Running the script
In step 11, you copy the self-signed certificate to the current user’s trusted root CA certificate store. There is no output from the console, but when PowerShell attempts to add the certificate, Windows opens a security warning message box that looks like this:

Figure 2.45: Authorizing the addition of the certificate
In step 12, you recheck the script’s digital signature, which looks like this:

Figure 2.46: Checking the script’s digital signature
In step 13, you rerun the script file. Doing so generates a warning message, as you can see here:

Figure 2.47: Rerunning the script
To resolve the warning message, in step 14, you copy the certificate to the current user’s trusted publisher store. Then in step 15, you run the signed script successfully, as you can see in this output:
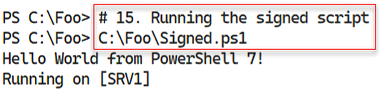
Figure 2.48: Rerunning the script
In the final step in this recipe, step 16, you reset the process level execution policy to Unrestricted.
There’s more...
In step 1, you open a new Windows PowerShell console. Make sure you run the console as the local administrator.
In step 4, you sign the script using the newly created code-signing certificate. The output from this step shows that you signed the script with a certificate that was not issued by a trusted certificate authority. In step 5, you can see that the script file exists, but is now 2,136 bytes! To see why this relatively large file size, in step 6, you can see the script, with a large text block at the end holding the digital signature.
With step 7, you verify the signature on the script, which results in the same status message. The file is signed, but Windows does not (yet) trust the certificate authority that issued the code-signing certificate.
In step 8, you run the script. Despite the signature issue, the script runs fine, since you set the PowerShell execution policy to Unrestricted when you installed PowerShell. In step 9, you set the execution policy to Allsigned, and in step 10, you run the script. As you can see, PowerShell stops you from running the script due to the certificate chain issue.
In step 11, you copy the self-signed certificate into the current user’s trusted root certificate store. You can only perform this copy action by using .NET objects as there are no cmdlets. When you invoke the Add() method, Windows displays a security warning. Note that Windows tends to display this dialog box under your PowerShell console or VS code. When you run this step, if the code seems to hang, check to see if the dialog box is hidden before agreeing to the addition to complete the step.
By copying the self-signed certificate to the trusted root store, Windows believes the code signing certificate is signed by a trusted CA. In step 12, you verify that the signature is trusted. Despite this, in step 13, you were sent a warning when you attempt to run the signed script. To avoid this warning, you copy the certificate to the current user’s trusted publisher certificate store. With this done, in step 15, you rerun the script to observe that it now runs successfully.
In a production environment, you would more likely use either a public CA or an internal CA. If you use a public CA, then Windows should have that CA’s certificate in the local host’s trusted root store. You may need to add that certificate to the Trusted Publisher’s store on each local host that you want to be able to run signed scripts. If you use an internal CA, you must ensure that each host is automatically enrolled for these certificates. For details on configuring certificate auto-enrollment, see: https://learn.microsoft.com/windows-server/networking/core-network-guide/cncg/server-certs/configure-server-certificate-autoenrollment.
Working With Shortcuts and the PSShortCut Module
A shortcut is a file that contains a pointer to another file or URL. You can place a shell link shortcut to some executable program, such as PowerShell, on your Windows desktop. When you click the shortcut in Windows Explorer, Windows runs the target program. You can also create a shortcut to a URL.
Shell link shortcuts have the extension .LNK, while URL shortcuts have the .URL extension. Internally, a file shortcut has a binary structure that is not directly editable. For more details on the internal format, see https://learn.microsoft.com/openspecs/windows_protocols/ms-shllink/16cb4ca1-9339-4d0c-a68d-bf1d6cc0f943.
The URL shortcut is a text document that you could edit with VS Code or Notepad. For more details on the URL shortcut file format, see http://www.lyberty.com/encyc/articles/tech/dot_url_format_-_an_unofficial_guide.html.
There are no built-in commands to manage shortcuts in PowerShell 7. As you saw earlier in this book, you can make use of older COM objects to create shortcuts. A more straightforward way is to use the PSShortCut module, which you can download from the PowerShell Gallery.
In this recipe, you discover shortcuts on your system and create shortcuts both to an executable file and a URL.
Getting ready
You run this recipe on SRV1 after you have installed PowerShell 7.
How to do it...
- Finding the
PSShortCutmoduleFind-Module -Name '*Shortcut' - Installing the PSShortCut module
Install-Module -Name PSShortcut -Force - Reviewing the PSShortCut module
Get-Module -Name PSShortCut -ListAvailable | Format-List - Discovering commands in the PSShortCut module
Get-Command -Module PSShortCut - Discovering all shortcuts on
SRV1$SHORTCUTS = Get-Shortcut "Shortcuts found on $(hostname): [{0}]" -f $SHORTCUTS.Count - Discovering PWSH shortcuts
$SHORTCUTS | Where-Object Name -match '^PWSH' - Discovering URL shortcut
$URLSC = Get-Shortcut -FilePath *.url $URLSC - Viewing the content of shortcut
$URLSC | Get-Content - Creating a URL shortcut
$NEWURLSC = 'C:FooGoogle.url' $TARGETURL = 'https://google.com' New-Item -Path $NEWURLSC | Out-Null Set-Shortcut -FilePath $NEWURLSC -TargetPath $TARGETURL - Using the URL shortcut
& $NEWURLSC - Creating a file shortcut
$CMD = Get-Command -Name notepad.exe $NP = $CMD.Source $NPSC = 'C:FooNotePad.lnk' New-Item -Path $NPSC | Out-Null Set-Shortcut -FilePath $NPSC -TargetPath $NP - Using the shortcut
& $NPSC
How it works...
In step 1, you use the Find-Module cmdlet to discover any modules with the string “Shortcut” in the module name. The output looks like this:

Figure 2.49: Rerunning the script
In step 2, you install the PSShortCut module, producing no output. After you have the module installed, in step 3, you examine the module details, with output like this:

Figure 2.50: Viewing module details
In step 4, you use Get-Command to confirm the names of the commands in the module, with output like this:

Figure 2.51: Using Get-Command to find the commands in the PSShortCut module
As shown in step 5, you can search the entire host to discover all the shortcuts on the server, with results like this:

Figure 2.52: Finding shortcuts on SRV1
In step 6, you discover the shortcut to PowerShell 7 (which you created in Chapter 1). The output is like this:

Figure 2.53: Discovering shortcuts to PowerShell 7
In step 7, you use the Get-Shortcut command to find all the URL shortcuts, with output like this:

Figure 2.54: Discovering URL shortcuts
In step 8, you view the contents of the shortcut, with output like this:

Figure 2.55: Viewing the contents of a URL shortcut
In step 9, you create a new URL shortcut, which generates no console output. In step 10, you use the URL shortcut. This step produces no console output, but you do see the Edge browser popping up, like this:

Figure 2.57: Using a shortcut to Google
In step 11, you create a new file-based URL (pointing to notepad.exe, which generates no output. Then in step 12, you use the shortcut. This step produces no output, but you should see Notepad pop up, like this:

Figure 2.57: Using the shortcut to Notepad
There’s more...
In step 7, you find URL shortcuts and as you can see, there is just one, to Bing. The Windows installer created this when it installed Windows Server on this host.
In step 8, you examine the contents of a URL shortcut. Unlike link shortcut files, which have a binary format and are not fully readable, URL shortcuts are text files. For an unofficial guide to the format of these files, see http://www.lyberty.com/encyc/articles/tech/dot_url_format_-_an_unofficial_guide.html.
Working With Archive Files
Since the beginning of the PC era, users have employed a variety of file compression mechanisms. An early method used the ZIP file format, initially implemented by PKWare’s PKZip program quickly became a near-standard for data transfer. A later Windows version, WinZip, became popular. With Windows 98, Microsoft provided built-in support for ZIP archive files. Today, Windows supports ZIP files up to 2GB in total size. You can find more information about the ZIP file format at https://en.wikipedia.org/wiki/Zip_(file_format).
Numerous developers, over the years, have provided alternative compression schemes and associated utilities, including WinRAR and 7-Zip. WinZip and WinRAR are both excellent programs but are commercial programs. 7-Zip is a freeware tool that is also popular. All three offer their own compression mechanisms (with associated file extension) and support the others as well.
For details on WinZip, see https://www.winzip.com/win/en, for information on WinRAR, see https://www.win-rar.com, and for more on 7-Zip, see https://www.7-zip.org. Each of the compression utilities offered by these groups also supports compression mechanisms from other environments such as TAR.
In this recipe, you will look at PowerShell 7’s built-in commands to manage archive files. The commands work only with ZIP files. You can find a PowerShell module for 7Zip at https://github.com/thoemmi/7Zip4Powershell, although the module is old and has not been updated in many years.
Getting ready
You run this recipe on SRV1 after you have installed PowerShell 7.
How to do it...
- Getting the archive module
Get-Module -Name Microsoft.Powershell.Archive -ListAvailable - Discovering commands in the archive module
Get-Command -Module Microsoft.PowerShell.Archive - Making a new folder
$NIHT = @{ Name = 'Archive' Path = 'C:Foo' ItemType = 'Directory' ErrorAction = 'SilentlyContinue' } New-Item @NIHT | Out-Null - Creating files in the archive folder
$Contents = "Have a Nice day with PowerShell and Windows Server" * 1000 1..100 | ForEach-Object { $FName = "C:FooArchiveArchive_$_.txt" New-Item -Path $FName -ItemType File | Out-Null $Contents | Out-File -FilePath $FName } - Measuring files to archive
$Files = Get-ChildItem -Path 'C:FooArchive' $Count = $Files.Count $LenKB = (($Files | Measure-Object -Property length -Sum).Sum)/1mb "[{0}] files, occupying {1:n2}mb" -f $Count, $LenKB - Compressing a set of files into an archive
$AFILE1 = 'C:FooArchive1.zip' Compress-Archive -Path $Files -DestinationPath "$AFile1" - Compressing a folder containing files
$AFILE2 = 'C:FooArchive2.zip' Compress-Archive -Path "C:FooArchive" -DestinationPath $AFile2 - Viewing the archive files
Get-ChildItem -Path $AFILE1, $AFILE2 - Viewing archive content with Windows Explorer
explorer.exe $AFILE1 - Viewing the second archive with Windows Explorer
explorer.exe $AFILE2 - Making a new output folder
$Opath = 'C:FooDecompressed' $NIHT2 = @{ Path = $Opath ItemType = 'Directory' ErrorAction = 'SilentlyContinue' } New-Item @NIHT2 | Out-Null - Decompress the
Archive1.ziparchiveExpand-Archive -Path $AFILE1 -DestinationPath $Opath - Measuring the size of the decompressed files
$Files = Get-ChildItem -Path $Opath
$Count = $Files.Count
$LenKB = (($Files |
           Measure-Object -Property length -Sum).Sum)/1mb
"[{0}] decompressed files, occupying {1:n2}mb" -f $Count, $LenKB
How it works...
In step 1, you get details of the Microsoft.Powershell.Archive module, with output like this:

Figure 2.58: Using the shortcut to Notepad
In step 2, you use Get-Command to discover additional details about the commands contained in the Archive module, with output like this:

Figure 2.59: Viewing the commands in the Microsoft.PowerShell.Archive module
To prepare to use the archiving commands, in step 3, you create a hash table to hold the parameters to New-Item to create a new folder. In step 4, you populate the folder with a set of files. These two steps produce no output.
In step 5, you get a count of the files in the folder and the space they occupy, with output like this:

Figure 2.60: Measuring the files to be compressed
In step 6, you compress a set of files into an archive file, and in step 7, you compress a folder (containing files) into another archive file. These two steps produce no output. In step 8, you view the two archive files, with output like this:

Figure 2.61: Viewing the archive files
In step 9, you view the first archive file in Windows File Explorer, with output like this:

Figure 2.62: Viewing Archive1.zip
In step 10, you view the second archive file, which looks like this:

Figure 2.63: Viewing Archive1.zip
To demonstrate expanding an archive, in step 11, you create a new folder (C:FooDecompressed), which generates no console output, In step 12, you use Expand-Archive to decompress the files within the archive to the specified destination folder, which also generates no output.
In the final step, step 13, you count the decompressed files with output like this:

Figure 2.64: Viewing Archive1.zip
There’s more...
In step 1 and step 2, you can see the Archive module has two commands internally. As you can see, the module details returned by Get-Module show the module to have two commands. In the next step, Get-Command confirms the module has the two commands but that these are PowerShell functions and not PowerShell cmdlets. If you navigate to the folder containing this module, you can see both the module manifest (Microsoft.PowerShell.Archive.psd1) and the module file that defines the exported functions (Microsoft.PowerShell.Archive.psm1).
In step 9, you created the archive file Archive1.zip, which contains 100 files. In step 12, you used Expand-Archive to expand the files from the archive into the specified folder. As you can see in step 13, the files previously compressed into an archive are now decompressed and in the destination path.
Searching for Files Using the Everything Search Tool
Void Tools is a software company that produced the Everything search tool. Most IT pros run it from the GUI but there is a community module to help you use this tool using PowerShell. The Everything tool and the PowerShell community have developed a nice little product that you can easily leverage in PowerShell. The Everything applications return fully qualified filenames for those files on your system whose names meet a specified pattern. You can use either a wild card (e.g., *.PS1) or a regular expression (e.g., '.PS1$') as a pattern. There is also an add-on module that provides an easy-to-use PowerShell COMMAND.
The key benefit is that it is very fast. On a large Windows host with say one million total files, it might take 10-12 seconds to return a list of all the files on that system. To find all the .PS1 files on the system drive would take under 100 milliseconds. By comparison, using Get-ChildItem would take several minutes.
If you are managing a large file server, tools like Everything could be very useful. And for a bit of light relief, you can bring up the GUI, specify ALL files, and sort files by date modified. After a second or two, you can watch as Windows and Windows applications create and update files on your system. Do you know what all those files are?
This recipe first downloads and installs the Everything tool and the PSEverything module from the PowerShell Gallery. Then you use the tool to find files on the system.
For more details on the Everything tool, see https://www.voidtools.com/. For the latest downloads, you can view the download page at https://www.voidtools.com/downloads/. And for more information about installing Everything, see a great support article at https://www.voidtools.com/forum/viewtopic.php?f=5&t=5673&p=15546. The tool provides a large range of installation options that you can use, depending on your needs.
Getting ready
You run this recipe on SRV1 after you have installed PowerShell 7.
How to do it...
- Getting download locations
$ELoc = 'https://www.voidtools.com/downloads' $Release = Invoke-WebRequest -Uri $ELoc # Get all $FLoc = 'https://www.voidtools.com' $EPath = $FLOC + ($Release.Links.href | Where-Object { $_ -match 'x64' } | Select-Object -First 1) $EFile = 'C:FooEverythingSetup.exe' - Downloading the Everything installer
Invoke-WebRequest -Uri $EPath -OutFile $EFile -verbose - Install Everything
$Iopt = "-install-desktop-shortcut -install-service" $Iloc = 'C:Program FilesEverything' .EverythingSetup.exe /S -install-options $Iipt /D=$Iopt - Open the GUI for the first time
& "C:Program FilesEverythingEverything.exe" - Finding the PSEverything module
Find-Module -Name PSEverything - Installing the
PSEverythingmoduleInstall-Module -Name PSEverything -Force - Discovering commands in the module
Get-Command -Module PSEverything - Getting a count of files in folders below
C:FooSearch-Everything | Get-Item | Group-Object DirectoryName | Where-Object name -ne '' | Format-Table -property Name, Count - Finding PowerShell scripts using wild cards
Search-Everything *.ps1 | Measure-Object - Finding all PowerShell scripts using regular expression
Search-Everything -RegularExpression '.ps1$' -Global |
  Measure-Object
How it works...
In step 1, you set the locations for the download of the Everything tool. Then in step 2, you download the installation package. With step 3, you perform a silent install of the tool onto SRV1. With step 4, you open the Everything GUI. This produces no console output but you do see the following popup:

Figure 2.65: Everything GUI
With step 5, you find the PSEverything module with output like this:

Figure 2.66: Finding the PSEverything module
In step 6, you install the module, which generates no console output. In step 7 you view the commands in the module with output like this:

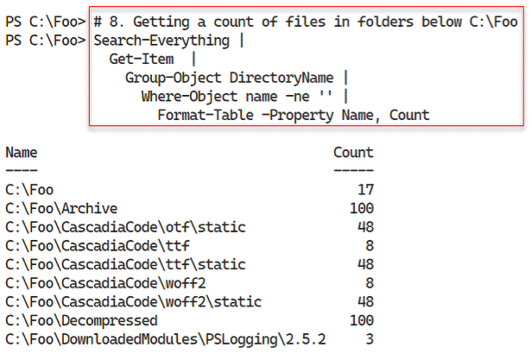
Figure 2.68: Counting the files in each folder below C:Foo on SRV1
In step 8, you search for all the *.PS1 files at and below C:Foo, then return a count, with output like this:

Figure 2.69: Counting the *.PS1 files in and below C:Foo
In the final step in this recipe, step 10, you count the total number of files on SRV1 whose filename matches the regular expression “.ps1$" – which is the equivalent of the wild card used in the prior step. The output from this step looks like this:

Figure 2.70: Counting the *.PS1 files on SRV1
There’s more...
In step 1, you set variables that correspond to the location from which you can download the Everything installation package. This location was correct at the time of writing – but may have changed.
The screenshot for step 4 shows the Everything GUI with the files sorted with the most recently changed files at the top of the window. Note the number of files that Windows changes every minute! Do you know what these files are or why Windows is changing them? Answers on a postcard, please.
In step 8, you view the folders below C:Foo and the files contained in each folder. You created these folders and files by performing the recipes in this book. If you skipped any of the prior recipes, loaded different modules, etc., you may see different output.
The Search-Everything cmdlet returns the filenames that match a specified pattern. The cmdlet does not search inside any of the files. As you see in step 7, there is another command in the module, Select-EverythingString, which does search inside the files found.
Join our community on Discord
Join our community’s Discord space for discussions with the author and other readers:
