
8
Managing Shared Data
This chapter covers the following recipes:
- Managing NTFS File and Folder Permissions
- Securing Your SMB File Server
- Creating and Securing SMB Shares
- Accessing SMB Shares
- Creating an iSCSI Target
- Using an iSCSI Target
- Implementing FSRM Filestore Quotas
- Implementing FSRM Filestore reporting
- Implementing FSRM Filestore Screening
Introduction
Sharing data with other users on your network has been a feature of computer operating systems from the very earliest days of computing. This chapter looks at Windows Server 2022 features that enable you to share files and folders and use your shared data.
Microsoft’s LAN Manager was the company’s first network offering. It enabled client computers to create, manage, and share files securely. LAN Manager’s protocol to provide this client/server functionality was an early version of the Server Message Block (SMB) protocol.
SMB is a file-level storage protocol running over TCP/IP. With the SMB protocol, you can share files and folders securely and reliably. To increase reliability for SMB servers, you can install a cluster and cluster the file server role.
A simple cluster solution is an active-passive solution – you have one cluster member sitting by if the other member fails. This solution works great as long as the underlying data is accessible. Scale-Out File Server (SOFS) is an active-active clustering-based solution. Both nodes of the cluster can serve cluster clients.
This chapter shows you how to implement and leverage the features of sharing data between systems in Windows Server 2022.
In the first recipe, Managing NTFS File and Folder Permissions, you use the NTFSSecurity third-party module to set Access Control List (ACL) and ACL inheritance for files held in NTFS from FS1. In the following recipe, Securing Your SMB File Server, you deploy a hardened SMB file server. You run that recipe on FS1.
iSCSI is a popular Storage Area Networking (SAN) technology. Many SAN vendors provide iSCSI as a way to access data stored in a SAN. There are two aspects to iSCSI: the server (the iSCSI target) and the client (the iSCSI initiator). With the Creating an iSCSI Target recipe, you create an iSCSI target on the SS1 server, while in the Using an iSCSI Target recipe, you make use of that shared iSCSI disk from FS1.
File System Resource Manager (FSRM) is a Windows Server feature that helps you manage file servers. You can use FSRM to set user quotas for folders, create file screens, and produce rich reports.
Several servers are involved in the recipes in this chapter—each recipe describes the specific server(s) you use for that recipe. As with other chapters in this book, all the servers are members of the Reskit.Org domain on which you have loaded PowerShell 7 and VS Code. You can install them by using the Reskit.Org setup scripts on GitHub.
The systems used in the chapter
There are two new servers, SS1 and FS, plus the existing SRV1. All servers run Windows Server 2022 Datacenter edition. The servers are member servers in the Reskit.Org domain served by the two domain controllers, DC1 and DC2, as shown here:

Figure 8.1: Hosts in use for this chapter
Managing NTFS File and Folder Permissions
Every file and folder in an NTFS file system has an ACL. The ACL contains a set of Access Control Entries (ACEs). Each ACE defines permission to a file or folder for an account. For example, you could give the Sales AD global group full control of a file.
NTFS also allows a file or folder to inherit permission from its parent folder. If you create a new folder and then create a file within that new folder, the new file inherits the parent folder’s permissions. You can manage the ACL to add or remove permissions, and you can modify inheritance.
There’s limited PowerShell support for managing NTFS permissions. PowerShell does have the Get-ACL and Set-ACL cmdlets, but creating the individual ACEs and managing inheritance requires using .NET Framework (by default). A more straightforward approach is to use a third-party module, NTFSSecurity, which makes managing ACEs and ACLs, including dealing with inheritance, a lot easier. In this recipe, you download and use this module. This recipe uses the NTFSSecurity module, which simplifies the management of NTFS ACLs. As an alternative, .NET has some basic classes you can use to create ACEs in memory. You can then use the cmdlets to add the ACE to an ACL. For a deeper look at using .NET classes with the Set-ACL command, look at https://adamtheautomator.com/ntfs-permissions/.
You can also find additional examples in the Set-ACL documentation at: https://learn.microsoft.com/powershell/module/microsoft.powershell.security/set-acl
Getting ready
This recipe uses FS1, a domain-joined host in the Reskit.Org domain, on which you have installed PowerShell 7 and VS Code. You also need DC1 online. You also need to add a disk to this host. Assuming you are using Hyper-V to run the FS1 host, you can add the disk with the following code (run on the Hyper-V Host):
- Stop the VM
Get-VM -Name FS1 | Stop-VM -Force - Get the path for hard disks for
SRV1andSRV2$Path1 = Get-VMHardDiskDrive -VMName FS1 $VMPath1 = Split-Path -Parent $Path1.Path - Create a new VHDX
New-VHD -Path $VMPath1FS1-F.vhdx -SizeBytes 64gb -Dynamic - Add a new SCSI controller to
FS1Add-VMScsiController -VMName FS1 [int] $FS1Controller = Get-VMScsiController -VMName FS1 | Select-Object -Last 1 | Select-Object -ExpandProperty ControllerNumber - Add the VHDX to the VM
$DiskHT = @{ VMName = 'FS1' Path = "$VMPath1FS1-F.vhdx" ControllerType = 'SCSI' ControllerNumber = $FS1Controller } Add-VMHardDiskDrive @DiskHT - Restart the VM
Start-VM -Name FS1
You may need to wait a few seconds before logging in to FS1 to run this recipe.
How to do it...
- Getting and initializing the new disk and creating an
F:volume$Disk = Get-Disk | Where-Object PartitionStyle -eq Raw | Select-Object -First 1 $Disk | Initialize-Disk -PartitionStyle GPT $NewVolumeHT1 = @{ DiskNumber = $Disk.DiskNumber DriveLetter = 'F' FriendlyName = 'FS Files' } New-Volume @NewVolumeHT1 | Out-Null - Downloading the
NTFSSecuritymodule from PSGalleryInstall-Module NTFSSecurity -Force - Getting commands in the module
Get-Command -Module NTFSSecurity - Creating a new folder and a file in the folder
New-Item -Path F:Secure1 -ItemType Directory | Out-Null "Secure" | Out-File -FilePath F:Secure1Secure.Txt Get-ChildItem -Path F:Secure1 - Viewing ACL of the folder
Get-NTFSAccess -Path F:Secure1 | Format-Table -AutoSize - Viewing ACL of the file
Get-NTFSAccess F:Secure1Secure.Txt | Format-Table -AutoSize - Creating the
Salesgroup in AD if it does not exist$ScriptBlock= { try { Get-ADGroup -Identity 'Sales' -ErrorAction Stop } catch { New-ADGroup -Name Sales -GroupScope Global | Out-Null } } Invoke-Command -ComputerName DC1 -ScriptBlock $ScriptBlock - Displaying
SalesAD groupInvoke-Command -ComputerName DC1 -ScriptBlock { Get-ADGroup -Identity Sales} - Adding explicit full control for
DomainAdmins$AddAdminHT= @{ Path = 'F:Secure1' Account = 'ReskitDomain Admins' AccessRights = 'FullControl' } Add-NTFSAccess @AddAdminHT - Removing
BuiltinUsersaccess from theSecure.Txtfile$RemoveUsersHT = @{ Path = 'F:Secure1Secure.Txt' Account = 'BuiltinUsers' AccessRights = 'FullControl' } Remove-NTFSAccess @RemoveUsersHT - Removing inherited rights for the folder
$RemoveInheritRHT = @{ Path = 'F:Secure1' RemoveInheritedAccessRules = $True } Disable-NTFSAccessInheritance @RemoveInheritRHT - Adding
Salesgroup access to the folder$AddHT = @{ Path = 'F:Secure1' Account = 'ReskitSales' AccessRights = 'FullControl' } Add-NTFSAccess @AddHT - Getting ACL of the
Secure1folderGet-NTFSAccess -Path F:Secure1 | Format-Table -AutoSize - Getting resulting ACL on the
Secure.TxtfileGet-NTFSAccess -Path F:Secure1Secure.Txt | Format-Table -AutoSize
How it works...
In step 1, you create a new volume on the disk added in the Getting ready section. This step is similar to those performed in the Managing disks recipe in Chapter 7. The step produces no output.
In step 2, you use the Install-Module command to download the NTFSSecurity module from the PowerShell Gallery. This step produces no output.
In step 3, you use the Get-Command cmdlet to discover the cmdlets inside the NTFSSecurity module, with output like this:

Figure 8.2: Reviewing the commands in the NTFSSecurity module
In step 4, you create a new folder and a new file on the newly created F: volume. The output from this step looks like this:

Figure 8.3: Creating a new folder and file in F:
In step 5, you use the Get-NTFSAccess command to view the ACL of the F:Secure1 folder, with output like this:

Figure 8.4: Viewing the ACL of the F:Secure folder
In step 6, you view the ACL for the Secure.Txt file, producing output like this:

Figure 8.5: Viewing the ACL of the Secure.Txt file
In step 7, you create and run a script block on DC1. The code in the script block checks to see if your AD has a Sales group and, if not, creates the AD group.
In the next step, step 8, you view the Sales group by running a second script block on the domain controller, with output like this:

Figure 8.6: Viewing the Sales group
In step 9, you use the Add-NTFSAccess cmdlet to give the domain admins full control over the folder. In step 10, you remove the BuiltinUsers group from the Secure.Txt file. Then, in step 11, you remove all inherited rights to the folder. Finally, in step 12, you give the Sales group full control over the folder (and, via inheritance, to files in the folder). These four steps produce no console output.
In step 13, you view the updated ACL for the Secure1 folder, with output like this:

Figure 8.7: Viewing the ACL for the Secure1 folder
In the final step, step 14, you view the resulting ACL on the Secure.Txt file with output like this:

Figure 8.8: Viewing the ACL for the Secure.Txt file
There’s more...
As you can see in step 3, in Figure 8.2, there are several cmdlets in the NTFSSecurity module. You can use these cmdlets to set up the ACL on a file or folder and the System ACL (SAC) that enables you to audit file or folder access. There are also some improved cmdlets, such as Get ChildItem2 and Get-Item2, which you may find helpful.
In steps 9 through step 14, update the ACL for the Secure1 folder and the text file, Secure.Txt, you created earlier. These steps demonstrate how you use the cmdlets in the NTFSSecurity module to update folder and file ACLs and may not be the best approach for your organization.
Securing Your SMB File Server
To create a file server, you first need to install the necessary features to the server and then harden it. You use the Add-WindowsFeature cmdlet to add the Windows features required for a file server. You can then use the Set-SmbServerConfiguration cmdlet to update the configuration to suit your organization’s needs.
Security is a good thing, but, as always, be careful! By locking down your SMB file server too hard, you can lock some users out of the server. Since your file server can contain sensitive information, you must take reasonable steps to avoid some of the expected attack mechanisms and adopt the best security practices.
Windows file servers (and file server clients) use the SMB protocol. This protocol has gone through several significant improvements over the years. The original version, SMB 1.0, has many weaknesses and, in general, should be removed and not used. When you install Windows Server 2022, the installer turns SMB 1.0 off. But it never hurts to double-check and disable SMB 1.0 explicitly.
Before you lock down any of the server configurations, be sure to test your changes. You should remember that if you disable SMB 1.0, you may find that older computers (for example, those running Windows XP) lose access to shared data. By the time you read this book, this should not be an issue for most, but not all, organizations. If you do enable SMB 1.0, do so carefully.
Getting ready
This recipe uses FS1, a domain-joined host in the Reskit.Org domain, on which you have installed PowerShell 7 and VS Code.
How to do it...
- Adding File Server features to
FS1$FeaturesHT = 'FileAndStorage-Services', 'File-Services', 'FS-FileServer', 'RSAT-File-Services' Add-WindowsFeature -Name $FeaturesHT - Viewing the SMB server settings
Get-SmbServerConfiguration - Turning off
SMB1$ConfigHT1 = @{ EnableSMB1Protocol = $false Confirm = $false } Set-SmbServerConfiguration @ConfigHT1 - Turning on SMB signing and encryption
$ConfigHT2 = @{ RequireSecuritySignature = $true EnableSecuritySignature = $true EncryptData = $true Confirm = $false } Set-SmbServerConfiguration @ConfigHT2 - Turning off default server and workstations shares
$ConfigHT3 = @{ AutoShareServer = $false AutoShareWorkstation = $false Confirm = $false } Set-SmbServerConfiguration @ConfigHT3 - Turning off server announcements
$ConfigHT4 = @{ ServerHidden = $true AnnounceServer = $false Confirm = $false } Set-SmbServerConfiguration @ConfigHT4 - Restarting SMB Server service with the new configuration
Restart-Service LanManServer -Force
How it works...
In step 1, you add the file server features to FS1, with output like this:

Figure 8.9: Adding features to FS1
In step 2, you use the Get-SmbServerConfiguration cmdlet to return the SMB server settings for SRV2, which looks like this:

Figure 8.10 Viewing SMB server configuration
In step 3, you turn off SMB 1.0 explicitly. In step 4, you turn on digital signing and encrypting of all SMB-related data packets. With step 5, you turn off the default server and workstation shares, and with step 6, you turn off SMB server announcements to improve security. These four steps produce no output.
In step 7, which also produces no output, you restart the LanManServer service, which is the Windows service that provides SMB file sharing. The changes you made in the earlier step only take effect after you restart this service.
There’s more...
In steps 3 through 6, you update the configuration of the SMB service to be more secure. The SMB 1.0 protocol has long been considered unsafe. By default, the Windows OS setup process never turns on version 1, but it’s a good idea to ensure you turn it off. Digitally signing and encrypting all SMB packets protects against someone using a network sniffer to view data packets. SMB server announcements could provide more information to a potential network hacker about the services on your network.
In step 7, after making changes to the SMB service configuration, you restart the LanManWorkstation service. You must restart this service to implement any changes to the file server configuration.
Creating and Securing SMB Shares
With your file server service set up, the next step in deploying a file server is to create SMB shares and then secure them. For decades, administrators have used the net.exe command to set up shared folders and more. This command continues to work in Windows Server 2022 (and Windows 10/11), but you may find the SMB cmdlets easier to use, particularly if you’re automating large-scale SMB server deployments.
This recipe looks at creating and securing shares on a Windows Server 2022 platform using the PowerShell SMBServer module. You also use cmdlets from the NTFSSecurity module (a third-party module you previously downloaded from the PSGallery).
You run this recipe on the file server (FS1) that you set up and hardened in the Securing Your SMB File Server recipe. You create and share a folder (F:ITShare) on the file server in this recipe. Then, you create a file in the C:ITShare folder and set the ACL for the files to be the same for the share. You use the Set-SMBPathAcl cmdlet to do this. You then review the ACL for both the folder and the file.
This recipe uses a security group, Sales, which you created in the Reskit.Org domain in a previous step. In this recipe, you also use the Get-NTFSAccess cmdlet from NTFSSecurity, a third-party module you can download from the PowerShell Gallery. See the Managing NTFS File and Folder Permissions recipe for more details about this module and download instructions.
Getting ready
This recipe uses FS1, a domain-joined host in the Reskit.Org domain, on which you have installed PowerShell 7 and VS Code. You should also have DC1 online.
How to do it...
- Discovering existing shares and access rights
Get-SmbShare -Name * | Get-SmbShareAccess | Format-Table -GroupBy Name - Creating and sharing a new folder
New-Item -Path F: -Name ITShare -ItemType Directory | Out-Null New-SmbShare -Name ITShare -Path F:ITShare - Updating the share to have a description
$NoCnfHT = @{Confirm=$False} Set-SmbShare -Name ITShare -Description 'File Share for IT' @NoCnfHT - Setting folder enumeration mode
$FldrEnumHT = @{ Name = 'ITShare' FolderEnumerationMode = 'AccessBased' Force = $True } Set-SMBShare @FldrEnumHT - Setting encryption on for the
ITShareshareSet-SmbShare -Name ITShare -EncryptData $true -Force - Removing all access to
ITShareshare for theEveryonegroup$AdminHT1 = @{ Name = 'ITShare' AccountName = 'Everyone' Confirm = $false } Revoke-SmbShareAccess @AdminHT1 - Adding
ReskitAdministratorsto have read permission$AdminHT2 = @{ Name = 'ITShare' AccessRight = 'Read' AccountName = 'ReskitADMINISTRATOR' ConFirm = $false } Grant-SmbShareAccess @AdminHT2 - Adding system full access
$AdminHT3 = @{ Name = 'ITShare' AccessRight = 'Full' AccountName = 'NT AuthoritySYSTEM' Confirm = $False } Grant-SmbShareAccess @AdminHT3 | Out-Null - Setting
Creator/OwnertoFull Access$AdminHT4 = @{ Name = 'ITShare' AccessRight = 'Full' AccountName = 'CREATOR OWNER' Confirm = $False } Grant-SmbShareAccess @AdminHT4 | Out-Null - Granting
Salesgroup read access,SalesAdminshasFullaccess$AdminHT5 = @{ Name = 'ITShare' AccessRight = 'Read' AccountName = 'Sales' Confirm = $false } Grant-SmbShareAccess @AdminHT5 | Out-Null - Reviewing share access
Get-SmbShareAccess -Name ITShare | Sort-Object AccessRight - Set file ACL to be same as share ACL
Set-SmbPathAcl -ShareName 'ITShare' - Creating a file in
F:ITShare'File Contents' | Out-File -FilePath F:ITShareFile.Txt - Setting file ACL to be same as share ACL
Set-SmbPathAcl -ShareName 'ITShare' - Viewing file ACL
Get-NTFSAccess -Path F:ITShareFile.Txt |
  Format-Table -AutoSize
How it works...
In step 1, you use Get-SmbShare to discover the current SMB shares on FS1 and which accounts have access to those shares. The output looks like this:

Figure 8.11: Viewing SMB shares on FS1
In step 2, you create a new folder (F:ITShare) and use the New-SMB share to share that folder (using default permissions). The output from this step looks like this:

Figure 8.12: Creating a new share on FS1
Having created the share, you next configure access to the share. In step 3, you modify the share to have a description. With step 4, you set access-based enumeration on the share. Then, in step 5, you ensure Windows encrypts all data transferred via the share. These two steps create no console output.
Next, with step 6, you remove access to the ITShare for the Everyone group. The output from this step looks like this:

Figure 8.13: Removing access to the Everyone group
In step 7, you grant the ReskitAdministrator account read permission on the ITShare share, creating the following output:
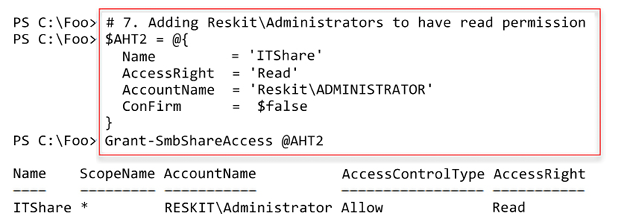
Figure 8.14: Removing access to the Everyone group
With step 8, you give the OS full access to the share. Finally, in step 9, you grant the creator or owner of any file/folder full access to the file. These seven configuration steps produce no output.
In step 11, you review the access to the share, which produces output like this:

Figure 8.15: Viewing share access
Now that you have configured access to the share, in step 12, you use the Set-SMBPathAcl command to make the NTFS permissions match the SMB share permissions. In step 13, you create a new file in the folder shared as ITShare and then ensure, in step 14, that the file itself has the same ACL as the share. These three steps produce no output.
In step 15, you view the file, F:ITShareFile.Txt, which produces output like this:

Figure 8.16: Viewing the File ACL
There’s more...
In step 1, you examine the shares available on FS1. In the Securing Your SMB File Server recipe, you configured the SMB service to remove the default shares on FS1. The only share you see in step 1 is the IPC$ share, which Windows uses for the named pipes communication mechanism. For more details about this share, see https://learn.microsoft.com/troubleshoot/windows-server/networking/inter-process-communication-share-null-session.
In step 4, you set access-based enumeration for the ITShare share. This setting means that any user viewing files or folders within the share only sees objects to which they have access.
This setting improves security and minimizes administrative questions, such as “What is this file/folder, and why can’t I have access to this file/folder?”.
In step 5, you set encryption for the ITShare share. This step ensures that Windows performs data encryption on any data transferred across this share. You can set this by default at the server level or, in this case, at the share level.
In the final step, step 15, you view the resultant ACL for the file F:ITShareFile.Txt. The ACL results from the changes you made in the prior steps. You need to adjust the specific permissions added and removed to meet the needs of your organization. Note that this recipe shows you how to change the ACLs, modify ACL inheritance, and view the results.
Accessing SMB Shares
In the Creating and Securing SMB Shares recipe, you created a share on FS1. Data you access using SMB file sharing acts and feels like accessing local files via Windows Explorer or the PowerShell console, as you see in this recipe.
In this recipe, you access the ITShare share on FS1 from SRV1.
Getting ready
This recipe uses SRV1, a domain-joined host in the Reskit.Org domain, on which you have installed PowerShell 7 and VS Code. You also use FS1 and should have DC1 online. You previously created SMB shares on FS1, which you use in this recipe.
How to do it...
- Examining the SMB client’s configuration on
SRV1Get-SmbClientConfiguration - Setting Signing of SMB packets
$ConfirmHT = @{Confirm=$false} Set-SmbClientConfiguration -RequireSecuritySignature $True @ConfirmHT - Examining SMB client’s network interface
Get-SmbClientNetworkInterface | Format-Table - Examining the shares provided by
FS1net view \FS1 - Creating a drive mapping, mapping
R:to the share on serverFS1New-SmbMapping -LocalPath R: -RemotePath \FS1ITShare - Viewing the shared folder mapping
Get-SmbMapping - Viewing the shared folder contents
Get-ChildItem -Path R: - Viewing existing connections
Get-SmbConnection
How it works...
In step 1, you examine details of the SMB client configuration on SRV1, with output like this:

Figure 8.17: Examing SMB client information
In step 2, you ensure that SRV1 requires signed SMB packets, irrespective of the settings on the SMB server (FS1). There is no output from this step.
In step 3, you examine details of the client NIC on SRV1, with output that looks like this:

Figure 8.18: Viewing NIC on SRV1
In step 4, you use the net.exe command to view the shares provided by the FS1 host. The output from this step looks like this:

Figure 8.19: Viewing shares offered by FS1
In step 5, you create a new drive mapping on SRV1, mapping the R: drive to \FS1ITShare, which creates output that looks like this:

Figure 8.20: Creating a drive mapping
In step 6, you view the SMB drive mappings on SRV1, which look like this:

Figure 8.21: Viewing the shared folder mapping
In step 7, you view the contents of the share to reveal the file you created in Creating and Securing SMB Shares, with output like this:

Figure 8.22: Viewing the contents of the shared folder
In step 8, you view all existing SMB connections from SRV1. This step produces the following output:

Figure 8.23: Viewing existing SMB connections from SRV1
There’s more...
In step 4, you use the net.exe command. The SMBShare module does not provide a PowerShell cmdlet that retrieves the shares offered by a remote host. As an alternative to using net.exe to discover remote shares, you could create a script block to retrieve the shares from a local host. Then use Invoke-Command to send that script block to a server to obtain the shares. Some just find using net.exe easier.
Creating an iSCSI Target
iSCSI is an industry-standard protocol that implements block storage over a TCP/IP network. With iSCSI, the server, or target, provides a volume shared via iSCSI to an iSCSI client, also known as the iSCSI initiator.
In the original SCSI protocol, you use the term Logical Unit Number (LUN) to refer to a single physical disk attached to the SCSI bus. With iSCSI, you give each remotely shared volume an iSCSI LUN. Once connected to the iSCSI target, the iSCSI client sees the LUN as another disk device attached to the local system. From the iSCSI client, you can manage the disk just like locally attached storage.
Windows Server 2022 includes iSCSI target (server) and iSCSI initiator (client) features. Windows installs the initiator software by default, and you can add the target feature to Windows Server systems.
To use iSCSI, you need an iSCSI target on a server and an iSCSI initiator on another server (or client) system to access the iSCSI target. You can use both Microsoft and third-party initiators and targets, although if you mix and match, you need to test very carefully that the combination works in your environment.
With iSCSI, a target is a single disk that the client accesses using the iSCSI client. An iSCSI target server hosts one or more targets, where each iSCSI target is equivalent to a LUN on a fiber channel SAN.
You could use iSCSI in a cluster of Hyper-V servers. The servers in the cluster can use the iSCSI initiator to access an iSCSI target. Used via the cluster shared volume, the shared iSCSI target is shared between nodes in a failover cluster that enables the VMs in that cluster to be highly available.
Getting ready
This recipe uses SS1, a domain-joined host in the Reskit.Org domain, on which you have installed PowerShell 7 and VS Code.
How to do it...
- Installing the iSCSI target feature on
SS1Import-Module -Name ServerManager -WarningAction SilentlyContinue Install-WindowsFeature FS-iSCSITarget-Server - Restarting the computer
Restart-Computer - Exploring iSCSI target server settings
Get-IscsiTargetServerSetting - Creating a folder on
SS1to hold the iSCSI virtual disk$NewFolderHT = @{ Path = 'C:iSCSI' ItemType = 'Directory' ErrorAction = 'SilentlyContinue' } New-Item @NewFolderHT | Out-Null - Creating an iSCSI virtual disk (aka a LUN)
$VDiskPath = 'C:iSCSIITData.Vhdx' $VDHT = @{ Path = $VDiskPath Description = 'LUN For IT Group' SizeBytes = 500MB } New-IscsiVirtualDisk @VDHT - Setting the iSCSI target, specifying who can initiate an iSCSI connection
$TargetName = 'ITTarget' $NewTargetHT = @{ TargetName = $TargetName InitiatorIds = 'IQN:*' } New-IscsiServerTarget @NewTargetHT - Creating iSCSI disk target mapping LUN name to a local path
$TargetHT = @{
  TargetName = $TargetName
  Path       = $VDiskPath
}
Add-IscsiVirtualDiskTargetMapping @TargetHT
How it works...
In step 1, you install the iSCSI target feature on the SS1 server, with output like this:

Figure 8.24: Installing the iSCSI target feature on SS1
In step 2, you restart SS1 to complete the installation of the iSCSI target feature. This step creates no output.
In step 3, you examine the iSCSI target server settings, with output that looks like this:

Figure 8.25: Exploring the iSCSI target server settings
In step 4, you create a folder on SS1 to hold the iSCSI virtual disk, which creates no output. In step 5, you create an iSCSI virtual disk (essentially a LUN) with output that looks like this:

Figure 8.26: Creating an iSCSI virtual disk on SS1
In step 6, you specify which computers can use the virtual iSCSI target, with output like this:

Figure 8.27: Specifying which hosts can access the iSCSI virtual disk
In the final step, step 6, you specify the disk target mapping, which generates no output. This step creates a mapping between an iSCSI target name (ITTarget) and the local path where you stored the virtual iSCSI hard disk.
There’s more...
By default, Windows does not install the iSCSI target feature, but as you can see in step 1, you use Install-WindowsFeature to add the feature to this storage server.
When you create an iSCSI target, you create the target name and the target virtual hard drive separately, and then, in step 6, you map the iSCSI target name to the file location. In production, you would use a separate set of (fault-tolerant) disks to hold the iSCSI information, possibly using storage spaces to create fault-tolerant virtual disks.
Using an iSCSI Target
Windows and Windows Server provide a built-in iSCSI client component you use to access almost any iSCSI target, as previously mentioned.
In the Creating an iSCSI Target recipe, you created an iSCSI target. The target is a disk you can access remotely via an iSCSI client. To make use of the remotely shared disk via iSCSI, you attach it to the iSCSI server and start using the disk as if it were locally attached.
Getting ready
This recipe uses FS1, a domain-joined host in the Reskit.Org domain, on which you have installed PowerShell 7 and VS Code. This recipe also uses SS1 (the host holding the iSCSI target), and you should have DC1 online. You previously created an iSCSI target (on SS1), and now you use the built-in iSCSI initiator to access the iSCSI disk. You run this recipe on FS1.
How to do it...
- Adjusting the iSCSI service to autostart, then start the service
Set-Service MSiSCSI -StartupType 'Automatic' Start-Service MSiSCSI - Setting up the portal to
SS1$PortalHT = @{ TargetPortalAddress = 'SS1.Reskit.Org' TargetPortalPortNumber = 3260 } New-IscsiTargetPortal @PortalHT - Finding and viewing the
ITTargeton the portal$Target = Get-IscsiTarget | Where-Object NodeAddress -Match 'ITTarget' $Target - Connecting to the target on
SS1$ConnectHT = @{ TargetPortalAddress = 'SS1.Reskit.Org' NodeAddress = $Target.NodeAddress } Connect-IscsiTarget @ConnectHT - Viewing the iSCSI disk from
FS1onSRV1$RemoteDisk = Get-Disk | Where-Object BusType -eq 'iscsi' $RemoteDisk | Format-Table -AutoSize - Turning disk online and making disk
R/W$RemoteDisk | Set-Disk -IsOffline $False $RemoteDisk | Set-Disk -Isreadonly $False - Formatting the volume on
SS1$NewVolumeHT = @{ FriendlyName = 'ITData' FileSystem = 'NTFS' DriveLetter = 'I' } $RemoteDisk | New-Volume @NewVolumeHT - Using the drive as a local drive
Set-Location -Path I:
New-Item -Path I:  -Name ITData -ItemType Directory |
  Out-Null
'Testing 1-2-3' |
  Out-File -FilePath I:ITDataTest.Txt
Get-ChildItem I:ITData
How it works...
In step 1, you set the iSCSI service to start automatically when SRV1 starts, and then you explicitly start the iSCSI service. This step creates no console output.
In step 2, you set up the iSCSI portal to SS1, which looks like this:

In step 3, you find and view the ITTarget LUN from SS1. The output looks like this:

In step 4, you connect from SRV1 to the iSCSI target on SS1, which looks like this:

SS1In step 5, you use Get-Disk to view the iSCSI disk from SRV1, which looks like this:

In step 6, you ensure the iSCSI disk is online and set to Read/Write – a step that generates no output. In step 7, you create a new volume on the iSCSI disks, which looks like this:

In the final step in this recipe, step 8, you create a folder in the iSCSI disk. Then you create a file and view the file, which looks like this:

Figure 8.33: Using the iSCSI target disk
There’s more...
Using an iSCSI disk is straightforward – connect to the iSCSI target and manage the disk volume locally. Once connected, you can format it with a file system and then use it to store data.
In production, you may not be using a Windows Server host to serve as an iSCSI target. For example, many SAN vendors add iSCSI target features to their SAN offerings. With a SAN offering, you can use the Windows iSCSI initiator to access the SAN via iSCSI. However, some SAN vendors may provide an updated iSCSI initiator for you to use. If you choose to mix and match vendors for the target and initiators, you must test the proposed environment carefully.
Implementing FSRM Filestore Quotas
File Server Resource Manager (FSRM) is a feature of Windows Server that assists you in managing file servers. FSRM has three key sub-features:
- Quota management: With FSRM, you can set soft or hard quotas on volumes and folders. Soft quotas allow users to exceed an allowance, while hard quotas stop users from exceeding an allowance. You can configure a quota with thresholds and threshold actions. If a user exceeds 65% of the quota allowance, FSRM can send an email, while at 90%, you log an event in the event log or run a program. You have different actions for different quota levels. This recipe shows how to use quotas.
- File screening: You can set up a file screen and stop users from saving screened files. For example, you could screen for MP3 or FLAC files – should a user attempt to save a file (say,
jg75-02-28D1T1.flac), the file screen rejects the request and doesn’t allow the user to save the file. - Reporting: FSRM enables you to create a wealth of storage reports that can be highly useful for management purposes.
In this recipe, you install FSRM on FS1, perform some general configuration, and then work with soft and hard quotas.
Getting ready
This recipe uses FS1, a domain-joined host in the Reskit.Org domain, on which you have installed PowerShell 7 and VS Code. You should have DC1 online to provide authentication for FS1.
FSRM has features that send email messages to an SMTP server. To test these features, as shown in this recipe, you need an email server so FSRM can send emails. In this recipe, you use SMTP.Reskit.Org. There are several ways to implement this SMTP server. You can, for example, use Internet Information Server (IIS) within Windows Server to forward emails to an external SMTP email server. Note that Microsoft has removed the IIS SMTP relay feature in Server 2022, so you may need to use an older version of Windows Server.
You could also set up a Linux mail forwarder (see https://www.plesk.com/blog/various/setting-up-and-configuring-a-linux-mail-server/ for more details on how to do this).
This recipe configures FSRM to send mail to a host (SMTP.Reskit.Org), which then forwards the mail.
How to do it...
- Installing FSRM feature on
FS1Import-Module -Name ServerManager -WarningAction 'SilentlyContinue' $InstallIHT = @{ Name = 'FS-Resource-Manager' IncludeManagementTools = $True WarningAction = 'SilentlyContinue' } Install-WindowsFeature @InstallIHT - Viewing default FSRM settings
Get-FsrmSetting - Setting SMTP settings in FSRM
$SMTPHT = @{ SmtpServer = 'SMTP.Reskit.Org' FromEmailAddress = '[email protected]' AdminEmailAddress = '[email protected]' } Set-FsrmSetting @SMTPHT - Sending a test email to check the setup
$TestHT = @{ ToEmailAddress = '[email protected]' Confirm = $false } Send-FsrmTestEmail @TestHT - Creating a new FSRM quota template for a 10 MB hard limit
$QuotaHT1 = @{ Name = '10 MB Reskit Quota' Description = 'Filestore Quota (10mb)' Size = 10MB } New-FsrmQuotaTemplate @QuotaHT1 - Viewing available FSRM quota templates
Get-FsrmQuotaTemplate | Format-Table -Property Name, Description, Size, SoftLimit - Creating a new folder on which to apply a quota
If (-Not (Test-Path C:Quota)) { New-Item -Path C:Quota -ItemType Directory | Out-Null } - Building an FSRM action
$MailBody = @' User [Source Io Owner] has exceeded the [Quota Threshold]% quota threshold for the quota on [Quota Path] on server [Server]. The quota limit is [Quota Limit MB] MB, and [Quota Used MB] MB currently is in use ([Quota Used Percent]% of limit). '@ $NewActionHT = @{ Type = 'Email' MailTo = '[email protected]' Subject = 'FSRM Over limit [Source Io Owner]' Body = $MailBody } $Action1 = New-FsrmAction @NewActionHT - Creating an FSRM threshold
$Thresh = New-FsrmQuotaThreshold -Percentage 85 -Action $Action1 - Building a quota for the
C:Quotafolder$NewQuotaHT1 = @{ Path = 'C:Quota' Template = '10 MB Reskit Quota' Threshold = $Thresh } New-FsrmQuota @NewQuotaHT1 - Testing the 85% soft quota limit on
C:QuotaGet-ChildItem -Path C:Quota -Recurse | Remove-Item -Force # for testing purposes! $Text1 = '+'.PadRight(8MB) # Make a first file - under the soft quota $Text1 | Out-File -FilePath C:QuotaDemo1.Txt # Now create a second file to take the user over the soft quota $Text2 = '+'.PadRight(.66MB) $Text2 | Out-File -FilePath C:QuotaDemo2.Txt - Testing the hard limit quota
$Text1 | Out-File -FilePath C:QuotaDemo3.Txt - Viewing the contents of the
C:QuotafolderGet-ChildItem -Path C:Quota
How it works...
In step 1, you use the Install-WindowsFeature cmdlet to add the FS-ResourceManager feature to FS1, which looks like this:

Figure 8.34: Installing the FSRM feature to FS1
In step 2, you view the default FSRM settings with output like this:

Figure 8.35: Viewing FSRM default settings
In step 3, you set FSRM’s SMTP details, including the SMTP server name and the From and Admin addresses. This step produces no output. In step 3, you use the Send-FsrmTestEmail cmdlet to test SMTP email handling.
This step has no console output but does generate an email, which should look something like this:

Figure 8.36: Test email received from FSRM
Now that you have installed and configured FSRM, in step 5, you create a new FSRM quota template for a 10 MB hard quota limit. The output from this step looks like this:

Figure 8.37: Creating an FSRM quota template
In step 6, you view the available FSRM quota templates with output like this:

Figure 8.38: Viewing available FSRM quota templates
In step 7, you create a new folder, C:Quota, which you can use to test file store quotas. In step 8, you build an FSRM action that sends an email whenever a user exceeds the quota. In step 9, you create an FSRM threshold (how much of the soft quota limit a user can use before triggering a quota violation). These three steps produce no console output.
In step 10, you build a quota for the C:Quota folder, with output that looks like this:
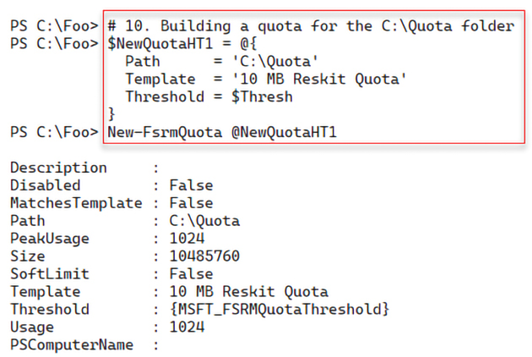
Figure 8.39: Building a quota for the C:Quota folder
In step 11, you test the 85% soft quota limit. First, you create a new file (C:QuotaDemo1.Txt) under the size of the soft quota limit. Thus, FSRM allows you to save the file.
Then, you create a second file (C:QuotaDemo2.Txt) that uses up more than the soft quota limit – but since the quota is a soft one, you can save the file. There is no console output from this step, but FSRM detects you have exceeded the soft limit quota for this folder and generates an email message that looks like this:

Figure 8.40: Exceeding soft quota limit email
In step 12, you attempt to create an additional file, C:QuotaDemo3.txt, by outputting the $Text1 array to a file, which results in you exceeding the hard quota limit. You see the following output:

Figure 8.41: Testing the hard quota limit
In step 13, you examine the files in the C:Quota folder, which looks like this:

There’s more...
In this recipe, you installed and configured FSRM, then defined and tested both a soft and a hard FSRM quota. With the soft quota, you configured FSRM to send an email to inform the recipient that they exceeded a quota. You might want to send an email to either an administrator or a user who has exceeded the quota thresholds.
For the hard quota, FSRM writes application event-log entries and stops the user from saving excess data. The quotas set in this recipe are very small and probably not of much use in production. But changing the step to have a quota of 10 GB is straightforward and might be more appropriate.
In step 1, you install a new Windows feature to FS1. From time to time, you may see the installation process just stall and not complete. In some cases, FSRM can require extra reboots to install the feature and tools. In such cases, re-running the command in a new PowerShell console or rebooting the server enables you to add features.
In step 5, you create a new FSRM quota template. You can see this new template in the output generated by step 6. Note that this quota template is for a hard, not a soft, limit.
In step 10, you create a new FSRM quota. If for some reason you get an error from this step, you may need to reboot the host then re-try the quota creation.
In step 13, you examine the C:Quota folder. Notice that with the third file (which you attempted to create in step 12), Windows has saved some but not all of the file’s intended contents. Suppose you are planning on imposing hard quotas. In that case, you must ensure users understand the implications of exceeding any hard quota limits and the potential for corrupting data (e.g., saving just half of a spreadsheet of a document).
Implementing FSRM Filestore Reporting
A useful and often overlooked feature of the FSRM component is reporting. You can generate FSRM reports immediately (also known as interactive) or at a scheduled time. The latter causes FSRM to create reports on a weekly or monthly basis. FSRM defines several basic report types that you can use.
FSRM produces reports with a fixed layout that you cannot change. FSRM can return the same data contained in the HTML report but as an XML document. You can then use the XML document to create the report the way you need it.
Getting ready
This recipe uses FS1, a domain-joined host in the Reskit.Org domain, on which you have installed PowerShell 7 and VS Code. In the previous recipe, Implementing FSRM quotas, you have installed FSRM on FS1.
How to do it...
- Creating a new FSRM storage report for large files on
C:onFS1$NewReportHT = @{ Name = 'Large Files on FS1' NameSpace = 'C:' ReportType = 'LargeFiles' LargeFileMinimum = 10MB Interactive = $true } New-FsrmStorageReport @NewReportHT - Getting existing FSRM reports
Get-FsrmStorageReport * | Format-Table -Property Name, NameSpace, ReportType, ReportFormat - Viewing interactive reports available on
FS1$Path = 'C:StorageReportsInteractive' Get-ChildItem -Path $Path - Viewing the report
$Rep = Get-ChildItem -Path $Path*.html Invoke-Item -Path $Rep - Extracting key information from the FSRM XML output
$XMLFile = Get-ChildItem -Path $Path*.xml $XML = [XML] (Get-Content -Path $XmlFile) $Files = $XML.StorageReport.ReportData.Item $Files | Where-Object Path -NotMatch '^Windows|^Program|^Users'| Format-Table -Property name, path, @{ Name ='Sizemb' Expression = {(([int]$_.size)/1mb).tostring('N2')}}, DaysSinceLastAccessed -AutoSize - Creating a monthly task in task scheduler
$Date = Get-Date '04:20' $NewTaskHT = @{ Time = $Date Monthly = 1 } $Task = New-FsrmScheduledTask @NewTaskHT $NewReportHT = @{ Name = 'Monthly Files by files group report' Namespace = 'C:' Schedule = $Task ReportType = 'FilesbyFileGroup' FileGroupINclude = 'Text Files' LargeFileMinimum = 25MB } New-FsrmStorageReport @NewReportHT | Out-Null - Getting details of the task
Get-ScheduledTask | Where-Object TaskName -Match 'Monthly' | Format-Table -AutoSize - Running the task now
Get-ScheduledTask -TaskName '*Monthly*' | Start-ScheduledTask Get-ScheduledTask -TaskName '*Monthly*' - Viewing the report in the
StorageReportsfolder$Path = 'C:StorageReportsScheduled' $Report = Get-ChildItem -Path $Path*.html $Report - Viewing the report
Invoke-item -Path $Report
How it works...
In step 1, you create a new FSRM report to discover large files (over 10 MB in size) on the C: drive. The output from this step looks like this:

In step 2, you view the available FSRM reports, with output like this:

In step 3, you examine the completed reports and output in the C:StorageReports folder. The output looks like this:

Figure 8.45: Viewing completed FSRM storage reports
In step 4, you examine the large file report in your default browser, which looks like this:

Figure 8.46: Viewing a large file report from FS1
In step 5, you extract the critical information from the report XML file and output it to the console. The output looks like this:

Figure 8.47: Viewing large file information
In step 6, you create a new scheduled task to run monthly. The task runs the FilesbyFileGroup report. This step produces no output.
In step 7, you examine the details of the scheduled task, with output like this:

Figure 8.48: Getting details of the scheduled task
In step 8, you execute the scheduled task immediately, with output like this:

Figure 8.49: Executing the scheduled FSRM task
In step 9, after FSRM completes running the report, you view the report output like this:

In the final step in this recipe, step 10, you view the report in the browser, with output like this:

Figure 8.51: Viewing the report in the browser
There’s more...
In step 1, you create a new FSRM interactive report. FSRM starts running this command immediately. If you are not quick enough, you might see no output when you attempt to view the FSRM reports in step 3. If the step shows you no output, this indicates that the report is complete. You can then view the report output, as you do in step 4.
When you view the report content folder, for example, in step 3, you may initially see no report output. It can take FSRM some time to produce the report, so you must be patient.
In step 4, you view the HTML report created by FSRM using your default browser. Depending on the configuration of your host, you may see a prompt asking which application you wish to use to view the report.
As you can see from this recipe, FSRM creates report output as HTML and XML. You cannot change the HTML format – but it is probably good enough for most uses. If you want a specific design or just some data, you get the same information from the XML and format it to suit your needs.
Implementing FSRM Filestore Screening
FSRM has a file screening option. This feature allows you to control the types of files you allow to be stored on your file server. You could, for example, define a file screen to prohibit a user from saving music files (files with the MP3 or FLAC extension) to your file server. With FSRM’s file screening, if a user attempts to save a file such as GD71-02-18.T09.FLAC, and FSRM prevents the saving of the file.
To configure FSRM file screening, you need to specify the folder FSRM should protect and a file screen template that describes the characteristics of files that FSRM should block. FSRM comes with five built-in file screen templates. You can create additional templates to suit your requirements.
FSRM has eleven built-in file groups that cover common content types and can be updated and extended. Each file screen template contains a set of file groups. Each file group defines a set of file extensions that FSRM can block.
One built-in FSRM file group is audio and video files. This group, for example, includes a wide variety of audio and video file extensions, including AAC, MP3, FLAC, and more. Interestingly, this built-in file group does not block SHN (Shorten) files. You could easily add this extension to the relevant file group, should you wish.
Note that file screening works solely based on file extensions. FSRM, for example, might block you from saving a file such as GD71-02-18.T09.FLAC. However, if you tried to store this file as GD71-02-18.T09.CALF, FSRM allows a user to save the file. The FSRM file screening does not examine the file to ascertain the actual file type. In most cases, file screening stops the more obvious policy infractions.
Getting ready
This recipe uses FS1, a domain-joined host in the Reskit.Org domain, on which you have installed PowerShell 7 and VS Code. In a previous recipe, Implementing FSRM quotas, you installed FSRM on FS1.
How to do it...
- Examining the existing FSRM file groups
Get-FsrmFileGroup | Format-Table -Property Name, IncludePattern - Examining the existing file screening templates
Get-FsrmFileScreenTemplate | Format-Table -Property Name, IncludeGroup, Active - Creating a new folder
$Path = 'C:FileScreen' If (-Not (Test-Path $Path)) { New-Item -Path $Path -ItemType Directory | Out-Null } - Creating a new file screen
$FileScreenHT = @{ Path = $Path Description = 'Block Executable Files' IncludeGroup = 'Executable Files' } New-FsrmFileScreen @FileScreenHT - Testing file screen by copying
notepad.exe$FSTestHT = @{ Path = "$Env:windir otepad.exe" Destination = 'C:FileScreen otepad.exe' } Copy-Item @FSTestHT - Setting up an active email notification
$MailBody = "[Source Io Owner] attempted to save an executable program to [File Screen Path]. This is not allowed! " $FSAction = @{ Type = 'Email' MailTo = '[email protected]' Subject = 'Warning: attempted to save an executable file' Body = $MailBody RunLimitInterval = 60 } $Notification = New-FsrmAction @FSAction $NewFileScreenHT = @{ Path = $Path Notification = $Notification IncludeGroup = 'Executable Files' Description = 'Block any executable file' Active = $true } Set-FsrmFileScreen @NewFileScreenHT - Getting FSRM notification limits
Get-FsrmSetting | Format-List -Property "*NotificationLimit" - Changing FSRM notification limits
$FSNotificationHT = @{ CommandNotificationLimit = 1 EmailNotificationLimit = 1 EventNotificationLimit = 1 ReportNotificationLimit = 1 } Set-FsrmSetting @FSNotificationHT - Retesting the file screen and viewing the FSRM email
Copy-Item @FSTestHT
How it works...
In step 1, you examine the initial set of FSRM file groups. The output looks like this:

Figure 8.52: Examining existing FSRM file groups
In step 2, you examine the built-in FSRM file screening templates. The output from this step is:

Figure 8.53: Viewing file screen templates
In step 3, you create a new folder for testing FSRM file screening, which produces no output. In step 4, you create a new FSRM file screen. The output from this step looks like this:

Figure 8.54: Creating a new file screen
To test the file screen, in step 5, you copy notepad.exe from the Windows folder to the file screen folder, with output like this:

Figure 8.55: Testing a file screen
In step 6, you set up an active email notification to notify you any time a user attempts to save an executable file to the screened folder. This step creates no output.
In step 7, you examine the FSRM notification limits with output like this:

Figure 8.56: Examining FSRM notification limits
In step 8, you reduce the email notification limits to one second to speed up the creation of email notifications for testing. This step creates no console output.
In step 9, you test the updated file screen by re-attempting to save an executable to the screened folder. You then get the following output:

Figure 8.57: Retesting the file screen
Having set up an email notification for the file screen, you can look at your email client and view the FSRM-generated email, which looks like this:

Figure 8.58: Viewing the File Screen email
There’s more...
In step 1, you look at the file extensions that FSRM recognizes by default. These file extensions cover most of the common scenarios. One small omission is that the audio and video files should include the extension SHN. Files with the SHN extension are lossless audio files using the Shorten compression algorithm. You can find a wealth of legal SHN-based concert recordings of many bands, such as The Grateful Dead. For this reason, in production, you might want to update the FSRM file group to enable FSRM to screen SHN files when you use that FSRM file group in a screening rule.
FSRM’s file screening feature does a good job of stopping a user from accidentally saving files that would violate the organization’s file storage policies. For example, the organization might stipulate that users may not save audio or video files to the organization’s file server.
If a user “accidentally” saves an MP3 file, FSRM would politely refuse. However, as noted earlier, FSRM file screening is based solely on the file’s extension. Thus, if the user saves a file and changes the extension to 3MP, FSRM does not object. Of course, in doing so, the user is deliberately breaking an organizational policy, which could be a career-limiting move.
Join our community on Discord
Join our community’s Discord space for discussions with the author and other readers:
