
11
Managing Hyper-V
This chapter covers the following recipes:
- Installing Hyper-V inside Windows Server
- Creating a Hyper-V VM
- Using PowerShell Direct
- Using Hyper-V VM groups
- Configuring the VM hardware
- Configuring VM networking
- Implementing nested virtualization
- Managing a VM’s state
- Managing storage movement
- Configuring VM replication
- Managing VM checkpoints
- Clustering Hyper-V servers
Introduction
Hyper-V is Microsoft’s virtual machine (VM) hypervisor. Microsoft has made Hyper-V available in all versions of Windows Server 2022 and the Enterprise, Professional, and Education editions of Windows 11. Windows Server 2022 and Windows 11 include Hyper-V as an option you can install.
Microsoft first released Hyper-V with Server 2008 and has improved it significantly with each successive version of Windows Server. Improvements include features, support for the latest hardware, and significantly increased scalability.
A useful feature of Hyper-V is nested virtualization, the ability to run Hyper-V inside a Hyper-V VM. Nested virtualization has some good use cases, such as in training. You could give each student a VM on a large blade containing the VMs needed for the course labs. Nested virtualization also provides an additional layer of security that might be useful in multi-tenant scenarios.
Microsoft previously shipped a free version of Hyper-V, Microsoft Hyper-V Server. Hyper-V Server runs VMs with no GUI. You configure and manage it remotely using recipes like the ones in this chapter. The product was free, although you did need to license any guest VMs. For Server 2022, Microsoft has dropped this. You can now only use Hyper-V inside Windows 11 or Windows Server.
This chapter starts with installing and configuring the Hyper-V feature. After installing Hyper-V, you will go on to create a VM, PSDirect, which requires you to download an ISO image of Windows Server from the internet.
After you create the PSDirect VM, you will use the VM. You will use PowerShell Direct to set up a remoting session into a VM without a network connection. You will also configure the VM’s hardware and networking capability. You will then use the PowerShell cmdlets to manage the state of the VM.
Hyper-V allows you to move a VM and/or a VM’s storage between Hyper-V hosts. For disaster recovery, you can replicate a running VM (and use that replica should the primary VM fail).
You can take snapshots, or checkpoints, of a VM to save a VM’s state and restore your VM to that point, as you will see in the Managing VM Checkpoints recipe.
The systems used in the chapter
This chapter uses two Hyper-V host systems, HV1 and HV2 – both domain-joined servers in the Reskit.Org domain. You will also use a domain-joined host, SRV1. Finally, you will make use of a domain controller in the domain (DC1), so that host must be online as well. The hosts used in this chapter are as shown here:

Figure 11.1: Hosts in use for this chapter
Installing Hyper-V inside Windows Server
In Windows Server, Hyper-V is a Windows feature you can add using the Install-WindowsFeature cmdlet. You also have the choice of whether to add the Hyper-V management tools. These tools include the Hyper-V Manager GUI tool and the PowerShell cmdlets that you will use in this chapter.
Once you have installed Hyper-V, you must reboot to complete the installation. Once fully installed, you can configure Hyper-V and the Hyper-V VMs using PowerShell, as you will see in later recipes in this chapter. One configuration setting you may wish to set initially is the location Hyper-V should use to store, by default, both the VM details and where to store the Virtual Hard Disks (VHDs). Another configuration setting you can make is to specify Non-Uniform Memory Address (NUMA) topology for the VM host. For more details on NUMA in Hyper-V, see: https://petri.com/customize-non-uniform-memory-access-numa-configuration-of-vm/#:~:text=You%20can%20find%20the%20NUMA%20topology%20settings%20if,machine%20starts%20up.%20You%20can%20customize%20three%20settings.
Getting ready
You should run this recipe on HV1 after you have installed PowerShell 7. You must also have HV2 online and configured.
How to do it...
- Installing the Hyper-V feature on
HV1,HV2$InstallSB = { Install-WindowsFeature -Name Hyper-V -IncludeManagementTools } Invoke-Command -ComputerName HV1, HV2 -ScriptBlock $InstallSB - Rebooting the servers to complete the installation
Restart-Computer -ComputerName HV2 -Force Restart-Computer -ComputerName HV1 -Force - Creating a
PSSessionwith both HV Servers (after reboot)$Sessions = New-PSSession HV1, HV2 - Creating and setting the location for the VMs and VHDs on
HV1andHV2$ConfigSB1 = { New-Item -Path C:VM -ItemType Directory -Force | Out-Null New-Item -Path C:VMVHDS -ItemType Directory -Force | Out-Null New-Item -Path C:VMVMS -ItemType Directory -force | Out-Null } Invoke-Command -ScriptBlock $ConfigSB1 -Session $Sessions | Out-Null - Setting default paths for the Hyper-V VM disk/config information
$ConfigSB2 = { $VHDS = 'C:VMVHDS' $VMS = 'C:VMVMS' Set-VMHost -ComputerName Localhost -VirtualHardDiskPath $VHDS Set-VMHost -ComputerName Localhost -VirtualMachinePath $VMS } Invoke-Command -ScriptBlock $ConfigSB2 -Session $Sessions - Setting NUMA spanning
$ConfigSB3 = { Set-VMHost -NumaSpanningEnabled $true } Invoke-Command -ScriptBlock $ConfigSB3 -Session $Sessions - Setting
EnhancedSessionMode$ConfigSB4 = { Set-VMHost -EnableEnhancedSessionMode $true } Invoke-Command -ScriptBlock $ConfigSB4 -Session $Sessions - Setting host resource metering on
HV1,HV2$ConfigSB5 = { $RMInterval = New-TimeSpan -Hours 0 -Minutes 15 Set-VMHost -ResourceMeteringSaveInterval $RMInterval } Invoke-Command -ScriptBlock $ConfigSB5 -Session $Sessions - Reviewing key VM host settings
$CheckVMHostSB = {
  Get-VMHost
}
$Properties = 'Name', 'V*Path','Numasp*', 'Ena*','RES*'
Invoke-Command -Scriptblock $CheckVMHostSB -Session $Sessions |
  Format-Table -Property $Properties
How it works...
In step 1, you install the Hyper-V feature to both HV1 and HV2. The output from this step looks like this:
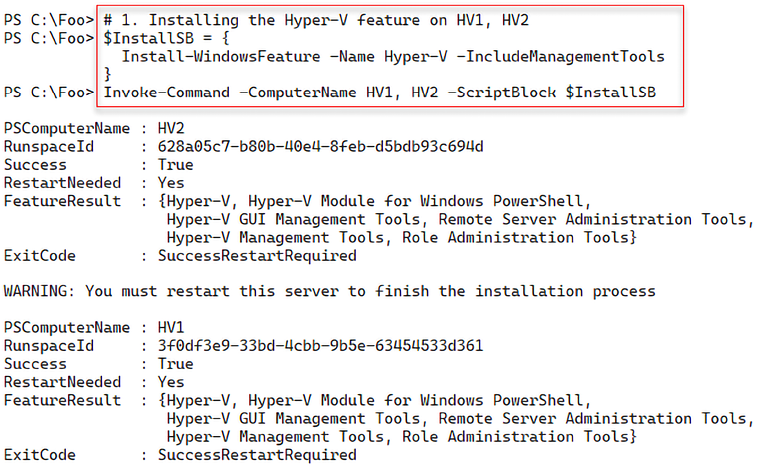
Figure 11.2: Installing Hyper-V on HV1 and HV2
To complete the installation of Hyper-V, in step 2, you reboot both HV1 and HV2. This step creates no output but does reboot both hosts.
After rebooting HV1 and HV2, you log back into the host using Reskit/Administrator. In step 3, you create two new PowerShell remoting sessions for HV1 and HV2. In step 4, you use the remoting sessions to create new folders for HV1 and HV2 to hold the Hyper-V VMs and Hyper-V virtual disks. In step 5, you configure Hyper-V on both hosts to use these new locations to store the VMs and virtual drives, and in step 6, you specify that the host should support NUMA spanning. Then, in step 7, you set EnhancedSessionMode to improve VM connections using the VMConnect.exe application. Finally, in step 8, you set the two Hyper-V hosts to use resource metering. These six steps produce no console output.
In step 9, you review the key Hyper-V host settings on your two Hyper-V hosts, with output like this:

Figure 11.3: Viewing Hyper-V settings on HV1 and HV2
There’s more…
In step 1, you install the Hyper-V feature on two servers. You can only do this successfully if your host supports the necessary virtualization capabilities and you have enabled them in your system’s BIOS. To ensure that your system supports Hyper-V, see this link: http://mikefrobbins.com/2012/09/06/use-powershell-to-check-for-processor-cpu-second-level-address-translation-slat-support/. Additionally, double-check that you have enabled virtualization in the VM host’s BIOS before running this step.
In step 2, you restart both servers. Install-WindowsFeature (used in step 1) can restart the servers automatically by using the -Restart switch. In automation terms, this would mean that the system starts rebooting before the remote script completes, which could cause Invoke-Command to error out. The recipe avoids this by not rebooting after installing the Hyper-V features. You then reboot the host in a controlled way in a later step. Once you complete the restart, your script can carry on managing the servers.
In steps 4 through step 8, you set up one aspect of the VM hosts in each step. You could have combined these steps and just called Set-VMHost once with all Hyper-V server properties specified.
See also
You can find more information on some of the Hyper-V features used in this recipe (details of which are outside the scope of this book) as follows:
|
Features |
Links for more information |
|
Connecting to a VM, including enhanced session mode | |
|
Understanding the hard disk options |
https://www.altaro.com/hyper-v/understanding-working-vhdx-files/ |
|
Hyper-V and NUMA | |
|
Configuring Hyper-V resource metering |
https://redmondmag.com/articles/2013/08/15/hyper-v-resource-metering.aspx |
Creating a Hyper-V VM
Creating a Hyper-V VM is relatively straightforward and consists of simple steps. First, you need to create the VM itself inside your Hyper-V host. Then, you create the VM’s virtual hard disk and add it to the VM. You may also wish to adjust the number of processors and memory for the VM and set the VM’s DVD drive contents. Once you have created your VM, you need to install the VM’s Operating System (OS). You have numerous options for deploying Windows (or Linux) in a Hyper-V VM.
Windows Assessment and Deployment Kit, a free product from Microsoft, contains various tools to assist in the automation of deploying Windows. These include Deployment Image Servicing and Management (DISM), Windows Imaging and Configuration Designer (Windows ICD), Windows System Image Manager (Windows SIM), User State Migration Tool (USMT), and a lot more. For more information on the tools and deploying Windows, see https://learn.microsoft.com/en-us/windows/deployment/windows-deployment-scenarios-and-tools.
Another way to install the OS into a VM is to create the VM (either with PowerShell or Hyper-V Manager) and attach the OS’s ISO image to the VM’s DVD drive. After starting the VM, you do a manual installation, and once you complete the OS installation, you can use the recipes in this book to configure the server to your needs.
In this recipe, you will create a VM, PSDirect. Initially, this has a VM name of PSDirect but a Windows-assigned hostname. In a later recipe, you will change this hostname to Wolf. In building the VM, you assign the Windows Server 2022 DVD to the VM’s DVD drive. This step ensures that Windows commences the GUI setup process when you start the VM. The result should be a fully installed OS inside the VM. The details of performing the actual installation are outside the scope of this recipe.
There are two minor issues with using the GUI to install Windows Server 2022. Firstly, the Windows setup process randomly generates a machine name. Secondly, the VM is set up as a workgroup computer and not joined to the domain. You can easily script both renaming the server and joining the domain to the VM. The scripts used to generate the VM farm used in this book are examples of deploying Windows Server 2022 in a more automated fashion using a SETUP.XML file that specifies the installation’s details. The scripts that create the VMs used are available online at GitHub. See https://github.com/doctordns/ReskitBuildScripts for the scripts and documentation on them.
Getting ready
You need to run this recipe on the VM host HV1 you created in the Installing Hyper-V inside Windows Server recipe. You also need the Windows Server ISO image. For testing purposes, this could be an evaluation version or a complete retail edition – and for this chapter, you could use an image of Windows Server 2022. To get an evaluation version of Windows Server, visit the Microsoft Evaluation Center at https://www.microsoft.com/evalcenter/evaluate-windows-server-2022.
You can also download an ISO of the latest preview copy of Windows Server and use ISO when installing the VM. See https://www.microsoft.com/en-us/software-download/windowsinsiderpreviewserver for preview build downloads, and https://techcommunity.microsoft.com/t5/windows-server-insiders/bd-p/WindowsServerInsiders for more information about Windows Insider builds. For this, you need to be a member of the Windows Insider program – membership is free. For more details on getting started with the Windows Insider program, see https://learn.microsoft.com/windows-insider/get-started.
How to do it...
- Setting up the VM name and paths for this recipe
$VMName = 'PSDirect' $VMLocation = 'C:VMVMS' $VHDlocation = 'C:VMVHDS' $VhdPath = "$VHDlocationPSDirect.Vhdx" $ISOPath = 'C:Buildsen_windows_server_x64.iso' If ( -not (Test-Path -Path $ISOPath -PathType Leaf)) { Throw "Windows Server ISO DOES NOT EXIST" } - Creating a new VM
New-VM -Name $VMName -Path $VMLocation -MemoryStartupBytes 1GB - Creating a virtual disk file for the VM
New-VHD -Path $VhdPath -SizeBytes 128GB -Dynamic | Out-Null - Adding the virtual hard disk to the VM
Add-VMHardDiskDrive -VMName $VMName -Path $VhdPath - Setting ISO image in the VM’s DVD drive
$IsoHT = @{ VMName = $VMName ControllerNumber = 1 Path = $ISOPath } Set-VMDvdDrive @IsoHT - Starting the VM
Start-VM -VMname $VMName - Viewing the VM
Get-VM -Name $VMName
How it works...
In step 1, you specify the VMs and the locations of the VMs’ hard disk and assign them to variables. You also check to ensure that the Windows Server ISO is in the correct place with the correct name. Assuming the ISO exists and you have named it correctly, this step produces no output. If the step fails to find the file, it aborts with a suitable error message. Depending on which Windows Server 2022 ISO image you get and from where, the filename may vary. You can either change the filename on the disk to match this step or change the script.
In step 2, you create a new VM using the New-VM cmdlet, with output that looks like this:

Figure 11.4: Creating a new VM
In step 3, you create a virtual disk file for the VM and add this VHDX to the PSDirect VM in step 4. In step 5, you add the ISO image to the PSDirect VM, and then, in step 6, you start the VM. These four steps generate no output.
In the final step in this recipe, you use Get-VM to view the VM details, producing output like this:

Figure 11.5: Viewing the new Hyper-V VM
There’s more...
In step 1, you specify the name of the ISO image for Windows Server 2022. Depending on which image you are using, the filename of the ISO you download may be different. Either adjust the filename to match this step or change it to match the ISO’s filename. You can find ISO images for evaluation versions at the Microsoft Evaluation Center for released versions of Windows Server. If you like living in the fast lane, consider using a Windows Insider preview build.
In step 2, you create a new VM. Although this step should succeed, you cannot run this VM yet, as you need to define at least one virtual hard disk to use with the VM. You will carry out these configuration steps in subsequent steps.
Once you start the VM, in step 6, the VM runs and completes Windows Server’s installation. To complete the installation of Windows Server, you need to use the GUI. For this chapter’s purposes, accept all the installation defaults and ensure that you set the Administrator password to Pa$$w0rd. As with all the passwords used in this book, feel free to use whatever passwords you wish – but ensure that you don’t forget them later.
Using PowerShell Direct
PowerShell Direct is a Hyper-V feature that allows you to open PowerShell remoting sessions to a VM without a network connection. This feature enables you to create a PowerShell remoting session to a VM to fix issues, such as networking misconfiguration. You can’t fix the issue without a working network connection to the VM, but until you fix the issue, you cannot make a connection to the VM. A “Catch-22” situation. With PowerShell Direct, you can create a remoting session in the VM, as seen in this recipe.
Getting ready
This recipe uses HV1, a Windows Server Datacenter host on which you have installed the Hyper-V feature. You should have also created a VM of Windows Server called PSDirect. This recipe demonstrates how to use PowerShell Direct, so it doesn’t matter which version of Windows Server you install so long as it is Windows Server 2016 or later (and you complete the installation of the OS inside the PSDirect VM).
You will run the final steps of this recipe on DC1, showing how to connect to a VM remotely from the Hyper-V host.
How to do it...
- Creating a credential object for
ReskitAdministrator$Admin = 'Administrator' $PS = 'Pa$$w0rd' $RKP = ConvertTo-SecureString -String $PS -AsPlainText -Force $Cred = [System.Management.Automation.PSCredential]::New( $Admin, $RKP) - Viewing the
PSDirectVMGet-VM -Name PSDirect - Invoking a command on the VM specifying the VM name
$CommandHT = @{ VMName = 'PSDirect' Credential = $Cred ScriptBlock = {HOSTNAME.EXE} } Invoke-Command @CommandHT - Invoking a command based on the VMID
$VMID = (Get-VM -VMName PSDirect).VMId.Guid Invoke-Command -VMid $VMID -Credential $Cred -ScriptBlock {ipconfig} - Entering a PS remoting session with the
PSDirectVMEnter-PSSession -VMName PSDirect -Credential $Cred Get-CimInstance -Class Win32_ComputerSystem ExitRun the rest of this recipe from
DC1. - Creating credential for
PSDirectonDC1$Admin = 'Administrator' $PS = 'Pa$$w0rd' $RKP = ConvertTo-SecureString -String $PS -AsPlainText -Force $Cred = [System.Management.Automation.PSCredential]::New( $Admin, $RKP) - Creating a remoting session to
HV1(Hyper-V host)$RemoteSession = New-PSSession -ComputerName HV1 -Credential $Cred - Entering an interactive session with
HV1Enter-PSSession $RemoteSession - Creating credentials for
PSDirectinsideHV1$Admin = 'Administrator' $PS = 'Pa$$w0rd' $RKP = ConvertTo-SecureString -String $PS -AsPlainText -Force $Cred = [System.Management.Automation.PSCredential]::New( $Admin, $RKP) - Entering and using the remoting session inside
PSDirect$PSDRS = New-PSSession -VMName PSDirect -Credential $Cred Enter-PSSession -Session $PSDRS HOSTNAME.EXE - Closing sessions
Exit-PSSession  # exits from session to PSDirect
Exit-PSSession  # exits from session to HV1
How it works...
In step 1, you create a PowerShell credential object. You use this object later in this recipe to enable a connection to the PSDirect VM. This step creates no output.
In step 2, you use the Get-VM cmdlet to view the PSDirect VM with output like this:

Figure 11.6: Viewing the PSDirect Hyper-V VM
In step 3, you use Invoke-Command to run the hostname command in the PSDirect VM, with output like this:
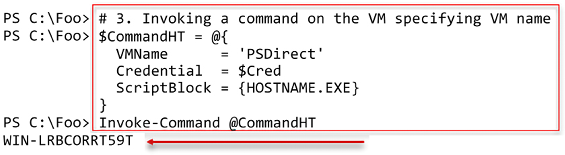
Figure 11.7: Checking the hostname of the PSDirect VM
In step 4, you invoke a command inside the PSDirect VM, but using the VM’s GUID, with output like this:

Figure 11.8: Checking the hostname of the PSDirect VM by VM GUID
In step 5, you use the Enter-PSSession command to enter an interactive session with the PSDirect VM. Inside the remoting session, you run Get-CimInstance to return details of the computer system of the VM. The output should look like this:

Figure 11.9: Entering a PS remoting session with the PSDirect VM
Now that you have created a working VM in HV1, you run the remainder of the VM setup steps remotely on DC1. In step 6, you create a credential object. In step 7, you use this credential object to create a PowerShell remoting session from DC1 to the Hyper-V host (HV1). These two steps produce no console output.
In step 8, you enter a remoting session with HV1. Inside the remoting session (effectively on HV1), you create a PSDirect-based remoting session with the PSDirect VM, with output like this:

Figure 11.10: Using the remoting session on HV1
In step 9, you create a credential object for the PSDirect VM, generating no output. Then, in step 10, you enter the remote session to the PSDirect VM using the credential object and run the HOSTNAME.EXE command. The result of this step looks like this:

Figure 11.11: Running HOSTNAME.EXE in session to PSDirect from HV1
In the final step in this recipe, step 11, you exit the interactive sessions on the PSDirect and HV1 VMs. The output from this step looks like this:

Figure 11.12: Exiting the remoting sessions
There’s more...
In step 3, you use PowerShell Direct to enter a VM session and run a command. Assuming you installed Windows in the PSDirect VM using a supported version of Windows, the setup process generates a random machine name. This machine name is different for each installation; therefore, the machine name of the host in your VM is certain to be different.
In step 4, you use the PowerShell Direct feature to run a command inside the PSDirect VM. As you can see from the output in Figure 12.8, the NIC for this VM is disconnected. Once inside this remote session, you can use the normal Windows Server troubleshooting tools to view and restore networking.
In step 6, you create and later use a credential object. Since HV1 is already domain-joined, this is not, strictly speaking, necessary.
Using Hyper-V VM groups
Hyper-Vs VM groups allow you to group VMs for automation. There are two types of VM groups you can create, VMCollectionType and ManagementCollectionType:
- A
VMCollectionTypeVM group contains VMs. - A
ManagementCollectionTypeVM group containsVMCollectionTypeVM groups.
You might have two VMCollectionType VM groups, SQLAccVMG (which contains the SQLAcct1, SQLAcct2, and SQLAcct3 VMs), and a group, SQLMfgVMG, that contains the SQLMfg1 and SQLMfg2 VMs. You could create a ManagementCollectionType VM group, VM-All, containing the two VMCollectionType VM groups.
The VMGroup feature feels incomplete. For example, no -VMGroup parameters exist on any of the Hyper-V cmdlets. Thus, you can’t easily execute any Hyper-V commands on all the members of a VM group, and having two types of groups seems confusing and possibly unhelpful. That said, this feature could be useful for large VM hosts running hundreds of VMs, if only from an organizational perspective.
Getting ready
You will run this recipe on the HV2, a Windows Server 2022 server with the added Hyper-V feature. You configured this host in the Installing Hyper-V inside Windows Server recipe.
How to do it...
- Creating five VMs on
HV2$VMLocation = 'C:VmVMs' # Created in earlier recipe # Create SQLAcct1 $VMN1 = 'SQLAcct1' New-VM -Name $VMN1 -Path "$VMLocation$VMN1" # Create SQLAcct2 $VMN2 = 'SQLAcct2' New-VM -Name $VMN2 -Path "$VMLocation$VMN2" # Create SQLAcct3 $VMN3 = 'SQLAcct3' New-VM -Name $VMN3 -Path "$VMLocation$VMN3" # Create SQLMfg1 $VMN4 = 'SQLMfg1' New-VM -Name $VMN4 -Path "$VMLocation$VMN4" # Create SQLMfg2 $VMN5 = 'SQLMfg2' New-VM -Name $VMN5 -Path "$VMLocation$VMN5" - Viewing SQL VMs
Get-VM -Name SQL* - Creating Hyper-V VM groups
$VHGHT1 = @{ Name = 'SQLAccVMG' GroupType = 'VMCollectionType' } $VMGroupACC = New-VMGroup @VHGHT1 $VHGHT2 = @{ Name = 'SQLMfgVMG' GroupType = 'VMCollectionType' } $VMGroupMFG = New-VMGroup @VHGHT2 - Displaying the VM groups on
HV2Get-VMGroup | Format-Table -Property Name, *Members, ComputerName - Creating arrays of group member VM names
$AccountingVMs = 'SQLAcct1', 'SQLAcct2','SQLAcct3' $ManfacturingVMs = 'SQLMfg1', 'SQLMfg2' - Adding members to the
AccountingSQL VM groupForeach ($Server in $AccountingVMs) { $VM = Get-VM -Name $Server Add-VMGroupMember -Name SQLAccVMG -VM $VM } - Adding members to the
ManufacturingSQL VM groupForeach ($Server in $ManfacturingVMs) { $VM = Get-VM -Name $Server Add-VMGroupMember -Name SQLMfgVMG -VM $VM } - Viewing VM groups on
HV2Get-VMGroup | Format-Table -Property Name, *Members, ComputerName - Creating a management collection VM group
$VMGroupHT = @{ Name = 'VMMGSQL' GroupType = 'ManagementCollectionType' } $VMManufacturingSQL = New-VMGroup @VMGroupHT - Adding the two
VMCollectionTypegroups to theVMManagementgroupAdd-VMGroupMember -Name VMMGSQL -VMGroupMember $VMGroupACC, $VMGroupMFG - Setting
FormatEnumerationLimitto99$FormatEnumerationLimit = 99 - Viewing VM groups by type
Get-VMGroup | Sort-Object -Property GroupType | Format-Table -Property Name, GroupType, VMGroupMembers, VMMembers - Stopping all the SQL VMs
Foreach ($VM in ((Get-VMGroup VMMGSQL).VMGroupMembers.vmmembers)) { Stop-VM -Name $VM.Name -WarningAction SilentlyContinue } - Setting CPU count in all SQL VMs to
4Foreach ($VM in ((Get-VMGroup VMMGSQL).VMGroupMembers.VMMembers)) { Set-VMProcessor -VMName $VM.name -Count 4 } - Setting
AccountingSQL VMs to have6processorsForeach ($VM in ((Get-VMGroup SQLAccVMG).VMMembers)) { Set-VMProcessor -VMName $VM.name -Count 6 } - Checking processor counts for all VMs sorted by CPU count
$VMS = (Get-VMGroup -Name VMMGSQL).VMGroupMembers.VMMembers Get-VMProcessor -VMName $VMS.Name | Sort-Object -Property Count -Descending | Format-Table -Property VMName, Count - Remove VMs from the VM groups
$VMs = (Get-VMGroup -Name SQLAccVMG).VMMEMBERS Foreach ($VM in $VMS) { $X = Get-VM -vmname $VM.name Remove-VMGroupMember -Name SQLAccVMG -VM $x } $VMs = (Get-VMGroup -Name SQLMFGVMG).VMMEMBERS Foreach ($VM in $VMS) { $X = Get-VM -vmname $VM.name Remove-VMGroupMember -Name SQLmfgvMG -VM $x } - Removing VM groups from
VMManagementGroups$VMGS = (Get-VMGroup -Name VMMGSQL).VMMembers Foreach ($VMG in $VMGS) { $X = Get-VMGroup -vmname $VMG.name Remove-VMGroupMember -Name VMMGSQL -VMGroupName $x } - Removing all the VM groups
Remove-VMGroup -Name SQLACCVMG -Force
Remove-VMGroup -Name SQLMFGVMG -Force
Remove-VMGroup -Name VMMGSQL   -Force
How it works...
In step 1, you create several VMs using the New-VM cmdlet, with the output of this step looking like this:

Figure 11.13: Creating new SQL VMs on HV2
In step 2, you use the Get-VM cmdlet to look at the five VMs you just created, with output like this:

Figure 11.14: Viewing the VMs on HV2
In step 3, you create several Hyper-V VM CollectionType VM groups, generating no output. In step 4, you examine the existing VM groups on HV2 with console output like this:
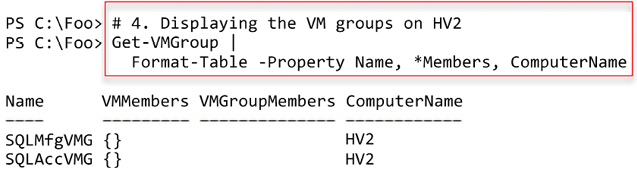
Figure 11.15: Viewing VM groups on HV2
To simplify the creation of the VM collection groups, in step 5, you create arrays of the VM names. In step 6, you add VMs to the SQLAccVMG VM group, while in step 7, you add VMs to the SQLMfgVMG VM group. These three steps produce no console output.
Then, in step 8, you view the VM groups again, with output like this:

Figure 11.16: Viewing the VM groups on HV2
In step 9, you create a VM management collection group, and in step 10, you populate the VM management collection group. To simplify the output, in step 11, you set the $FormatEnumerationLimit to 99. These three steps create no console output.
In step 12, you view all the fully populated VM groups, sorted by VM group type, with output like this:

Figure 11.17: Viewing the fully populated VM groups on HV2
In step 13, you use the VM groups you have created to stop all the SQL VMs. In step 14, you set the VMs in the VMMGSQL VM management collection group to have four virtual processors, and in step 15, you set the VMs in the SQLAccVMG VM collection group to each have six virtual processors. These three steps produce no output to the console.
In step 16, you review the virtual processors assigned to each SQL VM like this:

Figure 11.18: Viewing the processor counts for the VMs on HV2
In step 17, you remove all the VMs from the VM collection groups, and in step 18, you remove all the members from the VM management groups. Finally, in step 19, you remove all the VM groups. These three steps produce no output.
There’s more...
In step 11, you set a value for the $FormatEnumerationLimit automatic variable. This variable controls how many repeating groups the Format-* cmdlets display. By default, PowerShell initializes this variable with a value of 4. Using this default, in step 11, you will see at most four members of each of the VM groups, with PowerShell displaying “…" to indicate that you have more than four members. If you set $FormatEnumerationLImit to 0 (zero), PowerShell displays all the members, irrespective of the number. With this step, PowerShell can display up to 99 VM members for each VM group. You may wish to set this preference variable in your profile or inside specific scripts in production.
In this recipe, you used five supposed SQL Server VMs to illustrate the use of VM groups. There are no actual usable VMs (each of the five VMs you create does not have an OS or SQL Server loaded). You can, should you wish to, add steps to install Windows Server and SQL Server on these VMs.
VM groups provide few benefits for most Hyper-V customers, and as mentioned, VM groups feel half-implemented. In production, you could easily create string variables holding VM names and use these instead of VM groups.
Configuring the VM hardware
Configuring hardware in your VM is like configuring a physical computer without needing a screwdriver. With a physical computer, you can adjust the CPUs and BIOS settings and change physical RAM, network interfaces, disk interfaces, disk devices, DVD drives (with/without a loaded DVD), and more. You can find each of these virtual components within a Hyper-V VM. As you will see in the recipe, the PowerShell cmdlets make it simple to configure the virtual hardware available to any Hyper-V VM.
In this recipe, you will adjust the VM’s BIOS, CPU count, and memory and then add a SCSI controller. With the controller in place, you will create a new virtual disk and assign it to the SCSI controller. Then, you will view the results.
Like most physical servers, you cannot change all of these virtual hardware components while your virtual server is up and running. You will run this recipe from HV1 and turn the PSDirect VM off before configuring the virtual hardware.
This recipe does not cover the VM’s virtual NIC. By default, VMs (such as those created in the Creating a Hyper-V VM recipe) contain a single virtual NIC. You can add additional NICs to any VM should you wish to. You will configure VM networking in the Configuring VM Networking recipe later in this chapter.
Getting ready
This recipe uses HV1, a Windows Server 2022 host on which you have installed the Hyper-V feature. You should also have created a Windows Server VM called PSDirect.
How to do it...
- Turning off the
PSDirectVMStop-VM -VMName PSDirect Get-VM -VMName PSDirect - Setting the startup order in the VM’s BIOS
$Order = 'IDE','CD','LegacyNetworkAdapter','Floppy' Set-VMBios -VmName PSDirect -StartupOrder $Order Get-VMBios PSDirect - Setting and viewing CPU count for
PSDirectSet-VMProcessor -VMName PSDirect -Count 2 Get-VMProcessor -VMName PSDirect | Format-Table VMName, Count - Setting and viewing
PSDirectmemory$VMConfigurationHT = [ordered] @{ VMName = 'PSDirect' DynamicMemoryEnabled = $true MinimumBytes = 512MB StartupBytes = 1GB MaximumBytes = 2GB } Set-VMMemory @VMConfigurationHT Get-VMMemory -VMName PSDirect - Adding and viewing a
ScsiControllerin thePSDirectVMAdd-VMScsiController -VMName PSDirect Get-VMScsiController -VMName PSDirect - Starting the
PSDirectVMStart-VM -VMName PSDirect Wait-VM -VMName PSDirect -For IPAddress - Creating a new
VHDXfile for thePSDirectVM$VHDPath = 'C:VMVHDsPSDirect-D.VHDX' New-VHD -Path $VHDPath -SizeBytes 8GB -Dynamic - Getting controller number of the newly added
ScsiController$VM = Get-VM -VMName PSDirect $SCSIController = Get-VMScsiController -VM $VM | Select-Object -Last 1 - Adding the VHD to the
SCSIController$VMNewDiskHT = @{ VMName = 'PSDirect' ControllerType = $SCSIController.ControllerNumber ControllerNumber = 0 ControllerLocation = 0 Path = $VHDPath } Add-VMHardDiskDrive @VMNewDiskHT - Viewing drives in the
PSDirectVMGet-VMScsiController -VMName PSDirect | Select-Object -ExpandProperty Drives
How it works...
In step 1, you turn off the PSDirect VM and check the status of the VM, with output like this:

Figure 11.19: Stopping the PSDirect VM
In step 2, you set the startup order for the VM’s BIOS. Then, you view the BIOS details. The output of this step is:

Figure 11.20: Updating and viewing the VM’s BIOS
In step 3, you adjust and then view the number of virtual processors for the PSDirect VM, with an output like this:
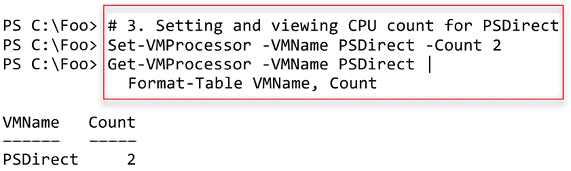
Figure 11.21: Updating and viewing the VM’s BIOS
In step 4, you set the virtual memory for the PSDirect VM and then view the memory settings with the following output:

Figure 11.22: Changing and viewing the VM memory
In step 5, you add a second SCSI controller to the PSDirect VM. You then view the SCSI controllers inside the PSDirect VM. You should see output like this:

Figure 11.23: Adding and viewing virtual disk controllers
Now that you have adjusted the virtual hardware for the PSDirect VM, in step 6, you restart the VM and wait for the VM to come up. This step generates no output.
In step 7, you create a new virtual disk file for the PSDirect VM, with output like this:
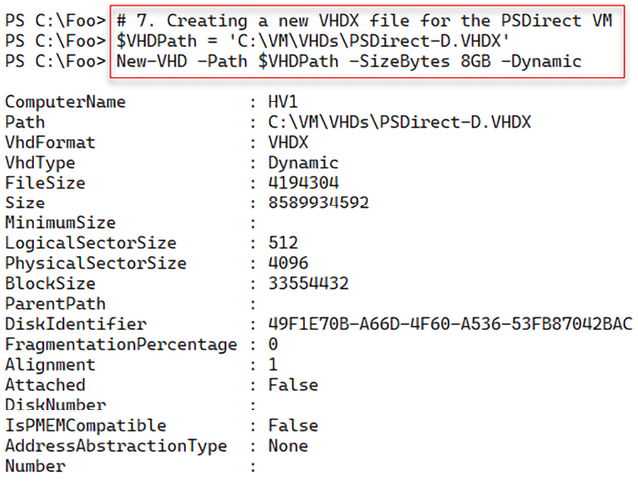
Figure 11.24: Creating a new virtual disk drive
In step 8, you get the SCSI controllers in the PSDirect VM and the controller you added in step 5. Then, in step 9, you add the newly created virtual disk drive to the recently added SCSI controller. These two steps produce no console output.
In step 10, you attach the disk drives to the SCSI controllers in the PSDirect VM, with an output like this:

Figure 11.25: Viewing the SCSI disk drives in the PSDirect VM
There’s more...
With Hyper-V, you can only update some VM hardware configuration settings when you have turned off the VM. In step 1, you switch the VM off to enable you to make virtual BIOS settings. Once you have completed these BIOS (and possibly other) changes, you can restart the VM.
In step 2, you set the startup order for the VM and view the settings. In production, you may have scripts like this that set VM settings to a preferred corporate standard, irrespective of the default values.
In step 3, you set the number of processors in the nested VM to 2. You should ensure that the Hyper-V host has at least two virtual CPUs if not more.
Some settings, such as the SCSI disk controllers and disk drives, can be added and removed from a running VM. In step 9, you add a newly created virtual disk drive to the running PSDirect VM.
In step 10, you view the SCSI disks in the PSDirect VM. This VM has an IDE-based boot disk. Hence, you see a single disk in the output of this step.
Configuring VM networking
In the Creating a Hyper-V VM recipe, you created a VM, PSDirect. This VM has, by default, a single network card that Hyper-V sets to acquire IP address details from DHCP. In this recipe, you create a new switch, assign the VM’s NIC to a switch, and configure the IP address details for the virtual network adapter.
Getting ready
You will run this recipe on HV1, which uses the PSDirect VM you created in the Creating a Hyper-V VM recipe. This recipe also makes use of a DHCP server running on DC1. In Chapter 5, Managing Networking, you set the DHCP service up in the Installing DHCP recipe. Then, you configured the DHCP server in the Configuring DHCP scopes and options recipe.
This chapter uses the PSDirect VM you created earlier. When you build this machine using the normal setup routine, Windows assigns a random machine name, which you saw in a previous recipe (Using PowerShell Direct). In this recipe, you will also change the name of the host inside to Wolf.
In this recipe, you will set the PSDirect VM’s networking card to enable MAC address spoofing. This step lets the VM see the network and get an IP address from the DHCP server on DC1. If you are running HV1 as a VM, you must also enable MAC spoofing on the NIC(s) in this VM on the VM host of HV1.
How to do it...
- Setting the
PSDirectVM’s NICGet-VM PSDirect | Set-VMNetworkAdapter -MacAddressSpoofing On - Getting NIC details and any IP addresses from the
PSDirectVMGet-VMNetworkAdapter -VMName PSDirect - Creating a credentials then getting VM networking details
$Administrator = 'localhostAdministrator' $Password = 'Pa$$w0rd' $RKPassword = ConvertTo-SecureString -String $Password -AsPlainText -Force $RKCred = [System.Management.Automation.PSCredential]::new( $Administrator, $RKPassword) $VMHT = @{ VMName = 'PSDirect' ScriptBlock = {ipconfig} Credential = $RKCred } Invoke-Command @VMHT - Creating a new virtual switch on
HV1$VirtSwitchHT = @{ Name = 'Internal' NetAdapterName = 'Ethernet' Notes = 'Created on HV1' } New-VMSwitch @VirtSwitchHT - Connecting the
PSDirectVM’s NIC to the internal switchConnect-VMNetworkAdapter -VMName PSDirect -SwitchName Internal - Viewing VM networking information
Get-VMNetworkAdapter -VMName PSDirect - Observing the IP address in the
PSDirectVM$CommandHT = @{ VMName = 'PSDirect' ScriptBlock = {ipconfig} Credential = $RKCred } Invoke-Command @CommandHT - Viewing the hostname on
PSDirect$CommandHT.ScriptBlock = {hostname} Invoke-Command @CommandHT - Changing the name of the host in the
PSDirectVM$CommandHT.ScriptBlock = {Rename-Computer -NewName Wolf -Force} Invoke-Command @CommandHT - Rebooting and wait for the restarted
PSDirectVMRestart-VM -VMName PSDirect -Wait -For IPAddress -Force - Getting hostname of the
PSDirectVM$CommandHT.ScriptBlock = {HOSTNAME} Invoke-Command @CommandHT
How it works...
In step 1, you set the PSDirect VM’s NIC to enable MAC address spoofing. There is no output from this step.
In step 2, you get the NIC details for the NIC assigned to the PSDirect VM, with output like this:

Figure 11.26: Viewing the NIC details for the PSDirect VM
In step 3, you create a credential object for the PSDirect VM. Then, you use the credentials to run the ipconfig.exe command from inside the VM, with output like this:
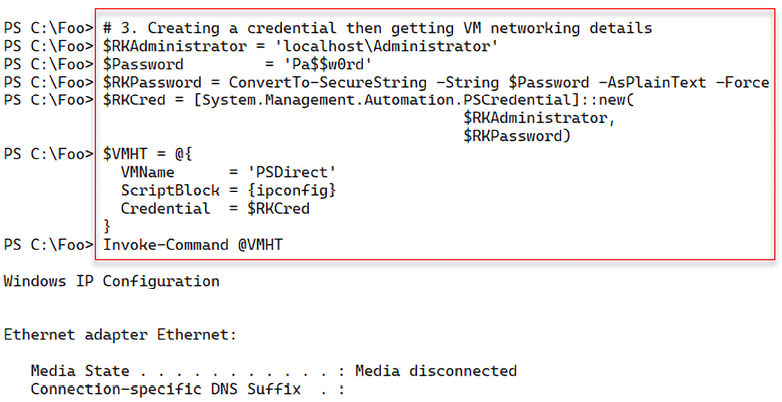
Figure 11.27: Viewing the IP configuration inside the PSDirect VM
In step 4, you create a new Hyper-V VM switch inside the HV1 VM host, which produces the following output:
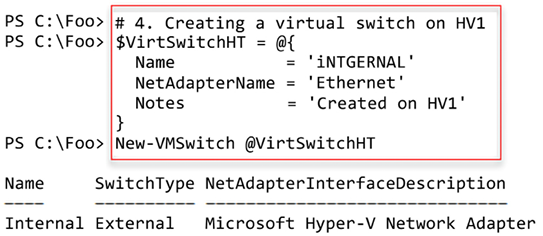
Figure 11.28: Creating a new virtual switch inside HV1
In step 5, you connect the NIC in the PSDirect VM to the VM switch, creating no output. In step 6, you can review the networking information for the PSDirect VM with output like this:

Figure 11.29: Viewing the PSDirect NIC settings
In step 7, you execute a script block inside the PSDirect VM to return the VM’s network details, which produces output that looks like this:

Figure 11.30: Observing the PSDirect network settings
In step 8, you view the existing hostname of the PSDirect VM with output that looks like this:

Figure 11.31: Viewing the hostname of the PSDirect VM
In step 9, you use the Rename-Computer cmdlet, running inside the PSDirect VM. This step changes the hostname of the VM to Wolf and produces the following output:

Figure 11.32: Changing the VM’s hostname
In step 10, you reboot the PSDirect VM, generating no console output. After the VM has restarted, in step 11, you run the HOSTNAME command inside the VM, with console output like this:

Figure 11.33: Viewing the updated hostname in the PSDirect VM
There’s more...
In step 1, you set the PSDirect VM’s NIC to enable MAC address spoofing. You can read more about MAC address spoofing with Hyper-V at https://charbelnemnom.com/how-to-set-dynamic-mac-address-on-a-hyper-v-vm-with-powershell/.
In step 5, you connect the PSDirect VM’s NIC to the virtual switch you created on HV1. Since the PSDirect VM’s NIC is (by default) set to get IP addresses via DHCP, as soon as you connect the virtual NIC to the switch, the VM should acquire the IP address configuration from the DC1 host, which is running DHCP. You can see the DHCP-acquired IP configuration details in the output from step 6.
Implementing nested virtualization
Nested virtualization is a feature that enables a Hyper-V VM to host VMs that also have virtualization enabled. You could, for example, take a Hyper-V host (say, HV1) and, on that host, run a VM (say, PSDirect). With nested virtualization, you could enable your PSDirect VM to host VMs. You could then create a nested VM inside the PSDirect VM called NestedVM.
Nested VMs have many uses. First, nested VMs hosted in one VM are provided hardware isolation from nested VMs run in other VMs. In this case, nested virtualization offers additional security for VMs.
Nested virtualization is also helpful for testing and education or training. You can give students a single VM (on a large blade server, for example). Nested virtualization enables them to create additional VMs for the course lab work. And most IT pros find it cool! You can, for example, run all the recipes in this chapter using nested virtualization.
Enabling nested Hyper-V is very simple. First, you must update the virtual CPU in the VM that you want to support nesting. Therefore, you will adjust the virtual CPU in the PSDirect VM to expose the virtualization extensions in this recipe. Changing the BIOS to do this must be done after you turn off the VM. After you restart the VM, you will install the Hyper-V feature and create the NestedVM nested VM. This recipe does not show the details of configuring the NestedVM VM. To expose the virtualization extensions for any Hyper-V VM, you use the Set-VMProcessor -ExposeVirtualizationExtensions $True, and specify a VM name.
Getting ready
This recipe uses the HV1 Hyper-V host, with an existing Hyper-V VM, PSDirect, available. The recipe assumes that you have set up PSDirect as discussed in the Creating a Hyper-V VM recipe earlier in this chapter.
How to do it...
- Stopping the
PSDirectVMStop-VM -VMName PSDirect - Setting the VM’s processor to support virtualization
$VMHT = @{ VMName = 'PSDirect' ExposeVirtualizationExtensions = $true } Set-VMProcessor @VMHT Get-VMProcessor -VMName PSDirect | Format-Table -Property Name, Count, ExposeVirtualizationExtensions - Starting the
PSDirectVMStart-VM -VMName PSDirect Wait-VM -VMName PSDirect -For Heartbeat Get-VM -VMName PSDirect - Creating credentials for
PSDirect$User = 'WolfAdministrator' $PasswordHT = @{ String = 'Pa$$w0rd' AsPlainText = $true Force = $true } $SecurePW = ConvertTo-SecureString @PasswordHT $Cred = [System.Management.Automation.PSCredential]::new( $User, $SecurePW) - Creating a script block for remote execution
$ScriptBlock = { Install-WindowsFeature -Name Hyper-V -IncludeManagementTools } - Creating a remoting session to
PSDirect$Session = New-PSSession -VMName PSDirect -Credential $Cred - Installing Hyper-V inside
PSDirect$InstallHT = @{ Session = $Session ScriptBlock = $ScriptBlock } Invoke-Command @InstallHT - Restarting the VM to finish adding Hyper-V to
PSDirectStop-VM -VMName PSDirect Start-VM -VMName PSDirect Wait-VM -VMName PSDirect -For IPAddress Get-VM -VMName PSDirect - Creating a nested VM inside the
PSDirectVM$ScriptBlock2 = { $VMName = 'NestedVM' New-VM -Name $VMName -MemoryStartupBytes 1GB | Out-Null Get-VM } $InstallHT2 = @{ VMName = 'PSDirect' ScriptBlock = $ScriptBlock2 } Invoke-Command @InstallHT2 -Credential $Cred
How it works...
In step 1, you ensure that the PSDirect VM has stopped. This step creates no console output. In step 2, you configure the VM’s virtual processor to support virtualization. Then, you review the VM’s processor settings, which look like this:

Figure 11.34: Viewing the virtual processor inside PSDirect
In step 3, you start the PSDirect VM and then use Get-VM to view details about the VM, which look like this:

Figure 11.35: Starting and viewing PSDirect
In step 4, you create a PowerShell credential object for the PSDirect VM. In step 5, you create a script block that installs the Hyper-V feature. Then, in step 6, you create a PowerShell remoting session with the PSDirect VM. These three steps produce no output to the console.
In step 7, you use the remoting session to install the Hyper-V feature inside the PSDirect VM, producing output like this:

Figure 11.36: Installing Hyper-V inside the PSDirect VM
As you can see from the output, after installing the Hyper-V feature inside PSDirect, you need to reboot the VM to complete the installation process. In step 8, you restart PSDirect, wait for it to start, and finally view the VM details with output like this:

Figure 11.37: Restarting the PSDirect VM
In the final step in this recipe, step 9, you create a new nested VM, NestedVM, inside the PSDirect VM, which produces console output like this:

Figure 11.38: Creating a nested VM inside PSDirect
There’s more...
In step 7, you install the Hyper-V feature in the nested VM (NestedVM) inside the PSDirect VM. The installation of Hyper-V inside the PSDirect VM is successful, as you can see in this step’s output. Had the PSDirect VM not supported virtualization, the Install-WindowsFeature cmdlet would have thrown an error. Likewise, had you not installed Hyper-V in PSDirect, step 9 would have failed without creating the VM. If you wish to, you can adjust the Creating a Hyper-V VM recipe steps to install and configure an OS in the NestedVM.
Managing the VM state
Hyper-V allows you to start, stop, and pause a Hyper-V VM. You can also save the VM and its state and then restore the VM. You use the Hyper-V cmdlets to manage your VMs locally (on the Hyper-V host in a remote desktop (RDP) or PowerShell remoting session) or use RSAT tools to manage the state of VMs on remote Hyper-V hosts.
You can start and stop VMs either directly or via the task scheduler. You might want to start up a few VMs every working morning and stop them every evening. If you have provisioned your Hyper-V host with spinning disks, starting multiple VMs at once stresses the storage subsystem, especially if you are using any form of RAID on the disk drives you use to hold your virtual disks. Depending on your hardware, you can sometimes hear the IO Blender effect starting up a small VM farm. Even with solid-state disks, starting several VMs simultaneously puts a considerable load on the Windows storage system. In such cases, you might pause a VM and let others start faster.
Saving a VM can help avoid a long startup process. If you have created multiple VMs to test the recipes in this book, you can save VMs and restart them as you move through the chapters.
Getting ready
You will run this recipe on the HV1 host once you have created the PSDirect VM. You created that VM in the Creating a Hyper-V VM recipe.
How to do it...
- Getting the VM’s state to check if it is off
Stop-VM -Name PSDirect -WarningAction SilentlyContinue Get-VM -Name PSDirect - Starting the VM
Start-VM -VMName PSDirect Wait-VM -VMName PSDirect -For IPAddress Get-VM -VMName PSDirect - Suspending and viewing the
PSDirectVMSuspend-VM -VMName PSDirect Get-VM -VMName PSDirect - Resuming the
PSDirectVMResume-VM -VMName PSDirect Get-VM -VMName PSDirect - Saving the VM
Save-VM -VMName PSDirect Get-VM -VMName PSDirect - Resuming the saved VM and viewing the status
Start-VM -VMName PSDirect Get-VM -VMName PSDirect - Restarting the
PSDirectVMRestart-VM -VMName PSDirect -Force Get-VM -VMName PSDirect - Waiting for the
PSDirectVM to get an IP addressWait-VM -VMName PSDirect -For IPaddress Get-VM -VMName PSDirect - Performing a hard power-off on the
PSDirectVMStop-VM -VMName PSDirect -TurnOff Get-VM -VMname PSDirect
How it works...
In step 1, you stop the PSDirect VM and check its status. The output looks like this:

Figure 11.39: Stopping the PSDirect VM
In step 2, you use the Start-VM cmdlet to start the PSDirect VM and then use Wait-VM to wait for the VM to start up and get an IP address. The output from this step looks like this:

Figure 11.40: Starting the PSDirect VM
In step 3, you use Suspend-VM to pause the PSDirect VM and observe its status with the following output:

Figure 11.41: Suspending the PSDirect VM
Having paused the PSDirect VM, in step 4, you use the Resume-VM cmdlet to unpause the VM with the following output:

Figure 11.42: Resuming the PSDirect VM
In step 5, you save the PSDirect VM, with output like this:

Figure 11.43: Saving the PSDirect VM
You can resume a saved VM by using the Start-VM command, as you can see in step 6, which creates output like this:

Figure 11.44: Resuming the PSDirect VM (after you have saved it)
Step 7 demonstrates how to use the Restart-VM cmdlet to restart the PSDirect VM. The output from this step looks like this:

Figure 11.45: Restarting the PSDirect VM (after you have saved it)
In the previous step, you restart the VM, which can take some time, depending on your VM host and VM size. In step 8, you use the Wait-VM cmdlet to wait for the VM to restart and then use the Get-VM cmdlet to observe the status of the PSDirect VM like this:

Figure 11.46: Waiting for the PSDirect VM to restart
In the final step in this recipe, step 9, you perform a hard power-off of the PSDirect VM, with an output like this:

Figure 11.47: Turning off the PSDirect VM
There’s more...
Managing the state of VMs is straightforward with the cmdlets in the Hyper-V module. You can start and stop a VM just like with physical machines. The Hyper-V cmdlets allow you to start a VM on a Hyper-V host and wait until it is far enough through the startup process to enable you to interact with the VM. This is an important feature of automation.
In some scenarios, saving a VM is very useful. If you have VMs that you use infrequently, you can save them rather than shutting them down, thereby improving the VM startup time. You can also save all the VMs when you need to reboot the VM host.
One thing to be aware of – if your VM host updates itself via Windows Update or WSUS, you may find from time to time that Windows cannot restart a saved VM. You can remove the saved state and restart.
Managing a VM and VM storage movement
Hyper-V enables you to move a VM to a new VM host and move a VM’s storage to a new location. Moving a VM and moving a VM’s storage are two important features you can use to manage your Hyper-V hosts.
Hyper-V’s Live Migration feature allows you to move a Hyper-V VM to a different VM host without any downtime. You can also move a VM’s storage (any VHD/VHDX associated with the VM) to a different location. You can combine these and move a VM supported by local storage to another Hyper-V host, moving both the VM and the underlying storage. Storage migration works best when the VM is held on shared storage (via a fiber channel SAN, iSCSI, or SMB).
In this recipe, first, you move the storage for the PSDirect VM. You created this VM in the Creating a Hyper-V VM recipe and stored the VM configuration and the VM’s VHD on the hard disk. To move the storage, you will create a new SMB share and then move the VM’s storage to the new SMB share.
In the second part of this recipe, you will perform the live migration of the PSDirect VM from HV1 to HV2. This VM movement is known as live migration because you are migrating a live VM that stays up and running during migration.
Getting ready
In this recipe, you will use the HV1 and HV2 systems (Windows 2022 Server with Hyper-V loaded) as set up in the Installing Hyper-V inside Windows Server recipe, and the PSDirect VM created in the Creating a Hyper-V VM recipe.
In the first part of this recipe, you will move the storage for the PSDirect VM. You created this VM in the Creating a Hyper-V VM recipe. You should ensure that this VM is up and running.
You will run the first part of this recipe on HV1 to move the PSDirect VM from HV1 to HV2. Once you have moved the VM to HV2, you will run the final part of this recipe on HV2 to move the VM back to HV1. If you attempt to run the last part of this recipe remotely, for example, for a client machine or from HV1 (suitably wrapped up in a script block you run with Invoke-Command), you will see a Kerberos error due to the Kerberos Double Hop problem. You can deploy Windows Credential Security System Provider (CredSSP) to overcome that issue.
How to do it...
- Viewing the
PSDirectVM onHV1and verifying that it is turned on and runningStart-VM -VMName PSDirect Get-VM -Name PSDirect -Computer HV1 - Getting the VM configuration location
(Get-VM -Name PSDirect).ConfigurationLocation - Getting the virtual hard disk locations
Get-VMHardDiskDrive -VMName PSDirect | Format-Table -Property VMName, ControllerType, Path - Moving the VMs to the
C:PSDirectNewfolder$MoveStorageHT = @{ Name = 'PSDirect' DestinationStoragePath = 'C:PSDirectNew' } Move-VMStorage @MoveStorageHT - Viewing the configuration details after moving the VM’s storage
(Get-VM -Name PSDirect).ConfigurationLocation Get-VMHardDiskDrive -VMName PSDirect | Format-Table -Property VMName, ControllerType, Path - Getting the VM details for the VMs from
HV2Get-VM -ComputerName HV2 - Creating
Internalvirtual switch onHV2$ScriptBlock = { $NSHT = @{ Name = 'Internal' NetAdapterName = 'Ethernet' ALLOWmAnagementOS = $true } New-VMSwitch @NSHT } Invoke-Command -ScriptBlock $ScriptBlock -ComputerName HV2 - Enabling VM migration for both
HV1andHV2Enable-VMMigration -ComputerName HV1, HV2 - Configuring VM migration on both hosts
$MigrationHT = @{ UseAnyNetworkForMigration = $true ComputerName = 'HV1', 'HV2' VirtualMachineMigrationAuthenticationType = 'Kerberos' VirtualMachineMigrationPerformanceOption = 'Compression' } Set-VMHost @MigrationHT - Moving the
PSDirectVM toHV2$Start = Get-Date $VMMoveHT = @{ Name = 'PSDirect' ComputerName = 'HV1' DestinationHost = 'HV2' IncludeStorage = $true DestinationStoragePath = 'C:PSDirect' # on HV2 } Move-VM @VMMoveHT $Finish = Get-Date - Displaying the time taken to migrate
$OS = "Migration took: [{0:n2}] minutes" ($OS -f ($($Finish-$Start).TotalMinutes)) - Checking the VMs on
HV1Get-VM -ComputerName HV1 - Checking the VMs on
HV2Get-VM -ComputerName HV2 - Looking at the details of the
PSDirectVM onHV2((Get-VM -Name PSDirect -Computer HV2).ConfigurationLocation) Get-VMHardDiskDrive -VMName PSDirect -Computer HV2 | Format-Table -Property VMName, Path - Moving the
PSDirectVM back toHV1$Start2 = Get-Date $VMHT2 = @{ Name = 'PSDirect' ComputerName = 'HV2' DestinationHost = 'HV1' IncludeStorage = $true DestinationStoragePath = 'C:vmvhdsPSDirect' # on HV1 } Move-VM @VMHT2 $Finish2 = Get-Date - Displaying the time taken to migrate back to
HV1$OS = "Migration back to HV1 took: [{0:n2}] minutes" ($OS -f ($($fINISH2 - $Start2).TotalMinutes)) - Check VMs on
HV1Get-VM -Computer HV1
How it works...
In step 1, you check the status of the PSDirect VM to confirm that it is up and running. The output should look like this:

Figure 11.48: Checking the status of the PSDirect VM
In step 2, you determine the location that Hyper-V is using to store the VM configuration for the PSDirect VM, with console output like this:

Figure 11.49: Checking the PSDirect VM configuration location
In step 3, you view the locations that Hyper-V is using to store the virtual hard disks for the PSDirect VM, with output like this:

Figure 11.50: Viewing PSDirect’s virtual hard disks
In step 4, you move the storage of the running PSDirect VM. This step generates no output. After moving the VM’s storage, in step 5, you review the VM configuration location and the details of the hard disks for the PSDirect VM. The output of this step looks like this:

Figure 11.51: Viewing PSDirect’s virtual hard disks after moving the storage
In step 6, you check to see which VMs remain available on HV2, with output like this:
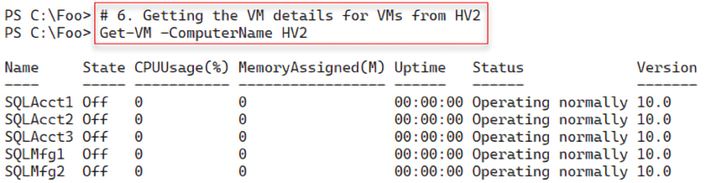
Figure 11.52: Viewing the VMs on HV2
In step 7, you create a new VM networking switch on HV2 to enable VM networking. The output you see is as follows:

Figure 11.53: Creating a new VM switch on HV2
In step 8, you enable VM migration on both HV1 and HV2. In step 9, you configure Hyper-V VM migration on both servers. Next, in step 10, you perform a live migration of the PSDirect VM to HV2. These three steps produce no output.
In step 11, you display how long it took Hyper-V to migrate the PSDirect VM, with output like this:

Figure 11.54: Displaying the VM migration time
In step 12, you use the Get-VM cmdlet to view the VMs on HV1. Since you migrated the PSDirect VM to HV2, there are no VMs on HV2. Thus, there is no console output from this step. Then, in step 13, you view the VMs on HV2, which produces output like this:

Figure 11.55: Displaying VMs on HV2
In step 14, you examine the details of where Hyper-V has stored the VM configuration and virtual hard disks for the PSDirect VM. The output of this step looks like this:

Figure 11.56: Displaying the hard disks for the PSDirect VM
In step 15 (which you run from HV2), you migrate the PSDirect VM back to HV1, producing no console output. In the final step in this recipe, step 16, you view how long it took Hyper-V to migrate the VM back to HV1, with output like this:

Figure 11.57: Viewing the PSDirect migration time
There’s more...
In step 1, you check the status of the PSDirect VM to ensure it is running. If the output you see shows that the VM is not running, you should use the Start-VM cmdlet to start it before proceeding with this recipe.
In step 6, you used Get-VM to view the VMs defined on HV2. The output shows the VMs created in the earlier recipe, Using Hyper-V VM groups.
In step 13, you view the VMs on HV2, which now shows the PSDirect VM. Note that the VM has continued running since you performed a live migration. Consider opening a remote desktop connection using mstsc.exe, or use the VMConnect feature of the Hyper-V management console and open a session to the PSDirect VM. With either method, you can use and view the VM as you carry out the migration. When the migration is complete, you may need to log in to your VM session again.
Managing VM replication
VM replication is a disaster recovery feature within Hyper-V. Hyper-V creates a VM replica on a remote Hyper-V server and keeps that replica up to date as the original VM changes. You can make the replica active should the VM’s host fail for some reason. The VM on the remote host is not active during the normal operation of the original VM.
With Hyper-V replication, the source VM host bundles up the changes in a running VM’s VHD file(s) and regularly sends them to the replica server. The replica server then applies those changes to the dormant replica.
Once you have established a VM replica, you can test the replica to ensure that it can start should you need it. Also, you can fail over to the replica, bringing the replicated VM up based on the most recently replicated data. If the source VM host becomes inoperable before it can replicate changes on the source VM, there is a risk of the replication process losing those changes.
In this recipe, you will create and use a replica of the PSDirect VM, which you have used in previous recipes in this chapter.
Getting ready
This recipe creates a Hyper-V VM replica of the PSDirect VM running in HV1 to HV2. You created this VM in the Creating a Hyper-V VM recipe. You also use this VM in the Managing VM and storage movement recipe.
You should have loaded the Hyper-V management tools on DC1. If you have not already done so, do the following on DC1:
Install-WindowsFeature -Name RSAT-Hyper-V-Tools, Hyper-V-PowerShell |
  Out-Null
Additionally, remember that these recipes assume you have turned off any firewalls on your VMs (and host). This simplifies the environment and enables the recipe to focus on, in this case, VM replication.
How to do it...
- Configuring
HV1andHV2to be trusted for delegation in AD onDC1$ScriptBlock = { Set-ADComputer -Identity HV1 -TrustedForDelegation $True Set-ADComputer -Identity HV2 -TrustedForDelegation $True } Invoke-Command -ComputerName DC1 -ScriptBlock $ScriptBlock - Rebooting the
HV1andHV2hostsRestart-Computer -ComputerName HV2 -Force Restart-Computer -ComputerName HV1 -Force - Configuring Hyper-V replication on
HV1andHV2$VMReplHT = @{ ReplicationEnabled = $true AllowedAuthenticationType = 'Kerberos' KerberosAuthenticationPort = 42000 DefaultStorageLocation = 'C:Replicas' ReplicationAllowedFromAnyServer = $true ComputerName = 'HV1.Reskit.Org', 'HV2.Reskit.Org' } Set-VMReplicationServer @VMReplHT - Enabling
PSDirectonHV1to be a replica source$VMReplicaSourceHT = @{ VMName = 'PSDirect' Computer = 'HV1' ReplicaServerName = 'HV2' ReplicaServerPort = 42000 AuthenticationType = 'Kerberos' CompressionEnabled = $true RecoveryHistory = 5 } Enable-VMReplication @VMReplicaSourceHT -Verbose - Viewing the replication status of
HV1Get-VMReplicationServer -ComputerName HV1 - Checking
PSDirecton Hyper-V hostsGet-VM -ComputerName HV1 -VMName PSDirect Get-VM -ComputerName HV2 -VMName PSDirect - Starting the initial replication
Start-VMInitialReplication -VMName PSDirect -ComputerName HV1 - Examining the replication state on
HV1just after you start the initial replicationMeasure-VMReplication -ComputerName HV1 - Examine the replication status on
HV1after replication completesMeasure-VMReplication -ComputerName HV1 - Testing
PSDirectfailover toHV2$FOScriptBlock = { $VM = Start-VMFailover -AsTest -VMName PSDirect -Confirm:$false Start-VM $VM } Invoke-Command -ComputerName HV2 -ScriptBlock $FOScriptBlock - Viewing the status of the
PSDirectVMs onHV2$VMsOnHV1 = Get-VM -ComputerName HV2 -VMName PSDirect* $VMsOnHV1 - Examining networking on
PSDirectTestVM$TestVM = $VMsOnHV1 | Where-Object Name -Match 'Test' Get-VMNetworkAdapter -CimSession HV2 -VMName $TestVM.Name - Stopping the failover test
$StopScriptBlock = { Stop-VMFailover -VMName PSDirect } Invoke-Command -ComputerName HV2 -ScriptBlock $StopScriptBlock - Viewing the status of VMs on
HV1andHV2after failover has stoppedGet-VM -ComputerName HV1 -VMName PSDirect* Get-VM -ComputerName HV2 -VMName PSDirect* - Stopping VM on
HV1before performing a planned failoverStop-VM PSDirect -ComputerName HV1 - Starting VM failover from
HV1toHV2Start-VMFailover -VMName PSDirect -ComputerName HV2 -Confirm:$false - Completing the failover
$CHT = @{ VMName = 'PSDIrect' ComputerName = 'HV2' Confirm = $false } Complete-VMFailover @CHT - Viewing VM status on both Hyper-V hosts
Get-VM -ComputerName HV1 -VMName PSDirect* Get-VM -ComputerName HV2 -VMName PSDirect* - Starting the replicated VM on
HV2Start-VM -VMname PSDirect -ComputerName HV2 - Checking
PSDirectVM networking forHV2Get-VMNetworkAdapter -ComputerName HV2 -VMName PSDirect - Connecting
PSDirectto the VM switch$ConnectHT = @{ VMName = 'PSDirect' ComputerName = 'HV2' SwitchName = 'Internal' } Connect-VMNetworkAdapter @ConnectHT - Checking
PSDirectVM networking forHV2Get-VMNetworkAdapter -ComputerName HV2 -VMName PSDirect
How it works...
In step 1, you configure HV1 and HV2 to be trusted for delegation as required to support VM replication, and then in step 2, you reboot both hosts to complete the process of trusting these hosts for delegation. These two steps produce no console output.
After rebooting both hosts, in step 3, you configure both Hyper-V hosts to support VM replication. In step 4, you set up a Hyper-V replication partnership between HV1 and HV2. These two steps create no output.
In step 5, you review the replication status of the HV1 Hyper-V host, which creates output like this:

Figure 11.58: Viewing the replication status of HV1
Next, in step 6, you check the replication status of the PSDirect VM, which you do on both Hyper-V servers. The output of this step looks like this:

Figure 11.59: Checking the PSDirect VM status on HV1 and HV2
In step 7, you start the VM replication process. This step involves Hyper-V creating a duplicate VM on HV2, essentially a full copy of the PSDirect VM. This step produces no output.
If you run step 8 immediately after completing step 7, you can observe the initial replication process. You should see output like this:

Figure 11.60: Viewing the replication process
The initial replication process should take a few minutes. However, the replication speed also depends on the Hyper-V host hardware components, VM memory and virtual processors, and the underlying network and disk subsystem speeds. The disk sizes of a VM’s virtual disks are also a significant factor that affects the initial replication speed. After Hyper-V completes the initial replication of PSDirect, you can view the replication status, as shown in step 9. The output of this step looks like this:

Figure 11.61: Viewing the replication once the initial replication is complete
Once the PSDirect replication is invoked, and Hyper-V has completed an initial replication, you can test the failover capability. In step 10, you run a test failover of the PSDirect VM from HV1 to HV2. This step generates no console output.
In step 11, you can view the status of the PSDirect VMs on HV2, with an output like this:

Figure 11.62: Viewing PSDirect VMs on HV2
In step 12, you examine the networking in the PSDirect test VM with output like this:

Figure 11.63: Viewing the status of PSDirect networking
In step 13, you stop the PSDirect VM before carrying out a planned failover. Next, in step 15, you perform the planned failover of PSDirect from HV1 to HV2. Once you have initiated the planned failover (that is, once the cmdlet completes), in step 16, you complete the VM failover process. In step 17, you start the PSDirect VM on HV2. These four steps produce no console output.
In step 18, you check the status of the PSDirect VM on both Hyper-V hosts. This step generates the following output:

Figure 11.64: Checking the VM status of PSDirect on both Hyper-V hosts
In step 19, you start the PSDirect VM on the HV2 Hyper-V host. This step creates no output. In step 20, you check the networking for the PSDirect VM with an output like this:

Figure 11.65: Checking the VM networking on PSDirect
In step 20, you add the NIC in the PSDirect VM into the Internal VM switch on HV2, creating no console output. In step 22, you re-check the networking on PSDirect with an output like this:

Figure 11.66: Checking the VM networking on PSDirect
There’s more...
In step 11, you view the two PSDirect VMs on HV2. The first is the VM that you are replicating from HV1. During this step, PSDirect is up and running on HV1 and replicates any changes to HV2. You see a separate test VM showing that the replica VM is up and running on HV2. It is always good to run a test failover after setting up replication to ensure that the replication and failover work as you wish.
In step 18, you view the PSDirect VM status on both of your Hyper-V hosts. As you can see in the output from this step, Figure 11.64, the PSDirect VM is up and running on HV2. On HV1, you still have an (older) copy of the VM with the VM failed over (and running) on HV2.
Managing VM checkpoints
With Hyper-V in Server 2022, a checkpoint captures the state of a VM as a restore point. Hyper-V then enables you to roll back a VM to a checkpoint. Windows Server 2008’s version of Hyper-V provided this feature, although these restore points were called snapshots at that time.
In Server 2012, Microsoft changed the name to “checkpoint.” This terminology change was consistent with System Center and avoided any confusion with the Volume Shadow Copy Service (VSS) snapshots used by many backup systems. While the Hyper-V team changed the terminology, some of the cmdlet names remain unchanged. For instance, to restore a VM to a checkpoint, you use the Restore-VMSnapshot cmdlet.
You can create a variety of checkpoints for a VM. When you create a checkpoint, Hyper-V temporarily pauses the VM. Hyper-V creates a new differencing disk (AVHD). Hyper-V then resumes the VM, which writes all data to the differencing disk.
Checkpoints are excellent for a variety of scenarios. They can be helpful in troubleshooting. You can trigger a bug in the VM and take a checkpoint. Then, you can try a fix—if it doesn’t work, you can just roll the VM back to the checkpoint and try another fix. Checkpoints are also helpful for training. You can create a VM in which you perform all the lab exercise steps and create a checkpoint after each successful lab. That way, the student can make a mistake in a lab exercise and skip forward to a later checkpoint to carry on.
Using checkpoints in production is a different matter. In general, you should avoid using checkpoints on your production systems for several reasons. If your servers use any replication or transaction-based applications, the impact of rolling back a VM to an earlier time can lead to issues. Since checkpoints rely on differencing disks that feature constantly growing physical disk files, using checkpoints can also result in poor performance.
In this recipe, you will create a checkpoint of the PSDirect VM, and then you create a file inside the VM. You will take a further checkpoint and create a second file. Then, you will revert to the first checkpoint, observing that there are no files (thus far) created. You roll forward to the second checkpoint to see that the first file is there but not the second (because you created the second file after taking the checkpoint). Then, you remove all the checkpoints. After each checkpoint operation, you observe the VHDX and AVHD files that Hyper-V uses in the PSDirect VM.
Getting ready
You will run this recipe on HV1. This recipe uses the PSDirect VM you created and used earlier in this chapter. Depending on which other recipes you have run from this chapter, the virtual disks may be in different folders, but the recipe copes with the disk files in any folder known to Hyper-V.
How to do it...
- Ensuring
PSDirectVM is running$VMState = Get-VM -VMName PSDirect | Select-Object -ExpandProperty State If ($VMState -eq 'Off') { Start-VM -VMName PSDirect } - Creating credentials for
PSDirect$RKAdmin = 'WolfAdministrator' $Pass = 'Pa$$w0rd' $RKPassword = ConvertTo-SecureString -String $Pass -AsPlainText -Force $RKCred = [System.Management.Automation.PSCredential]::new( $RKAdmin,$RKPassword) - Examining the
C:in thePSDirectVM before we start$ScriptBlock = { Get-ChildItem -Path C: | Format-Table} $InvocationHT = @{ VMName = 'PSDirect' ScriptBlock = $ScriptBlock Credential = $RKCred } Invoke-Command @InvocationHT - Creating a checkpoint of
PSDirectonHV1$CPHT = @{ VMName = 'PSDirect' ComputerName = 'HV1' SnapshotName = 'Snapshot1' } Checkpoint-VM @CPHT - Examining the files created to support the checkpoints
$Parent = Split-Path -Parent (Get-VM -Name PSdirect | Select-Object -ExpandProperty HardDrives).Path | Select-Object -First 1 Get-ChildItem -Path $Parent - Creating some content in a file on
PSDirectand displaying it$ScriptBlock = { $FileName1 = 'C:File_After_Checkpoint_1' Get-Date | Out-File -FilePath $FileName1 Get-Content -Path $FileName1 } $InvocationHT = @{ VMName = 'PSDirect' ScriptBlock = $ScriptBlock Credential = $RKCred } Invoke-Command @InvocationHT - Taking a second checkpoint
$SecondChkpointHT = @{ VMName = 'PSDirect' ComputerName = 'HV1' SnapshotName = 'Snapshot2' } Checkpoint-VM @SecondChkpointHT - Viewing the VM checkpoint details for
PSDirectGet-VMSnapshot -VMName PSDirect - Looking at the files supporting the two checkpoints
Get-ChildItem -Path $Parent - Creating and displaying another file in
PSDirect$ScriptBlock2 = { $FileName2 = 'C:File_After_Checkpoint_2' Get-Date | Out-File -FilePath $FileName2 Get-ChildItem -Path C: -File | Format-Table } $InvocationHT2 = @{ VMName = 'PSDirect' ScriptBlock = $ScriptBlock2 Credential = $RKCred } Invoke-Command @InvocationHT2 - Restoring the
PSDirectVM back to the checkpoint namedSnapshot1$Snap1 = Get-VMSnapshot -VMName PSDirect -Name Snapshot1 Restore-VMSnapshot -VMSnapshot $Snap1 -Confirm:$false Start-VM -Name PSDirect Wait-VM -For IPAddress -Name PSDirect - Seeing what files we have now on
PSDirect$ScriptBlock3 = { Get-ChildItem -Path C: | Format-Table } $InvocationHT3 = @{ VMName = 'PSDirect' ScriptBlock = $ScriptBlock3 Credential = $RKCred } Invoke-Command @InvocationHT3 - Rolling forward to
Snapshot2$Snap2 = Get-VMSnapshot -VMName PSdirect -Name Snapshot2 Restore-VMSnapshot -VMSnapshot $Snap2 -Confirm:$false Start-VM -Name PSDirect Wait-VM -For IPAddress -Name PSDirect - Observe the files you now have supporting
PSDirect$ScriptBlock4 = { Get-ChildItem -Path C: | Format-Table } $InvocationHT4 = @{ VMName = 'PSDirect' ScriptBlock = $ScriptBlock4 Credential = $RKCred } Invoke-Command @InvocationHT4 - Restoring to
Snapshot1again$Snap1 = Get-VMSnapshot -VMName PSDirect -Name Snapshot1 Restore-VMSnapshot -VMSnapshot $Snap1 -Confirm:$false Start-VM -Name PSDirect Wait-VM -For IPAddress -Name PSDirect - Checking checkpoints and VM data files again
Get-VMSnapshot -VMName PSDirect Get-ChildItem -Path $Parent | Format-Table - Removing all the checkpoints from
HV1Get-VMSnapshot -VMName PSDirect | Remove-VMSnapshot - Checking VM data files again
Get-ChildItem -Path $Parent
How it works...
In step 1, you ensure that the PSDirect VM is running (on HV1). Next, in step 2, you create a Windows credential object to use when invoking script blocks inside the PSDirect VM. These steps generate no console output.
In step 3, using the credential object you created earlier, you invoke a script block that examines the C: drive inside the PSDirect VM. This step creates output like this:

Figure 11.67: Viewing the C: drive inside the PSDirect VM
In step 4, you use the Checkpoint-VM cmdlet to create a new VM checkpoint, which you name Snapshot1. This step creates no output.
With step 5, you determine where Hyper-V has stored the virtual disks for the PSDirect VM, and then you display the associated files with an output like this:

Figure 11.68: Examining files supporting a checkpoint
In step 6, you create a new file on the C: drive in the PSDirect VM. Then, you view the contents of this file. The output looks like this:

Figure 11.69: Creating a file in the PSDirect VM
After creating a file inside the VM, in step 7, you create a second checkpoint that generates no output. In step 8, you use the Get-VMSnapshot cmdlet to view the checkpoint for the PSDirect VM currently on HV1, which looks like this:
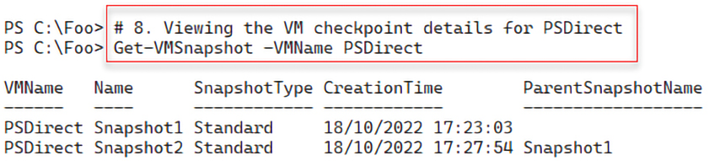
Figure 11.70: Viewing snapshots of the PSDirect VM
In step 9, again, you examine the files that Hyper-V uses to store your virtual disk images and both sets of checkpoint files for the PSDirect VM like this:

Figure 11.71: Viewing snapshots of the PSDirect VM
In step 10, you create a new file in the PSDirect VM, add contents to the file, and then view those files created so far like this:

Figure 11.72: Creating a second file in PSDirect
In step 11, you revert the PSDirect VM back to the first checkpoint (i.e. Snapshot1), which generates no output to the console. In step 12, you see what files you now have on the C: drive (after you have reverted to the earlier checkpoint), with output like this:

Figure 11.73: Checking the files in PSDirect
In step 13, you roll forward the PSDirect VM to the second checkpoint, which generates no output. In step 14, you examine the files created in PSDirect (in the second checkpoint), which looks like this:

Figure 11.74: Checking files in PSDirect after restoring Snapshot2
In step 15, you restore PSDirect to the first checkpoint, a step that generates no console output. In step 16, you check the checkpoints and the virtual disk files again, with output like this:
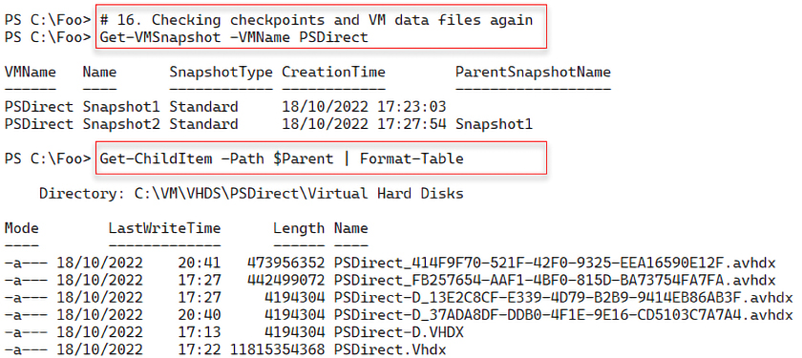
Figure 11.75: Checking the checkpoints on HV1
In step 17, you remove all the checkpoints for PSDirect on HV1, which generates no output to the console. In the final step in this recipe, step 18, you check the VM data files on HV1, which produces the following output:
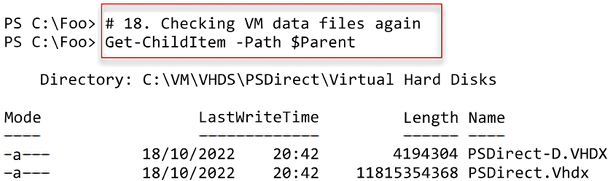
Figure 11.76: Viewing the disk files after removing the checkpoints for the PSDirect VM
There’s more...
In step 9, you examine the files that Hyper-V uses to support the PSDirect VM checkpoints. The first VHDX file holds the starting state at which you took the first checkpoint. Then, you see another AVHDX file (one per virtual disk in the VM) representing the state after the second snapshot. You have taken snapshots of the AVHDX files for both virtual disks, representing any work you have done after taking a checkpoint and before taking another.
In step 10, you view the two files you have created in the PSDirect VM. After reverting to the first checkpoint, in step 12, you see that neither of the two files you created exists on the C: drive. This is because you created those files after creating the first checkpoint. This situation is the expected result of restoring a checkpoint. It also illustrates that you need to take care when reverting to a snapshot, as you can lose work.
A final point about checkpoints/snapshots – this is a great bit of technology but is not a long-term backup or recovery strategy. Backup products, such as VEAAM, can take a snapshot of a VM and back up the now-static VHDX. Once the backup is complete, you remove the snapshot and allow Hyper-V to merge any updates back into the base disk.
Creating a Hyper-V report
Your Hyper-V hosts are almost certainly mission-critical. Indeed, any Hyper-V host you deploy is critical to your IT infrastructure. If a Hyper-V host goes down or starts suffering from performance or capacity issues, it can affect all the VMs running on that host.
If you deploy Hyper-V, you must report on and monitor the health of your HyperV host, as well as the health of the VMs. By monitoring the reports, you can detect issues before they become critical. If your VM host, for example, has a slowly increasing CPU load, you can consider moving a VM to another VM host.
Reports that you use to monitor the health of a Hyper-V host fall into two broad categories – firstly, details about the VM host itself. Secondly, you need to monitor the VMs running on that host. This recipe creates a report containing both sets of information.
Getting ready
This recipe runs on the Hyper-V host HV1. The host should be set up as per the Installing Hyper-V inside Windows Server recipe. This host should be up and running and have one VM defined and running. The VM is PSDirect, which you created in the Creating a Hyper-V VM recipe.
How to do it...
- Creating a basic report object hash table
$ReportHT = [Ordered] @{} - Adding host details to the report hash table
$HostDetails = Get-CimInstance -ClassName Win32_ComputerSystem $ReportHT.HostName = $HostDetails.Name $ReportHT.Maker = $HostDetails.Manufacturer $ReportHT.Model = $HostDetails.Model - Adding PowerShell and OS version information
$ReportHT.PSVersion = $PSVersionTable.PSVersion.tostring() $OS = Get-CimInstance -Class Win32_OperatingSystem $ReportHT.OSEdition = $OS.Caption $ReportHT.OSArch = $OS.OSArchitecture $ReportHT.OSLang = $OS.OSLanguage $ReportHT.LastBootTime = $OS.LastBootUpTime $Now = Get-Date $UpdateTime = [float] ("{0:n3}" -f (($Now -$OS.LastBootUpTime).Totaldays)) $ReportHT.UpTimeDays = $UpdateTime - Adding a count of processors in the host
$ProcessorHT = @{ ClassName = 'MSvm_Processor' Namespace = 'root/virtualization/v2' } $Proc = Get-CimInstance @ProcessorHT $ReportHT.CPUCount = ($Proc | Where-Object elementname -match 'Logical Processor').Count - Adding the current host CPU usage
$ClassName = 'Win32_PerfFormattedData_PerfOS_Processor' $CPU = Get-CimInstance -ClassName $ClassName | Where-Object Name -eq '_Total' | Select-Object -ExpandProperty PercentProcessorTime $ReportHT.HostCPUUsage = $CPU - Adding the total host physical memory
$Memory = Get-Ciminstance -Class Win32_ComputerSystem $HostMemory = [float] ( "{0:n2}" -f ($Memory.TotalPhysicalMemory/1GB)) $ReportHT.HostMemoryGB = $HostMemory - Adding the memory allocated to VMs
$Sum = 0 Get-VM | Foreach-Object {$sum += $_.MemoryAssigned + $Total} $Sum = [float] ( "{0:N2}" -f ($Sum/1gb) ) $ReportHT.AllocatedMemoryGB = $Sum - Creating a report header object
$HostDetails = $ReportHT | Format-Table | Out-String - Creating two new VMs to populate the VM report:
New-VM -Name VM2 | Out-Null New-VM -Name VM3 | Out-Null - Getting VM details on the local VM host
$VMs = Get-VM -Name * $VMDetails = @() - Getting VM details for each VM
Foreach ($VM in $VMs) { # Create VM Report hash table $VMReport = [ordered] @{} # Add VM's Name $VMReport.VMName = $VM.VMName # Add Status $VMReport.Status = $VM.Status # Add Uptime $VMReport.Uptime = $VM.Uptime # Add VM CPU $VMReport.VMCPUUsage = $VM.CPUUsage # Replication Mode/Status $VMReport.ReplMode = $VM.ReplicationMode $VMReport.ReplState = $Vm.ReplicationState # Creating object from Hash table, adding to array $VMR = New-Object -TypeName PSObject -Property $VMReport $VMDetails += $VMR } - Getting the array of VM objects as a table
$VMReportDetails = $VMDetails | Sort-Object -Property VMName | Format-Table | Out-String - Creating final report
$Report = "VM Host Details: 'n" + $HostDetails + "'nVM Details: 'n" + $VMReportDetails - Displaying the final report
$Report
How it works...
Except for the final step, none of the steps in this recipe produce a console output.
In step 1, you create a report hash table to collect details about the Hyper-V host. In step 2, you add the host details to this hash table. In step 3, you add the PowerShell and OS details. In step 4, you add a count of processors in the Hyper-V host.
In step 5, you add the current host’s CPU utilization to the hash table. In step 6, you add the total physical memory of the host. In step 7, you add the memory allocated to VMs. Then, in step 8, you create the first part of the Hyper-V report, containing the host system details.
In step 9, you create two new VMs to HV1 to add some additional content to the final report. In step 10, you collect the details of each VM and create a new hash table.
In step 11, you collect details for each VM and add these to the $VMDetails array. In step 12, you convert this array into a report fragment. With step 13, you create the final report, adding the details about the host and the details of each VM.
In the final step, step 14, you display the report, which looks like this:
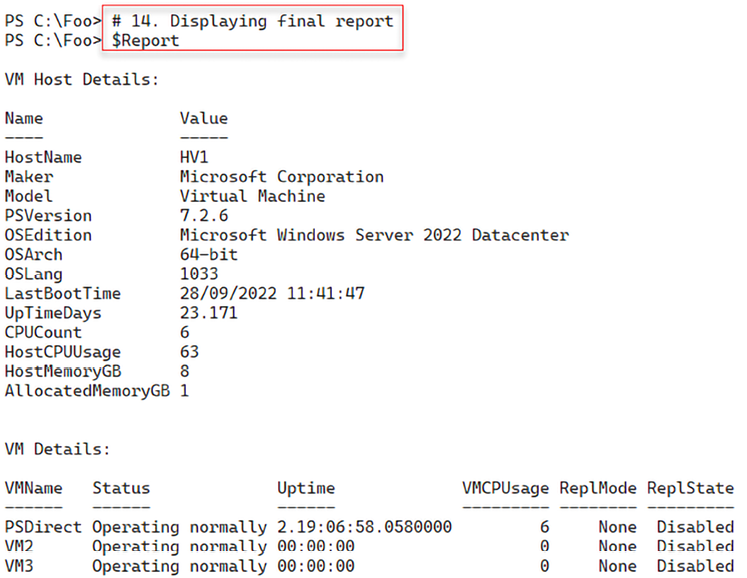
Figure 11.77: Viewing disk files after removing the checkpoints for the PSDirect VM
There’s more...
This recipe uses various methods to obtain key performance and usage metrics. Once this information has been retrieved, the recipe converts this information into an object, which you can then display.
The recipe first creates a report object, containing the VM host’s details. Then, the recipe gets key information about each VM and creates an object for each VM on the host, which the recipe adds to the overall Hyper-V report. At the end of the recipe, you display the combined report. This approach lets you sort and filter the objects to create whatever kind of reporting you need. The technique used here is to create hash tables that hold the host and VM details and then turn these hash tables into full-fledged objects.
This recipe reports some, but not all, of the details of the host or the VMs. You can adjust either part of the recipe to add (or remove) details from the report.
In step 14, you view a report of the HV1 Hyper-V host, which is running a limited set of VMs. On a busier and larger system, this report might look like this:

Figure 11.78: Viewing the report on a real Hyper-V host
Join our community on Discord
Join our community’s Discord space for discussions with the author and other readers:
