
10
Exploring Windows Containers
This chapter covers the following recipes:
- Configuring a container host
- Deploying sample containers
- Deploying IIS in a container
- Using a Dockerfile to create a custom container
Introduction
Containers and container technology have been around on the Linux platform for some time and can also be run on Windows (both Windows 10/11 and Windows Server 2022). Containers can assist in deploying applications. The opensource Docker initiative popularized containers. Windows Server 2022 supports both Docker and Docker containerization integrated with Hyper-V.
With containers in Windows Server 2022, you perform most administration tasks not by using PowerShell cmdlets but by using a command-line tool called docker.exe. For those used to PowerShell’s object-oriented and task-focused approach, you may find this application hard to use. I daresay you are not alone. The docker.exe application works in PowerShell, and you can use PowerShell to wrap the command. As ever with command-line tools, you can wrap the command-line application with a PowerShell function to get the benefits of object orientation.
To use containers with Windows Server 2019, you must download and install several components, including container base images. These downloads require an internet connection and are not particularly small. So be sure to have lots of disk space.
Containers provide scalability by enabling you to run multiple containers directly on top of Windows Server 2022. Containers can take up considerably fewer resources than if you run each container in separate virtual machines (VMs). In theory, running multiple containers on a single host could be a security risk because malware could enable bad actors to access the contents of one container from another unfriendly container. To reduce those risks, you can run containers virtualized inside Hyper-V. With Hyper-V containers, Windows runs the container inside a virtualized environment that provides additional hardware-level security, albeit at the price of performance. Hyper-V containers are also useful in a shared tenant environment, where one container host can run containers belonging to different organizations.
By default, you cannot run a container that uses one version of Windows Server within another version of Windows Server. So if you base a container on Windows Server 2019 Server Core, you cannot, by default, run it on top of Windows Server 2022. This does incur a small performance overhead when you start and stop the container. To get around this issue, you can run the container virtualized.
The first step in deploying containers in Windows Server 2022 is configuring your container host, including adding several downloaded components. In the Configuring a container host recipe, you configure a host, CH1, to run containers.
Once you have configured a container host, it’s a great idea to test that you can run containers successfully. You can download many sample containers to test out the basic container functionality (and the use of docker.exe). You explore and download key base container images and sample containers in the Deploying sample containers recipe.
A common application that you can deploy using containers is Internet Information Server (IIS). In the Deploying IIS in a container recipe, you download a container base image containing IIS and then run this image inside a container.
You can also build customized container images containing your applications, as seen in the Using a Dockerfile to create a custom container recipe.
The recipes in this chapter use the command-line tool docker.exe. For those familiar and comfortable with all of PowerShell’s awesomeness, this may come as a bit of a shock. As you can observe, docker.exe has no tab completion, all output is minimal text blobs (no objects), parameter names seem random and curious, the online help is not very helpful, and the error reporting is downright atrocious. All in all, docker.exe takes time to get to grips with, is less easy to automate than other Windows features, and feels very, very slow even on a well-equipped workstation. But if you plan to use the awesome container features in Windows Server, consider spending some time building a good framework and framework tools for your environment. One example is the Get-ContainerImage function you create in the Deploying IIS in a container recipe.
It’s also worth noting that if you use most major search engines to discover aspects of containers, searches tend to yield many useful pages. However, many pages focus on Linux as a container host and using tools and features not available under Windows. It can be a struggle to find good Windows-based documentation.
There is much more to explore with containers. This chapter only introduces containers, container images, docker.exe, and Dockerfile files. Topics including Docker networking, Docker Swarm, and more are outside the scope of this book. To discover more about containers than we can fit here, look at Packt’s book: Learning Windows Server Containers by Srikanth Machiraju. And, for more on the endearingly awful docker.exe application, take a look at Docker on Windows by Elton Stoneman.
For more information on Windows containers, see this link: https://learn.microsoft.com/virtualization/windowscontainers/about/
The systems used in the chapter
In this chapter, you configure and manage containers on the Windows Server 2022 host CH1. You have installed PowerShell 7 (and VS Code) on this host. You also need the domain controller and DNS server for the Reskit.Org domain, DC1, online.
The hosts are as follows:

Figure 10.1: Host in use for this chapter
Configuring a container host
The first step in containerization is to configure a container host. The container host is a Windows system (virtual or physical). You have installed the Windows Server 2022 host with just PowerShell loaded.
Configuring the host requires you to add Windows features and download/install the Docker components you need to manage containers.
You can also run containers on Windows 11, and this recipe would mostly work on that platform but would need some modifications. These changes and containers on Windows 11 are outside the scope of this chapter.
Getting ready
You run this recipe on CH1 after you have installed PowerShell 7 (and VS Code).
How to do it...
- Installing the Docker provider module
$InstallHT1 = @{ Name = 'DockerMSFTProvider' Repository = 'PSGallery' Force = $True } Install-Module @InstallHT1 - Installing the latest version of the Docker package
$InstallHT2 = @{ Name = 'Docker' ProviderName = 'DockerMSFTProvider' Force = $True } Install-Package @InstallHT2 - Ensuring that the Hyper-V and related tools are added
Add-WindowsFeature -Name Hyper-V -IncludeManagementTools | Out-Null - Removing Defender, as it interferes with Docker
Remove-WindowsFeature -Name Windows-Defender | Out-Null - Restarting the computer to enable Docker and containers
Restart-Computer - Checking Windows containers and Hyper-V features are installed on
CH1Get-WindowsFeature -Name Containers, Hyper-v - Checking Docker service
Get-Service -Name Docker - Checking Docker version information
docker version - Displaying Docker configuration information
docker info
How it works...
In step 1, you download and install the Docker provider module for Windows. This step produces no console output. In step 2, you install the latest version of the Docker provider, which produces the following output:

Figure 10.2: Installing the Docker package
In step 3, you add the Hyper-V feature to CH1 and add the Hyper-V management tools, producing output like this:

Figure 10.3: Adding Hyper-V Windows Server feature to CH1
The Windows Defender package can interfere with the operation of containers. For that reason, in step 4, you remove this feature. To complete the setup of the components added and removed so far, you need to reboot the machine, which you do in step 5. These two steps produce no console output.
After rebooting CH1, in step 6, you confirm that you have added the containers and Hyper-V features successfully, producing output like this:

Figure 10.4: Checking the Hyper-V and Containers features on CH1
Within Windows Server, the Docker service does much of the work of running containers. In step 7, you verify that the Docker service is running. This step produces output like this:

Figure 10.5: Checking the Hyper-V and Containers features on CH1
In step 8, you use the docker.exe command to display Docker’s version information, with output like this:

Figure 10.6: Checking the Docker version information
In step 9, you display the Docker configuration details with output like this:

Figure 10.7: Displaying the Docker configuration
There’s more...
In step 2, you install the DockerMSFTProvider package. This package also has the necessary Windows components to run containers. On Windows Server, this includes the containers Windows feature (as you check in step 6).
In step 5, you remove Defender. This is a simple fix to avoid issues that can arise when you test this recipe. For production, you should consult the Docker documentation at https://docs.docker.com/engine/security/antivirus/.
Deploying sample containers
Once you have a container host configured, you should check that you have set up your environment successfully and your container host can utilize containers. A really simple way to check that your container host is fully able to run containers is by downloading and running a simple container image. Docker publishes a useful hello-world container image you can use. Or you can download and run one of the standard OS images.
Before you can run a container, you must acquire a container image. There are several ways to obtain images, as you see in this chapter. Using the docker command, you can search and download images either to use directly or to use as the basis of a custom-built container. Docker maintains an online registry that contains a variety of container images for you to leverage.
This recipe demonstrates using the Docker registry to obtain images and then using those images locally. This recipe looks at some basic container management tasks and shows some methods to automate the docker.exe command.
Getting ready
You run this recipe in the container host, CH1. You set up this host in the Configuring a container host recipe.
How to do it...
- Finding hello-world container images at the Docker hub
docker search hello-world - Pulling the Docker official hello-world image
docker pull hello-world - Checking the image just downloaded
docker image ls - Running the hello-world container image
docker run hello-world - Getting Server Core base image
$ServerCore = 'mcr.microsoft.com/windows/servercore:ltsc2022' docker pull $ServerCore - Checking the images available now on
CH1docker image ls - Running the
ServerCorecontainer imagedocker run $ServerCore - Creating a function to get the Docker image details as objects
Function Get-DockerImage { # Getting the images $Images = docker image ls | Select-Object -Skip 1 # Regex for getting the fields $Regex = '^(S+)s+(S+)s+(S+)s+([ w]+)s+(S+)$' # Creating an object for each image and emit foreach ($Image in $Images) { $image -match $Regex | Out-Null $ContainerHT = [ordered] @{ Name = $Matches.1 Tag = $Matches.2 ImageId = $Matches.3 Created = $Matches.4 Size = $Matches.5 } # end hash table New-Object -TypeName pscustomobject -Property $ContainerHT } # end foreach } # end function - Inspecting
ServerCoreimage$ServerCoreImage = Get-DockerImage | Where-Object name -match servercore docker inspect $ServerCoreImage.ImageId | ConvertFrom-Json - Pulling a Server 2019 container image
$Server2019Image = 'mcr.microsoft.com/windows:1809' docker pull $Server2019Image - Running older server image
docker run $Server2019Image - Running the image with
isolationdocker run --isolation=hyperv $Server2019Image - Checking difference in run times with Hyper-V
# Running with no isolation $Start1 = Get-Date docker run hello-world | Out-Null $End1 = Get-Date $Time1 = ($End1-$Start1).TotalMilliseconds # Running with isolation $Start2 = Get-Date docker run --isolation=hyperv hello-world | Out-Null $End2 = get-date $Time2 = ($End2-$Start2).TotalMilliseconds # Displaying the time differences "Without isolation, took : $Time1 milliseconds" "With isolation, took : $Time2 milliseconds" - Viewing system disk usage
docker system df - Viewing active containers
docker container ls -a - Removing active containers
$Actives = docker container ls -q -a foreach ($Active in $actives) { docker container rm $Active -f } - Removing all Docker images
docker rmi $(docker images -q) -f | Out-Null - Removing other Docker detritus
docker prune -f - Checking images and containers
docker image ls
docker container ls
How it works...
In step 1, you use the docker.exe search command to find hello-world containers at Docker hub. The output looks like this:

Figure 10.8: Discovering hello-world container images
In step 2, you use the docker.exe command to pull the Docker official hello-world image with output like this:
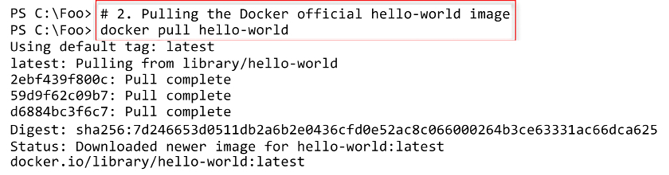
Figure 10.9: Downloading the hello-world official Docker container from the Docker hub
In step 3, you use the docker image command to view the images that reside on CH1, with output like this:

Figure 10.10: Viewing Docker image on CH1
With the container image downloaded, in step 4, you run this image in the container to validate your container installation and configuration. The output looks like this:

Figure 10.11: Running the hello-world container image
In step 5, you download another container image, a Windows ServerCore image. The output from this step is as follows:

Figure 10.12: Pulling a Windows Server Core container image
In step 6, you check the container images on CH1, where you can see the newly downloaded server core container image. The output looks like this:

Figure 10.13: Listing container images on CH1
In step 7, you run the container, returning output like this:

Figure 10.14: Executing the servercore container image
The docker.exe command produces simple string output, unlike PowerShell cmdlets, which produce rich objects. One way to overcome that limitation is to create objects on the fly using a wrapper function.
In step 8, you create a new PowerShell function (Get-DockerImage), which gets the images but returns the information as custom objects. There is no output directly from this step. Within this step, you create a hash table, which you then convert to a custom object. You could have created the object directly – as always you have choices.
In step 9, you use the Get-DockerImage function to get a specific container image, then you do a detailed examination of this container image, with output like this:

Figure 10.15: Inspecting the server core image
In step 10, you pull a Windows Server image for an older version (Windows Server 2019):

Figure 10.16: Inspecting the server core image
In step 11, you attempt to run this downloaded image with the following output:

Figure 10.17: Running a Windows Server 2019 image natively
Since the Windows kernel in the container host is different from the kernel in the container image, Windows cannot natively run the Windows Server 2019 images. You can work around this by using Hyper-V isolation, like this:

Figure 10.18: Running a Windows Server 2019 image inside Hyper-V
While Hyper-V isolation can help with incompatible kernel version issues, there is a performance hit with using virtualization. In step 13, you run the hello-world container image natively and in Hyper-V. Then the step displays how to Windows run the container with and without virtualization. The output looks like this:

Figure 10.19: Measuring the performance impact of running a container inside Hyper-V
In step 14, you use the docker system command to view the disk usage for containers on CH1 with output like this:

Figure 10.20: Viewing container image disk space usage
In step 15, you view the containers currently active on CH1, with output like this:

Figure 10.21: Viewing active containers on CH1
In step 16, you remove all active containers on CH1. In step 17, you remove all Docker images from CH1. These two steps produce no console output. In step 18, you use the prune command to remove all other Docker-related resources with output like this:

Figure 10.22: Using the Docker prune command
In step 19, you verify that you have removed all containers and container images from CH1, with output like this:

Figure 10.23: Checking on remaining containers and container images
There’s more...
In step 4, you run the hello-world container you downloaded in step 2. When Windows runs this container, the container prints out some text, then exits. These sample container images are a great demonstration that your container host is up, running, and able to host containers.
Docker.exe returns the images on the system as an array of strings (that is, not objects!). The first ($Images[0]) entry is a string of the line of column headers. The next two entries in the $Images array relate to the ServerCore and hello-world images, respectively.
In step 8, you create a simple PowerShell function that uses docker.exe to get and return the container images. This function returns the container image details as rich objects, not simple strings. If you are doing a lot of work with docker.exe, consider writing wrapper functions like this to simplify scripting.
In step 10, you download a container whose built-in base OS is a different version from the OS running on the container host (CH1). In step 11, you run it and see an error. You should expect this error. You have two options. The first is to use a more up-to-date container image that matches yours. The other alternative is to use Hyper-V isolation, which works fine, as you see in step 12.
In step 13, you could have used the measure command to measure how long it took Windows to load and execute the container.
Using Hyper-V isolation has a performance implication that involves the overhead of Hyper-V. But when you use Hyper-V for containers, you can experience a startup performance hit. But once the container is up and running, the hit is not usually significant. Also, using virtualization can provide added security, which may be appropriate, particularly in a shared-hosting environment.
Deploying IIS in a container
A popular containerized application is IIS. Microsoft publishes a container image that contains everything you need to run IIS containerized.
In this recipe, you download and run a container with IIS running and serving web pages.
Getting ready
This recipe uses the CH1 host, which you configured in the Configuring a container host recipe.
How to do it…
- Creating the
reskitappfolder$EA = @{ErrorAction='SilentlyContinue'} New-Item -Path C:ReskitApp -ItemType Directory @EA - Creating a web page
$FileName = 'C:ReskitappIndex.htm' $Index = @" <!DOCTYPE html> <html><head><title> ReskitApp Container Application</title></head> <body><p><center><b> HOME PAGE FOR RESKITAPP APPLICATION</b></p> Running in a container in Windows Server 2022<p> </center><br><hr></body></html> "@ $Index | Out-File -FilePath $FileName - Getting a server core with an IIS image from the Docker registry
$Image = 'mcr.microsoft.com/windows/servercore/iis' docker pull $Image - Running the image as a container named
rkwebcdocker run -d -p80:80 --name rkwebc "$Image" - Copying the page into the container
Set-Location -Path C:Reskitapp docker cp .index.htm rkwebc:c:inetpubwwwrootindex.htm - Viewing the page
Start-Process "Http://CH1.Reskit.Org/Index.htm" - Cleaning up
docker rm rkwebc -f | Out-Null
docker image rm  mcr.microsoft.com/windows/servercore/iis |
  Out-Null
How it works...
In step 1, you create a new folder to hold the new application you are going to create, with output like this:

Figure 10.24: Creating the c:ReskitApp folder
In step 2, you create a simple web page and store it in the C:ReskitApp folder, producing no console output.
In step 3, you download a server core image that contains IIS, with output like this:

Figure 10.25: Pulling a container image with IIS
In step 4, you run the container image as a detached (i.e., permanently running) container. This step creates a small bit of console output as follows:

Figure 10.26: Running a detached container
Now you have the container running (and running IIS), you can use your browser to connect to the website published by IIS. In step 5, you start the browser to view the default home page for the default website, with output like this:
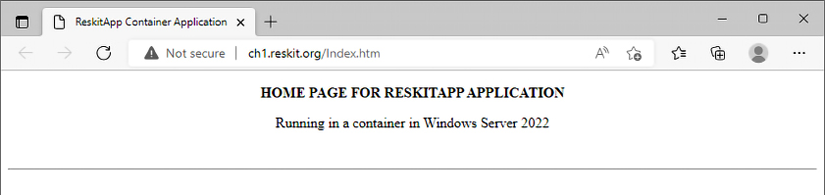
Figure 10.27: Running a detached container
In step 7, you clean up by first stopping the container and then removing the IIS container image. This step creates no output.
There’s more...
This recipe creates a new web page (in step 1 and step 2) on the CH1 host, then copies that file into the running container (step 5). When you run the container, you use port forwarding to instruct Docker to forward port 80 on the container host to port 80 in the container.
With containers, although you do not have IIS loaded on CH1, you can run a container in which IIS is active and provides a website (although, in this case, a default website with no site content).
In this recipe, you use the existing network address/name (that is, of the CH1 host) to access the container’s website. You can see another method to push data into a container in the Using a Dockerfile to create a custom container recipe.
In step 5, you use the docker cp command to copy files from the container host into the container. In this recipe, you only add (and in step 6, view) a single page to the existing default website loaded by installing IIS. You can always use the docker exec command to create a new website inside the container and run that, much like you did in the recipes in the IIS chapter. You could also copy all the files and other resources necessary for a rich website, set up SSL, and use host headers to support multiple containers. There are other ways to transfer information between your container and other hosts in your environment. See https://markheath.net/post/transfer-files-docker-windows-containers and take a look at some methods you can use to transfer data into and out of your containers.
In this recipe, you forwarded traffic inbound to port 80 on the container host to port 80 in the container. This is a very simple way to use containers and container networking. You could also create a Docker network and give your container unique IP settings. For more on Docker networking, see the following: http://rafalgolarz.com/blog/2017/04/10/networking_golang_app_with_docker_containers/ and https://docs.docker.com/v17.09/engine/userguide/networking/. You can, as ever, use your search engine to discover more about containers and networking. One thing to keep in mind as you search is that much of the search results relate to running containers on Linux, where the networking stack is quite different and differently managed.
Using a Dockerfile to create a custom container
You can use containers in various ways, depending on your needs. In most cases, you may find it useful to build custom container images, complete with an OS, OS features, and applications. A great way to make your image is to use a Dockerfile containing the instructions for building a new image and then use the docker build command to create a customized container you can then run.
In this recipe, you create a custom container image that provides an IIS website.
Getting ready
In this recipe, you use the container host, CH1, that you set up in the Configuring a container host recipe.
How to do it...
- Creating folder and setting location to the folder on
CH1$SitePath = 'C:RKWebContainer' $NewItemHT = @{ Path = $SitePath ItemType = 'Directory' ErrorAction = 'SilentlyContinue' } New-Item @NewItemHT | Out-Null Set-Location -Path $SitePath - Creating a script to run in the container to create a new site in the container
$ScriptBlock = { # 2.1 Creating folder in the container $SitePath = 'C:RKWebContainer' $NewItemHT2 = @{ Path = $SitePath ItemType = 'Directory' ErrorAction = 'SilentlyContinue' } New-Item @NewItemHT2 | Out-Null Set-Location -Path $NewItemHT2.Path # 2.1 Creating a page for the site $PAGE = @' <!DOCTYPE html> <html> <head><title>Main Page for RKWeb.Reskit.Org</title></head> <body><p><center><b> Home Page For RKWEB.RESKIT.ORG </b></p> Windows Server 2002, Containers, and PowerShell Rock! </center/</body></html> '@ $PAGE | OUT-FILE $SitePathIndex.html | Out-Null #2.2 Creating a new web site in the container that uses Host headers $WebSiteHT = @{ PhysicalPath = $SitePath Name = 'RKWeb' HostHeader = 'RKWeb.Reskit.Org' } New-Website @WebSiteHT } # End of script block # 2.5 Save script block to file $ScriptBlock | Out-File $SitePathConfig.ps1 - Creating a new a record for our soon to be containerized site
Invoke-Command -Computer DC1.Reskit.Org -ScriptBlock { $DNSHT = @{ ZoneName = 'Reskit.Org' Name = 'RKWeb' IpAddress = '10.10.10.221' } Add-DnsServerResourceRecordA @DNSHT } - Creating Dockerfile
$DockerFile = @" FROM mcr.microsoft.com/windows/servercore/iis LABEL Description="RKWEB Container" Vendor="PS Partnership" Version="1.0.0.42" RUN powershell -Command Add-WindowsFeature Web-Server RUN powershell -Command GIP WORKDIR C:\RKWebContainer COPY Config.ps1 Config.ps1 RUN powershell -command ".Config.ps1" "@ $DockerFile | Out-File -FilePath .Dockerfile -Encoding ascii - Building the image
docker build -t rkwebc . - Running the image
docker run -d --name rkwebc -p 80:80 rkwebc - Navigating to the container
Invoke-WebRequest -UseBasicParsing HTTP://RKweb.Reskit.Org - Viewing the web page in the browser
Start-Process "http://RKWeb.Reskit.Org" - Testing network connection
Test-NetConnection -ComputerName localhost -Port 80 - Cleaning up forcibly
docker container rm rkwebc -f
How it works...
In step 1, you create a new folder to hold a new IIS website and navigate to the folder. In step 2, you create a script you later run inside a container to create a new website (within the container). In step 3, you run a script block on DC1 that creates a new A record for the containerized website. In step 4, you create a Dockerfile that contains the Docker build instructions that enable docker build to create your container image. These four setup steps generate no output.
In step 5, you use the Docker command to build your new customized container. The (voluminous) output from this step looks like this:

Figure 10.28: Running a detached container
In step 6, you run a detached container with your new customized container image, producing output like this:

Figure 10.29: Running a detached container
In step 7, you use the Invoke-WebRequest command to get the web page from the container. This step produces output like this:

Figure 10.30: Getting the web page from the container
In step 8, you view the web page from the containerized website within the browser, with output like this:

Figure 10.31: Getting the web page from the container
In step 9, you view the network connection to port 80 on the local host. Docker binds this local port to port 80 in the container. The output from this step looks like this:

Figure 10.32: Viewing port 80 on the local host
In the final step in this recipe, step 10, you stop and close the container producing no output.
There’s more...
In this recipe, you use a base container image that you have to download from the Docker registry (mcr.microsoft.com/windows/servercore/iis). Then, you build a container that has the web server feature added and in which you can run the Config.ps1 file to configure the container to run your website. For more information on Dockerfiles, see this link: https://docs.docker.com/engine/reference/builder/
Join our community on Discord
Join our community’s Discord space for discussions with the author and other readers:
