
6
Implementing Enterprise Security
This chapter covers the following recipes:
- Implementing Just Enough Administration (JEA)
- Examining Applications and Services Logs
- Discovering Logon Events in the Event Log
- Deploying PowerShell Group Policies
- Using PowerShell Script Block Logging
- Configuring AD Password Policies
- Managing Windows Defender Antivirus
Introduction
Security within every organization is vital. The threats faced by most organizations are nearly constant. With today’s threat model, with attacks from any number of attackers, you need to ensure every aspect of your organization is secure, from physical security to the security of your network and computer infrastructure.
Since the earliest times, security-savvy folks have preached the gospel of security in-depth. Having as many layers as realistic as possible and is a good thing. As the theory goes – the bad guys have to defeat all your layers to defeat you, while you only need to hold one to stay safe.
PowerShell is a powerful tool for IT professionals wanting to be secure and stay secure. There is so much you can do with PowerShell to help your organization deploy excellent security over your network and computer infrastructure. This chapter looks at several ways to use PowerShell to improve your Windows infrastructure’s security.
JEA is a Windows feature that enables you to implement fine-grained administration, giving users just enough power to do their job and no more. A core objective of JEA is to reduce the number of users who are members of very high-privilege groups, including the local administrators, domain admins, and enterprise admins groups. The idea is you specify precisely what a user can do, and JEA makes it so.
In Windows, almost every component logs information to Windows event logs. These include the classic logs (first implemented with Windows NT 3.1) and the application and services logs that Microsoft added to Windows Vista. The logs provide a massive amount of information to help you manage your systems. One particular type of event that can be of interest is logon events – who logged on and when. You can use this information to track unusual or suspicious logins.
Using Group Policy, you can manage certain aspects of PowerShell 7 (and Windows PowerShell). With attackers increasingly using fileless PowerShell attacks, script block logging is one way of detecting suspicious behavior. You can use these event log entries for active detection by deploying a security information and event management (SIEM) tool, such as Solar Windows Security Event Manager or RSA NetWitness. Or you can store the events for manual review. As an alternative to a Group Policy setting, you can configure script block logging using registry settings, which helps for workgroup hosts (e.g., in the DMZ).
A critical security consideration for any sized organization is your password policy. You have considerable flexibility over your Windows password policies. Windows 11 and Windows Server 2022 have a default password policy that you can change. You can update your default domain password policy if you want longer or shorter passwords and complex or non-complex passwords. For those cases where you wish to have a different password policy for specific users, you can use AD’s fine-grained password feature that enables you to set a password policy for a user or group.
Windows Server 2022 and Windows 11 have a built-in antivirus and antimalware product, Microsoft Defender Antivirus (MDA). This feature was formerly just Microsoft Defender. MDA is part of a more extensive suite of products under the umbrella name of Microsoft Defender for Endpoint. Windows 10/11 and Windows Server come with a Defender module to help you manage Defender on a server. See https://www.microsoft.com/microsoft-365/security/endpoint-defender for more information.
The systems used in the chapter
This chapter uses two systems: DC1 and SRV1, and should have the second domain controller, DC2, online like this:

Figure 6.1: Hosts in use for this chapter
Implementing Just Enough Administration (JEA)
Just Enough Administration, also known as JEA, is a security framework that allows you to implement fine-grained administrative delegation. With JEA, you enable a user to have just enough administrative power to do their job, and no more. JEA is a more secure alternative to just adding users to the domain administrator or enterprise administrator groups.
With JEA, you could, for example, enable a junior administrator the right to access your domain controllers to administer the DNS service on the domain controller. JEA allows you to constrain what the user can do on the protected server. For example, you could allow the user to stop and start the DNS service (using Stop-Service and Start-Service) but no other services.
JEA makes use of three objects:
- JEA role capabilities file (.psrc): This file defines a role in terms of its capabilities. You would configure the JEA role
RKDnsAdminsto define a limited set of cmdlets that the role has access to on the domain controller, namely those related to administering DNS on a domain controller. - JEA session configuration file (.pssc): This file defines who can access a PowerShell remoting session and what they can do within the session. The session configuration file defines the JEA session’s actions in the role capabilities file. Individuals can use JEA-protected remoting to do only what the role capabilities file dictates. You could allow anyone in the
RKDnsAdminsdomain security group to access the server using a JEA endpoint. - A PowerShell remoting endpoint: Once you have the role capabilities and session configuration files created, you register the JEA endpoint to the server you are protecting with JEA.
Once the JEA endpoint is registered, a user who is a member of the domain security group, RKDnsAdmins, can use Invoke-Command or Enter-PsSession, specifying the remote server and the JEA-protected endpoint to access the protected server. Once inside the remoting session, the user can run the commands defined by the role capabilities.
The following diagram shows the components of JEA:

Figure 6.2: JEA components
Getting ready
This recipe uses DC1, a domain controller in the Reskit.Org domain on which you set up JEA for inbound connections. In earlier chapters, you installed DC1 as a domain controller and configured users, groups, and OUs. You run this recipe on DC1.
You would typically use a client computer to access the DC to manage DNS in production. For this recipe, adding an extra client host is replaced by using DC1 to test JEA without requiring an additional host. Of course, in production, you should test JEA on a client host.
How to do it...
- Creating a transcripts folder
New-Item -Path C:JEATranscripts -ItemType Directory | Out-Null - Creating a role capabilities folder
$Capabilities= "C:JEACapabilities" New-Item -Path $Capabilities -ItemType Directory | Out-Null - Creating a JEA session configuration folder
$SCF = 'C:JEASessionConfiguration' New-Item -Path $SCF -ItemType Directory | Out-Null - Creating
DNSAdminsJEAas a global security group$DNSGHT = @{ Name = 'DNSAdminsJEA' Description = 'DNS Admins for JEA' GroupCategory = 'Security' GroupScope = 'Global' } New-ADGroup @DNSGHT Get-ADGroup -Identity 'DNSAdminsJEA' | Move-ADObject -TargetPath 'OU=IT, DC=Reskit, DC=Org' - Adding
JerryGto theDNSAdminsgroup$ADGHT = @{ Identity = 'DNSAdminsJEA' Members = 'JerryG' } Add-ADGroupMember @ADGHT - Creating a JEA role capabilities file
$RCF = Join-Path -Path $Capabilities -ChildPath "DnsAdmins.psrc" $RCHT = @{ Path = $RCF Author = 'Reskit Administration' CompanyName = 'Reskit.Org' Description = 'DnsAdminsJEA role capabilities' AliasDefinition = @{Name='gh';Value='Get-Help'} ModulesToImport = 'Microsoft.PowerShell.Core','DnsServer' VisibleCmdlets = (@{ Name = 'Restart-Computer'; Parameters = @{Name = 'ComputerName'} ValidateSet = 'DC1, DC2'}, 'DNSSERVER*', @{ Name = 'Stop-Service'; Parameters = @{Name = 'DNS'}}, @{ Name = 'Start-Service'; Parameters = @{Name = 'DNS'}} ) VisibleExternalCommands = ('C:WindowsSystem32whoami.exe', 'C:WindowsSystem32ipconfig.exe') VisibleFunctions = 'Get-HW' FunctionDefinitions = @{ Name = 'Get-HW' Scriptblock = {'Hello JEA World'}} } New-PSRoleCapabilityFile @RCHT - Creating a JEA session configuration file
$P = Join-Path -Path $SCF -ChildPath 'DnsAdmins.pssc' $RDHT = @{ 'DnsAdminsJEA' = @{'RoleCapabilityFiles' = 'C:JEACapabilitiesDnsAdmins.psrc'} } $PSCHT= @{ Author = '[email protected]' Description = 'Session Definition for DnsAdminsJEA' SessionType = 'RestrictedRemoteServer' # ie JEA! Path = $P # Role Capabilties file RunAsVirtualAccount = $true TranscriptDirectory = 'C:JeaTranscripts' RoleDefinitions = $RDHT # tk role mapping } New-PSSessionConfigurationFile @PSCHT - Testing the session configuration file
Test-PSSessionConfigurationFile -Path $P - Enabling remoting on
DC1Enable-PSRemoting -Force | Out-Null - Registering the JEA session configuration remoting endpoint
$SCHT = @{ Path = $P Name = 'DnsAdminsJEA' Force = $true } Register-PSSessionConfiguration @SCHT - Viewing remoting endpoints
Get-PSSessionConfiguration | Format-Table -Property Name, PSVersion, Run*Account - Verifying what the user can do
$SCHT = @{ ConfigurationName = 'DnsAdminsJEA' Username = 'ReskitJerryG' } Get-PSSessionCapability @SCHT | Sort-Object -Property Module - Creating the credentials for user
JerryG$U = '[email protected]' $P = ConvertTo-SecureString 'Pa$$w0rd' -AsPlainText -Force $Cred = [PSCredential]::New($U,$P) - Defining three script blocks and an invocation splatting hash table
$SB1 = {Get-Command} $SB2 = {Get-HW} $SB3 = {Get-Command -Name '*-DNSSERVER*'} $ICMHT = @{ ComputerName = 'DC1.Reskit.Org' Credential = $Cred ConfigurationName = 'DnsAdminsJEA' } - Geting commands available within the JEA session
Invoke-Command -ScriptBlock $SB1 @ICMHT | Sort-Object -Property Module | Select-Object -First 15 - Invoking a JEA-defined function in a JEA session as
JerryGInvoke-Command -ScriptBlock $SB2 @ICMHT - Getting
DNSServercommands available toJerryG$C = Invoke-Command -ScriptBlock $SB3 @ICMHT "$($C.Count) DNS commands available" - Examining the contents of the transcripts folder
Get-ChildItem -Path $PSCHT.TranscriptDirectory - Examining a transcripts
Get-ChildItem -Path $PSCHT.TranscriptDirectory |
  Select-Object -First 1  |
    Get-Content
How it works...
In step 1, you create a new folder to hold JEA transcripts. In step 2, you create a folder to store JEA role capabilities files. And in step 3, you create a folder to hold JEA session configuration files. Next, in step 4, you create a new global security group, DNSAdminsJEA. Then in step 5, you add the user JerryG to the newly created DNSAdminsJEA security group. This step creates no console output.
In step 6, you create a new JEA role capabilities file. In step 7, you create the JEA session configuration file. These two steps, which finish the basic JEA setup, produce no console output.
In step 8, you use the Test-PSSessionConfigurationFile cmdlet to ensure the session configuration file is valid. This step creates some rather simple output, like this:

Figure 6.3: Testing the session configuration file
In step 9, you use Enable-PSRemoting to ensure you have DC1 set up for PowerShell remoting. This command produces a warning message like this:

Figure 6.4: Ensuring remoting is active on DC1
In step 10, you register the JEA session configuration remoting endpoint with output like this:

Figure 6.5: Registering the JEA remoting endpoint
In step 11, you use the Get-PSSessionConfiguration command to display the PowerShell remoting endpoints available, with output like this:

Figure 6.6: Viewing PowerShell remoting endpoints
With step 12, you use the Get-PSSessionCapability command to determine what commands, if any, the JerryG user can use within the JEA session, with output like this (truncated for publication):
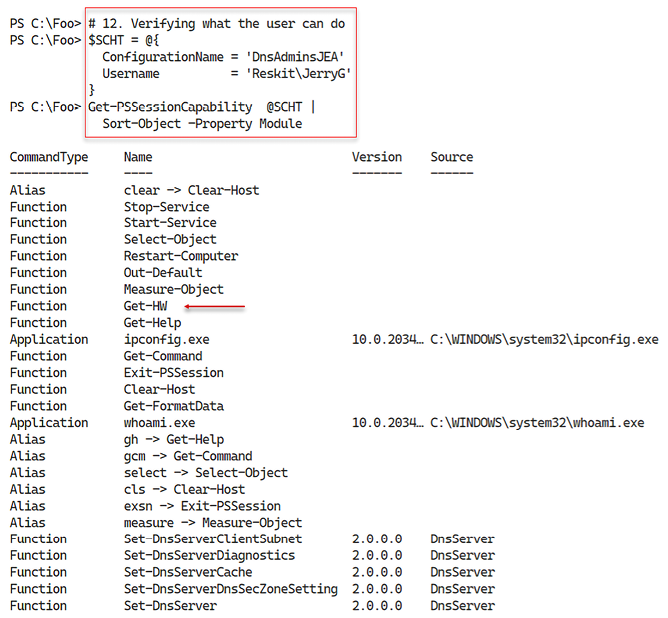
Figure 6.7: Viewing available commands for JerryG
In step 13, you create a PowerShell credential object for JerryG. In step 14, you create three script blocks and an invocation hash table for use in later steps, producing no output. There are numerous ways to create your credential. The approach shown here, especially as it contains the actual user name and password, is far from best practice. A better approach to obtaining credentials would be to use the Secrets module – see https://devblogs.microsoft.com/powershell-community/how-to-use-the-secret-modules/ for more details.
In step 15, you invoke the $SB1 script block inside a JEA session (to DC1, as JerryG), with output (truncated) like this:

Figure 6.8: Getting commands available within the JEA session
In step 16, you invoke the $SB2 script block in the JEA session. This script block calls the Get-HW function defined in the JEA role capabilities file. The output of this step looks like this:

Figure 6.9: Invoking a JEA-defined function in a JEA session as JerryG
In step 17, you invoke the $SB3 script block, which counts the number of commands available in the DNS server module, which the user JerryG has permission to use.
The output is like this:

Figure 6.10: Counting the number of DNS commands available to JerryG
When you set up JEA, you indicated that JEA should create a transcript for each JEA session. In step 18, you examine the transcripts in the transcript folder, with output like this:

Figure 6.11: Examining the transcript folder contents
In the final step, step 19, in this recipe, you examine the first transcript in the transcripts folder, with output (truncated for publishing) that should look like this:

Figure 6.12: Examining the transcripts
There’s more...
In step 1, you run a command but pipe the output to Out-Null. This is one of several ways to run the cmdlet and avoid seeing the output from that command. Another way you could write this line is like this:
$Null = New-Item -Path C:JEATranscripts -ItemType Directory
For more details on this, see https://powerwisescripting.blog/2020/04/15/powershell-null-vs-out-null.
In step 6, you create a JEA role capabilities file. In this file, you specify what actions a user can perform within a JEA session. This file defines the commands a user can run, modules they can load, specific JEA session-specific functions they can access, and more. You can, for example, specify that the JEA user can run a cmdlet that takes parameters, but you only allow specific parameter values. For instance, you could enable the user to start a service using Start-Service, but only the DNS service and not any other service. If you are deploying JEA in an enterprise, you might have many servers and services managed with JEA sessions and a disparate user base. In such cases, you may wish to create a platform for your deployment to simplify creating the role definitions and your JEA deployment in general.
In step 9, you use the Enable-PSRemoting command. This command ensures you enable WinRM remoting and creates two standard PowerShell 7 remoting endpoints, in addition to the one you create in step 10.
In step 15, you run $SB1 inside a JEA session on DC1. This script invokes Get-Command to list all the commands available to any member of the DNSAdminsJEA group. The output is truncated in the figure to take up less space for publishing. The complete output lists all the commands available.
In step 16, you use the Get-HW function defined in the JEA role capabilities file. This function only exists within the JEA session.
In step 18, you examine the transcripts in the JEA transcripts folder. Depending on what you have done so far, you may see a different number of transcripts. Each transcript represents one use of a JEA session. The transcript contains full details of the user’s commands inside the session and documents that the user initiated the session and when. The transcript provides valuable information for subsequent analysis where needed.
In the final step, step 19, you examine one of the JEA session transcripts. In Figure 6.12, you see the transcript generated by step 15. You must also manage the transcripts folder, including archiving or removing older transcripts. And if you are implementing JEA widely, you may wish to develop some summary reporting based on each transcript’s contents, including which users used any JEA session and when.
Examining Applications and Services Logs
Since the first version of Windows NT in 1993, anytime anything happens on a Windows, the component responsible writes details to an event log. In the earlier versions of Windows Server, there were four different Windows logs:
- Application – holds events related to software you have installed on the server
- Security – holds events related to the security of your server
- Setup – holds events related to Knowledge Base (KB) installation and events that occurred during installation activities
- System – holds events that relate to this system, such as system start and system shutdown
In addition to these logs, other applications and features can add additional logs. You can see the classic and additional logs using the Windows Powershell Get-Eventlog cmdlet.
With Windows Vista, Microsoft significantly improved the event logging features, including adding the applications and Services logs. This provides you with more than four hundred individual logs (although not all are enabled by default). These extra logs allow Windows components to write to application-specific logs rather than the system or application classic event logs. Individual application-specific logs make finding application-specific issues easier to find. You can use Get-Event to examine the classic event logs, and, with PowerShell 7, you use Get-WinEvent to work with all of the event logs, including these newer ones.
In this recipe, you examine both the classic event logs and the applications and Services Logs and get log event details from both sets of event logs.
Getting ready
You run this recipe on SRV1, a domain-joined server. You used SRV1 in earlier chapters, on which you installed PowerShell 7. You should ensure you log in as the domain administrator (ReskitAdministrator).
How to do it...
- Registering PowerShell event log provider
& $PSHOMERegisterManifest.ps1 - Discovering classic event logs on
SRV1Get-EventLog -LogName * - Discovering and measuring all event logs on this host
$Logs = Get-WinEvent -ListLog * "There are $($Logs.Count) total event logs on SRV1" - Discovering and measuring all event logs on
DC1$SB1 = {Get-WinEvent -ListLog *} $LogsDC1 = Invoke-Command -ComputerName DC1 -ScriptBlock $SB1 "There are $($LogsDC1.Count) total event logs on DC1" - Discovering
SRV1log member details$Logs | Get-Member - Measuring enabled logs on
SRV1$Logs | Where-Object IsEnabled | Measure-Object | Select-Object -Property Count - Measuring enabled logs on
DC1$LogsDC1 | Where-Object IsEnabled | Measure-Object | Select-Object -Property Count - Measuring enabled logs that have records on
SRV1$Logs | Where-Object IsEnabled | Where-Object RecordCount -gt 0 | Measure-Object | Select-Object -Property Count - Discovering PowerShell-related logs
$Logs | Where-Object LogName -match 'Powershell' - Examining
PowerShellCoreevent logGet-WinEvent -LogName 'PowerShellCore/Operational' | Select-Object -First 10
How it works...
By default, Windows disabled the PowerShell event logs. In step 1, you run a script that enables these logs, which generates no console output.
With step 2, you use Get-EventLog to discover the classic event logs on SRV1, with output like this:

Figure 6.13: Discovering classic event logs on SRV1
In step 3, you use the Get-WinEvent to return all the event logs on this host and provide a count of available event logs, with output like this:

Figure 6.14: Discovering all event logs on SRV1
In step 4, you use Get-WinEvent remotely to provide details of the event logs available on the domain controller, DC1, with output like this:

Figure 6.15: Discovering all event logs on DC1
In step 5, you use Get-Member to determine the properties available for the event logs, with output like this:
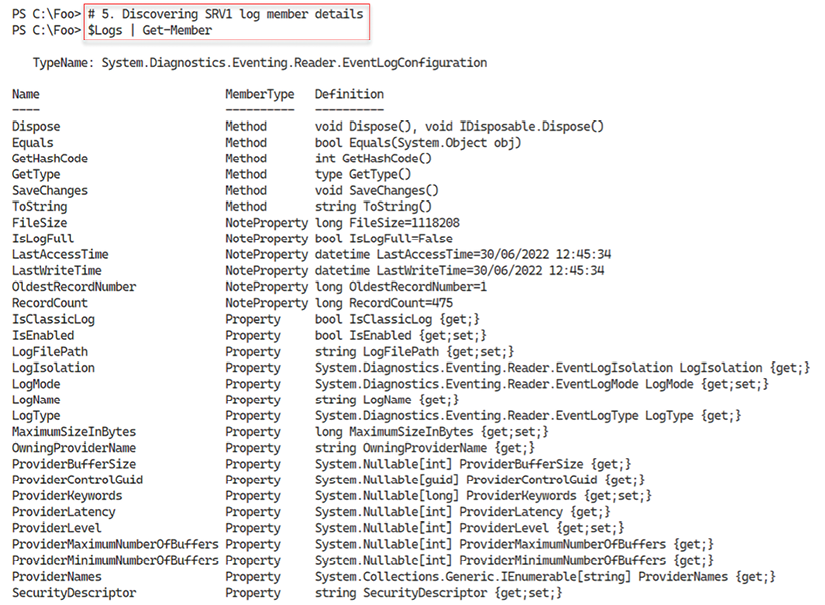
Figure 6.16: Discovering event log object properties
As noted above, Windows does now enable all event logs by default. In step 6, you count the enabled event logs (on SRV1) with output like this:

Figure 6.17: Counting enabled event logs on SRV1
With step 7, you count the enabled event logs for DC1 with this output:

Figure 6.18: Counting enabled event logs on DC1
In step 9, you discover the PowerShell (and Windows PowerShell) related event logs with this output:

Figure 6.19: Discovering PowerShell-related event logs available on SRV1
In step 10, you examine the ten most recent event log entries in the PowerShell/Operational event log, with the following output:

Figure 6.20: Viewing more recent event entries in the PowerShell/Operational log on SRV1
There’s more...
In step 3 and step 4, you get a count of the number of event logs on SRV1 and DC1. As you can see, the number of logs differs on different hosts. Different Windows features and applications can add additional event logs for your use. In step 6 and step 7, you also see the number of enabled logs on both systems. And with step 8, you see how many enabled logs (on SRV1) actually contain event log entries.
In step 10, you view the most recent event log entries in the PowerShell entries.
Discovering Logon Events in the Event Log
Each time you attempt to log on to Windows, whether you are successful or not, Windows logs the attempt in the security log. These log events can help determine who logged into a computer and when.
Windows defines several different logon types. A logon type of 2 indicates a local console login (logging on to a physical host), while a logon type of 10 indicates a logon over RDP. Other logon types include service logon (type 5), batch or scheduled task (type 4), and console unlock (type 7).
You can read about this in more detail in this article: https://learn.microsoft.com/windows-server/security/windows-authentication/windows-logon-scenarios. Note that this document is somewhat outdated, and Microsoft has not updated it for later versions of Windows.
With that said, the information continues to be correct.
In this recipe, you use PowerShell to examine the Security event log and look at the logon events.
Getting ready
You run this recipe on DC1, a domain controller in the Reskit.Org forest.
How to do it...
- Getting security log events
$SecLog = Get-WinEvent -ListLog Security "Security Event log entries: [{0,10:N0}]" -f $Seclog.RecordCount - Getting all Windows Security log event details
$SecEvents = Get-WinEvent -LogName Security "Found $($SecEvents.count) security events on DC1" - Examining Security event log event members
$SecEvents | Get-Member - Summarizing security events by event ID
$SecEvents | Sort-Object -Property Id | Group-Object -Property ID | Sort-Object -Property Name | Format-Table -Property Name, Count - Getting all successful logon events on
DC1$Logons = $SecEvents | Where-Object ID -eq 4624 # logon event "Found $($Logons.Count) logon events on DC1" - Getting all failed logon events on
DC1$FLogons = $SecEvents | Where-Object ID -eq 4625 # failed logon event "Found $($FLogons.Count) failed logon events on DC1" - Creating a summary array of successful logon events
$LogonEvents = @() Foreach ($Logon in $Logons) { $XMLMSG = [xml] $Logon.ToXml() $Text = '#text' $HostName = $XMLMSG.Event.EventData.data.$Text[1] $HostDomain = $XMLMSG.Event.EventData.data.$Text[2] $Account = $XMLMSG.Event.EventData.data.$Text[5] $AcctDomain = $XMLMSG.Event.EventData.data.$Text[6] $LogonType = $XMLMSG.Event.EventData.data.$Text[8] $LogonEvent = New-Object -Type PSCustomObject -Property @{ Account = "$AcctDomain$Account" Host = "$HostDomain$Hostname" LogonType = $LogonType Time = $Logon.TimeCreated } $LogonEvents += $logonEvent } - Summarizing successful logon events on
DC1$LogonEvents | Group-Object -Property LogonType | Sort-Object -Property Name | Select-Object -Property Name,Count - Creating a summary array of failed logon events on
DC1$FLogonEvents = @() Foreach ($FLogon in $FLogons) { $XMLMSG = [xml] $FLogon.ToXml() $Text = '#text' $HostName = $XMLMSG.Event.EventData.data.$Text[1] $HostDomain = $XMLMSG.Event.EventData.data.$Text[2] $Account = $XMLMSG.Event.EventData.data.$Text[5] $AcctDomain = $XMLMSG.Event.EventData.data.$Text[6] $LogonType = $XMLMSG.Event.EventData.data.$Text[8] $LogonEvent = New-Object -Type PSCustomObject -Property @{ Account = "$AcctDomain$Account" Host = "$HostDomain$Hostname" LogonType = $LogonType Time = $FLogon.TimeCreated } $FLogonEvents += $LogonEvent } - Summarizing failed logon events on
DC1$FLogonEvents | Group-Object -Property Account | Sort-Object -Property Name | Format-Table Name, Count
How it works...
In step 1, you use the Get-WinEvent cmdlet to retrieve details about the security log on DC1. Then you display the number of events in the Security event log. The output looks like this:

Figure 6.21: Getting security log events
In step 2, you use Get-WinEvent to retrieve all events from the security log and display a count of the events returned, with output like this:

Figure 6.22: Getting all Windows security log event details
The Get-WinEvent cmdlet returns objects that contain individual event log entries. Each object is of the type System.Diagnostics.Eventing.Reader.EventLogRecord.
In step 3, you view the members of this .NET object class with output like this:

Figure 6.23: Examining Security event log entry members
Once you have retrieved the events in the security log, you can examine the different security event types held in the ID field of each log record. In step 4, you view and count the different event IDs in the security log. The output from this step, truncated for publication, looks like this:

Figure 6.24: Summarizing security events by event ID
There are two logon-related events you might track, particularly on important servers. Log entries with an event ID of 4624 represent successful logon events, while 4625 represents failed logons. In step 5, you get ALL the successful logon events, with output like this:

Figure 6.25: Getting all successful logon events on DC1
In step 6, you count the number of logon failures on DC1, which looks like this:

Figure 6.26: Getting all failed logon events on DC1
In step 7, you create an array summarizing the successful logons. This step produces no output. In step 8, you summarize the successful logon events showing how many logon events occurred by each type.
The output of this step looks like this:

Figure 6.27: Summarizing successful logon events on DC1 by logon type
In step 9, you summarize the failed logon events on DC1. You display the details of unsuccessful logons with step 10, which looks like this:
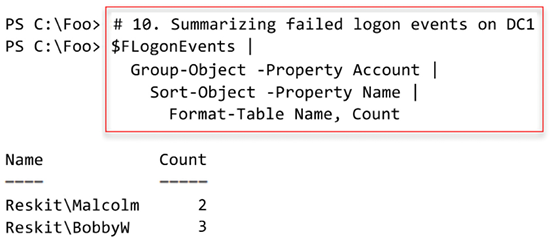
Figure 6.28: Summarizing failed logon events on DC1 by user name
There’s more...
In step 1, you retrieve a summary of the events in the security log and display the number of events in the log. In step 2, you retrieve and count the number of entries. As shown in the figures above, the counts do not match. The event counts may differ since Windows constantly logs additional events to the security log. The additional events are events generated by background tasks or services. This minor discrepancy is not unexpected and is harmless.
In step 3, you view the members of log event objects. You can discover more about the members of the class at https://learn.microsoft.com/dotnet/api/system.diagnostics.eventing.reader.eventlogrecord.
In step 6, you obtain unsuccessful logon events. To get unsuccessful logons, you must ensure you have attempted to log on to DC1 but with invalid credentials. As you see in the output of step 10 in Figure 6.28, two users were involved with the recent unsuccessful logon attempts on DC1. Depending on which user you have attempted to log in to this server (and failed), the results you see in this step may differ from the above figure.
In step 7, you parse the XML log data to create a summary array. To create this array, you need to know which XML data item corresponds to the hostname, account name, etc. Note that this step uses normal PowerShell arrays. You could have used the [System.Arraylist] type, which would be a bit more performant. For some background into the array versus arraylist types, see https://learn.microsoft.com/en-us/powershell/scripting/learn/deep-dives/everything-about-arrays?view=powershell-7.2.
Deploying PowerShell Group Policies
AD supports group policies. Group policies are groups of policies you can deploy to control a user or computer environment. The policies define what a given user can and cannot do on a given Windows computer. For example, you can create a Group Policy Object (GPO) that defines what screen saver to use, allow the user to see the Control Panel, or specify a default PowerShell execution policy. There are over 2,500 individual settings that you can deploy.
After you create a GPO and specify the policies to deploy, you can apply the GPO to an Organizational Unit (OU) in your domain (or to the domain as a whole to a specific AD site). An OU is a container object within the AD that can contain other OUs and leaf objects such as AD users, computers, or group objects. You use OUs to support the deployment of GPOs and the delegation of AD administration.
GPOs provide considerable flexibility in restricting what users can do on a workstation or a server. You can apply a GPO to a specific OU, the domain, or an AD site. Additionally, you can specify whether policies within a given GPO are to apply to users, computers, or both.
With Windows PowerShell 5.1, Microsoft included a set of five Group Policy settings. The PowerShell team has extended the policies you can use with PowerShell 7. Installing PowerShell 7, even on a DC, does not also install the necessary GPO administrative template files. So you need to install them yourself if you choose to use them.
You can find the policy template files and a script to install them in the PowerShell home folder ($PSHOME). After installing PowerShell 7 on your domain controller, you run the installation script in the $PSHOME folder and install the policy definitions. If you use one, you either do this on all DCs or the central policy store.
For some details on PowerShell 7’s group policies, see https://learn.microsoft.com/powershell/module/microsoft.powershell.core/about/about_group_policy_settings.
In this recipe, you discover the files necessary to add PowerShell 7 GPO support, run the installer, then create a GPO to deploy a set of PowerShell-related policies.
Getting ready
You run this recipe on DC1 after installing PowerShell 7 and Visual Studio. DC1 is a domain controller in the Reskit.Org domain you used in earlier chapters.
How to do it...
- Discovering the GPO-related files
Get-ChildItem -Path $PSHOME -Filter *Core*Policy* - Installing the PowerShell 7 group policy files
$LOC = $PSHOME + 'InstallPSCorePolicyDefinitions.ps1' & $LOC -VERBOSE - Creating and displaying a new GPO for the IT group
$PshGPO = New-GPO -Name 'PowerShell GPO for IT' - Enabling module logging
$GPOKEY1 = 'HKCUSoftwarePoliciesMicrosoftPowerShellCoreModuleLogging' $GPOHT1 = @{ DisplayName = $PshGPO.DisplayName Key = $GPOKEY1 Type = [Microsoft.Win32.RegistryValueKind]::DWord ValueName = 'EnableModuleLogging' Value = 1 } Set-GPRegistryValue @GPOHT1 | Out-Null - Configuring module names to log
$GPOHT2 = @{ DisplayName = $PshGPO.DisplayName Key = "$GPOKEY1ModuleNames" Type = [Microsoft.Win32.RegistryValueKind]::String ValueName = 'ITModule1', 'ITModule2' Value = 'ITModule1', 'ITModule2' } Set-GPRegistryValue @GPOHT2 | Out-Null - Enabling script block logging
$GPOKey3 = 'HKCUSoftwarePoliciesMicrosoftPowerShellCoreScriptBlockLogging' $GPOHT3 = @{ DisplayName = $PshGPO.DisplayName Key = $GPOKEY3 Type = [Microsoft.Win32.RegistryValueKind]::DWord ValueName = 'EnableScriptBlockLogging' Value = 1 } Set-GPRegistryValue @GPOHT3 | Out-Null - Enabling Unrestricted Execution Policy
$GPOKey4 = 'HKCUSoftwarePoliciesMicrosoftPowerShellCore' # create the key value to enable $GPOHT4 = @{ DisplayName = $PshGPO.DisplayName Key = $GPOKEY4 Type = [Microsoft.Win32.RegistryValueKind]::DWord ValueName = 'EnableScripts' Value = 1 } Set-GPRegistryValue @GPOHT4 | Out-Null # Set the default $GPOHT4 = @{ DisplayName = $PshGPO.DisplayName Key = "$GPOKEY4" Type = [Microsoft.Win32.RegistryValueKind]::String ValueName = 'ExecutionPolicy' Value = 'Unrestricted' } Set-GPRegistryValue @GPOHT4 - Assigning GPO to IT OU
$Target = "OU=IT, DC=Reskit, DC=Org" New-GPLink -DisplayName $PshGPO.Displayname -Target $Target | Out-Null - Creating and viewing an RSOP report (after logging in as
JerryG!)$RSOPHT = @{ ReportType = 'HTML' Path = 'C:FooGPOReport.Html' User = 'ReskitJerryg' } Get-GPResultantSetOfPolicy @RSOPHT & $RSOPHT.Path
How it works...
In step 1, you discover the PowerShell 7 GPO-related files, with output like this:

Figure 6.29: Discovering the GPO-related files
In step 2, you create a string to hold the location of the GPO installation file. Then you run this file to install the GPO files, which look like this:

Figure 6.30: Installing the PowerShell 7 group policy files
In step 3, you create a new GPO object and view it, which produces this output:
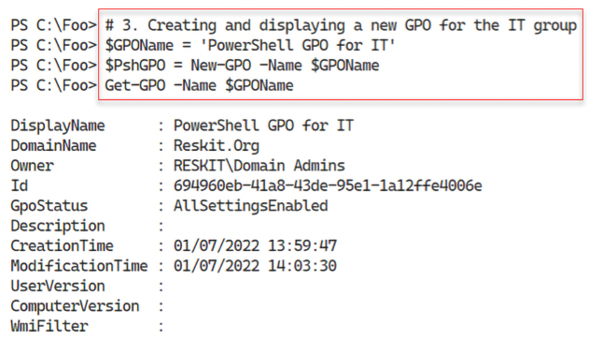
Figure 6.31: Creating and displaying a new GPO object for the IT group
In step 4, you configure the GPO to enable module logging, and in step 5, you configure the module names to log. In step 6, you enable script block logging, and in step 7, you configure the GPO to allow an Unrestricted PowerShell execution policy. These four steps produce no output.
In step 8, you assign this GPO to the IT OU, creating no output. In the final step, step 9, you create and view a resultant set of policy reports, which looks like this:

Figure 6.32: Viewing an RSOP report
There’s more...
This recipe creates a new GPO, configures the GPO object with specific policy values, and then assigns it to the IT OU in the Reskit.Org domain. When any user in the IT group logs on, PowerShell performs the specified logging and uses an Unrestricted execution policy. You can see in the RSOP report, produced in step 9, which policy settings PowerShell applies.
In step 9, you create an RSOP report. To ensure you get sensible output, you must ensure that the user JerryG has logged into the DC (as noted in the step heading). That way, you can generate a meaningful RSOP report.
Using PowerShell Script Block Logging
In the Deploying PowerShell group policies recipe, you saw how you could deploy policies related to PowerShell 7. One of these policies, Script Block Logging, causes PowerShell 7 to generate log events whenever you execute a script block that PowerShell deems noteworthy. PowerShell does not log ALL script blocks, only those that can change the system’s state.
There are two ways you can use to implement script block logging. The first and possibly best approach is to use GPOs to enforce logging on some or all hosts. You can also configure the local registry to enable script block logging. Modifying the local registry mimics a GPO by setting the appropriate registry settings on a host. You can use the Group Policy editor – it does provide a nice interface to the policies but you can’t automate the GUI. The GUI may be more convenient if you need to make a single policy change to a single GPO. But if you are making changes to or creating more policies, using a PowerShell script may be more productive.
Getting ready
You run this recipe on SRV1, a domain-joined Windows host in the Reskit.Org domain. You must log in as a ReskitAdministrator, a member of the domain administrators group.
How to do it...
- Clearing PowerShell Core operational log
wevtutil.exe cl 'PowerShellCore/Operational' - Enabling script block logging for the current user
$SBLPath = 'HKCU:SoftwarePoliciesMicrosoftPowerShellCore' + 'ScriptBlockLogging' if (-not (Test-Path $SBLPath)) { $null = New-Item $SBLPath -Force } Set-ItemProperty $SBLPath -Name EnableScriptBlockLogging -Value '1' - Examining the PowerShell Core event log for
4104eventsGet-Winevent -LogName 'PowerShellCore/Operational' | Where-Object Id -eq 4104 - Examining logged event details
Get-Winevent -LogName 'PowerShellCore/Operational' | Where-Object Id -eq 4104 | Select-Object -First 1 | Format-List -Property ID, Logname, Message - Creating another script block that PowerShell does not log
$SBtolog = {Get-CimInstance -Class Win32_ComputerSystem | Out-Null} $Before = Get-WinEvent -LogName 'PowerShellCore/Operational' Invoke-Command -ScriptBlock $SBtolog $After = Get-WinEvent -LogName 'PowerShellCore/Operational' - Comparing the events before and after you invoke the command
"Before: $($Before.Count) events" "After : $($After.Count) events" - Removing registry policy entry
Remove-Item -Path $SBLPath
How it works...
In step 1, you use the wevtutil.exe console application to clear the PowerShell Core operational log. In step 2, you update the registry to enable script block logging for the currently logged-on user (ReskitAdministrator). These steps produce no output.
In step 3, you examine the PowerShell Core log for 4104 events, with output like this:

Figure 6.33: Examining the PowerShell Core event log for 4104 events
In step 4, you view the details of one of the event log entries you saw in the previous step, with output that looks like this:

Figure 6.34: Examining logged event details
In step 5, you create and execute another script block. This step gets a count of the event log entries before and after you execute the script block. In this case, this script block is one that PowerShell does not consider important enough to log. This step produces no output, but in step 6, you view the before and after counts like this:

Figure 6.35: Comparing events in the PowerShell event log
In the final step, step 7, you remove the policy entry from the registry, producing no output.
There’s more...
In step 1, you use the wevtutil.exe console application to clear an event log. With Windows PowerShell, you can use the Clear-EventLog cmdlet that you can use to clear an event log. This cmdlet does not exist in PowerShell 7, which is why you use a Win32 console application to clear the event log. As an alternative, you could use PowerShell remoting, create a remoting session to the current machine using a Windows PowerShell endpoint, and run the Clear-EventLog command in that session.
In step 6, you can see that the script block you executed did not result in PowerShell logging the script block. By not logging every script block, you reduce the amount of logging PowerShell needs to perform (and the work you need to do to review the logs).
Configuring AD Password Policies
Passwords are essential for security as they help ensure that a person is who they say they are and thus are allowed to perform an action such as logging on to a host or editing a file. Password policies allow you to define your password attributes, including the minimum length and whether complex passwords are required. You can also set the number of times a user can enter an invalid password before that user is locked out (and a lockout duration). For more details on improving authentication security, see https://www.microsoftpressstore.com/articles/article.aspx?p=2224364&seqNum=2.
In AD, you can apply a default domain password policy. This policy applies to all users in the domain. In most cases, this is adequate for the organization. But in some cases, you may wish to apply a more stringent password policy to certain users or groups of users. You can use AD’s fine-grained password policy to manage these more restrictive passwords. A “fine-grained” policy is one you can apply to just a single user or an OU, as opposed to every user in the domain.
Getting ready
You run this recipe on DC1, a domain controller in the Reskit.Org domain. You must log in as a domain administrator.
How to do it...
- Discovering the current domain password policy
Get-ADDefaultDomainPasswordPolicy - Discovering if there is a fine-grained password policy for
JerryGGet-ADFineGrainedPasswordPolicy -Identity 'JerryG' - Updating the default password policy
$DPWPHT = [Ordered] @{ LockoutDuration = '00:45:00' LockoutObservationWindow = '00:30:00' ComplexityEnabled = $true ReversibleEncryptionEnabled = $false MinPasswordLength = 6 } Get-ADDefaultDomainPasswordPolicy -Current LoggedOnUser | Set-ADDefaultDomainPasswordPolicy @DPWPHT - Checking updated default password policy
Get-ADDefaultDomainPasswordPolicy - Creating a fine-grained password policy
$PD = 'DNS Admins Group Fine-grained Password Policy' $FGPHT = @{ Name = 'DNSPWP' Precedence = 500 ComplexityEnabled = $true Description = $PD DisplayName = 'DNS Admins Password Policy' LockoutDuration = '0.12:00:00' LockoutObservationWindow = '0.00:42:00' LockoutThreshold = 3 } New-ADFineGrainedPasswordPolicy @FGPHT - Assigning the policy to
DNSAdmins$DNSADmins = Get-ADGroup -Identity DNSAdmins $ADDHT = @{ Identity = 'DNSPWP' Subjects = $DNSADmins } Add-ADFineGrainedPasswordPolicySubject @ADDHT - Assigning the policy to
JerryG$Jerry = Get-ADUser -Identity JerryG Add-ADFineGrainedPasswordPolicySubject -Identity DNSPWP -Subjects $Jerry - Checking on policy applications for the group
Get-ADGroup 'DNSAdmins' -Properties * | Select-Object -Property msDS-PSOApplied - Checking on policy applications for the user
Get-ADUser JerryG -Properties * | Select-Object -Property msDS-PSOApplied - Getting
DNSAdminspolicyGet-ADFineGrainedPasswordPolicy -Identity DNSPWP - Checking on
JerryG's resultant password policyGet-ADUserResultantPasswordPolicy -Identity JerryG
How it works...
In step 1, you retrieve and display the default AD password policy, which looks like this:

Figure 6.36: Discovering the current domain password policy
In step 2, you check to see if there are any fine-grained password policies for the user JerryG, which looks like this:

Figure 6.37: Checking for fine-grained password policies
In step 3, you update the default password policy for the domain, changing a few settings. This produces no output. In step 4, you review the updated default password policy, which looks like this:

Figure 6.38: Checking the updated default password policy
In step 5, you create a new fine-grained password policy with some overrides to the default domain policy you looked at above. In step 6, you assign the policy to the DNS Admins group, and in step 7, you apply this policy explicitly to the user JerryG. These three steps create no output.
In step 8, you check on the policy application for the DNSAdmins group, which looks like this:
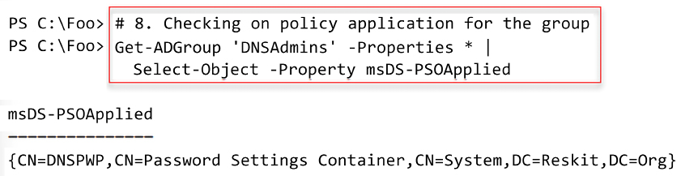
Figure 6.39: Checking the policy application for the DNS Admins group
In step 9, you check on the password policy applied to the user JerryG, which looks like this:

Figure 6.40: Checking on policy application for the user
In step 10, you examine the DNS Admins password policy, with output like this:

Figure 6.41: Getting the DNS Admins password policy
In the final step in this recipe, step 11, you examine the resulting password policy for the user JerryG, which looks like this:

Figure 6.42: Checking JerryG’s resultant password policy
There’s more...
In step 1, you view the existing default domain password policy. The settings you see in this step were created by the installation process when you installed Windows Server on DC1.
In step 2, you attempt to find a fine-grained password policy that would apply to the user JerryG. As you can see from the output, there is no existing policy in AD.
In step 5, you create a new fine-grained password policy assigned to the DNS Admins group (in step 6) and JerryG (in step 7). This assignment ensures the policy applies to JerryG, whether or not this user is a DNS Admins group member.
In step 11, you see the password policy settings for the user JerryG. These settings derive from the default domain policy plus the settings you specified in the DNSPWP policy. In theory, you could have a user with effective password policy settings coming for multiple policy objects (e.g., a GPO for the domain, one for an OU, etc.), although you should avoid such complexity. A better approach would be to create specific AD security groups that contain the users you need to have a different policy and apply the policy to the group.
Managing Windows Defender Antivirus
Microsoft Defender Antivirus is the next-generation protection component of Microsoft Defender for Endpoint. Defender Antivirus provides antivirus and antimalware facilities. The product also does some packet analysis to detect network-level attacks.
The Windows installation process installs Defender on Windows 10, Windows 11, and Windows Server 2022 by default. You can subsequently remove Defender should you wish. For more details on Defender in Windows Server, see https://learn.microsoft.com/en-us/microsoft-365/security/defender-endpoint/microsoft-defender-antivirus-on-windows-server?view=o365-worldwide.
Testing any antivirus or antimalware application can be difficult. On the one hand, you want to ensure that the product, Defender, in this case, is working. But at the same time, you don’t want to infect a server. One solution is to create a test file. The European Institute for Computer Anti-Virus Research (EICAR) has created a simple set of test files you can use to ensure your antivirus product works. EICAR has created several versions of this file, including a text file and an executable. These files are harmless, but as you see, they trigger Defender.
Getting ready
You run this recipe on DC1, a domain controller in the Reskit.Org domain.
How to do it...
- Ensuring Defender and tools are associated and installed
$DHT = @{ Name = 'Windows-Defender' IncludeManagementTools = $true } $Defender = Install-WindowsFeature @DHT If ($Defender.RestartNeeded -eq 'Yes') { Restart-Computer } - Discovering the cmdlets in the Defender module
Import-Module -Name Defender Get-Command -Module Defender - Checking the Defender service status
Get-Service -Name WinDefend - Checking the operational status of Defender on this host
Get-MpComputerStatus - Getting and counting threat catalog
$ThreatCatalog = Get-MpThreatCatalog "There are $($ThreatCatalog.count) threats in the catalog" - Viewing five threats in the catalog
$ThreatCatalog | Select-Object -First 5 | Format-Table -Property SeverityID, ThreatID, ThreatName - Enabling key Defender settings
# Enable real-time monitoring Set-MpPreference -DisableRealtimeMonitoring 0 # Enable sample submission Set-MpPreference -SubmitSamplesConsent Always # Enable checking signatures before scanning Set-MpPreference -CheckForSignaturesBeforeRunningScan 1 # Enable email scanning Set-MpPreference -DisableEmailScanning 0 - Creating a false positive threat
$TF = 'C:FooFalsePositive1.Txt' $FP = 'X5O!P%@AP[4PZX54(P^)7CC)7}$EICAR-' + 'STANDARD-ANTIVIRUS-TEST-FILE!$H+H*' $FP | Out-File -FilePath $TF Get-Content -Path $TF - Running a quick scan on
C:Foo$ScanType = 'QuickScan' Start-MpScan -ScanType $ScanType -ScanPath C:Foo - Viewing detected threats
Get-MpThreat
How it works...
In step 1, you use the Install-WindowsFeature command to ensure that you have installed both Defender and the management tools. The management tools include a PowerShell module you can use to manage Defender. This step may require a reboot. If so, this step reboots DC1 without producing any output.
In step 2, you look at the Defender module to discover the cmdlets contained in the module. The output looks like this:

Figure 6.43: Discovering the cmdlets in the Defender module
In step 3, you check the status of the WinDefend service. You should see the following output:

Figure 6.44: Checking the Defender service status
You use the Get-MpComputerstatus cmdlet to get the status of Defender on the local computer in step 4. The output looks like this:

Figure 6.45: Checking the Defender service status
Defender uses details of individual threats that it stores in a threat catalog. Windows Update regularly updates this catalog as needed. In step 5, you produce a count of the number of threats in the catalog, which looks like this:

Figure 6.46: Getting and counting the threat catalog
In step 6, you examine the first five threats in the Defender threat catalog, which looks like this:

In step 7, you configure four important Defender settings. You can use the Set-MpPreference cmdlet to configure a range of preference settings for Windows Defender scans and updates. You can modify exclusion file name extensions, paths, or processes and specify the default action for high, moderate, and low threat levels. You can view more details at: https://learn.microsoft.com/powershell/module/defender/set-mppreference.
In step 8, you attempt to create a file that Defender regards as a threat. This file comes from the EICAR and, as you can see, is a benign text file. When you run this step, you see an error message, and you may notice a Defender popup warning you that it has discovered a threat. The output from this step looks like this:

Figure 6.48: Creating and viewing a false positive file
In step 9, you use Start-MpScan to run a quick scan on the C:Foo folder where you attempted to create the test threat file. This step also produces no output.
In step 10, you view all the threats detected by Defender, which looks like this:

Figure 6.49: Viewing all detected threats
There’s more...
In step 2, you manually import the Defender module. This module is not directly compatible with PowerShell 7. PowerShell uses Windows PowerShell compatibility to expose the commands to PowerShell 7.
In step 5, you get a count of the number of threats Defender is aware of today (that is, at the time of writing). When you run this step, you should see a higher number, reflecting newly discovered threats. It is worth noting that this step can take a long time to run.
With step 8, you attempt to create a file that Defender recognizes as a threat. This file is the EICAR test file, which is harmless, but you can use it to test the basic functioning of Defender. In step 10, you view the threats Defender detected, and you can see it is the file identified as an EICAR_Test_File.
Join our community on Discord
Join our community’s Discord space for discussions with the author and other readers:
