Chapter 40: Using Shared Resources
IN THIS CHAPTER
Accessing remote resources
Opening documents from remote computers
Transferring files between networked computers
Using a shared printer
Using shared media
Chapters 38 and 39 covered all the basics of setting up and sharing resources on a private home or small business network. This chapter assumes that you've already done all that. Nothing in this chapter will work until the network is set up, you've turned on network sharing and discovery on each Windows 8 and Windows 8.1 computer, and you've shared some things on the network.
This chapter looks at how you find and use shared resources from computers within the network. It looks at opening documents from remote resources, moving and copying files between networked computers, using remote printers, and ways of using shared media.
UNC Paths
Before diving too deep into methods for accessing network resources, let's take some time to delve into a topic that will help you navigate network resources more easily — UNC paths.
UNC stands for Universal Naming Convention. A UNC path is expressed in the form:
\MachineNamePathName
MachineName is the name of the computer and PathName is a folder path on that computer. For example, assume that your network includes a computer named SNOOPY that you use as a file server. On that computer is a folder that you have shared as SharedDocs. Within that SharedDocs folder is a subfolder named Contracts. The UNC path to the Contracts folder would be \SNOOPYSharedDocsContracts. Note that the UNC path is not case-sensitive.
A UNC path makes it easy to navigate the network, particularly when you know the path name already. Using a UNC path is often quicker than navigating to the Network folder, and then to a remote computer, and drilling down through its shared folders. Instead, you can open the This PC folder, click in the Address bar, and simply type the UNC path to the remote share that you want to use.
Another point to understand is that you can specify the IP address of the remote computer in place of the computer name in the UNC path. So, assuming that our trusty computer named SNOOPY has the IP address 192.168.0.5, the UNC path to the Contracts folder would be \192.168.0.5SharedDocsContracts.
Now that you're up to speed on UNC paths, let's take a look at how to access network resources.
Accessing Remote Resources
Every Windows 8.1 computer on which you've enabled network sharing and discovery should show up in every computer's Network folder. The same is true of any Windows 8, Windows 7, Vista, and XP computers in the network that have at least one shared resource (such as the built-in Shared Documents folder). To open the Network folder on a Windows 8.1 computer, use whichever technique is most convenient:
- Display the Charms Bar, click Search, type network, click Network, and then right-click on the Network node on the tree in the dialog box that opens and select Properties. The Network and Sharing Center app now opens. Information about your network appears in the View Your Active Networks area.
- If you're already in a File Explorer folder, click Network in the Folders list.
The first time you open the Network folder on a computer, it might take a few seconds for it to discover other computers in the network. But within a few seconds you should see an icon for each computer in the network, as in the example shown in Figure 40.1. Notice how each computer is also accessible from the Folders list after expanding the Network category in that list.
Each computer's icon is like a folder in that, when you open it, you see shared resources from that computer. That includes a folder icon for each shared folder and printer icons for any shared printers connected to that computer.
Figure 40.1
A Network folder.

If you use the Network folder often, you'll want to make sure it's easy to find its icon. To put a Network icon on your desktop, right-click the desktop and choose Personalize. In the left column, click Change Desktop Icons. Select the Network check box (and the check boxes of any other icons you want) and click OK.
If you don't have a Network option on the right side of your Start screen, you can add one using methods for customizing the Start screen discussed in Chapter 10.
To add Network to your Favorite Links in File Explorer, open a folder and make sure you can see the Navigation pane. Open the Folders list, and then drag the Network icon in the Folders list into the Favorites Bar.
Opening Remote Documents
One of the advantages to having a network is that you can put documents in shared folders and open them from any computer in the network. For example, you might put all your important work documents in a shared folder on your main work computer. If you also have a portable computer, you can use outside on sunny days (or from the sofa on lazy days), you can work directly with those documents from the remote computer.
The process is really no different from opening a document on a local computer. You could, for instance, just navigate to the folder, via the Network folder, in which the document is stored. Or open the Computer folder, type the UNC path to the shared folder in the Address bar, and press Enter. Then double-click (or click) the document you want to edit, and the document will open from the remote computer (providing that the local computer has the appropriate program installed for working with that type of document).
Optionally, you can go through the program's Open dialog box to get to the document. Here's how:
- Open the program you want to use and choose File ⇒ Open or the command, link or button to open a file.
- In the Open dialog box, click Network (if available) at the left side of the dialog box.
- Select the computer on the network where the document resides. Then navigate to the folder for (or a parent folder to) the document. If you have to open a parent folder, just navigate down through the subfolders until you get to the document's icon.
- Click or double-click the document's icon.
Once the document is open, you can edit it or print it however you like. When you save the document, your changes will be saved at the original location. If you want to save a local copy of the document to work with, choose File ⇒ Save As within the program, navigate to a local folder such as your Documents folder, and save your copy there.
Opening a read-only copy
If you try to open a document that someone already has open on another computer, you might see a message telling you what your options are. Those options will vary from one program to the next. For example, you might be offered the option to open a read-only copy of the document, or to open an editable copy of the document. If you choose to open a read-only copy, you can then choose File ⇒ Save As in the program and save a local copy that you can modify.
Creating network locations
If you have your own website, or permission to upload to an FTP site, Microsoft SharePoint site, or really anything on the Internet to which you can upload files, you can add an icon for that location to your This PC folder. Doing so will allow you to upload files to that location using the same techniques you use to save a file to your own computer.
You'll need to know the URL (address) to which you can download. Chances are, you'll need a username and password as well. The people who own the site to which you'll be uploading will provide that information when you set up your account. They might also provide upload instructions. But as long as you know the URL and your username and password, you should be able to use the technique described here in addition to whatever method they provide.
To create a link to the Internet location, follow these steps:
- Open your computer folder, named This PC in Windows 8.1.
- Right-click any unused space in the window and choose Add a Network Location.
- Click Next on the first wizard page.
- Click Choose a Custom Network Location and click Next.
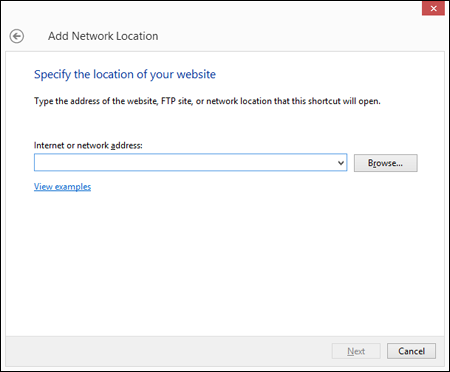
- Type the complete URL of the remote site. For example, if it's a website you own, include the
http://. In Figure 40.2, we're about to create a shortcut to theftp://ftp.akivajoseph.comsite. If the shortcut is to an FTP site for which you have upload permissions, use theftp://prefix on the URL. Click Next. To see a list of examples, click the View Examples link in the middle of the window. - If the remote resource requires a username and password, you'll be prompted to enter your credentials. Enter the credentials and click OK.
- The next wizard page will suggest the URL (without the
http://orftp://prefix) as the name of the shortcut icon. You can replace that with any name you like because it's used only as the label for the shortcut. Type the desired name and click Next. - On the last wizard page, you can select (check) the check box Open This Network Location When I Click Finish if you want to see the remote folder immediately. Or clear the check box if you don't want to see that right now. Then click Finish.
When you double-click the icon for the remote site, it will open in File Explorer, looking much the same as any local folder on your own hard disk. You may not have quite as many options to choose from in the Explorer bar. In Figure 40.3, we've opened an FTP site.
Figure 40.2
Providing the URL of an Internet resource.
You can treat the folder as you would any other, provided you have the credentials, permissions, and authority. For example, you can create a new folder, or rename or delete existing files and folders by right-clicking, just as you would in any folder on your C: drive. You can also move and copy files to/from the site. Things will be slower than on your own computer because the remote resource could be thousands of miles away, but the techniques should all be the same.
Figure 40.3
An FTP site as a folder in File Explorer.

If things don't work as described here, your best resource for getting answers would be the people who provided the site. They're the only ones who know the details of that site. You may have to provide a user ID and password in order to gain access to the location.
Saving to a Remote Computer
Any time you save a new document — whether it's one you've created yourself or something you're downloading — a Save As dialog box (or something similar) will open, enabling you to save the file. The dialog box will have a Folders list so that you can choose where you want to save the document.
As with the Open dialog box, you can choose the Network folder from the Folders list to get to all the locations in your Network folder, and then navigate to wherever you want to save the file from there. Or click in the text box where you would normally enter the filename and instead enter a UNC path to the folder where you want to store the file. After the folder opens in the dialog box, enter the filename.
Downloading Programs to a Network Share
If you regularly download programs to install on multiple computers, consider using the folder named Public Downloads within your Public folder. After you save a downloaded program file to that folder, you'll be able to install it on all the computers in the network. You still have to install it on each computer individually, but there is no need to download it on every computer, especially if you're sharing a not-so-speedy Internet connection.
Start by creating the Public Downloads folder in your own Documents folder, or on another shared folder on your network. Then initiate the download as you normally would. When the File Download dialog box appears, click Save or Save As. In the Save As dialog box, navigate to the shared Public Downloads folder and save the file there.
After the file has been downloaded, you can access it from any other computer on the network to install the program. Just browse the network from the computer where you want to install the program, open the shared Public Downloads folder, and double-click the file to begin the installation.
Transferring Files Between Computers
Moving and copying files on a network is virtually identical to doing so on a single computer. You can use any of the techniques described in Chapter 28 to select, move, or copy files from any folder on your own computer to any shared folder or from any shared folder to any folder on your own computer. You can also use those same techniques to move and copy files between shared folders on any two remote computers on the network.
For example, let's say you're sitting at a computer named Hobbes, and you have a bunch of files in a subfolder named Rob-PCCommon Downloads on a computer named Rob-PC. So, the UNC path would be \Rob-PCSharedDocsCommon Downloads (where SharedDocs is the name of the shared documents folder). You want to copy one or more files to the Downloads folder of your own user account on HP-Rob. Just open the Network folder. Then open the Rob-PC/SharedDocs/Common Downloads folder. Then open the Documents folder for your user account. It might be easier if you size and position the windows so you can see the contents of both, as in Figure 40.4.
Figure 40.4
Remote shared folder (top) and local folder (bottom).
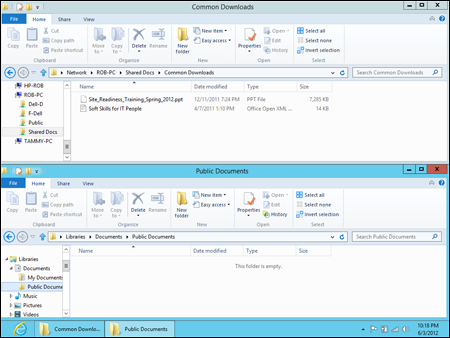
With both folders open, as in the figure, you can select the files you want to copy in the remote folder using any technique you like, as discussed in Chapter 21. To copy (rather than move) the items to the remote folder, right-drag any selected icon to the remote folder and then choose Copy Here after you release the mouse button. (You also can drag using the left mouse button; the files will be copied from the remote location to the local one.) That's all there is to it. As we said, it's no different from moving and copying files between folders and drives on your own computer, except that you have to use the Network folder or a UNC path to open the remote folder.
Mapping Drive Letters to Shared Folders
Some programs require that you assign a drive letter to remote resources. You can assign any unused drive letter to a resource. For example, if you already have drives A: through F: in use, you can assign drive letters G: through Z: to any shared resource. Use the following steps to map a drive letter to a shared folder:
- Go to the computer on which you need to assign a drive letter to a remote shared resource.
- Open any folder (such as the This PC folder), select the Computer tab, and click Map Network Drive. The Map Network Drive dialog box opens.
- Click the Browse button to open the Browse for Folder dialog box.
- In the Browse for Folder dialog box, click the name of the shared resource to which you want to map a drive letter, so its name is selected (highlighted). For example, in Figure 40.5, we're about to map the drive letter
Y:to the shared Download folder on a computer named Rob-PC. - Click OK.
- If you want the drive to be mapped automatically each time you log on, select the Reconnect at Sign-In check box.
- Click Finish.
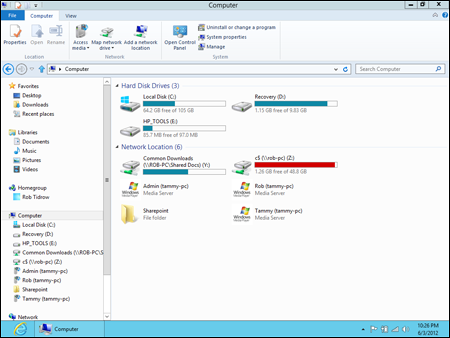
The remote resource will open. You can close that folder and also close the Network folder. Because you've mapped a drive letter to the remote resource, it will appear in your This PC folder. In Figure 40.6, we've mapped two resources: Y: is mapped to the Download folder on the computer named Rob-PC, and Z: is mapped to the hidden root share of drive C: on the computer with an IP address of 192.168.0.2.
Figure 40.5
The Map Network Drive dialog box.

From that point on, you can access the folder either by going through the Network folder as usual, or just by opening your This PC folder and opening the resource's icon under Network Location.
Figure 40.6
Drives Y: and Z: are actually shared resources on other computers.
Using a Shared Printer
You use a shared printer from a remote computer exactly as you use a local printer. Choose File ⇒ Print from the program's menu bar. When the Print dialog box opens, look for the shared printer, click it, and click the Print button.
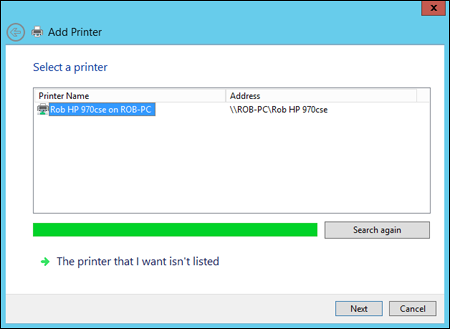
If the shared printer doesn't show up in the Print dialog box, you can either add it right from the Print dialog box or install it from the Devices and Printers applet. To install it from the Devices and Printers Control Panel applet, click Add a Printer to open the Add Printer dialog box. Windows 8.1 automatically searches for all local and shared network printers and displays them in the Select a Printer dialog box (see Figure 40.7).
Figure 40.7
Windows 8.1 does a great job finding networked printers.
Select the printer you want to add to your list of printers and click Next. Windows 8.1 attempts to install the necessary printer driver for the networked printer. If it does not find one, you're shown a message that Windows could not find a driver. Click OK to manually specify where the necessary drivers are for the printer you want to set up.
After the drivers are installed, you return to the Devices and Printers folder. If that's the printer you'll use most often, make it the default printer as described in Chapter 25.
Whichever method you use to add the printer, after the printer is installed, choose File ⇒ Print, select the newly installed printer, and click Print.
Using Shared Media
Shared media are different from shared files because they're streamed to the local computer when played. This allows you to play the media files on non-computer network devices such as the Xbox 360 or a networked digital media player. Exactly how you work such a device depends on the device. You'll need to refer to the instructions that came with the device for specifics. You also can use the new Windows 8.1 Xbox LIVE Games app from the Windows 8.1 interface to connect your Windows computer or tablet with a Microsoft Xbox device.
You can access the shared media by opening Windows Media Player normally. In the left pane, you should see each of the devices on the network that are sharing their media. Click the arrow next to a device to access its shared music, as shown in Figure 40.8.
You can also browse for media devices (and computers that are sharing their music libraries) from the Network folder. When you open the Network folder, you'll see a section named Media Devices that shows all the streaming media devices on the network (see Figure 40.9). Just double-click a device to open its library in Media Player.
Figure 40.8
Accessing a remote shared library.

Figure 40.9
Shared media in the Network folder.

Wrap-Up
This chapter looked at ways to access shared network resources from computers in the same private network.
- To get to shared folders on other computers in the network, first open the Network folder on the computer at which you're sitting.
- To open a remote document from within a program, choose File ⇒ Open from that program, as usual. Then choose the Network folder from the Folders drop-down list in the Open dialog box.
- To save a document to a remote computer, choose File ⇒ Save (or File ⇒ Save As), and choose your Network folder from the Folders drop-down list.
- To create a Network Location link to an Internet site, right-click within your Computer folder and choose Add a Network Location.
- To move or copy files between computers in a network, use your Network folder to open the source and/or destination folders. Then use the standard techniques described in Chapter 21 to select, move, or copy the files.
- To use a shared printer, print normally but select the shared printer's name in the Print dialog box.
- If you don't see a shared printer in the Print dialog box, install the printer on the local computer using techniques described in Chapter 25.
- To play shared media using Windows Media Player, open the Network folder and double-click the shared media's icon.