
Chapter 6: Troubleshooting Startup Problems
IN THIS CHAPTER
The computer won't start
The computer takes too long to start
Resources for troubleshooting startup problems
When programs won't start
Each major part in this book ends with a troubleshooting chapter like this one. The troubleshooting chapters provide quick solutions to common problems. That's about it. You won't catch us yammering on for paragraph after paragraph in these troubleshooting chapters!
The Computer Won't Start
If the computer does absolutely nothing when you first turn it on, your first move is to check all cable connections. Make sure the power plug on every device that plugs into the wall is firmly plugged in. Also, make sure the mouse, keyboard, and all other devices are firmly plugged into their slots.
If it's a desktop computer, look for a 0/1 power switch on the back of the computer and make sure it's on (flipped to the 1 position).
If it's a laptop computer or tablet device, make sure your battery is connected correctly. You might also ensure that the AC adapter is plugged in on your device.
Turn on the computer again and, as it is powering up, push the button on the CD or DVD drive. If there is a disk in the drive, remove it.
If the computer sounds as though it's starting up but you don't see anything on the screen, make sure all plugs to the monitor are firmly seated. If it's a desktop computer, make sure the monitor's power cable is firmly attached to the monitor and wall socket, and that the cable connecting the computer to the monitor is firmly attached at both ends of the cable. Make sure the monitor is turned on. Then restart the computer.
Non-system disk or disk error message
This type of message appears when the computer attempts to boot from a disk on which Windows is not installed. If a floppy disk is in the floppy drive (there are still computers that have floppy disk drives), remove it. Likewise for any disk in the CD drive or DVD drive, or any drive that's connected to the computer through a USB port. Press any key to continue startup. If that doesn't work, press Ctrl+Alt+Del or restart the computer with the main on/off switch.
Computer starts but mouse and keyboard don't work
If the computer starts but doesn't respond to the mouse and keyboard, turn off the computer. Unplug both the mouse and keyboard from the computer. For USB mice and keyboards, unplug each and re-connect them. Ensure each USB connection is tight and secure. If the plug is round and green, make sure you plug it into the PS/2 port for the mouse (usually colored green). Make sure nothing is resting on the keyboard and holding down a key. Then firmly plug in the keyboard. If the plug is round and purple, plug it into the PS/2 port for the keyboard. Check all cable connections to the computer one more time. Then restart the computer.
Screen turns blue during startup and then stops
This is commonly referred to as the “blue screen of death.” It doesn't mean your computer is permanently broken. A frequent cause of this problem is a device driver for a hardware device that doesn't work with Windows 8. If you recently connected or installed a new hardware device, disconnect or uninstall it. Then start the computer again. That's your best bet.
If you still get the blue screen of death, you'll likely have to boot to Safe Mode and disable the device through Device Manager. This is not the sort of thing the average user normally does. This is more the kind of thing that a professional handles. But if you want to take a shot at fixing it yourself, see this chapter and Chapter 37.
If the error persists, look for an error number on the blue screen of death page. It will most likely start with the characters 0x. Jot down that number on a sheet of paper. Then, if you can get online through another computer, go to Microsoft's site (http://search.microsoft.com) or your favorite online search engine (such as Google or Bing) and search for that number. You might find a page that offers an exact solution to your problem.
If you can get online through another computer, you might also consider posting a question at the Windows Communities site (http://answers.microsoft.com/en-us/windows). Be sure to include the error number in your post. You might find someone who has already experienced and solved that very problem.
Computer Takes Too Long to Start
On most systems, Windows 8 is optimized to decrease boot time from many seconds (or minutes) to just a handful of seconds. For example, a laptop might take approximately 35 seconds to boot to Windows 7. With Windows 8, the boot time is only about 8 seconds. You may or may not see that large of a decrease in wait time, but you should pay attention if the boot time takes longer and longer each time you start your computer.
When the computer takes much longer to start than it used to, the problem is usually caused by too many programs trying to auto-start. Consider uninstalling any programs you don't really use, as discussed in Chapter 30. Configure the remaining programs so that they don't start automatically (see Chapter 13).
Many things that prevent a computer from starting have nothing to do with Windows 8. It often takes even seasoned pros many hours to diagnose and repair startup problems. But before you resort to the repair shop, here are some other things you can try.
Restore system files to an earlier time
The Windows 8 Advanced Startup options (described later, in the “Advanced Startup” section) include a System Restore item that enables you to restore your system to a previous state. Windows 8.1 creates restore points automatically, and you can also create a restore point any time you want using the Recovery item in the Control Panel. To recover your system to a previous state, boot using the Advanced Startup options as explained later in this chapter, and then choose System Restore from the Advanced Options screen. Follow the prompts to choose a restore point from which to restore.
Open the Control Panel, open the Restore item, and click Open System Restore.
If you can get the computer to start in Safe Mode, you can also use System Restore to restore your PC. Boot to Safe Mode and then open the Control Panel. Then use the Restore item to choose a restore point and start the restore process.
Windows 8.1 Automatic Repair Mode
If Windows 8.1 automatically detects an issue with your startup, you see a light blue window (not the blue screen of death) that says “Automatic Repair.” This is the Windows 8 Automatic Repair Mode. The screen informs you that Windows could not start properly and that a System Restore point can be used to attempt to repair the issue.
![]() Chapter 24 discusses the System Restore process and how you should consider keeping this feature activated for situations like the one you're experiencing.
Chapter 24 discusses the System Restore process and how you should consider keeping this feature activated for situations like the one you're experiencing.
System Restore turns back the clock to a previous setup when Windows was working correctly. During the System Restore process, you don't lose any personal data that you added to the system. Instead, programs and apps that were installed after the latest System Restore point and time are uninstalled from your computer. The assumption is that a program or app may have damaged your computer to the point that it won't boot. By removing the programs and apps, Windows may be able to start properly.
If you decide to choose to restore, the process cannot be undone. You have the option of canceling, but you must do it from this initial screen; don't try to cancel after you start the restore process. If you decide to cancel, click the Cancel button now.
To continue, click the Restore button and work through the onscreen prompts.
Repair Windows 8 Install
If you have the DVD with Windows 8.1 on it, you can boot from that disk and do a repair installation. Put that disk in the DVD drive and start the computer. Watch the screen for the message “Press Any Key to Boot from CD or DVD” (or a similar message); then press Enter or the Spacebar.
If the option to boot from the CD or DVD never appears, and the computer won't boot from that disk, you need to change your BIOS options to boot from the CD/DVD drive. How you do that varies from one computer to the next. Typically, you start the computer and then immediately start pressing the F1, F2, or Del key (perhaps all three, if you don't know which is required) repeatedly as the computer is starting. This should take you to the BIOS Setup options where you can configure the computer to try booting from the CD/DVD before it tries booting from the hard drive. Close and save the new settings. The computer will restart, and this time you should be able to boot from the Windows DVD.
If you're able to boot from the DVD, the first screen you see will likely ask about your language and locale. Make any necessary changes and click Next. On the next page, click Repair Your Computer (not the Install Now option). Then just follow the onscreen instructions to do a repair install of Windows 8.1.
Advanced startup
If you can boot into Windows 8.1, but you're having issues with the boot process, consider using Windows 8.1's Advanced Startup tool. This tool does assume you can boot into Windows and navigate to the PC Settings area.
To use this tool, perform the following steps:
- Display the Charms Bar and choose Settings.
- Click Change PC Settings.
- Click the Update and Recovery item.
- Click Recovery, and then click Restart Now in the Advanced Startup group, as shown in Figure 6.1.
- After Windows 8.1 restarts, it displays a screen similar to the one in Figure 6.2.
- Click Troubleshoot.
- Click one of three options (see Figure 6.3) and work through the onscreen prompts:
- Refresh Your PC: Use this option to refresh your copy of Windows but not to destroy any of your files. This is similar to the Automatic Repair Mode discussed previously in this chapter. This is a good option because you don't lose your file and you get a “fresh” version of Windows.
- Reset Your PC: Use this option to completely remove all files (including files you've created) and to reinstall Windows 8. This will destroy all files you have created or saved to the computer.
- Advanced Options: Provides additional tools for fixing startup problems.
Figure 6.1
Advanced startup option in the Update and Recovery settings.

Figure 6.2
Troubleshoot startup problems.

Start in Safe Mode
For many experienced Windows users who have dealt with faulty Windows startups, Safe Mode has become a close friend. Safe Mode offers a way to start Windows in a barebones setup. That is, Windows starts with just enough system files, programs, and services to allow it to run so you can diagnose issues, remove programs, and perform other tasks that can be done only at the graphical user interface level.
To enter Safe Mode in Windows 8, access the Advanced Startup options as described in the previous section. Click Troubleshoot, click Advanced Options, and click Startup Settings. On the resulting page, click Restart.
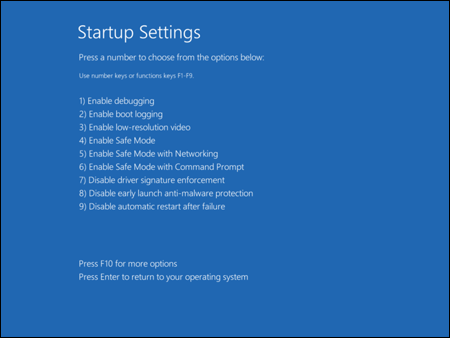
Figure 6.4 shows the options you can choose to start Windows and to diagnose and/or repair Windows from the resulting menu. Figure 6.5 shows the Safe Mode Windows desktop. Although this looks like a normal version of Windows, many programs and features do not work. It is simply a place where you can modify system settings, such as those for Device Manager, MSCONFIG, the Windows Registry, Control Panel applets, and the like. You cannot, for example, start some Windows 8 apps or other programs.
After you finish repairing Windows, shut down Safe Mode and restart normally.
Figure 6.3
Advanced options for troubleshooting startup problems.

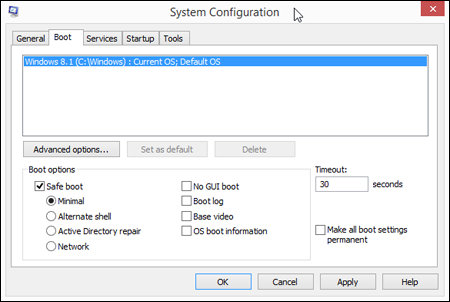
Another way to boot into Safe Mode is to set Windows to do it automatically. To do this, press Windows+X and choose Run. Type MSCONFIG in the Open dialog box and click OK. The System Configuration dialog box appears (see Figure 6.6).
Select the Boot tab and click the Safe Boot option. Click Apply and then OK. You're prompted with a dialog box that has Restart or Exit without Restart buttons. Click Restart so that Windows reboots. When it restarts, you're in Safe Mode, as shown in Figure 6.5. Use Safe Mode to diagnose or repair Windows.
When you want to leave Safe Mode, you need to undo the Safe Boot option in the System Configuration tool. To do that, press Windows+X, choose Run, and enter MSCONFIG. On the Boot tab of the System Configuration dialog box, clear the Safe Boot option and click Apply; then OK. Click Restart to shut down and restart Windows into its normal view.
The instruction manual that came with your computer
Most computer manufacturers provide some means of helping you troubleshoot and repair startup problems. Be sure to look through whatever documentation you have for your computer manufacturer's recommendations. That could be your best bet because all computers are unique in some ways. The manual that came with your computer provides information that's specific to your exact make and model of computer.
Figure 6.4
Windows 8.1 boot options.
Resources in this book
We've thrown a lot of technical terms and concepts at you in this chapter. But when it comes to solving startup problems, there's no way around that. Here are some additional resources within this book that might help you solve a startup problem:
- Restoring from previous file versions: If you've backed up your entire hard disk using File History, see Chapter 24 for information on restoring from that backup.
- Restoring to an earlier time: For information on restoring your computer to an earlier time, see “Using System Protection” in Chapter 24.
- Removing programs: If you think a faulty program might be preventing your computer from starting, you can uninstall the program using techniques described in Chapter 30 (assuming that you can get to Safe Mode so that you have access to that program).
- Removing hardware: When faulty hardware or drivers are preventing Windows 8 from starting, techniques described under “Removing Hardware” in Chapter 34 might help.
- Troubleshooting hardware: Startup problems are often hardware problems. See Chapter 37 for more information on troubleshooting hardware.
Figure 6.5
Windows 8.1 Safe Mode desktop view.

Resources in Windows Help
If you can start the computer in Safe Mode, you can get to Windows Help, too. In fact, the Help window should open automatically as soon as you enter Safe Mode. If it doesn't, click the Start button and choose Help and Support. Then search using the keywords “Safe Mode” for additional information on using Safe Mode to troubleshoot startup options.
Online resources
If you can start in Safe Mode with Networking, you can access online resources. You might try searching Windows Communities (which you can get to from Windows Help) for words related to the startup problem you're having, or you can post a question describing the problem in as much detail as possible.
You can also search Microsoft's website for words that describe the problem you're having. Be sure to include the number 8 in your search. Otherwise, the search result will likely include other irrelevant Microsoft products. Starting your search from http://search.microsoft.com or http://support.microsoft.com will help limit the search to Microsoft, rather than include the entire web. If that doesn't help, you can try searching the entire web from www.bing.com, www.google.com, or whatever search engine you prefer. If you're not a technical person, don't expect it to be easy. As we said, startup problems can be difficult to troubleshoot, even for the pros. If all else fails, you may have to take the system to a repair shop to get the problem resolved. Or call a mobile service that will send a computer geek to your home or office.
Figure 6.6
Windows 8 Safe boot options in the System Configuration tool.
Programs Won't Start
If a favorite old program won't start, it's most likely an incompatibility issue. Try right-clicking the startup icon for the program and choosing Run as Administrator. If that doesn't help, try the program compatibility features.
![]() See Chapter 29 for more information on getting older programs to run with Windows 8.1.
See Chapter 29 for more information on getting older programs to run with Windows 8.1.
Wrap-Up
This chapter discussed ways to troubleshoot your computer when you're experiencing problems. Some fixes to problems are easy, while others may require you to reinstall Windows 8.1. If the steps and methods described in this chapter don't help, refer to the other chapters described above for tips on additional troubleshooting steps you can take.