
Secure Authentication Best Practices
Given the fundamental role that authentication plays in an access control system in combination with the variety of attacks that can be perpetrated, it’s essential to ensure that all best practices are followed when implementing these systems. More often than not, a single seemingly innocuous weakness in an authentication system’s implementation can lead to the eventual compromise of a single user’s account or many users’ accounts.
When and Where to Perform Authentication
We’ve now discussed a number of authentication topics including the coverage of the fundamentals, the many ways to prove identity, and password best practices. In addition to these subjects, it’s important to understand when or where authentication should be applied within a web application. In web applications, the rule is to perform authentication every time that a request is made to access a protected resource.
Yes, every single time.
More specifically, there are three areas where authentication should be applied:
![]() When a user’s access level or rights change
When a user’s access level or rights change
![]() With every request to protected data or functionality
With every request to protected data or functionality
![]() When accessing an outside or third-party resource
When accessing an outside or third-party resource
The validation of a user’s identity should occur whenever their access level or rights change, such as logging in to a web application. The most straightforward example is when a user needs to log in to a web application such as their online bank. In order to gain access to view or interact with their accounts, which are protected resources, they must first prove their identity. Only after successfully authenticating would the user be granted the rights to view their account balances, close accounts, and transfer money.
It’s important to keep in mind that even after the most obvious authentication step of providing a username and password, the web application continues to authenticate the user. It just so happens that this occurs without the user’s interaction; instead, the browser automatically supplies the session ID that it was assigned after the credentials were successfully validated (see the earlier section “Web Authentication Process”). It’s worth reemphasizing that the session ID is normally stored in a cookie value that was set by the web application in an HTTP response message after the user successfully authenticated. By default, the browser is designed to append associated cookie values to all HTTP requests. So the cookie value associated with the online bank that contains the user’s session ID is passed automatically with every request.
The session ID is a persistent authentication token that you have. It functions just like a badge (a physical persistent authentication token) that you might have in your own workplace. When you walk into the building, you swipe your badge to authenticate yourself to the door, which will open if you have the right permissions. It’s something you carry around with you all day. Every time you need to get into the server room, you swipe your badge. Explained from a different perspective, every time you need to access a protected resource (for example, the server room), you’re required to prove your identity (for example, swipe your badge). The same requirement exists in web applications, so that every time you make a request to see your account balance (a protected resource), you should be required to provide the session ID (proving your identity). So by providing your session ID with every request, the browser is constantly attempting to authenticate to the web application. We say attempting to, because in some cases the attempt should fail, for example, when the session has expired and the session ID is therefore stale.
Remember that authenticating is the first step in the access control process, so by extension we can assume that authorization should occur with every request as well. The reason for this is that it’s possible that even as a user is logged in to a web application, their rights may suddenly change mid-session. Examples of this include when a subscription to an online newspaper expires, or if an employee is only allowed to access HR data during working hours. An employee’s authorization could also change if they’re being terminated, in which case you would want their accounts to cease having access to protected resources. Authentication (and authorization) with every request ensures that when access rights change, they’re immediately enforced by the application. Less dramatically but more pragmatically, an authenticated user may have some, but not all, rights to various data or functions. A user’s spouse may have rights to view the balance of a joint bank account and transfer money out of the account, but not to close the account. Thus, authorization is necessary on every request.
Make sure that your web application contains code that validates the session ID (that is, authenticates the user) every time that protected data or functionality is being requested. Of course, you’ll also want code that performs authorization to ensure that the user, once their identity has been proven, is actually allowed to execute that functionality or access the protected data. This code should be checking authentication on every possible execution path that leads to the data or functionality.
IMHO
You must always authenticate and authorize every request! From time to time, I hear that it’s too computationally expensive to perform authentication or authorization with every request to a protected resource. That argument has long since been proven to be outdated especially with the constant and rapid increase in the processing power found today. If the application can’t perform basic security checks without bringing the system to a crawl, then the application is usually either poorly designed or inefficiently coded.
In some cases, highly sensitive functionality will require another authentication factor beyond just providing the session ID, which is something that you have. If you’ve ever ordered from Amazon.com, you may have noticed that you can log in and browse around the web site, but you’ll be asked to enter your password again if you try to purchase something. Amazon considers purchasing to be an important enough function that they require not only that you possess a valid session ID, but also that you re-authenticate with something that you know (that is, a password) if you’re going to buy something. Re-authentication is also commonly found when you’re changing your password, which requires that you enter your old password before you’re allowed to supply a new password.
This prevents attackers from sniffing or stealing your session ID and being able to change your password; it also guards against cross-site request forgery attacks (see Chapter 6).
Another reason for re-authentication is to increase privileges within an application. Let’s say that you log in to an application as a user, but need to perform some administrative functionality as a power user. Web applications can be designed to have different levels of authorization that can be reached by authenticating at a higher level, often with another password. When a user authenticates to a higher level (or even switches roles to access a different area), then the web application should grant them a new session ID with different rights or update the rights associated with the existing session ID. Keep in mind, however, that if a user downgrades their access level or changes roles, then authentication should occur once again so that the correct set of rights is granted or associated to the user’s session ID. Updating the rights associated with a session ID is fraught with complexity and potential for introducing vulnerabilities into the application. Generally, it is safer to invalidate an older session ID and issue a new one any time a user changes authentication levels—upward or downward.
Your Plan
Whether you’re planning to implement authentication or you’re checking someone else’s implementation, you can use the following steps as a guide to help you design your process.
![]() Identify protected data and sensitive functionality
Identify protected data and sensitive functionality
![]() Examples of protected data include account numbers, balance information, personal data, health information, and so on.
Examples of protected data include account numbers, balance information, personal data, health information, and so on.
![]() Examples of sensitive functionality include password updates, financial transfers, purchasing or cancelling services, and so on.
Examples of sensitive functionality include password updates, financial transfers, purchasing or cancelling services, and so on.
![]() Determine where within code or along the workflows the authentication should take place.
Determine where within code or along the workflows the authentication should take place.
![]() Sometimes authentication (and authorization) can occur before a web page loads, and sometimes it can occur right before a transaction is executed.
Sometimes authentication (and authorization) can occur before a web page loads, and sometimes it can occur right before a transaction is executed.
![]() Usually the rule of thumb is to perform the authentication and authorization as close to the sensitive transaction as possible.
Usually the rule of thumb is to perform the authentication and authorization as close to the sensitive transaction as possible.
![]() Design or check the authentication mechanism to ensure that it first identifies the user and then validates their identity using a strong and correct process.
Design or check the authentication mechanism to ensure that it first identifies the user and then validates their identity using a strong and correct process.
![]() As an example, for password-based authentication, make sure that the password best practices are followed.
As an example, for password-based authentication, make sure that the password best practices are followed.
![]() For session ID authentication, see Chapter 4 for best practices.
For session ID authentication, see Chapter 4 for best practices.
![]() Check that the authentication system follows best practices
Check that the authentication system follows best practices
![]() See best practices outlined in the following section.
See best practices outlined in the following section.
Securing Web Authentication Mechanisms
There are a few more recommendations related to the proper design of an authentication mechanism that should be followed. The following practices can be used both when designing and when evaluating the security of a system.
Secure the Transmission
Using an encrypted channel (that is, SSL/TLS) to send and receive data protects against eavesdropping attacks. In particular, it prevents someone from intercepting sensitive information such as usernames, passwords, session IDs, and login forms. Stealing credentials or session IDs is pretty easy to understand, but the danger with login forms is if someone is able to modify the login form in-transit. If they can do this, then it would be possible to change the form’s behavior and redirect the submission of credentials to a malicious third party.
Allow Account Lockout
Account lockout works by preventing a user from being able to log in (even if the correct password is provided) after a certain number of failed login attempts have occurred. This defensive technique is designed to counter online dictionary or brute-force attacks. These brute-force attacks work by successively guessing potential passwords, so by locking out an account after five failed attempts, the effectiveness of the attack is severely limited. There are a few things to consider when setting up account lockouts, including
![]() How many failed attempts should trigger the lockout?
How many failed attempts should trigger the lockout?
![]() Within what timeframe are we counting failed attempts?
Within what timeframe are we counting failed attempts?
![]() How long do we lock out the account until it automatically resets?
How long do we lock out the account until it automatically resets?
Determining the answer to the preceding questions should depend on the level of security that your web application requires. That being said, here are some guidelines that you can use as a starting point.

In other words, an application requiring a standard level of security would lock out an account for 30 minutes if someone fails to authenticate 10 times within a 60-minute window. A high-security web application that detected five failed attempts within a 30-minute window would lock out the account indefinitely, or until an administrator manually resets the account.
Of course, this defense can be abused by attackers who want to create a denial-of-service condition within the application. If an attacker has a list of usernames, then they can purposefully brute-force all the accounts until they’re locked out. Because of this, it’s never a good idea to allow an administrative account to be locked out.
Sometimes, it’s not feasible to lock out an account, for example, if you’re Google and you have hundreds of millions of users. You wouldn’t want to lock out their accounts and then have hundreds of millions of e-mails and phone calls flooding in to you. Fortunately, alternatives do exist, and they can be applied in combination with or instead of lockouts. One approach is to use increasing timeout values between subsequent authentication attempts. For example, after the first failed attempts, there would be a 1-second timeout that must be observed before a second authentication attempt is permitted. After the second authentication attempt fails, there would be a 2-second timeout. The next failed attempt would result in a 4-second timeout, and so forth. These delays work to slow down brute-force attempts. The exact value of each timeout can be generated differently, but the concept of inserting a delay remains. It should be noted, however, that this approach is not too common with web applications.
Another approach that is very popular is the use of CAPTCHAs (Completely Automated Public Turing test to tell Computers and Humans Apart). CAPTCHAs work against brute-force attacks by requiring a human to intervene in the authentication process. The CAPTCHAs (see Figure 3-13) require that an actual person answer a question that only a human could answer.
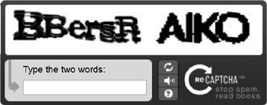
Google’s authentication system utilizes CAPTCHAs whenever it detects anomalous behavior or it believes that a brute-force attack is being used. This slows down and prevents automated tools from being used to brute-force an account.
![]() Tip
Tip
Check with your local laws and regulations. In some countries CAPTCHAs may be illegal because they violate disability/accessibility laws.
Allow Accounts to Be Disabled
Along the same lines of account lockout, it can be useful to disable an account, rendering it unusable without removing it from the system. Disabling an account can be useful when a user or employee goes on an extended leave of absence, and you want to reduce the potential attack surface without having to delete the account. In addition, disabling an account allows you to lock down a specific account that’s been compromised without disrupting availability for other users.
No Default Accounts
Don’t release an application to production that has default accounts such as “Administrator,” “Admin,” “Guest,” and so on. These names are always the first ones that an attacker will try to brute-force, and more often than not the passwords for these accounts are easily guessable.
Don’t Hard-Code Credentials
It can be convenient to hard-code credentials within your web application’s source code, but it’s very dangerous to do so. In web applications written in interpreted languages, the credentials are sitting there in plaintext, and even with compiled web applications, the credentials can often be extracted with little effort. The recommended approach is to use some form of key or credential management system, or use a properly secured configuration file.
Avoid Remember Me (Stay Signed In)
The Remember Me (or Stay Signed In) option, shown in Figure 3-14, is a common sight on many web sites, and it’s a classic example of the security versus convenience tradeoff.

Figure 3-14 Stay Signed In (Remember Me) option
What the option allows a user to do is to enter their username and password once and then never have to worry about signing in again. While this feature is very convenient, it’s also very risky because it grants a user a persistent authentication token that does not expire for extremely long periods of time. Applications requiring high security should never allow this feature, whereas applications with standard security should only allow the application to remember the username. Under no circumstances should this feature be turned on by default; the user should be required to opt in. Many web applications have gone for the middle ground, whereby the username is remembered, but the password is not.
The use of autocomplete is one common way that web applications will get a browser to store a username. To do this, the autocomplete attribute is set to “on” in the form or input tag. To explicitly disable this implementation of Remember Me, you just need to set the value to off.
Be examining the login forms, you can quickly tell whether or not the Remember Me functionality has been enabled or disabled.
Stay Signed In features are usually implemented by setting a long lifetime on the cookie containing the session ID. The session ID will remain valid until the cookie expires (for example, 50 years from now), as seen in Figure 3-15. You can detect this in a web application by examining the expiration date of the cookie that contains the session ID. Another way that we’ve seen this feature implemented is by storing the username and password in the cookie itself, which obviously creates issues when the cookie is being stored locally on the system and must be passed to the web application. This is a terribly insecure way of implementing Stay Signed In.
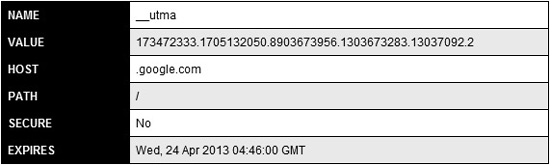
Figure 3-15 Long cookie expiration
Access control overview
![]() Basic components of access control
Basic components of access control
![]() High-level access control process
High-level access control process
Authentication fundamentals
![]() The definition of authentication
The definition of authentication
![]() Ways of proving your identity
Ways of proving your identity
![]() Two-factor authentication
Two-factor authentication
Web application authentication
![]() Built-in HTTP authentication (Basic and Digest)
Built-in HTTP authentication (Basic and Digest)
![]() Single sign-on authentication
Single sign-on authentication
![]() Custom authentication process
Custom authentication process
Securing password-based web authentication
![]() Attacks against passwords
Attacks against passwords
![]() Importance of password complexity
Importance of password complexity
![]() Password best practices
Password best practices
Secure web authentication mechanisms
![]() When and where to perform authentication
When and where to perform authentication