In full animation, it is important for a character to mime. When speaking, therefore, their miming must be accurately synchronized to the soundtrack. Dialog is invariably recorded before production and the timing of it is passed to the animator as a phonetic breakdown. It is also important that the animator has a copy of the track on tape, so that they can listen to it repeatedly until the pattern of emphasis, the rise and fall of the voice, etc. is clear in their mind. It is sometimes useful to indicate this alongside the phonetic breakdown by means of a line which moves left and right as the voice falls and rises, and becomes thicker and thinner according to the degree of emphasis. Usually the voice rises on important syllables or words and falls on less important ones.
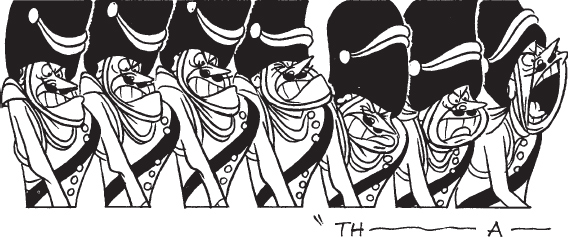
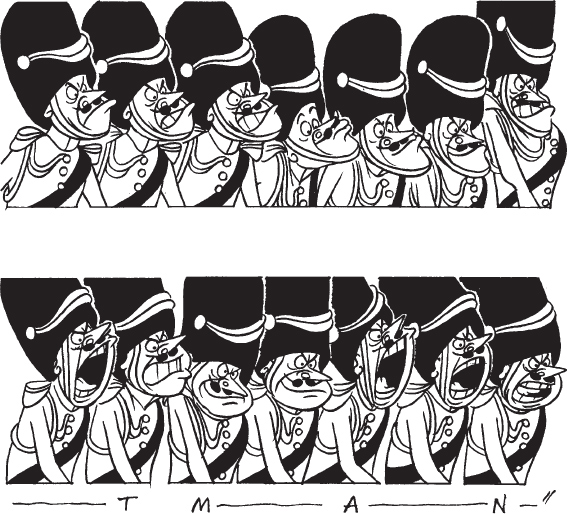
Figure 64 A sequence of drawings in which the whole body is involved in lip-sync. After a preliminary loss of temper and intake of breath, the sergeant major shouts: ‘That man there!’ From The Guardsman, a Halas and Batchelor commercial for TV.

Figure 65 The important elements of emphasis—mouth and eyes—should express the meaning of the dialog; hands and the movement of the body can also contribute in conveying the meaning of the dialog.
The first step is to make the character’s actions fit his words. If he is aggressive he will tend to thrust himself forward and reinforce certain points with gestures. If he is shy he may shrink away and speak apologetically, and if he is crafty he may pretend to smile, whilst giving quick glances to see the reaction to his words, and so on.
The second step consists of moving the character’s lips, and perhaps the lower part of the face, to fit the frame-by-frame phonetic breakdown of the speech on the exposure chart. Here it is important to listen repeatedly to the way the dialog is spoken. There is a broad tendency for the mouth and lower jaw to open on a vowel sound and close on a consonant. In a normally spoken sentence there are usually a few accentuated vowel sounds, and the rest of the words are of lesser importance. Play the soundtrack over and over again until the pattern of emphasis, the rise and fall of the voice, etc. is clear. Then plan the lip-sync to conform to this pattern in visual terms.
As already mentioned, in mass-produced TV series the dialog carries the central interest of the film and there is practically no animation, apart from the mouth. This is not acceptable in other types of production, and it is therefore important to ensure first of all that the mouth, eyes and other features of the face express the meaning of the dialog. The hands should also be used for emphasis. Thirdly, the body itself should be used to underline the content. The three elements have, of course, to be closely coordinated.
Once the basic timing of mouth movement is worked out, the next stage is to consider how the facial expression, head movement and body gestures can underline and add to the meaning and interest of the dialog.
In Old Major’s first speech in Animal Farm, it was especially important to convey the message of this character to the audience, since the whole film was motivated by it. The facial expression had to show not only the figure’s sincere concern but, as an ailing character, physical pain as well. The entire body of the pig was unanimated while it’s face, eyes, mouth, snout and the facial creases conveyed the emotions of the character.
It is not essential to animate all vowels and consonants in terms of single frames. Especially in a TV entertainment series, where speed of production is essential, about eight positions of mouth and tongue are adequate.


Figure 66 Top Eight mouth positions which, with a few inbetweens, would cover most lip-sync possibilities in limited animation. Bottom Lip-sync with full animation. The pig says: ‘Our children are born…’
Ever since the very first animated productions, Disney’s Steamboat Mickey and Oskar Fischinger’s abstract film Composition in Blue, it has been clear that there is a strong relationship between animation and music. This relationship can be explained on two accounts. First, both elements have a basic mathematical foundation and move forward at a determined speed. Second, since animation is created manually frame-by-frame, it can be fitted to music in a very exact manner. It is further able to capture its rhythm, its mood and hit the beat right to the frame. Most animation makes good use of this advantage.
As a general principle it is more difficult to follow the rhythm of a musical composition with its mood than its beat. The latter aspect of the music is easily measured, since beats are fitted into bar units of defined time length and are interpreted in time units.
Bars can contain various numbers of beats and these must be measured to the film frame. Having done this, it is comparatively easy to fit the animation to the speed of the beat and find the right type of movement to follow the music, whether it is a slow waltz of 36 frames or four frames for rock music. A beat can be emphasized by synchronization of the feet but it works better if the whole body is used. In quick beats of three, four or six frames it is possible to follow every second beat without losing the rhythm. It is always better to work to specially prepared music if this can be afforded.


Figure 67 A This eight frame cycle, animated on double frames, of a whirling Spanish dancer is fitted closely to strong flamenco music. The figure fully conveys the character of the music with all its functional simplicity. B Single and double frame animation are alternated to fit the beats of the sound of a Spanish guitar. It is essential for the movement to follow the musical lead of a specially pre-recorded music track, for accurate synchronization.
Before the Digital Age all animation was shot on a down shooter camera, called at times a ‘Rostrum camera’ or an ‘Oxberry camera’, named after the American engineer John Oxberry (1918 – 1974) who designed an industry-standard camera stand. These cameras set-ups could be as simple as a home camera with a single frame shutter, clamped on a shelf or table, up to the huge, motorized two-column professional camera stands. But, in most cases, the set-up was similar: a single frame camera was mounted on a column and the animation artwork was placed on pegs on a compound table and held down by a heavy glass plate called a ‘platen’. The table had long top and bottom peg bars to move (pan) artwork, could rotate 360 degrees (a ‘tilt’ angle) and was equipped with a light box underneath to do bottom-lit shots. The camera had an auto-focus so no matter how the camera or artwork moved, the lens adjusted. The earliest camera stands even had wooden frames, where camerapeople would pin artwork not in use.
Tracks (‘Truck in’ and ‘Truck out’ in the USA) are used to move into a closer field or pull back to a more distant one. This is done by moving the camera frame-by-frame, up or down its vertical pillar, above the animation drawings. Usually the field center also moves during a track and, as the camera travels on a fixed axis, this movement in a north – south, east – west direction is done by moving the table.
Tracks and table moves are worked out in terms of general timing—track lengths and the action which the various fields must include—preliminarily by the director on exposure sheets before production begins, then refined by a scene planner.
When the animator finalizes the action of the scene in detail, the scene planner converts the director’s timing into specific instructions to the cameraperson. He or she writes down the field sizes and marks the frames where camera movements start and stop in the ‘camera instructions’ column on the exposure chart (Fig. A). They also provide a drawn field key with field centers marked (Fig. B).
It then becomes the cameraman’s responsibility to execute the required move smoothly and accurately on the screen. Briefly, the procedure is as follows: in Fig. B the track is made from field X to field Y so the screen center moves towards the south-east. This means that under the camera, the table must move north-west. Fig. C is an enlargement of this table move, showing how the cameraperson divides the line to achieve a smooth movement from X to Y. At the same time they measure the distance the camera travels on its column during the track, and divide this in exactly the same way as Fig, C, so that camera and table top move smoothly together. Fig. D is a similar track and table move which includes a tilt. This would also be done as a table move.
Tracks and table moves are usually animated on single frames.

Figure 68 A The director’s timing of tracks is finalized by the animator in the ‘camera instructions’ column on the exposure sheet. B The accompanying field key (layout). C Enlargement of field centers from Fig. B, inverted for use as table move. D Another example of a track including a table tilt.
The transition to computer technologies has greatly altered the job of creating camera moves in animation. Even in most traditionally animated-on-paper films, the down shooter camera stand has been replaced with a digital scanning system and elements painted digitally. In big budget 3D projects, all the animation is produced digitally, so a camera is no longer necessary. Artists planning camera moves no longer draw paper camera guides (drawn field key Fig. B on page 134), since the moves are blocked out virtually and tested in real time. Fig. C (on page 134), the movement track between fields X and Y, has been replaced with a virtual track on your computer screen called a ‘path of action’. This is controlled with spline curves, which are bent to modify the shape, timing and acceleration of motion between the key positions.
In traditional paper animation, you moved artwork under a stationary camera, so to achieve a north-west move you moved the artwork on the table southeast. In digital animation, the virtual camera now moves around the subjects, much like a live action camera. Previously difficult tracking shots, like handheld camera or racking the focus from foreground to background, can now be done with relative ease. In the past you had to describe the movement to the camera, now the camera describes itself to you by immediate playback.
In high-end Hollywood productions, the director oversees the creation of the storyboard as an animatic, with some perfunctory camera moves already laid in. The layout supervisor or pre-visualization director will plan out a rough camera pass—the virtual workbook. In some cases, a live action cinematographer (DP) or production designer would be invited to confer with the director about the positioning of the camera. As stated in the chapter on storyboarding, the rough layout pass has become more like a live action camera rehearsal with geometric avatars standing in for the actors.
As the animation is being done, the camera moves can be sweetened to better accommodate the performance. There is much more give and take than in the more departmentalized assembly lines of the past. Then, after animation is completed, the layout supervisor and director consult on a final camera pass. Since the animation is done in 3D, the director can change their mind to alter the camera angle radically without the artwork having to be redone. So something animated in a simple flat proscenium set-up can be rotated 90 degrees and made an upshot with an added fish-eye lens effect. All this can be done with little impact on the completed artwork. This last step is only done in 3D as in 2D some of the distortions and optical tricks accomplished in the drawings by the artist preclude a last minute change of camera angle.

Figure 69 A An example of peg movements written out by the animator in accordance with the director’s timing. The walk cycle 1L – 24L is on the left, and in the ‘camera instructions’ column the bottom peg moves are on the left in decimals of an inch, and the top peg moves are on the right. B, C and D show the positions of the top and bottom peg bars at the top, middle and bottom of Fig. A respectively.
Peg Movements in Traditional Animation
Unlike camera movements, Compensating Pan or Peg Bar moves are synched directly with the character animation levels, and therefore need to be calculated by the animator instead of being left for others. An example of a compensating pan for instance, is when a painted background stops panning at the speed with which the character stops walking and comes to a rest, or if a character gains momentum to go out of frame while the background stops. When an object or character is moving across a background there are very often two and sometimes more sets of pegs working together, and their compensating movements need to be worked out in great detail at the same time as the drawings.
In Figure 69, A is an example of peg instructions written out by the animator, and Figs B, C and D illustrate the timing problems involved.
In the left-hand column of Fig. A is a 24 frame walk cycle, 1L – 24L. The character makes a 1.8 inch stride in 12 frames on bottom pegs. This governs the speed of background pan on top pegs to 0.15 inches per frame, Fig. B. The director then called for a 1 sec pan ahead to a doorway, which the character is approaching on the right of the background, Fig. C. The animator therefore measures the distance ahead to the door, and by trial and error splits this up into a series of accelerating and decelerating moves to stop smoothly at the door on the required frame. The character and the background must work together so that his feet do not slip (in effect the character moves 0.15 inches to the right of the background per frame, no matter what the background does). So the bottom pegs start to move to the left—always 0.15 inches per frame less than the top pegs. At some point this will bring the character of screen, when he is replaced with a blank cel. If we imagine him continuing to walk of screen, then on an appropriate frame he starts to appear in screen again. At this point the bottom pegs are set so that his front toe is just in screen, Fig. D. The bottom pegs then pan to the right 0.15 inches per frame against the static background.
The cycle 1L – 24L would of course have to be on long cels with enough blank on the right of the character to pan him out of screen without the cel edge showing.
In digital 2D, whether created on paper and then scanned or drawn directly in a digital form, the peg bar or the notion of a peg bar is still the same. The main difference is that the peg bar is invisible to the camera, allowing for the animation to be scaled and positioned anywhere within the field of view. However, the basic structure laid out in the section ‘Peg movements in traditional animation’ remains the same.
3D animation has made such problems as compensating peg bar moves a moot point. When walking your character in 3D, they have a true position within the virtual set. The camera’s path of action would be calculated in the rough layout pass, then played back and refined as the animation is created.

Figure 70 A sequence of key drawings with in-betweening scales. A mole squeezes himself up from his hole and puts on his spectacles, only to be stepped on a moment later Note the rounded feeling of all the shapes, to give him a non-aggressive, harmless look. From Butterfly Ball by Halas and Batchelor.
Figure 71 An example of an emphatic point (see page 44). Anticipation on 1, out to extreme on 9, back to pose on 18, and into final pose on 22.

Figure 72 An example of a ‘take’. Farmer Jones is about to pick up his shotgun when it is stepped on by Boxer, the horse, trapping Jones’s fingers. He tries to pull his hand away on drawing 3, then, after a quick wriggle of pain on drawing 5, looks up in surprise at Boxer on drawing 11. (From Animal Farm by Halas and Batchelor.)

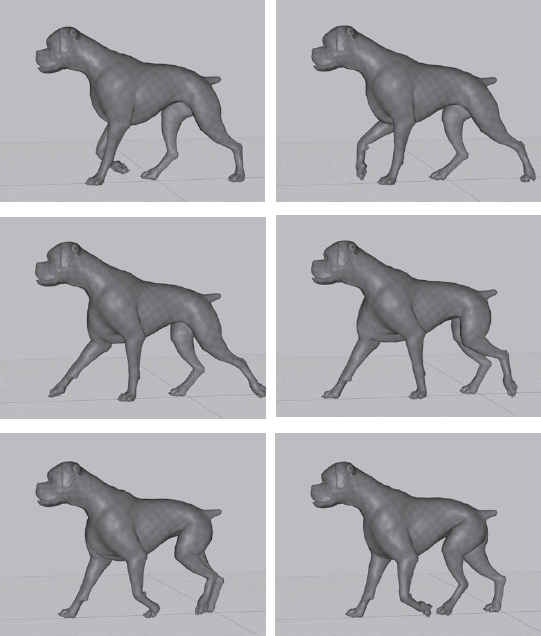
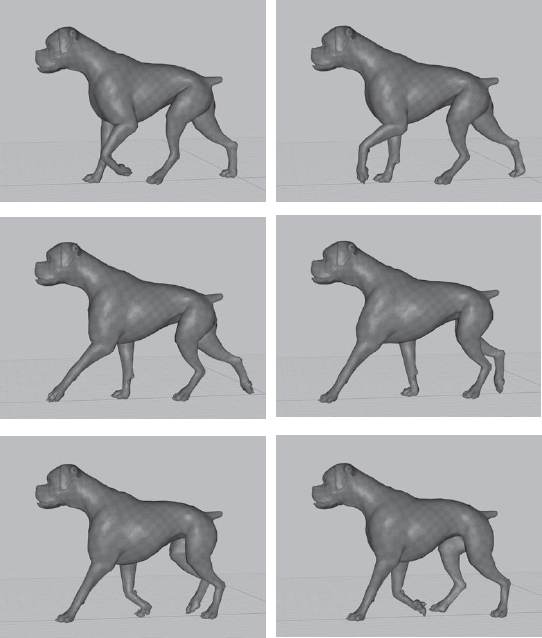
Figure 73 An example from Ryan Larkin’s 1969 film Walking which was entirely devoted to the mechanics of animated walking cycles. This example represents a 32 frame double frame cycle demonstrating how smoothly it is possible to carry out an extremely difficult human movement. It also makes good use of perspective animation through the exaggeration of the character’s arm nearest to the camera.

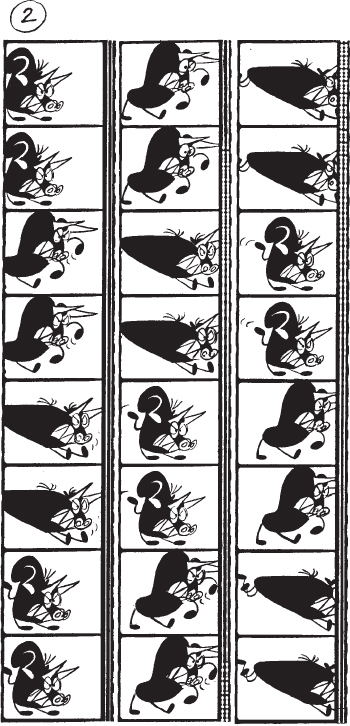
Figure 74 Animation samples enlarged from actual film frames show the timing of certain actions: 1 The Matador, in the film The Insolent Matador, fighting a furious bull. In spite of the high speed of this action, it is possible to animate in double frames. The economy of work could be considerable and the audience would not notice the difference in the smoothness of the action. 2 The bull charge in the film The Insolent Matador. Gesture and force of action convey the power and fury of this dangerous animal. Nevertheless, the action is conveyed in double frames and it loses none of its dynamism.
Some like to think that because animated film is so carefully planned out in advance, the final editing becomes a simple task of stringing together shots. But in practice we find that the animated film can require the touch of an editing professional just as much as a live action film does. In addition, an editor possesses many more digital tricks to enhance the final film than they did in the age of guillotine splicers and tape. Most fades (‘dissolves’ in the USA) and wipes from one shot to another are now done in editorial. Editors can duplicate and flop shots, and even digitally correct small mistakes. Additionally, an editor is an artist in their own right, and they are sensitive to the overall pacing of the cuts and the overall timing of the film. After the work is done, there are many films that could still use a final tightening in editorial.
If your budget does not permit the hiring of an editor and their top-line equipment, new 2D and 3D software programs make desktop editing a simple task. But just be sensitive to the special challenges each type of project presents. You would not edit an online game for preschoolers like a violently paced feature film. Over the years, editing styles have changed. Since the rock & roll video era of the 1980s, audiences are much more tolerant of rapid cutting and jump cuts than previous generations. In the first decade of the twenty-first century, the audience’s taste for ‘reality’ shows spun of an interest in a more free-floating camera, and a deliberate awkwardness to the camerawork—this all to duplicate a ‘man-on-the-scene’ home-made feel. The Sony Pictures 2007 film Surf’s Up experimented with this to great effect. They animated and rendered their scenes the conventional way, then re-photographed the existing scenes with a separate camera to achieve the hand-held ‘reality show’ look. The 2008 Dreamworks Animation film Kung Fu Panda played with split screen images, sometimes having three separate scenes occurring up on the screen simultaneously.
Feature films are, for any company, a high stakes gamble, where all the stops are pulled to achieve the best cinematic experience possible. As taste in film changes with the times, so audiences expect animated films to keep pace. Animators should be open to experiment with new ideas in cutting, more interesting camera moves, and montages that challenge the normal idea of time and space. In the 1990s, Pixar adopted the custom used at Walt Disney years ago of trying out a new technique in a short first, then adapting what they learned into the feature projects.
Editing for Television Episodes
Episodic television is animated film produced in mass quantities. Characters develop over several episodes, and if you are lucky, several seasons. To produce such shows economically, more emphasis is placed on dialog and music than intricate and expensive one-time action scenes (refer back to page 14 ‘Directing for television’). In addition, you can cut around actions without having to show it. Japanese Anime films are particularly good in putting emphasis on interesting layout designs and establishing shots with simple character movement and repetitive facial set-ups for dialog, saving full animation for key important shots. This way they economize without hurting the overall quality.
Editing for Children’s Programming
Parent and consumer groups are aware that children are watching programming at a much younger age than ever before. Programs aimed at preschoolers have a particular set of rules all of their own: no fast cutting and little overlapping dialog; simple staging without a lot of inter-cutting; pauses placed in between important ideas for young minds to catch up; dialog and action paced in a gentle, non-threatening way; and large friendly colors with little shadows or effects.
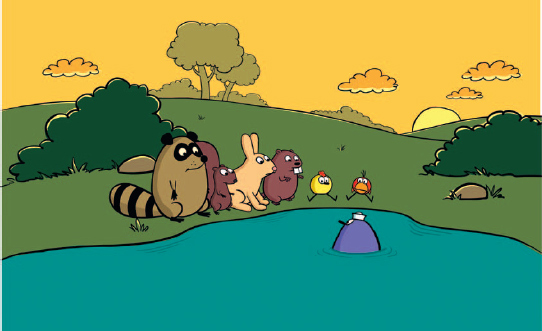
Figure 76 Image from the TV show Peep and the Big Wide World. (Copyright 2004, WGBH Educational Foundation. ‘Peep’, ‘Chirp’ and ‘Quack’ were originally created by Kai Pindal for the National Film Board of Canada.)
Editing for Internet Downloads
Today many people around the world experience animation not in a theater, but on a hand-held computer or phone. This form of downloadable film has opened a brave new world to short film production. Because of the immediacy of the medium, only the most cutting edge and cleverest ideas reach the largest audiences, and that in the blink of an eye. To tap this audience, the filmmaker needs to be shrewd with their resources. You can’t waste time on elaborate set-ups or subtle interplay of dialog. Your target audience is probably viewing in an open, noisy place, and has a short attention span. Small, visceral bits delivered with simple designs and staging will read better than a widescreen baroque spectacle.

Figure 77 Time For Some Campaignin ‘ an animated short film created for the internet by JibJab. (Copyright © Jibjab 2008.)
The design and creation of interactive games has evolved from the humble Pong game of the late 1970s to mega-budget high-quality productions that rival the largest Hollywood blockbusters in complexity. The project is divided into two parts: the body of the game itself, and the cinematics—an elaborate narrative introduction to set up the backstory and the mood. Depending upon your budget, the cinematics can be as high quality as theatrical animation. Some games producers will even use a higher-end animation program like Maya to do the cinematics rather than the actual programs used in the game itself.
The game itself is determined by the show’s ‘assets’, i.e. the numbers of controls on your character’s rig and the number of pre-made actions they have. Each character player has been given a library of modules—movements and gestures such as running, jumping, shooting, etc. The animator also needs to create bridges in between every conceivable pairing of actions. With the more realistic games, like war simulations, motion capture is used for much of the body actions.
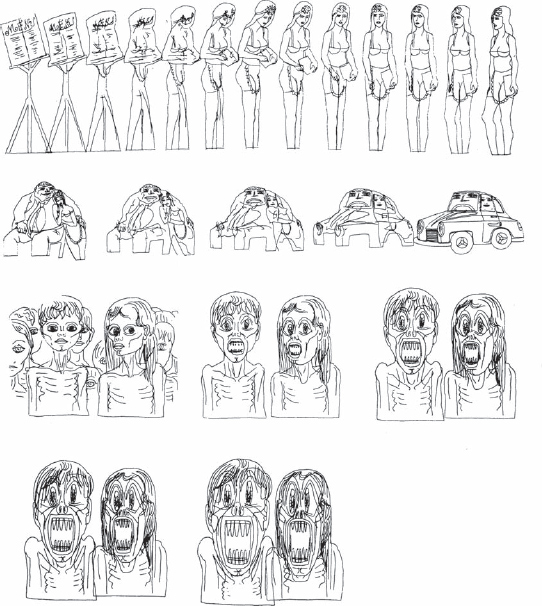
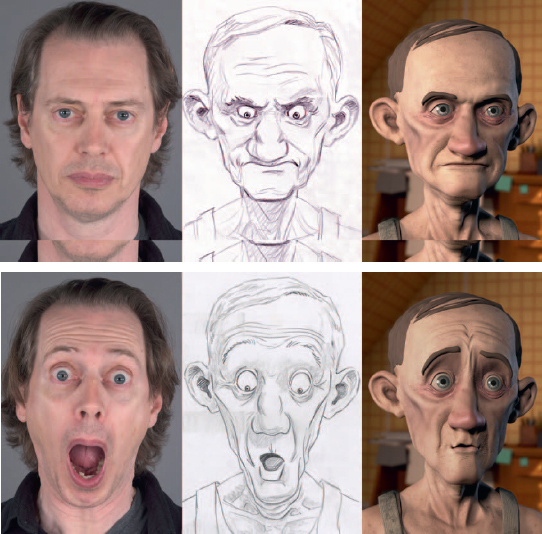
Figure 79 Image of live actor—2D rendered character and 3D digital image. ( Monster House © 2006 Columbia Pictures Industries, Inc. and GH One LLC. All Rights Reserved. Courtesy of Columbia Pictures.)
This book originally ended with an image from Peter Foldes’ pioneering computer animation piece, Hunger (1974). Its images look amusingly crude by today’s standards. Halas and Whitaker mentioned the future potential of animating with a computer—that ‘it inevitably and eventually will become an added tool in the hands of animators’. This present volume takes the prophesy of the potential to the reality of now. Computer animation, digital, 3D, whatever you care to call it, is the reality of our age. No longer theoretical, it is vital in the production of any animation today, including that which is still done by pencil and brush. The challenge to us in our present, and for our future, is to keep using the basic lessons taught to us by past masters like John Halas and Harold Whitaker. For their continued relevance is as vital to us as learning the latest software package. Being able to wield a hammer and chisel does not make you a Michelangelo; nor does raising a camera to your eye make you another Ansel Adams. So learning how to handle a specific software program, mastering the right buttons and levers to push, is only a small part of your animation education.
This book should not be thought of as the final word in your education in the art of animation. It but serves to point the way to a lifetime of study to master the medium. A career in the arts is never as simple as mastering some technique, then collecting a paycheck. It is a journey of growth and experimentation. Our hope is that by the time you are done reading these words, we will have helped you along in your first steps. Good luck!
